
Build Your Game: Vector Actors and Particles
Core Graphics is a powerful 2D drawing library that is responsible for rendering large portions of iOS and OS X. In this chapter, we see how to use this library to draw actors in our game. The goal is to have actors that are drawn dynamically based on game state. To illustrate this, we’ll create two example actors drawn with Core Graphics: a health bar that shows the amount of health remaining for an actor, and a bullet that is drawn in a particular color depending on how powerful it is. These two examples will illustrate how to use Core Graphics within the context of the simple game engine we have started.
We will accomplish this by creating a new class called VectorRepresentation, which is analogous to the class ImageRepresentation from the previous chapter. The class VectorRepresentation will be used to create a UIView to represent our actor, and be drawn with custom code using Core Graphics.
We’ll also look at another popular technique used in games to create a compelling visual: the particle system. Stated simply, a particle system is anything in a game that generates lots of little graphics that, when composed on the screen, create an overall effect more interesting than the sum of its parts. Particle systems are used in games to create fire effects, water effects, and spell effects, to name a few.
In this chapter, we use particle systems to create comets that are composed of a large number of simple particle actors to give the comets a glowing, fluid feel. We are also going to use this technique to illustrate a little realism when an asteroid breaks apart.
The sample code for this chapter can be found in the Xcode project Sample 06+07.
Saucers, Bullets, Shields, and Health Bars
In this example, we will look at four new actors: saucers, bullets, shields, and health bars. The code for this section is found under the group Example 2, in the Xcode project Sample 06+07.
The health bar and bullet actors will be rendered programmatically with Core Graphics instead of using a pre-rendered image. The other actors—saucers and shields—exist in this example to provide a little context (got to have something to shoot with the bullets) and flesh out our example from the last chapter in terms of behaviors. Figure 7-1 shows the saucers, bullets, shields, and health bars in action.

Figure 7-1. Saucers, bullets, shields, and health bars
In Figure 7-1, we see a flying saucer in the middle of the screen. Coming from the right and traveling left are a number of circular bullets. The bullets come in three different sizes, which reflect their potential for damage. If a bullet collides with the saucer, a shield effect is added to the flying saucer and the health bar goes down, indicating the damage done. In this example, the bullets will keep coming until the saucer’s health is zero, at which point it is removed and a new flying saucer is added. Figure 7-2 shows the three difference saucers used in this example, as well as the graphic used for the shield.
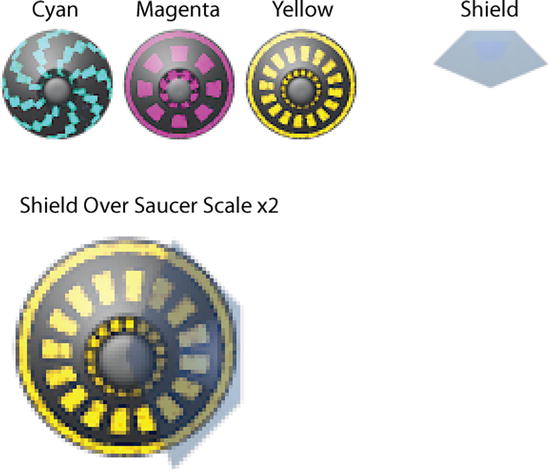
Figure 7-2. Three saucers and a shield
The shield image is partially transparent and is designed be drawn over a saucer, as can be seen in the scaled up saucer with the shield drawn over it.
To understand how all the parts and pieces of this example fit together, we will start by looking at the implementation of the class Example02Controller, starting with the doSetup task, shown in Listing 7-1.
Listing 7-1. Example02Controller.m (doSetup)
-(BOOL)doSetup
{
    if ([super doSetup]){
        NSMutableArray* classes = [NSMutableArray new];
        [classes addObject:[Saucer class]];
        [classes addObject:[Bullet class]];

        [self setSortedActorClasses:classes];
        return YES;
    }
    return NO;
}
In Listing 7-1, we see the doSetup task of the class Example02Controller. This method simply indicates that we want to keep actors of type Saucer and Bullet sorted for easy access later on. We do this by creating an NSMutableArray called classes and adding the class objects for two classes in which we are interested. The NSMutableArray classes are then passed to setSortedActorClasses:. This way, when we call actorsOfType: in the future, we will not have to sort through all of the actors to find them. Next, we want to take a look at the code that describes the action in this example that is found in the task updateScene of class Example02Controller. See Listing 7-2.
Listing 7-2. Example02Controller.m (updateScene)
-(void)updateScene{

    NSMutableSet* suacers = [self actorsOfType:[Saucer class]];

    if ([suacers count] == 0){
        Saucer* saucer = [Saucer saucer:self];
        [self addActor: saucer];
    }

    if (self.stepNumber % (30) == 0){
        float direction = M_PI - M_PI/30.0;
        float rand = (arc4random()%100)/100.0 * M_PI/15.0;
        direction += rand;
        Bullet* bullet = [Bullet bulletAt:CGPointMake(1000, 768/2) WithDirection:direction];
        [self addActor: bullet];

        if (arc4random()%4 == 0){
            if (arc4random()%2 == 0){
                [bullet setDamage:20.0];
            } else {
                [bullet setDamage:30.0];
            }
        }
    }

    NSMutableSet* bullets = [self actorsOfType:[Bullet class]];

    for (Bullet* bullet in bullets){
        for (Saucer* saucer in suacers){
            if ([bullet overlapsWith:saucer]){
               [saucer doHit:bullet with:self];
            }
        }
    }
    [super updateScene];
}
In Listing 7-2, we first get all instances of Saucer in the scene and check to see if any exist. If none do, we create a new Saucer and add it to the scene with the addActor: task. This ensures that there is always exactly one Saucer in the middle of the screen. Then, every 30 steps, we create a new Bullet using the task bullatAt:WithDirection:. The location of bullet is specified in game coordinates, and the right-most point at the vertical center. The direction specified will cause the Bullet to travel toward the left, possibly hitting the Saucer. Once bullet is added to the scene, the damage is randomly assigned. The damage each Bullet does will also dictate how we draw the Bullet. The more damage a Bullet does, the larger it will be drawn.
The last thing the updateScene task does is check to see if any Bullet has collided with the Saucer. This is done by calling actorsOfType: and getting all Bullet objects in the scene stored in the NSMutableSet* bullets. We simply iterate over each Bullet and Saucer and check if there is a hit by calling overlapsWith:. If there is a hit, we call the doHit:with: task of the class Saucer.
Let’s take a closer look at them implementation of the Actor classes used in this example.
The Actor Classes
In this section, we learn about the Saucer actor and the HealthBar actor classes. The HealthBar is different from other actors we have looked at up until this point. It is different because its location in the scene is dependent on the location of another Actor—in this case, a Saucer. Once we have reviewed the classes Saucer and HealthBar, we will look at the Behavior class FollowActor and see how we implement this feature.
Instantiating the Saucer Class
We will start by looking at the constructor for the class Saucer. We want to start with the Saucer’s constructor because this is where we create the HealthBar. In this way, we don’t have to worry about adding a HealthBar when we create a new Saucer because one will be created automatically every time we create a Saucer. The constructor for Saucer is shown in Listing 7-3.
Listing 7-3. Saucer.m (saucer:)
+(id)saucer:(GameController*)controller{
    CGSize gameAreaSize = [controller gameAreaSize];
    CGPoint gameCenter = CGPointMake(gameAreaSize.width/2.0, gameAreaSize.height/2.0);

    ImageRepresentation* rep = [ImageRepresentation imageRep];
    [rep setBackwards:arc4random()%2 == 0];
    [rep setStepsPerFrame:3];

    Saucer* saucer = [[Saucer alloc] initAt:gameCenter WithRadius:32 AndRepresentation:rep];
    [rep setDelegate:saucer];

    [saucer setVariant:arc4random()%VARIATION_COUNT];
    [saucer setMaxHealth:100];
    [saucer setCurrentHealth:100];

    HealthBar* healthBar = [HealthBar healthBar:saucer];
    [healthBar setPercent:1];
    [saucer setHealthBar:healthBar];
    [controller addActor:healthBar];

    return saucer;
}
In Listing 7-3, we start by finding the center of the game area and storing that value in the CGPoint gameCenter. Next, we create an ImageRepresentation called rep. We indicate that rep should spin the Saucer backward half the time at a rate of 3 steps per frame of animation. The CGRect gameCenter and the ImageRepresentation rep are passed to the super-initializer initAt:WithRadius:AndRepresenation: to create a Saucer object with a radius of 32. The object saucer is then set as the delegate to the ImageRepresenation so we can specify the representational details with the class Saucer. This works exactly like the actors in Chapter 6. Have a look at the source code to see exactly how these tasks are implemented.
Once the saucer object is created, we want to initialize it with some details. We set which of the three variants we want to use by calling setVariant: on saucer. We also set the max health and current health properties to 100. Let’s move on to the HealthBar class.
Instantiating the HealthBar Class
In order to render the health bar under the saucer, we create a HealthBar object and pass in the object we want it to follow, the actor saucer. We also set the healthBar property of saucer to the newly created healthBar so the saucer object can update the percentage displayed by healthBar when it takes damage. Lastly, healthBar is added to the scene. Let’s take a look at the constructor for HealthBar and understand how it is set up and behaves the way it does. See Listing 7-4.
Listing 7-4. HealthBar.m (healthBar:)
+(id)healthBar:(Actor*)anActor{

    VectorRepresentation* rep = [VectorRepresentation vectorRepresentation];

    HealthBar* healthBar = [[HealthBar alloc] initAt:anActor.center WithRadius:anActor.radius AndRepresentation:rep];
    [rep setDelegate:healthBar];
    [healthBar setColor:[UIColor blueColor]];
    [healthBar setBackgroundColor:[UIColor colorWithRed:0 green:0 blue:0 alpha:.5]];

    FollowActor* follow = [FollowActor followActor:anActor];
    [follow setYOffset:[anActor radius]];
    [healthBar addBehavior:follow];

    return healthBar;
}
In Listing 7-4, we see the constructor task healthBar: and that it takes an Actor as an argument. The Actor anActor is the actor that this HealthBar will stay under if anActor moves. In this example, the Saucer associated with it does not move, but we are going to use this class in future examples, where its actor does move. Before we look at the behavior FollowActor, notice that HealthBar is initialized by passing an instance of VectorRepresentation instead of an ImageRepresentation object. This indicates that we want to draw this object programmatically. We will look at how this works in the next section. For now, let’s continue to explore this example. The next class we want to inspect is FollowActor.
The Behavior FollowActor Class
The class responsible for keeping the HealthBar near the Saucer is the class FollowActor. This class is a Behavior and provides the same sort of abstraction we found with the other Behavior classes. Let’s see how all of this fits together by looking at the class FollowActor. See Listing 7-5.
Listing 7-5. FollowActor.m
#import "FollowActor.h"
#import "GameController.h"

@implementation FollowActor
@synthesize actorToFollow;
@synthesize xOffset;
@synthesize yOffset;

+(id)followActor:(Actor*)anActorToFollow{
    FollowActor* follow = [FollowActor new];
    [follow setActorToFollow:anActorToFollow];
    return follow;
}
-(void)applyToActor:(Actor*)anActor In:(GameController*)gameController{
    if (![actorToFollow removed]){
        CGPoint c = [actorToFollow center];
        c.x += xOffset;
        c.y += yOffset;

        [anActor setCenter: c];
    } else {
        [gameController removeActor:anActor];
    }
}
@end
In Listing 7-5, we see the entire implementation of the class FollowActor. It is constructed with the task followActor:, which takes the actor to follow as an argument. The task applyToActor:In: is called for every step of the game and is responsible for repositioning the actor this behavior is associated with. To do this, we simply set the property center of anActor to the property center of the Actor we are following, adjusting by xOffest and yOffset. Looking at Listing 7-4, we see that the HealthBar is configured to follow the saucer at an xOffset equal to the radius of saucer. This keeps the HealthBar centered below saucer. Now let’s explore the Bullet class.
The Bullet Class
We have seen how the Saucer and the HealthBar classes work together. We now want to look at the Bullet class and understand why it behaves the way it does. Listing 7-6 shows Bullet’s constructor.
Listing 7-6. Bullet.m (bulletAt:WithDirection:)
+(id)bulletAt:(CGPoint)aCenter WithDirection:(float)aDirection{

    VectorRepresentation* rep = [VectorRepresentation vectorRepresentation];

    Bullet* bullet = [[Bullet alloc] initAt:aCenter WithRadius:4 AndRepresentation:rep];
    [rep setDelegate:bullet];

    [bullet setDamage: 10];

    LinearMotion* motion = [LinearMotion linearMotionInDirection:aDirection AtSpeed:3];
    [motion setWrap:YES];

    [bullet addBehavior: motion];

    ExpireAfterTime* expires = [ExpireAfterTime expireAfter:240];
    [bullet addBehavior:expires];

    return bullet;
}
In Listing 7-6, we see the class is composed of familiar building blocks. It is initialized with the now familiar task initAt:WithRadius:AndRepresentation:, and we are adding the behavior objects of type LinearMotion and ExpiresAfterTime. These two behavior objects are used by the class Powerup and are fully described in Chapter 6. The only new feature in the Bullet class is the class VectorRepresentation, which was also used by the class HealthBar to indicate that this type of actor will be drawn using Core Graphics. Let’s take a closer look at the class VectorRepresentation and see how it interacts with our game engine and actors to provide a simple method for rendering our actors with Core Graphics.
Drawing Actors with Core Graphics via VectorRepresentation
The Core Graphics library is interesting because it is not a vector graphics library (like SVG), but it is excellent at rasterizing vector data structures. This makes a lot of sense if you consider that Core Graphics was originally based on PDF. Core Graphics is a great library for rendering high-quality graphics in a resolution-independent way. What this means for us is that our code will not be specifying which pixel is which color, but instead will be describing shapes and how they should be filled. Core Graphics is also known as Quartz. A complete description of the available drawing functions can be found here: http://goo.gl/6i5gr .
In iOS, a UIView can specify how it is drawn by overriding the task drawRect:, getting a reference to its graphics context and then calling a number drawing methods. Because our game engine uses UIView’s to represent each actor, we know that ultimately we will be creating a subclass of UIView and calling the drawing code for our vector-based actors. It is the job the class VectorRepresentation to manage the relationship between the actor and the view that draws it on the screen.
The VectorRepresentation Class
The VectorRepresentation class is responsible for creating a UIView suitable to draw our actor on. Let’s start exploring this class with the header for VectorRepresentation. See Listing 7-7.
Listing 7-7. VectorRepresentation.h
#import <Foundation/Foundation.h>
#import "Actor.h"

@class VectorActorView;

@protocol VectorRepresentationDelegate
-(void)drawActor:(Actor*)anActor WithContext:(CGContextRef)context InRect:(CGRect)rect;
@end

@interface VectorRepresentation : NSObject<Representation> {
    VectorActorView* view;
}
@property (nonatomic, assign) NSObject<VectorRepresentationDelegate>* delegate;
+(id)vectorRepresentation;
@end
In Listing 7-7, we see that the class VectorRepresentation defines a protocol called VectorRepresentationDelegate to which each vector-based actor must conform. This protocol requires the task drawActor:WithContext:InRect: to be implemented by all classes that conform to it, and is where the actual drawing code should be placed.
The class VectorRepresentation extends NSObject and conforms to the protocol Representation, just like the class ImageRepresentation does. The idea here is that most of the code should not care which type of representation we use—vector or image. We simply create the correct Representation object and associate it with each actor.
We also see that the class VectorRepresentation has a single property view of type VectorActorView. A VectorActorView is a subclass of UIView and will ultimately call the task drawActor:WithContext:InRect: as defined by the protocol VectorRepresentationDelegate. Before looking at the class VectorActorView, let’s look at the implementation of VectorRepresentation as shown in Listing 7-8.
Listing 7-8. VectorRepresentation.m
#import "VectorRepresentation.h"
#import "VectorActorView.h"

@implementation VectorRepresentation
@synthesize delegate;

+(id)vectorRepresentation{
    return [VectorRepresentation new];
}
-(UIView*)getViewForActor:(Actor*)anActor In:(GameController*)aController{
    if (view == nil){
        view = [VectorActorView new];
        [view setBackgroundColor:[UIColor clearColor]];
        [view setActor: anActor];
        [view setDelegate:delegate];
        [anActor setNeedsViewUpdated:YES];
    }
    return view;
}
-(void)updateView:(UIView*)aView ForActor:(Actor*)anActor In:(GameController*)aController{
    if ([anActor needsViewUpdated]){
        [aView setNeedsDisplay];
        [anActor setNeedsViewUpdated:NO];
    }
}
@end
In Listing 7-8, we see the implementation of the class VectorRepresentation and that it has a trivial constructor. We also see that it implements the tasks getViewForActor:In: and updateView:In: as defined by the protocol Representation. In the task getViewForActor:In: we create a new VectorActorView, and specify the actor and delegate that should be used to draw. Then we call setNeedsViewUpdated, making sure the actor’s drawing code is called at least once.
In the task, updateView:In: we check to see if the actor needs updating; if so, we call setNeedsDisplay on the UIView aView. The task setNeedsDisplay is defined by the class UIView and indicates to the underlying graphics system that the UIView should be redrawn. In effect, this causes the drawRect: task of our VectorActorView to be called, which in turn will call the drawActor:WithContext:InRect: of our actor. Next we want to look at the details of the class VectorActorView.
A UIView for Vector-Based Actors: VectorActorView
The class VectorActorView is a subclass of UIView and is used to represent the actor in the scene in much the same way as we use UIImageView instances to represent image-based Actors. Let’s take a look at the class VectorActorView and see how it all fits together, starting with the header. See Listing 7-9.
Listing 7-9. VectorActorView.h
#import <UIKit/UIKit.h>
#import "Actor.h"
#import "VectorRepresentation.h"

@interface VectorActorView : UIView {

}
@property (nonatomic, retain) Actor* actor;
@property (nonatomic, retain) NSObject<VectorRepresentationDelegate>* delegate;

@end
In Listing 7-9, we see that VectorActorView extends UIView and has two properties. The first is the Actor that is to be drawn. The second property is the VectorRepresentationDelegate that is responsible for actually drawing the Actor. In this example, these two objects—the actor and the delegate—will be the same object, either a Bullet or a HealthBar. However, this is not a requirement. I like to keep all the code related to an actor in the actor’s class. The delegate could be its own class responsible for drawing the actor. This would make sense if you wanted to use a single VectorRepresentationDelegate to draw multiple types of actors. The implementation of the class VectorActorView is very simple, as can be seen in Listing 7-10.
Listing 7-10. VectorActorView.m
- (void)drawRect:(CGRect)rect
{
    CGContextRef context = UIGraphicsGetCurrentContext();
    [delegate drawActor:actor WithContext:context InRect:rect];
}
In Listing 7-10, we see that the implementation is the class VectorActorView a single method, the implementation of the task drawRect:. In this method, we get a reference to the current graphics context by calling UIGraphicsGetCurrentContext and passing the context and the actor to the delegate to be drawn in the CGRect specified. Let’s now take a look at a specific example.
Drawing a HealthBar
As mentioned, the vector-based actors used in this example are their own delegates in terms of drawing, so let’s look at the HealthBar class again and see how it draws itself. See Listing 7-11.
Listing 7-11. HealthBar.m (drawActor:WithContext:InRect:)
-(void)drawActor:(Actor*)anActor WithContext:(CGContextRef)context InRect:(CGRect)rect{
    CGContextClearRect(context,rect);

    float height = 10;

    CGRect backgroundArea = CGRectMake(0, self.radius-height/2, self.radius*2, height);
    [self.backgroundColor setFill];
    CGContextFillRect(context, backgroundArea);

    CGRect healthArea = CGRectMake(0, self.radius-height/2, self.radius*2*percent, height);
    [self.color setFill];
    CGContextFillRect(context, healthArea);

}
In Listing 7-11, we start by calling CGContectClearRect. This erases any old content in the given rect, getting us ready to do our real drawing. To draw the HealthBar, all we have to do is draw two rectangles, one for the background and another on top of the background representing the current percentage of the health bar. To draw a rectangular area (as apposed to drawing the edges of a rectangle), we define a rect by calling CGRectMake. Then we specify the color to be used by calling setFill on the UIColor object backgroundColor, which is a property of HealthBar.
To actually change the color of the pixels of the UIView being drawn, we call CGContextFillRect passing in our context and the CGRect backgroundArea. To draw the foreground rectangle, we repeat the process, but the width of our top rectangle, healthArea, is calculated based the value of the property percent. This indicates that every time the percent of the HealthBar changes, we have to redraw the HealthBar. To make sure this happens, we have to provide our own implementation of setPercent: instead of relying on the default implementation that would be provided by a synthesized property. Listing 7-12 shows the custom implementation of setPercent: for the class HealthBar.
Listing 7-12. HealthBar.m (setPercent:)
-(void)setPercent:(float)aPercent{
    if (percent != aPercent){
        percent = aPercent;
        if (percent < 0){
            percent = 0;
        }
        if (percent > 1){
            percent = 1;
        }
        [self setNeedsViewUpdated:YES];
    }
}
Listing 7-12 shows our custom implementation of setPercent:. First we check to see if the values of percent (the backing variable for the property) and the passed in value aPercent have different values. If they do, we set percent to aPercent and we normalize the values by ensuring it is between the values 0 and 1. Lastly, we call setNeedsViewUpdate: with YES. This ensures that the HealthBar will be redrawn during the next step in the animation. Let’s now take a look at how the Bullet class is drawn.
Drawing the Bullet Class
We have looked at the class HealthBar and inspected how it is drawn. We only used a single drawing function, CGContextFillRect, to create our visual effect. Of course, there are many, many more drawing functions that allow you to create any visual effect you want. We are not going to cover all of these functions, but there is fantastic documentation available online. That being said, let’s take a look at the drawing implementation of the class Bullet. See Listing 7-13.
Listing 7-13. Bullet.m (drawRect:WithContext:InRect:)
-(void)drawActor:(Actor*)anActor WithContext:(CGContextRef)context InRect:(CGRect)rect{

    CGContextAddEllipseInRect(context, rect);
    CGContextClip(context);

    CGFloat locations[2];

    locations[0] = 0.0;
    locations[1] = 1.0;

    CGColorSpaceRef space = CGColorSpaceCreateDeviceRGB();

    UIColor* color1 = nil;
    UIColor* color2 = nil;

    if (damage >= 30){
        color1 = [UIColor colorWithRed:1.0 green:0.8 blue:0.8 alpha:1.0];
        color2 = [UIColor colorWithRed:1.0 green:0.0 blue:0.0 alpha:1.0];
    } else if (damage >= 20){
        color1 = [UIColor colorWithRed:0.8 green:1.0 blue:0.8 alpha:1.0];
        color2 = [UIColor colorWithRed:0.0 green:1.0 blue:0.0 alpha:1.0];
    } else {
        color1 = [UIColor colorWithRed:0.8 green:0.8 blue:1.0 alpha:1.0];
        color2 = [UIColor colorWithRed:0.0 green:0.0 blue:1.0 alpha:1.0];
    }

    CGColorRef clr[] = { [color1 CGColor], [color2 CGColor] };
    CFArrayRef colors = CFArrayCreate(NULL, (const void**)clr, sizeof(clr) / sizeof(CGColorRef), &kCFTypeArrayCallBacks);

    CGGradientRef grad = CGGradientCreateWithColors(space, colors, locations);
    CGColorSpaceRelease(space);

    CGContextDrawLinearGradient(context, grad, rect.origin, CGPointMake(rect.origin.x + rect.size.width, rect.origin.y + rect.size.height), 0);

    CGGradientRelease(grad);
}
In Listing 7-13, we see the code that draws each bullet on the screen. This code draws a circle with a gradient based on the damage of the Bullet. In my opinion, this is a lot of code to accomplish something so simple. Let’s break it down piece by piece. The first line of the task creates an oval clipping region for the graphic context based on the provided rectangle. This means that future drawing operations will be visible only with this oval region.
The next step is to create the gradient used by the drawing operation. A gradient is made of two main parts. The first part is an array specifying where each color of the gradient should be applied. In our case, we are only using a two-color gradient, so we create an array called locations, making the first value 0 and second 1. This means that the colors should blend evenly from the start of the gradient to the end.
The second part of a gradient is the colors used. In our example, we specify each color based on value of damage. We simply assign the variables color1 and color2 to the colors we want to use to draw the Bullet. Once we have our colors, we create a CFArrayRef to store our colors in.
Once we have the locations of the colors and the colors themselves stored in the correct type of array, we call CGGradientCreateWithColors and pass the arrays in to create a CGGradientRef call grad. Note we also have passed in a reference to the color space, as defined by CGColorSpaceRef call ref. This is the default color space for the display and will only have to be changed if your application is doing sophisticated color presentation.
Once the CGGradientRef is created, call CGContextDrawLinearGradient. It would normally fill the entire UIView with the specified gradient, but because we specified the clip region at the top of the task, we get a nice circle with the gradient evenly drawn over it.
We have looked at how we can create actors that are drawn using Core Graphics to open up the possibility of dynamically drawing our actors, preventing us from having to create an image for every possible state of our actors. In the next section, we will look at another strategy for drawing actors, those based on particles.
Adding Particle Systems to Your Game
Particle systems in games are collections of many, usually small, images drawn together to create an overall affect. Particle systems are used in many different ways in computer graphics; some common examples are fire, water, hair, and grass. In our example, we are going to create a new actor called Particle that will be used to draw out Comet actor and improve our Asteroid actor by making it appear to break up. Figure 7-3 shows this next example in action.
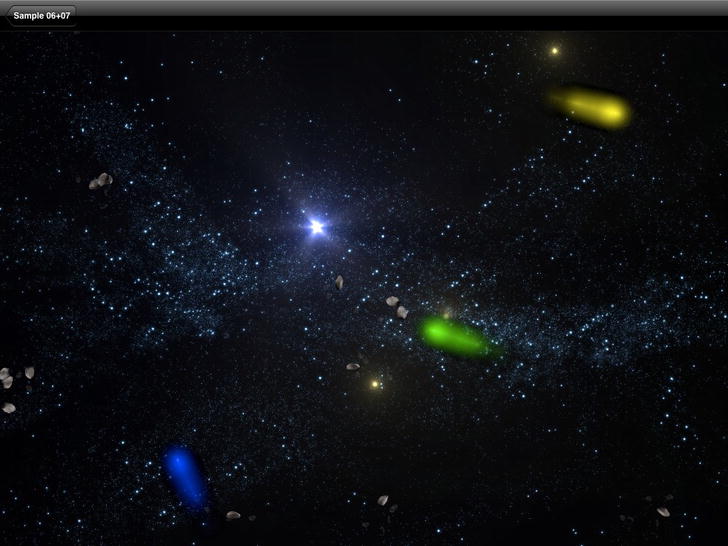
Figure 7-3. Comets and destructible asteroids
In Figure 7-3, we see three comets traveling across the screen. We also see a number of asteroids in various states of exploding. The asteroids drift in from off the screen, and when you tap the screen they explode into a number of smaller asteroids. In addition to creating the new, smaller asteroids, we send out a number of particles that look like asteroids. This gives the destruction of the larger asteroid some added realism because big chunks of rock seldom break cleanly into smaller pieces. These two different particle effects, the comets and the asteroid debris, are very different, but each is implemented with the same base class, Particle. Let’s take a closer look at the class Example03Controller to better understand how this example works before diving into the details of each new actor. Listing 7-14, shows the important parts of Example03Controller.
Listing 7-14. Example03Controller.m (doSetup and updateScene)
-(BOOL)doSetup{
    if([super doSetup]){
        NSMutableArray* classes = [NSMutableArray new];
        [classes addObject:[Asteroid class]];

        [self setSortedActorClasses:classes];

        UITapGestureRecognizer* tapRecognizer = [[UITapGestureRecognizer alloc] initWithTarget:self action:@selector(tapGesture:)];
        [tapRecognizer setNumberOfTapsRequired:1];
        [tapRecognizer setNumberOfTouchesRequired:1];

        [actorsView addGestureRecognizer:tapRecognizer];

        return YES;
    }
    return NO;
}

-(void)updateScene{
    if (self.stepNumber % (60*5) == 0){
        [self addActor:[Comet comet:self]];
    }

    if ([[self actorsOfType:[Asteroid class]] count] == 0){
        int count = arc4random()%4+1;
        for (int i=0;i<count;i++){
            [self addActor:[Asteroid asteroid:self]];
        }

    }

    [super updateScene];
}
In Listing 7-14, we see two tasks of the class Example03Controller: doSetup and updateScene. The task doSetup follows our now familiar pattern of identifying the actor classes we want efficient access to—in this case, Asteroid, by calling the task setSortedActorClass:. We also create a UITapGestureRecognizer called tapRecognizer and register that with the actorsView object. In this way, the task tapGesture: will be called when we tap the screen.
The task updateScene, as shown in Listing 7-14, adds a new Comet actor every five seconds (60*5) and adds one to four Asteroids whenever there are zero Asteroids in the scene. As with the previous examples, the code in the controller class is relatively simple. Most of the real logic for the example lives in the different actor classes. Before we look at the Asteroid class, let’s consider the task tapGesture :, shown in Listing 7-15.
Listing 7-15. Example03Controller.m (tapGesture:)
- (void)tapGesture:(UIGestureRecognizer *)gestureRecognizer{
    for (Asteroid* asteroid in [self actorsOfType:[Asteroid class]]){
        [asteroid doHit:self];
    }
}
In Listing 7-15, we see that the tapGesture: task, which is called when the user taps the screen, simply iterates through each Asteroid in the scene and calls doHit: on it. It is because of this task that we want to make sure we have easy access to the Asteroids in the scene.
The following section describes the implementation details of the actor Asteroid, as well the particle effect that is created when each Asteroid explodes.
Simple Particle System
The simplest particle systems involve creating a bunch of short-lived items on the screen that decay or disappear relatively quickly. Let’s take a look at the Asteroid class and see how we can create a very simple particle effect.
The Asteroid Class
Before we look at how we add the particle effect to the destruction of the Asteroid, let’s take a moment to understand the Asteroid class as whole. This will give us the context to understand the particle effect while building another Actor class. The header for the Asteroid class is shown in Listing 7-16.
Listing 7-16. Asteroid.h
@interface Asteroid : Actor{

}
@property (nonatomic) int level;
+(id)asteroid:(GameController*)aController;
+(id)asteroidOfLevel:(int)aLevel At:(CGPoint)aCenter;
-(void)doHit:(GameController*)controller;
@end
In Listing 7-16, we see the declaration of the class Asteroid. We see that Asteroid class extends Actor and has two constructors. The constructor asteroid: is used by the Example03Controller to add the biggest Asteroids into the scene. The constructor asteroidOfLevel:At: is used to create and add the smaller Asteroids in the task doHit:, which is called after a tap event. Listing 7-17 shows the first constructors for the class Asteroid.
Listing 7-17. Asteroid.m (asteroid:)
+(id)asteroid:(GameController*)acontroller{
    CGSize gameSize = [acontroller gameAreaSize];

    CGPoint gameCenter = CGPointMake(gameSize.width/2.0, gameSize.height/2.0);

    float directionOffScreen = arc4random()%100/100.0 * M_PI*2;
    float distanceFromCenter = MAX(gameCenter.x,gameCenter.y) * 1.2;

    CGPoint center = CGPointMake(gameCenter.x + cosf(directionOffScreen)*distanceFromCenter, gameCenter.y + sinf(directionOffScreen)*distanceFromCenter);

    return [Asteroid asteroidOfLevel:4 At:center];
}
In Listing 7-17, we see the task asteroid:, which creates a new Asteroid of size 4 by calling the other constructor. Most of the work being done is simply finding the starting point for the Asteroid off screen. This is identical to the code used to find a point for the Powerup actor in Chapter 6. The details can be found in Figure 7-3. The second constructor for Asteroid is shown in Listing 7-18.
Listing 7-18. Asteroid.m (asteroidOfLevel:At:)
+(id)asteroidOfLevel:(int)aLevel At:(CGPoint)aCenter{

    ImageRepresentation* rep = [ImageRepresentation imageRepWithDelegate:[AsteroidRepresentationDelegate instance]];
    [rep setBackwards:arc4random()%2 == 0];
    if (aLevel >= 4){
        [rep setStepsPerFrame:arc4random()%2+2];
    } else {
        [rep setStepsPerFrame:arc4random()%4+1];
    }

    Asteroid* asteroid = [[Asteroid alloc] initAt:aCenter WithRadius:4 + aLevel*7 AndRepresentation:rep];

    [asteroid setLevel:aLevel];
    [asteroid setVariant:arc4random()%AST_VARIATION_COUNT];
    [asteroid setRotation: (arc4random()%100)/100.0*M_PI*2];

    float direction = arc4random()%100/100.0 * M_PI*2;
    LinearMotion* motion = [LinearMotion linearMotionInDirection:direction AtSpeed:1];
    [motion setWrap:YES];
    [asteroid addBehavior:motion];

    return asteroid;
}
In Listing 7-18, we see the main constructor of the class Asteroid. We also see that we create the Asteroid with a radius based on the value of aLevel. In this way, we have progressively smaller asteroids as they break apart, since each new asteroid has a level of one less than its creator. The last thing we do in the asteroidOfLevel:At: is to add a LinearMotion behavior the Asteroid so it moves in a straight line, wrapping around the screen.
Another thing to note in Listing 7-8 is that we are creating an ImageRepresentation in a slightly different way than we have up until this point. Previously, all the ImageRepresentations we created used the actor as the delegate, This made sense because it put all of the information about an actor into a single file. However, we will want the Asteroid class and the particles we create to look the same, though different size. To facilitate this, we have created a new class called AsteroidRepresentationDelegate that is responsible for specifying how things that look like asteroids are rendered. Let’s move on to the class AsteroidRepresentationDelegate.
Representing an Asteroid and Particle with the Same Class
As mentioned, how an Asteroid is drawn is defined in the class AsteroidRepresentationDelegate. This class will be used to represent each Asteroid, as well as the particles we create when an Asteroid breaks up. The implementation of AsteroidRepresentationDelegate is shown in Listing 7-19.
Listing 7-19. AsteroidRepresentationDelegate.m
+(AsteroidRepresentationDelegate*)instance{
    static AsteroidRepresentationDelegate* instance;
    @synchronized(self) {
  if(!instance) {
  	instance = [AsteroidRepresentationDelegate new];
  }
 }
 return instance;
}
-(int)getFrameCountForVariant:(int)aVariant AndState:(int)aState{
    return 31;
}
-(NSString*)getNameForVariant:(int)aVariant{
    if (aVariant == VARIATION_A){
        return @"A";
    } else if (aVariant == VARIATION_B){
        return @"B";
    } else if (aVariant == VARIATION_C){
        return @"C";
    } else {
        return nil;
    }

}
-(NSString*)baseImageName{
    return @"Asteroid";
}
In Listing 7-19, we see the expected tasks for defining an image-based actor. We see that image files will start with the string "Asteroid" as shown in the task baseImageName. We also see that there are 31 images for each of the three variants, as shown in getFramesCountForVariant:AndState: and getNameForVariant:.
The task, instance in Listing 7-19, is something new for us. This task represents a way for us to create a singleton of the class AsteroidRepresentationDelegate. We do this by synchronizing on the class object for Asteroid and only creating a new AsteroidRepresentationDelegate if the variable instance is nil. This allows us to only create one instance of this class, even though we could have hundreds of Asteroids and Particles using it to specify how they look. Let’s now put all the pieces together and look at how an Asteroid is destroyed.
Destroying an Asteroid
We have set the groundwork for understanding how an Asteroid is created and represented on the screen. Let’s take a look at the task doHit : to understand how these pieces are brought together to create the desired behavior. See Listing 7-20.
Listing 7-20. Asteroid.m (doHit:)
-(void)doHit:(GameController*)controller{
    if (level > 1){
        int count = arc4random()%3+1;
        for (int i=0;i<count;i++){
            Asteroid* newAst = [Asteroid asteroidOfLevel:level-1 At:self.center];
            [controller addActor:newAst];
        }
    }

    int particles = arc4random()%5+1;
    for (int i=0;i<particles;i++){
        ImageRepresentation* rep = [ImageRepresentation imageRepWithDelegate:[AsteroidRepresentationDelegate instance]];
        Particle* particle = [Particle particleAt:self.center WithRep:rep Steps:25];
        [particle setRadius:6];
        [particle setVariant:arc4random()%AST_VARIATION_COUNT];
        [particle setRotation: (arc4random()%100)/100.0*M_PI*2];

        LinearMotion* motion = [LinearMotion linearMotionRandomDirectionAndSpeed];
        [particle addBehavior:motion];

        [controller addActor: particle];
    }
    [controller removeActor:self];
}
In Listing 7-20, we see the task doHit:. This task is called when we tap on the screen, causing all Asteroids in the scene to break apart into a number of smaller Asteroids. We also want to generate a number of asteroid-looking Particles when we do this. The first thing we do is to make sure the Asteroid we call doHit: on is bigger than level one, because those asteroids should not create additional Asteroids. If the Asteroid is bigger than level one, we create one to three new Asteroids at the same location as the current Asteroid with one level smaller. These new Asteroids will travel away from the current Asteroid in a straight line until they also explode.
To create the particle effect in Listing 7-20, we first decide how many particles we will be adding to the scene. We then create a new Particle using the Asteroids current position, the singleton instance of AsteroidRepresentationDelegate, and indicate that the particle should live for 25 steps of animation. The radius of particle is set to 6. This is a purely aesthetic choice; it could be any value. The variation and rotation properties are also set to provide visual variation in each particle that is created. The last thing we do to the particle is to specify a random LinearMotion before adding it to the scene. Figure 7-4 shows a close-up of the new Asteroids being created, as well as the Particles.
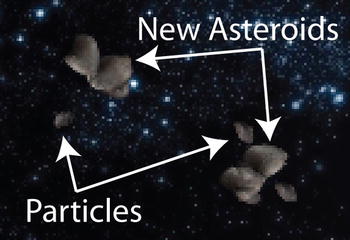
Figure 7-4. Asteroids and particles, zoomed in
The Particle Class
We looked at how the Particles are created when the each Asteroid explodes, so let’s now look at the Particle class in detail and see how it is implemented, starting with the header file shown in Listing 7-21.
Listing 7-21. Particle.h
@interface Particle : Actor<ExpireAfterTimeDelegate> {

}
@property (nonatomic) float totalStepsAlive;
+(id)particleAt:(CGPoint)aCenter WithRep:(NSObject<Representation>*)rep Steps:(float)numStepsToLive;
@end
In Listing 7-21, the header for the class Particle extends Actor and conforms to the protocol ExpireAfterTimeDelegate. Particle conforms to ExpireAfterTimeDelegate, because we want to change the opacity of the particle, fading it out, during its lifetime. The property totalStepsAlive indicates how long the particle should exists in the scene, and is set as part of the constructor particleAt:WithRep:Steps:. We can also see that a particle requires a Representation to be passed as an argument to the constructor. The implementation of Particle is shown in Listing 7-22.
Listing 7-22. Particle.m
@implementation Particle
@synthesize totalStepsAlive;

+(id)particleAt:(CGPoint)aCenter WithRep:(NSObject<Representation>*)rep Steps:(float)numStepsToLive{
    Particle* particle = [[Particle alloc] initAt:aCenter WithRadius:32 AndRepresentation:rep];

    [particle setTotalStepsAlive:numStepsToLive];

    ExpireAfterTime* expire = [ExpireAfterTime expireAfter:numStepsToLive];
    [expire setDelegate: particle];
    [particle addBehavior:expire];

    return particle;
}
-(void)stepsUpdated:(ExpireAfterTime*)expire In:(GameController*)controller{
   self.alpha = [expire stepsRemaining]/totalStepsAlive;
}
@end
In Listing 7-22, we see that the constructor particleAt:WithRep:Steps: is pretty straightforward. We create a new Particle object, passing in the provided Representation object. We also set the property totalStepsAlive and create an ExpiresAfterTime Behavior. Notice that particle is set as expire’s delegate; this causes the task stepsUpdated:In: to be called every time expire is executed.
In the task stepsUpdated:In: we simply adjust the alpha value of Particle based on how far along Particle's life cycle we are. In a more complex implementation of Particle, this fading behavior would be configurable, not just on or off but also at which rate a Particle fades. In this simple implementation, each particle simply fades in a linear way.
We have looked at the implementation of Asteroid and Particle, and see that it is pretty simple to create a particle effect in our scene. In the next section, we will look at the Comet actor and see a more visually striking example, though the implementation will be just as simple.
Creating Based Vector-Based Particles
In the previous example, we looked at Particles that were represented by a sequence of images. Because we have a flexible way of rendering actors, we can just as easily create particles that are programmatically drawn. In this example, we will be creating Particles that stay in one place, but we will move the point where they are created. This will give our Comet actors a nice glowing tail, as any comet should have. Figure 7-5 shows our new actor, the Comet.
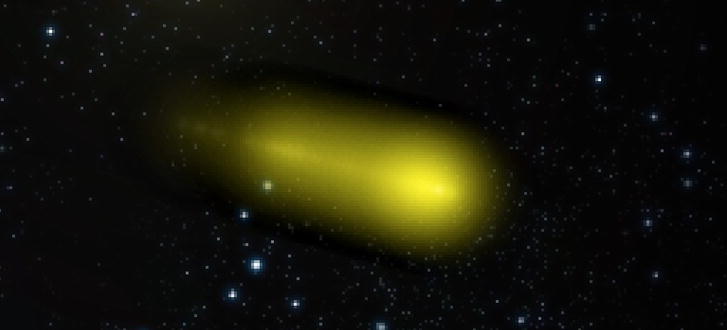
Figure 7-5. Comet detail
In Figure 7-5, we see a zoomed-in detail of a comet. It is composed of many particles, each one slowly fading in place to produce the tail of the comet. Let’s take a look at the Comet class and see how this visual is created. Listing 7-23 shows the header for the Comet class.
Listing 7-23. Comet.h
enum{
    VARIATION_RED = 0,
    VARIATION_GREEN,
    VARIATION_BLUE,
    VARIATION_CYAN,
    VARIATION_MAGENTA,
    VARIATION_YELLOW,
    VARIATION_COUNT
};

@interface Comet : Actor<VectorRepresentationDelegate> {

}
+(id)comet:(GameController*)controller;
@end
In Listing 7-23, we see that Comet extends Actor and conforms to the protocol VectorRepresentationDelegate. There is a single constructor, taking a GameController as the only argument. Let’s look at the implementation of this constructor, shown in Listing 7-24.
Listing 7-24. Comet.m (comet:)
+(id)comet:(GameController*)controller{
    CGSize gameSize = [controller gameAreaSize];

    CGPoint gameCenter = CGPointMake(gameSize.width/2.0, gameSize.height/2.0);

    float directionOffScreen = arc4random()%100/100.0 * M_PI*2;
    float distanceFromCenter = MAX(gameCenter.x,gameCenter.y) * 1.2;

    CGPoint center = CGPointMake(gameCenter.x + cosf(directionOffScreen)*distanceFromCenter, gameCenter.y + sinf(directionOffScreen)*distanceFromCenter);

    ImageRepresentation* rep = [ImageRepresentation imageRep];
    Comet* comet = [[Comet alloc] initAt:center WithRadius:16 AndRepresentation:rep];
    [rep setDelegate:comet];
    [comet setVariant:arc4random()%VARIATION_COUNT];

    float direction = arc4random()%100/100.0 * M_PI*2;
    LinearMotion* motion = [LinearMotion linearMotionInDirection:direction AtSpeed:1];
    [motion setWrap:YES];
    [comet addBehavior: motion];

    ExpireAfterTime* expire = [ExpireAfterTime expireAfter:60*15];
    [comet addBehavior: expire];

    return comet;
}
In Listing 7-24, we see that we again create each Comet offscreen by calculating CGPoint called center, which is on a circle just off the edge of the game area. We also create a VectorRepesentation and use the Comet as the delegate. We will be drawing the Comet and the Comet’s tail particles with the same tasks. After specifying an ExpireAfterTime and a LinearMotion as the Comet’s behavior, it is ready to be added to the scene. Listing 7-25 shows the task that draws each Comet and Particle.
Listing 7-25. Comet.m (drawActor:WithContect:InRect:)
-(void)drawActor:(Actor*)anActor WithContext:(CGContextRef)context InRect:(CGRect)rect{
    CGContextClearRect(context,rect);
    CGColorSpaceRef space = CGColorSpaceCreateDeviceRGB();

    CGFloat locations[4];
    locations[0] = 0.0;
    locations[1] = 0.1;
    locations[2] = 0.2;
    locations[3] = 1.0;

    UIColor* color1 = nil;
    UIColor* color2 = nil;
    UIColor* color3 = nil;

    float whiter = 0.6;
    float c2alpha = 0.5;
    float c3aplha = 0.3;

    if (self.variant == VARIATION_RED){
        color1 = [UIColor colorWithRed:1.0 green:whiter blue:whiter alpha:1.0];
        color2 = [UIColor colorWithRed:1.0 green:0.0 blue:0.0 alpha:c2alpha];
        color3 = [UIColor colorWithRed:1.0 green:0.0 blue:0.0 alpha:c3aplha];
    } else if (self.variant == VARIATION_GREEN){
        color1 = [UIColor colorWithRed:whiter green:1.0 blue:whiter alpha:1.0];
        color2 = [UIColor colorWithRed:0.0 green:1.0 blue:0.0 alpha:c2alpha];
        color3 = [UIColor colorWithRed:0.0 green:1.0 blue:0.0 alpha:c3aplha];
    } else if (self.variant == VARIATION_BLUE){
        color1 = [UIColor colorWithRed:whiter green:whiter blue:1.0 alpha:1.0];
        color2 = [UIColor colorWithRed:0.0 green:0.0 blue:1.0 alpha:c2alpha];
        color3 = [UIColor colorWithRed:0.0 green:0.0 blue:1.0 alpha:c3aplha];
    } else if (self.variant == VARIATION_CYAN){
        color1 = [UIColor colorWithRed:whiter green:1.0 blue:1.0 alpha:1.0];
        color2 = [UIColor colorWithRed:0.0 green:1.0 blue:1.0 alpha:c2alpha];
        color3 = [UIColor colorWithRed:0.0 green:1.0 blue:1.0 alpha:c3aplha];
    } else if (self.variant == VARIATION_MAGENTA){
        color1 = [UIColor colorWithRed:1.0 green:whiter blue:1.0 alpha:1.0];
        color2 = [UIColor colorWithRed:1.0 green:0.0 blue:1.0 alpha:c2alpha];
        color3 = [UIColor colorWithRed:1.0 green:0.0 blue:1.0 alpha:c3aplha];
    } else if (self.variant == VARIATION_YELLOW){
        color1 = [UIColor colorWithRed:1.0 green:1.0 blue:whiter alpha:1.0];
        color2 = [UIColor colorWithRed:1.0 green:1.0 blue:0.0 alpha:c2alpha];
        color3 = [UIColor colorWithRed:1.0 green:1.0 blue:0.0 alpha:c3aplha];
    }
    UIColor* color4 = [UIColor colorWithRed:0.0 green:0.0 blue:0.0 alpha:0.0];

    CGColorRef clr[] = { [color1 CGColor], [color2 CGColor] , [color3 CGColor], [color4 CGColor]};
    CFArrayRef colors = CFArrayCreate(NULL, (const void**)clr, sizeof(clr) / sizeof(CGColorRef), &kCFTypeArrayCallBacks);

    CGGradientRef grad = CGGradientCreateWithColors(space, colors, locations);
    CGColorSpaceRelease(space);

    CGContextDrawRadialGradient(context, grad, CGPointMake(self.radius, self.radius), 0, CGPointMake(self.radius, self.radius), self.radius, 0);

    CGGradientRelease(grad);
}
In Listing 7-25, we want to draw a simple radial gradient with the color appropriate to the variant at the center and transparent at the edge. We have to create a four-color gradient to achieve a nice-looking Comet. The first color is mostly white and fully opaque, the next two colors are the color of the variant with two different alpha values. The last color will be completely transparent. The function CGContextDrawRadialGradient draws the radial gradient at the center of the actor with the first color and creates a smooth transition to the transparent edge of the actor.
Now that we can see how each particle is drawn, we should look how the particles are created, Listing 7-26 shows the implementation of Comet's step: task.
Listing 7-26. Comet.m (step:)
-(void)step:(GameController*)controller{
    if ([controller stepNumber]%3 == 0){
        VectorRepresentation* rep = [VectorRepresentation vectorRepresentation];
        [rep setDelegate:self];

        int totalStepsAlive = arc4random()%60 + 60;
        Particle* particle = [Particle particleAt:self.center WithRep:rep Steps:totalStepsAlive];
        [particle setRadius:self.radius];
        [controller addActor: particle];
    }
}
In Listing 7-26, the step: task creates a new Particle every three steps in the animation. For each new Particle, a VectorRepresentation is created, but note that the delegate is the Comet object. The Particle is created with a random life span from 1 to 2 seconds. This randomness creates the slight flickering variation in the tail of the comet. Notice that the Particle has no additional behaviors added at this point; this causes the Particle to just sit in one place and fade away.
Summary
In this chapter we looked at a technique to create actors in our game that are drawn programmatically. We created a new class called VectorRepresentation to handle the details of creating a UIView for our code to draw on. We used these new vector-based actors to create a health bar and a simple bullet. The chapter continued by showing two simple examples of creating particle systems. The first example reused the art for the asteroids to create a sense of debris when we exploded the asteroids. The second example used vector-based particles to create comets with glowing tails. The actors created in this and the previous chapter will be used to create a complete game in Chapter 12.