
A Completed Game: Belt Commander
Throughout this book, we have covered a number of techniques for building iOS games. We looked at how to build the basic application flow for a game in Chapter 3. We learned how to build a basic turn-by-turn game when we looked at Coin Sorter in Chapter 4. Then we moved in to frame-by-frame games and learned how to build a game that is in constant motion in Chapter 5. In Chapters 6 and 7, we looked at how to create different types of actors to populate our game. Chapter 8 covered how to capture user input that manipulates in-game elements, and Chapter 9 looked at how to reach out to our players with Game Center and other social media services. In Chapter 10, we discussed how to add in-app purchases and to help make some money with our game. In Chapter 11, we added sound effects to our game. In this chapter, we are going to bring all of these elements together into one full-featured game, Belt Commander. The title graphic is shown in Figure 12-1.

Figure 12-1. Title graphic for Belt Commander
In this chapter, we are going to take a high-level look at the game Belt Commander. We are also going to walk through how the game is put together, including how the views are organized and how the application game logic is implemented. We will discuss the different actors in the game and how they are added. In some ways, this chapter is a review of the techniques we learned in previous chapters. However, exploring how these techniques fit together will give you a roadmap that will help you put together your own games. In fact, feel free to start out with the sample code for this chapter for your own game. It is my intention to do just that and release a commercial version of Belt Commander in the iTunes Store. So let’s get started.
Belt Commander is an action game in which you control a spaceship that is traveling through an asteroid belt. Destroying asteroids and alien flying saucers rewards the player with points. During play, a power-up occasionally floats onto the screen, giving the player a chance to heal some damage, earn some bonus points, or upgrade weapons. This is a relatively fast-paced game with simple interactions. Let’s take a look at the opening screen of the game, shown in Figure 12-2.

Figure 12-2. Belt Commander’s opening screen
In Figure 12-2, we see the first screen of the game. We have a title at the top of the screen as well as a number of buttons. The Facebook, Tweet, and Leaderboards buttons enable the various social functions that we discussed in Chapter 9. The extras button allows the user to configure the game and purchase new parts of the game. How purchases are handled is described in Chapter 10. For this chapter, we will assume all of the extras are purchased. The Play button will take the user into the action part of the game, as shown in Figure 12-3.
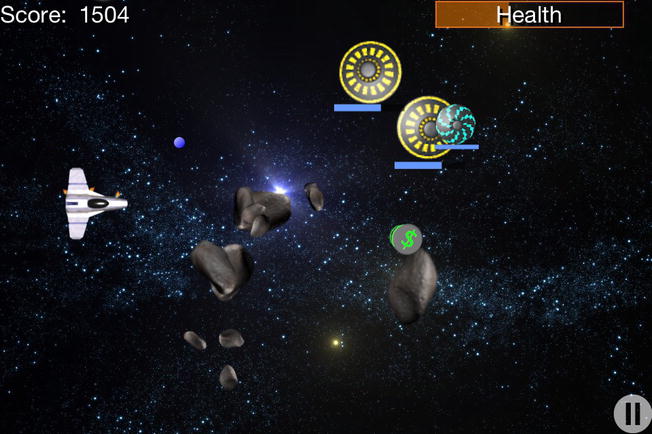
Figure 12-3. Belt Commander in action
In Figure 12-3, we see the action part of the game. On the left is the spaceship controlled by the user. The user can tap on the screen and the ship will travel up or down to the location of the tap. This is how the user can avoid the many asteroids that travel from the right side of the screen to the left. In addition to the asteroids, there are alien saucers that travel up and down on the screen, shooting bullets at the user’s ship. Both the asteroids and the saucers’ bullets do damage to the ship when they hit. The game continues until the ship is overwhelmed with damage. To help the player along, power-ups appear on the right and travel to the left. If users can intercept a power-up, they receive whatever bonus it gives: health, more damage, or extra points.
In the lower right-hand side of the Figure 12-3, we see a Pause button (II). This will pause the game and allow the user to quit or continue playing, as shown in Figure 12-4.

Figure 12-4. Belt Commander on pause
In Figure 12-4, we see the dialog that pops up when the user clicks the touch button on the lower right of the screen. This dialog allows the user to exit the game by clicking Yes, or to continue by clicking No. If the user is playing the game and the application is sent to the background by another app’s starting, this dialog will be presented when the user brings the game back up. When the user’s ship has no health left, the game is over. The dialog shown in Figure 12-5 appears.

Figure 12-5. Game over
In Figure 12-5, we see the dialog presented at the end of the game. This dialog allows the user to get right back into the action by clicking Yes. If the user clicks No, he is sent back to the starting screen of the game. The entire application flow is shown in Figure 12-6.
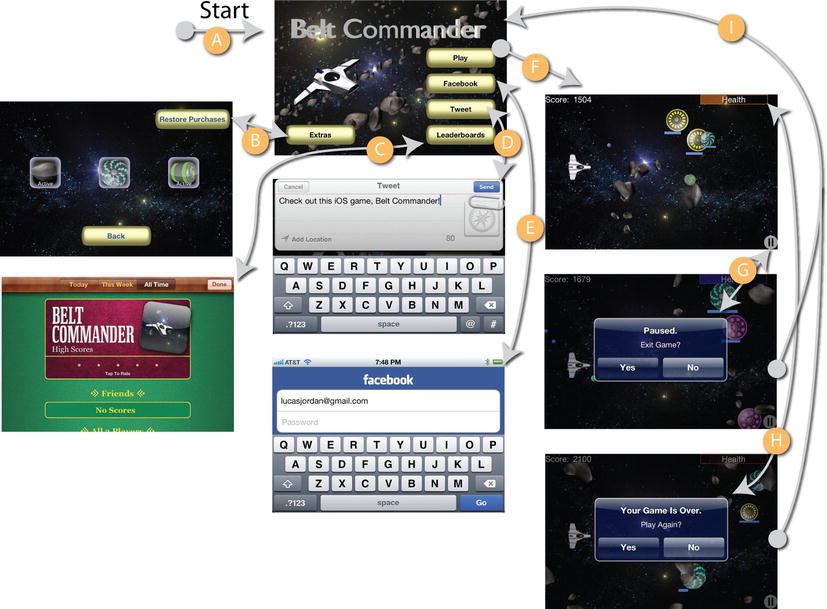
Figure 12-6. Application flow
In Figure 12-6, we see the eight screens of the game. The arrows indicate how the user navigates from one view to another. Each transition is lettered as described in the following:
The application starts at A, the Start view. This is the first thing the user sees.
By pressing the Extras button, the user is taken to the Extras view, where he can select which actors are in the game: asteroids, saucers, and power-ups. The user returns to the Start view by clicking the Back button.
Clicking the Leaderboard button brings up the standard Leaderboard view. Clicking Done on the upper right returns the user to the Start view.
The Tweet button brings up the Twitter dialog. While not technically a separate view, since the Tweet dialog is a pop-up, it still takes up most of the screen. The Send or Cancel button returns the user to the Start view.
Clicking the Facebook button will exit the app and bring up a Facebook authentication screen. When the user enters her credentials, he is brought back to the Start view.
Clicking the Play button starts the game proper. In the Action view, the user plays the game. He moves the ship up and down, trying to score as many points as possible by destroying asteroids and saucers.
While playing, the user may click the Pause button to stop the game. When the Pause button is pressed, a dialog pops up asking the user if he would like to exit the game or not. This dialog is also brought up if the application is sent to the background while the game is in progress.
When the ship’s health reaches zero, the game ends. When this happens, a dialog is presented asking the user if he would like to play again or not.
If the user has paused the game and selected not to end it, he is brought back to the Start view. Similarly, when the game is over, if the user chooses not to play again, he is brought back to the main view.
We have looked at the views that make up the game and have a sense of how the game flows from view to view. Next, let’s take a look at how this navigation is implemented, starting with the XIB files that make up the game.
Implementing View-to-View Navigation
We have gone over the views involved in Belt Commander. Let’s take a closer look at the how the game is initialized, at the XIB files that make up the game, and how we handle navigation programmatically. This information will help you when you are building your own game, as there are a number of different techniques at work here. Let’s start by looking at how we launch the application.
Launching the Application
Like all iOS applications, the starting place is the main function found in the file main.m. However, in this application, we don’t customize that at all, so we can skip describing it. The real starting place for this application is the plist file, Belt Commander-Info.plist. Figure 12-7 shows Xcode’s representation of this file.
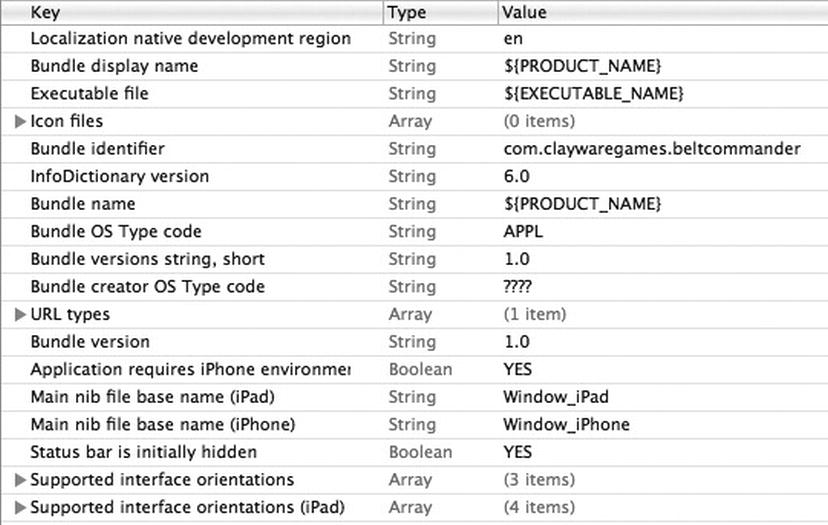
Figure 12-7. Belt Commander-Info.plist in Xcode
In Figure 12-7, we see file Belt Commander-Info.plist as presented by Xcode. In this file, we see a pretty standard setup for an iOS application. We see that the Bundle identifier is com.claywaregames.beltcommander that corresponds to the application we created in iTunes Connect that supports in-app purchases and Game Center. What is a little different in this file from the other samples in this book is that we specify the starting XIB files in this file. The starting XIB files are indicated by the key values “Main nib file base name (iPad)” and “Main nib file base name (iPhone).” These keys are set to the values “Window_iPad” and “Window_iPhone,” respectively. By setting these values, we are requesting that the iOS application automatically use these files to create our main UIWindow and call makeKeyAndVisible on it. This removes the need for us to put any code in our application delegate’s application:didFinishLaunchingWithOptions: task. To understand how the other objects in the application relate to each other, let’s take a look at XIB files for this game.
The XIB Files
The XIB files in this application bind instances of the key classes together and allow them to coordinate. While this application is a universal one, and runs on both the iPhone and iPad, we are going to focus on the iPhone XIB file because the iPad version is different only in layout. By looking at the contents of this XIB file, we will understand how the application is put together. An overview is shown in Figure 12-8.
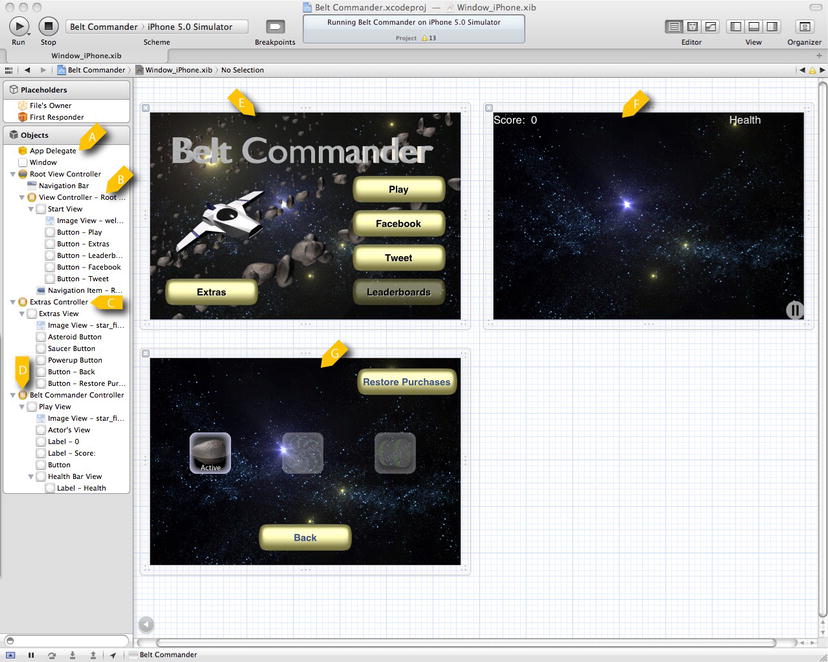
Figure 12-8. Overview of iPhone XIB file
In Figure 12-8, we see the XIB file for the iPhone version of this game fully expanded. On the left, at item A, we see a reference to the main UIWindow of the game, as well as a reference to the AppDelegate. The view controller at item B is an instance of the class RootViewController, which is a subclass of UINavigationController. The view controller RootViewController is wired up to the Window so that it is the root controller; this causes the RootViewController's top-level UIViewController to be displayed. In short, everything is wired up so the view at item E is displayed at launch.
In Figure 12-8, we see that there are two other UIViewControllers: Extras Controller at item C and Belt Commander Controller at item D. The object Extras Controller corresponds to the view at item G, while the object BeltCommanderController corresponds to the view at item G. Both of these controllers have an IBOutlet in our class RootViewController so they can be referenced. In fact, many of the objects in the XIB file are connected to the RootViewController, as shown in Listing 12-1.
Listing 12-1. RootViewController.m
@interface RootViewController : UINavigationController<BeltCommanderDelegate,
UIAlertViewDelegate, GKLeaderboardViewControllerDelegate>{
    IBOutlet UIViewController* welcomeController;
    IBOutlet BeltCommanderController* beltCommanderController;
    IBOutlet ExtrasController *extrasController;
    IBOutlet UIButton *leaderBoardButton;

    IBOutlet UIButton *tweetButton;
    IBOutlet UIButton *facebookButton;

    UIAlertView* newGameAlertView;
    UIAlertView* pauseGameAlerTView;

    GKLocalPlayer* localPlayer;

    ACAccountStore* accountStore;
    ACAccount* facebookAccount;

    BOOL isPlaying;
}
-(void)doPause;
-(void)endOfGameCleanup;

-(void)initGameCenter;
-(void)initFacebook;
-(void)initTwitter;

-(void)notifyGameCenter;
-(void)notifyFacebook;

-(BOOL)handleOpenURL:(NSURL *)url;

-(void)applicationWillResignActive;
-(void)applicationDidBecomeActive;
@end
In Listing 12-1, we see the header for the class RootViewController. The class RootViewController is responsible for managing the application state that does not involve the actual playing of the game. This includes transitioning from view to view, handling the application startup, and managing the social services from Chapter 9. As we can see in Listing 12-1, we have IBOutlets for the three UIViewControllers: welcomeController, beltCommanderController, and extrasController.
Listing 12-1 also shows that the class RootViewController has IBOutlets for two buttons: leaderBoardButton and tweetButton. A reference to these objects is required, as they will be enabled or disabled at runtime. The GKLocalPlayer is used to manage Game Center and the ACAccountStore and ACAccount objects are used to manage interactions with Facebook. Let’s take a look at how we handle the navigation across views.
View Navigation
In order to change views when a user clicks a button, we have created a number of IBAction tasks in the implementation of RootViewController and are wired up in the XIB file to the corresponding buttons. Listing 12-2 shows two of these IBAction tasks.
Listing 12-2. RootViewController.m (extrasButtonClicked: and playButtonClicked:)
- (IBAction)extrasButtonClicked:(id)sender {
    [self pushViewController:extrasController animated:YES];
}
- (IBAction)playButtonClicked:(id)sender {
    [self pushViewController:beltCommanderController animated:YES];
    [beltCommanderController doNewGame: [extrasController gameParams]];
}
In Listing 12-2, we see two tasks responsible for handling a button click. The task extrasButtonClicked: is called when the user presses the Extras button on the Start view. This task simply uses task pushViewController:animated:, as defined by UINavigationController, to present the view associated with extrasController. Similarly, the task playButtonClicked: uses the same task to display the view associated with beltCommandController, as well as calls doNewGame: on beltCommanderController. Listing 12-3 shows how we navigate back to the Start view.
Listing 12-3. RootViewController.m (backFromExtras:)
- (IBAction)backFromExtras:(id)sender {
    [self popViewControllerAnimated:YES];
}
In Listing 12-3, we see the task backFromExtras: that is called when the user clicks the Back button on the Extras view. To navigate back to the Start view, we call popViewControllerAnimated: to remove the Extras view showing the Start view. The task popViewControllerAnimated: is defined by UINavigationController, of which RootViewController is a subclass.
There is one last piece of code that handles navigation, and that is the code that responds to the two dialogs that appear on the game view, as shown in Listing 12-4.
Listing 12-4. RootViewController.m (alertView:clickedButtonIndex:)
- (void)alertView:(UIAlertView *)alertView   clickedButtonAtIndex:(NSInteger)buttonIndex{
    if (alertView == pauseGameAlerTView){
        if (buttonIndex == 0) {
            [self endOfGameCleanup];
            [self popViewControllerAnimated:YES];
        } else {
            [beltCommanderController setIsPaused:NO];
        }
    }
    if (alertView == newGameAlertView){
        if (buttonIndex == 0) {
            [beltCommanderController doNewGame: [extrasController gameParams]];
        } else {
            [self popViewControllerAnimated:YES];
        }
    }
}
In Listing 12-4, we see the task alertView:clickedButtonAtIndex:, which is defined by the protocol UIAlertViewDelegate and implemented by RootViewController. In this task, we first check which UIAlertView was clicked.
If alertView is equal to pauseGameAlertView, then we know that the user has clicked the Pause button on the Game view and is responding to the dialog that is presented. If the user clicks Yes on the dialog (buttonIndex == 0), then the user wants to exit the current game. We call endOfGameCleanup and popViewControllerAnimated:; the latter, of course, returns us to the Start view. The task endOfGameCleanup is responsible for reporting on the social media services, and we will look at it shortly. If the user had clicked No, we simply unpause the game by calling setIsPaused: and beltCommanderController and pass in NO.
In Listing 12-4, there are two possible UIAlertViews that might be responsible for alertView:clickedButtonAtIndex: being called. We looked at the case for the UIAlertView pauseGameAlertView; the other option is that the newGameAlertView is responsible. This UIAlertView is displayed at the end of a game when the user’s ship has lost all of its health. This dialog allows the user to simply start a new game or return to the Start view. As can be seen, starting a new game is as simple as calling doNewGame: on beltCommanderController. To return to the Start view, we use the now familiar task popViewControllerAnimated:.
The code responsible for displaying the two different UIAlertView is very similar; let’s just look at one of those to understand it. The code that displays the UIAlertVIew at the end of a game is shown in Listing 12-5.
Listing 12-5. RootViewController.m (gameOver:)
-(void)gameOver:(BeltCommanderController*)aBeltCommanderController{
    if (newGameAlertView == nil){
        newGameAlertView = [[UIAlertView alloc] initWithTitle:@"Your Game Is         Over." message:@"Play Again?" delegate:self cancelButtonTitle:@"Yes"         otherButtonTitles:@"No", nil];
    }
    [newGameAlertView show];

    [self endOfGameCleanup];
}
In Listing 12-5, we see the task gameOver: as implemented by RootViewController. The task gameOver: is defined by the protocol BeltCommanderDelegate, which is the delegate protocol used to communicate between the RootViewController and the BeltCommanderController when a game starts or stops. That is to say, the RootViewController is a delegate of beltCommanderView. This relationship is defined in the XIB file. In this case, we are looking at the code that is called when the game is over. In this task, we lazily create the UIAlertView newGameAlertView, specifying the text to be displayed and that self should be used as the delegate. To display the UIAlertView we call show, causing the view to pop up on the user’s screen. The last thing we do is call endOfGameCleanup, as shown in Listing 12-6.
Listing 12-6. RootViewController.m (endOfGameCleanup)
-(void)endOfGameCleanup{
    isPlaying = NO;
    [self notifyGameCenter];
    [self notifyFacebook];
}
In Listing 12-6, we see the task endOfGameCleanup that is called when the game ends, either by the user’s losing all her ship’s health or by quitting her active game from the pause dialog. In this task, we record that we are no longer playing by setting isPlaying to NO. The tasks notifyGameCenter and notifyFacebook inform those two services of the user’s score, and are described in Chapter 9.
We have looked at how the application is organized by inspecting the XIB file, understanding the flow of the application and how we implemented it. Next, we want to look at the game itself and understand how the class BeltCommanderController, along with the Actor subclasses, creates the game.
Implementing the Game
We have looked at an overview of how the application is put together. We know how the views got on the screen and looked at the life cycle of the application. In this section, we are going to focus on just the game mechanics. We will look at how we get actors into the game, how they behave, and how they interact.
First, we will review the classes we created throughout this book to build a simple game framework. We will then explore the class BeltCommanderController and understand how it manages the game. Lastly, we will look at each actor and understand how its implementation makes it work the way that it does.
In previous chapters, we have built a collection of classes for implementing a game. We have the class GameController that is responsible for adding and removing actors from the game, as well as rendering them into the screen. We also have the class Actor that represents the characters and interactive elements of the game. Subclasses of Actor specify a Representation, a collection of Behaviors, and some custom code. The following is a review of these classes.
The class GameController is the beating heart of the game; subclasses of this class need only add Actors and animations will start happening. To customize the GameController, subclasses should implement the task applyGameLogic to perform any game-specific logic, such as add or remove Actors, check for victory or failure conditions, or anything else unique to a particular game.
In addition to updating the Actors and game logic, GameController is responsible for rendering the Actors to the screen. GameController does this in two ways. First, GameController extends UIControllerView so it has a primary UIView called view, which can be part of an applications scene. Second, GameController has a UIView called actorsView, which is the super-view for all of the UIViews that represent actors in the game. By specifying the view and actorsView in a XIB file, an instance of GameController can draw to the screen. The second way that GameController is responsible for rendering the game is by working with the Representation of each Actor to create a UIView to add as a child to actorsView. For each step of the animation, GameController changes the location, scale, and transparency for each Actor’s UIView. The key tasks for GameController are as follows:
- doSetup. In the task doSetup, a subclass of GameController should specify the subclasses of Actor that should be kept sorted by calling setSortedActorClasses:. Also, any audio files to be played should be prepared by calling prepareAudio:.
-
applyGameLogic. The task applyGameLogic is called once for every step of the animation. It is in this task that subclasses should implement all game logic, including:
- Setting end-of-game conditions
- Adding and removing Actors
- Keeping score
- Tracking achievements
- Updating heads-up display (HUD)
- Managing user input (touches, gestures, and so on)
- actorsOfType:. The task actorsOfType: is used inside of the applyGameLogic to find all Actors of a particular class. The type of actor requested needs to be specified during doSetup with the setSortedActorClasses: task.
- addActor:/removeActor:. The tasks addActor: and removeActor: are how actors get added and removed from the game. These tasks collect all Actors added or removed during an animation step, and then apply those changes all at once at the end of the animation loop. This prevents modification of the collections that hold the actors, so any subclass of Actor or GameController can add or remove any Actor during their apply task.
Actor
The Actor class represents anything that is dynamic in a game. In our example, the ship, asteroids, saucers, power-ups, health bars, particles, and bullets are all actors. When creating a game, a subclass of GameController will handle the big details about the game, but it is the subclasses of Actor that provide the unique and interesting behaviors of each item in the game. In practice, each Actor in the game is a composition of its properties, how it is drawn (Representation), how it behaves (Behaviors), and the custom code defined in a subclass. We will look at Representations and Behaviors after we look at the class Actor. The following is a list of the properties of an Actor and what each means.
- long actorId: The actorId is a unique number assigned to each Actor. This value can be used to provide a soft reference to Actors in the game.
- BOOL added/removed: The properties added and removed can be used to test if an Actor has successfully been added or removed from a game.
- CGPoint center: The property center defines the location of the center of the Actor in game coordinates.
- float rotation: The rotation property indicates the rotation of the Actor in radians.
- float radius: The radius of the Actor describes how big it is. Together, center and radius describe the area of the game occupied by the Actor.
- NSMutableArray* behaviors: The behaviors property is a collection of Behavior objects. A Behavior object describes some sort of aspect of an Actor. It might describe how it moves or when it is removed from the game. Each Behavior in the behaviors array will be applied to the Actor on each step of the game.
- BOOL needsViewUpdated: Throughout a step of the game, an Actor may undergo changes that require its UIView to be updated. These might include advancing the image that should represent it or a change in state. This flag informs the GameController that work is required to synchronize the Actor with its representation.
- NSObject<Representation> representation: Each Actor in the game requires an object conforming to Representation to describe how to create a UIView to represent it in the game. Representations are discussed in the next section.
- int variant: It is common to have Actors in a game that differ only slightly. Perhaps they are a different color or have a slightly different behavior. Since this is a common requirement, the property variant provides a simple way of distinguishing Actors of the same class.
- int state: The property state is used to describe the state of an Actor. This state can be anything, and is up to the subclass to define exactly what this indicates. The property state and variant work with the class ImageRepresentation to figure out which image should be used for an Actor.
- float alpha: The property alpha describes how opaque an Actor is. An Actor with an alpha of 0.0 is fully transparent, while an alpha value of 1.0 is fully opaque. Transparent regions in an Actor's representation are unaffected.
- BOOL animationPaused: The property animationPaused is used to pause any animation that is being applied to the Actor. It is up to the implementation of the animation to honor this value. ImageRepresentation will not update the image, in a sequence of images, used to represent an Actor if this property is true.
In addition to the properties that define an Actor, there are a handful of tasks that come with the class Actor. These are the following:
- -(id)initAt:(CGPoint)aPoint WithRadius:(float)aRadius AndRepresentation:(NSObject<Representation>*)aRepresentation: This task is the designated constructor for the class Actor. It requires that each Actor has a center, a radius, and a representation. All subclasses of Actor should be sure that this task gets called when the Actor is created.
- -(void)step:(GameController*)controller: The task step: is called once per game step by the GameController. Subclasses of Actor can provide custom logic in their implementation of this task.
- -(BOOL)overlapsWith: (Actor*) actor: The task overlapsWith: is used to test if an Actor occupies any of the same space as another Actor. This can be used to implement simple collision detection.
- -(void)addBehavior:(NSObject<Behavior>*)behavior: The task addBehavior: is a utility method for adding Behaviors to an Actor in a single step.
Representation
Each Actor has to describe how the GameController should render it. The protocol Representation (defined in Actor.h) describes how a GameController can get and update a UIView for each Actor. There are two concrete implementations of Representation: ImageRepresentation and VectorRepresentation. The class ImageRepresentation uses UIImages and UIImageViews to create a UIView suitable for presenting the Actor. The class VectorRepresentation draws the Actor dynamically using Core Graphics. The details for how ImageRepresentation are covered in Chapter 6, while the implementation of VectorRepresentation is covered Chapter 7. There are two tasks defined by the protocol:
- -(UIView*)getViewForActor:(Actor*)anActor In:(GameController*)aController: This task is called once shortly after an Actor is added to a GameController. It is responsible for creating and returning a UIView suitable for rendering the Actor.
- -(void)updateView:(UIView*)aView ForActor:(Actor*)anActor In:(GameController*)aController: This task is called whenever an Actor's needsViewUpdated property is true. This task should make any changes to the UIView required to make it accurately represent the Actor.
When creating a game, a lot of different Actors will require very similar code to implement. While it is definitely possible to construct a class hierarchy that provides just the right code for each class, I find this cumbersome. One solution is the Behavior protocol and the classes that implement it. Each instance of the protocol Behavior is responsible for applying some logic to an Actor, one per step. The protocol Behavior defines a single task:
- -(void)applyToActor:(Actor*)anActor In:(GameController*)gameController;
- The task applyToActor:In: is implement by the classes that conform to this protocol to provide some sort of behavior to the Actors they are attached to. There are several implementations of Behavior included in the game Belt Commander; those are:
- LinearMotion: The class LinearMotion is used to move an Actor in a straight line during the game. The class provides several utility constructors to make it easy to define the motion based on a direction or a target point.
- ExpireAfterTime: The class ExpireAfterTime is used to remove an Actor after a given number of steps. This is handy for Particles, where you want to create them, add them to the scene, and then forget about them.
- FollowActor: This class is used to keep one Actor at a fixed distant from another Actor. This is used by the HealthBars attached to the Saucers to keep them together.
Now that we have reviewed the core classes used to create the game Belt Commander, it is time to look at the subclasses of the classes we just described to understand how we can extend and customize them to create the game Belt Commander.
Understanding BeltCommanderController
In previous chapters, we have extended the class GameController to make our examples. To create a whole game, we are going to do the same thing by creating the class BeltCommanderController. The class BeltCommanderController is responsible for managing the Actors in the game, determining the end condition, updating the health and score, and interpreting input from the user. Let’s take a look again at the action in the game and review how the game is played and what challenges confront the player. A screenshot of the game is shown in Figure 12-9.
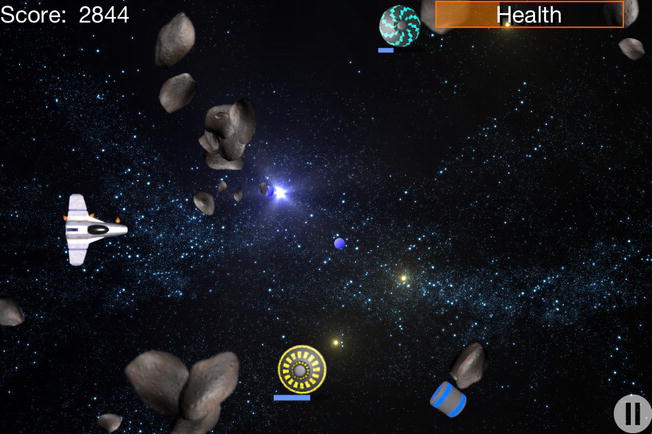
Figure 12-9. Belt Commander, mid-game
In Figure 12-9, we see the game Belt Commander. The player controls the ship on the left by tapping the screen. The ship will move to the same height as the tap. The ship constantly fires bullets to the right, as represented by the circle just to the lower right of the bright star in the background. From the right, moving left, come an endless wave of asteroids. If a bullet collides with an asteroid, the asteroid breaks into smaller parts, and the score is incremented. If an asteroid collides with the ship, the asteroid is destroyed, but the ship’s health is decremented. To add a little chaos to the game, saucers appear on the right side of the game and travel up and down, firing bullets at the ship. The bullets will destroy asteroids, but their main purpose is to hit the ship and reduce its health. To help out our poor ship, three types of power-ups come from the right and travel to the left. If the ship is lucky enough to be in the path of a power-up, it gains its benefit. These benefits are increased health, more powerful bullets, and extra points. The game continues until the ship’s health is reduced to zero.
Now that we have an overview of how the game is played, we are going to look at the class BeltCommanderController, first examining at how a new game is set up and then looking at the code that runs every step of the game.
BeltCommanderController: Getting Started
To understand how this game is implemented, we need to understand how the BeltComanderController gets set up to play the game. The following section provides an overview of the initial code required to get a game up and running. Let’s start with the header file for the class BeltCommanderController, as shown in Listing 12-7.
Listing 12-7. BeltCommanderController.h
@class BeltCommanderDelegate, BeltCommanderController;

@protocol BeltCommanderDelegate
@required
-(void)gameStarted:(BeltCommanderController*)aBeltCommanderController;
-(void)gameOver:(BeltCommanderController*)aBeltCommanderController;
@end

@interface BeltCommanderController : GameController{
    IBOutlet HealthBarView* healthBarView;
    IBOutlet UILabel* scoreLabel;

    GameParameters* gameParameters;
    Viper* viper;

    //achievement tracking
    int asteroids_destroyed;
}
@property (nonatomic, retain) IBOutlet NSObject<BeltCommanderDelegate>* delegate;
-(void)doNewGame:(GameParameters*)aGameParameters;
-(void)tapGesture:(UITapGestureRecognizer*)tapRecognizer;

-(void)doEndGame;
-(void)doAddNewTrouble;
-(void)doCollisionDetection;
-(void)doUpdateHUD;
-(void)checkAchievements;

-(Viper*)viper;
@end
In Listing 12-7, we see the header file for the class BeltCommanderController. As expected, the class extends GameController. It also defines a protocol called BeltCommanderDelegate. This protocol is implemented by RootViewController and is used to pass game state. There are two IBOutlets associated with this class. The first, HealthBarView, is the UIView subclass that is responsible for rendering the health bar at the upper right of the screen. The second, scoreLabel, is used to display the player’s score as the game is played.
In Listing 12-7, we see that there is a GameParameters object called gameParameters. This object is used to determine which types of Actors should be included in the game. The idea is that this game would be free and the player could purchase different types of Actors to make it more fun (and profitable). Such in-app purchases are discussed in Chapter 10. For this chapter, we are assuming all in-app purchases have been made.
The Viper object is used to keep a reference to the ship in the game. Since we will want easy access to this object, it makes sense just to keep a pointer to it, instead of searching for it in with the other Actors. The last field is called asteroids_destroyed and is used to track achievements, as described in Chapter 9.
There are a number of tasks associated with the class BeltCommanderController. The only ones we need to worry about at this point are doNewGame: and tapGesture:; the others we will cover as we go through the implementation. The task doNewGame: is called by RootViewController to start a new game—we will look at the implementation shortly. The task tapGesture: is called when a UITapGestureRecognizer detects a tap on the screen; we will see this shortly as well. More about how gestures work is covered in Chapter 8. Let’s focus on the setup first.
There are few steps that we must take to get BeltCommanderController set up. Since we know that BeltCommanderController extends GameController, we know that it should implement a doSetup task, as shown in Listing 12-8.
Listing 12-8. BeltCommanderController.m (doSetup)
-(BOOL)doSetup{
    if ([super doSetup]){
        [self setGameAreaSize:CGSizeMake(480, 320)];
        [self setIsPaused:YES];

        NSMutableArray* classes = [NSMutableArray new];
        [classes addObject:[Saucer class]];
        [classes addObject:[Bullet class]];
        [classes addObject:[Asteroid class]];
        [classes addObject:[Powerup class]];
        [self setSortedActorClasses:classes];

        UITapGestureRecognizer* tapRecognizer = [[UITapGestureRecognizer alloc] initWithTarget:self action:@selector(tapGesture:)];

        [self prepareAudio: AUDIO_BLIP];
        [self prepareAudio: AUDIO_GOT_POWERUP];
        [self prepareAudio: AUDIO_VIPER_EXPLOSION];
        [self playBackgroundAudio: AUDIO_BC_THEME];

        [actorsView addGestureRecognizer:tapRecognizer];
        return YES;
    }
    return NO;
}
In Listing 12-8, we see the task doSetup as defined by the class BeltCommanderController. In this task, we define the size of the game to be 480x320, which happens to be the native size of the iPhone screen in points. We also set the property isPaused to YES, so nothing is animating until doNewGame: is called later. The next step is to indicate which classes of Actors we want easy access to as the game progresses. In this case, we specify the classes Saucer, Bullet, Asteroid, and Powerup. Keep in mind that there is only one Viper in the game, and we have a reference to it in the header file. The last thing we do is to create a UITapGestureRecognizer and add it to actorsView. In this way, the task tapGesture: will be called when the user taps on the screen. Before any of that can happen, we need to understand how a new game is created.
A New Game
Whether we are running the first game or the hundredth, they all start with the task doNewGame :, as shown in Listing 12-9.
Listing 12-9. BeltCommanderController.m (doNewGame:)
-(void)doNewGame:(GameParameters*)aGameParameters{
    gameParameters = aGameParameters;

    [self removeAllActors];

    [self setScore:0];
    [self setStepNumber:0];
    [self setScoreChangedOnStep:0];

    viper = [Viper viper:self];
    [self addActor:viper];

    asteroids_destroyed = 0;

    [self setIsPaused:NO];
    [delegate gameStarted:self];
}
In Listing 12-9, we see the task doNewGame:, which is called by the RootViewController to start a new game. In this task, we set the gameParameters for future reference. Then we have to reset this object so that it is ready for a new game. To remove all Actors, we call removeAllActors. We also want to reset the score, the number of steps, and the number of Asteroids destroyed. We also create a Viper object and store it in the variable viper. Once we are reset, we set isPaused to NO and inform the delegate that the game has started. Let’s take a look at how we handle input and then we will be ready to move beyond the setup.
As soon as isPaused is set to NO, the game is up and running. At this point, the only actor in the game is the Viper. Let’s take a moment to understand how we intercept input to make it move before the Asteroids and aliens show up. The task tapGesture: is shown in Listing 12-10.
Listing 12-10. BeltCommanderController.m (tapGesture:)
-(void)tapGesture:(UITapGestureRecognizer*)tapRecognizer{
    if (![self isPaused]){

        CGSize gameSize = [self gameAreaSize];
        CGSize viewSize = [actorsView frame].size;
        float xRatio = gameSize.width/viewSize.width;
        float yRatio = gameSize.height/viewSize.height;

        CGPoint locationInView = [tapRecognizer locationInView:actorsView];
        CGPoint pointInGame = CGPointMake(locationInView.x*xRatio, locationInView.y*yRatio);
        [viper setMoveToPoint: pointInGame within:self];
    }
}
In Listing 12-10, we see the task tapGesture: that is called when the user taps the screen. In this task, after checking if we are paused, we have to convert the point of the touch into game coordinates. On the iPhone, this is not strictly necessary because the view actorsView is the same number of points wide and high as the size of our game. However, when we play this game on the iPad, the actorsView is 1024x682, while our game is still 640x480. In order to convert from one coordinate space to the other, we divide the game width by the width of actorsView and multiply it by the X location of the touch. We repeat the process for the height and Y value. Once we have the point figured out, we call setMoveToPoint:within: on Viper, which sets it in motion. We will look at the implementation of setMoveToPoint:within: when we take a closer look at the class Viper in the next section.
We have covered all there is to know about getting BeltCommanderController setup to play the game. Everything is ready to start processing user input and adding new Actors to the mix. The following section describes how BeltCommanderController checks for an end condition, adds Actors, and performs other task appropriate for the BeltCommanderController class.
BeltCommanderController, One Step at a Time
We have our BeltCommanderController class all set up and ready to play the game. We are going to look at the code that is run for every step to manage the overall state of the game. We will look at how the end condition is tested for, how we add new Actors to the scene, and how we manage the interactions between the Actors. Since BeltCommanderController is a subclass of GameController, we start out in game logic in the task applyGameLogic, as shown in Listing 12-11.
Listing 12-11. BeltCommanderController.m (applyGameLogic)
-(void)applyGameLogic{
    if ([viper health] <= 0.0f){
      [self playAudio:AUDIO_VIPER_EXPLOSION];
        [self doEndGame];
    } else {

        [self doAddNewTrouble];
        [self doCollisionDetection];
        [self doUpdateHUD];

        if ([self stepNumber]%30 == 0){
            [self checkAchievements];
        }
    }
}
In Listing 12-11, we see the task applyGameLogic that is called once for every step of the game. The first thing we do is check to see if the Viper’s health is below 0.0. If it is, we play the explosion sound and end the game—simple as that. If the Viper is still alive, we continue by calling doAddNewTrouble, doCollisionDetection, and doUpdateHUD. The call to checkAchievements is done only once every 30 steps. This is done for performance reasons—we don’t really want to make these extra calls for every step. This does have the drawback that achievements might be reached by the player but not recorded. For a more sophisticated game, we would designate which achievements are tested when.
We just listed off a good number of tasks, and we will take each in turn, starting with the task doEndGame, as shown in Listing 12-12.
Listing 12-12. BeltCommanderController.m (doEndGame)
-(void)doEndGame{
    [self setIsPaused:YES];
    [delegate gameOver:self];
}
In Listing 12-12, we see the very simple task doEndGame where we simply pause the game and call gameOver: on the delegate. The task gameOver: is implemented by RootViewController and can be seen in Listing 12-5. Next, let’s review how Actors are added to the game.
We know from experience that Actors are added by calling addActor :. However, to make a game, we have to include some logic that dictates when and how an Actor is added. Let’s continue and see how we add new Actors to the game in the task doAddNewTrouble, as shown in Listing 12-13.
Listing 12-13. BeltCommanderController.m (doAddNewTrouble)
-(void)doAddNewTrouble{
    if ([gameParameters includeAsteroids] && arc4random() % (5*60) == 0){
        if ([[self actorsOfType:[Asteroid class]] count] < 20){
            [self addActor:[Asteroid asteroid:self]];
        }
    }
    if ([gameParameters includeSaucers] && arc4random() % (10*60) == 0){
        if ([[self actorsOfType:[Saucer class]] count] < 3){
            [self addActor:[Saucer saucer:self]];
        }
    }
    if ([gameParameters includePowerups] && arc4random() % (20*60) == 0){
        [self addActor:[Powerup powerup:self]];
    }
}
In Listing 12-13, we see the task doAddNewTrouble that is responsible for adding new Actors to the game. For each of three types of Actors we might add, we first check to see if gameParameters indicates that we should add it. If gameParameters indicates that we should add an Actor of a particular type, we perform a random check to see if we actually add it. For example, Asteroids have a 1 in 300 chance to be added. To add each Actor we create it and call addActor:. The Actor’s constructor handles the details of how and where each Actor is created. We will now move on and examine how Actors interact with each other.
Now we know how each Actor is added to the scene. Let’s move on and look at how they interact. If we consider the five main Actors in this game, there are several interactions that must be considered, as follows:
- Bullets and Asteroids
- Asteroids and the Viper
- Bullets and the Viper
- Bullets and Saucers
- Powerups and the Viper
These interactions are handled in the task doCollisionDetection, the first part of which is shown in Listing 12-14.
Listing 12-14. BeltCommanderController.m (doCollisionDetection, part 1)
-(void)doCollisionDetection{
    NSSet* bullets = [self actorsOfType:[Bullet class]];
    NSSet* asteroids = [self actorsOfType:[Asteroid class]];
    NSSet* saucers = [self actorsOfType:[Saucer class]];
    NSSet* powerups = [self actorsOfType:[Powerup class]];

    for (Asteroid* asteroid in asteroids){
        for (Bullet* bullet in bullets){
            if ([bullet overlapsWith:asteroid]){
                [bullet decrementDamage: self];

                asteroids_destroyed++;
                [asteroid doHit:self];
                [self incrementScore: [asteroid level]*10];
                break;
            }
        }
        if ([asteroid overlapsWith:viper]){
            [viper decrementHealth: [asteroid level]*2];

            Shield* shield = [Shield shieldProtecting:viper From: asteroid];
            [self addActor:shield];

            asteroids_destroyed++;
            [asteroid doHit:self];
        }
    }
In Listing 12-14, we see the first part of the task doCollisionDetection where we handle the interaction concerning Asteroids. The first thing we do in this task is to get a reference to all of the different Actors we are going to need to interact with. Once we have reference to all of the Asteroids, Bullets, and the Viper, we can start testing to see if there are collisions. Inside the outermost loop in Listing 12-14, we start by testing to see if each Asteroid overlaps with each Bullet. If they do, we have the bullet decrement the Asteroid’s damage, which usually removes the Asteroid from the game, but more on that later. We also record that we have destroyed another Asteroid before calling doHit; on the Asteroid. Lastly, we increment the score.
In Listing 12-14, after we have considered the relation between each Asteroid and Bullet, we check to see if the Asteroid is overlapping the Viper. If it is, we decrement the health of the Viper and add a Shield to the scene. The Shield is an Actor that is just decoration and has no game function beyond that; it looks like a shield went up to protect the spaceship.
Let’s look at the rest of the doCollisionDetection task and understand how the rest of the inter-Actor relationships are handled. The task continues in Listing 12-15.
Listing 12-15. BeltCommanderController.m (doCollisionDetection, part 2)
    for (Bullet* bullet in bullets){
        if ([[bullet source] isKindOfClass:[Saucer class]]){
            if ([viper overlapsWith: bullet]){
                [viper decrementHealth: [bullet damage]];

                Shield* shield = [Shield shieldProtecting:viper From: bullet];
                [self addActor:shield];

                [self removeActor:bullet];
                break;
            }
        } else {
            for (Saucer* saucer in saucers){
                if ([saucer overlapsWith: bullet]){
                    [saucer decrementHealth:[bullet damage]];
                    Shield* shield = [Shield shieldProtecting:saucer From:bullet];
                    [self addActor:shield];
                    [self removeActor:bullet];
                    break;
                }
            }
        }
    }

    for (Powerup* powerup in powerups){
        if ([powerup overlapsWith:viper]){
            [self playAudio:AUDIO_GOT_POWERUP];
            [powerup doHitOn:viper in:self];
        }
    }
}
In Listing 12-15, we continue looking at the task doCollisionDetection. While iterating over all of the Bullets, we start by considering the interactions between Bullets and the Vipers. We do this by checking the source property on the Bullet. If the source was a Saucer, then the Bullet was intended for the Viper and cannot hurt a Saucer. If the Bullet overlaps with the Viper, we decrement the Viper's health, add a Shield, and remove the Bullet from the game.
If the Bullet was not shot by a Saucer, it must have come from the Viper. So we check to see if the Bullet overlaps with any of the Saucers. If it does, we decrement the health of the Saucer, add a Shield to the Saucer, and remove the Bullet.
The last relationship we have to consider in doCollisionDetection is that between Powerups and the Viper. We iterate over all of the Powerups in the game and check if they overlap. If they do, we call doHitOn:in: on the Powerup to apply the bonus. The implementation of doHit:in: will be described when we consider the Powerup class in detail.
We have now looked at all of the interactions between the different Actors. Before looking at each of the different Actor classes, let’s take a look how we update the score and the health bar on the screen.
Updating the HUD
For every step of the game, the score or the health meter might change. Collectively, these two components are called the heads-up display (HUD). Looking back to Listing 12-7, we see that these two components are connected to the BeltCommanderController though an IBOutlet. We see that the scoreLabel is a simple UILabel, but the class HealthBarView is unfamiliar. We will discuss the class HealthBarView in a moment; first, let’s look at the code that updates these components in the task doUpdateHUD, as shown in Listing 12-16.
Listing 12-16. BeltCommanderController.m (doUpdateHUD)
-(void)doUpdateHUD{
    if ([self stepNumber] == [self scoreChangedOnStep]){
        [scoreLabel setText: [[NSNumber numberWithLong:[self score]] stringValue] ];
    }
    [healthBarView setHealth:[viper health]/[viper maxHealth]];
}
In Listing 12-16, we see the task doUpdateHUD that is called for every step of the game. In this task, we check to see if the current stepNumber is equal to the property scoreChangedOnStep. The property scoreChangedOnStep is the value of stepNumber when the score was last updated. So, if stepNumber is equal to scoreChangedOnStep, we know that the score was changed in this step and, hence, scoreLabel needs to be updated. To update scoreLabel, we simply call setText: and pass in an NSString version of the score.
In Listing 12-16, we also call setHealth: on healthBarView to update how the health bar is drawn. The object healthBarView is of type HealthBarView, which is simply a UIView with a custom drawRect: task, as shown in Listing 12-17.
Listing 12-17. HealthBarView.m (drawRect:)
- (void)drawRect:(CGRect)rect
{
    [self setDefaults];
    int index = 0;

    float marker = [[percents objectAtIndex:index] floatValue];

    while (percent > marker) {
        marker = [[percents objectAtIndex:++index] floatValue];
    }

    UIColor* baseColor = [colors objectAtIndex:index];
    const float* rgb = CGColorGetComponents( baseColor.CGColor );


    UIColor* frameColor = [UIColor colorWithRed:rgb[0] green:rgb[1] blue:rgb[2] alpha:.8f];
    UIColor* healthColor = [UIColor colorWithRed:rgb[0] green:rgb[1] blue:rgb[2] alpha:.5f];

    [frameColor setStroke];
    [healthColor setFill];

    CGSize size = [self frame].size;
    CGContextRef context = UIGraphicsGetCurrentContext();

    CGRect frameRect = CGRectMake(1, 1, size.width-2, size.height-2
                                  );
    CGContextStrokeRect(context, frameRect);

    CGRect heatlhRect = CGRectMake(1, 1, (size.width-2)*percent, size.height-2);
    CGContextFillRect(context, heatlhRect);
}
In Listing 12-17, we see the task drawRect: of class HealthBarView. In this task, we draw two rectangles. The first rectangle is filled and the second is just an outline. Besides just drawing the rectangles, we want to adjust the color of the rectangles to reflect how damaged the ship is. To figure out which color we should use as our baseColor, we iterate through the NSArray percents until the percent we are going to draw is higher than the percent at index.
Once we have our base color, we create two modified colors from it. The first is the color frameColor used for the outline of the health bar; it has an alpha of 0.8. The second color is healthColor and will be used to draw the interior of the health bar; it has an alpha of 0.5.
To draw the rectangles, we first define them by calling CGRectMake. Once the CGRect is created, we call CGContextStrokeRect and CGContextFillRect, respectively.
We have looked at the class BeltCommanderController and know it works. In the next section, we will consider the four main actors and understand how they have the features that they do.
Implementing the Actors
We have reviewed how the class BeltCommanderController handles the big picture. It controls how and when Actors are created, and it manages the interactions between them. However, a lot of the functionality of the game is implemented in the classes that make up the different Actors. In this section, we will take each of the four main Actors and understand what the key customizations are to make them work the way we want. In several earlier chapters, we have implemented Actors of different types. In that light, we are only going to look at the bits of code that make each interesting feature of the Actor work. If you would like a refresher on how to implement Actors, check out Chapters 6 and 7. Also, you can always look at the full source code. Let’s start with the class Viper.
The Viper Actor
The Viper class represents the spaceship at the left side of the screen. This is the Actor that the user controls to achieve a high score. The Viper fires Bullets continuously to the right. To move the Viper, the user taps the screen, indicating a point above or below the Viper where it should travel. When traveling, the graphic changes to show thrusters on the top or bottom of the craft. Also, a Viper can intercept a Powerup that improves its guns. Lastly, the Viper has a fixed amount of health that slowly regenerates. In summary, the key features of the Viper are as follows:
- Moves to a point specified by user.
- Thrusters fire when ship moves.
- Fires bullets continuously.
- Improves quality of bullets when “powered up.”
- Has a health value that regenerates.
Let’s take a look at the source code and see how we implement these features, starting with the header file for context, as shown in Listing 12-18.
Listing 12-18. Viper.h
enum{
    VPR_STATE_STOPPED = 0,
    VPR_STATE_UP,
    VPR_STATE_DOWN,
    VPR_STATE_COUNT
};

@interface Viper : Actor <ImageRepresentationDelegate, LinearMotionDelegate>{
    LinearMotion* motion;

    long lastStepDamageWasModified;
}
@property (nonatomic) float health;
@property (nonatomic) float maxHealth;
@property (nonatomic) long lastShot;
@property (nonatomic) long stepsPerShot;
@property (nonatomic) BOOL shootTop;
@property (nonatomic) int damage;

+(id)viper:(GameController*)gameController;
-(void)setMoveToPoint:(CGPoint)aPoint within:(GameController*)gameController;
-(void)incrementHealth:(float)amount;
-(void)decrementHealth:(float)amount;
-(void)incrementDamage:(GameController*)gameController;
-(void)decrementDamage:(GameController*)gameController;
@end
In Listing 12-18, we see the header file for the class Viper. In this file, we see that we define an enum with three states. This is very much like the enums we have declared in the past to specify the state of an Actor. Looking at the properties, we can see that we have a property for health and maxHealth. We also have a property called lastShot, which will be used to keep track of whether it is time to shoot another Bullet in conjunction with the property stepsPerShot. The BOOL property shootTop is used to keep track if the next Bullet should come from the top of the Viper or not. The last property damage indicates the damage value of the next Bullet.
The tasks in Listing 12-18 are pretty mundane. There are four tasks for incrementing and decrementing health and damage. Each keeps the value of health and damage within a reasonable range. The interesting task is setMoveToPoint:within:, as shown in Listing 12-19.
Listing 12-19. Viper.m (setMoveToPoint:within:)
-(void)setMoveToPoint:(CGPoint)aPoint within:(GameController*)gameController{
    if (motion){
        [[self behaviors] removeObject: motion];
    }
    CGPoint point = CGPointMake([self center].x, aPoint.y);

    if (point.y < self.center.y){
        [self setState:VPR_STATE_UP];
    } else if (point.y > self.center.y){
        [self setState:VPR_STATE_DOWN];
    }


    motion = [LinearMotion linearMotionFromPoint:[self center] toPoint:point AtSpeed:1.2f];
    [motion setDelegate:self];
    [motion setStopAtPoint:YES];
    [motion setPointToStopAt:point];

    [motion setStayInRect:YES];
    CGSize gameSize = [gameController gameAreaSize];
    [motion setRectToStayIn:CGRectMake(63, 31, 2, gameSize.height - 63)];

    [motion setWrap:NO];

    [[self behaviors] addObject:motion];

}
In Listing 12-19, we see the task setMoveToPoint:within:. In this task, the goal is to set up a LinearMotion object that will move the Viper to the specified point. The first step is to see if we have an existing LinearMotion object stored at the variable motion. If so, we want to remove it from our active set of behaviors. The next step is to create a new CGPoint called point, based on the CGPoint that was passed in. Because this method will accept a point from any place in the game, we have to find a point that keeps the Viper horizontally fixed. Once we know where our point is, we can set our state to either VPR_STATE_UP or VPR_STATE_DOWN.
Creating the new LinearMotion is as simple as passing the Viper's current center and point to the constructor linearMotionFromPoint:toPoint:AtSpeed:. Setting self as the delegate, and telling it to stop when it reaches the specified point, further modifies the LinearMotion. The last modification is to set LinearMotion so that it stays within the specified rectangle. This prevents the Viper from going outside the bounds of the screen.
We have looked at how the Viper moves about the screen. The rest of the interesting features are implemented in the task step:, as shown in Listing 12-20.
Listing 12-20. Viper.m (step:)
-(void)step:(GameController*)gameController{
    long stepNumber = [gameController stepNumber];
    if (stepNumber - lastShot > stepsPerShot - damage){

        [gameController playAudio:AUDIO_BLIP];

        CGPoint center = [self center];
        CGSize gameSize = [gameController gameAreaSize];

        float offset;
        if (shootTop){
            offset = −15;
        } else {
            offset = 15;
        }

        CGPoint bCenter = CGPointMake(center.x + 20, center.y + offset);
        CGPoint bToward = CGPointMake(gameSize.width, bCenter.y);

        Bullet* bullet = [Bullet bulletAt:bCenter TowardPoint:bToward From:self];
        [bullet setDamage:damage];
        [gameController addActor:bullet];

        shootTop = !shootTop;
        lastShot = stepNumber;
    }
    if (stepNumber % 60 == 0){
        [self incrementHealth:1];
    }
    if (lastStepDamageWasModified + 10*60 == stepNumber){
        [self decrementDamage:gameController];
    }
}
In Listing 12-20, we see the task step:, which is called for every step of the game. We do a number of things in this task; primarily, we figure out if a Bullet should be shot and, if so, shoot it. But we also regenerate our health and keep track of whether we are still under the influence of a Powerup. To figure out if we should fire a Bullet, we see if stepNumber minus lastShot is greater than stepsPerShot minus damage. In this way, we fire more often if damage is higher, which happens when a Powerup has given the Viper extra damage.
To fire a Bullet, we figure out if the Bullet should come from the top or the bottom of the ship. Then it is just a matter of creating the CGPoints that describe its motion. Lastly, we clean up by flipping the value of shootTop and set lastShot to stepNumber.
In Listing 12-20, we also increase our health. This is done by calling incrementHealth every 60 frames. Calculating if we should decrement our damage is done by checking when our damage was last increased and calculating if 600 frames (∼10 seconds) have passed.
All in all, very little is required to get our Viper class to do what we want. Let’s move on the Asteroid class.
The Asteroid Class
The Asteroids are the primary opponents in Belt Commander (presumably, the word belt in the title refers to an asteroid belt). These Actors start on the right and travel to the left. When they reach the left side, they start over again on the right. We have used the variations of the Asteroid class several times in this book, and they are well documented. However, the feature that makes the Asteroid interesting is how it breaks up into multiple, smaller asteroids while shooting Particles. This code was modified from previous examples, and is shown in Listing 12-21.
Listing 12-21. Asteroid.m (doHit:)
-(void)doHit:(GameController*)controller{
    if (level > 1){
        int count = 1;
        float percent = arc4random()%1000/1000.0f;
        if (percent > 0.9){
            count = 3;
        } else if (percent > 0.5){
            count = 2;
        }
        for (int i=0;i<count;i++){

            float radius = [self radius];

            float rx = arc4random()%1000/1000.0*radius*2 - radius;
            float ry = arc4random()%1000/1000.0*radius*2 - radius;
            CGPoint newCenter = CGPointMake(self.center.x + rx, self.center.y + ry);

            Asteroid* newAst = [Asteroid asteroidOfLevel:level-1 At: newCenter];
            [controller addActor:newAst];
        }
    }

    int particles = arc4random()%4+1;
    for (int i=0;i<particles;i++){
ImageRepresentation* rep = [ImageRepresentation imageRepWithDelegate:[AsteroidRepresentationDelegate instance]];
        Particle* particle = [Particle particleAt:self.center WithRep:rep Steps:25];
        [particle setRadius:6];
        [particle setVariant:arc4random()%AST_VARIATION_COUNT];
        [particle setRotation: (arc4random()%100)/100.0*M_PI*2];

        LinearMotion* motion = [LinearMotion linearMotionRandomDirectionAndSpeed];
        [particle addBehavior:motion];

        [controller addActor: particle];
    }
    [controller removeActor:self];
}
In Listing 12-21, we see the task doHit: as implemented by the class Asteroid. In this task, we check to see if the Asteroid we are working with is above level one. If it is, then we need to create sub-Asteroids to replace this one. In other examples, we just randomly picked a number of child Asteroids to create. However, while play-testing Belt Commander, this was unsatisfactory because the number of Asteroids generated was way too high. To reduce the number of Asteroids created, a percentage was given for each possible value of count. So only 10 percent of the time an Asteroid will create three children Asteroids; 40 percent of the time there will be two children Asteroids; the rest of the time only a single Asteroid is created. In this way, the game is balanced, keeping it fun and playable.
The other interesting thing about the task doHit:, as shown in Listing 12-21, is how it creates Particles to emphasize the destruction of the parent Asteroid. By creating 1 to 5 Particles that look just like Asteroids and sending them out in random directions, we make a very pleasing Asteroid destruction.
Let’s continue and explore a little about the class Saucer.
The Saucer class is mostly a troublemaker. It appears at either the top or the bottom of the screen, shooting Bullets at the Viper. What makes the Saucer class troublesome is that the Bullets most often break apart Asteroids, creating an unpredictable pattern. The implementation of the Saucer class in this chapter is much likes its implementation in the other chapters. However, some modification was made to the step: task as shown in Listing 12-22.
Listing 12-22. Saucer.m (step:)
-(void)step:(GameController*)gameController{
    if (health <= 0){
        [gameController incrementScore:[self radius]*10];
        [gameController removeActor:self];
        return;
    }

    CGSize gameAreaSize = [gameController gameAreaSize];
    CGPoint center = [self center];

    if (center.y < −[self radius]){
        [linearMotion setDirection:DIRECTION_DOWN];
    } else if (center.y > gameAreaSize.height + [self radius]){
        [linearMotion setDirection:DIRECTION_UP];
    }
    if (arc4random()%180 == 0){
        BeltCommanderController* bc = (BeltCommanderController*)gameController;

        [gameController addActor:[Bullet bulletAt:[self center] TowardPoint:[bc viper].center From:self]];
    }
}
In Listing 12-22, we see the implementation of the class step: from the class Saucer. In this task, we check to see if the Saucer's health is below zero. If it is, we increment the gameControllers score and remove the Saucer from the game. The next part of the task step: is to determine if the Saucer should change direction on account of going off the screen. The last section of the task step: is responsible for shooting Bullets. In order to do this, we get the viper property of the gameController so we can target the Bullet on it. This is the first case where we had to cast gameController to BeltCommanderController. It raises the question of how we might add a general way to reference particular actors (like Viper) without depending on class definition. But, this is an exercise for another time.
The last Actor we are looking at is Powerup.
The Powerup class is pretty simple, really. It is just an Actor that moves from the right to the left. We have reviewed in other chapters how it appears to be spinning and how it flashes at the end of its life. In this game, the interesting thing is the effect it has on a Viper. This feature is implemented in the task doHitOn:in:, as shown in Listing 12-23.
Listing 12-23. Powerup.m (doHitOn:in:)
-(void)doHitOn:(Viper*)viper in:(GameController*)gameController{
    if (self.variant == VARIATION_HEALTH){
        [viper incrementHealth:30];
    } else if (self.variant == VARIATION_DAMAGE){
        [viper incrementDamage:gameController];
    } else if (self.variant == VARIATION_CASH){
        [gameController incrementScore:1000];
    }
    [gameController removeActor:self];
}
In Listing 12-23, we see the task doHitOn:in: of the class Powerup. This is called when a Powerup collides with the Viper. The implementation could not be more straightforward: we simply check the variant of the Powerup and apply the correct effect. For VARIATION_HEALTH, we increment the Viper’s health by 30. For VARIATION _DAMAGE, we increment the Viper's damage. Lastly, for VARIATION_CASH, we just increment the score by 1,000. I think the simplicity of this task is a direct byproduct of using Actors the way we do. It turned out to be a strong OO model.
Summary
In this chapter, we brought together all of the techniques we have discussed in this book. We started by exploring what our game, Belt Commander, is and how it is played. We then reviewed the flow of the application and looked at how we used the UINavigationController class to implement switching between views. We continued by looking at the class BeltCommanderController and learned how to implement the major parts of the game. Lastly, we looked at a few specific implementation choices that added life to our Actors.
When creating a game, there will always be unique code and techniques involved. Each game is one of a kind and requires a unique effort to bring it to life. It would be impossible to write a book that explains every possible challenge a game developer can face. However, many developers and game designers are going to face requirements that are very similar to what I have outlined here. It is my hope that this book shows how to work through a number of these common challenges. From the most basic issue of switching screens and saving user data, to the more complex topics like particle animations and in-app purchases, I think of this book as a map of the code and classes that are the infrastructure of a game. Ultimately, it is up to each developer to fill in the middle parts and create a new game. Thank you for reading this book.