
Doing Useful Things with Your Images
In this chapter, you will see how to improve your image-based applications by adding special effects, transforming images, and exporting apps from your apps. Additionally, you will be exposed to new user interfaces for working with images that can help you handle more-advanced use cases and build compelling user experiences.
This chapter assumes that you have a basic level of understanding about using the UIImage class to represent image data and using the UIImageView class to display image data. If you already have a firm grasp of these subjects, feel free to dive straight into this chapter and concentrate on the topics you are most interested in. If you still need a refresher, I recommend reviewing Chapter 2.
Manipulating Images
Two common tasks you will encounter when dealing with images in iOS are adjusting their size and orientation. While the UIImage class allows you to scale images at runtime depending on the frame size, this is not a permanent solution and can slow down your apps. Similarly, UIImage provides very limited (and inconsistent) control over cropping.
For a more permanent solution, you should implement what Apple calls a graphics context. A graphics context is a data type provided by Apple’s Quartz framework that represents a drawing area to which you can save information. Quartz is Apple’s drawing engine. It sits at a lower level than UIkit, allowing you more-direct control over drawing operations. You can use a graphics context to draw 2D graphics, display bitmap image data, and even display PDFs.
For all image manipulation operations, you need to do the following:
- Create a context that meets your target dimensions.
- Use CGRect and CGContext helper methods to create a frame for cropping, resizing, or rotation.
- Draw the manipulated image by placing it on the context.
- Export a snapshot of the context to a file or UIImage object.
- Close the context to indicate that your image manipulation operation has completed, and that the view is ready for another operation.
You will notice that many of the steps are related to setup and teardown. Graphics contexts are unique to each view, but shared within views. A graphics context is nil until you call the UIGraphicsGetCurrentContext helper method, which will try to retrieve the current context for the view or create a new one. To preserve your changes, you need to close the context you are working on before attempting any other operations.
You can think of a context like a physical canvas. You can add items to a canvas, rotate them within the canvas without affecting the overall size, and even cut them to fit. Drawing an object is like gluing it down and cutting away the edges. Exporting is equivalent to calling the work of art ready and sending it to a framer.
Resizing an Image
To resize an image, the main operations you need to focus on are calculating your target image size and then drawing the image within that frame. As highlighted earlier, once you are satisfied with your changes, you need to export the resulting image from the context to save it.
The most frequent reason for resizing an image is to create a thumbnail, a smaller version of an image that is appropriate for displaying in a collection of multiple items. When displaying a large number of items, you should optimize for speed by loading files that are small in both their file size and dimensions.
After you have determined the bounding size (or limits) for your thumbnail (for example, 50 pixels by 50 pixels), you scale the image down to fit this frame. To preserve the aspect ratio of the image, you pick one dimension that will remain fixed and use that to calculate a scaling factor. Figure 3-1 illustrates the process of resizing an image.
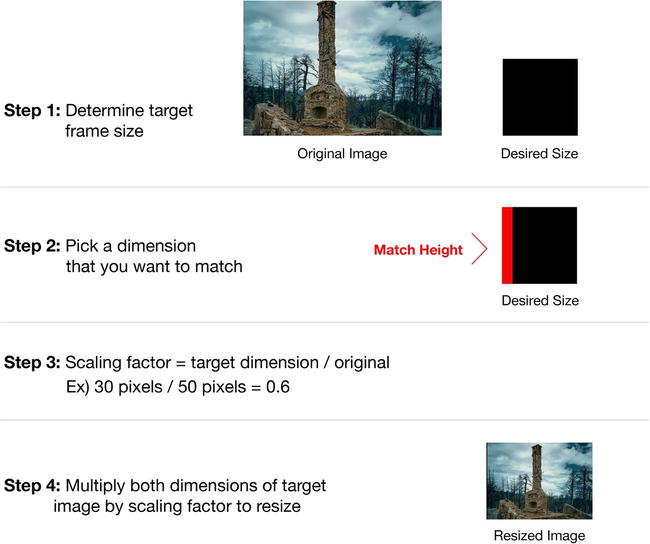
Figure 3-1. Process of resizing an image
Note Using a fixed dimension lets you create a better user experience, by making the thumbnail images all the same width or height.
You find the scaling factor by dividing your target (fixed) dimension by the matching dimension from the source image: For example, if you were matching heights, you would use the height of the image.
CGSize originalImageSize = self.originalImage.size;
float targetHeight = 150.0f;
float scaleFactor = targetHeight / originalImageSize.height;
You calculate your target frame by multiplying the remaining dimension by the scaling factor:
float targetWidth = originalImageSize.width * scaleFactor;
CGRect targetFrame = CGRectMake(0, 0, targetWidth, targetHeight);
For the final step, you create your scaled-down image by creating a context based on the target frame size and calling the [UIImage drawInRect:] instance method to draw it on the context. When you are finished, save a snapshot of the context to a UIImage object and close the context:
UIGraphicsBeginImageContext(targetFrame.size);
[self.originalImage drawInRect:targetFrame];
resizedImage = UIGraphicsGetImageFromCurrentImageContext();
UIGraphicsEndImageContext();
[self.imageView setImage:resizedImage];
Listing 3-1 provides an example of the completed method, which puts together all of these steps.
Listing 3-1. Resizing an Image
-(IBAction)shrink:(id)sender
{
    UIImage *resizedImage = nil;

    CGSize originalImageSize = self.originalImage.size;
    float targetHeight = 150.0f;
    float scaleFactor = targetHeight / originalImageSize.height;
    float targetWidth = originalImageSize.width * scaleFactor;

    CGRect targetFrame = CGRectMake(0, 0, targetWidth, targetHeight);

    UIGraphicsBeginImageContext(targetFrame.size);

    [self.originalImage drawInRect:targetFrame];

    resizedImage = UIGraphicsGetImageFromCurrentImageContext();

    UIGraphicsEndImageContext();

    [self.imageView setImage:resizedImage];
}
Remember, when resizing an image, most of your code will be dedicated to calculating the new frame size and placing it correctly within your graphics context.
Cropping an Image
Cropping an image employs a very similar process to resizing an image, except that rather than shrinking the entire image down to the target frame’s size, you need to resize it and reposition it to fit within the cropping frame. A common reason for cropping an image is to make a consistent image thumbnail (for example, a square), regardless of the source image’s dimensions.
Similar to resizing, your first step is to find a scaling factor for your image. Since you want to preserve the natural aspect ratio of your images (that is, make sure they are not distorted), you should use the smaller dimension as the baseline. From there, you can center the image in the bounding frame and crop away the excess. You can find an updated graphic illustrating the crop process in Figure 3-2.

Figure 3-2. Process of cropping an image
Listing 3-2 provides an implementation of the cropping process.
Listing 3-2. Cropping an Image
-(IBAction)crop:(id)sender
{
    UIImage *resizedImage = nil;
    CGSize originalImageSize = self.originalImage.size;
    CGSize targetImageSize = CGSizeMake(150.0f, 150.0f);
    float scaleFactor, tempImageHeight, tempImageWidth;
    CGRect croppingRect;

    BOOL favorsX = NO;

    if (originalImageSize.width > originalImageSize.height) {
        scaleFactor = targetImageSize.height / originalImageSize.height;
        favorsX = YES;
    } else {
        scaleFactor = targetImageSize.width / originalImageSize.width;
        favorsX = NO;
    }

    tempImageHeight = originalImageSize.height * scaleFactor;
    tempImageWidth = originalImageSize.width * scaleFactor;

    if (favorsX) {
        float delta = (tempImageWidth - targetImageSize.width) / 2;
        croppingRect = CGRectMake(-1.0f * delta, 0, tempImageWidth, tempImageHeight);
    } else {
        float delta = (tempImageHeight - targetImageSize.height) / 2;
        croppingRect = CGRectMake(0, -1.0f * delta, tempImageWidth, tempImageHeight);
    }

    UIGraphicsBeginImageContext(targetImageSize);

    [self.originalImage drawInRect:croppingRect];

    resizedImage = UIGraphicsGetImageFromCurrentImageContext();

    UIGraphicsEndImageContext();

    [self.imageView setImage:resizedImage];

    self.statusLabel.text = @"Effect: Crop";

}
You will notice that the key logic in this method centers around finding the smaller dimension, repositioning the image, and saving the changes by removing everything outside the bounding frame. You shift the image to fit in the center of frame, depending on whether it needs more cropping in the x or y dimension (as indicated by the favorsX variable). This example multiplies one of the origin values by -1.0 to indicate that the image needs to be shifted in the negative direction (left for x, up for y). Just as when resizing images, you must export a snapshot of your graphics context when you are finished, to preserve your changes.
If you do not want to scale down the image and just want to crop out a portion of it at a specified (x,y) position, you can ignore the scale step. In this case, the most important operation is positioning the bounding frame by calling [UIView drawRect:] with the correct target coordinates. An example of a crop operation that ignores scaling is provided in Listing 3-3.
Listing 3-3. Cropping Without Scaling at a Specified (x,y) Position
-(IBAction)crop:(id)sender
{
    UIImage *resizedImage = nil;
    CGSize originalImageSize = self.originalImage.size;
    CGSize targetImageSize = CGSizeMake(150.0f, 150.0f);

    float originX = 10.0f;
    float originY = 20.0f;
    float scaleFactor, tempImageHeight, tempImageWidth;
    CGRect croppingRect = CGRectMake(originX, originY, originalImageSize.width,
        originalImageSize.height);
    UIGraphicsBeginImageContext(targetImageSize);

    [self.originalImage drawInRect:croppingRect];

    resizedImage = UIGraphicsGetImageFromCurrentImageContext();

    UIGraphicsEndImageContext();

    [self.imageView setImage:resizedImage];

    self.statusLabel.text = @"Effect: Crop";

}
You can find a sample project illustrating cropping and resizing in the source code bundle for this book (see the Source Code/Download area of the Apress web site, www.apress.com). The project is named ImageTransformations and can be found in the Chapter 3 folder. As shown in Figure 3-3, the project provides an image view to preview the image, and buttons to crop it, resize it, and restore it to its original size.

Figure 3-3. ImageTransformations project
Saving Images
To get the most use out of your photos, including those you manipulated in your app, you often need the ability to save them to disk or back to the photo album. Unless they are using an app that declares it deletes all images after a certain period of time (such as Snapchat), most users expect to be able to retrieve images they created with your app, the next time they open it. The ability to save images is important because it will satisfy this expectation, and it will allow users to export images they create to e-mail or other apps.
Saving Images to Files
The process of saving images to disk is quite simple. Much like any other data operation, you need to extract the binary data for the image, and write this data to a file.
To extract the binary data for an image, you can use the UIkit convenience methods, UIImagePNRepresentation() and UIImageJPEGRepresentation(). Both of these methods return NSData objects, as shown here:
NSData *imageData = UIImagePNGRepresentation(self.originalImage);
You would use UIImagePNGRepresentation() when you are trying to preserve alpha (transparency) information in your image. Its only parameter is your input UIImage. If your image does not contain any alpha information, and you are looking for compression options, you should use UIImageJPEGRepresentation(). Its parameters are your input UIImage and a float between 0.0 and 1.0 representing your compression quality. Lower values represent higher compression values, with lower quality; 0.6 or 0.7 is a good trade-off between file size and image quality for most applications:
NSData *imageData = UIImageJPEGRepresentation(self.originalImage, 0.7f);
After the binary data for the image is ready, you write it to a file. You can use the NSData instance method [NSData writeToFile:] to write the data to disk. This method requires a target location for the file. Just as when reading a file from within your app bundle, you can use your app’s document directory as an interface to your device’s file system. An example of saving an image to the documents folder is provided in Listing 3-4.
Listing 3-4. Saving an Image to the Documents Folder
-(IBAction)saveToDisk:(id)sender
{
    NSArray *paths = NSSearchPathForDirectoriesInDomains(NSDocumentDirectory, NSUserDomainMask,
                     YES);
    NSString *documentsDirectory = [paths objectAtIndex:0];
    NSString *filePath = [documentsDirectory stringByAppendingPathComponent:@"image.jpg"];

    NSData *imageData = UIImageJPEGRepresentation(self.originalImage, 0.7f);
    NSError *error = nil;
    NSString *alertMessage = nil;

    //check if the file exists before trying to write it
    if ([[NSFileManager defaultManager] fileExistsAtPath:filePath]) {

        NSDateFormatter *dateFormat = [[NSDateFormatter alloc] init];
        [dateFormat setDateFormat:@"yyyyMMddHHmm"];

        NSString *dateString = [dateFormat stringFromDate:[NSDate date]];

        NSString *fileName = [NSString stringWithFormat:@"image-%@.jpg", dateString];

        filePath = [documentsDirectory stringByAppendingPathComponent:fileName];
    }

    [imageData writeToFile:filePath options:NSDataWritingAtomic error:&error];

    if (error == nil) {
        alertMessage = @"Saved to 'Documents' folder successfully!";
    } else {
        alertMessage = @"Could not save image :(";
    }

    UIAlertView *alertView = [[UIAlertView alloc] initWithTitle:@"Status"
                               message:alertMessage delegate:nil cancelButtonTitle:@"OK"
                               otherButtonTitles:nil];
    [alertView show];
}
Caution Apple’s APIs do not provide automatic file naming, so remember to check for existing file names before attempting to write your file.
In Listing 3-4, the object representing the image takes the format self.originalImage. This indicates that the image is an instance variable that belongs to the class, rather than a specific method. Instance variables are important when you need to manipulate the same object multiple times within a class, without passing it as a parameter. You create an instance variable by declaring it in your header file:
@property (nonatomic, strong) UIImage *originalImage;
Now that the files are saved in the documents folder, you can access them the next time you load the app.
If you want users to be able to download the output from your app to their computers, you need to perform one last step: enabling iTunes File Sharing for your app. You can do this by navigating over to the Info tab of Project Settings, and then adding the key Application Supports iTunes File Sharing, as shown in Figure 3-4.

Figure 3-4. Enabling iTunes file sharing
Users can now view their files by selecting their device in iTunes and scrolling down to the File Sharing section of the Apps tab. By clicking your app’s name in the installed apps list, they will see the contents of your app’s documents folder, as shown in Figure 3-5.
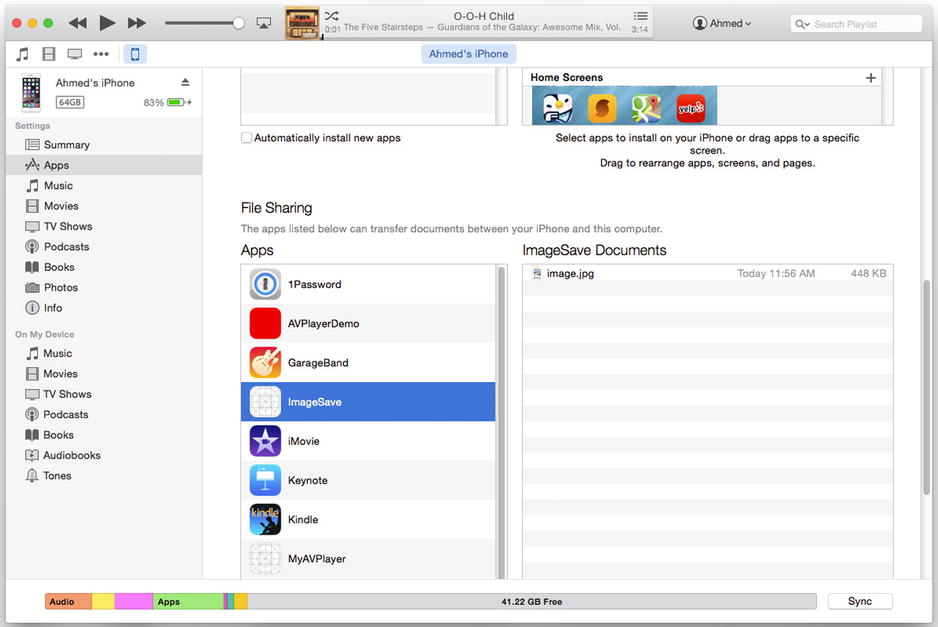
Figure 3-5. Viewing files in iTunes
Saving Images to the Photo Library
For many photo-based apps, you will want to be able to give other apps access to images that were created or manipulated within your app. In this case, it would be more appropriate to save the images directly to the system’s photo library. To facilitate this, Apple provides a convenience method, UIImageWriteToSavedPhotosAlbum(), which allows you to save a UIImage object directly to the Camera Roll photo album.
To use the UIImageWriteToSavedPhotosAlbum() method, you need pass the UIImage object you want to save and, optionally, a completion handler that will execute when the operation has finished. You can use your completion handler to determine whether the save was successful and to perform a subsequent action, such as displaying a UIAlertView:
UIImageWriteToSavedPhotosAlbum(self.originalImage, self,
                               @selector(image:didFinishSavingWithError:contextInfo:), nil);
If you are using a completion handler, be careful to pass both the completionTarget parameter (in this case, self) and the selector for your handler method. Otherwise, your code will not know what method to use at runtime or where to look for it. Listing 3-5 provides an example of a completion handler that shows an alert view.
Listing 3-5. Completion Handler That Shows an Alert View
- (void)image:(UIImage *)image didFinishSavingWithError:(NSError *)
                                                         error contextInfo:(void *)contextInfo
{
    NSString *alertMessage = nil;
    if (error == nil) {
        alertMessage = @"Saved to Camera Roll successfully!";
    } else {
        alertMessage = @"Could not save image :(";
    }

    UIAlertView *alertView = [[UIAlertView alloc] initWithTitle:@"Status"
                               message:alertMessage delegate:nil cancelButtonTitle:@"OK"
                               otherButtonTitles:nil];
    [alertView show];
}
In the source code bundle, I provide a sample project called ImageSave, which illustrates both ways of saving an image. As shown in Figure 3-6, this app provides an image view and two buttons to trigger the save actions.
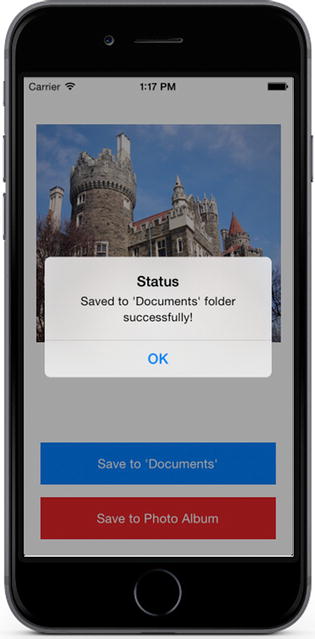
Figure 3-6. ImageSave project
Loading Images from the Internet
You can never predict how long it will take to load an image from the Internet. Although you can use the [NSData initWithContentsOfUrl:] method to load the image data, it will not provide you with error handling, and will it be a blocking operation, meaning your app will not be able to respond to other events until the download has completed. A better approach is to download an image in the background, and to refresh the UIImageView with the downloaded result when the data is ready.
To download image data in the background of your app, you use the NSURLConnection class. This class gives you the ability to control a download (start/stop) and options to control where it will execute (in the foreground or background) and whether the response will be handled via a delegate or completion block.
You start by initializing your UIImageView with a placeholder image, or a nil value:
[self.imageView setImage:nil];
Next, you initialize an NSURLRequest object containing the target URL:
NSURL *imageUrl = [NSURL URLWithString:@"http://www.devatelier.com/images/flower.png"];
NSURLRequest *urlRequest = [NSURLRequest requestWithURL:imageUrl];
The NSURLRequest object wraps the URL in an HTTP GET command, which is how browsers and other apps send download requests to a web server.
To streamline this implementation, I suggest using the NSURLConnection method that allows you to specify a completion block: [NSURLConnection sendAsynchronousRequest:]. Using a completion handler enables you to execute a block of code as soon as a method finishes, without needing to persist variables or create extra methods. It is a class method, so you do not need to instantiate an object to use it:
[NSURLConnection sendAsynchronousRequest:urlRequest queue:[NSOperationQueue mainQueue]
                 completionHandler:^(NSURLResponse *response, NSData *data,
                 NSError *connectionError) { ... }];
You see that the completion handler for this method returns an NSData object and an NSError object. If the download fails, the error object will be nil; otherwise, it will contain a non-nil value. Listing 3-6 presents a method that initiates a download and creates a UIImage object from the resulting data if the download is successful. If the download fails, the application will display an alert view indicating the failure to the user.
Listing 3-6. Loading an Image from the Internet
-(IBAction)start:(id)sender
{
    NSURL *imageUrl = [NSURL URLWithString:@"http://www.devatelier.com/images/flower.png"];
    NSURLRequest *urlRequest = [NSURLRequest requestWithURL:imageUrl];

    [self.imageView setImage:nil];

    [NSURLConnection sendAsynchronousRequest:urlRequest queue:[NSOperationQueue mainQueue]
                     completionHandler:^(NSURLResponse *response, NSData *data,
                     NSError *connectionError) {

        if (connectionError == nil) {

            UIImage *newImage = [UIImage imageWithData:data];
            [self.imageView setImage:newImage];

        } else {
            UIAlertView *alertView = [[UIAlertView alloc] initWithTitle:@"Error"

                message:@"Could not load image :(" delegate:nil cancelButtonTitle:@"OK"
                otherButtonTitles:nil];
            [alertView show];
        }
    }];
}
Adding an Activity Indicator
In many apps, you will notice a spinning animation that indicates an operation is in progress (such as downloading an image), as shown in Figure 3-7. You can add a spinner (or activity indicator) to any view via the UIActivityIndicatorView class.
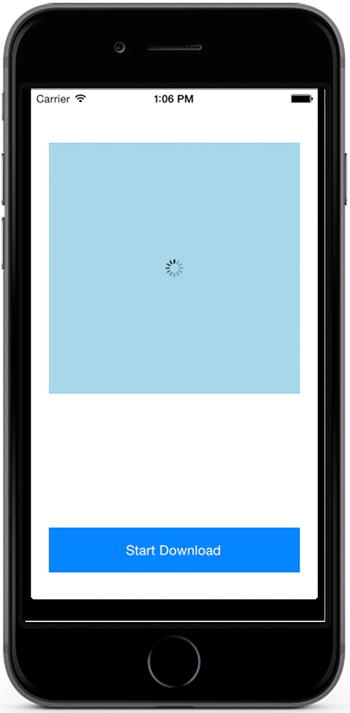
Figure 3-7. View with activity indicator superimposed
To add a UIActivityIndicatorView to a UIImageView, you follow many of the same initialization steps you would use with any other UIView, including setting up the container frame and adding the UIActivityIndicatorView as a subview on top of the UIImageView.
By reviewing Figure 3-7, you will notice that the UIActivityIndicatorView is very small in comparison to the UIImageView. To accommodate for the size difference, you could find the center of the UIImageView and use this as the origin for the UIActivityIndicatorView. An example of adding an activity indictor to an image view is provided in Listing 3-7.
Listing 3-7. Adding an Activity Indicator to an Image View
//calculate the mid-way point of the image view
CGFloat indicatorWidth, indicatorHeight;
indicatorWidth = indicatorHeight = 100.0f;

CGFloat originX = (self.imageView.frame.size.width - indicatorWidth) / 2;
CGFloat originY = (self.imageView.frame.size.height - indicatorHeight) / 2;

CGRect activityFrame = CGRectMake(originX, originY, indicatorWidth, indicatorHeight);

self.activityView = [[UIActivityIndicatorView alloc] initWithFrame:activityFrame];
self.activityView.color = [UIColor blackColor];
[self.imageView addSubview:self.activityView];
You declare the UIImageView and UIActivityIndidatorView objects as instance variables, since you will need to access them throughout the class.
After the UIActivityIndicatorView has been initialized and added to the UIImageView, you are ready to make magic happen. You should use the [UIActivityIndicatorView startAnimating] instance method to start animating the activity indicator when the download operation begins. When the operation completes, due to success or failure, call the [UIActivityIndicatorView stopAnimating] instance method to stop the animation and hide the activity indicator.
Listing 3-8 shows an example that combines initiating a download with starting and stopping the activity indicator.
Listing 3-8. Loading an Image and Mirroring Status with an Activity Indicator
-(IBAction)start:(id)sender
{
    NSURL *imageUrl = [NSURL URLWithString:@" @"http://images.devatelier.com/castle.jpg "];
    NSURLRequest *urlRequest = [NSURLRequest requestWithURL:imageUrl];

    [self.imageView setImage:nil];
    [self.imageView bringSubviewToFront:self.activityView];
    [self.activityView startAnimating];

    [NSURLConnection sendAsynchronousRequest:urlRequest queue:[NSOperationQueue mainQueue]
                     completionHandler:^(NSURLResponse *response, NSData *data,
                     NSError *connectionError) {

        [self.activityView stopAnimating];

        if (connectionError == nil) {

            UIImage *newImage = [UIImage imageWithData:data];
            [self.imageView setImage:newImage];

        } else {
            UIAlertView *alertView = [[UIAlertView alloc] initWithTitle:@"Error" message:@"Could not load image :(" delegate:nil cancelButtonTitle:@"OK" otherButtonTitles:nil];
            [alertView show];
        }
    }];
}
Note Views are displayed in the order they were added. I am using the [UIView bringSubviewToFront:] instance method in this example to force the activity indicator to appear at the top of the view stack.
The ImageDownload project in the source code bundle for this chapter implements the user interface that was illustrated in Figure 3-7. When the user presses the Start Download button, the image will start downloading in the background and display the activity indicator. When the download has completed, the indicator will disappear and the image view will be reloaded with the downloaded image.
Adding Effects to Your Images
Arguably, the most striking change that Apple introduced with iOS 7 was its new visual design language and the tools it provided developers to implement this language. iOS 7 marked Apple’s shift from its traditional skeumorphic user interface approach (taking cues from the real world) to flat, clean, digital-first design.
In this section, you will see how to begin using this design language. You will leverage traditional methods, such as gradients, to give depth to images, and you will see how blurring and motion effects can give your app access to many of the compelling visual effects Apple uses in its apps.
Adding Gradients
To add depth and accentuate overlays on top of your images (such as text), you can use gradients. Luckily for us, there’s an API for that!
The Quartz class you can use to draw a gradient over a view is called CAGradientLayer. It is a subclass of CALayer, the view drawing class, intended for drawing gradients based on input colors and color stop points. A stop point determines where regions should stop and begin to intersect with each other. There is no limit on the number of colors or stop points you can have, but you should try to practice good design and implement a nondistracting gradient. As shown in Figure 3-8, different numbers of stop points can create drastically different effects based on how you place them and use your color areas.
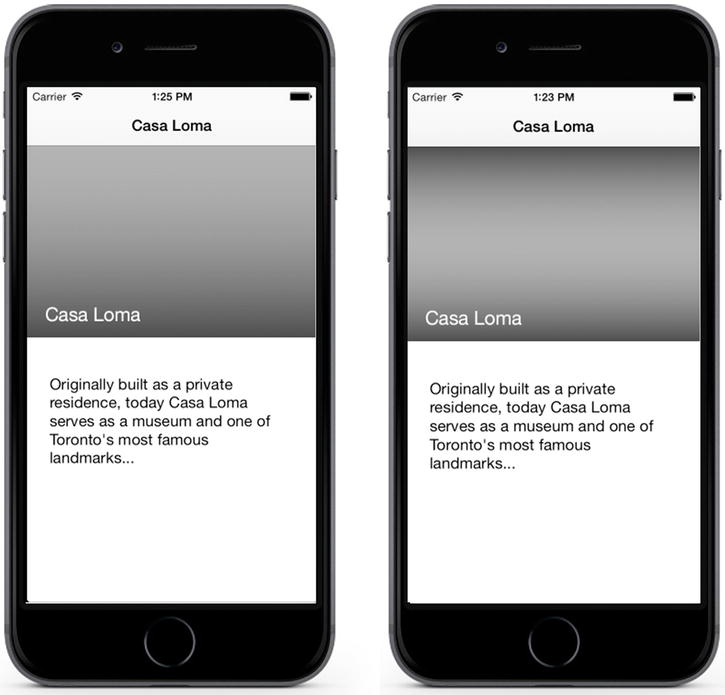
Figure 3-8. A gradient with two stop points vs. a gradient with three stop points
Listing 3-9 shows an example of adding a gradient to a UIImageView.
Listing 3-9. Adding a Gradient to a UIImageView
UIColor *darkestColor = [UIColor colorWithWhite:0.1f alpha:0.7f];
UIColor *lightestColor = [UIColor colorWithWhite:0.7f alpha:0.1f];

CAGradientLayer *headerGradient = [CAGradientLayer layer];
headerGradient.colors = [NSArray arrayWithObjects:(id)darkestColor.CGColor,
                         (id)lightestColor.CGColor, (id)darkestColor.CGColor,  nil];

headerGradient.frame = self.headerImageView.bounds;
[self.headerImageView.layer insertSublayer:headerGradient atIndex:0];
Note If you do not define any stop points, the default values will be evenly distributed.
To create a gradient, you start by creating a CAGradientLayer object. From there, specify the colors to use. For this example, I wanted the image to display a rounded effect, so I used three stop points and colors that shift from darker to lighter, and then back to darker.
Note When placing a gradient over an image, I strongly suggest using a UIColor method that allows you to specify an alpha value. Alpha values determine the transparency of a layer. An alpha value of 0.0 means the layer is completely transparent, while an alpha value of 1.0 means the layer is completely opaque. Alternate your alpha values to make the gradient effect stronger or weaker in different positions, all the while not completing masking your image.
Figure 3-9 shows an example of the output of the gradient.
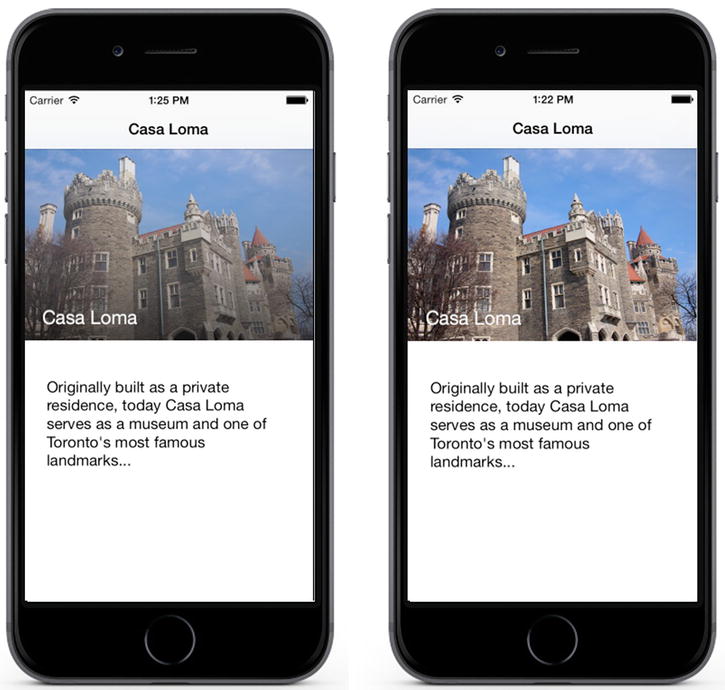
Figure 3-9. An image view with a gradient vs. an image view with no gradient
Using gradients, you can create powerful visual effects with only a few simple lines of code, helping your images achieve a more realistic sense of lighting. Gradients can also accentuate overlays better than drop shadows alone. The effect used in this example is the same as the one Facebook uses on its profile pages.
The sample project that employs gradients is named ImageGradient.
Making Your Images Move with Your Device
One of the most visually exciting user interface features that came with iOS 7 was the ability to add motion effects to any view. Motion effects allow you to move the view in response to accelerator events, causing an app to feel more immersive and accentuate the most important parts of your UI. Apple uses motion effects to animate the iOS 7+ home screen, lock screen, alert views, and Safari tab browser on the iPhone.
Apple exposes the ability to access and create motion effects through the UIMotionEffect abstract class. As an abstract class, it must be subclassed in order to be instantiated. Fortunately, however, Apple provides a very simple subclass that moves a view horizontally or vertically based on accelerometer changes, called UIInterpolatingMotionEffect.
Note To implement your own completely custom behaviors and advanced animations, you subclass UIMotionEffect directly, and add your custom logic in the keyPathsAndRelativeValuesForViewerOffsets: method.
To use UIInterpolatingMotionEffect, you must instantiate an object with a keyPath representing the view property you want to modify based on the motion event (for example, the center x position) and the type of motion you want to react to (for example, horizontal movement). For many motion effects, you will be exposing areas of the view that are hidden, so you must also define relative limits that let the motion effect know what these boundaries are. Once you have defined an effect, you can add it to a view by using the [UIView addMotionEffect:] instance method. You can pass this method one UIMotionEffect object directly, or a UIMotionEffectGroup object if you are trying to add multiple effects at one time. Listing 3-10 shows an example of adding motion effects to a UIImageView.
Listing 3-10. Adding Motion Effects to a UIImageView
UIInterpolatingMotionEffect *horizontalEffect = [[UIInterpolatingMotionEffect alloc]
                             initWithKeyPath:@"center.x"
                             type:UIInterpolatingMotionEffectTypeTiltAlongHorizontalAxis];

UIInterpolatingMotionEffect *verticalEffect = [[UIInterpolatingMotionEffect alloc]
                             initWithKeyPath:@"center.y"
                             type:UIInterpolatingMotionEffectTypeTiltAlongVerticalAxis];

horizontalEffect.minimumRelativeValue  = [NSNumber numberWithInteger:-50];
horizontalEffect.maximumRelativeValue  = [NSNumber numberWithInteger:50];

verticalEffect.minimumRelativeValue  = [NSNumber numberWithInteger:-50];
verticalEffect.maximumRelativeValue  = [NSNumber numberWithInteger:50];

//set bg image effects
[self.backgroundImageView addMotionEffect:horizontalEffect];
[self.backgroundImageView addMotionEffect:verticalEffect];
In Listing 3-10, I set the motion effect on the background view. As the intent of a motion effect is to highlight or diminish a view in the view hierarchy, it is often appropriate to apply the effect to a view that is in the background or an action view in the foreground (for example, a UIAlertView).
Note The Reduce Motion switch in iOS’s accessibility screen allows a user to disable motion effects across the entire system (including your app). This cannot be overridden, so remember to design for this limitation.
The sample project in the source code bundle that employs motion effects is named ImageTilt. As shown in Figure 3-10, there are no buttons. The input comes from tilting the device. You will notice that the image moves, but the label does not.
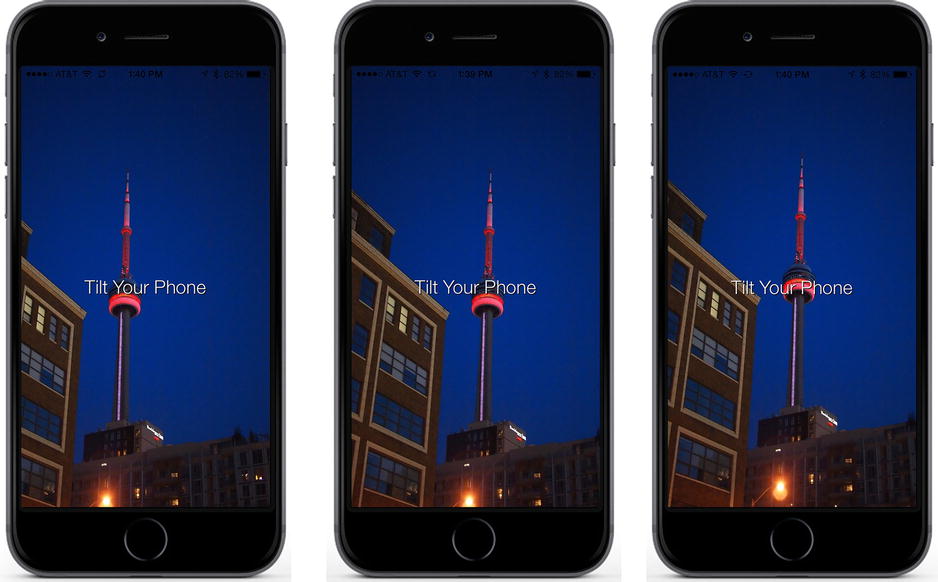
Figure 3-10. The ImageTilt project’s motion effects
Adding Blurring to Your Images
Another exciting visual effect Apple brought with the design language of iOS 7 was an emphasis on blurring background images to highlight important parts of your user interface. You can see this effect quite frequently when you open Siri, as shown in Figure 3-11.

Figure 3-11. Blur effect in Siri
Many of the core concepts required to create a blurred background take advantage of creating a graphics context to manipulate an image, and then using CGAffineTransform to modify the source image. Apple prefers to use Gaussian blur effects, which reduce details in images through a mathematical effect that creates smoothing. Fortunately, Apple created a category class for UIImage at the Apple Worldwide Developers Conference (WWDC) 2013 called UIImage+ImageEffects.h that manages the graphics context for the calculation, performs the blur function, and returns the results. I have included the ImageEffects category in the sample code for this chapter. You can also find it on the iOS Dev Center by searching for the WWDC session “Implementing Engaging UI on iOS.”
Categories in iOS allow you to extend a class without subclassing it. Categories allow you to write very small files that can add several methods to existing classes, for the purpose of adding functionality.
To use the ImageEffects category, you include UIImage+ImageEffects.h in your class. From there, you can use the additional methods it provides as you would with any other UIImage method. Figure 3-12 compares the results provided by each blur effect.

Figure 3-12. Extra Light Effect blur, Light Effect blur, and Dark Effect blur on the same image
The blur effect you should use depends on your user interface and the color of your image. For a light image, it is better to use [UIImage applyLightEffect:], whereas [UIImage applyDarkEffect:] is more appropriate for dark images. As you can see here, selecting an effect is a one-liner:
UIImage *blurredImage = [self.originalImage applyLightEffect];
The sample project that adds blurring to an image is named ImageBlur. As you can see in Figure 3-13, the project has three buttons, which toggle between blur types. I highly recommend testing the project with some of your own images to see how blurring affects them.
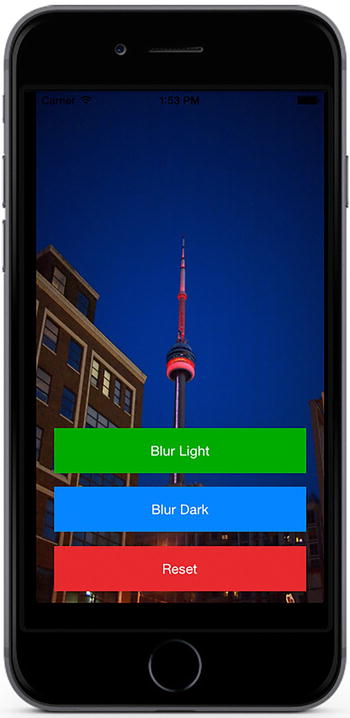
Figure 3-13. ImageBlur project
Summary
In this chapter, you saw how to use the canvas-like abilities of graphics contexts to manipulate images. From there, you saw how to export images to files and the photo album, to be able to reuse them later or share them with other apps. To make your apps faster, you saw how to load images from the Internet without blocking the user interface. Finally, you began to see how to use many of Apple’s visual effects methods to add an extra sense of depth to your images.