
In this chapter, you will explore lower-level camera programming topics by building your own image-capture and photo-picker classes, similar to the defaults provided by UIImagePickerController. Along the way, you will see how to configure the hardware camera for image capture, how to access photos directly from the Photos app, and what you need to do to present this raw data in a user interface.
You will use the UIImagePickerController as your reference for functionality, so if you are unsure how to present the class or handle its output, it would be a good idea to review Chapter 2.
Although it may seem like a lot of work to replicate functionality iOS already offers, having a camera interface that looks radically different from the rest of your app, or that does not allow users to make modifications to improve the quality of their pictures, will greatly impact your functionality and drive users away.
Building a Custom Camera Interface
The first exercise is to replicate the basic image-capture interface provided by UIImagePickerController. As shown in Figure 4-1, the project uses a nonstandard interface and exposes an expanded set of hardware controls.

Figure 4-1. Mock-up of the camera controller with custom user interface
To make this happen, the application must be able to do the following:
- Discover and configure the camera hardware
- Display a live feed of the data from the camera
- Modify the capture settings from the UI
- Capture a picture when the user clicks the Take Picture button
Ideally, you should use a class that lets you configure a camera “object” and access the data stream that it generates. At the same time, you don’t want to have to write the hardware drivers yourself, so it’s better to use something that abstracts this layer. Luckily, that functionality exists in the AVFoundation framework, which is included as part of Cocoa Touch.
As its name implies, AVFoundation is one of Apple’s media frameworks for capturing, manipulating, and storing audio and video assets. The video-capture APIs in AVFoundation let you access the raw video stream coming from the camera, and provide high-level configuration capabilities for hardware controls, such as the flash or autofocus.
You can build an image-capture interface from a video stream by remembering that a video stream is nothing but a series of images called frames. To capture an image, you just need to extract a frame from the video. To make sure the result is accurate, you want to extract a frame when the image is in focus.
In this section, you will see how to use AVFoundation to set up the camera, display a live feed, and capture frames or change settings based on user interface events. To speed up the workflow, this section uses storyboards and Interface Builder to build the user interface.
As with previous exercises in this book, you can find the source code for this project in the Source Code/Download area of the Apress web site (www.apress.com), under the Chapter 4 folder. The project for this application is called MyCamera.
Initializing the Hardware Interface
In situations where your application attempts to access a shared resource (such as hardware) or perform an operation with a high potential for failure, Apple suggests using a session design pattern. This pattern pipes all your operations through the session object, which provides error reduction and traffic control features, such as semaphores. Sessions also reduce errors by streamlining the process for setting up and tearing down complicated interfaces. You will see this design pattern in use when accessing audio hardware or performing network operations.
To begin using AVFoundation classes in your project, you need to add the framework to your project, and also include it in any classes that use it. The easiest way to add a framework to your project is by adding it to the Linked Frameworks and Libraries array for your application. You can modify this array by clicking your project name in the Xcode Project Navigator, and scrolling to the bottom of the General tab, as shown in Figure 4-2.

Figure 4-2. Finding the Linked Frameworks and Libraries array
You can choose which framework to add by clicking the Plus button at the bottom of the Linked Frameworks and Libraries pane. Doing this displays a navigator showing the frameworks that are installed on your development computer. You can filter the list further by typing the name of your desired framework. Select a framework and click the Add button to add it to your project (see Figure 4-3).

Figure 4-3. Xcode’s framework picker
After adding the AVFoundation framework to your project, you include it in your file by adding it to the top of the header file for each class that uses it. The header file for the MyCamera application is ViewController.h:
#include <AVFoundation/AVFoundation.h>
The AVFoundation class you need to manage hardware sessions is called AVCaptureSession. This class manages the hardware interfaces and provides high-level start and stop operations. Instantiating a session object is very easy; just call the init method on the AVCaptureSession object:
AVCaptureSession *session = [[AVCaptureSession alloc] init];
Note You will need to share your session object with all classes trying to access it in the app, so remember to declare it as an instance variable or singleton.
When you are ready to use hardware devices through the session, you add them as inputs. This is a two-step process: first you identify the hardware device you want to use, and then you configure it to send its data to your session. Hardware devices are represented by the AVCaptureDevice class, through which you can query for device permissions and hardware availability, and configure capture settings for the device.
Before you can start sending commands to a device, you need to discover it. You use the [AVCaptureDevice defaultDeviceWithMediaType:] class method to discover the default hardware device for a specific media type. Use the AVMediaTypeVideo constant to specify video devices:
AVCaptureDevice *camera = [AVCaptureDevice defaultDeviceWithMediaType:AVMediaTypeVideo];
Note To discover all devices that match a type, use the [AVCaptureDevice devicesWithMediaType:] class method. In order to match a specific property (such as camera positions), you will need to iterate through the results. You can use the position property to determine if a camera is on the front or rear of the device.
After finding a device, you need to add it to your session. To configure a device for use with AVCaptureSession, you need to instantiate it as an AVDeviceCaptureInput object. AVDeviceCaptureInput attempts to initialize the hardware device and returns an object if it succeeds, or an NSError if it fails. After the object is ready, use the [AVCaptureSession canAddInput:] method to make sure the device is available for use by your application, and then call the [AVCaptureSession addInput:] instance method to add it to your session. You can find an example that illustrates this process in Listing 4-1.
Listing 4-1. Adding a Camera Input
NSError *error = nil;
AVCaptureDeviceInput *cameraInput = [AVCaptureDeviceInput
                                     deviceInputWithDevice:camera
                                     error:&error];

if (error == nil && [self.session canAddInput:cameraInput]) {
    [self.session addInput:cameraInput];
}
Caution To reduce errors, you should always make sure an input is available before trying to add it. Remember, the camera is a shared resource, and you need to play nice with others!
Accessing the Live Camera Feed
After establishing an interface to the camera hardware, you need some way of displaying the output on the screen. To display the live video feed, you need to perform three steps:
- Access the data source containing the live video stream.
- Place the video stream on a view.
- Start the stream.
The AVFoundation class responsible for mirroring the video output from a session is AVCaptureVideoPreviewLayer. This class is a subclass of CALayer, more commonly known as a Core Animation Layer. Core Animation Layers are the backing class to which you send image data before painting it on the screen. Layers represent content, while views represent where the content will be displayed.
Much like cels in traditional animation, you can combine layers to represent more-complicated data, or you can move them around independently. Because video streams are inherently a quickly changing series of images, it makes more sense from a performance standpoint to write the content directly to a layer, rather than tearing down views for every frame change.
You instantiate the AVCapturePreviewLayer object by calling the [AVCapturePreviewLayer initWithSession:] constructor method, passing in your session object as the input parameter:
AVCaptureVideoPreviewLayer *previewLayer =
     [[AVCaptureVideoPreviewLayer alloc] initWithSession:self.session];
To correctly display a layer, you need to specify its dimensions and position. For the MyCamera project, you will use a UIView property called previewView to display the camera live feed. To center the video layer on this view and give it the same bounds, you can use the following snippet:
CGRect layerRect = self.previewView.bounds;
CGPoint layerCenter = CGPointMake(CGRectGetMidX(layerRect),
    CGRectGetMidY(layerRect));
[previewLayer setBounds:layerRect];
[previewLayer setPosition:layerCenter];
To display the video layer, however, you need to give the layer a drawing target. You want to draw the video on the view, so add the preview layer as a sublayer on top of the view:
[self.previewView.layer addSublayer:previewLayer];
By default, the preview layer resizes the camera output to fit within its container frame, while preserving aspect ratio. By setting the videoGravity property to AVLayerVideoGravityResize, you can change the scaling to aspect fill:
[previewLayer setVideoGravity:AVLayerVideoGravityResize];
The final step is to start the stream, which you do by calling the [AVCaptureSession startRunning] method on the session object:
[self.session startRunning];
The complete camera setup code for the ViewController class is in Listing 4-2. It is wrapped in the [self viewDidLoad:] method because you need to initialize the camera when the view is initialized.
Listing 4-2. Initializing the Camera Input
- (void)viewDidLoad
{
        [super viewDidLoad];
            // Do any additional setup after loading the view.
        self.session = [[AVCaptureSession alloc] init];
        AVCaptureDevice *camera = [AVCaptureDevice
            defaultDeviceWithMediaType:AVMediaTypeVideo];
        NSError *error = nil;

        AVCaptureDeviceInput *cameraInput = [AVCaptureDeviceInput
             deviceInputWithDevice:camera error:&error];

        if (error == nil && [self.session canAddInput:cameraInput]) {
             [self.session addInput:cameraInput];

            AVCaptureVideoPreviewLayer *previewLayer =
                [[AVCaptureVideoPreviewLayer alloc]
                  initWithSession:self.session];

            CGRect layerRect = self.previewView.bounds;
            CGPoint layerCenter = CGPointMake(CGRectGetMidX(layerRect),
                                  CGRectGetMidY(layerRect));

            [previewLayer setBounds:layerRect];
            [previewLayer setPosition:layerCenter];

            [previewLayer setVideoGravity:AVLayerVideoGravityResize];

            [self.previewView.layer addSublayer:previewLayer];

            [self.session startRunning];
    }
}
Similarly to the way you added an input to the AVCaptureSession to determine the input device, you need to add an output to determine how to export data. For this example, you want to export a photo—represented as a single frame of video—when the user is ready.
The base class for AVCaptureSession output objects is AVCaptureOutput, however, as an abstract class that specifies only what information is required for a capture object. Luckily, though, AVFoundation comes with a number of AVCaptureObject subclasses you can use for desired export formats. Several of the most popular subclasses are enumerated in Table 4-1.
Table 4-1. Popular AVCaptureOutput Subclasses
Subclass | Capture Output |
|---|---|
AVCaptureMovieFileOutput | QuickTime movie file |
AVCaptureVideoDataOutput | Video frames—intended for processing |
AVCaptureAudioFileOutput | Audio files supported by Core Audio (.MP3, .AIFF, .WAV, .AAC) |
AVCaptureAudioDataOutput | Audio buffer— intended for processing |
AVCaptureMetadataOutput | Media file metadata properties (for example, GPS location, exposure level) |
AVCaptureStillImageOutput | Still images and metadata |
To capture a still image, use the AVCaptureStillImageOutput subclass. The method to capture images using this class is defined as an instance method, so declare an AVCaptureStillImageOutput object as an instance variable:
self.stillImageOutput = [[AVCaptureStillImageOutput alloc] init];
Although you do not have to configure the output object to capture raw data, it is a good idea to compress the data by saving it as a JPEG file (.JPG). To do this, you need to specify the codec type in a configuration dictionary. You specify JPEG format using the kCMVideoCodecType_JPEG constant for the value at the AVVideoCodecKey key. After the dictionary is ready, save your settings using the [AVStillImageOutput setOutputSettings:] method, as shown in Listing 4-3.
Listing 4-3. Configuring an Output Object
NSMutableDictionary *configDict = [NSMutableDictionary new];
[configDict setObject:AVVideoCodecJPEG forKey:AVVideoCodecKey];
[self.stillImageOutput setOutputSettings:configDict];
Again, just as when adding an input object, you should check to make sure the output object is available before adding it to your session, as shown in Listing 4-4.
Listing 4-4. Adding an Output Object
if ([self.session canAddOutput:self.stillImageOutput]) {
    [self.session addOutput:self.stillImageOutput];
}
Now that you have set up an output object, you can use it to capture still images. The API reference for the AVCaptureStillImageOutput class shows that you can use the [AVCaptureStillImageAsynchronouslyFromConnection:completionHandler] instance method. Unfortunately, though, you need to set up a connection to use this method. A connection, represented by the AVCaptureConnection class, is an interface that links the input and output objects. Luckily, connections are created automatically when you add outputs to a session. You can query for a connection by specifying the output object and media type you are looking for (for example, audio or video), as shown in Listing 4-5.
Listing 4-5. Querying for a Connection Object
AVCaptureConnection *connection = [self.stillImageOutput
    connectionWithMediaType:AVMediaTypeVideo];
Having created a connection object, you can now call a block to capture still images. The completion handler returns a low-level media buffer (CMSampleBufferRef) that points to the still image, or an NSError object if the operation failed. You can save the image by calling the [AVCaptureStillImageOutput jpegStillImageNSDataRespresentation:] class method, which returns the NSData representation for the still image as a JPEG file with valid EXIF metadata. After retrieving the NSData for the image, you can save it to disk or convert it to a UIImage object.
In Listing 4-6, a button handler encapsulates the entire process of capturing an image. In the MyCamera project, this would be triggered by the Shoot button. If this method is able to capture an image successfully, it will send a didFinishWithImage message to its camera delegate. If the capture fails, it logs the error by sending the cancel message and logging the error as a string using [NSLog description].
Listing 4-6. Capturing a Still Image
-(IBAction)finish:(id)sender
{

    AVCaptureConnection *connection = [self.stillImageOutput
        connectionWithMediaType:AVMediaTypeVideo];

    //[[self.stillImageOutput connectionWithMediaType:AVMediaTypeVideo]
        setVideoOrientation:[connection videoOrientation]];

    [self.stillImageOutput
        captureStillImageAsynchronouslyFromConnection:connection
        completionHandler:^(CMSampleBufferRef imageDataSampleBuffer,
        NSError *error) {

        if (imageDataSampleBuffer != nil) {

            NSData *imageData = [AVCaptureStillImageOutput
             jpegStillImageNSDataRepresentation:imageDataSampleBuffer];

            UIImage *image = [UIImage imageWithData:imageData];

            [self.delegate didFinishWithImage:image];
        } else {

            NSLog(@"error description: %@", [error description]);

            [self.delegate cancel];
        }

    }];
Note EXIF (Exchangeable Image File Format) metadata is an industry standard for capturing information about a picture that was taken. Your iOS capture device produces values that include exposure, orientation, date taken, and flash setting. You can find a complete listing of all valid key/value pairs in Apple’s “CGImageProperties Reference” (available in Apple’s online iOS Developer Library).
Because the goal is to implement a workflow much like UIImagePickerController, you want to dismiss the camera interface as soon as the user has taken a picture. To speed up the process, and free up the camera for other processes, call the [AVCaptureSession stopRunning] method on the session in the [UIViewController viewWillDisappear] method for the camera controller class, as shown in Listing 4-7.
Listing 4-7. Stopping the Capture Session
- (void)viewWillDisappear:(BOOL)animated
{
    [super viewWillDisappear:animated];
    [self.session stopRunning];
}
Caution The old method for cleaning up view controllers, [UIViewController viewDidUnload], has been deprecated starting with iOS 6.0. Do not attempt to define this function, as your code will never be called.
The final component to complete the custom camera controller is an interface to configure the camera’s capture settings. This sample application focuses on switching cameras (for example, front/rear) and configuring the flash, autofocus, and exposure settings. These examples demonstrate two important patterns with camera development:
- You must always lock your device configuration before changing it.
- You should use touch events to drive area-specific settings (for example, autofocus, exposure).
The first hardware control you will build is a button that allows users to switch between the front and rear cameras on the device. Much like the default camera in iOS, the example will retain the ability to see a live preview of the camera output and take pictures, and allow users to toggle the cameras as often as they like. Remembering what you learned earlier about AVFoundation’s capture stack, you can implement camera switching by switching the active input on the session.
To switch cameras at runtime, you need to maintain pointers to each hardware device. Whereas in the earlier example, you found the default camera device using the [AVCaptureDevice defaultDeviceWithMediaType] instance method, this time you need to maintain an array of devices. The method that returns an array of AVCaptureDevice objects is [AVCaptureDevice devicesWithMediaType:]:
self.cameraArray = [AVCaptureDevice
                    devicesWithMediaType:AVMediaTypeVideo];
Initialize the NSArray as an instance variable of the target class, because you need to be able to query it again before switching cameras (in other words, you should not allow the user to switch cameras if they’re using a device with only one camera).
You can use the _position_ property of the AVCaptureDevice to determine the front and rear cameras. As with the earlier example, you need to create an AVCaptureDeviceInput object to tie the AVCaptureDevice to the capture session. This example initializes device objects as instance variables to make it easy to modify their capture settings later. Similarly, you should initialize input objects as instance variables so you can toggle devices later. You toggle devices by switching the active input object on the session. You can find an example which illustrates this process in Listing 4-8.
Listing 4-8. Initializing the Camera Inputs
-(void)initializeCameras
{
    NSArray *cameraArray = [AVCaptureDevice
                            devicesWithMediaType:AVMediaTypeVideo];

    NSError *error = nil;

    self.rearCamera = nil;
    self.frontCamera = nil;

    if ([self.cameraArray count] > 1) {

        for (AVCaptureDevice *camera in self.cameraArray) {
            if (camera.position == AVCaptureDevicePositionBack) {
                self.rearCamera = camera;
            } else if (camera.position == AVCaptureDevicePositionFront)
            {
                self.frontCamera = camera;
            }
        }

        self.rearCameraInput = [AVCaptureDeviceInput
                                deviceInputWithDevice:self.rearCamera
                                error:&error];
      self.frontCameraInput = [AVCaptureDeviceInput
                               deviceInputWithDevice:self.frontCamera
                               error:&error];

    } else {
        self.rearCamera = [AVCaptureDevice
             defaultDeviceWithMediaType:AVMediaTypeVideo];
        self.rearCameraInput = [AVCaptureDeviceInput
             deviceInputWithDevice:self.rearCamera
             error:&error];
    }

    self.currentDevice = self.rearCamera;
}
You can see that the code in Listing 4-8 falls back to the default capture device if the camera array contains only one object. Because the capture setting changes affect only the device the user has set to active, the code also keeps a pointer to the current device.
Now that you have pointers for each capture device, you need to implement the code to switch the active camera when the user presses the Camera button in the preview view. In this example, we have implemented the method with a return type of IBAction, because it is an event handler tied to an object in Interface Builder (in this case, the Camera button). If the device has two cameras, the app displays a multiple-choice action sheet to allow users to save their selection. If there is a failure, it displays an error alert. You can find a handler method that performs all of the initialization code in Listing 4-9.
Listing 4-9. Action Sheet for Selecting a Camera
-(IBAction)switchCamera:(id)sender {

    if ([self.cameraArray count] > 1) {

        //present an action sheet

        UIActionSheet *cameraSheet = [[UIActionSheet alloc]
            initWithTitle:@"Choose Camera"
            delegate:self cancelButtonTitle:@"Cancel"
            destructiveButtonTitle:nil
            otherButtonTitles:@"Front Camera", @"Rear Camera", nil];
        cameraSheet.tag = 100;
        [cameraSheet showInView:self.view];

    } else {
        //we only have one camera, show an error message

        UIAlertView *alert = [[UIAlertView alloc]
                               initWithTitle:@"Error"
            message:@"You only have one camera" delegate:nil
                cancelButtonTitle:@"OK"
                otherButtonTitles:nil];
        [alert show];
    }

}
To support the action sheet, you need to declare the view controller as a delegate. To do that, modify the class signature as shown here:
@interface CameraViewController : UIViewController
      <UIActionSheetDelegate>
In the action sheet button handler, [UIActionSheetDelegate actionSheet:didDismissWithButtonIndex:], the main logic checks the tag of the incoming action sheet, and passes the button index to the target method. In this case, you want to pass it to the switchToCameraWithIndex: method, as shown in Listing 4-10.
Listing 4-10. Action Sheet Button Handler
-(void) actionSheet:(UIActionSheet *)actionSheet
        didDismissWithButtonIndex:(NSInteger)buttonIndex
{
    switch (actionSheet.tag) {
        case 100:
            [self switchToCameraWithIndex:buttonIndex];
            break;
    }
}
You are now ready to implement the code to switch the active camera. The ultimate target of the change operation will be the capture session, because you add or remove input devices to or from a session. To prevent conflicts, you need to “take a lock” on the target object to indicate you will be changing the capture settings, before committing any changes. The lock for AVCaptureSession is [AVCaptureSession beginConfiguration]:
[self.session beginConfiguration];
Next, you need to line the button selections up to the target devices. Action sheet button indexes progress in a top-down manner, meaning the topmost item will have an index of 0. In this example, Front Camera is the top item. You switch to the front camera by removing the rear camera as an input on the capture session, and then adding the front camera input. To mirror the selection, you also need to update the currentDevice pointer in the class, and the label for the Switch Camera button:
if (buttonIndex == 0) { //front camera

        [self.session removeInput:self.rearCameraInput];

        if ([self.session canAddInput:self.frontCameraInput]) {
            [self.session addInput:self.frontCameraInput];
        }

        self.cameraButton.titleLabel.text = @"Camera: Front";
        self.currentDevice = self.frontCamera;

    }
For the final product, add an else if statement for the Rear Camera option in the action sheet, and release the configuration lock for the session object, as shown in Listing 4-11.
Listing 4-11. Complete Implementation for Switching Between Two Cameras
-(void)switchToCameraWithIndex:(NSInteger)buttonIndex
{
    [self.session beginConfiguration];

    if (buttonIndex == 0) {

        [self.session removeInput:self.rearCameraInput];

        if ([self.session canAddInput:self.frontCameraInput]) {
            [self.session addInput:self.frontCameraInput];
        }

        self.cameraButton.titleLabel.text = @"Camera: Front";
        self.currentDevice = self.frontCamera;

    } else if (buttonIndex == 1) {

        [self.session removeInput:self.frontCameraInput];

        if ([self.session canAddInput:self.rearCameraInput]) {
            [self.session addInput:self.rearCameraInput];
        }

        self.cameraButton.titleLabel.text = @"Camera: Rear";
        self.currentDevice = self.frontCamera;
    }

    [self.session commitConfiguration];
}
Changing flash modes in the app follows a process very similar to changing cameras; the key exception is that you are operating on the AVCaptureDevice level, rather than the AVCaptureSession level. Much like the Change Camera example, this example uses a button to change flash modes, and presents users with an action sheet to make their selection. The flash modes supported by iOS are Automatic, On, and Off.
The code in Listing 4-12 checks whether the current input device supports flash mode before presenting the picker. This error-checking step is critical, because it allows the app to support older iPhones and circumvents the assumption that all the system’s built-in cameras support the flash feature. On many devices, the front camera does not have a flash.
Listing 4-12. Change Flash Mode Event Handler
-(IBAction)flashMode:(id)sender {
    if ([self.currentDevice isFlashAvailable]) {
        UIActionSheet *cameraSheet = [[UIActionSheet alloc]
                                       initWithTitle:@"Flash Mode"
                                       delegate:self
                                       cancelButtonTitle:@"Cancel"
                                       destructiveButtonTitle:nil
                                       otherButtonTitles:@"Auto",
                                       @"On" , @"Off", nil];
        cameraSheet.tag = 101;
        [cameraSheet showInView:self.view];
    } else {
        //
        UIAlertView *alert = [[UIAlertView alloc]
                               initWithTitle:@"Error"
                               message:@"Flash not supported"
                               delegate:nil
                               cancelButtonTitle:@"OK"
                               otherButtonTitles:nil];
        [alert show];
    }
}
The next step is to expand the action sheet button handler to support this new action sheet, as shown in Listing 4-13. Give the action sheet a unique tag so you can identify it.
Listing 4-13. Modified Action Sheet Button Handler
-(void) actionSheet:(UIActionSheet *)actionSheet
        didDismissWithButtonIndex:(NSInteger)buttonIndex
{
    switch (actionSheet.tag) {
        case 100:
            [self switchToCameraWithIndex:buttonIndex];
            break;
        case 101:
            [self switchToFlashWithIndex:buttonIndex];
            break;
        default:
            break;
    }
}
You switch a device’s flash mode by setting its flashMode property. Listing 4-14 uses a switch statement at the beginning of the [switchToFlashWithIndex:] method to correlate button selections with valid flashMode constants. To commit the configuration change, try to take the lock for the device, and then release it when you are done. As additional error checking, the example makes sure the device supports the selected flash mode before trying to set it.
Listing 4-14. Changing the Flash Mode for a Device
-(void)switchToFlashWithIndex:(NSInteger)buttonIndex
{
    NSError *error = nil;

    AVCaptureFlashMode flashMode = 0;

    switch (buttonIndex) {
        case 0: {
            flashMode = AVCaptureFlashModeAuto;
            self.flashButton.titleLabel.text = @"Flash: Auto";
            break;
        }
        case 1: {
            flashMode = AVCaptureFlashModeOn;
            self.flashButton.titleLabel.text = @"Flash: On";
            break;
        }
        case 2: {
            flashMode = AVCaptureFlashModeOff;
            self.flashButton.titleLabel.text = @"Flash: Off";
            break;
        }
        default:
            break;
    }

    if ([self.currentDevice lockForConfiguration:&error]) {

        self.currentDevice.flashMode = flashMode;

        [self.currentDevice unlockForConfiguration];
    } else {
        NSLog(@"could not set flash mode");
    }

}
Setting the autofocus modes on the camera follows the exact same process as setting the flash (presenting an action sheet, choosing a mode, and querying for compatibility before committing). But there is one major addition: you need to define a focal point for the camera.
As with previous examples, this example uses a button handler to present an action sheet if the current camera device supports autofocus, as shown in Listing 4-15.
Listing 4-15. Change Focus Mode Button Handler
-(IBAction)focusMode:(id)sender {
    if ([self.currentDevice isFocusPointOfInterestSupported]) {
        UIActionSheet *focusSheet = [[UIActionSheet alloc]
                                      initWithTitle:@"Focus Mode"
                                      delegate:self
                                      cancelButtonTitle:@"Cancel"
                                      destructiveButtonTitle:nil
                                      otherButtonTitles:@"Auto",
                                          @"Continuous Auto" ,
                                          @"Fixed", nil];
        focusSheet.tag = 102;
        [focusSheet showInView:self.view];
    } else {
        //
        UIAlertView *alert = [[UIAlertView alloc]
                               initWithTitle:@"Error"
                               message:@"Autofocus not supported"
                               delegate:nil
                               cancelButtonTitle:@"OK"
                               otherButtonTitles:nil];
        [alert show];
    }
}
As with the previous examples, expand the action sheet handler to support the new sheet, as shown in Listing 4-16.
Listing 4-16. Modified Action Sheet Handler
-(void) actionSheet:(UIActionSheet *)actionSheet
        didDismissWithButtonIndex:(NSInteger)buttonIndex
{
    switch (actionSheet.tag) {
        case 100:
            [self switchToCameraWithIndex:buttonIndex];
            break;
        case 101:
            [self switchToFlashWithIndex:buttonIndex];
            break;
        case 102:
            [self switchToFocusWithIndex:buttonIndex];
            break;
        default:
            break;
    }
}
Just as when changing flash mode, the code converts the button options to valid constants, takes a configuration lock, and commits the changes if they are supported by the device. You can find a method that encapsulates the autofocus mode switching logic in Listing 4-17.
Listing 4-17. Switching Autofocus Modes
-(void)switchToFocusWithIndex:(NSInteger)buttonIndex
{
    NSError *error = nil;

    AVCaptureFocusMode focusMode = 0;

    switch (buttonIndex) {
        case 0: {
            focusMode = AVCaptureFocusModeAutoFocus;
            self.focusButton.titleLabel.text = @"Focus: Auto";
            break;
        }
        case 1: {
            focusMode = AVCaptureFocusModeContinuousAutoFocus;
            self.focusButton.titleLabel.text = @"Focus: Cont";
            break;
        }
        case 2: {
            focusMode = AVCaptureFocusModeLocked;
            self.focusButton.titleLabel.text = @"Focus: Fixed";
            break;
        }
        default:
            break;
    }

    if ([self.currentDevice lockForConfiguration:&error] &&
        [self.currentDevice
        isFocusModeSupported:focusMode]) {

        self.currentDevice.focusMode = focusMode;

        [self.currentDevice unlockForConfiguration];
    } else {
        NSLog(@"could not set focus mode");
    }

}
By default, the focal point is at the center of the screen, but often a user will have a subject in the left or right third of the frame. To fully take advantage of autofocus, you want to let the user refocus the camera to some new focal point. When using the default camera in iOS, you may remember that a rectangle appears when you press the screen. This happens through the use of a UITapGestureRecognizer object.
Gesture recognizers allow you to call a method when a touch gesture from the user (such as tapping the screen or pinching your fingers in/out) occurs, and provides you with properties such as where the touch event happened on the screen. The signature for a gesture recognizer handler method looks similar to that of a normal event handler, except the parameter type is UIGestureRecognizer:
-(IBAction)didTapPreview:(UIGestureRecognizer *)gestureRecognizer;
You use the method [UIGestureRecognizer locationInView:] to determine the x and y coordinates of the touch event, relative to the origin of the view you pass in as an input parameter.
To configure the camera to focus to a specific point, use the instance method [AVCaptureDevice setFocusPointOfInterest:focusPoint]. The input parameter is a CGPoint object with x and y values between 0.0 and 1.0 that correspond to the relative position of the focal point within the frame. For example, a value of (0.5, 0.75) would center the focal point horizontally, and place it one-fourth of the way above the bottom of the frame, vertically.
You convert gesture recognizer touch coordinates from absolute to relative positions by dividing the touch event’s x position by the frame’s width, and dividing the touch event’s y position by the frame’s height, as shown in Listing 4-18.
Listing 4-18. Converting Absolute Positions to Relative Positions
CGPoint tapPoint = [gestureRecognizer
                    locationInView:gestureRecognizer.view];
CGFloat relativeX = tapPoint.x / self.previewView.frame.size.width;
CGFloat relativeY = tapPoint.y / self.previewView.frame.size.height;
CGPoint focusPoint = CGPointMake(relativeX, relativeY);
Finally, tie everything together by adding the position code and capture setting configuration code into the gesture recognizer handler, as shown in Listing 4-19.
Listing 4-19. Setting Focal Point from a Tap Gesture Handler
-(void)didTapPreview:(UIGestureRecognizer *)gestureRecognizer
{
    CGPoint tapPoint = [gestureRecognizer
        locationInView:gestureRecognizer.view];
    CGFloat relativeX = tapPoint.x / self.previewView.frame.size.width;
    CGFloat relativeY = tapPoint.y /
        self.previewView.frame.size.height;
    CGPoint focusPoint = CGPointMake(relativeX, relativeY);

    AVCaptureFocusMode focusMode = self.currentDevice.focusMode;

    NSError *error = nil;

    if ([self.currentDevice isFocusPointOfInterestSupported] &&
        [self.currentDevice isFocusModeSupported:focusMode])
    {
        if ([self.currentDevice lockForConfiguration:&error])
        {
            [self.currentDevice setFocusMode:focusMode];
            [self.currentDevice setFocusPointOfInterest:focusPoint];
            [self.currentDevice unlockForConfiguration];
        }
    }

    self.tapPosition.text = [NSString stringWithFormat:
                             @"Tap Position: (%0.f, %0.f)",
                             tapPoint.x, tapPoint.y];
}
Modifying exposure settings has all of the same properties and background knowledge requirements as changing autofocus settings:
- Use a button and action sheet to select exposure mode.
- Query for compatibility before setting desired exposure mode.
- Set the focal point for exposure settings based on a touch event.
Therefore, the button handler should look very familiar. The major difference is that this functionality will allow the user to select only Continuous Auto-Exposure or Fixed Exposure. You can find a button handler that presents the exposure mode action sheet in Listing 4-20.
Listing 4-20. Action Sheet Button Handler, Including Exposure
-(IBAction)exposureMode:(id)sender {
    if ([self.currentDevice isExposurePointOfInterestSupported]) {
        //
        UIActionSheet *exposureSheet =
             [[UIActionSheet alloc]
               initWithTitle:@"Exposure Mode"
               delegate:self
               cancelButtonTitle:@"Cancel"
               destructiveButtonTitle:nil
               otherButtonTitles:@"Continuous Auto" , @"Fixed", nil];
        exposureSheet.tag = 103;
        [exposureSheet showInView:self.view];
    } else {
        //
        UIAlertView *alert = [[UIAlertView alloc]
                               initWithTitle:@"Error"
                               message:@"Flash not supported"
                               delegate:nil
                               cancelButtonTitle:@"OK"
                               otherButtonTitles:nil];
        [alert show];
    }
}
The final action sheet handler adds the tag for the exposure sheet, as shown in Listing 4-21.
Listing 4-21. Exposure Mode Button Handler
-(void) actionSheet:(UIActionSheet *)actionSheet didDismissWithButtonIndex:(NSInteger)buttonIndex
{
    switch (actionSheet.tag) {
        case 100:
            [self switchToCameraWithIndex:buttonIndex];
            break;
        case 101:
            [self switchToFlashWithIndex:buttonIndex];
            break;
        case 102:
            [self switchToFocusWithIndex:buttonIndex];
            break;
        case 103:
            [self switchToExposureWithIndex:buttonIndex];
            break;
        default:
            break;
    }
}
You set exposure settings in the manner that should now be extremely familiar—converting indices to constants, and taking a lock, as shown in Listing 4-22.
Listing 4-22. Setting Exposure Mode
-(void)switchToExposureWithIndex:(NSInteger)buttonIndex
{
    NSError *error = nil;

    AVCaptureExposureMode exposureMode = 0;

    switch (buttonIndex) {
        case 0: {
            exposureMode = AVCaptureExposureModeContinuousAutoExposure;
            self.exposureButton.titleLabel.text = @"Exposure: Cont";
            break;
        }
        case 1: {
            exposureMode = AVCaptureExposureModeLocked;
            self.exposureButton.titleLabel.text = @"Exposure: Fixed";
            break;
        }
}

    if ([self.currentDevice isExposureModeSupported:exposureMode] &&
        [self.currentDevice lockForConfiguration:&error]) {

        self.currentDevice.exposureMode = exposureMode;

        [self.currentDevice unlockForConfiguration];
    } else {
        NSLog(@"could not set exposure mode");
    }

}
The final gesture recognizer duplicates the autofocus logic, except for exposure, as shown in Listing 4-23.
Listing 4-23. Tap Gesture Recognizer, Including Exposure Settings
-(void)didTapPreview:(UIGestureRecognizer *)gestureRecognizer
{
    CGPoint tapPoint = [gestureRecognizer
                        locationInView:gestureRecognizer.view];
    CGFloat relativeX = tapPoint.x / self.previewView.frame.size.width;
    CGFloat relativeY = tapPoint.y /
                        self.previewView.frame.size.height;
    CGPoint focusPoint = CGPointMake(relativeX, relativeY);

    AVCaptureExposureMode exposureMode =
                          self.currentDevice.exposureMode;
    AVCaptureFocusMode focusMode = self.currentDevice.focusMode;

    NSError *error = nil;

    if ([self.currentDevice lockForConfiguration:&error])
    {
        if ([self.currentDevice isFocusPointOfInterestSupported] &&
            [self.currentDevice isFocusModeSupported:focusMode])
        {
            [self.currentDevice setFocusMode:focusMode];
            [self.currentDevice setFocusPointOfInterest:focusPoint];
        }
        if ([self.currentDevice isExposurePointOfInterestSupported] &&
            [self.currentDevice isExposureModeSupported:exposureMode])
        {
            [self.currentDevice setExposureMode:exposureMode];
            [self.currentDevice setExposurePointOfInterest:focusPoint];
        }
        [self.currentDevice unlockForConfiguration];
    }

    self.tapPosition.text =
        [NSString stringWithFormat:@"Tap Position: (%0.f, %0.f)",
                                   tapPoint.x, tapPoint.y];
}
Handling Different Screen Sizes
While you do not need to add any extra configuration options to your AVCaptureSession to handle different screen sizes (for example, the iPad, iPhone 4S, or iPhone 5), you will want to make sure you are following the best practices for universal (multi-device) user interface development.
If you are using one storyboard for both your tablet and phone user interfaces, make sure you have enabled auto-layout for your camera controller interface so that it will grow (or shrink) with your screen size. It is a good idea to assign fixed dimensions to your controls while letting the preview area adjust to fill your screen size.
In contrast, if you are using separate storyboards for your tablet and phone user interfaces, remember to lay out your camera controller on both storyboards. Make sure all your outlets and actions are set correctly on both storyboards, and try to optimize your user interface for each device. You may find that short captions or a limited set of exposed configuration options are appropriate for a phone interface, while expanded captions and a comprehensive set of configuration options are perfect for a tablet interface. Once again, try to let your preview area expand with the screen, as it is your user’s primary feedback interface.
Caution Remember, auto-layout is not available for NIB-based user interfaces, so be careful to duplicate your changes across all screen-size versions of an interface, or begin transitioning over to storyboards.
Building a Custom Image Picker
In this section, you will build a custom image picker, using the same logic as with the custom camera controller—to implement use cases. Apple does not provide a UIImagePickerController out of the box. For this app, you want to be able to theme the image picker, and be able to select multiple images before returning to the original view. Figure 4-4 shows a flow diagram and mock-up of the image picker.

Figure 4-4. Flow diagram and mock-up of the custom image picker
Much like a UIImagePickerController, you want to present the image picker modally, dismissing it after users confirm their selection(s). Because this example adds functionality to a familiar user interface, it presents the thumbnail images in a grid implemented via the UICollectionView class. The app represents a selection by highlighting the selected item and displaying a filled-in check box over it. Deselecting an item will undo both those state changes. The app destroys the modal view after users have confirmed their changes or decided to cancel the view. The selected images will appear in a scrollable table view on the parent view controller.
To accomplish this workflow, you need to perform the following steps, which are covered in this section:
- Initialize a data source containing images from the camera roll.
- Present these images in a UICollectionView.
- Configure the UICollectionView to allow multiple selections.
- Create a programmatic interface for returning selected images.
You’ll be using the Assets Library framework as the data source. Because this framework and the UICollectionView class may be unfamiliar to most readers, you’ll also see background information on both.
You can find the source code for this application in the Chapter 4 folder of the source code bundle. This project is called MyPicker.
Instantiating an Asset Library as a Data Source
The first step in building the photo browser is to instantiate a data source. While there is no API that will allow you to just “get all UIImages on the device,” you can take advantage of the Assets Library framework to access all the photos and videos available through the Photos app.
Asset libraries, represented by the ALAssetsLibrary class, provide a two-way interface to the Photos app for reading and writing photos and videos. You can look up assets by album, unique URL, or media type, and save assets to the Photos app or create new albums from within your apps. Additionally, as with other apps that access shared resources, you can query whether your app has permission to access the photos. While iOS does not have such concepts as a global file system, limited interfaces like this allow apps to share data in a safe, consistent way.
To instantiate an Asset Library, you first add the AssetsLibrary.framework to the project. As with the MyCamera project, you can add the framework to your project by adding it to the Linked Frameworks and Libraries array under your project’s general settings.
After adding the framework, include its header file in the target class:
#import <AssetsLibrary/AssetsLibrary.h>
Note The import keyword allows you to reduce code size by checking for duplicates before adding a file, unlike the include keyword.
Now that the groundwork is in place, you can instantiate an Assets Library:
ALAssetsLibrary *assetsLibrary = [[ALAssetsLibrary alloc] init];
Just as you need to select an album or timeline to view photos from the Photos app, you need to specify a group to discover assets through an Asset Library. Represented by the ALAssetGroup class, asset groups allow you to access a subset of assets from the Photos app based on one or more filters. While asset groups allow you to replicate some of the functionality of an NSSet, such as providing the number of items in the set, they also allow for more-advanced functionality and can provide information such as a thumbnail image for a group or permission status.
To retrieve an asset group, use the Asset Library API [ALAssetsLibrary enumerateGroupsWithTypes:usingBlock:failureBlock]. You pass this API an NSInteger that represents the filters to include in the search, a block that will be called each time an ALAssetGroup is found, and a block that will be called if a failure occurs. Because there is no way of guaranteeing how processor- or time-intensive group lookup will be (a user could have hundreds of albums, many of which are hidden), block syntax is appropriate for this API. Blocks make apps faster by giving developers a way to run snippets of code in the background, freeing up the main thread for time-sensitive operations, such as feedback from user-interface elements (for example, catching button presses).
Listing 4-24 returns groups that represent photos in the Saved Photos and Photo Stream galleries. The example prints log messages upon success or failure.
Listing 4-24. Enumerating Asset Groups
NSInteger photoFilters = ALAssetsGroupPhotoStream |
                         ALAssetsGroupSavedPhotos;

[assetsLibrary enumerateGroupsWithTypes:photoFilters
    usingBlock:^(ALAssetsGroup *group, BOOL *stop) {
        [group enumerateAssetsUsingBlock:^(ALAsset *result,
        NSUInteger index, BOOL *stop) {
            NSLog(@"success! asset found");
        }];

    } failureBlock:^(NSError *error) {
        NSLog(@"error! %@", [error description]);
    }
];
The filter values represent bits in a mask, so by ORing them together, you can combine filters. Table 4-2 shows a list of filter values and what they represent.
Table 4-2. Frequently Used Asset Group Filters
Constant | Asset Group |
|---|---|
ALAssetsGroupLibrary | Library—all assets on the device, originating from iTunes |
ALAssetsGroupAlbum | All albums on the device, except for Photo Stream or Shared Streams |
ALAssetsGroupEvent | All Event albums |
ALAssetsGroupFace | All Face albums |
ALAssetsGroupSavedPhotos | Camera Roll album |
ALAssetsGroupPhotoStream | Photo Stream album (iCloud) |
ALAssetsGroupAll | All albums except for those coming from iTunes |
Now that you have a set of asset groups ready, you can implement the logic to iterate through each individual asset. The ALAsset class represents assets. Much like ALAssetGroups, they are more intelligent than the base classes you might expect to represent such binary data. ALAssets maintain unique internal URLs corresponding to every version of an asset that exists, such as the original version and multiple edited versions. They also provide access to derived properties, such as thumbnails, for an asset, and even support saving new versions of assets.
To access the ALAssets represented by an ALAssetGroup, you use an API similar to the group discovery API: [ALAssetGroup enumerateAssetsUsingBlock:]. As with the group discovery API, the block you define will be called every time the API finds an asset and is ready to access. To keep things simple, this example appends every valid (non-nil), photo result to an NSMutableArray of assets. You’ll use this data structure to populate the collection view later.
Listing 4-25. Enumerating Image Assets
self.assetsLibrary = [[ALAssetsLibrary alloc] init];
self.images = [NSMutableArray new];

NSInteger photoFilters = ALAssetsGroupPhotoStream |
                         ALAssetsGroupSavedPhotos;

[self.assetsLibrary enumerateGroupsWithTypes:photoFilters
    usingBlock:^(ALAssetsGroup *group, BOOL *stop) {
        [group enumerateAssetsUsingBlock:^(ALAsset *result, NSUInteger
                                           index, BOOL *stop) {
            if (result != nil) {
                    [self.images addObject:result];
            }
        }];
    } failureBlock:^(NSError *error) {
        NSLog(@"error! %@", [error description]);
    }
];
QUICK GUIDE TO BLOCKS
In Objective-C, blocks are a language feature that allow you to specify anonymous methods—pieces of code that act like a method but do not need to be declared with a signature. Blocks are a great way of creating a “disposable” method that is called from only one specific code path. Additionally, you can define blocks as a parameter for a method. Throughout this book, you will see mention of completion blocks; these are blocks defined in the method call that get called immediately when a method completes.
Block signatures have a jarring syntax compared to methods. The signature for a block is as follows:
void (^myBlock)(NSString* string1, NSString *string2, int count);
The first keyword, void, is the return type for the block. myBlock is the block name; it is always preceded by a caret symbol. The contents of the final set of parentheses are the parameter types. Blocks are closer to C in syntax style and do not require labels for parameters.
A block’s signature specifies its return type, name, and parameters, just like a method’s. To define a block, append the code for the block in curly braces, just as you would a method. Blocks are treated as inline functions by the compiler, meaning they do not break a line of code, so make sure you add a semicolon to the end of the line:
int finalPhotoCount = ^(int count1, int count2) {
return count1+count2;};
You use the same syntax to call a block with parameters as you do a method, by specifying the parameter types and code for the block. For example, blocks were used to enumerate the assets and groups in Listing 4-25.
[group enumerateAssetsUsingBlock:^(ALAsset *result, NSUInteger index,
BOOL *stop) {
if (result != nil) {
[self.images addObject:result];
}
}];
One of the more perilous aspects of a block is that its variable scoping is different from that of a normal method. You can create local variables within a block, and you can access instance variables from outside the block. However, by default, all outside variables in a block are passed by copy, meaning you can see their contents, but you cannot modify them. To declare a local or instance variable so that it can be modified by a block, you need to add the __block keyword in front of its type:
__block NSInteger photoCount;
You use a similar pattern for instance variables, adding the __block keyword after the attributes and before the type:
@property (nonatomic, assign) __block NSInteger photoCount;
Using a block is like driving a Ferrari without brakes. You can go incredibly fast, but you need to be aware of your limitations and how to work around them.
Using the UICollectionView Class to Enumerate Assets
If you built the examples in the previous section, you now have an array containing a set of assets that correspond to photos from the Saved Photos and Photo Stream galleries. At this point, you can build a collection view user interface to represent these items.
Introduced with iOS 6, collection views refer to the graphics-based navigation interface that you may be familiar with from the iBooks app, and from older versions of the Photos app (see Figure 4-5). In a collection view, items are generally represented by a graphical representation (such as album art or book covers), and flow from left to right, top to bottom. Much like with a table view, you define a data source for the view, specify what each item (called a cell) should look like, and define the behaviors that should occur when the user interacts with an item. Unlike a table view, you do not need to specify how many items will be in each column or row; the UICollectionView class will automatically fit items into the grid based on the cell size and the container view size. That makes it easy to pass in linear data sets. Similarly, you can group data in sections, as you would with a table view.

Figure 4-5. Screenshot of the collection view in iBooks
To add a collection view to the application, drag a Collection View Controller from Interface Builder’s object library. Make sure you instantiate your own subclass of UICollectionViewController so that you can tie the data source to the view, and implement your own action handlers. If you are implementing an iPad interface, remember to duplicate these settings in the iPad storyboard as well. You can find a screenshot of the storyboard in Figure 4-6.
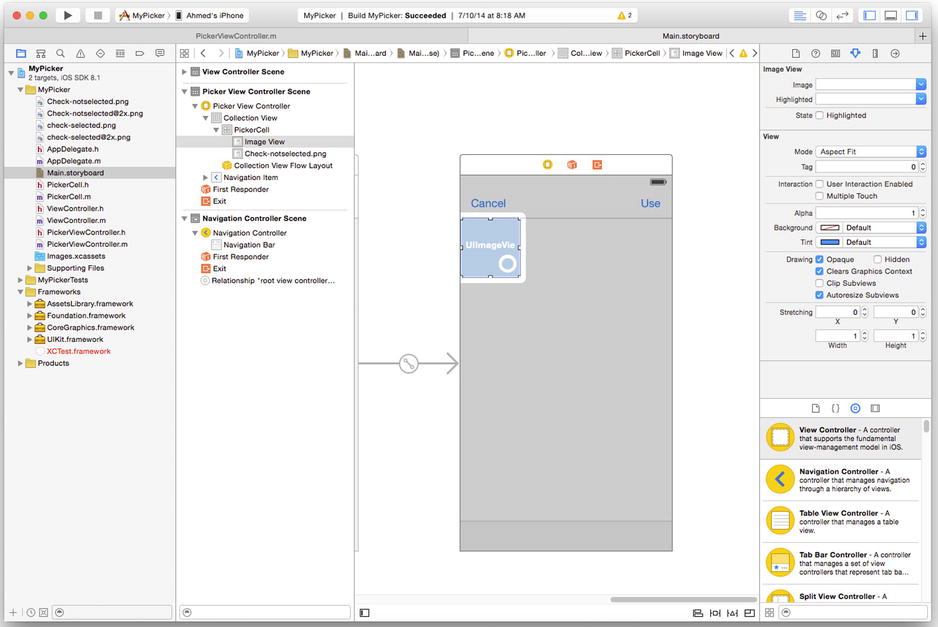
Figure 4-6. Adding a collection view in Interface Builder
The easiest way to think of a UICollectionView is as a more advanced UITableView. Like a table view, a collection view needs to be initialized with an array of data, and each item is represented by a cell. For the MyPicker project, you will want each cell to contain an image and a check box representing its state.
The default Interface Builder template for a UICollectionView comes with an empty UICollectionViewCell. In order to make it display two images (one for the contents and one for the check box), you need to follow these steps:
- Create a new subclass of UICollectionViewCell. Set this as the parent class for your cell (use the Interface Builder attributes inspector for this).
- Give the cell a new reuse identifier (use the Interface Builder attributes inspector for this).
- Add two UIImage properties to the cell to represent the image and check box. Tie these to your class by using Xcode.
When working with a UICollectionViewCell, make sure you have the cell selected in Interface Builder; otherwise, you will have trouble modifying it. As shown in Figure 4-7, you can easily select items by using the Scene Navigator in Interface Builder (the left pane).
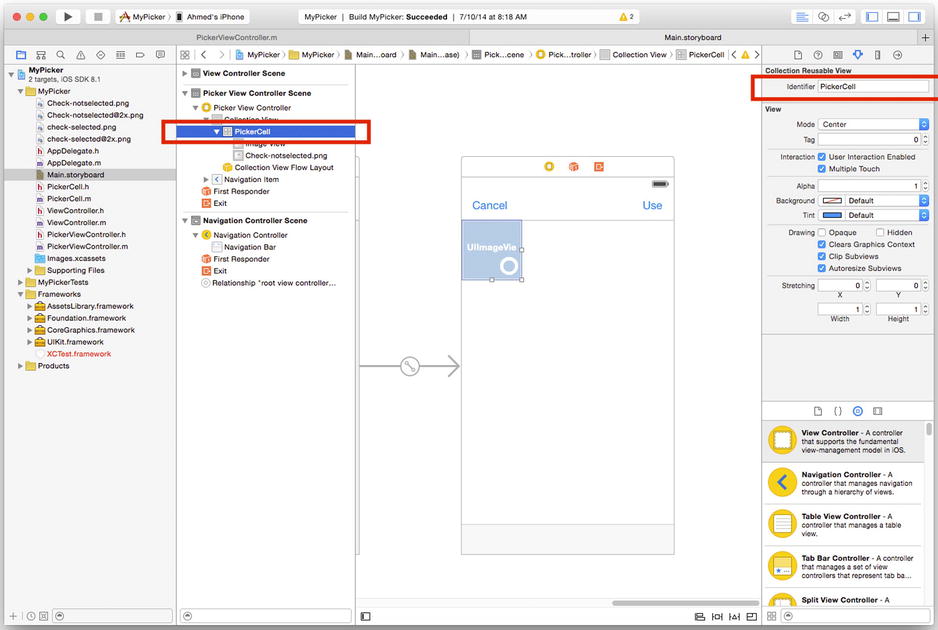
Figure 4-7. Setting a reuse identifier in Interface Builder
Note If you are having trouble setting your reuse identifier, make sure you have selected the UICollectionViewCell, not one of its subviews.
Much as with a UITableView, you need to implement a series of delegate methods to fully realize the collection view. The first step is to let the collection view know how many sections the data source has, and how many rows you want in each section. You define the number of sections by implementing the [UICollectionViewDataSource numberOfSectionsInCollectionView] protocol method. In this method, the return type is an integer that specifies the number of sections. This simple example loads assets from a one-dimensional array, so you can return 1 as the number of sections, as shown in Listing 4-26.
Listing 4-26. Initializing Collection View Section Count
- (NSInteger)numberOfSectionsInCollectionView:(UICollectionView *)collectionView
{
    return 1;
}
The real configuration work happens in defining the number of rows for each section. For this example, the number of rows is equal to the number of items in the array, so you can simply return the count property. You implement this in the delegate method, [UICollectionView numberOfItemsInSection:], which takes the section number as input and returns the row count, as shown in Listing 4-27.
Listing 4-27. Initializing Collection View Row Count
- (NSInteger)collectionView:(UICollectionView *)view numberOfItemsInSection:(NSInteger)section;
{
    return [self.images count];
}
You may run into timing issues, depending on where you initialize your input array. For example, if you make your Asset Library calls from the [UIViewController viewDidLoad] method, you will notice that the [UICollectionView numberOfItemsInSection:] method initializes the collection view with a count of 0, even if you have found several items. This is due to the asynchronous nature of block programming. Because the lookup code runs in the background, there is nothing preventing the system from executing the collection view initialization code immediately against the still-empty array.
While this may seem like a pretty big bug, it’s nothing to worry about, because there’s an API that lets you refresh the collection view’s data source at any time. This API is [UICollectionView reloadData]. It immediately calls the [UICollectionView numberOfSections] and [UICollectionView numberOfItemsInSection:] methods again, which then return accurate initialization values. All you need to do is call that method when you are confident the array has been fully populated. The sample application calls it when it has finished iterating through all the groups. The refresh code block is illustrated in Listing 4-28.
Listing 4-28. Refreshing the Collection View
[self.assetsLibrary enumerateGroupsWithTypes:photoFilters
    usingBlock:^(ALAssetsGroup *group, BOOL *stop) {
    [group enumerateAssetsUsingBlock:^(ALAsset *result, NSUInteger
                                       index, BOOL *stop) {
    if (result != nil) {
        [self.images addObject:result];
    }
}];

    [self.collectionView reloadData];
} failureBlock:^(NSError *error) {
    NSLog(@"error! %@", [error description]);
}];
Now that you can be confident about the data source, you need to make sure each UICollectionViewCell is initialized with information from the assets. You initialize the cells using the [UICollectionView cellForItemAtIndexPath:] method, where the inputs are the collection view and the NSIndexPath value for each item. Following the pattern of initializing table view cells, the first step is to retrieve a cell to work on, which you do with the [UICollectionView dequeueReusableCellWithReuseIdentifier:forIndexPath:] method. Pass in the indexPath and the reuse identifier you defined in Interface Builder. To access the image view for the custom cells, make sure to cast the object after retrieving it. You can find the basic initialization code in Listing 4-29.
Listing 4-29. Initializing a Collection View Cell
- (UICollectionViewCell *)collectionView:(
       UICollectionView *)collectionView
           cellForItemAtIndexPath:(NSIndexPath *)indexPath
{
    PickerCell *cell = (PickerCell *)[collectionView
        dequeueReusableCellWithReuseIdentifier:@"PickerCell"
           forIndexPath:indexPath];

    return cell;
}
Having retrieved the cell, you now need to retrieve the asset that goes with it. Because the data source is a one-dimensional array, you know that the row numbers will line up exactly with the index of each item in the array. Therefore, to retrieve each asset, all you need to do is call [NSArray objectAtIndex:] with the row property of the indexPath. If the data source were a multidimensional array, you could pass in the section number as well.
ALAsset *asset = [self.images objectAtIndex:indexPath.row];
An indexPath in Cocoa Touch is a two-dimensional array that contains sections (the first dimension) and rows (the second dimension). You need to translate an indexPath to a single-dimensional array by accessing its row contents for the current section, which is why you will often see indexPath.row used in a lot of code.
The goal for this sample application is to build a thumbnail browser, similar to the default one provided by the UIImagePickerController class. Although you could create your own thumbnail from the full image data stored in the ALAsset, in the interests of speed and memory, you should use the one available through the derived properties in the class. ALAsset exposes two properties: [ALAsset thumbnail] and [ALAsset aspectRatioThumbnail], which both return CGImageRefs, or pointers to image data, for each asset. The difference is that thumbnail returns a thumbnail cropped to a square aspect ratio, while aspectRatioThumbnail returns a thumbnail that preserves the original aspect ratio of the asset.
You can create a UIImage from the CGImageRef value using the initialization method [UIImage imageWithCGImage:], passing in the pointer directly. From there, you simply set the image property on the cell’s image view, and you are good to go. You can find the completed initialization method for a cell in Listing 4-30.
Listing 4-30. Initializing a Collection View Cell with a Thumbnail
- (UICollectionViewCell *)collectionView:(
       UICollectionView *)collectionView
       cellForItemAtIndexPath:(NSIndexPath *)indexPath
{
       PickerCell *cell = (PickerCell *)[collectionView
       dequeueReusableCellWithReuseIdentifier:@"PickerCell"
           forIndexPath:indexPath];

    ALAsset *asset = [self.images objectAtIndex:indexPath.row];
    cell.imageView.image = [UIImage imageWithCGImage:asset.aspectRatioThumbnail];

    return cell;
}
As stated at the beginning of the chapter, one of the most compelling reasons for building your own image picker is to cover use cases that are not supported by Apple through the UIImagePickerController class, such as selecting multiple images at once. By taking advantage of UICollectionView’s multiple selection APIs, you can fill this gap without too much extra work.
To enable multiple image selection, you need to perform three high-level tasks:
- Enable multiple-selection on the collection view
- Add or remove items to or from a data structure based on their selection status
- Update each item’s user interface based on its selection status
To enable multiple-selection, all you need to do is enable the allowMultipleSelection flag on the collection view:
[self.collectionView setAllowsMultipleSelection:YES];
To return multiple images when users dismiss the custom image picker, you need to store the images to a data structure that grows or shrinks based on the user’s selections. You could store the items in an NSMutableArray, but you would need to write your own wrapper code to make sure items do not already exist in the structure before adding them, which could slow down the app or increase its memory footprint. A more elegant solution is to use an NSMutableDictionary, keyed by asset index number. By keying assets directly to the index number, you are not dependent on what order items are added to the dictionary, and you can employ very fast, direct lookups. When users select an asset, you do not need to worry about duplicates, because you can tie only one object to the key. And when users deselect an asset, you can instantly find and remove the asset from the dictionary based on the index number.
The final step is to update the user interface to mirror changes in selection state. The two delegate methods needed to implement this behavior are [UICollectionView didDeselectItemAtIndexPath:] and [UICollectionView didSelectItemAtIndexPath:]. Much as when you were building the items, the core operations for these functions are to first look up the appropriate cell objects and then modify specific values. This application indicates that an item is selected by changing its background color and the state of an overlay image placed over the thumbnail. Since the app respects the original aspect ratio of the images, and the collection cells are square, there’s some space to play with in the background. By adding an overlay image, you can also create an interface that users are familiar with from other apps that allow multiple item selection, such as the iOS mail app. The logic for selecting and deselecting cells is illustrated in Listing 4-31.
Listing 4-31. Logic for Selecting and Deselecting Collection View Cells
-(void)collectionView:(UICollectionView *)collectionView
        didSelectItemAtIndexPath:(NSIndexPath *)indexPath
{
    PickerCell *cell = (PickerCell *)[collectionView
        cellForItemAtIndexPath:indexPath];

    cell.overlayView.image = [UIImage imageNamed:@"Check-selected"];
    cell.imageView.backgroundColor = [UIColor whiteColor];

    [self.selectedImages setObject:[self.images
                                    objectAtIndex:indexPath.row]
                                    forKey:[NSNumber
                                    numberWithInteger:indexPath.row]];
}

- (void)collectionView:(UICollectionView *)collectionView
        didDeselectItemAtIndexPath:(NSIndexPath *)indexPath
{
    PickerCell *cell = (PickerCell *)[collectionView
        cellForItemAtIndexPath:indexPath];

    cell.overlayView.image = [UIImage imageNamed:@"Check-notselected"];
    cell.imageView.backgroundColor = [UIColor purpleColor];

    if ([self.selectedImages objectForKey:[NSNumber
                     numberWithInteger:indexPath.row]] !=  nil) {
        [self.selectedImages removeObjectForKey:[NSNumber
                     numberWithInteger:indexPath.row]];
    }

}
Creating an Interface for Returning Image Data
The final step for the custom image picker is to build a programmatic interface for returning the user’s image selections back to the calling class. You also need a way of passing back a cancel message, indicating that the user did not select any images.
Harkening back to the earlier discussion of message passing, you may remember that there are several ways of building an interface between two classes, ranging from loose implementations such as notification and key/value observing, to very strict ones including protocols and delegation. While a notification-based system could work here, these systems are often more appropriate for background tasks or classes that want to subscribe to a service, meaning they could easily remove themselves as an observer and still operate fine. Because you are trying to build an experience that is similar to the native UIImagePickerController, you should try to use a design pattern similar to the native functionality, which includes defining specific messages and having a pointer back to the calling class. In this case, the most appropriate message-passing system would be delegation.
To specify which messages to pass, you must first define the protocol. In this case, you are going to pass either a didSelectImages message, along with a list of assets the user selected, or a cancel message, which indicates that the user selected nothing and wants to dismiss the image picker. To make life easier for the users of this interface, this implementation passes back an array of images with the didSelectImages message, and nothing with the cancel message. You can find an example of the protocol definition in Listing 4-32.
Listing 4-32. Defining a Protocol for the Image Picker
#import <UIKit/UIKit.h>
#import <AssetsLibrary/AssetsLibrary.h>

@protocol PickerDelegate <NSObject>

-(void)didSelectImages:(NSArray *)images;
-(void)cancel;

@end

@interface PickerViewController : UICollectionViewController

@property (nonatomic, strong) NSMutableArray *images;
@property (nonatomic, strong) ALAssetsLibrary *assetsLibrary;
@property (nonatomic, strong) NSMutableDictionary *selectedImages;
@property (nonatomic, weak) id <PickerDelegate> delegate;

-(IBAction)cancel:(id)sender;
-(IBAction)done:(id)sender;

@end
From within the image picker class, call the protocol methods in the action button handlers. The didSelectImages handler builds an array of assets to pass back by iterating through the selection dictionary and returning the image representations of the non-nil assets indicated by each index. For the cancel handler, you can simply send a cancel message to the delegate object. You can find these calls in Listing 4-33.
Listing 4-33. Calling Protocol Methods from the Image Picker
-(IBAction)done:(id)sender
{
    NSMutableArray *imageArray = [NSMutableArray new];
    for (id key in self.selectedImages.allKeys) {
        if ([self.selectedImages objectForKey:key] != nil) {
            [imageArray addObject:[self.selectedImages
                                   objectForKey:key]];
        }
    }

    [self.delegate didSelectImages:imageArray];
}

-(IBAction)cancel:(id)sender
{

    [self.delegate cancel];
}
In the parent view controller, which calls the image picker, declare that you’ll be using a delegate for the image picker class within the class signature when you instantiate the image picker, as shown in Listing 4-34.
Listing 4-34. Specifying That the Target Class Implements the Picker Protocol
@interface ViewController : UIViewController <PickerDelegate,
                            UITableViewDelegate, UITableViewDataSource>
Although that code declares the class as a delegate of the picker protocol, you still need to initialize it.
The delegate method implementations tell the table view to load the thumbnails from the asset array upon receiving a didSelectImages message, and then dismiss the image picker controller. Or, for a cancel message, it simply needs to dismiss the image picker controller to get back to the normal user interface. You can find examples of the picker delegate methods in Listing 4-35.
Listing 4-35. Implementing the Picker Delegate Methods
#pragma mark - Picker Delegate methods

-(void)cancel
{
    [self dismissViewControllerAnimated:YES completion:nil];
}

-(void)didSelectImages:(NSArray *)images
{
    [self dismissViewControllerAnimated:YES completion:nil];

    self.imageArray = [images copy];

    [self.tableView reloadData];
}
Creating Image Data from Asset Representations
Now that you have created an interface to pass back selected assets, there’s one more step required to make it work more like the native image picker: it needs to return some UIImage objects. To extract the original image data from an ALAsset, you need to perform the following steps:
- Extract the desired version, or representation, of the asset to an ALAssetRepresentation object.
- Save a pointer to the image data for the asset by using the [ALAssetRepresentation fullResolutionImage] instance method.
- Query the ALAsset’s metadata to determine the correct orientation for the image.
- Create a UIImage object based on the orientation and the extracted CGImageRef.
As mentioned earlier in the chapter, one of the strengths of the ALAsset class is its ability to store not only raw image data, but also metadata and multiple versions of an image (called representations). A representation can cover such changes as different compression formats or resolutions. The ALAssetRepresentation class stores representation information and has instance methods that let you query for image pointers, metadata, raw data, and storage URLs/UTIs (universal type identifiers).
You create an ALAssetRepresentation object from an ALAsset object either by passing in the UTI for the desired representation or by calling [ALAsset defaultRepresentation], which returns the first available, saved representation of an image:
ALAssetRepresentation *defaultRepresentation = [asset defaultRepresentation];
Similarly, you can get a pointer to the image data for a representation by calling the [ALAssetRepresentation fullResolutionImage] instance method on the representation object. The return type is CGImageRef, a pointer to image data, which reduces object size and increases speed (similar to ALAsset thumbnails).
CGImageRef imagePtr = [defaultRepresentation fullResolutionImage];
To create a UIImage object from a CGImageRef, use the [UIImage imageFromCGImage:] or [UIImage imageFromCGImage:scale:orientation:] instance methods. As it is an extremely common use case for people to take pictures in landscape or portrait mode, you should initialize the image with orientation data to make sure it displays correctly. The instance method takes a UIImageOrientation scalar as its input, so you need to query the ALAsset object for the orientation information. Set the default value to UIImageOrientationUp—just in case no orientation information is available. You can find an This process is illustrated in Listing 4-36.
Listing 4-36. Querying for Asset Orientation
UIImageOrientation imageOrientation = UIImageOrientationUp;
NSNumber *orientation =
    [asset valueForProperty:@"ALAssetPropertyOrientation"];
if (orientation != nil) {
    imageOrientation = [orientation integerValue];
}
Note Querying the ALAssetRepresentation for orientation returns an ALAssetOrientation scalar, which does not accurately represent how the image was taken.
Having collected all of the necessary puzzle pieces, you can now create an image object:
UIImage *image = [UIImage imageWithCGImage:imagePtr scale:1.0f orientation:imageOrientation];
Summary
This chapter presented detailed exercises for building your own camera and image picker controllers with the goal of learning how you can gain more control over photo-related APIs and build your own user interfaces to supply missing functionality. By using lower-level frameworks, you should have a firm sense of how the UIImagePickerController class works. I hope you also gained a deeper understanding of how images are captured and stored at the system level.
In the camera controller exercise, you explored the AVFoundation framework and how you can use its video capture capabilities to build a live preview of a camera feed, as well as how to export frames as images. You also saw one way to perform faster view operations using CALayer objects and how to manipulate the capture settings of the camera using AVCaptureDevice.
The image picker exercise showed how the AssetsLibrary framework gives you a convenient, lower-level API for querying media items on the device. You saw how to filter assets by groups and asset type, and how to add the results to a list. You also saw how to display such results in a UICollectionView, and how to manipulate the settings of the collection view to allow users to select multiple images.