
Using the AVKit Framework for Media Playback
While iOS 7 brought a seismic shift in design sensibilities to the Apple mobile application world, iOS 8 promises to shift mobile app development yet again with its emphasis on new functionality and streamlining of old features. The changes extend into media playback, with the introduction of yet another media playback framework—AVKit!
The AVKit framework is intended to be a drop-in replacement for the media playback features of the MediaPlayer framework. As shown in Figure 12-1, this framework provides a playback interface via the AVPlayerViewController class that is almost exactly the same as the one provided by the MPMediaPlayerController class that you have been using throughout the book.

Figure 12-1. The familiar MPMoviePlayerController playback interface vs. the new AVPlayerController playback interface
From the user interface perspective, not much has changed, aside from the addition of a tiny Expand button in the control bar. For some videos, you may also see a Dialog button, which exposes an audio and subtitle track picker, as shown in Figure 12-2.
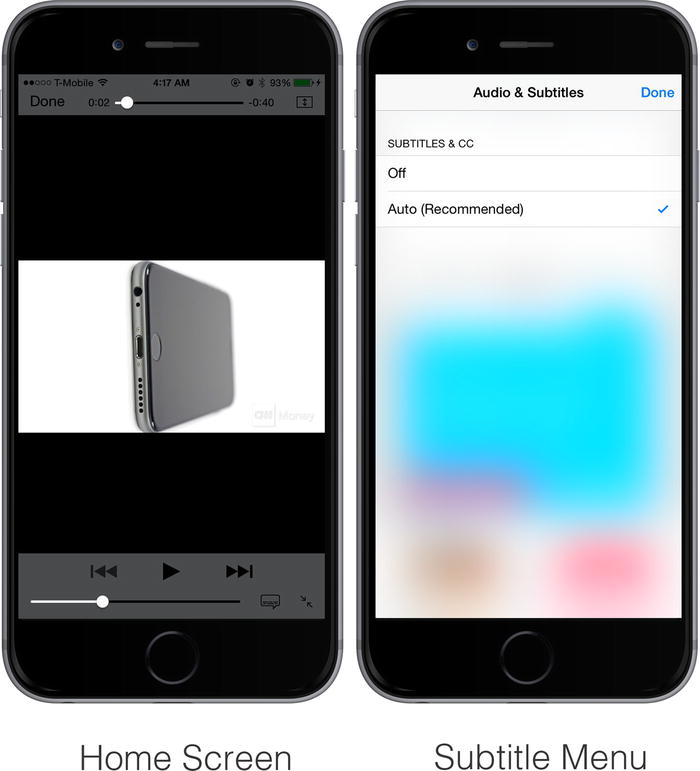
Figure 12-2. Audio and subtitle picker for AVPlayerController class
This new feature is driven by the key difference between the AVKit and MediaPlayer frameworks at a software-architecture level; the AVKit framework is designed to be a media playback that operates closer to the AVFoundation framework. From the video chapters (Chapters 8–10), you may remember that you used the MediaPlayer framework to present the iOS built-in media playback interface, but that you had to drop down to the AVFoundation level to override controls or to create your own recording interface.
Similarly, from the audio chapters (Chapters 5–7), you may remember that AVFoundation allowed you to control playback—as long as you built your own playback interface. The AVKit framework tries to bridge this gap by providing a playback interface that operates on AVAssetItem objects (the class AVFoundation uses to represent media). Thus it can perform more-advanced operations with less “glue” code. This makes it easier for you to work with media files and even lets you perform video effects on-the-fly—such as adding watermarks or color filters.
In this chapter, you will see how to take advantage of the AVKit framework by modifying the MyVideoPlayer video player application from Chapter 9 to use the AVPlayerController class for media playback. Additionally, you will learn about AVKit’s tighter integration with the AVFoundation framework by using the AVQueuePlayer class to effortlessly load a playlist into your video player. Finally, to add that last little bit of flair, you will see how to add a watermark to your player—a convenient way of adding branding to your video playback interface.
At this point, you may be wondering whether the MediaPlayer framework will be around and whether your knowledge will stay relevant for the next few years. The answer is yes, absolutely! The AVPlayerViewController class is meant to mimic the MPMoviePlayerController class in its functionality and message passing, so the MediaPlayer framework knowledge you have will reduce any speed bumps in debugging and implementing AVKit-based applications. Additionally, despite the introduction of the AVKit framework, Apple announced that the MediaPlayer framework is not being deprecated. For the next few releases at least, you can expect MediaPlayer-based apps to work just as they always have.
While Apple is not deprecating the MediaPlayer framework, their general trend with competing APIs is to shift active development to the newer one; getting started early will help you stand out from the crowd.
Caution You need to upgrade your development tools to Xcode 6 and the iOS 8 SDK before attempting to implement the project in this chapter. The AVKit framework is not available in SDK versions prior to iOS 8.
Getting Started
To illustrate the use of the AVKit framework, you will modify the MyVideoPlayer video playback application from Chapter 9 to use the AVPlayerViewController class for media playback, and you will add support for watermarking and queue playback (playlists). The new project will be called MyAVPlayer and can be found in the Chapter 13 folder of the source code bundle.
The MyVideoPlayer project presented a windowed video player. Users could choose a media file to play from the app’s documents folder. As shown in Figure 12-3, the only graphical interface changes apparent to users in the MyAVPlayer project are the watermark, which appears over the player, and an additional Play All button that begins playing all the media files in the documents folder.
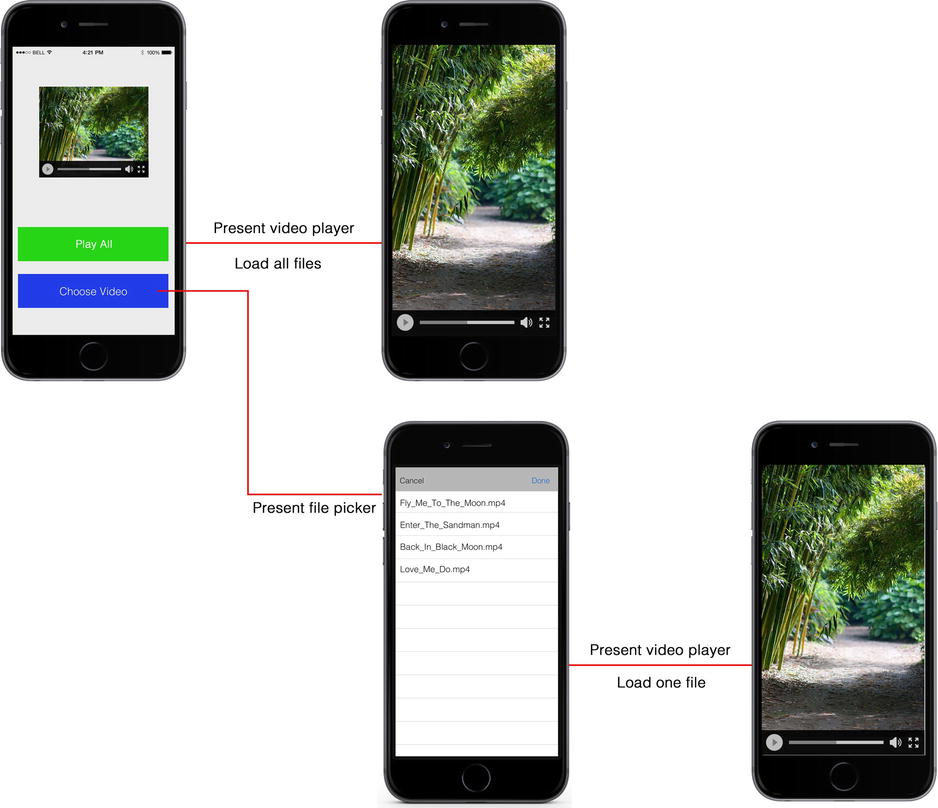
Figure 12-3. Mock-up for MyAVPlayer project
Following the same process you used in Chapter 8 to create the MyVideoPlayer project from a copy of the MyPod project, create a copy of the folder containing the MyVideoPlayer project and then rename it to MyAVPlayer in Xcode.
To use the AVKit framework, you must make sure that both it and the AVFoundation framework are included in your project. If you are using Xcode 6 and the iOS 8 SDK (or greater), both will appear in the Framework Browser. Because you are using AVKit as a drop-in replacement for the MediaPlayer framework in this project, remove the MediaPlayer framework from your project. Your final list of frameworks should look like the example in Figure 12-4.

Figure 12-4. List of frameworks for MyAVPlayer project
Next, you need to update the code in your MainViewController class to reflect the AVKit framework and the new Play All button. First, import the AVKit and AVFoundation frameworks:
#import <AVFoundation/AVFoundation.h>
#import <AVKit/AVKit.h>
Then change the type of the moviePlayer property from MPMoviePlayerController to AVPlayerViewController:
@property (nonatomic, strong) AVPlayerViewController *moviePlayer;
Finally, add a UIButton property representing the Play All button:
@property (nonatomic, strong) IBOutlet UIButton *playAllButton;
Your header file for the MainViewController class should look like the example in in Listing 12-1.
Listing 12-1. Header File for MainViewController Class
#import <UIKit/UIKit.h>
#import <AVFoundation/AVFoundation.h>
#import <AVKit/AVKit.h>
#import "FileViewController.h"

@interface MainViewController : UIViewController <FileControllerDelegate>

@property (nonatomic, strong) IBOutlet UIView *playerViewContainer;
@property (nonatomic, strong) IBOutlet UIButton *chooseFileButton;
@property (nonatomic, strong) IBOutlet UIButton *playAllButton;
@property (nonatomic, strong) AVPlayerViewController *moviePlayer;

-(IBAction)playAll:(id)sender;

@end
To wrap things up, add your Play All button to the storyboard for the project, and tie it to the property you just added. Your intermediate storyboard should look like the example in Figure 12-5.
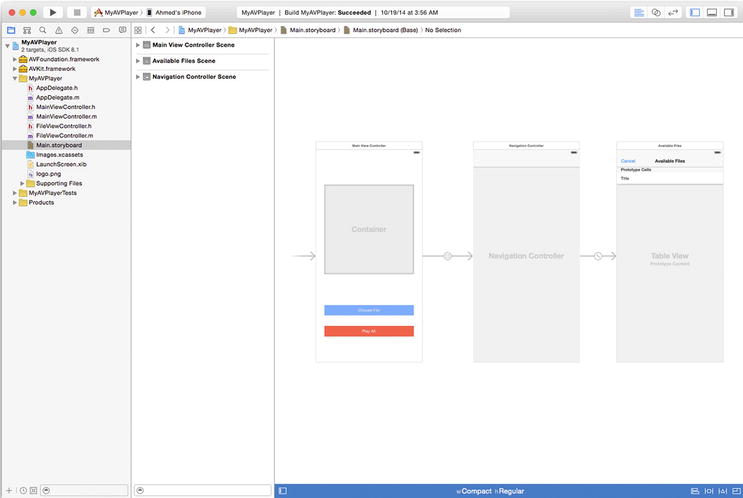
Figure 12-5. Storyboard for MyAVPlayer project
Using the AVPlayer Class to Play a Media File
Just as with the MPMediaPlayerController class, to initialize an AVPlayerViewController object, you need to provide it with a media file or content URL to use as an input. The AVPlayer class handles the playback functions of the AVPlayerViewController class. The AVPlayer class uses AVPlayerItem objects, a subclass of AVAsset, to represent media items. Unlike an MPMediaItem object, an AVAsset can represent media files in container formats, can include multiple subtitle and audio tracks, and can represent AVComposition objects—special objects that add time-based effects such as filters and transitions to assets.
You initialize an AVPlayer object with a single media file by using the [AVPlayer playerWithURL:] method. Doing so automatically converts your content URL to an AVPlayerItem object. As with the MyVideoPlayer application, you should initialize your AVPlayer after the user has selected a file from the file picker. Place your initialization code in the handler method for the FileControllerDelegate protocol, [FileControllerDelegate didFinishWithFile:], as shown in Listing 12-2. This will replace your previous MPMoviePlayerController initialization code.
Listing 12-2. Loading a Media File into an AVPlayer Object
-(void)didFinishWithFile:(NSString *)filePath
{
    NSArray *paths = NSSearchPathForDirectoriesInDomains(
        NSDocumentDirectory, NSUserDomainMask,  YES);
    NSString *documentsDirectory = [paths objectAtIndex:0];
    NSString *relativePath = [documentsDirectory
        stringByAppendingPathComponent:filePath];

    NSURL *fileURL = [NSURL fileURLWithPath:relativePath];

    self.moviePlayer.player = [AVPlayer playerWithURL:fileURL];
    [self.moviePlayer.player addObserver:self forKeyPath:@"status"
                             options:0 context:nil];


    [self dismissViewControllerAnimated:YES completion:^{

        [self.moviePlayer.player play];
    }];

}
As with the MediaPlayer-based implementation, your content URL needs to be created at runtime, to correctly determine the location of your app’s documents directory (remember, the exact location is tied to a UUID that is auto-generated by iOS).
Note If you want to load an AVComposition or AVPlayerItem directly, you can use the[AVPlayer playerWithPlayerItem:] method.
After an AVPlayer object has been initialized, a user can click the Play button to start file playback. However, to fully implement the workflow of the MyVideoPlayer project, you need to add two final steps:
- Present the AVPlayerViewController.
- Define media playback events, (for example, preloading the media so it will load faster).
Presenting the AVPlayerViewController
From a user interface perspective, AVPlayerViewController has two major advantages over MPMoviePlayerController: it provides adaptive controls that respond to both the size of the window and to the type of content being played, and it provides an object representation you use in Interface Builder, as shown in Figure 12-6.
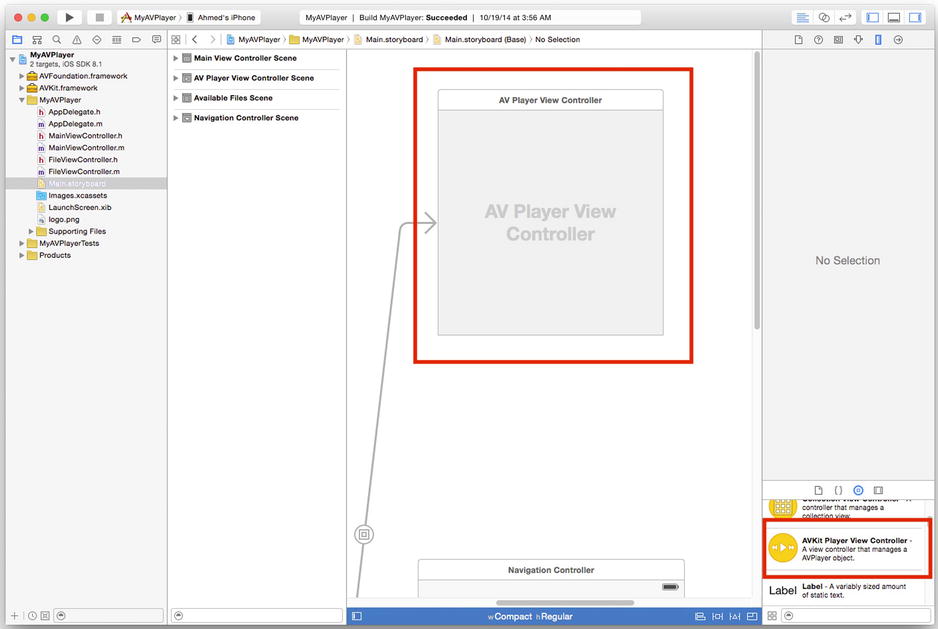
Figure 12-6. Interface Builder object for AVPlayerViewController
As shown in Figure 12-7, the AVPlayerViewController class will automatically switch the control types based on the presentation style (windowed or full-screen). In contrast, the MPMoviePlayerController required users to specify their control style.
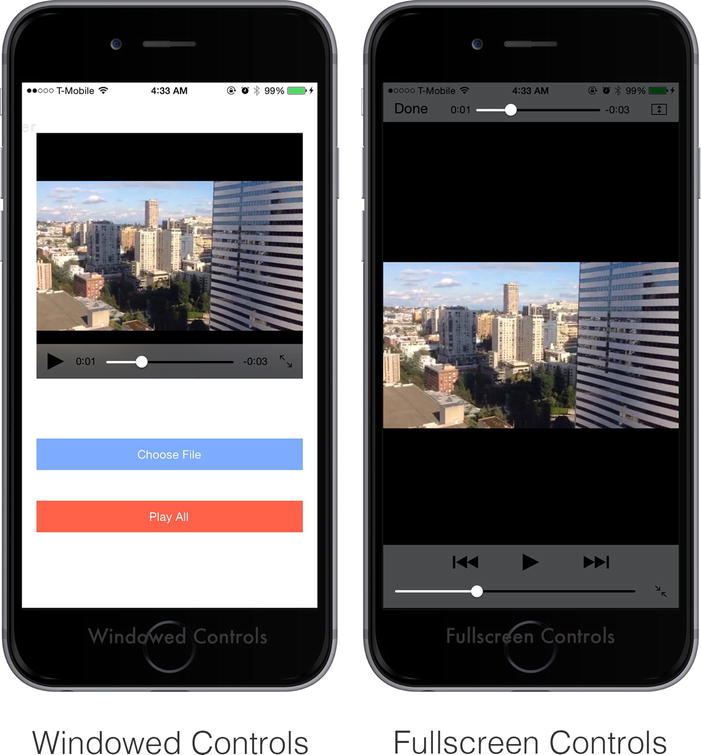
Figure 12-7. Control differences between two AVPlayerViewController presentation styles
As with the MPMoviePlayerController class, users can click the Expand control in the embedded player to toggle between windowed and full-screen playback.
Note You can still hide the AVPlayerViewController controls completely by using the showsPlaybackControls property.
Similarly, the controls change based on whether the user is playing a local media file or a streaming one. As shown in Figure 12-8, local playback exposes a Play button and Forward/Back buttons so users can navigate through a playlist, while streaming playback exposes a Play button and a Repeat button. As with control style, the AVPlayerViewController class does all of this automatically.
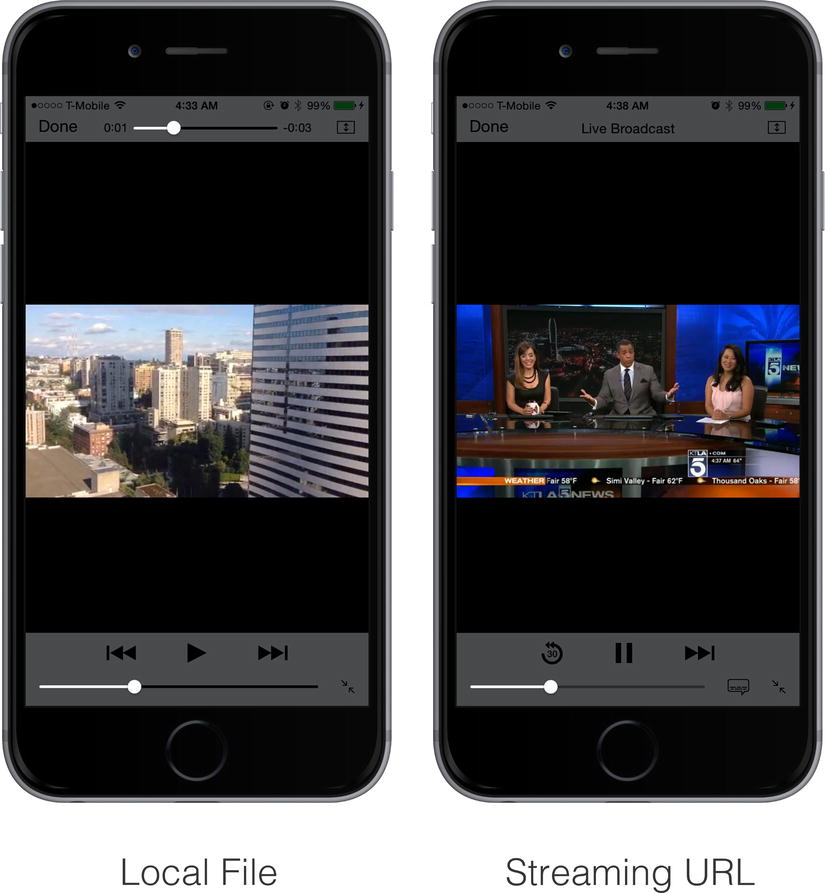
Figure 12-8. AVPlayerViewController control differences between local and streaming files
Although the user interface for the MyAVPlayer project should replicate the MyVideoPlayer project, you need to change the view initialization code. The AVPlayer class is responsible for controlling media playback while the AVPlayerViewController acts as a wrapper for the user interface. To present an AVPlayerViewController in windowed mode, use a container view to contain the AVPlayerViewController object.
To place the AVPlayerViewController on the MainViewController class, drag and drop Container View and AVPlayer View Controller objects from the Interface Builder Object Library onto your storyboard, as shown in Figure 12-9.
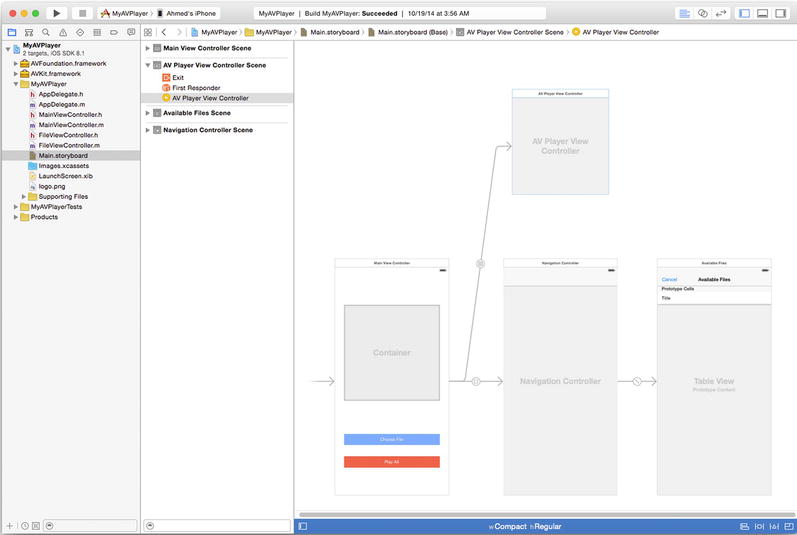
Figure 12-9. Completed storyboard for MyAVPlayer project
Attach the container view to the playerView property in your MainViewController class. To initialize the view, create an embed segue named setPlayer. The system will call this segue only once—after the view has loaded. As with all segues, add this to the [MainViewController prepareForSegue:sender:] method, as shown in Listing 12-3.
Listing 12-3. Initializing an AVPlayerViewController object from a segue
-(void)prepareForSegue:(UIStoryboardSegue *)segue sender:(id)sender
{
    if ([segue.identifier isEqualToString:@"setPlayerContent"]) {
        AVPlayerViewController *playerVC = (AVPlayerViewController *)
            segue.destinationViewController;
        self.moviePlayer = playerVC;

    } else if ([segue.identifier isEqualToString:@"showFilePicker"]) {
        NSMutableArray *videoArray = [NSMutableArray new];

        NSArray *paths = NSSearchPathForDirectoriesInDomains(
            NSDocumentDirectory, NSUserDomainMask, YES);
        NSString *documentsDirectory = [paths objectAtIndex:0];
        NSError *error = nil;

        NSArray *allFiles = [[NSFileManager defaultManager]
            contentsOfDirectoryAtPath:documentsDirectory error:&error];

        if (error == nil) {

            for (NSString *file in allFiles) {
                NSString *fileExtension = [
                    [file pathExtension] lowercaseString];
                if ([fileExtension isEqualToString:@"m4v"] ||
                    [fileExtension isEqualToString:@"mov"]) {
                        [videoArray addObject:file];
                }
            }

        UINavigationController *navigationController =
            (UINavigationController *) segue.destinationViewController;
        FileViewController *fileVC =
          (FileViewController *)navigationController.topViewController;
        fileVC.delegate = self;
        fileVC.fileArray = videoArray;
        } else {
            NSLog(@"error looking up files: %@", [error description]);
        }

     }
}
With segues, the primary method for accessing the destination view controller is through the destinationViewController property. Because the setPlayer segue identifier is used only once in your storyboard, you know that the destinationViewController object points to the AVPlayerViewController you placed there. After casting, you have a valid object that you can use to set the moviePlayer property of the MainViewController class. (Remember, objects placed on a storyboard are initialized by their default constructor when loaded).
Because you initialized the AVPlayer object in the [FileViewDelegate didFinishWithFile:] method (after the user selected a file from the file picker), your video player is now ready to use. When the user selects a media file, your video player will load the first frame of the video and the control bar for the player, indicating that it is ready for playback.
Using the AVQueuePlayer Class to Play a Playlist
Another advantage of the AVKit framework over the MediaPlayer framework is that it allows you to initialize a media player with a playlist, using the AVQueuePlayer class. In addition to being able to load multiple files at once, using AVQueuePlayer as the player property for your AVPlayerController will automatically add controls and handler methods so that users can navigate between items in the playlist.
You might be thinking, “This is pretty standard functionality; shouldn’t all of the media player classes have it?” Unfortunately, the primary classes you have used for media playback, AVAudioPlayer (for audio) and MPMediaPlayerController (for video), cannot be initialized with a playlist. The way most applications implement playlist-like functionality with these classes is by initializing a media player with the “next file” in the playlist when the app receives the event for playback completed. Prior to AVKit, the only media player class that could handle a playlist natively was the MPMusicPlayerController class, which you used for iPod music playback—but remember, you had to implement your own user interface to use this class. The AVQueuePlayer class kills two birds with one stone by providing both the user interface and transition logic from one object.
Just as the AVPlayerViewController class is intended to be a drop-in replacement for the MPMediaPlayerController class, you can use the AVQueuePlayer class as a drop-in replacement for the AVPlayer class. The key difference between the two classes is that instead of initializing an AVQueuePlayer with a single media asset, you pass it an array of AVPlayerItem objects:
AVQueuePlayer *queuePlayer = [[AVQueuePlayer alloc]
                              initWithItems:playerItemArray];
The requirement to use AVPlayerItem objects means that you cannot use a single content URL to initialize your player. However, you can create AVPlayerItem objects from content URLs by using the [AVPlayerItem playerItemWithURL:] method:
AVPlayerItem *item1 = [AVPlayerItem playerItemWithURL:@"goodDoge.mp4"];
This method allows you to use either a local file URL or a remote content URL. As always, remember to calculate your local file URL at runtime in order to properly load it:
NSString *relativePath = [documentsDirectory
    stringByAppendingPathComponent:@"goodDoge.mp4"];
NSURL *fileURL = [NSURL fileURLWithPath:relativePath];
AVPlayerItem *item1 = [AVPlayerItem playerItemWithURL:fileURL];
Because the AVQueuePlayer class is a subclass of AVPlayer, all you need to do to is pass an AVQueuePlayer object to your AVPlayerViewController’s player property:
self.moviePlayer.player = queuePlayer;
As mentioned at the beginning of the chapter, in the MyAVPlayer project, you want to let the user play a single file by using the Choose File button, or load all available files when they use the Play All button. To do this, initialize the AVPlayerViewController with an AVPlayer when the user selects the Choose File button, and an AVQueuePlayer when the user selects the Play All button.
To retain single-file playback, you should leave the Choose File handler (the file picker delegate) untouched. Instead, make a new method, [MainViewController playAll:], which will act as the handler for the Play All button. As shown in Listing 12-4, use this method to set the player property for the shared AVPlayerViewController object.
Listing 12-4. Initializing an AVPlayerViewController with an AVQueuePlayer
-(IBAction)playAll:(id)sender
{

    NSString *relativePath = [documentsDirectory
        stringByAppendingPathComponent:@"goodDoge.mp4"];
    NSURL *fileURL = [NSURL fileURLWithPath:relativePath];
    AVPlayerItem *item1 = [AVPlayerItem playerItemWithURL:fileURL];

    NSString *relativePath2 = [documentsDirectory
        stringByAppendingPathComponent:@"badDoge.mp4"];
    NSURL *fileURL2 = [NSURL fileURLWithPath:relativePath2];

    AVPlayerItem *item2 = [AVPlayerItem
        playerItemWithURL:@"http://www.devatelier.com/commercial.mov"];
    NSArrray *playerItemArray = [NSArray arrayWithObjects: item1, item2];

    self.moviePlayer.player = [[AVQueuePlayer alloc]
        initWithItems:playerItemArray];

    [self.moviePlayer.player addObserver:self forKeyPath:@"status"
        options:0 context:nil];

    [self.moviePlayer.player play];

}
To get this code to compile, you need to define the inputPlaylist object. Because the goal is to play all files, you can duplicate the scanning logic from the file picker (the FileViewController) class. Scan for all files in the documents directory and add them to an NSMutableArray. When that process completes, attach it to your AVPlayerViewController. Listing 12-5 shows the completed initialization method.
Listing 12-5. Completed Initialization Code for AVQueuePlayer
-(IBAction)playAll:(id)sender
{
    NSArray *paths = NSSearchPathForDirectoriesInDomains(
        NSDocumentDirectory, NSUserDomainMask, YES);
    NSString *documentsDirectory = [paths objectAtIndex:0];
    NSError *error = nil;

    NSArray *allFiles = [[NSFileManager defaultManager]
        contentsOfDirectoryAtPath:documentsDirectory error:&error];

    NSMutableArray *playerItemArray = [NSMutableArray new];

    for (NSString *file in allFiles) {

        if ([[file pathExtension] isEqualToString:@"mp4"] ||
            [[file pathExtension] isEqualToString:@"mov"] ||
             [[file pathExtension] isEqualToString:@"MOV"]) {
            NSString *relativePath = [documentsDirectory
                stringByAppendingPathComponent:file];

            NSURL *fileURL = [NSURL fileURLWithPath:relativePath];

            AVPlayerItem *playerItem = [AVPlayerItem
                playerItemWithURL:fileURL];

            [playerItem addObserver:self forKeyPath:@"status"
                options:nil context:nil];

            [playerItemArray addObject:playerItem];
        }

    }

    self.moviePlayer.player = [[AVQueuePlayer alloc]
        initWithItems:playerItemArray];

    [self.moviePlayer.player addObserver:self forKeyPath:@"status"
        options:0 context:nil];

    [self.moviePlayer.player play];

}
Working with Media Playback Events
One of the few features from the MPMediaPlayerController class that was not ported directly to the AVPlayerViewController class was reporting playback state changes through notifications. The good news is that you implement similar functionality in AVPlayerViewController by using key-value observers. Notifications still exist for some playback events, such as playback finished and similar events.
USING KEY-VALUE OBSERVERS
Like notifications, key-value observing (KVO) is a subscription-based message-passing system, meaning a class does not receive any messages until it declares it is observing them. While notifications require you to define and use a notification “name” to pass and receive messages through a central service (the notification center), key-value observers are decentralized.
Key-value observer messages are triggered when the content (value) of a property (key) changes on an object. In KVO, a class declares itself an observer of messages for an object, and specifies a handler method—just as with notifications. Any object or property can be observed, giving you the flexibility to define handling of events that are not tied to notifications or delegate methods—at the cost of reuse (your implementation will be class-specific and less portable).
The process of creating and using a key-value observer is quite similar to that of creating a notification (with the major exception being its object-specific nature): Declare your class as observing a property on an object.
- Implement handler code for the KVO event.
- Remove your observer when it’s no longer needed (to prevent crashing).
The API for registering a key-value observer is [NSObject addObserver:forKeyPath:options:context]. If you wanted to observe when an array’s length changed, your registration code would look like this:
[self.peopleArray addObserver:self forKeyPath:@"count" options:nil
context:nil];
The receiver (calling class) for this message is the object that needs to be observed; in this case, the array itself. The observer is the class that acts like a delegate and receives messages based on the indicated value change. key path is the property of the object that you want to observe; the name is passed as a case-sensitive string. The options parameter lets you specify how information should be sent to the handler method. For example, you can pare down the frequency of messages (the default value of nil is sufficient for most beginning applications). The context parameter lets you to specify an “original value” to compare against in your handler method. Once again, nil is sufficient for most beginning applications.
Unlike a notification, the NSObject method handles all key-value observers by using [NSObject observeValueForKeyPath:ofObject:change:context]. For the array example, your handler method would look like this:
-(void)observeValueForKeyPath:(NSString *)keyPath
ofObject:(id)object change:(NSDictionary *)change
context:(void *)context
{
if ((object == self.peopleArray) &&
[keyPath isEqualToString:@"count"] ) {
NSLog(@"new count!", [self.peopleArray count]);
}
}
The parameters for handling a KVO message correspond in a one-to-one relationship with the parameters you used to declare your observer. The unfamiliar part should be the handling logic. Because one method handles all the messages, you need to check that the message originated from the object you specified. If you are using an instance variable, you would compare the object directly; if you wanted to use a local variable, you could compare the object type. Additionally, you need to check that the message corresponds to the expected property (because you can observe multiple properties on the same object).
Finally, to remove an observer, you call the [NSObject removeObserver:forKeyPath] method on the receiving object, during the tear-down process for your class. For the array example, it would look like this:
-(void)dealloc
{
[self.peopleArray removeObserver:self forKeyPath:@"count"];
}
Just as with notifications, a KVO message could fire after you have torn down your class; cleaning up your observer will prevent crashes. If you are reinitializing an instance variable at runtime, it is wise to remove the observer as part of your reset step.
As you may remember from Chapter 8, after selecting a media file, you immediately called the [MPMediaPlayer prepareToPlay] method to start loading it. After the file was loaded, the MPMoviePlayerLoadStateChanged notification fired, indicating the file was ready for playback. Upon receipt of this notification, you called the [MPMediaPlayer play] function. The AVPlayer object status property retrieves the loading state of a video. In your FileViewController delegate method, add an observer after initializing your player object, as shown in Listing 12-6.
Listing 12-6. Adding a Key-Value Observer for Video Loading State
-(IBAction)playAll:(id)sender
{
    NSArray *paths = NSSearchPathForDirectoriesInDomains(
        NSDocumentDirectory, NSUserDomainMask, YES);
    NSString *documentsDirectory = [paths objectAtIndex:0];
    NSError *error = nil;

    NSArray *allFiles = [[NSFileManager defaultManager]
        contentsOfDirectoryAtPath:documentsDirectory error:&error];

    if (error == nil) {
        NSMutableArray *playerItemArray = [NSMutableArray new];

      for (NSString *file in allFiles) {
        NSString *fileExtension = [file pathExtension];
        if ([[fileExtension lowercaseString] isEqualToString:@"mp4"] ||
            [[fileExtension lowercaseString] isEqualToString:@"mov"]) {

                NSString *relativePath = [documentsDirectory
                    stringByAppendingPathComponent:file];

               NSURL *fileURL = [NSURL fileURLWithPath:relativePath];

               AVPlayerItem *playerItem = [AVPlayerItem
                   playerItemWithURL:fileURL];

               [playerItem addObserver:self forKeyPath:@"status"
                   options:NSKeyValueObservingOptionNew context:nil];

               [playerItemArray addObject:playerItem];
       }

     }

     self.moviePlayer.player = [[AVQueuePlayer alloc] initWithItems:playerItemArray];

        [self.moviePlayer.player addObserver:self forKeyPath:@"status" options:0 context:nil];

        [self.moviePlayer.player play];


  } else {
         NSLog(@"no files found");
  }
}
Referring back to the “Using Key-Value Observers” sidebar, in your [MainViewController observeValueForKeyPath:] method, place your handler logic in an if block that checks to make sure the observed object was your player and that the observed keyPath was status. If an error occurs, display an alert view; otherwise, start playing the video file immediately, as shown in Listing 12-7. Your handler method should execute only when both comparisons are successful.
Listing 12-7. Handler method for Video Loading State Key-Value Observer
-(void)observeValueForKeyPath:(NSString *)keyPath ofObject:(id)object
    change:(NSDictionary *)change context:(void *)context
{
    if ((object == self.moviePlayer.player) && [keyPath
        isEqualToString:@"status"] ) {

        UIImage *image = [UIImage imageNamed:@"devat"];
        UIImageView *imageView = [[UIImageView alloc]
            initWithImage:image];
        imageView.frame = self.moviePlayer.videoBounds;
        imageView.contentMode = UIViewContentModeBottomRight;
        imageView.autoresizingMask = UIViewAutoresizingFlexibleHeight |
            UIViewAutoresizingFlexibleWidth;

        if ([self.moviePlayer.contentOverlayView.subviews count] == 0) {
            [self.moviePlayer.contentOverlayView addSubview:imageView];
        }

        [object removeObserver:self forKeyPath:@"status"];

    } else if ([object isKindOfClass:[AVPlayerItem class]]) {

        AVPlayerItem *currentItem = (AVPlayerItem *)object;

        if (currentItem.status == AVPlayerItemStatusFailed) {
            NSString *errorString = [currentItem.error description];
            NSLog(@"item failed: %@", errorString);

            if ([self.moviePlayer.player
                isKindOfClass:[AVQueuePlayer class]]) {
                AVQueuePlayer *queuePlayer =
                    (AVQueuePlayer *)self.moviePlayer.player;
                [queuePlayer advanceToNextItem];
            } else {
                UIAlertView *alert = [[UIAlertView alloc]
                    initWithTitle:@"Error" message:errorString
                    delegate:self cancelButtonTitle:@"OK"
                    otherButtonTitles:nil];
                [alert show];
            }
        } else {
            [object removeObserver:self forKeyPath:@"status"];
        }
    }
}
Remember, the goal of key-value observing is to filter your messages down to exactly what you need (for example, a specific media player object, a specific property). You do not need to add in error-handling logic since the delegate method is shared by the entire class (every KVO object will send a message to this class).
Also note that the last line of Listing 12-7 removes the observer after catching it. This prevents crashes from occurring the next time the user starts playing a video. At this point, your original AVPlayer object has been freed from memory.
In the MyVideoPlayer app, you showed an alert view when media playback completed, by observing the MPMoviePlayerPlaybackDidFinishNotification notification. To catch the equivalent notification for the AVKit framework, add an observer for the AVPlayerItemDidPlayToEndTimeNotification notification, as shown in Listing 12-8.
Listing 12-8. Adding an Observer for AVPlayer’s “Playback Completed” Notification
- (void)viewDidLoad {
    [super viewDidLoad];
    [[NSNotificationCenter defaultCenter] addObserver:self
        selector:@selector(playbackFinished:)
        name:AVPlayerItemDidPlayToEndTimeNotification object:nil];
}
Many video applications commonly dismiss the video playback interface automatically when playback has completed. You can implement this behavior by calling the [self dismissViewController:animated:] method in your callback method, as shown in Listing 12-9.
Listing 12-9. Callback Method for “Playback Completed” Notification
-(void)playbackFinished:(NSNotification *) notification
{
    NSDictionary *userInfo = notification.userInfo;

    if ([self.moviePlayer.player isKindOfClass:[AVPlayer class]]) {
        [self dismissViewControllerAnimated:YES completion:nil];
    } else {
        //do nothing
    }

}
With the Playback Completed notification, be careful to check the type of the AVPlayer object that is currently loaded before dismissing the AVPlayerViewController entirely. For an AVQueuePlayer, you will need to create a variable that maintains the queue position before dismissing the AVPlayerViewController. Unfortunately, there is no API for this yet.
When you are playing one media file, it is good form to display an error message if the file failed to load. When you are playing multiple files, it is critical to have a recovery strategy, such as skipping the bad item and continuing with the next one. The playback state observer handled this error when you were playing a single file using the AVPlayer class. For the AVQueuePlayer, you will need something a little bit more advanced.
You can enable item error handling for the AVQueuePlayer class by observing the status variable on each AVPlayerItem that you add to the queue. As shown in Listing 12-10, modify your [MainViewController playAll:] method to add an observer for each AVPlayerItem you create. While the same observer method can service all the items, unless you register them individually, their events will be ignored.
Listing 12-10. Adding Key-Value Observers for AVPlayerItem Objects
-(IBAction)playAll:(id)sender
{
    NSArray *paths =
        NSSearchPathForDirectoriesInDomains(NSDocumentDirectory,
        NSUserDomainMask, YES);
    NSString *documentsDirectory = [paths objectAtIndex:0];
    NSError *error = nil;

    NSArray *allFiles = [[NSFileManager defaultManager]
        contentsOfDirectoryAtPath:documentsDirectory error:&error];

    NSMutableArray *playerItemArray = [NSMutableArray new];

        if (error == nil) {

            for (NSString *file in allFiles) {
              NSString *fileExtension =           [[file pathExtension] lowercaseString];
                if ([fileExtension isEqualToString:@"m4v"] ||
                    [fileExtension isEqualToString:@"mov"]) {

                        NSString *relativePath = [documentsDirectory
                              stringByAppendingPathComponent:file];

                NSURL *fileURL = [NSURL fileURLWithPath:relativePath];

                AVPlayerItem *playerItem = [AVPlayerItem
                        playerItemWithURL:fileURL];

                 [playerItem addObserver:self forKeyPath:@"status"
                 options:NSKeyValueObservingOptionNew context:nil];

                 [playerItemArray addObject:playerItem];
                 }
        }

        self.moviePlayer.player = [[AVQueuePlayer alloc]
        initWithItems:playerItemArray];

        [self.moviePlayer.player addObserver:self forKeyPath:@"status"
        options:0 context:nil];

        [self.moviePlayer.player play];

}
Because the objects you are observing were created on-the-fly, in the [MainViewController observeValueForKeyPath:] method, you will need to check the incoming object for class type, rather than doing a direct pointer comparison. In Cocoa Touch, you can check the type of any object by using the method [NSObject kindOfClass:]. Compare your incoming object to the class property of the target class. In the KVO handler method, comparing against the AVPlayerItem class would look like this:
if ([object isKindOfClass:[AVPlayerItem class]])
After passing the type comparison, you can query the status property of the incoming object to see if it is in the AVPlayerItemStatusFailed state. As shown in Listing 12-11, if the player is an AVQueuePlayer, log the error and advance to the next item; otherwise, display an alert view.
Listing 12-11. Key-Value Observer for Item State
-(void)observeValueForKeyPath:(NSString *)keyPath ofObject:(id)object
    change:(NSDictionary *)change context:(void *)context
{
    if ((object == self.moviePlayer.player) && [keyPath
        isEqualToString:@"status"] ) {

        UIImage *image = [UIImage imageNamed:@"logo.png"];
        UIImageView *imageView = [[UIImageView alloc]
            initWithImage:image];
        imageView.frame = self.moviePlayer.videoBounds;
        imageView.contentMode = UIViewContentModeBottomRight;
        imageView.autoresizingMask = UIViewAutoresizingFlexibleHeight |
            UIViewAutoresizingFlexibleWidth;

        if ([self.moviePlayer.contentOverlayView.subviews count] == 0) {
            [self.moviePlayer.contentOverlayView addSubview:imageView];
        }

        [object removeObserver:self forKeyPath:@"status"];

    } else if ([object isKindOfClass:[AVPlayerItem class]]) {

        AVPlayerItem *currentItem = (AVPlayerItem *)object;

        if (currentItem.status == AVPlayerItemStatusFailed) {
            NSString *errorString = [currentItem.error description];
            NSLog(@"item failed: %@", errorString);

            if ([self.moviePlayer.player
                isKindOfClass:[AVQueuePlayer class]]) {
                AVQueuePlayer *queuePlayer =
                    (AVQueuePlayer *)self.moviePlayer.player;
                [queuePlayer advanceToNextItem];
            } else {
                UIAlertView *alert = [[UIAlertView alloc]
                    initWithTitle:@"Error" message:errorString
                    delegate:self cancelButtonTitle:@"OK"
                    otherButtonTitles:nil];
                [alert show];
            }
        } else {
            [object removeObserver:self forKeyPath:@"status"];
        }
    }
}
What you have seen is just a taste of the playback state events you can handle for the AVPlayer class. For the complete list, check Apple’s Developer Library documentation for the AVPlayer class (https://developer.apple.com/Library/ios/documentation/AVFoundation/Reference/AVPlayer_Class/index.html). Remember, if a notification does not exist for the event you are trying to observe—create a key-value observer!
Adding an Overlay View (Watermark)
Another added convenience of the AVPlayerViewController class is its ability to let you add a content overlay view. Overlay views let you display static or live content on top of your video layer, without the hassle of writing complicated low-level code to intercept the video layer. For example, if you need to display annotations, live status indicators, or even a watermark, content overlay views are a quick way to enable such features. One famous example of overlay behavior is the YouTube Advertising view, as shown in Figure 12-10, which allows you to click on a highlighted area to visit an advertiser’s site.

Figure 12-10. YouTube Ad functionality
In this section, you will learn how to add a watermark to your video—a great way to add branding to your app. This example uses a static image for the watermark, but you can display anything you want in the overlay view—as long as it subclasses the UIView class.
Caution Avoid placing highly interactive elements in your content overlay view, because they could conflict with the control bar.
To get started, import an image into your project. If you want your watermark to have some transparency, use a PNG image with a transparency layer; otherwise, use a JPEG or opaque PNG image file. I prefer to use images that are approximately 50 pixels in height, so that the image does not distract viewers from the content. Try to build in at least 10 pixels of padding on all edges into the image. Create a UIImage object with this image. In the MyAVPlayer project, the file is named logo.png:
UIImage *image = [UIImage imageNamed:@"logo.png"];
To display the image on the content overlay view, you need to wrap it in a subclass of UIView, so initialize a UIImageView object with the UIImage object you just created:
UIImageView *imageView = [[UIImageView alloc] initWithImage:image];
Remember that the process of creating a UIView is not the same as sizing and placing it. To imitate a television broadcast, most video applications like to place their watermark at the bottom-right or top-right corner of the video. By setting the contentMode property of the UIImageView class to UIViewContentModeBottomRight, you can instruct the UIImageView class to place the image in the bottom-right corner, while retaining its original dimensions:
imageView.contentMode = UIViewContentModeBottomRight;
Similarly, you will want the image to stay in the video playback area. Unfortunately, the size of the video player changes with the presentation style of the AVPlayerViewController (windowed or full-screen). However, you can account for this by setting the size of your overlay equal to the bounding frame of the video playback area, and adding flexible width and height resizing masks:
imageView.frame = self.moviePlayer.videoBounds;
imageView.autoresizingMask = UIViewAutoresizingFlexibleHeight |
    UIViewAutoresizingFlexibleWidth;
After you have initialized and positioned the UIImageView, add it as a subview on top of the contentOverlayView:
[self.moviePlayer.contentOverlayView addSubview:imageView];
Now for the most important question, “Where?” As mentioned, one of the requirements for placing the contentOverlayView on top of the video layer is information about the dimensions of the video layer. Unfortunately, this value is not valid until the video is loaded. Luckily, this is the same event that you built a key-value observer for, to find out when an item was loaded. Create a new if block for the overlay, as shown in Listing 12-12.
Listing 12-12. Adding a Watermark to Your “Loading Complete” Key-Value Observer
-(void)observeValueForKeyPath:(NSString *)keyPath ofObject:(id)object
     change:(NSDictionary *)change context:(void *)context
{
    if ((object == self.moviePlayer.player) && [keyPath
        isEqualToString:@"status"] ) {

        UIImage *image = [UIImage imageNamed:@"logo.png"];
        UIImageView *imageView = [[UIImageView alloc]
           initWithImage:image];
        imageView.frame = self.moviePlayer.videoBounds;
        imageView.contentMode = UIViewContentModeBottomRight;
        imageView.autoresizingMask = UIViewAutoresizingFlexibleHeight |
                                     UIViewAutoresizingFlexibleWidth;

        if ([self.moviePlayer.contentOverlayView.subviews count] == 0) {
            [self.moviePlayer.contentOverlayView addSubview:imageView];
        }

        [object removeObserver:self forKeyPath:@"status"];

    } else if ([object isKindOfClass:[AVPlayerItem class]]) {

        AVPlayerItem *currentItem = (AVPlayerItem *)object;

        if (currentItem.status == AVPlayerItemStatusFailed) {
            NSString *errorString = [currentItem.error description];
            NSLog(@"item failed: %@", errorString);

            if ([self.moviePlayer.player
                isKindOfClass:[AVQueuePlayer class]]) {
                AVQueuePlayer *queuePlayer =
                    (AVQueuePlayer *)self.moviePlayer.player;
                [queuePlayer advanceToNextItem];
            } else {
                UIAlertView *alert = [[UIAlertView alloc]
                    initWithTitle:@"Error" message:errorString
                    delegate:self cancelButtonTitle:@"OK"
                    otherButtonTitles:nil];
                [alert show];
            }
        } else {
            [object removeObserver:self forKeyPath:@"status"];
        }
    }
}
As a final note, the contentOverlayValue property is read-only, meaning you cannot remove subviews from it; you can only add views. For this reason, in Listing 12-12, I checked the number of subviews before adding the watermark—you should have only one watermark, no matter how many times the user selects a video!
Summary
In this chapter, you saw how to use the AVKit framework and its media playback classes, AVPlayer and AVQueuePlayer, as a drop-in replacement for the MediaPlayer framework. Through the MyAVPlayer project, you integrated a playlist-based media and overlay view, taking advantage of AVKit’s tighter integration with the AVFoundation framework. During the integration process, you saw that many of the design patterns of the framework mimic those used in MediaPlayer closely, but required slightly different implementations.
Remember, although Apple is not retiring the MediaPlayer framework immediately, employing it sooner rather than later gives you access to a new feature set that you would otherwise have had to develop yourself.