
Building a Custom Video-Recording Interface
To close out the unit on video, you will build your own video-recording interface “the hard way.” As you have seen while working with other media features, Cocoa Touch provides a great built-in interface for video capture—but only if you are willing to accept its user interface and functionality limits. When you want to go beyond these limits, customizing the video-capture interface to better suit your workflow or brand, you need to build your own user interface. To do that, you need to hook into AVFoundation’s low-level image-capture functionality.
If all this sounds familiar, that’s because it is. By repeating many of the same steps you used to build a custom still-image interface in Chapter 4, you can build a custom video-capture interface. As you learned in Chapter 4, these are the major steps required to implement a still-image interface:
- Discover and configure the camera hardware.
- Build a user interface capable of displaying the live camera feed.
- Modify the capture settings from the UI.
- Save the image when the user presses the Take Picture button.
To adapt that workflow to video, you need to do the following:
- Configure the capture session for video.
- Add video-specific capture controls.
- Display a preview interface when the user finishes recording.
- Refactor the message-passing interface to handle larger files.
In this chapter, you will build a custom video-recording interface by implementing the MyCustomRecorder project (you can find the code in the Chapter 10 folder) that you first saw in Chapter 9, adding video-capture features accessible via a Record Video button. You will reuse the MyCustomPlayer project code for all video-playback functions. Users will be able to modify capture settings before video recording begins. After recording is complete, they will see a preview interface, where they can choose to accept or reject the video they just shot.
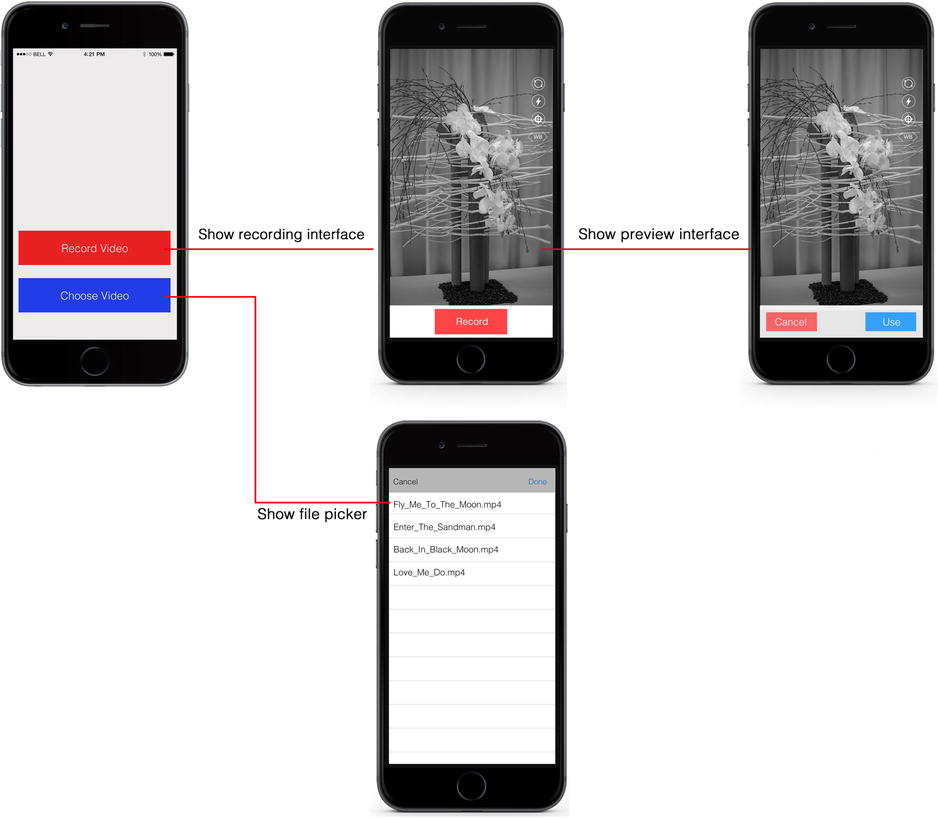
Figure 10-1. Mock-up for MyCustomRecorder project
In Figure 10-2, you can compare the MyCustomRecorder project to the MyCamera still-image capture project from Chapter 4. You can see that the general flow of the application is the same, with the exception of the preview interface and capture settings.

Figure 10-2. Mock-up for MyCamera still-image capture project
This chapter relies heavily on your knowledge of image capture using AVFoundation from Chapter 4. If you haven’t mastered that topic, I recommend reviewing Chapter 4 before you proceed. This project reuses many of the image-capture code samples from Chapter 4, but my explanations of the core classes (such as AVCaptureInputDevice and AVCaptureSession) will not be as deep.
Getting Started
For this chapter, your primary focus is video capture. First, clone the MyCustomPlayer from Chapter 9 to get a base user interface and video-playback interface. You clone a project by making a copy of it in the Finder and then opening it in Xcode. As shown in Figure 10-3, remember that you can rename the project by clicking carefully inside the project file’s name in the Project Navigator.

Figure 10-3. Renaming a project
To build a custom video-capture interface, you need to use the AVFoundation framework’s image-capture classes. As in previous projects, add this framework to your project as a Linked Framework under your project’s Settings. Your final set of included frameworks should look like the example in Figure 10-4.

Figure 10-4. List of frameworks for MyCustomRecorder project
The device setup code, user interface, and protocol for the MyCamera project were encapsulated in the CameraViewController class. Because the user interface and protocol mimicked the UIImagePickerControllerView class closely, you should use these as a base for the MyCustomRecorder project. Copy these files over from the MyCamera project.
Setting Up the Hardware Interface
After including the base classes for the project, you can start modifying the CameraViewController class to support video capture. Before dealing with the user interface, you need to make sure the hardware interface to the camera is properly set up for video capture.
To review Chapter 4, the classes you configure to capture media are as follows:
- AVCaptureDevice: Represents the hardware device you are going to access
- AVCaptureInput: Represents the data stream you are accessing (for example, video stream for a camera, audio stream for a microphone)
- AVCaptureOutput:Represents the data that is captured by your device (for example, a movie file)
- AVCaptureSession: Manages the interface between the input data stream and the output
In the CameraViewController class, the hardware initialization code was in the [CameraViewController viewDidLoad] and [CameraViewController initializeCameras] methods. The hardware initialization code for still-image capture is highlighted in Listing 10-1. Throughout this section, you will change the settings so that they are appropriate for video.
Listing 10-1. Hardware Interface Settings for Still-Image Capture
- (void)viewDidLoad
{
    [super viewDidLoad];
    // Do any additional setup after loading the view.

    self.previewView.autoresizingMask =
       UIViewAutoresizingFlexibleWidth |
       UIViewAutoresizingFlexibleHeight;

    self.session = [[AVCaptureSession alloc] init];

    // find the back-facing camera

    [self initializeCameras];

    NSError *error = nil;

    self.stillImageOutput = [[AVCaptureStillImageOutput alloc] init];

     NSMutableDictionary *configDict = [NSMutableDictionary new];
     [configDict setObject:AVVideoCodecJPEG forKey:AVVideoCodecKey];

    [self.stillImageOutput setOutputSettings:configDict];

    if (error == nil && [self.session canAddInput:self.rearCameraInput]) {
        [self.session addInput:self.rearCameraInput];

        // set up our preview layer

        self.previewLayer = [[AVCaptureVideoPreviewLayer alloc]
                              initWithSession:self.session];

        CGRect layerRect = self.view.bounds;
        CGPoint layerCenter = CGPointMake(CGRectGetMidX(layerRect),
            CGRectGetMidY(layerRect));

        [self.previewLayer setBounds:layerRect];
        [self.previewLayer setPosition:layerCenter];

        [self.previewLayer setVideoGravity:AVLayerVideoGravityResize];

        [self.previewView.layer addSublayer:self.previewLayer];

        // set up our output

        if ([self.session canAddOutput:self.stillImageOutput]) {
            [self.session addOutput:self.stillImageOutput];
        }

        [self.view bringSubviewToFront:self.tapPosition];

    }
}


-(void)initializeCameras
{

    self.cameraArray = [AVCaptureDevice
                        devicesWithMediaType:AVMediaTypeVideo];

    NSError *error = nil;

    self.rearCamera = nil;
    self.frontCamera = nil;

    if ([self.cameraArray count] > 1) {

        for (AVCaptureDevice *camera in self.cameraArray) {
            if (camera.position == AVCaptureDevicePositionBack) {
                self.rearCamera = camera;
            } else if (camera.position == AVCaptureDevicePositionFront) {
                self.frontCamera = camera;
            }
        }

        self.rearCameraInput = [AVCaptureDeviceInput
            deviceInputWithDevice:self.rearCamera error:&error];
        self.frontCameraInput = [AVCaptureDeviceInput
            deviceInputWithDevice:self.frontCamera error:&error];

    } else {
        self.rearCamera = [AVCaptureDevice
            defaultDeviceWithMediaType:AVMediaTypeVideo];
        self.rearCameraInput = [AVCaptureDeviceInput
            deviceInputWithDevice:self.rearCamera error:&error];
    }

    self.currentDevice = self.rearCamera;
}
First, you need to make sure all of the AVCaptureDevice and AVCaptureInput objects for the hardware interfaces you want to use are correctly set up. In reviewing the [CameraViewController initializeCameras] method, you can see that still-image capture required you to find capture devices that were capable of capturing video (in order to display a live feed). That takes care of the visual aspect; however, to capture audio, you need to add an input device for the microphone. Listing 10-2 provides a modified version of the [CameraViewController initializeCameras] method that includes the audio input.
Listing 10-2. AVCaptureDevice and AVCaptureDeviceInput Settings for MyCustomRecorder Project, Including Audio
-(void)initializeCameras
{
    self.cameraArray = [AVCaptureDevice
                        devicesWithMediaType:AVMediaTypeVideo];

    NSError *error = nil;

    self.rearCamera = nil;
    self.frontCamera = nil;

    self.microphone = nil;

    if ([self.cameraArray count] > 1) {

        for (AVCaptureDevice *camera in self.cameraArray) {
            if (camera.position == AVCaptureDevicePositionBack) {
                self.rearCamera = camera;
            } else if (camera.position == AVCaptureDevicePositionFront) {
                self.frontCamera = camera;
            }
        }

        self.rearCameraInput = [AVCaptureDeviceInput
            deviceInputWithDevice:self.rearCamera error:&error];
        self.frontCameraInput = [AVCaptureDeviceInput
            deviceInputWithDevice:self.frontCamera error:&error];

    } else {
        self.rearCamera = [AVCaptureDevice
            defaultDeviceWithMediaType:AVMediaTypeVideo];
        self.rearCameraInput = [AVCaptureDeviceInput
            deviceInputWithDevice:self.rearCamera error:&error];
    }

    self.microphone = [[AVCaptureDevice
        devicesWithMediaType:AVMediaTypeAudio] objectAtIndex:0];
    self.audioInput = [AVCaptureDeviceInput
        deviceInputWithDevice:self.microphone error:&error];

    self.currentDevice = self.rearCamera;
}
Next, you need to make sure you have set up the correct AVCaptureOutput objects for your media. For still-image capture, the AVCaptureOutput object for the class was represented by the stillImageOutput property, which subclassed the AVCaptureStillImageOutput class. To capture video, you need to generate a file that contains both the audio and video streams, in a format that the MPMoviePlayerController class can play back. As a refresher, Table 10-1 repeats the list of AVCaptureOutput types from Chapter 4. The most appropriate output type for recording a movie file with both audio and video data is AVCaptureMovieFileOutput, which generates a valid QuickTime movie file.
Table 10-1. AVCaptureOutput Types
Subclass | Capture Output |
|---|---|
AVCaptureMovieFileOutput | QuickTime movie file |
AVCaptureVideoDataOutput | Video frames—intended for processing |
AVCaptureAudioFileOutput | Audio files supported by Core Audio (MP3, AIFF, WAV, AAC) |
AVCaptureAudioDataOutput | Audio buffer— intended for processing |
AVCaptureMetadataOutput | Media file metadata properties (for example, GPS location, exposure level) |
AVCaptureStillImageOutput | Still images and metadata |
You need to add a new property to your class to handle the movie output. In the MyVideoRecorder project, this property is called fileOutput:
@property (nonatomic, strong) AVCaptureMovieFileOutput *fileOutput;
So far, you have not configured the hardware interfaces to better suit your application. As with the simple video-recording example in Chapter 8 (the MyVideoRecorder project), at minimum you should specify dimensions for the video file and a maximum recording length. Additionally, for the AVCaptureMovieFileOutput class, you can implement the minFreeDiskSpaceLimit property to prevent recording from starting if the device does not have enough free disk space. Listing 10-3 shows a code snippet that initializes the fileOutput object with these changes. In your final code, this snippet will be part of the [CameraViewController viewDidLoad] method.
Listing 10-3. Initializing an AVCaptureMovieFileOutput Object
self.movieFileOutput = [[AVCaptureMovieFileOutput alloc] init];
self.movieFileOutput.minFreeDiskSpaceLimit = 200 * 1024; //200MB
self.movieFileOutput.maxRecordedDuration =
    CMTimeMakeWithSeconds(180, 1); //3 mins max

if ([self.session canAddOutput:self.movieFileOutput]) {
    [self.session addOutput:self.movieFileOutput];
} else {
    UIAlertView *alert = [[UIAlertView alloc] initWithTitle:@"Error!"
        message:@"Not enough disk space" delegate:self
        cancelButtonTitle:@"OK" otherButtonTitles:nil];
    [alert show];
}
Because video capture operates at a lower level than typical Cocoa Touch classes, the minFreeDiskSpaceLimit property uses the C type for a 64-bit integer, int64_t, and the maxRecordedDuration property uses Apple’s lower-level struct (custom data type) for representing time: CMTime. As shown in the example, by casting, you can cleanly convert your input into types that the classes can work with.
Specifying the video resolution comes into play when you configure the final piece of the hardware interface: the AVCaptureSession object. The session functions much like a telephone operator for the hardware interface, connecting the input devices with the output streams. Looking back at Listing 10-2, remember that the basic steps for initializing an AVCaptureSession object are picking the appropriate constructor method and then addinginputs. While these steps are still true for video, there’s an extra step: using a session preset to configure the session for video capture. Table 10-2 lists the preset options.
Table 10-2. AVCaptureSession Presets
Preset | Output Type |
|---|---|
AVCaptureSessionPresetPhoto | High-quality still images |
AVCaptureSessionPresetLow | Low-quality video and audio available on the device, suitable for transmitting over 3G cellular |
AVCaptureSessionPresetMedium | Mid-range quality video and audio available on the device |
AVCaptureSessionPresetHigh | Highest-quality video and audio available on the device (default) |
AVCaptureSessionPreset1080x720 | 1080×720 (720p) video |
AVCaptureSessionPreset1920x1080 | 1280×1080 (1080p) video |
AVCaptureSessionPresetiFrame960x540 | 960×540 H.264 iFrame video (ideal for iMovie editing) |
AVCaptureSessionPresetiFrame1280x720 | 1280×720 H.264 iFrame video (ideal for iMovie editing) |
AVCaptureSessionPresetInputPriority | Raw video and audio streams, appropriate for advanced codecs or video processing |
As with all applications, pick the preset that is best for your intended application and devices. If you’re not sure, a safe bet for video capture is AVCaptureSessionPreset1920x1080. All iOS devices running iOS 6 or higher are capable of capturing 1080p video. To configure your session with a preset, simply set the property with your selected constant:
[self.session setSessionPreset:AVCaptureSessionPreset1920x1080];
Listing 10-4 shows the completed [CameraViewController viewDidLoad] and [CameraViewController initializeCameras] methods for the MyVideoRecorder project. As with the still-image sample in Listing 10-1, the hardware interface sections are in bold.
Listing 10-4. Completed Hardware Interface Code for MyCustomRecorder Project
- (void)viewDidLoad
{
    [super viewDidLoad];
    // Do any additional setup after loading the view.

    self.session = [[AVCaptureSession alloc] init];

    // find the back-facing camera

    [self initializeCameras];

    NSError *error = nil;

    if (error == nil && [self.session
        canAddInput:self.rearCameraInput]) {
        [self.session addInput:self.rearCameraInput];

        // set up our output

        self.movieFileOutput = [[AVCaptureMovieFileOutput alloc] init];
        self.movieFileOutput.minFreeDiskSpaceLimit = 200 * 1024; //200MB
        self.movieFileOutput.maxRecordedDuration =
            CMTimeMakeWithSeconds(180, 1); //3 mins max

        if ([self.session canAddOutput:self.movieFileOutput] &&
            [self.session
                canSetSessionPreset:AVCaptureSessionPreset1920x1080]) {
            [self.session
                setSessionPreset:AVCaptureSessionPreset1920x1080];
            [self.session addOutput:self.movieFileOutput];
        } else {
                 UIAlertView *alert = [[UIAlertView alloc]
                initWithTitle:@"Error!" message:@"Camera Unavailable"
                delegate:self cancelButtonTitle:@"OK"
                otherButtonTitles:nil];
            [alert show];
        }

        [self.view bringSubviewToFront:self.tapPosition];
    }

}

-(void)initializeCameras
{
    self.cameraArray = [AVCaptureDevice
                        devicesWithMediaType:AVMediaTypeVideo];

    NSError *error = nil;

    self.rearCamera = nil;
    self.frontCamera = nil;

    self.microphone = nil;

    if ([self.cameraArray count] > 1) {

        for (AVCaptureDevice *camera in self.cameraArray) {
            if (camera.position == AVCaptureDevicePositionBack) {
                self.rearCamera = camera;
            } else if (camera.position == AVCaptureDevicePositionFront) {
                self.frontCamera = camera;
            }
        }

        self.rearCameraInput = [AVCaptureDeviceInput
            deviceInputWithDevice:self.rearCamera error:&error];
        self.frontCameraInput = [AVCaptureDeviceInput
            deviceInputWithDevice:self.frontCamera error:&error];

    } else {
        self.rearCamera = [AVCaptureDevice
            defaultDeviceWithMediaType:AVMediaTypeVideo];
        self.rearCameraInput = [AVCaptureDeviceInput
            deviceInputWithDevice:self.rearCamera error:&error];
    }

    self.microphone = [[AVCaptureDevice
        devicesWithMediaType:AVMediaTypeAudio] objectAtIndex:0];
    self.audioInput = [AVCaptureDeviceInput
        deviceInputWithDevice:self.microphone error:&error];

    self.currentDevice = self.rearCamera;
}
Building the User Interface
Having configured the hardware interface, you can start updating the user interface to support video capture. As with the hardware interface, you will not need to throw out all of the existing code to enable this; you will mostly need to make notifications to the existing code.
Similar to still-image capture, here are the major areas to target in your user interface:
- Display a live feed of the camera input.
- Expose controls for modifying capture settings.
- Expose controls for starting and stopping recording.
Unlike still images, you will need to change the user interface during recording. In addition to toggling the state of the Record button, you should display recording progress and hide some of the capture settings (users should not be able to change torch mode or low-light settings during recording; doing so produces a jarring effect). After recording is complete, users should enter a preview mode where they can accept or reject their recording.
This section focuses on the user-interface elements that initiate video recording and appear while recording is in progress. The process for completing a recording primarily consists of non-user-interface topics and is covered in the upcoming section, “Completing a Recording.”
Setting Up the Video Layer
In the [CameraViewController viewDidLoad] method for the still-image capture project, you used an AVCaptureVideoPreviewLayer object to display the live feed from the camera. As shown in Listing 10-5, this layer was connected to the session object and configured to appear correctly in the parent view controller.
Listing 10-5. Video Preview Layer Initialization Code for MyCamera Project
self.previewLayer = [[AVCaptureVideoPreviewLayer alloc]
                      initWithSession:self.session];

// CGRect layerRect = self.previewView.bounds;
CGRect layerRect = self.view.bounds;
CGPoint layerCenter = CGPointMake(CGRectGetMidX(layerRect),
     CGRectGetMidY(layerRect));

[self.previewLayer setBounds:layerRect];
[self.previewLayer setPosition:layerCenter];

[self.previewLayer setVideoGravity:AVLayerVideoGravityResize];
// [self.previewLayer
//    setVideoGravity:AVLayerVideoGravityResizeAspectFill];

[self.previewView.layer addSublayer:self.previewLayer];
The good news is, for video capture, you need to make no changes at all to display live video in your code! You can reuse this code as is. While you needed to create an audio input object to manage audio capture in your hardware initialization code, the live preview should contain only video. The user will be able to preview audio after the video has completed recording, because previewing audio during recording causes a nasty feedback loop (echo).
Before moving on, I want to review a couple of configuration options you need to remember to give special attention to: setting the correct frame properties and starting the stream. From Chapter 4, you may remember that a layer is just a component you add to a view—like a part of an animation cel. To position a layer correctly, you need to give it the appropriate bounds and origin position. This is the same process you follow for a normal view, except you need to remember to explicitly define everything to correctly display a layer. Similarly, the concept of auto-resizing is not a default setting for video layers, so you need to make sure you specify AVLayerVideoGravityResize for the videoGravity property of the preview layer.
You may also remember that positioning the frame for the video layer did not automatically display the live feed on the target view. To display live video, you need to start your session. As with still-image capture, you can start a session by calling the [AVCaptureSession startRunning] method on your session object. This is applicable to most session preset types. An important distinction for the video-capture application is that starting the session is not the same as recording the file. You start or stop recordings through the AVCaptureMovieFileObject. You’ll add that code to the handler for the Toggle Recording button later.
Listing 10-6 shows the final version of the [CameraViewController viewDidLoad] method for the MyCustomRecorder project. The video preview layer initialization code is highlighted in bold text.
Listing 10-6. Video Preview Layer Initialization Code for MyCustomRecorder Project
- (void)viewDidLoad
{
    [super viewDidLoad];
    // Do any additional setup after loading the view.

    self.previewView.autoresizingMask =
        UIViewAutoresizingFlexibleWidth |
        UIViewAutoresizingFlexibleHeight;

    self.session = [[AVCaptureSession alloc] init];

    // find the back-facing camera

    [self initializeCameras];

    NSError *error = nil;

    self.focusPoint = CGPointMake(0.5f, 0.5f);


    if (error == nil && [self.session
        canAddInput:self.rearCameraInput]) {
        [self.session addInput:self.rearCameraInput];

        // set up our preview layer
      self.previewLayer = [[AVCaptureVideoPreviewLayer alloc]
            initWithSession:self.session];

        CGRect layerRect = self.view.bounds;
        CGPoint layerCenter = CGPointMake(CGRectGetMidX(layerRect),
            CGRectGetMidY(layerRect));

        [self.previewLayer setBounds:layerRect];
        [self.previewLayer setPosition:layerCenter];

        [self.previewLayer setVideoGravity:AVLayerVideoGravityResize];

        [self.previewView.layer addSublayer:self.previewLayer];

        // set up our output

        self.movieFileOutput = [[AVCaptureMovieFileOutput alloc] init];
        self.movieFileOutput.minFreeDiskSpaceLimit =
           200 * 1024; //200MB
        self.movieFileOutput.maxRecordedDuration =
            CMTimeMakeWithSeconds(180, 1); //3 mins max


        if ([self.session canAddOutput:self.movieFileOutput] &&
            [self.session
                canSetSessionPreset:AVCaptureSessionPreset1920x1080]) {
            [self.session
                setSessionPreset:AVCaptureSessionPreset1920x1080];
            [self.session addOutput:self.movieFileOutput];
        } else {
            UIAlertView *alert = [[UIAlertView alloc]
                initWithTitle:@"Error!"
                message:@"Not enough disk space"
                delegate:self cancelButtonTitle:@"OK"
                otherButtonTitles:nil];
            [alert show];
        }

        [self.view bringSubviewToFront:self.tapPosition];
    }

}
Adding Controls for Capture Settings
For the still-image capture project, you added a wide set of controls to modify the camera capture settings, such as exposure, flash, device selection, and autofocus control. While you can reuse the device selection and autofocus controls, you will need to pare down the list of controls for this project, because some concepts, such as exposure and flash, are applicable only when the camera’s sensor is active, which is just for a moment. The good news is that you can implement features for video, such as torch mode, white balance, and low-light settings that provide similar functionality.
Looking at Apple’s built-in camera interfaces in Figure 10-5, you can see that the only controls Apple exposes are Toggle Torch and Toggle Device.
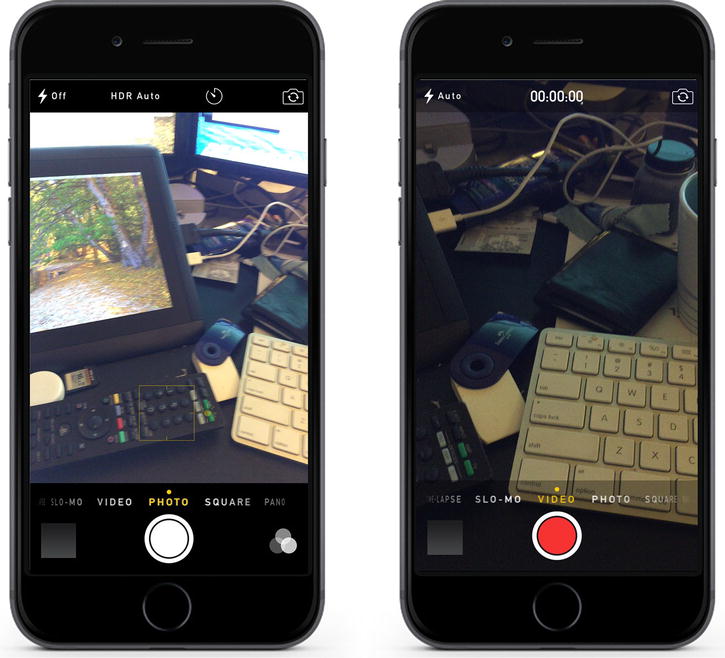
Figure 10-5. Differences between Apple’s still-image and video-capture interfaces
Because your application provides a user experience different from the default, you will add controls for torch mode and low-light settings, as shown in Figure 10-6.

Figure 10-6. Video capture interface for MyCustomRecorder project
For the MyCustomRecorder project, you will remove the exposure button and repurpose the flash button for torch mode. You will also add buttons for low-light settings and to start recording. After making these changes in Interface Builder, your storyboard should look like the one shown in Figure 10-7.

Figure 10-7. Storyboard for video-capture interface
With the new buttons in place, your CameraViewController.h file should look like the example in Listing 10-7.
Listing 10-7. Modified Header File for CameraViewController, with New Controls
#import <UIKit/UIKit.h>
#import <AVFoundation/AVFoundation.h>

@protocol CameraDelegate <NSObject>

-(void)cancel;
-(void)didFinishWithImage:(UIImage *)image;

@end

@interface CameraViewController : UIViewController
    <UIActionSheetDelegate>

@property (nonatomic, strong) IBOutlet UIView *previewView;
@property (nonatomic, strong) IBOutlet UIButton *torchButton;
@property (nonatomic, strong) IBOutlet UIButton *lowLightButton;
@property (nonatomic, strong) IBOutlet UIButton *focusButton;
@property (nonatomic, strong) IBOutlet UIButton *cameraButton;

@property (nonatomic, strong) IBOutlet UILabel *tapPosition;


@property (nonatomic, strong) AVCaptureSession *session;
@property (nonatomic, strong) AVCaptureMovieFileOutput
    *movieFileOutput;

@property (nonatomic, strong) id <CameraDelegate> delegate;

-(IBAction)cancel:(id)sender;
-(IBAction)toggleRecording:(id)sender;

-(IBAction)torchMode:(id)sender;
-(IBAction)lowLightMode:(id)sender;
-(IBAction)focusMode:(id)sender;
-(IBAction)switchCamera:(id)sender;

-(IBAction)didTapPreview:(UIGestureRecognizer *)gestureRecognizer;

@end
For your reference, I have included the handlers for the autofocus and toggle device buttons in Listing 10-8. You don’t need to modify these at all for video capture, and as always, they go in your CameraViewController.m file.
Listing 10-8. Button Handlers for Autofocus and Toggling Devices
-(void)switchToFocusWithIndex:(NSInteger)buttonIndex
{
    NSError *error = nil;

    AVCaptureFocusMode focusMode = 0;

    switch (buttonIndex) {
        case 0: {
            focusMode = AVCaptureFocusModeAutoFocus;
            self.focusButton.titleLabel.text = @"Focus: Auto";
            break;
        }
        case 1: {
            focusMode = AVCaptureFocusModeContinuousAutoFocus;
            self.focusButton.titleLabel.text = @"Focus: Cont";
            break;
        }
        case 2: {
            focusMode = AVCaptureFocusModeLocked;
            self.focusButton.titleLabel.text = @"Focus: Fixed";
            break;
        }
        default:
            break;
    }

    if ([self.currentDevice lockForConfiguration:&error] &&
        [self.currentDevice isFocusModeSupported:focusMode]) {

        self.currentDevice.focusMode = focusMode;

        [self.currentDevice unlockForConfiguration];
    } else {
        NSLog(@"could not set focus mode");
    }

}

-(void)switchToCameraWithIndex:(NSInteger)buttonIndex
{
    [self.session beginConfiguration];

    if (buttonIndex == 0) {

        [self.session removeInput:self.rearCameraInput];

        if ([self.session canAddInput:self.frontCameraInput]) {
            [self.session addInput:self.frontCameraInput];
        }

        self.cameraButton.titleLabel.text = @"Camera: Front";
        self.currentDevice = self.frontCamera;

    } else if (buttonIndex == 1) {

        [self.session removeInput:self.frontCameraInput];

        if ([self.session canAddInput:self.rearCameraInput]) {
            [self.session addInput:self.rearCameraInput];
        }

        self.cameraButton.titleLabel.text = @"Camera: Rear";
        self.currentDevice = self.frontCamera;
    }

    [self.session commitConfiguration];
}
Torch Mode
The idea of a flash in a camera is to provide a burst of light to brighten up a shot that would otherwise be too dark to be useful. Users frame their shot with the flash off, but when they press the capture button, the flash activates just long enough to illuminate the scene while the camera sensor is active. This concept does not translate to video, because the sensor is active for an extended period of time; however, by implementing torch mode, you can give users the ability to add light to a scene by keeping the flash LED active during recording.
To activate torch mode, you can reuse the Flash button from the MyCamera project. The functionality is different at a low level, but that difference is not apparent to users. In the MyCamera project, the handler for flash mode was the [CameraViewController flashMode:] method. Bring up your CameraViewController.h file and perform a secondary click (right-click or Option-click) on the method name to bring up the Refactor window, as shown in Figure 10-8. This will allow you to rename the method in every file in which it appears, including the Interface Builder files. Your new method should be named [CameraViewController torchMode:].

Figure 10-8. Refactor window
As you saw in Chapter 4, the general flow to modify a capture setting is to use the onscreen display button to show an action sheet of available modes, and then set the mode (if the device supports it). While almost all modern iOS devices these days have two cameras, it is important to note that the cameras are not equal. Generally, the rear-facing camera is more powerful, with support for high-resolution images, flash, and other features that improve picture quality (such as image stabilization for the iPhone 6 Plus). In contrast, the front-facing camera has lower resolution and a narrower set of capture controls.
The torchMode property controls torch mode on an AVCaptureDevice. Its configuration options are Off, On, and Auto, represented by the AVCaptureTorchModeOff, AVCaptureTorchModeOn, and AVCaptureTorchModeAuto constants, respectively. For the first step of the process, change your button handler to display these new values in the action sheet, as shown in Listing 10-9.
Listing 10-9. Button Handler for Torch Mode
-(IBAction)torchMode:(id)sender {
    if ([self.currentDevice isTorchAvailable]) {
        UIActionSheet *cameraSheet = [[UIActionSheet alloc]
            initWithTitle:@"Flash Mode" delegate:self
            cancelButtonTitle:@"Cancel" destructiveButtonTitle:nil
            otherButtonTitles:@"Auto", @"On" , @"Off", nil];
        cameraSheet.tag = 101;
        [cameraSheet showInView:self.view];
    } else {
        UIAlertView *alert = [[UIAlertView alloc]
            initWithTitle:@"Error"
            message:@"Flash not supported" delegate:nil
            cancelButtonTitle:@"OK" otherButtonTitles:nil];
        [alert show];
    }
}
As with previous examples, you modify the capture settings after the action sheet protocol has returned a [UIActionSheet didDismissWithButtonIndex:] message. Remember, this message is sent globally for all action sheets. To differentiate between action sheets, you give each one a tag (101 was the tag for flash mode). In the case block for torch mode (case 101), perform another refactor operation to rename the configuration method to [CameraViewController switchToTorchModeWithIndex:], as shown in Listing 10-10.
Listing 10-10. Modified Action Sheet Delegate for Torch Mode
-(void) actionSheet:(UIActionSheet *)actionSheet
      didDismissWithButtonIndex:(NSInteger)buttonIndex
{
    switch (actionSheet.tag) {
        case 100:
            [self switchToCameraWithIndex:buttonIndex];
            break;
        case 101:
            [self switchToTorchWithIndex:buttonIndex];
            break;
        case 102:
            [self switchToFocusWithIndex:buttonIndex];
            break;
        case 103:
            [self switchToExposureWithIndex:buttonIndex];
            break;
        default:
            break;
    }
}
The method you use to determine whether torch mode is available on an AVCaptureDevice is [AVCaptureDevice isTorchModeSupported:]. As shown in Listing 10-11, in your [CameraViewController switchToTorchModeWithIndex:] method, after locking the device for configuration, first check that torch mode is available, and then set it if applicable. After making your configuration change, unlock the device. If an error occurs while locking the device or attempting to make the change, show an error alert.
Listing 10-11. Method for Changing Torch Mode
-(void)switchToTorchWithIndex:(NSInteger)buttonIndex
{
    NSError *error = nil;

    AVCaptureTorchMode torchMode = 0;

    switch (buttonIndex) {
        case 0: {
            torchMode = AVCaptureTorchModeAuto;
            self.torchButton.titleLabel.text = @"Torch: Auto";
            break;
        }
        case 1: {
            torchMode = AVCaptureTorchModeOn;
            self.torchButton.titleLabel.text = @"Torch: On";
            break;
        }
        case 2: {
            torchMode = AVCaptureTorchModeOff;
            self.torchButton.titleLabel.text = @"Torch: Off";
            break;
        }
        default:
            break;
    }

    if ([self.currentDevice lockForConfiguration:&error]) {

        self.currentDevice.torchMode = torchMode;

        [self.currentDevice unlockForConfiguration];
    } else {
        NSLog(@"could not set torch mode");
    }

}
Following Apple’s example, use AVCaptureTorchModeAuto as the default configuration setting for torch mode. You can define this by adding the torch mode setting to the [CameraViewController initializeCameras] method.
Low-Light Boost
With still images, you were able to use exposure as a way to modify the brightness or darkness of the captured image, without the need to involve the flash. As part of the framing process, you allowed users to specify whether they wanted the exposure to change automatically with changes in their focal point selection, or whether it should stay fixed based on a prior selection. In this way, when users readjust the focal point, they could see the image lighten/darken or maintain current brightness settings. Unfortunately, there is a trade-off to everything, and when you add or remove light to a picture, you are often adding or removing detail. This can result in a great amount of noise from the sensor, but you can often refocus the shot or change the exposure settings to compensate. When you are shooting video, however, you do not want to refocus or greatly change exposure settings while shooting, as either change will create unnatural effects that most people find distracting.
To compensate for changes in image quality during lighting adjustments in video, you will enable a control for low-light boost in your capture interface, in place of exposure modes. Low-light settings instruct the AVCaptureDevice class to automatically brighten or dim a scene based on its ambient light—unlike exposure modes, which change settings based on the current focal point. If the user chooses to disable low-light boosting, the camera will not adjust the lighting for the scene during recording.
You control low-light settings (boost on or off) for an AVCaptureDevice with the automaticallyEnablesLowLightBoostWhenAvailable method. As the name implies, the input is a BOOL, meaning users can only enable or disable the setting.
As with all capture settings, when committing changes, you need to lock the device and make sure the settings are supported by the hardware. To query whether low-light boost mode is supported on a device, use the lowLightSupported property. Listing 10-12 shows the handler for the Low-Light Mode button.
Listing 10-12. Handler for Low-Light Mode Button
-(IBAction)lowLightMode:(id)sender {
    if ([self.currentDevice isLowLightBoostSupported]) {
        //
        UIActionSheet *lowLightSheet = [[UIActionSheet alloc]
            initWithTitle:@"Low Light Boost Mode" delegate:self
            cancelButtonTitle:@"Cancel" destructiveButtonTitle:nil
            otherButtonTitles:@"On" , @"Off", nil];
        lowLightSheet.tag = 103;
        [lowLightSheet showInView:self.view];
    } else {
        //
        UIAlertView *alert = [[UIAlertView alloc]
            initWithTitle:@"Error"
            message:@"Low Light Boost not supported" delegate:nil
            cancelButtonTitle:@"OK" otherButtonTitles:nil];
        [alert show];
    }
}
-(void)switchToExposureWithIndex:(NSInteger)buttonIndex
{
    NSError *error = nil;

    BOOL boostOn;
    switch (buttonIndex) {
        case 0: {
            boostOn = YES;
            self.lowLightButton.titleLabel.text = @"LL Boost: On";
            break;
        }
        case 1: {
            boostOn = NO;
            self.lowLightButton.titleLabel.text = @"LL Boost: Off";
            break;
        }
        default:
            break;
    }

    if ([self.currentDevice lockForConfiguration:&error] &&
        [self.currentDevice isLowLightBoostSupported]) {

        self.currentDevice.
            automaticallyEnablesLowLightBoostWhenAvailable = boostOn;

        [self.currentDevice unlockForConfiguration];
    } else {
        NSLog(@"could not set exposure mode");
    }

}
Starting/Stopping Recording
Having set up the preview layer and capture controls for the video-capture interface, the only remaining user-interface task is to handle starting and stopping recording. Look at the Recording Active interface for Apple’s Camera app, shown in Figure 10-9. Note that during recording, Apple changes the state of the Start button to Stop and displays the length of the current recording.
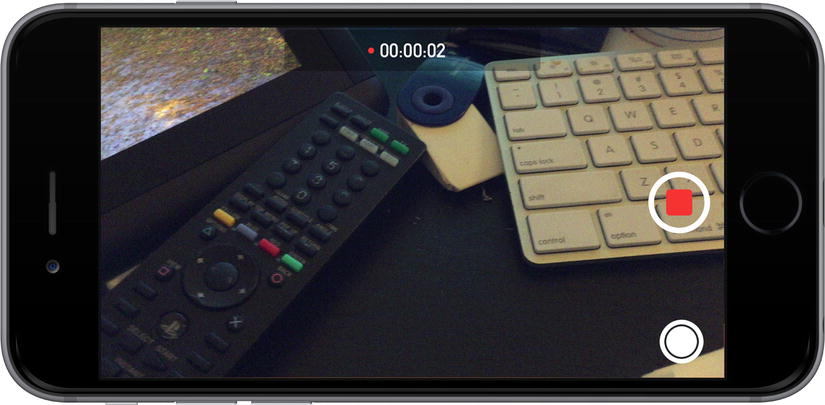
Figure 10-9. Recording Active interface for the Camera app
In the MyCustomRecorder app, you will go a step further by hiding the capture controls, because users should not be able to modify anything except the focal point during recording.
To display the recording time, add a UILabel to your storyboard and an NSTimer object to your CameraViewController class. In the MyCustomRecorder project, I named these timeLabel and recordingTimer, respectively:
@property (nonatomic, strong) IBOutlet UILabel *timeLabel;
@property (nonatomic, strong) NSTimer *recordingTimer;
In Interface Builder, use the Attributes Inspector to make the timeLabel hidden by default. You will show it when the user begins playback.
Before moving further, take a second to step back and review how you turned a captured image into an image file while building the still-image capture interface. Looking at Listing 10-13 for reference, you will see that in the handler for the Finish button, you called the [AVCaptureImageOutput captureStillImageAsynchronouslyFromConnection:completionHandler:] method on your output to generate the image file. When the operation completed, you generated a UIImage object and passed it back to your delegate object.
Listing 10-13. Capturing an Image File from the Video Feed
-(IBAction)finish:(id)sender
{

    AVCaptureConnection *connection = [self.stillImageOutput
        connectionWithMediaType:AVMediaTypeVideo];

    [self.stillImageOutput
        captureStillImageAsynchronouslyFromConnection:connection
        completionHandler:^(CMSampleBufferRef imageDataSampleBuffer,
            NSError *error) {

        if (imageDataSampleBuffer != nil) {

            NSData *imageData = [AVCaptureStillImageOutput
             jpegStillImageNSDataRepresentation:imageDataSampleBuffer];

            UIImage *image = [UIImage imageWithData:imageData];

            [self.delegate didFinishWithImage:image];
        } else {

            NSLog(@"error description: %@", [error description]);

            [self.delegate cancel];
        }

    }];

}
For video capture, you want to toggle recording when the Record button is pressed. Similar to still-image capture, you need to perform this operation on the AVCaptureOutput object for the class, which is an AVCaptureMovieFileOutput object for video capture (AVCaptureMovieFileOutput is a subclass of AVCaptureFileOutput). Instead of calling one method to capture a still image, you instead want to start or stop recording. The methods to start and stop recording on an AVCaptureMovieFileOutput object are [AVCaptureFileOutput startRecordingToOutputFileURL:recordingDelegate:] and [AVCaptureFileOutput stopRecording].
Listing 10-14 shows the handler method for toggling recording, which was defined as [CameraViewController toggleRecording] in the CameraViewController.h file. In this method, you want to start or stop video capture based on the current state of the AVCaptureOutput object. You can query the recording state of an AVCaptureMovieFileOutput object by using the recording property.
Listing 10-14. Button Handler for Toggling Video Recording
-(IBAction)toggleRecording:(id)sender
{
    if ([self.movieFileOutput isRecording]) {

        NSArray *paths = NSSearchPathForDirectoriesInDomains(
            NSDocumentDirectory, NSUserDomainMask, YES);
        NSString *documentsDirectory = [paths objectAtIndex:0];
        NSString *relativePath = [documentsDirectory
            stringByAppendingPathComponent:@"movie.mov"];

        NSURL *fileURL = [NSURL fileURLWithPath:relativePath];

        [self.movieFileOutput startRecordingToOutputFileURL:fileURL
             recordingDelegate:self];
    } else {

        [self.movieFileOutput stopRecording];
    }
}
When you start recording a file, you need to specify the URL for the output file and a delegate for a protocol. The AVCaptureFileOutput class defines the AVCaptureFileOutputRecordingDelegate protocol for passing back the complete message for your movie file, so modify your CameraViewController’s header file to indicate that you will be implementing that protocol:
@interface CameraViewController : UIViewController
    <UIActionSheetDelegate, AVCaptureFileOutputRecordingDelegate >
In the next section, “Completing a Recording,” you will implement the delegate method to close the movie file.
As the final user-interface step, you should update your user interface after recording has started, by hiding the capture buttons and displaying recording progress. Luckily, hiding user-interface elements in Cocoa Touch is extremely easy: just set the isHidden property to YES. Setting this property to NO will show hidden elements. In Listing 10-15, I have added user-interface updates to the recording button handler.
Listing 10-15. Adding User Interface Updates to the Toggle Recording Button
-(IBAction)toggleRecording:(id)sender
{
    if ([self.movieFileOutput isRecording]) {

        NSArray *paths = NSSearchPathForDirectoriesInDomains(
            NSDocumentDirectory, NSUserDomainMask, YES);
        NSString *documentsDirectory = [paths objectAtIndex:0];
        NSString *relativePath = [documentsDirectory
            stringByAppendingPathComponent:@"movie.mov"];

        NSURL *fileURL = [NSURL fileURLWithPath:relativePath];

        self.torchButton.hidden = YES;
        self.focusButton.hidden = YES;
        self.cameraButton.hidden = YES;
        self.lowLightButton.hidden = YES;

        self.timeLabel.hidden = NO;

        [self.movieFileOutput startRecordingToOutputFileURL:fileURL
            recordingDelegate:self];

        self.recordingTimer = [NSTimer timerWithTimeInterval:1.0f
            target:self selector:@selector(updateProgress) userInfo:nil
            repeats:YES];
        self.duration = 0;
    } else {

        [self.movieFileOutput stopRecording];

        self.torchButton.hidden = NO;
        self.focusButton.hidden = NO;
        self.cameraButton.hidden = NO;
        self.lowLightButton.hidden = NO;

        self.timeLabel.hidden = YES;

        [self.recordingTimer invalidate];
      self.duration = 0;
    }
}
In addition to hiding or showing the user-interface elements, note that the recording button handler creates or invalidates the playbackTimer object. As with all timers, to update the status, you need to reinitialize the timer object with a handler method (selector). The only way to stop the timer is by destroying it. In Listing 10-16, you can find the selector method for the timer, [CameraViewController updateProgress], which updates the timeLabel with the current recording length.
Listing 10-16. Selector Method for Time Updates
-(void)updateProgress
{
    NSInteger durationMinutes = self.duration / 60;
    NSInteger durationSeconds = self.duration  - durationMinutes * 60;
    NSString *progressString = [NSString stringWithFormat:@"%d:%02d",
        durationMinutes, durationSeconds];
    self.timeLabel.text = progressString;
    self.duration++;
}
Completing a Recording
To finish the MyCustomRecorder project, you need to implement the code to complete the recording process. Although you called the [AVCaptureFileOutput stopRecording] method, this alone is not enough to generate a valid movie file that you can play back by using a MPMoviePlayerController subclass.
Because you are not using the UIImagePickerController class to record video, you need to present your own video player to preview the recorded file. As shown in Figure 10-10, this video player will expose limited playback controls, as well as buttons to let the user accept or reject the recorded video. To enable these limited controls, you will reuse the video player from the MyVideoPlayer project you built in Chapter 9.
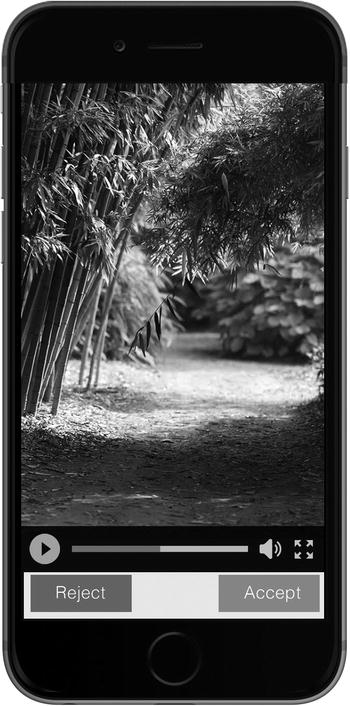
Figure 10-10. Mock-up of video preview interface
Finally, to return results from the CameraViewController object, you need to use the CameraDelegate protocol, which you need to modify to handle video. Because video files are much larger than images, they cannot be passed back as parameters, so you need to find an alternative solution.
Saving Video Output
You may remember earlier discussions in the book, where I hinted that video files are more complex than image and audio files. Unlike image and audio files, which contain the binary information for one data stream, video files are containers that contain both audio and video data streams. This makes the requirement of having valid headers and footers (which indicate the termination points for the data) even more strict with video files. Combined with the increased sophistication of the algorithms required to compress video (codecs), you can start to see why the process is complex.
By calling the [AVCaptureFileOutput stopRecording] method from the [CameraViewController togglePlayback:] method, you instructed the AVCaptureMovieFileOutput class to kick off this process and close the file. After the File Close operation is complete, your output object calls the [AVCaptureFileOutputRecordingDelegate captureOutput:didFinishRecordingToOutputFileAtURL:fromConnections:error:] method on the object you declared as the delegate (for the MyCustomRecorder project—the CameraViewController class).
One of the key advantages of a protocol is that it strictly defines a set of messages it will send its delegates, down to the message name and parameter types. The didFinish protocol message sends back the following:
- An AVCaptureOutput object, identifying the output object that completed
- An NSURL object that indicates the URL for the file that successfully (or unsuccessfully) closed
- An NSArray of AVCaptureConnection objects that are associated with the session for the output
- An NSError object that returns a non-nil value if the file failed to close successfully
You can find the implementation for the CameraViewController class in Listing 10-17.
Listing 10-17. “Output Finished” Delegate Method for the CameraViewController Class
-(void)captureOutput:(AVCaptureFileOutput *)captureOutput
    didFinishRecordingToOutputFileAtURL:(NSURL *)outputFileURL
    fromConnections:(NSArray *)connections error:(NSError *)error
{
    if (error != nil)  {
        NSString *errorString = [error description];
        UIAlertView *alertView = [[UIAlertView alloc]
            initWithTitle:@"Error" message:errorString delegate:self
            cancelButtonTitle:@"OK" otherButtonTitles:nil];
        [alertView show];

    } else {
        VideoPlaybackController *playbackVC =
            [[VideoPlaybackController alloc]
            initWithURL:outputFileURL];
        playbackVC.delegate = self;

        [self presentViewController:playbackVC animated:YES
            completion:^{
               [playbackVC prepareToPlay];
        }];
    }
}
This implementation uses the error object to check whether the operation was successful. If the operation was a failure, it displays an alert view with the human-readable description string from the error object. When the operation succeeds, it presents a VideoPlaybackController that has been initialized with the output file URL. The VideoPlaybackController is the customized subclass of the MPMoviePlayerController class that you will use in this project for the video preview.
Caution Although the output file URL that is returned from the AVCaptureFileOutputRecordingDelegate protocol is the same as the one used to start the recording, you should not start playback until the delegate method has fired, because the file will not be valid until this message has been received.
Showing the Preview Interface
For your video preview interface, you will want to display a video player that allows users to accept or reject the video they just recorded. While you could simply return the recorded video as is, it is best to give users an opportunity to check their work before returning them to the main interface of the MyCustomRecorder application.
For the VideoPlaybackController class, you will want to take the basic video playback function of the CustomVideoPlayer class from the MyCustomPlayer project you built in Chapter 9 and modify the controls to toggle playback and to accept or reject the file. Subclassing is an object-oriented programming concept that allows you to inherit all of the properties and methods of a parent class while still retaining the ability to modify those properties and methods in your child class. Inheritance is a convenient way to expand the functionality of a class without destroying or affecting the original. In this case, you need to subclass to reuse the CustomVideoPlayer class for this app’s full-screen video player.
First, copy the CustomVideoPlayer.h and CustomVideoPlayer.m files into your working directory and add them to your project. Next, from the File menu, choose New File. As shown in Figure 10-11, when you are asked to specify the parent class for your file, type MyCustomPlayer—doing so will cause Xcode to create a subclass template for you automatically.

Figure 10-11. Specifying a parent class for a new file in Xcode
Next, you need to create the storyboard for the video player. The key difference between this new playback interface and the one you created for the MyCustomPlayer project is that instead of having a Done button in the navigation bar, you will have Accept and Reject buttons, both of which finish the video completion process. Using Figure 10-12 as a reference, add a layer for the video output and a button to control playback. Embed this view controller in a Navigation Controller so that you can add your buttons.

Figure 10-12. Storyboard for video player
The header file for the VideoPlaybackController class is in Listing 10-18. As with other projects, remember to tie your button handlers and properties to the storyboard.
Listing 10-18. Header File for VideoPlaybackController Class
#import <UIKit/UIKit.h>

@interface VideoPlaybackController : MyCustomPlayer

@property (nonatomic, strong) IBOutlet *const;

-(IBAction)accept:(id)sender;
-(IBAction)reject:(id)sender;

@end

@protocol CustomPlayerDelegate <NSObject>

-(void)didFinishWithSuccess:(BOOL)success;

@end
Because you are subclassing the CustomVideoPlayer class, you do not need to reimplement video playback. Simply tie your button to the togglePlayback button handler you defined in the CustomVideoPlayer class (methods from parent classes show up in Interface Builder just as if you had defined them in your class). For the video-recording process, you will need to focus on the Accept and Reject functionality.
When a user decides to accept the video just recorded, you should follow the same workflow as the UIImagePickerController and return the user to the main user interface. During this process, you will need to save the file and dismiss the video preview and capture interfaces. The Accept button handler for the VideoPlaybackController class is shown in Listing 10-19.
Listing 10-19. Accept Button Handler for VideoPlaybackController
-(IBAction)accept:(id)sender
{
    [self.mediaPlayer stop];
    [self.delegate didFinishWithSuccess:YES];
}
This button handler is very short—all it does is stop the player and call the [CustomPlayerDelegate didFinishWithSuccess:] method. The [ViewController dismissViewController:animated:] method dismisses only one modal controller at a time. To dismiss both the VideoPlaybackController and the CameraViewController, you need to dismiss each from the view controller that presented them. The CameraViewController was presented by the MainViewController, so you will need to dismiss it via the CameraDelegate protocol. Similarly, the VideoPlaybackController was presented by the CameraViewController, so you will need to dismiss it via the CustomPlayerDelegate protocol.
The Reject button handler is similarly straightforward. All you need to do is dismiss the playback controller and reset the video-recording interface. As part of the reset process, you should delete the current movie file. Listing 10-20 shows the Reject button handler method.
Listing 10-20. Reject Button Handler for VideoPlaybackController
-(IBAction)reject:(id)sender
{
    [self.mediaPlayer stop];
    [self.delegate didFinishWithSuccess:NO];
}
You may be wondering about the implementation of the [CustomPlayerDelegate didFinishWithSuccess:] method. In your CameraViewController class, if the success parameter is set to YES, then you know the user wanted to accept the video, so you can dismiss the modal view controller that represents the player and call the [CameraDelegate didFinishWithURL:] on your camera delegate object. If the success parameter was set to NO, then you know the user wanted to reject the video. The completed [CustomPlayerDelegate didFinishWithSuccess:] method for the CameraViewController class is provided in Listing 10-21.
Listing 10-21. “Playback Completed” Delegate Method for CameraViewController Class
-(void)didFinishWithSuccess:(BOOL)success
{
    NSURL *outputUrl = [self.movieFileOutput outputFileURL];

    if (success) {

        [self.delegate didFinishWithUrl:outputUrl];

        [self dismissViewControllerAnimated:YES completion:nil];

    } else {

        [self dismissViewControllerAnimated:YES completion:^{
            //delete old movie file

            [[NSFileManager defaultManager]
                 removeItemAtPath:[outputUrl path] error:NULL];

        }];

    }
}
Next, you will learn more about the [CameraDelegate didFinishWithURL:] method, which is the message that allows you to pass back a video instead of an image.
Modifying Your Protocol for Video
To finish the Recording Complete process, you need to modify the CameraDelegate protocol to add an option that allows you to pass back a video. Looking at the implementation for still images in Listing 10-22, you can see that you specified a [CameraDelegate didFinishWithImage:] method, which returned the captured image as a UIImage object.
Listing 10-22. CameraDelegate Protocol Declaration for Still Images
@protocol CameraDelegate <NSObject>

-(void)cancel;
-(void)didFinishWithImage:(UIImage *)image;

@end
While this message-passing technique works for still images, which are a couple of megabytes at most, video files can easily be hundreds of megabytes in size. To effectively pass back a video, you should return the URL for the movie file generated by the AVCaptureMovieFileOutput. Listing 10-23 includes the modified declaration for the CameraDelegate protocol. The method for returning videos is named [CameraDelegate didFinishWithURL:].
Listing 10-23. CameraDelegate Protocol Declaration for Videos
@protocol CameraDelegate <NSObject>

-(void)cancel;
-(void)didFinishWithUrl:(NSURL *)url;

@end
Note Remember, present the playback interface only after the AVCaptureFileOutputRecordingDelegate has completed. That way, you can be sure that the video file will be valid.
As with all other protocols, you need to implement the [CameraDelegate didFinishWithURL:] method in the class that was set as the delegate. For the MyCustomRecorder project, this was the MainViewController. All you need to do for your implementation is dismiss the video-capture interface and display a success alert view. Because you specified an output URL that was in the application’s documents directory when you created your AVCaptureMovieFileOutput object, you do not need to do any extra work to save the video file. The final implementation for the MainViewController class is included in Listing 10-24.
Listing 10-24. “Did Finish with URL” Implementation for MainViewController Class
-(void)didFinishWithSuccess:(BOOL)success
{
    NSURL *outputUrl = [self.movieFileOutput outputFileURL];

    if (success) {

        [self.delegate didFinishWithUrl:outputUrl];

        [self dismissViewControllerAnimated:YES completion:nil];

    } else {

        [self dismissViewControllerAnimated:YES completion:^{
            //delete old movie file

            [[NSFileManager defaultManager]
                removeItemAtPath:[outputUrl path] error:NULL];

        }];

    }
}
Summary
In this chapter, you saw how to build a custom video-recording interface based on the AVFoundation framework’s image-capture classes. To save time, you reused the CameraViewController class from Chapter 4 for the basic capture interface and the CustomPlayer class from Chapter 9 for the custom video-playback interface.
It’s worth noting that you were able to reuse most of the code from the still-image capture project you built in Chapter 4, making only a few changes to handle movie file output and enable video-specific capture settings. To mimic the UIImagePickerController’s preview interface, you added Accept and Reject controls to the CustomPlayer class. Finally, to accommodate the larger size of video files, you added a Did Finish with URL method to the CameraDelegate protocol.
As has been the pattern for so many other projects in this book, this custom video-recording project was primarily an exercise in modifying existing code to meet a new use case. As you continue as a media app developer (and engineer in general), you will find many other concepts that greatly overlap with what you already know. The key is to keep an open mind and take advantage of common patterns that you recognize.