Chapter 12
Channeling the World Into Your Device
In This Chapter
![]() Opening a browser from your app
Opening a browser from your app
![]() Incorporating a browser view into your application
Incorporating a browser view into your application
![]() Using web services
Using web services
![]() Finding and using your devices’ location
Finding and using your devices’ location
![]() Incorporating maps into your app
Incorporating maps into your app
Your iPhone or tablet is your portal to the world. You can interact with others, find out what's going on around you (such as shopping, dining and local points of interest) and in distant places (such as weather where you plan to visit).
Your device can do all these things because of apps that utilize three things: the web; location-based services provided by a variety of providers, especially Apple and Google; and the device's own built-in location-finding capability.
In this chapter, I illustrate how to create apps that can browse the web, call web services that provide specific assistance and information, provide maps of places of interest, show where you are on a map, and more.
Networking Basics
A network is any collection of interconnected computers. They can be in either Local Area Networks (or LANs) or Wide Area Networks (or WANs). LANs are computers grouped together in close proximity (for example, (in your home or workplace); WANs span across wide geographical areas, with the Internet being the largest WAN we know of.
All forms of communication have a set of rules known as a protocol. In computing, a protocol is a formal description of the digital formats of the messages that are exchanged and the rules for exchanging the messages — the signaling, acknowledgements, and so on. There are many such protocols, but here I focus on the three that iOS devices use to communicate:
- Bluetooth is used for close-range device-to-device communication.
- TCP/IP (Transmission Control Protocol/Internet Protocol) is the most widely used protocol for computer-to-computer communication over the Internet.
- Layered on TCP/IP is the HTTP protocol (HyperText Transfer Protocol) upon which most web-based applications are built.
 Layered on top of HTTP are some capabilities that iOS provides, such as launching a web browser. These capabilities hide even HTTP, making things even simpler.
 Unless you're building a performance-critical application — such as a multiplayer game — that requires exchanging large numbers of messages in real time, the HTTP protocol is the only one you'll need. This book deals only with applications that you can build using this protocol.
Launching a browser from your app
The first (and simplest) example I show is one where your application launches the built-in Safari browser on a specific web page identified by a URL.
In Tic-Tac-Toe, I show you how to access the Wikipedia page from the Help screen of the app (see Figure 12-1).
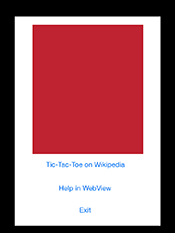
Figure 12-1: The Tic-Tac-Toe Help screen.
Tapping the button labeled Tic-Tac-Toe on Wikipedia brings up a Wikipedia page that describes Tic-Tac-Toe, as shown in Figure 12-2.
The code for opening a URL in the built-in Safari browser is straightforward. Here is a code snippet from Tic-Tac-Toe (taken from the helpViaBrowser method in TTTHelpViewController.m):
- (IBAction)helpViaBrowser: (id) sender{
[[UIApplication sharedApplication] openURL:[NSURL
URLWithString:@"http://en.wikipedia.org/wiki/Tictactoe"]];
}
One line of code. Yes, it's that simple.
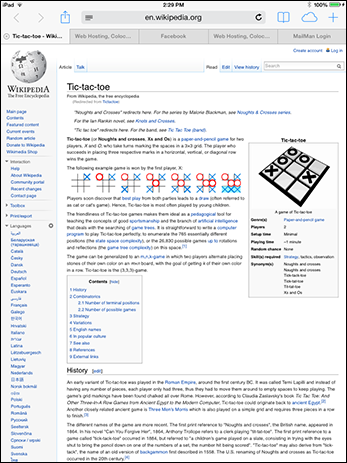
Figure 12-2: Launching a web page in a browser from your app.
Of course, this simplicity is thanks to the UIApplication class that does all the hard work. This class provides a central coordination point for iOS apps — essentially acting as a Façade to a set of functionality provided by the operating system.
Every app gets exactly one instance of UIApplication (or a subclass) because this class is implemented as a Singleton. When an app is launched and UIApplicationMain is called (look at the main.m method in the Tic-Tac-Toe project, or for that matter in any project), a UIApplication object is created. After that, you access this single object by invoking the sharedApplication class method.
The device’s browser, which opened the URL http://en.wikipedia.org/wiki/Tictactoe, is automatically redirected by the web server to http://en.m.wikipedia.org/wiki/Tictactoe. This page is the Tic-Tac-Toe web page for mobile devices (which, for example, doesn't use frames and has fewer embedded graphics).
Once you launch the browser, it completely takes over, and you don't have a good way to get back to your app. You can, of course, exit the browser by touching the Home button. But to get to the Tic-Tac-Toe app again, you must go to the Home screen and restart it, at which point, it will likely start where it left off — because it didn’t really go away. However, you can't rely on this of returning to where you left off. If iOS needs to conserve resources, it may shut down your app once the browser is launched.
In other words, the preceding approach to opening a web page on an app forces you to give up control to the browser and the iOS operating system. To ensure that your app manages the web page, you must embed the browser as a view in your application, which I explain in the next section.
Embedding a browser in your iOS application using WebView
Being able to browse the web from within an app on a mobile device is a useful functionality, for users, apps, and websites. For users, apps set the browsing context and can take users to particular web pages; for apps, as users browse, apps can observe the pages being browsed and use that information to improve performance; and for websites, apps provide the context of the browsing (such as the location of users).
Figure 12-3 shows what an embedded view looks like. As you can see, and unlike the previous example where the browser took over the entire screen, here you still have access to everything else on the screen.
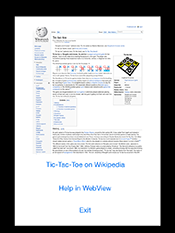
Figure 12-3: Showing a web page in an embedded web view.
In the iOS framework, Apple enables you to embed a browser in your app by using the Web View component. To embed this view in a screen on a storyboard, drag and drop a component named WebView onto the screen, as you do any other UI component.
In this example, I set up an outlet in the view controller for the Web View, along with an action triggered by the Help in WebView button wired to the action helpWithWebView. In the following code (from TTTHelpViewController.h), you see the various outlets and actions:
#import <UIKit/UIKit.h>
@interface TTTHelpViewController : UIViewController
...
@property (nonatomic, retain) IBOutlet UIWebView *helpWebView;
...
@property (nonatomic, retain) IBOutlet UIButton *helpViaWebViewButton;
...
...
- (IBAction) helpWithWebView: (id) sender;
...
@end
This is the code behind the helpWithWebView action:
- (IBAction) helpWithWebView: (id) sender{
NSString *wikpediaURLString = @"http://en.wikipedia.org/wiki/Tictactoe";
NSURL *wikepediaUrl = [NSURL URLWithString:wikpediaURLString];
NSURLRequest *requestObj = [NSURLRequest requestWithURL:wikepediaUrl];
[helpWebView loadRequest:requestObj];
}
The preceding code does the following:
- An object representing a URL (an instance of the
NSURLclass) is created from the URL string. - This
NSURLobject is embedded in aNSURLRequestobject. - The
NSURLRequestobject is sent to theloadRequestmethod of the web view.
And that, as they say, is that.
Using Maps and Providing Location-Based Services
A mobile device, especially a smartphone, is an integral part of many people’s professional and personal lives. Because this device is also a computer that can record and remember, it retains intimate knowledge about people — such as their friends (through the address book and calling patterns), common haunts, and so on. This information can be used by your app to provide personalized and highly targeted context-based services that appear to be created just for a given individual.
A very important component of context is location, one that a smart iOS device is especially capable of providing because it can be located, either through a built-in GPS device or because it's visible to cellular phone towers or Wi-Fi hotspots. Because most users take these devices everywhere they go, its location is also the users' locations.
By using the iOS framework’s location-finding services, you can write apps to provide location-based services. There are many kinds of location-based services — among others, providing directions to places a user isn't familiar with and information on points of interest such as dining or sights in close proximity to the user.
All of these services must have a way to do the following:
- Bring up a map.
- Navigate the map to various positions.
- Identify (from the device) the user's coordinates.
I cover how to enable these three actions in the next few sections.
To illustrate how to use location and maps from your app, I created a screen and a view controller named Where Am I (why not?). Note that the view controller is named TTTWhereAmIViewController, in keeping with the naming convention used in this book. The app first brings up a map inside an instance of a Map View class (named MKMapView) from the MapKit package (#import <MapKit/MapKit.h>).
 Maps and location services are limited when run on the iOS simulator (you can see only California and Apple’s location in Cupertino). To properly test maps, you must run your app on a real device. So, for this next step, locate that device and hook it up.
When you run this app on an actual device, the map responds to touch-based gestures to zoom in and out. You can also pan to different locations by dragging the map in any direction. You can enter the address of your intended destination, and the map will navigate to that address. The application determines your current location by invoking the location services on your phone and navigates the map to that location.
Installing the additional development components needed for maps
The iOS libraries added to your project don't automatically contain the Map Kit library that you need to write map applications. If you build your code based on these libraries, you'll get errors. This is not a big deal, though. You simply enable the Map capability, as shown in Figure 12-4, to link in the necessary libraries.
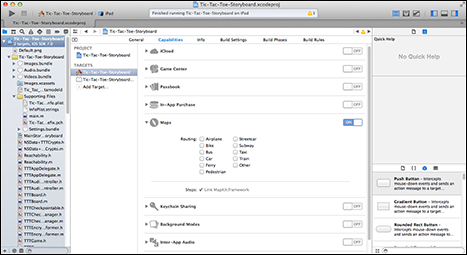
Figure 12-4: Enabling the Map capability.
You can also manually install the MapKit framework, as shown in Figure 12-5.
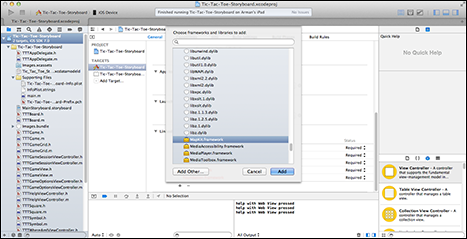
Figure 12-5: Manually adding the MapKit framework to your project.
Displaying a map using a MapView
I next illustrate how to display a map using the built-in MapView class by walking you through the Where Am I screen and view controller (once again, feel free to follow along in Xcode). Start with the screen layout for the Where Am I screen (see Figure 12-6). Note the Map View at the top and the two buttons, Find and Locate Me, next to two text fields. You can enter text in the Find text field. The Locate Me text field is, on the other hand, set programmatically when you touch Locate Me. Also note the Exit button. Finally note the segue to the Where Am I screen. If you look in Xcode, you see that this segue originates at the button named Where Am I in the Game Options screen.
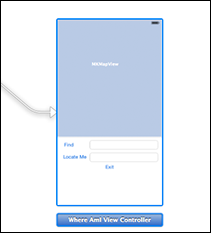
Figure 12-6: Laying out a map using a Map View.
Now, look at the Where Am I view controller, starting as usual with the interface file:
#import <UIKit/UIKit.h>
#import <MapKit/MapKit.h>
@interface TTTWhereAmIViewController : UIViewController <MKMapViewDelegate> {
}
@property (nonatomic, retain) IBOutlet MKMapView *thisMapView;
@property (nonatomic, retain) IBOutlet UIButton *findButton;
@property (nonatomic, retain) IBOutlet UIButton *locateMeButton;
@property (nonatomic, retain) IBOutlet UIButton *exitButton;
@property (nonatomic, retain) IBOutlet UITextField *locateMeTextField;
@property (nonatomic, retain) IBOutlet UITextField *findTextField;
- (IBAction) find:(id)sender;
- (IBAction) locateMe:(id)sender;
- (IBAction) exit:(id)sender;
@end
You see all the expected outlets (for each of the UI components on the screen) and actions (corresponding to the buttons). Now, look at the ViewDidLoad method:
- (void)viewDidLoad{
[super viewDidLoad];
// Do any additional setup after loading the view.
locateMeTextField.enabled = NO; // Prevent typing in this field
[locateMeButton setEnabled:NO]; // Disable till location found
thisMapView.showsUserLocation = YES; // show ball at location
myGeocoder = [[CLGeocoder alloc] init]; // Create a geocoder
// Set this as the delegate to the location listener
[thisMapView setDelegate:self];
}
In this method, you see additional setup for the Where Am I screen, after it's loaded for display. The Locate Me text field is disabled, so you can’t type in it, and the Locate Me button is disabled until the device can connect to a location provider and get its location. I explain how that works in the section “Wherever you go, there you are,” later in this chapter.
Next, look at the statement thisMapView.showsUserLocation = YES. This statement configures the map so that the user’s current location is shown as a blinking ball on the map.
Finally, an instance of a GLGeoCoder class is created. GLGeoCoder is a helper class for the view that geocodes an address and also reverse geocodes a location and determines what's at that location.
Using geocoding to navigate the map
To use geocoding to navigate a map, start by locating a place on the map. The upcoming code snippet illustrates use of the find method, which is the action prompted by the Find button. To test this method, type the name of a unique location (for example, London, England, or New Delhi in the Find field — the name must be unique; London alone could bring up several locations, such as London, Ohio). Touch Find, and the app navigates the map to that location.
After you understand what the method calls do, you'll find that the code is straightforward. The myGeocoder object is an instance of the class CLGeocoder. The method geocodeAddressString of this instance takes the location name as a string and converts it to coordinates on the map:
- (IBAction) find:(id)sender{
NSString *findString = [findTextField text];
[myGeocoder geocodeAddressString:findString completionHandler:^(NSArray* placemarks, NSError* error){
if ([placemarks count] > 0){
MKPlacemark *aPlacemark = [placemarks objectAtIndex:0];
[thisMapView
setCenterCoordinate:aPlacemark.location.coordinate animated:YES];
}
}];
}
This information then centers the map using [thisMapView setCenterCoordinate:userLocation.coordinate animated:YES].
The geocodeAddressString method is actually a web service call to a remote server. This remote call can take time, especially if the network is slow or spotty. If you don't want the app to hang in the meantime, you can launch the remote call in a separate thread, with a callback method defined inline to process the results when it comes back.
The MKPlacemark class is important. A MKPlacemark object stores location-related data for a given latitude and longitude, such as the country, state, city, street address, and points of interest. You can find more information about this class at the MKPlacemark link in the web resources for this chapter at www.dummies.com/go/iosprogramminglinks.
Wherever you go, there you are
iOS provides three types of location-finding capabilities as part of the iOS framework: GPS-based, cellular-tower-based, and Wi-Fi. The most accurate system is GPS (Global Positioning System), which uses a permanent ring of satellites to locate devices containing a GPS receiver. GPS is accurate to within a few meters. However, GPS doesn't work well indoors, consumes a fair bit of battery power, and sometimes takes a while to figure out where a device is located.
In addition, the cell towers that a device is communicating with (if it's a phone) know approximately where a device is to within several thousand meters — through triangulating based on signal direction and strength. Similarly, Wi-Fi access points that devices are connected to serve as approximate proxies for the device. Wi-Fi location is accurate to about a few hundred meters because, in most cases, the address of the gateway that all the access points connect to is known and serves as the proxy for the location of the device (for example, a cable or DSL modem in your house).
However, challenges remain in device location. The preceding techniques are approximations, and as a user moves around, different ones may become available or unavailable, or the provider being used may not always be the best one.
Before showing you how to get the current location of a device, you need a little background. Because the location of a mobile device changes with the location of the user, finding a location is rarely a one-time process. Location-based apps are dynamic apps, so as a user moves around, what these apps show changes accordingly. For that reason, most location-based apps are event-based, with the event being a detectable change in the location.
If you look at the code in the Where Am I view controller, you’ll see what I mean. Now, to revisit the ViewDidLoad method:
- (void)viewDidLoad{
[super viewDidLoad];
// Do any additional setup after loading the view.
...
[locateMeButton setEnabled:NO]; // Disable till location found
thisMapView.showsUserLocation = YES; // show ball at location
myGeocoder = [[CLGeocoder alloc] init]; // Create a geocoder
// Set this as the delegate to the location listener
[thisMapView setDelegate:self];
}
Notice the statement [thisMapView setDelegate:self];. Here, the view controller (self) is setting itself up as a delegate for an event in the MapView object. That event is a location-changed event. In fact, when a MapView is instantiated and while it's showing a map, it has a separate thread that's busily monitoring the location of the device.
When the location changes by a settable threshold, an event occurs. The MapView object delegates the response to that event to a delegate object — in this case, the parent view controller object (that is, the current instance of the Where Am I view controller) — by calling the delegate method didUpdateUserLocation with the changed location, as shown here:
- (void)mapView:(MKMapView *)mapView
didUpdateUserLocation:(MKUserLocation *)userLocation {
if ((userLocation.coordinate.latitude != 0.0) &&
(userLocation.coordinate.longitude != 0.0)){
// Center the map
[thisMapView setCenterCoordinate:userLocation.coordinate
animated:YES];
//Save the location from userLocation
myLocation = [userLocation location];
// Enable Locate Me button
if (myLocation != nil)[locateMeButton setEnabled:YES];
}
}
Incidentally, didUpdateUserLocation is a method in the MKMapViewDelegate protocol shown in the definition of the Where Am I view controller (see the declaration of TTTWhereAmIViewController in the file TTTWhereAmIViewController.h).
In this method, the new location is used first to center the map using [thisMapView setCenterCoordinate:userLocation.coordinate animated:YES]. Then a location structure is extracted from the userLocation object and cached. Finally, now that a location is found, the Locate Me button is enabled.
Touching the Locate Me button causes the locateMe method to execute, as shown here:
- (IBAction) locateMe:(id)sender{
// Lookup the information for the current location of the user.
[myGeocoder reverseGeocodeLocation:myLocation
completionHandler:^(NSArray *placemarks,
NSError *error) {
if ((placemarks != nil) && (placemarks.count > 0)) {
// get a placemark - there should be only one most of the time
MKPlacemark *placemark = [placemarks objectAtIndex:0];
// Convert the location to a string
NSString *myLocationString = [[NSArray arrayWithObjects:
placemark.subThoroughfare,
@" ",
placemark.thoroughfare,
@",",
placemark.locality,
@",",
placemark.administrativeArea,
@",",
placemark.country,
@" ",
placemark.postalCode,
nil]
componentsJoinedByString:@""];
[locateMeTextField setText:myLocationString];
[thisMapView
setCenterCoordinate:placemark.location.coordinate
animated:YES];
} else {
// Handle errors.
[locateMeTextField setText:@"Current location not found"];
}
}];
}
This method looks up the location saved by the didUpdateUserLocation callback and reverse geocodes it using the trusty myGeocoder object. In reverse geocoding, meaningful location information (such as address, city, state, points of interest, and so on) is extracted corresponding to the GPS coordinates. This information is returned in and extracted from a MKPlacemark object that's shown in the view. The map is also centered at this location. Figure 12-7 shows the resulting map after it's been centered.
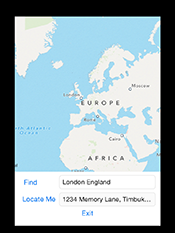
Figure 12-7: Map centered at a location.
Now that you understand how to get a device's location and how to use that information, you need to know another important point. Before making use of its location, an app must ask for and receive permission to do so. Your app doesn't need to do anything special to ask for this location; it simply tries to use the current location of the device. The iOS framework then causes the app to prompt for this permission (see Figure 12-8).
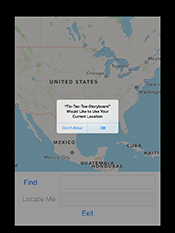
Figure 12-8: Requesting permission to use the device's location.
Design Principles for Web- and Location-Based Apps
When you're reaching out to the web to invoke a service or read data, you're going outside the device into what is essentially the wide blue yonder. Keep in mind the things that can go wrong — such as losing connectivity or, even worse, dealing with a connection with very low bandwidth. Your application must be able to deal with such situations and still provide a good user experience.
Being nice about using remote services
Because remote calls are made to external services, you need to be aware of how to use geocoding. Here are some best-practice suggestions:
- Send, at most, one geocoding request for a single user action.
- If the user performs multiple actions that involve geocoding the same location, cache and reuse the results from the first request.
- Issue new geocoding requests to keep track of a moving user (therefore, the device) only after the user moves a significant distance or after some reasonable amount of time passes.
In typical situations, Apple recommends sending not more than one geocoding request per minute.
- When a user may not see the results right away, don't start a geocoding request. You’d just be wasting resources.
Even though the app or the location-handling components in iOS may be caching location data, the device must be able to reach the network in order to return detailed MKPlacemark information. The geocoder caches the localized country name and ISO country code for most locations. However, if more detailed information about a country isn't available for a specific location, the geocoder may still report an error.
Using threading to deal with slow network connections
Dealing with connectivity is complicated. Dealing with situations where there is no connectivity is actually straightforward. The difficult part is deciding whether there is enough connectivity. This is because tests for connectivity will succeed if there's any connectivity at all, even if the connection is poor and has low bandwidth. However, no test will tell the app how good or bad the connectivity is.
The iOS framework tries to deal with poor connectivity by launching most remote calls over the Internet in a new thread so that, despite the slow connection, your app won't hang and stays responsive while the remote call is in progress.
In many cases, you won’t have to deal directly with threads because the iOS framework does that for you. For example, when you launched the Web View in the Help screen (see the earlier section “Embedding a browser in your iOS application using WebView”) or when you brought up the Map View in the Where Am I screen, the iOS framework created threads in the background to do this work so that the rest of the app remained responsive. You can test this behavior in iOS by touching the Exit button on either of the screens while the web page or the map is loading — the screen will exit immediately.
Note how the Map View finessed dealing with the lack of connectivity. It did so by automatically finding the current location in a separate thread. If there isn't access to a location-finding device, the callback method didUpdateUserLocation will never be invoked.