

Keybanging
Enjoy code-free home automation using prop controllers.
BY WILLIAM GURSTELLE
Despite the unfortunate experiences of Dr. Frankenstein, I think adding life to inanimate things is one of most interesting types of automation. Thanks to the current generation of easy-to-use programmable animation controllers, making an articulated figure move like a person, giving jets of water “personality” as they stream out of a fountain, or sequencing holiday lights to musical beats isn’t just for theme park set designers anymore.
Of course, making all that happen requires computer programming. I may be limiting my opportunities to tackle the most involved projects, but I don’t want to be a computer programmer. If a project includes stuff like:
void setup(){ pinMode(ledPin, OUTPUT); then count me out.
Sure, microcontrollers like Arduino and BASIC Stamp can perform a million automation tasks a million different ways, but usually that’s overkill for what I need. Instead, I use a far simpler method of adding life to props, displays, and room environments that doesn’t require coding or digital programming.
It’s called keybanging. A keybanger is a standalone, controllable programming device that allows the automation of complex tasks through a simple pushbutton programming interface. Born in the animatronics industry, these devices are also known as prop controllers, programmable switches, or effects programmers. The simplest devices have a single trigger circuit, control a single device, and cost about $50. More elaborate models use a microcontroller chip for a brain and include onboard audio amplifiers, output relays for 8 or more devices, interfaces for servomotors, and (shudder) a programmable digital interface to supplement the buttons.
Besides animatronics, keybangers are used to automate water fountains, fireworks, lighting displays, sound systems, slide and movie projectors, window displays, signs, or just about anything else that can be controlled by an electrical on-off signal.
Say, for example, you had a 6-pump water fountain and you wanted to coordinate the fountain sprays to the rhythm of a particular piece of music. If you used a typical microprocessor, this would require some elaborate I/O programming. Further, turning the water jets on and off to coordinate with the music equates to some fancy sequencing and timing.
But programming a keybanger for this job is quite simple. Just play the music and then push the buttons when you want the fountains to spray; release them when you want them off. All keybangers allow you to record at least a 2-minute-long sequence, and some allow for far longer programs.
L-Dopa
Use the keybanger to automate any number of household systems.
Input/output schemes on keybangers are straightforward. There are one or more trigger inputs on the front of the box. When the circuit is closed (or opened, depending on the type of trigger) the device begins running its program. The circuit closure could be a simple pushbutton, a switch hidden under a floor mat, or a passive infrared sensor, for example. When the circuit closure is made, the keybanger detects it and starts running its program.
Once the program starts, electrical contacts on the device open and close according to the instructions you programmed into it. When the keybanger is triggered, its little computer brain turns the attached gadgets on and off in accordance with the program. Since the unit is fairly intelligent (at least in a specialized way), it can easily control complicated or lengthy sequences.
A number of small electronics designers produce keybanger logic systems. An internet search will turn up dozens of websites with products made by companies ranging from part-time garage operations to large companies with customer support staff and full product lines. Most, but not all, started in the commercial haunted house business. In fact, animating Halloween props is by far the most common application.
The simplest and cheapest devices sequence a single relay. A well-known device of this sort is the Animation Maestro from Haunted Enterprises. AMs are great for simple Halloween props such as the beloved Trash Can Trauma (see MAKE’s Halloween Special Edition from 2007, makershed.com item #9780596514297.PDF). An Animation Maestro costs about $60. The simplest model has a single trigger input and a single output. Programming the device takes about a minute to learn.
Gregory Hayes
Gilderfluke & Co. designs and manufactures a wide variety of animatronic devices. Their MiniBrick controller models can control 4, 8, or 32 relays, and can interface with standard DC servomotors. As keybangers go, MiniBricks are the most complicated to program, but once you figure out the nuances, their capabilities are nearly endless. An 8-output MiniBrick with 2 servo outputs runs $210.
My personal favorite is the Monster Guts Nerve Center for about $70. The Nerve Center controls 2 on-off relays and has a small LED display that makes it a snap to program. It runs multiple programs, so the animation can behave differently on successive triggers. Best of all, it has an onboard audio amplifier and enough memory to record 8 seperate sound tracks, so if your project includes sound, just add a speaker (no amp needed) and you’re good to go. Here’s how I used it to make an animated water fountain.
START
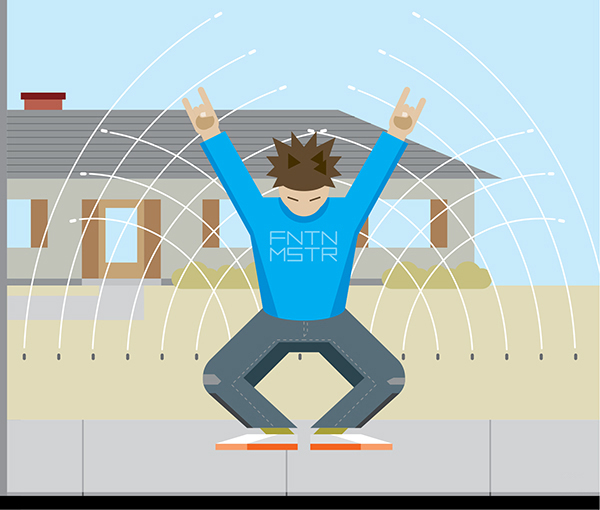
1. BUILD YOUR FOUNTAIN TABLEAU
Place a submersible fountain pump inside a water-filled container and plumb the device so that the water jets upward when the pump is energized. Attach a light source to the container so you can light up the water spray (Figure A).
![]() WARNING:
WARNING:
Exercise extreme caution using AC power with water-based projects.

2. SET UP THE AUDIO
Connect a music source (e.g., iPod) to the audio input on the Nerve Center, and connect a speaker to the audio out jack (Figure B).
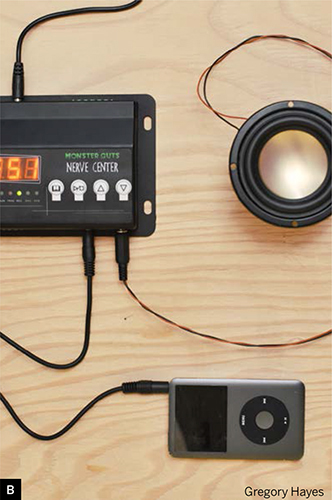
Select the Enter Sound command and record your musical selection into memory.
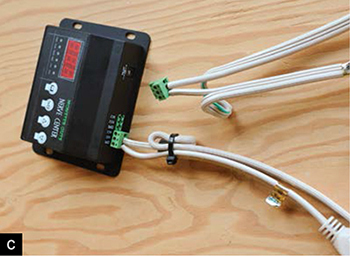
3. CONNECT THE PUMP AND LIGHT
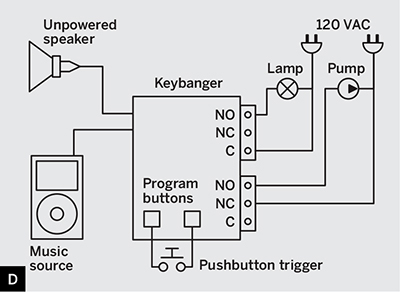
The Nerve Center connections are simple relays that make or break according to the programmed instructions. The Nerve Center doesn’t provide AC power; it merely switches it on or off. That means that to control power to the pump and light, you’ll need to break into one conductor on each extension cord so they connect to the Nerve Center relays (Figure C) as shown in the schematic (Figure D).
4. RECORD YOUR SEQUENCE
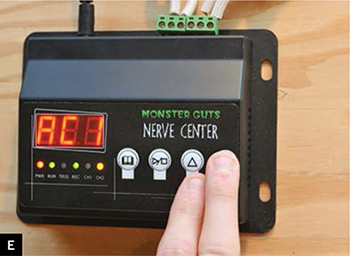
This is the fun part. Select the Action Control command on the LED display. The music recorded to the device in Step 2 begins to play.
Use the 2 programming buttons on the front of the controller to bring your fountain to life. When you depress the button corre-sponding to the pump, the pump will run. Releasing the button will turn it off. The light control button works similarly. You can sequence your entire show just by pressing and releasing the 2 buttons on the front panel (Figure E). The fountain spray and light work independently, so you can devise all sorts of routines.
5. ADD A PUSHBUTTON
Wire the pushbutton switch between the keybanger’s NO (normally open) and Common trigger contacts (Figure F).
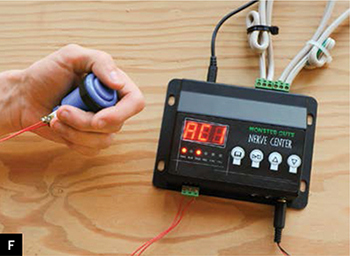
6. ANIMATE!
Select the Scene Control command and press the pushbutton to trigger your animated sequence. Want to make changes? Just tweak the program for best effect, then sit back and enjoy the show.
The applications for keybangers are limited only by your imagination. By replacing the pushbutton with a sensor (motion, heat, humidity, temperature, etc.) you can use the keybanger to automate any number of household systems. ![]()
William Gurstelle is a contributing editor of MAKE. Visit williamgurstelle.com for more information on this and other maker-friendly projects.
Photograph by Pat Molner