

Listening to Satellites
Tune in to space with a homemade yagi antenna.
BY DIANA ENG

Photography by Diana Eng
One of my favorite things to do is talk with other ham radio operators through satellites or the International Space Station (ISS). To do this, I stand on a rooftop and tune a handheld multiband radio while tracing the orbit of a satellite or the ISS with my homemade yagi antenna.
Orbiting satellites such as SO-50 act as repeaters, relaying signals from low-power transceivers like mine back to hams elsewhere on the planet. So if you know where to aim the antenna, you can communicate around the world via space.
The ISS also has a repeater, and occasionally, when we’re lucky, the astronauts themselves exchange transmissions to communicate with hams on the ground.
To listen to these signals from space, you don’t have to be a licensed ham radio operator, or even stand on the roof. You can do it in your own backyard with an off-the-shelf UHF FM radio. The whip antenna on the radio might let you hear satellites and the ISS, but you’ll get far better reception by making your own yagi antenna, which takes about an hour and costs less than $25 (not including the cost of your radio) using materials from your local hardware store.
If you do have a ham radio license and a UHF/VHF transceiver, you can upgrade this antenna with VHF elements so that it can both send and receive transmissions.
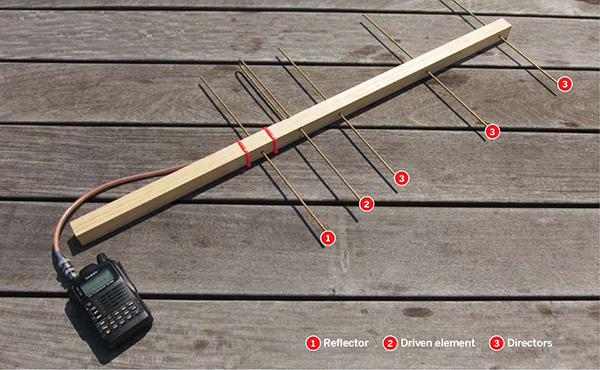
A yagi antenna has three types of elements, consisting of metal rods of varying lengths and quantities. The driven element is a dipole antenna that’s connected to the radio and receives the signal, just like a whip antenna. The reflector is positioned behind the driven element, where it acts as a mirror by bouncing signals from the satellite forward to the driven element. Directors are one or more rods that act like a lens, focusing the incoming signal onto the driven element. Both the reflector and the directors improve reception from whatever direction the antenna points.
The antenna design I use comes from Kent Britain’s (WA5VJB) "Cheap Antennas for Low Earth Orbit" (available at wa5vjb.com/references.html), which is a great reference for building many different types of yagi antennas.
UHF FM radio like a police scanner, such as the Uniden BC72XLT handheld scanner, amazon.com, $85. Or, if you have a ham radio license, a UHF transceiver such as the Yaesu VX-7R, universal-radio.com/catalog/ht/0777.html.
Square wooden dowel, 1"×1"×30" or longer if you want a handle longer than 10" for attaching to a tripod or mounting the radio. Approximately $2–$3 at hardware or craft stores.
Brass rods, 1/3" diameter, 36" long (3) Uncoated brazing rods work, but almost any brass rod or tube will do as long as it’s approximately 1/3" diameter; $3–$4 each at a hardware or craft store.
Coaxial cable, RG-58, with BNC connectors, 3' universal-radio.com/catalog/cable/cable.html, order #4616, $4
Nylon cable ties (2) aka zip ties
TOOLS
Hacksaw
Soldering iron and solder
Glue gun and glue
Wire strippers and cutters
Ruler
Marker
Vise
Drill, or drill press, and 1/3" drill bit File, smooth cut, flat, approx. 10"
Wooden dowel or broomstick, approx. ¾" diameter
Computer with an internet connection
Pencil
≫ Build the Yagi Antenna
Time: 1–2 Hours
Complexity: Building Antenna = Easy; Receiving Signals = Medium
1. Measure and cut.
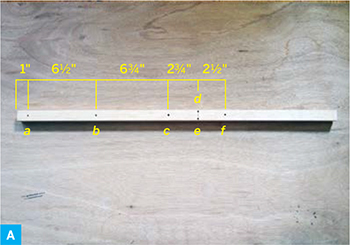
Use a pencil and ruler to draw a centerline down one long side of the wooden beam. Then measure and mark hole locations on the centerline (except holes d and e) at the following intervals: hole a 1" from one end; hole b 6½" from a; hole c 6¾" from b; holes d and e 2¾" from c, 5/8" apart and equidistant from the centerline; and hole f 2½" from d and e.
Drill 1/8" holes completely through the beam at each point (Figure A). Be careful when drilling d and e not to blow out the sides of the beam.
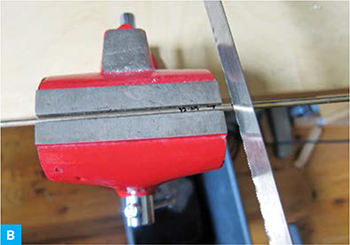
Use a marker and ruler to mark 5 pieces of brass rod at the following lengths: 21", 13½", 12½", 12¼", and 11¾". Secure the rod in a vise, cut to the measured lengths using a hacksaw, and file the ends so they’re no longer sharp and dangerous (Figure B).
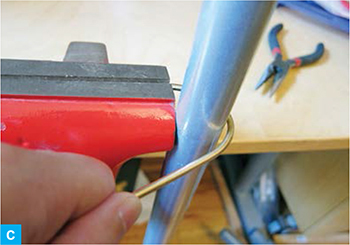
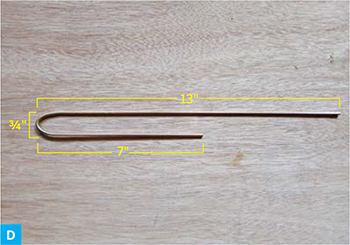
To make the driven element, place the 21" rod in the vise, mark it 13" from one end, center the mark on the broomstick, then bend it 180° around so it’s J-shaped (Figure C). Trim the rod so it measures 13" from one end to the center of the ¾" curve, and 7" from the other end to the center of the curve (Figure D).
2. Assemble the parts.
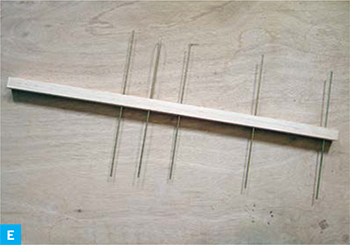
Insert the 11¾" element into hole a, the 12¼" element into b, the 12½" element into c, the J-shaped (driven) element into d and e, and the 13½" element into f. Center all the elements, and secure them in place with hot glue (Figure E).
To prepare the coaxial cable, cut off one of its connectors and strip 3" of outer insulation off that end, being careful not to cut the wires. Separate the outer wires, twist them to one side, and strip 2" of insulation off the inner wire (Figure F).

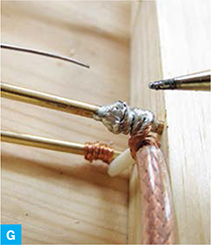
Connect the coax cable to the 2 parts of the driven element near where they enter the wooden beam. Wrap the cable’s inner wire around the short leg of the J, and the twisted outer wires around the long leg. Solder the wires in place (Figure G).
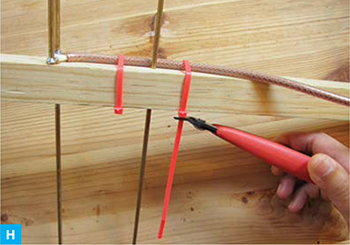
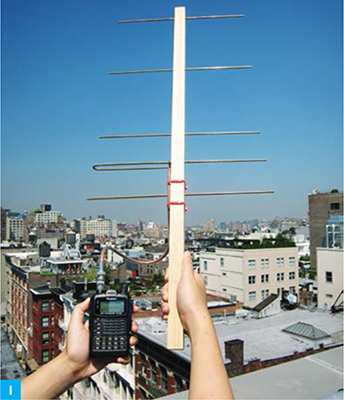
Secure the coax cable with a couple of zip ties (Figure H). Your antenna is done (Figure I)!
3. Receive signals from space.
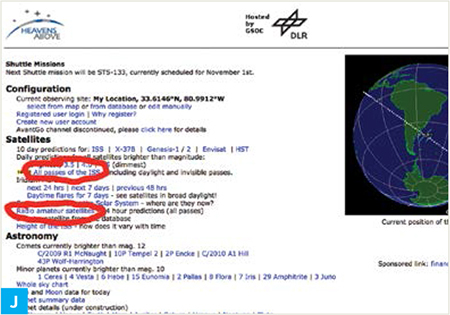
To use your antenna, you need to find out where to point it and what frequency to tune in to. To find a good satellite target, visit heavens-above.com.
To specify your location, select a Configuration option (map, database, or manual), plug in the necessary info, then click Submit. From your new location-specific homepage, select “All passes of the ISS” to track the International Space Station or “Radio amateur satellites” to track a ham radio repeater satellite (Figure J, following page).
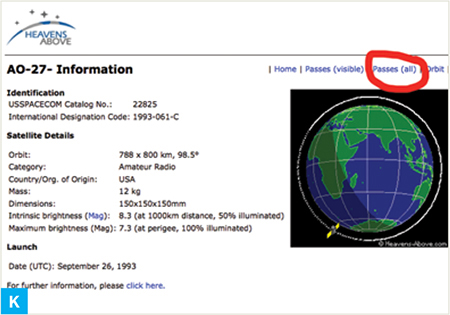
On the Radio Amateur Satellites page, click on one of the radio satellites you want to track from the Satellite column (such as AO-Echo, aka AO-51; SaudiSat 1C, aka SO-50; or AO-27), then show its pass chart by selecting “Passes (all)” above the globe (Figure K).
The pass chart lists all the satellite passes for the next few days. Each pass is listed by its times and locations in polar coordinates, for its start, maximum altitude, and end, with each pass typically taking about 10 minutes. The start and end points are defined as when the “bird” appears 10° above the horizon, and the maximum altitude (in degrees above the horizon) will vary. The azimuth for each location is listed in compass points (Figure L).

Make sure your location is listed correctly on the chart, and pick a pass during which the satellite will come close to directly overhead. Look for max altitudes that are 45° or higher — the higher, the better. In the example here, the second pass, on July 17 at 3:50, looks good since its altitude reaches 75°, but the first pass, on July 16 at 16:55, only comes up to 18°, which is very close to the horizon and difficult to pick up.
Next, find the frequency to tune in to. Satellite repeaters work with 2 different frequencies — an uplink and a downlink. You listen to signals received via the downlink. (If you wish to transmit, you’ll need to program in the uplink frequency as well.)
To find a radio satellite’s current frequencies, you have to refer to the authoritative web page for each individual satellite. Some references online, including AMSAT (amsat.org), aggregate frequency information for multiple satellites, but these can be incorrect and you often need to dig deeper.
What you want is a current update or schedule with uplink and downlink frequencies, and this data is unfortunately not published in a standardized manner. I like to Google the satellite’s name to find its authoritative source.
At the time of this writing, SO-50 is the only active FM satellite. But EO-80 and FOX-1A will be active soon.Once you’ve determined your target sat’s current downlink frequency (example: 436.7950MHz FM), tune your radio to that frequency, and you’re ready to go out and listen. Aim your yagi antenna directly at the satellite, with the shortest rods (directors) closest to the satellite and the longest rod (the reflector) farthest away. When the pass starts, aim the yagi toward the satellite (Figure M), then sweep it right and left slightly until you hear something. You can also move the antenna up and down slightly as you sweep right and left. Also try rotating the antenna by twisting your wrist, adjusting its polarity to receive a stronger signal.

If you’re using a whip antenna, hold it perpendicular to the satellite, and keep it perpendicular while you rotate it to get a clearer signal (Figure N).

Trace the path of the satellite’s orbit according to the pass chart, so that at its maximum altitude and its end time, the antenna is pointed in the corresponding locations. In our example, the antenna should be pointed east at 75° above the horizon at 3:55, and south at 10° above the horizon at 4:00. It can be difficult trying to catch the satellites, and you may spend a lot of time not hearing anything. The best method is to move the antenna around in small side-to-side and up-and-down motions until you hear a bit of audio.
The Doppler effect makes the frequency vary by 0.010MHz, so as you trace the satellite’s path you’ll also need to twiddle the tuning a bit. Add 0.010MHz to your target frequency early in the pass, then gradually dial it down until it’s approximately 0.010MHz less than the listed downlink frequency by the end time.
The FM satellites repeat whatever they receive, so you’ll hear whoever’s signal is strongest. (Another type of satellite, linear transponders, can handle multiple conversations at once, but these are harder to use and require a more expensive single sideband, not FM, radio.)
Hamspeak
When you eavesdrop on ham radio satellites and ISS, you’ll probably hear a lot of letters, numbers, and strange words, like “KC2UHB Foxtrot November three one … roger roger.” One reason is that ham operators use a phonetic alphabet to make themselves clear through the static and interference, so that “P” sounds nothing like “T,” for example.
The ham ABCs are: Alpha, Bravo, Charlie, Delta, Echo, Foxtrot, Golf, Hotel, India, Juliet, Kilo, Lima, Mike, November, Oscar, Papa, Quebec, Romeo, Sierra, Tango, Uniform, Victor, Whiskey, X-ray, Yankee, and Zulu.
Also, orbits don’t last very long, so radio operators extending their reach via satellites tend to communicate quickly, following the same general dialogue. Here’s an example:
“Kilo Charlie two Uniform Hotel Bravo.” (Hi, my call sign is KC2UHB, does anyone want to talk to me?) A call sign is like a screen name assigned to ham radio operators when they receive their license. Some operators have vanity call signs like NE1RD.
“KC2UHB from Whiskey two Victor Victor please copy Foxtrot November three one.” (I hear you KC2UHB, my call sign is W2VV and I am in Maidenhead location FN31.) The Maidenhead system divides the Earth into grid squares as shorthand to describe locations, and FN31 covers most of Connecticut and some of New York State. You can look up grid square locations online at levinecentral.com/ham/grid_square.php and elsewhere.
“W2VV, QSL this is KC2UHB, Echo Mike eight nine.” (W2VV, I received your transmission, my location is EM89.) KC2UHB is in central Ohio.
“QSL. Thank you for the contact. 73.” (I received your transmission. Thank you for the contact. Goodbye.)
“73.” (Goodbye.)
Just as we text each other abbreviations like OMG, BRB, TTYL, LOL, BF, GF, and <3, ham operators have their own, much older shorthand that was originally based on Morse code but became spoken with the advent of voice transmissions — much like when people say “Oh em gee” or “Be eff eff” today. Here are some ham abbreviations you may hear:
73 = goodbye, best wishes
88 = xoxo
OM (old man) = a friendly term for a male ham, a boyfriend/husband if described as “my OM”
YL (young lady) = a female ham, a girlfriend if described as “my YL”
XYL = wife
QSL = confirmation of message received
QRP = operating with low power
HT (handy talky) = a walkie-talkie
![]() To learn more about how a yagi antenna works, watch Diana Eng’s MAKE video on directional antennas, aka “Seeing Radio Waves With a Light Bulb,” at makezine.com/go/yagi.
To learn more about how a yagi antenna works, watch Diana Eng’s MAKE video on directional antennas, aka “Seeing Radio Waves With a Light Bulb,” at makezine.com/go/yagi.
Diana Eng (dianaeng.com) is a fashion designer who works with technology, math, and science. She is author of Fashion Geek: Clothes, Accessories, Tech (North Light Books, 2009) and is the ham radio correspondent for Make: Online (makezine.com).