
The BizTalk engine uses adapters to communicate with outside systems, and adapters start and end any process within BizTalk. Adapters come in three basic flavors: protocol adapters, database adapters, and ERP adapters.
Hundreds of adapters are available from third-party vendors that enable the BizTalk engine to communicate with just about any system. In addition, if an adapter is not available, the BizTalk adapter framework facilitates custom adapter development in .NET. Commonly used adapters include the following:
Protocol adapters: HTTP, File, and SOAP
Database adapters: SQL, DB2, and Oracle
ERP adapters: SAP, PeopleSoft, and Siebel
An entire book would be necessary to cover all the adapters available and their proper use. ERP adapters in particular require an in-depth discussion of the ERP system in question before you are able to use the adapter for that system. This chapter will therefore focus on a few of the more basic protocol and database adapters that are included with BizTalk out of the box.
Note
Make sure to look at the BizTalk line of business (LOB) adapters (which include PeopleSoft, JD Edwards, TIBCO, and WebSphere) and the BizTalk Adapter Pack (which includes SAP, Siebel, and Oracle). All are available for download from Microsoft's site.
The BizTalk platform offers numerous options to facilitate sending files. Within the BizTalk File adapter, various send options are natively available for the user to configure. The following steps demonstrate how to configure a send port:
Open the BizTalk Explorer, and create a send port that uses the File adapter.
Note
In alignment with standard BizTalk functionality, only static ports are defined to use a named File adapter.
In the send port properties, under the General options, click the ellipses for the
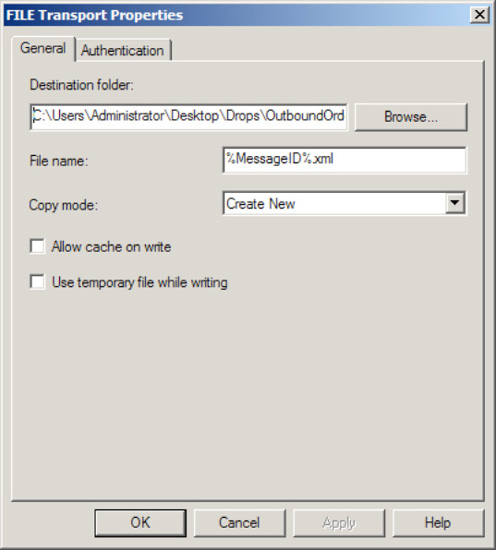
Address (URI)property. The FILE Transport Properties dialog box appears.Click the Destination Folder input box. Enter the value of the folder where you would like BizTalk Server to write the file.
→ Click the Copy Mode drop-down list, and ensure that the default value, Create New, is selected, as shown in Figure 6-1.
Click the Authentication tab, ensure that the Use These Credentials When Host Does Not Have Access to Network Share check box is unchecked.
Note
BizTalk gives you the ability to specify a different user account if the security permissions are different from the running host user account.
Click OK.
You can configure the File adapter either within the BizTalk Explorer (under a send port) or through code programmatically. The File adapter send configuration options encompass naming a file, using copy mode, implementing caching, and implementing security.
When naming files on the General tab of the FILE Transport Properties dialog box, you can configure a file send in conjunction with numerous macros to assist in making a file name more meaningful. For example, as shown in Figure 6-1, the File Name value is %MessageID%.xml. The macro, %MessageID%, will be substituted with the globally unique identifier (GUID) of the message in BizTalk Server at runtime when the file is named. This GUID comes directly from the message context property, BTS.MessageID. Please see Table 6-1 for a list of available macros. It is important to note you can use only these macros.
Table 6.1. BizTalk Macros
Description | |
|---|---|
| Sets the name of the file to the current UTC date in the format YYYY-MM-DD (example: 2010-07-01T103500). |
| Sets the name of the file to the current UTC date in the format YYYYMMDDhhmmsss (example: 201007011035234). |
| Sets the name of the file to the current local date plus the time zone difference from GMT in the format YYYY-MM-DDThhmmss-TZD (example: 2010-07-01T103500+700). |
| The name of the file would be set to whatever value is in the message context property for |
| The name of the file would be set to whatever value is in the message context property for |
| The most commonly used macro. This sets the name of the file equal to the unique identifier of the message. Using this macro guarantees that the name of the file will always be unique. |
| The file will be named after the value in the |
| The name of the source party (if available) from the |
| The name of the source party (if available) from the |
| Sets the name of the file to the current UTC time in the format hhmmss (example: 103523). |
| Sets the name of the file to the current local time plus the time zone difference from GMT in the format hhmmss-TZ (example: 103523+700). |
Currently, the product does not support creating custom or user-defined macros, and it doesn't support using any other BizTalk context properties other than what is available via the macros. Using these file-naming macros has been described as somewhat problematic within the BizTalk user group community. It is worth noting that a macro will fail if the following is true:
A corresponding system property is not set, for example, the exclusion of
SourcePartyorSourcePartyID.The file send macro is misspelled (including case-sensitive considerations).
The value of the macro result causes an invalid file name, for example, the usage of the following characters:
/ ! . , * " |
A further consideration when using the File send adapter is to ensure the security/access permissions are set appropriately. This encompasses standard Active Directory security considerations for related share and folder permissions, as well as security considerations related to non-Windows environments. By default, the File adapter write activity uses the user account of the running BizTalk host. It is always a good idea to unit test a security scenario first to ensure a file can be written to the desired destination before introducing the File send adapter. This way, you can isolate permission issues, saving possible issue detection and resolution time.
Within the BizTalk File adapter, numerous options are available to facilitate receiving files. You can configure all these options natively within the adapter. The following steps outline configuring the File receive adapter:
Open the BizTalk Administration Console
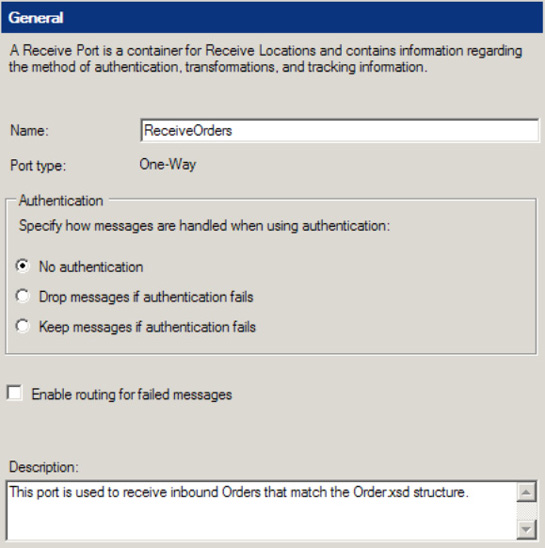
In the desired BizTalk application, right-click the Receive Ports folder, and select New→One-way Receive Port. Specify a name for the receive port. Leave the default settings on the remainder of the General tab, as shown in Figure 6-2.
Note
You can add maps to a receive port; a map would be applied after a pipeline but before any subscribers (send ports or orchestrations) have processed the message. Some solutions can have maps but no orchestrations; the maps are added to the receive and/or send ports.
Click the Receive Locations tab, and click the New button. This will open a new window for configuring the receive location. A receive port can have one or more receive locations.
Give the receive location a name, and set the Type property to FILE.
The Receive handler property should be set the correct host application; this will depend on how you want to organize your environment. In many scenarios, only a single option is available here.
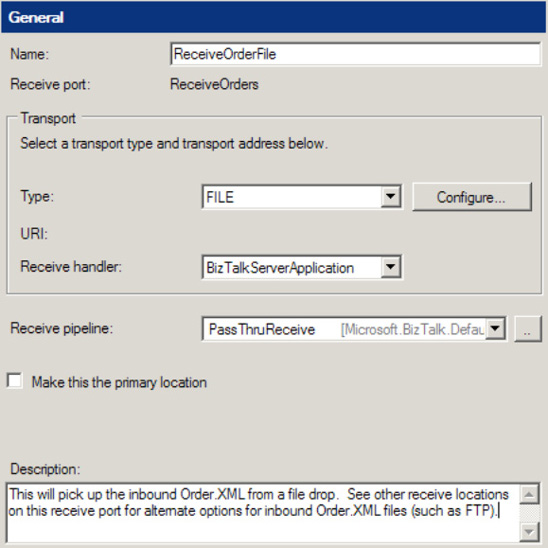
Set the Receive pipeline property to the correct pipeline. In this case, the
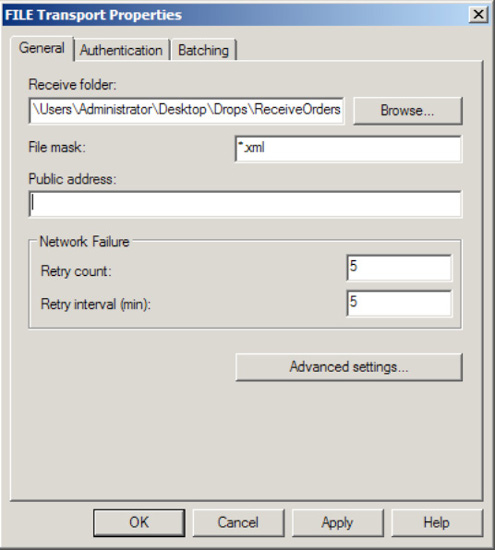
PassThruReceivepipeline will be adequate; this means that any file will be picked up, and the contents will not be validated by any code. If the file that was being picked up was XML and you needed to ensure that it validated against a deployed schema, the correct receive pipeline would beXMLReceive. Figure 6-3 shows the configuration of the receive location so far.Enter the value of the file folder you want BizTalk Server to pull for files.
Click the File Mask input area. Enter the value *.*.
Note
The
File Maskproperty allows the File adapter to consume files that match a specific file mask. In the instance of*.*, all files will be consumed by the wildcard mask. However, it is worth noting that you cannot set up two receive locations with the same mask, monitoring the same location.Under the Network Failure options, set the retry values. The default options are 5 and 5 for Retry Count and Retry Interval but can be set at any value. If the retries are exceeded, the receive location will be automatically disabled. This would most commonly occur when polling a network drive that is inaccessible for a period of time.
Click OK to create the receive location.
In this recipe, how to use the File receive adapter was demonstrated. You can configure the File adapter either using the BizTalk Explorer (within a receive location) from Visual Studio, using code (most commonly via an orchestration), or using the BizTalk Administration Console. The File adapter receive configuration options encompass receive location parameters, network failure options, batching, and authentication.
In addition to the basic configuration options, you can configure other advanced options to assist in the process of receiving files. The General tab contains some advanced configuration options, as shown in Table 6-2.
Table 6.2. Advanced Settings for File Transport
Option | Description |
|---|---|
Rename Files While Reading | Ensures that a file is renamed while BizTalk is reading the file during the receive process. This might assist in ensuring that an incoming file is not overwritten if the source address has the ability to write files with identical names. |
Receive Location Polling | Gives the ability to set the polling interval for BizTalk to check for new files on a given receive location. |
Removing of Files | Specifies timing values that control when BizTalk deletes the source files after a file has been read and submitted to the BizTalk MessageBox. This might be useful when trying to avoid overwrites in a scenario where multiple files are written to the same file source. |
The File receive adapter also allows for the configuration of file batching. Batching allows destination files to be submitted in a collective batch, allowing for the configuration of file consumption and file exception options on the entire batch. Within BizTalk's batch processing model, files that are processed successfully to the MessageBox are deleted from the source, files that are processed to the MessageBox with exception are suspended, and messages that fail to write to the MessageBox cause the entire batch to be rolled back. For example, a security permission issue might prevent the file from being open and consumed. This premise ensures that all files are preserved on the source file location. That is, the physical file deletion process does not occur until the entire batch has been processed.
This example configures a BizTalk send port using the SMTP adapter to send a message to a single email recipient. The following steps outline how to configure the SMTP adapter:
Note
This recipe demonstrates how to create a static SMTP port. In many cases, you will need to specify dynamic values for an e-mail, including message content, recipients, subject line, and so on. All of this can be set dynamically using an orchestration and a dynamic send port.
If BizTalk needs to send each message to a different email address, use a dynamic port from an orchestration.
Open the BizTalk Administration Console.
Expand the BizTalk Server group, select the appropriate BizTalk application, and select the
Send Portsfolder.Right-click the
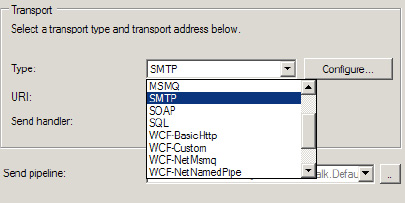
Send Portsfolder, and select New→Static One-Way Send Port to open the Send Port Properties dialog box. Give the Send Port a name.Within the Transport section of the General tab, select SMTP from the Type drop-down list, as shown in Figure 6-5.
Click the Configure button to open the SMTP Transport Properties dialog box.
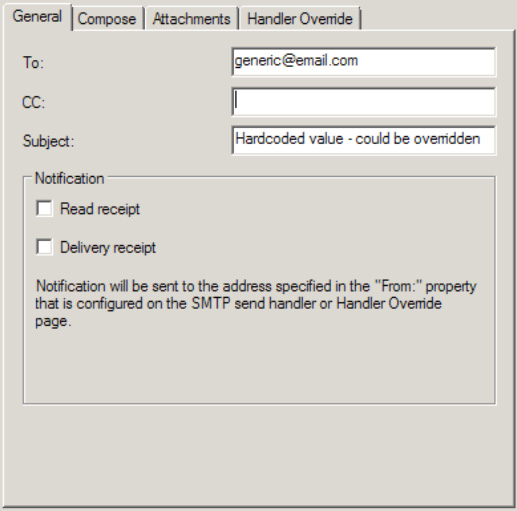
On the General tab, enter the message recipient's e-mail address and the e-mail message subject, as shown in Figure 6-6. Additionally, request delivery and read receipts to get a notification e-mail when the message recipient receives or marks the message as read.
The settings on the Compose tab provide three options for specifying the message body. First, the message body may directly contain the sent message. Second, you can set the message to a fixed value, as shown in Figure 6-7. Third, BizTalk can retrieve the message from a file location. Set these options as necessary.
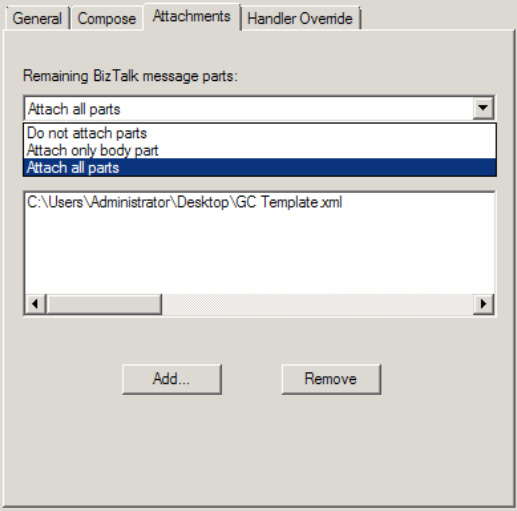
The Attachments tab allows you to configure the different ways BizTalk can include attachments. BizTalk can include the message being sent with the SMTP adapter as an attachment or include an external file as an attachment, as shown in Figure 6-8. Set these options as necessary.
The Handler Override tab contains SMTP configuration settings such as the SMTP server name, the From address used when sending email messages, and authentication settings. Instead of setting these configuration values for each send port using the SMTP transport, all SMTP send ports can share configuration values for the SMTP handler. Only change these values from the default settings if you need to override the default SMTP handler configuration.
Note
This recipe demonstrates how to create a static SMTP port. In many cases, you will need to specify dynamic values for an e-mail, including message content, recipients, subject line, and so on. All of this can be set dynamically using an orchestration and a dynamic send port.

BizTalk can only send email messages with the SMTP adapter. To receive a message via e-mail, you can use the POP3 adapter. Of course, in all cases, you can write a custom adapter or implement a third-party adapter if available.
The security settings of some SMTP servers disallow impersonation. Under these circumstances, the From address in an e-mail must match the account credentials provided to the SMTP server. The SMTP server must have an e-mail account created specifically for the credentials provided by BizTalk. For example, when specifying process account (NTLM) authentication, the identity of the BizTalk host instance must also have a valid e-mail address. If the From address does not match the e-mail address of the host instance identity, the e-mail will not be sent. You can configure settings on the adapter to be used by all send ports via the adapter. Configure the SMTP handler with properties that any SMTP send port can reuse with the following steps:
Connect to the BizTalk group in the BizTalk Administration Console, expand the
Platform Settingsfolder, and expand theAdaptersfolder. Select the SMTP adapter.Right-click the host appearing in the right pane of the BizTalk Administration Console, and select Properties.
Click the Properties button in the SMTP Transport Properties dialog box.
Set the default configuration values for the SMTP adapter. See Figure 6-9.

You have three handler configuration options for authenticating with the SMTP server, as shown in Table 6-3. SMTP send ports have a fourth default authentication option, which specifies to use the handler configuration setting.
Table 6.3. SMTP Handler Authentication Options
Authentication Option | Description |
|---|---|
Basic Authentication | Specifies specific credentials to authenticate with the SMTP server. BizTalk may pass these credentials over the network in clear text. |
Do Not Authenticate | BizTalk provides no authentication credentials when sending an email message via SMTP. |
Process Account (NTLM) | The adapter uses the host instance identity to authenticate with the SMTP server. |
Finally, when setting SMTP values on a dynamic port from within an orchestration, use a message assignment shape to set the properties to the variable values. For example, if you want to set the e-mail body text to a dynamic value, the message assignment would look like that shown in Figure 6-10.

You are integrating with a system that subscribes to messages from a Microsoft Message Queue (MSMQ) queue, and you must configure BizTalk Server to send messages to MSMQ.
Note
See Recipe 6-5 for further information about how to configure the MSMQ receive adapter.
You are building a solution that processes orders from an online commerce site and must deliver those messages to an ERP system via an MSMQ queue. To send messages to the destination queue, you must create a BizTalk Server send port that utilizes the MSMQ adapter. To configure the send port, follow these steps:
Open the BizTalk Administration Console.
Expand the BizTalk Server group, select an appropriate BizTalk application, and select the
Send Portsfolder.Right-click the
Send Portsfolder, and select New→Static One-way Send Port to open the Send Port Properties dialog box.Give your send port a descriptive name, select the
XMLTransmitpipeline, ensure any correct subscriptions are implemented (on the Filters tab), and select MSMQ as the transport type.Click the Configure button to the right of the Transport Type field. This launches the MSMQ Transport Properties dialog box.
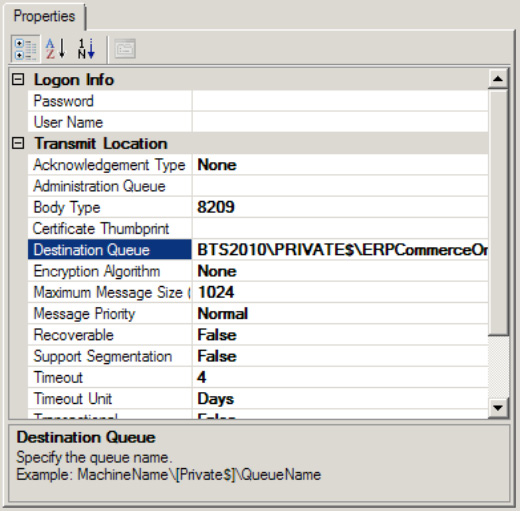
Set the
Destination Queueproperty to the queue name that the ERP system accepts messages from, as shown in Figure 6-11. In this scenario, we are using a queue namedERPCommerceOrder.Leave all other properties with their default values, and click OK.
Click OK in the Send Port Properties dialog box to save the send port.
Right-click the send port created in the previous step, and select Start.
The BizTalk Server MSMQ adapter allows easy access to messages in MSMQ queues (MSMQ versions 2.0 and 3.0). The adapter relies on the local MSMQ service, which must be installed on the same computer hosting the adapter.
Although this example illustrates the simplest scenario for sending MSMQ messages to a specified queue, you can make a number of configurations against the MSMQ adapter:
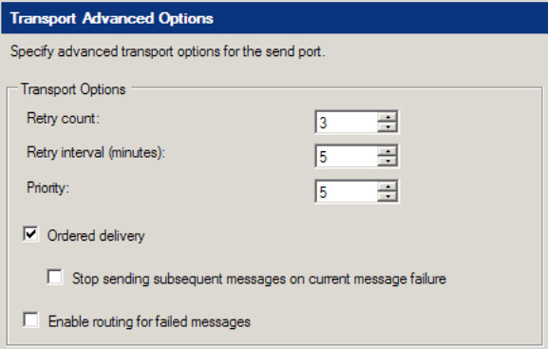
Destination Queue: Specifies the queue to which to send messages. See the following section for further information about how to format queue names.Ordered Delivery: Specifies whether the message order is persisted when delivering messages to the destination queue. This property enables a solution to implement ordered message delivery, although you must also ensure that all the previous processing (including the receipt of the message from the source queue) is handled serially if the order is to be maintained.You can additionally specify whether the send port should be stopped if errors are encountered when delivering a message to the destination queue. This setting helps enforce a strict ordered delivery requirement, although it has the side effect of completely disabling an interface if a single error occurs. This property is available only via the BizTalk Administration Console, under the Transport Advanced Options grouping of an MSMQ Send Port Properties dialog box. See Figure 6-12.
Note
You can make this setting only via the BizTalk Administration Console, under the Transport Advanced Options grouping of an MSMQ Send Port Properties dialog box.
Encryption Algorithm: Specifies the algorithm used to encrypt messages as they are written to the destination queue. The available values are RC2, RC4, and None. This property results in theMessage.UseEncryptionandMessage.EncryptionAlgorithmproperties being set.Body Type: Specifies the body type of MSMQ messages written to the destination queue.Maximum Message Size (in kilobytes): Specifies the maximum size of the message batch to be delivered to the destination queue. The MSMQ adapter will fill the batch with messages from the MessageBox until this setting is reached.Message Priority: Specifies the priority for delivering messages. This setting is relative to the other send ports within your BizTalk environment. To nullify the functionality of this property, set the priority on all the send ports in your environment to the same value.Recoverable: Specifies whether messages will be recoverable if errors are encountered during the delivery to the destination queue. When this value is set toTrue, messages are persisted to disk in between being pulled from the MessageBox and delivered to the destination queue. If errors occur during delivery, messages can be recovered from the disk.Support Segmentation: Specifies whether the adapter allows large messages (larger than 4MB) to be segmented. This property should be set toTrueif you have implemented the large message extension—if the adapter attempts to deliver a message larger than 4MB and this property is set toFalse, an error is thrown and the message is not delivered.Timeout: Specifies the timeout value for which messages must be delivered (combined with theTimeout Unitproperty). This value applies only when theTransactionproperty is set toTrue. The MSMQ adapter treats messages not delivered within the specified timeout period as error scenarios.Timeout Unit: Specifies the timeout unit for which messages must be delivered (combined with theTimeoutproperty). The available values for this property areDays, Hours, Minutes, andSeconds.Use Journal Queue: Specifies whether messages will be copied to the journal queue.Note
The journal queue is a system queue that is automatically created when MSMQ is installed and is meant to contain copies of messages that are sent or received.
Use Dead Letter Queue: Specifies whether error messages will be sent to the dead letter queue.User Name: Specifies the user for accessing a remote queue. This property applies only when accessing remote queues. The MSMQ adapter's host account is used to access all local queues.Password: Specifies the password for accessing a remote queue. This property applies only when accessing remote queues.Acknowledgement Type: Specifies the type of acknowledgment to send upon the successful delivery of a message batch to the destination queue. The available acknowledgment types are defined in theSystem.Messaging.AcknowledgeTypesenumeration. You can select multiple acknowledgment types for this property.Administration Queue: Specifies the administration queue where acknowledgment messages are sent upon the successful delivery of messages to the destination queue.Use Authentication: Specifies that a certificate thumbprint will be used when delivering messages to the destination queue.Certificate Thumbprint: Specifies the certificate thumbprint used to attach to the message batch. You can use this certificate thumbprint to authenticate your BizTalk environment as the sender of the messages, helping increase the overall security of your integration solution. The certificate is stored in theSystem.Messaging.Message.SenderCertificateproperty.Note
You can find certificate thumbprints by viewing a certificate's details in the Certificate MMC snap-in.
Transactional: Specifies whether the send port will deliver messages transactionally. This property must be set toTrueif the destination queue is transactional andFalseif the destination queue is not transactional.If the
Transactionalproperty is set toTrue, the MSMQ adapter transactionally retrieves the appropriate amount of messages (as defined by theMaximum Message Sizeproperty) into a batch from the MessageBox and attempts to deliver the batch to the queue within the transaction. If any errors are encountered when delivering the batch (including a timeout, as defined by theTimeoutandTimeout Unitproperties), the MSMQ adapter attempts to redeliver the messages. If any errors are encountered when redelivering the batch, MSMQ suspends the messages, leaving them in a recoverable state in the MessageBox. Setting this property toTrueautomatically implements the behavior defined by theRecoverableproperty. Messages within a batch are handled individually—those messages that do not encounter errors are delivered to the destination queue, even if other messages in the batch have errors.If the
Transactionalproperty is set toFalse, the MSMQ adapter retrieves the appropriate number of messages (as defined by theMaximum Message Sizeproperty) into a batch from the MessageBox and attempts to deliver the batch to the queue. If any errors are encountered when delivering the batch (including a timeout, as defined by theTimeoutandTimeout Unitproperties), the MSMQ adapter attempts to suspend the messages. If any errors are encountered when suspending the batch, the messages are lost.Note
As a batch is delivered to the destination queue, errors can occur as messages. They pass through the send pipeline configured on the send port, pass through the map configured on the receive port, or are written to the destination queue.
To successfully send documents to an MSMQ queue, you must appropriately format the name of the queue via the Destination Queue property. The appropriate name depends on the type and location of the queue. The following list defines the way the Queue property should be entered for the commonly implemented queues:
Public queue:
ComputerNameQueueNamePrivate queue:
ComputerNamePrivate$QueueNameDirect access to a queue via TCP:
DIRECT=TCP:IPAddressOfComputerQueueNameDirect access to a queue via HTTP:
DIRECT=http://ComputerName/MSMQVirtualDirectory/QueueName, whereMSMQVirtualDirectoryis the Internet Information Services (IIS) virtual directory name of the MSMQ serviceDirect access to a queue via HTTPS:
DIRECT=https://ComputerName/MSMQVirtualDirectory/QueueName, whereMSMQVirtualDirectoryis the IIS virtual directory name of the MSMQ serviceJournal queue:
ComputerNameQueueNameJournal$Dead letter queue:
ComputerNameDeadletter$Transaction dead letter queue:
ComputerNameXactDeadletter$
By default, the MSMQ adapter prepends FORMATNAME:DIRECT=OS: to the Queue property, assuming the queue is referenced directly via the host computer's name.
You are integrating with a system that publishes messages to an MSMQ queue, and you must configure BizTalk Server to receive messages from MSMQ.
Note
See Recipe 6-4 for further information about how to configure the MSMQ send adapter.
You are building a solution that processes orders from an online commerce site that outputs order messages to an MSMQ queue. To receive messages from the queue, you must create a BizTalk Server receive location that utilizes the MSMQ adapter. To configure the receive location, follow these steps:
Open the BizTalk Administration Console.
Expand the BizTalk Server group, select an appropriate BizTalk application, and select the
Receive Portsfolder.Right-click the
Receive Portsfolder, and select New→One-way Receive Port to open the Receive Port Properties dialog box.Give your new receive port a descriptive name, and click OK.
Right-click the receive port created in the previous step, and select New→Receive Location. The Receive Location Properties dialog box appears.
Give your receive location a descriptive name, select the
XMLReceivepipeline, and select MSMQ as the transport type.Click the Configure button to the right of the Transport Type field. This launches the MSMQ Transport Properties dialog box.
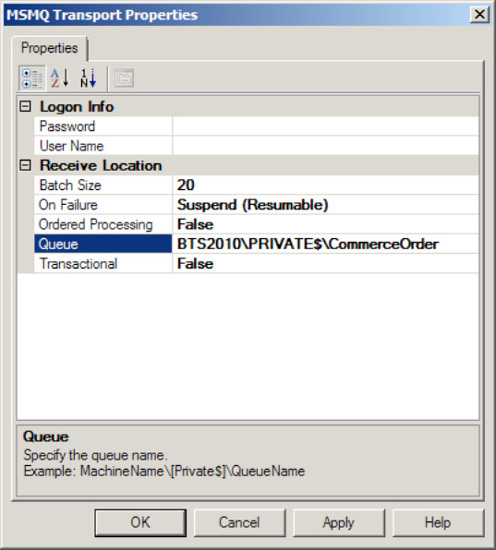
Set the
Queueproperty to the queue name that the online commerce site outputs messages to, as shown in Figure 6-13. In this scenario, we are using a queue namedCommerceOrder.Leave all the other properties with their default values, and click OK.
Click OK in the Receive Location Properties dialog box to save the receive location.
Select the
Receive Locationsfolder in the BizTalk Administration Console, right-click the receive location created earlier, and select Enable.
The BizTalk Server MSMQ adapter allows easy access to messages in MSMQ queues (MSMQ versions 2.0 and 3.0). The adapter relies on the local MSMQ service, which must be installed on the same computer hosting the adapter.
Although this example illustrates the simplest scenario for receiving MSMQ messages from a specified queue, you can make a number of configurations against the MSMQ adapter:
Queue: Specifies the queue from which to receive messages. Each queue must be polled by only one receive location per BizTalk environment. See the following section for further information about how to format queue names.Ordered Processing: Specifies whether the message order is persisted in the MessageBox. If this property is set toTrue, only one message is received in each batch (one message retrieved each time the receive location polls the queue). This property enables a solution to implement ordered message delivery, although you must also ensure that any subsequent processing (including the delivery of the message to a destination system) is handled serially if order is to be maintained. ATruevalue for this property overrides theBatchproperty, essentially setting its value to 1.On Failure: Specifies the action the adapter should take on the receive location if an error occurs. These are the available values:Stop: The receive location will be stopped.Suspend(nonresumable): The receive location will remain enabled, with error messages being suspended in a nonresumable state.Suspend(resumable): The receive location will remain enabled, with error messages being suspended in a resumable state.
Batch Size: Specifies the number of MSMQ messages to be handled in a single batch. The default value of 0 indicates an unlimited number of messages in a batch. The MSMQ adapter retrieves messages from a queue and submits them to the MessageBox in batches of one to many messages.User Name: Specifies the user for accessing a remote queue. This property applies only when accessing remote queues. The MSMQ adapter's host account is used to access all local queues.Password: Specifies the password for accessing a remote queue. This property applies only when accessing remote queues.Transactional: Specifies whether the receive location will retrieve messages transactionally. This property must be set toTrueif the source queue is transactional andFalseif the source queue is not transactional.If the
Transactionalproperty is set toTrue, the MSMQ adapter transactionally retrieves the appropriate number of messages into a batch and attempts to submit the batch to the MessageBox within the transaction. If any errors are encountered when submitting the messages, the MSMQ adapter attempts to suspend the messages that have errors. If any errors are encountered when suspending the error messages, the MSMQ adapter rolls back the receive transaction (which leaves the messages in their original location—in the MSMQ queue). Messages within a batch are handled individually; those messages that do not encounter errors are submitted to the MessageBox, even if other messages in the batch have errors.If the
Transactionalproperty is set toFalse, the MSMQ adapter retrieves the appropriate number of messages in a batch and attempts to submit the batch to the MessageBox. If any errors are encountered when submitting the batch, the MSMQ adapter attempts to suspend the messages. If any errors are encountered when suspending the batch, the messages are lost.
Note
The MSMQ adapter does not support transactionally receiving messages from a remote queue. If the queue is remote, message batches will be retrieved nontransactionally, regardless of the configuration of this property.
As a batch is submitted to the MessageBox, errors can occur in messages. They pass through the receive pipeline configured on the receive location, pass through the map configured on the receive port, or are written to the MessageBox database.
You should consider the performance impact when using the MSMQ adapter. It is important to understand the volume and size characteristics of the messages you expect to receive via MSMQ, because they can significantly impact your BizTalk Server resources. You should pay particular attention to the following:
Threading: BizTalk Server attempts to allocate threads to each MSMQ receive location as it polls its queue. Depending on how many messages are in the source queue, multiple threads may be allocated to each receive location. By default, the number of active threads allocated to the MSMQ adapter cannot exceed 25. If you have more than 25 messages being retrieved at any one time, it is possible to have latency.
Memory allocation: As message batches are retrieved by MSMQ receive locations, they are stored in memory until they are written to the MessageBox. The larger these batches are, the more memory is allocated. To throttle the amount of memory used by the MessageBox adapter, you can use the
BatchandSerial Processingproperties. You can limit the number of messages in any given batch by setting theBatchproperty to a low value. You can also set theSerial Processingproperty toTrue, which limits the MSMQ receive location to retrieving a single message in each batch. Memory allocation is particularly important if you have implemented the large message extension for message queuing, which allows messages larger than 4MB in size to be handled by the MSMQ adapter. See the SDK example devoted to this topic for further information.
It is important to understand the relationship of these configurations and the impact they have on system resources. The ideal configuration of threading, serial processing, and batch processing is specific to each BizTalk environment. Optimization should be part of the performance-testing phase for all solutions you deploy to your BizTalk Server environment.
To successfully read messages from an MSMQ queue, you must appropriately format the name of the queue via the Queue property. The appropriate name depends on the type and location of the queue. The following list defines the way the Queue property should be entered for the commonly implemented queues:
Public queue:
ComputerNameQueueNamePrivate queue:
ComputerNamePrivate$QueueNameDirect access to a queue via TCP:
DIRECT=TCP:IPAddressOfComputerQueueName
By default, the MSMQ adapter prepends FORMATNAME:DIRECT=OS: to the Queue property, assuming the queue is referenced directly via the host computer's name.
You need to create an orchestration that inserts a record into a table in your SQL database. Specifically, you need to create an orchestration that inserts a new customer record in your ERP system based on an inbound customer creation message from your CRM system.
The solution reviewed as part of this recipe outlines how to use the SQL adapter within the context of an orchestration. The following instructions outline the tasks required to create and configure the physical SQL send port as well as the orchestration that implements the SQL adapter.
The solution has sample XML files to demonstrate how the SQL adapter inserts message content into a SQL table. The solution also includes a sample SQL table structure.
Your first task is to create supporting artifacts. These include a database table and a BizTalk solution. Here are the steps to follow:
Create a new SQL database and table for which to insert the record. Compile the table definition listed in Listing 6-1.
Example 6.1. Listing Customer Table Definition
CREATE TABLE [dbo].[Customer] (
    [CustomerID][int] IDENTITY (1,1) NOT NULL,
    [CustomerName][nvarchar](30) COLLATE SQL_Latin1_General_CP1_CI_AS NOT NULL,
    [Address][nvarchar](60) COLLATE SQL_Latin1_General_CP1_CI_AS NOT NULL,
    [City][nvarchar](30) COLLATE SQL_Latin1_General_CP1_CI_AS NOT NULL,
    [Region][nvarchar](30) COLLATE SQL_Latin1_General_CP1_CI_AS NOT NULL,
    [PostalCode][nvarchar](10) COLLATE SQL_Latin1_General_CP1_CI_AS NOT NULL,
) ON [PRIMARY]
Create a new BizTalk solution that will contain the objects that will insert customers into the Customer table in your SQL database. Next, create a sample message that matches the structure detailed in Listing 6-2. The schema for this message will be created as part of the solution as defined in the "Task 2: Create BizTalk Solution Artifacts" section of this recipe.
You will be using the Add Generated Items Wizard to generate the BizTalk artifacts for this recipe. The wizard will prompt you to specify your BizTalk environment (such as specifying the BizTalk MessageBox database, setting the connection string to the database you will be accessing, and identifying the type of SQL port you are creating, such as send or receive). The following steps describe this task in detail:
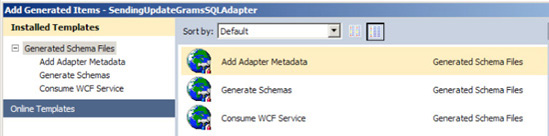
Choose Add Generated Items from the Solution Explorer tool menu. Verify that Add Adapter Metadata is selected. Figure 6-14 displays the Add Generated Items Wizard.
On the Add Adapter Wizard screen that opens, select the SQL adapter, and verify the settings to your BizTalk MessageBox database.
Note
You can leave the Port field empty unless you are specifying an already created SQL send or receive port. This sample will create a send port that you will specify later through the BizTalk Explorer.
Click Next, and set the connection string for the database to which you are connecting.
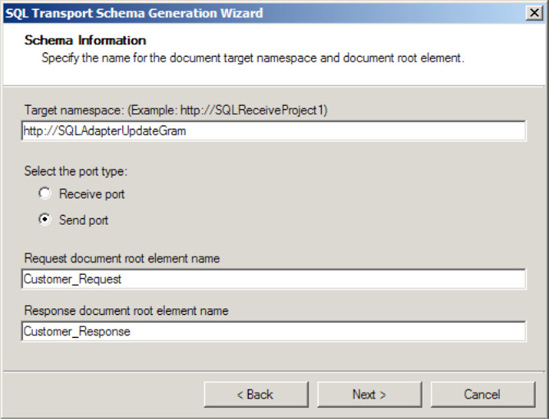
Next, in the SQL Transport Schema Generation Wizard, specify the target namespace as
http://SQLAdapterUpdategram, the port type property as a Send port, the request document root element name asCustomer_Request, and the response document root element name asCustomer_Response. The wizard should look like Figure 6-15.On the Statement type information page of the wizard, select Updategram as the type of statement.
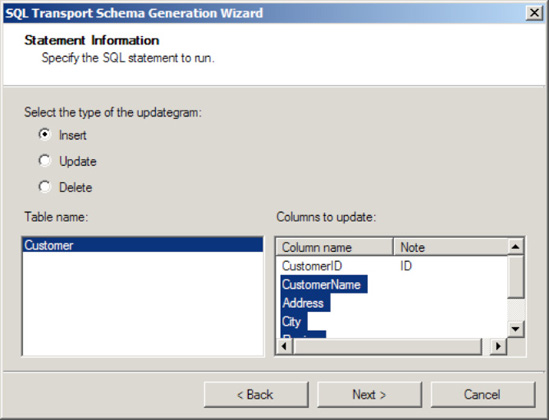
On the Statement Information page of the wizard, select Insert as the type of the updategram to create. Additionally, on the same page, select the Customer table as the table name. In the Columns to Update list, multiselect the following columns: CustomerName, Address, City, Region and PostalCode. CustomerID is not required because SQL Server automatically generates the ID because of the column being an Identity column. The wizard should resemble Figure 6-16.
Click Finish, completing the wizard. When you complete the wizard, notice that BizTalk creates two artifacts for you: the BizTalk orchestration and
InsertCustomerService.xsd.Note
The BizTalk orchestration allows you to perform additional processing of an inbound message before sending the message to the SQL database. The
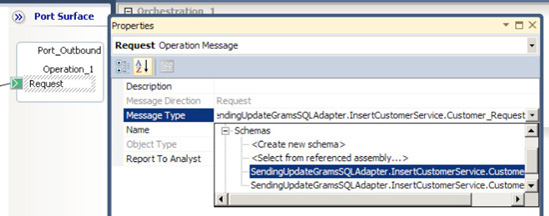
InsertCustomerServiceschema represents a multipart message within your orchestration. The first part of the message represents the request you will be sending to the SQL database, and the second part represents the response the database will return to you. In this recipe, we will use only the request portion of the multipart message.Configure the BizTalk orchestration for an inbound receive and an outbound send. Set the both the inbound and outbound ports to work with schemas of type
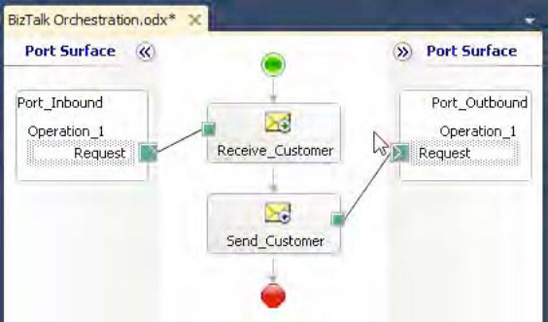
SQL_Adapter_Updategram.InsertCustomerService.Customer_Request. This property is set as shown in Figure 6-17. Make sure to set the Activate property on the receive shape of the orchestration to True.Build and deploy your BizTalk solution. Your orchestration should resemble Figure 6-18.
To test this solution, you will need to create a physical file receive port to consume the inbound XML file and a SQL send port to send the message to the SQL database. A simple file receive port will consume the inbound XML document and activate the SQL updategram orchestration just created. Please see Recipe 6-2 for creating a file receive port. The following steps outline creating the SQL send port:
Open the BizTalk Administration Console.
From an appropriate BizTalk application, right-click the
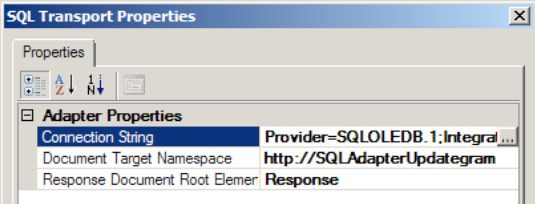
Send Portsfolder, and select New→Static One-way Send Port to open the Send Port Properties dialog box. Enter Sample SQL Updategram Send Port for the new send port's name. Within the Transport section of the General tab, select SQL from the Type drop-down list.In the SQL Transport Properties dialog box, configure the connection string to the appropriate database by clicking the ellipses next to the Connection String field. Additionally, configure the document target namespace as
http://SQLAdapterUpdategram. The Response Document Root Name can be set to any value; it is not used in this recipe. See Figure 6-19.Set the
Send Pipelineproperty to theMicrosoft.BizTalk.DefaultPipelines.XMLTransmitpipeline.Bind the deployed orchestration to the newly created send and receive ports.
Follow these steps to test the solution:
Place the customer test file in the file folder being monitored by BizTalk Server by the file receive port just created. BizTalk Server will consume the file, launch the orchestration, and send the updategram to SQL Server via the SQL send port configured.
Verify that the record inserted successfully into the Customer ustomer table.
SQL updategrams are extremely useful when you need a lightweight implementation to insert, update, or delete data from a SQL table. This recipe demonstrates how to use the Add Generated Items Wizard as well as how to insert records into a SQL table. This recipe did not address the need to process exceptions that may occur when inserting records into a SQL table.
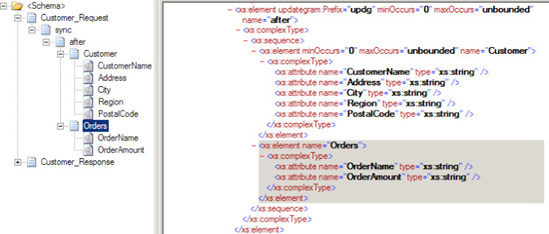
The focus of this recipe was to demonstrate how to insert a record into a single table; however, updategrams can also affect data in multiple tables. The Add Generated Items Wizard creates only a single schema for a single table. However, if you want to modify multiple tables in the same call, you can run the wizard multiple times and then copy the generated schemas into a single schema, or you can manually adjust the autogenerated schema and add the nodes. Assume you have a Customer table and an Order table. For each customer, you insert into the Customer table, you would also like to insert the corresponding orders to the Order table. If you knew the structure of the Order table, you could add the structure to the autogenerated schema, and BizTalk will know to insert the records into a table with the name of the node you specified. Figure 6-20 displays the structure of the modified schema to also insert records into the Order table. A better approach to modifying the autogenerate schema would be to consider using a SQL stored procedure to manage the insertion of data into multiple tables.
SQL updategrams allow you to update records at a table level, which is convenient. However, not all databases may allow access at a table level; they may require you to use other means to manipulate data in the specific table. Additionally, using an updategram locks you into using a deployed table structure, which presents a challenge from a maintenance perspective. When determining the best way to manipulate data in a SQL table, consider the following questions:
Will the account with which you are accessing the SQL database have permissions at a table level?
What is the likelihood of the table structure changing, and how does that affect the solution you are building?
Is there logic at a database level that must be performed before the message from your orchestration can be processed?
Do you need to affect data in many tables? Even though it is technically possible to insert data into multiple tables via an update datagram, inserting data into multiple tables can be better managed using a SQL stored procedure.
If any of the previous questions is true, you should consider an alternative to using an updategram. Recipe 6-7 discusses using SQL stored procedures as an alternative.
You need to create an orchestration that inserts a record into a table in your SQL database via a stored procedure. Specifically, you need to create an orchestration that inserts a new customer record based on an inbound message.
The solution reviewed as part of this recipe outlines how to use the SQL adapter within the context of an orchestration. The following instructions outline the tasks required to create and configure the physical SQL send port as well as the orchestration that implements the SQL adapter.
The solution has sample XML files to demonstrate how the SQL adapter inserts message content into a SQL table via a stored procedure. The solution also includes a sample SQL table structure.
The steps outlined for this task create the supporting solution artifacts. You will create the table, stored procedure, and inbound message structure for the message consumed by BizTalk. Here are the steps to follow:
Create a new SQL database and table for which to insert the record. Compile the table definition listed in Listing 6-3.
Example 6.3. Example Customer Table Definition
CREATE TABLE [dbo].[Customer] (
    [CustomerID][int] IDENTITY (1,1) NOT NULL,
    [CustomerName][nvarchar](30) COLLATE SQL_Latin1_General_CP1_CI_AS NOT NULL,
    [Address][nvarchar](60) COLLATE SQL_Latin1_General_CP1_CI_AS NOT NULL,
    [City][nvarchar](30) COLLATE SQL_Latin1_General_CP1_CI_AS NOT NULL,
    [Region][nvarchar](30) COLLATE SQL_Latin1_General_CP1_CI_AS NOT NULL,
    [PostalCode][nvarchar](10) COLLATE SQL_Latin1_General_CP1_CI_AS NOT NULL,
) ON [PRIMARY]
If you do not have a stored procedure to insert individual customer records, compile the stored procedure listed in Listing 6-4.
Example 6.4. Example Insert Customer Stored Procedure
if exists  (select * from sysobjects where name = 'BizTalkToCustomerInsert'
and type = 'P')
    drop proc BizTalkToCustomerInsert
go
CREATE procedure BizTalkToCustomerInsert
                    @CustomerName nvarchar(60)
                    , @Address nvarchar(120)
                    , @City nvarchar(60)
                    , @Region nvarchar(60)
                    , @PostalCode nvarchar(60)
AS
/*
**
** Object: BizTalkToCustomerInsert
**
** Description: Inserts records into the Customer table for the SQL adapter
** stored procedure recipe
**
**
*/
BEGIN
    Declare @intReturnCode int
    select    @intReturnCode = 0

    /*Insert records that will be returned to caller*/
    Insert Customer (CustomerName, Address, City, Region, PostalCode)
    Values (@CustomerName, @Address, @City, @Region, @PostalCode)

    /* Set the outbound return code */
    select    @intReturnCode = @@error

    /* return the return code */
    return @intReturnCode
END

go
grant execute on dbo.BizTalkToCustomerInsert to public
go
Create a new BizTalk solution that will contain the components used to insert customers into the Customer table in your SQL database. Next, create a sample message that matches the structure detailed in Listing 6-5. The schema for this message will be created as part of the solution as defined in the "Task 2: Create BizTalk Solution Artifacts" section of this recipe.
Next, you will be using the Add Generated Items Wizard to generate the BizTalk artifacts for this recipe. The wizard will prompt you to specify your BizTalk environment (such as specifying the BizTalk MessageBox database, setting the connection string to the database that you will be accessing, and identifying the type of SQL port you are creating such as send or receive). Follow these steps:
Choose Add Generated Items from the Solution Explorer's tool menu. Verify that Add Adapter Metadata is selected.
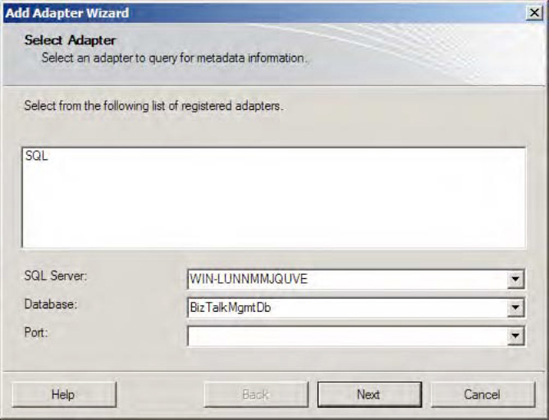
On the Add Adapter Wizard page, select the SQL adapter, and verify the settings to your BizTalk MessageBox database. Figure 6-21 shows the initial connection screen.
Click Next, and set the connection string for the database to which you are connecting.
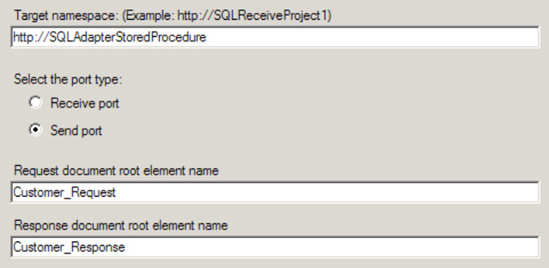
Click Next, and specify the target namespace as
http://SQLAdapterStoredProcedure, the port type as Send, the request document root element name asCustomer_Request, and the response document root element name asCustomer_Response. The wizard should look like Figure 6-22.On the Statement Type page of the wizard, select Stored Procedure as the type of statement, and click Next.
On the Statement Information page of the wizard, select the
BizTalkToCustomerInsertstored procedure from the drop-down enumeration, and leave all the check boxes next to the input parameters empty.Finally, click the Generate button, because it results in a generated execute script that is listed in the Generated Script field of the wizard. The wizard should resemble Figure 6-23.
Note
Because the stored procedure contains input parameters, they are displayed in the datagrid of the wizard. If there are default values that should be specified, you can enter those parameters next to the name of the input parameter. If the check box is selected, a null value will be submitted as the value for the input parameter.
Click Next and then Finish, completing the wizard. When you complete the wizard, notice that BizTalk creates two artifacts for you: the BizTalk orchestration and
SQLService.xsd.Note
The BizTalk orchestration allows you to perform additional processing of the inbound message, and the
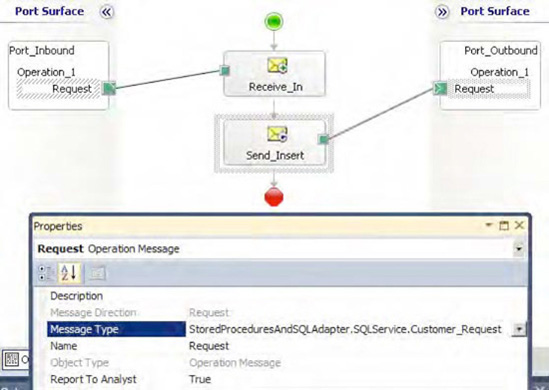
SQLServiceschema contains the physical representation of the data returned from the stored procedure.Configure the BizTalk orchestration for an inbound receive and an outbound send. The ports should be configured to receive and to send a message of type
SQL_Adapter_Stored_Procedure.SQLService.Customer_Request. Your orchestration should resemble Figure 6-24. Make sure to set theActivateproperty on the Receive shape to True.Build and deploy your BizTalk solution.

Your next task is to create the physical BizTalk ports you will need to test the solution. Follow the process outlined in these steps:
To test this solution, you will need to create a physical file receive port to consume the inbound XML file and a SQL send port to send the message to the SQL database. Open the BizTalk Administration Console.
Find the appropriate BizTalk application, right-click the
Send Portsfolder, and select New→Static One-way Send Port to open the Send Port Properties dialog box. Name the new send port Sample SQL Stored Procedure Send Port. Within the Transport section of the General tab, select SQL from the Type drop-down list.In the SQL Transport properties, configure the connection string to the appropriate database by clicking the ellipses next to the Connection String field. Additionally, configure the document target namespace as
http://SQLAdapterStoredProcedure.Set
Send Pipelineto theMicrosoft.BizTalk.DefaultPipelines.XMLTransmitpipeline.Bind the deployed orchestration to the newly created send and receive ports.
Your last task is to test your solution to be sure it works correctly. The procedure for testing is simple: place your sample customer test file in the folder being monitored by the file receive port, and verify that the record inserted successfully into the Customer table.
Utilizing the SQL adapter to call stored procedures is a great way to insert data into a database or call a procedure to return data from a database. The benefits of using the SQL adapter over creating a component to make database calls include being able to use any BizTalk adapter (including guaranteed reliable message delivery, retry capabilities, and the ability to specify alternative mechanisms for message delivery). Additionally, a stored procedure is capable of taking an entire XML message or individual data elements as input parameters.
This recipe demonstrates how to use the SQL adapter and stored procedure to insert customer records in a SQL table. The stored procedure required input parameters but could have taken the entire contents of the XML message and parsed the contents of message.
You need to create an orchestration that retrieves messages from a SQL table via a SQL stored procedure. Specifically, you need to create an orchestration that will receive individual customer records from your SQL database via a SQL stored procedure.
The solution reviewed as part of this recipe outlines how to use the SQL receive adapter within the context of an orchestration. The solution has a sample table and stored procedure to demonstrate how the SQL receive adapter routes messages based on message content. The following instructions outline the tasks required to create and configure the physical SQL receive port as well as the orchestration that implements the SQL receive adapter.
Perform the following steps to create the SQL support artifacts that are used by this recipe:
Create a new SQL database and table for which to insert the record. Compile the following table definition, and insert the statements listed in Listing 6-6.
Note
The table definition is different from the previous recipe. Make sure to use the table definition in Listing 6-6 or modify the previously created table definition.
Example 6.6. Example Customer Table Definition
CREATE TABLE [dbo].[Customer] (
    [CustomerID][int] IDENTITY (1,1) NOT NULL,
    [CustomerName][nvarchar](30) COLLATE SQL_Latin1_General_CP1_CI_AS NOT NULL,
    [Address][nvarchar](60) COLLATE SQL_Latin1_General_CP1_CI_AS NOT NULL,
    [City][nvarchar](30) COLLATE SQL_Latin1_General_CP1_CI_AS NOT NULL,
    [Region][nvarchar](30) COLLATE SQL_Latin1_General_CP1_CI_AS NOT NULL,
    [PostalCode][nvarchar](10) COLLATE SQL_Latin1_General_CP1_CI_AS NOT NULL,
    [RecordStatus][tinyint] NOT NULL
) ON [PRIMARY]

Insert Customer (CustomerName, Address, City, Region, PostalCode, RecordStatus)
Values ('Shauna Marie', '9515 S Wally St', 'Bellevue', 'WA', '98004', 1)
Insert Customer (CustomerName, Address, City, Region, PostalCode, RecordStatus)
Values ('Pat Dean', '10034th 49th Ave NE', 'Redmond', 'WA', '95550', 1)
Insert Customer (CustomerName, Address, City, Region, PostalCode, RecordStatus)
Values ('Sherrie Long', '5015 48th Ave SW', 'Woodland Park', 'CO', '80863', 1)
If you do not have a stored procedure to retrieve individual customer records, compile the stored procedure listed in Listing 6-7.
Note
Notice that the select statement in Listing 6-7 contains a
FOR XML AUTO, XMLDATA, ELEMENTSclause. The SQL adapter requires select statements returning records to return them in XML format. Additionally, theXMLDATAclause is required only when running the wizard to generate the schema for the result set from the stored procedure. When you test the solution, make sure to remove theXMLDATAclause from your stored procedure.Example 6.7. Example Retrieve Customer Record Stored Procedure
if exists(select * from sysobjects where name = 'CustomerToBizTalk' and type = 'P')
    drop proc CustomerToBizTalk
go
CREATE procedure CustomerToBizTalk
AS
/*
**
** Object: CustomerToBizTalk
** ** Description: Retrieves records from the Customer table for the SQL receive ** adapter recipe ** ** */ BEGIN /*Populate temp table with records that will be returned to caller*/ Select top 1 CustomerID , CustomerName , Address , City , Region , PostalCode , RecordStatus Into #TempCustomer From Customer Where RecordStatus = 1 /*Update Status of retrieved record from the Customer table*/ Update Customer Set RecordStatus = 0 Where CustomerID = (select CustomerID from #TempCustomer) /*Return records to caller*/ Select CustomerID , CustomerName , Address , City , Region , PostalCode , RecordStatus from #TempCustomer as Customer FOR XML AUTO, XMLData, Elements /*Clean up temp table*/ drop table #TempCustomer END go grant execute on dbo.CustomerToBizTalk to public go
Next, use the Add Generated Items Wizard to generate the BizTalk artifacts for this recipe. The wizard will prompt you to specify your BizTalk environment (including specifying the BizTalk MessageBox database, setting the connection string to the database you will be accessing, and identifying the type of SQL port you are creating such as send or receive). This recipe assumes you have created an empty BizTalk solution. Here are the steps to follow:
Choose Add Generated Items from the Solution Explorer's tool menu. Select the Add Adapter Metadata template.
On the Add Adapter Wizard page, select the SQL adapter, and verify the settings to your BizTalk MessageBox database.
Click Next, and set the connection string for the database to which you are connecting (this is where the table and stored procedure created in the previous task reside). Then, in the SQL Transport Schema Generation Wizard, specify the target namespace as
http://SQLReceiveAdapterand the document root element name asCustomer_Response. The wizard should resemble Figure 6-25.Click Next, and on the Statement type information page of the wizard, select Stored Procedure as the type of statement. On the Statement Information page of the wizard, select the
CustomerToBizTalkstored procedure from the drop-down enumeration, and click the Generate button. The Generate button results in a generated execute script that is listed in the Generated Script field of the wizard. Figure 6-26 displays the completed wizard.Note
If the stored procedure contained any input parameters, those parameters would display in the datagrid of the wizard. The wizard also depends on the select statement in the stored procedure to contain the
XMLDATAclause in theFOR XMLstatement. TheXMLDATAclause returns the schema layout for the structure returned by the select statement.Click Finish, completing the wizard. When you complete the wizard, notice that BizTalk creates two artifacts for you: the BizTalk orchestration and
SQLService.xsd.Note
The BizTalk orchestration allows you to perform additional processing of the inbound message, and the
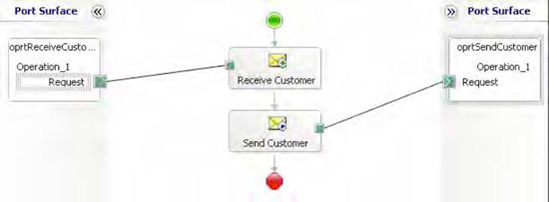
SQLServiceschema contains the physical representation of the data returned from the stored procedure.Modify the BizTalk orchestration, configuring it based on the artifacts listed in Table 6-4. Configure the BizTalk orchestration for an inbound receive and an outbound send. See Figure 6-27.
Once your orchestration is complete, build and deploy your solution.
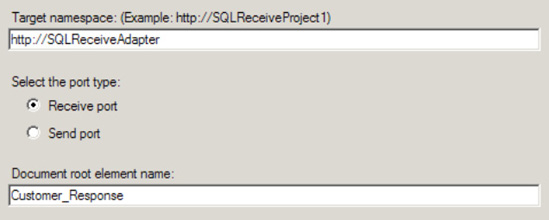
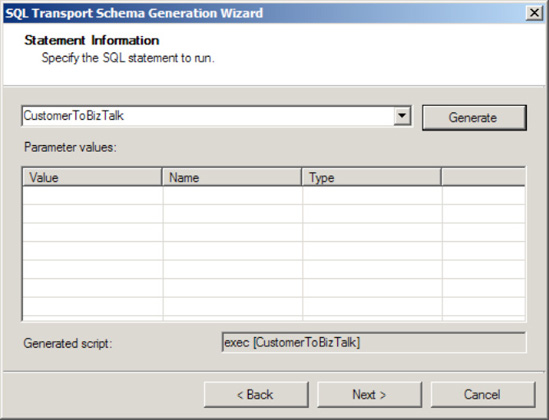
Table 6.4. SQL Receive Orchestration
ID | Name | Discussion |
|---|---|---|
1 | Receive Customer | Receive shape. Set the Activate property to True. |
2 | oprtReceiveCustomerSQL | Receive port |
3 | oprtReceiveCustomerSQLType | Receive port type |
4 | msgSQLCustomer | Orchestration message pointed to the schema generated from the Add Generated Items Wizard |
5 | Send Customer | Send shape |
6 | oprtSendCustomer | Send port |
7 | oprtSendCustomerType | Send port type |
Execute the following steps to create the SQL receive port that will call the stored procedure and route the message received to the deployed BizTalk solution:
To test this solution, you will need to create a physical SQL receive port to consume the inbound XML file and a physical file send port to send the message to a file share for examination.
From the BizTalk Administration Console, right-click the
Receive Portsfolder, and select Add Receive Port
Right-click the
Receive Locationsfolder, and select Add Receive Location. Select the receive port that was created in the previous step, and click OK. In the Receive Location Properties dialog box, configure the transport type, address, receive handler, and receive pipeline. Configure the dialog box settings specified in Table 6-5.Table 6.5. SQL Receive Location Configuration Settings
Configuration Parameter
Value
Transport TypeSQL
Address (URI)Location of your SQL server (See step 5 for more information.)
Receive HandlerBizTalk host instance (for example,
BizTalkServerApplication)Receive PipelineMicrosoft.BizTalk.DefaultPipelines.XMLReceiveWhen configuring the
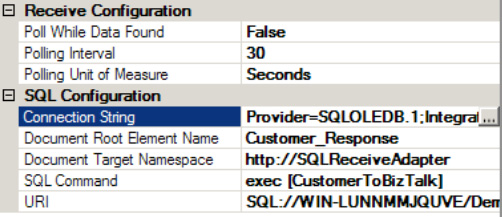
Address (URI)property in the Receive Port dialog box, leave the Receive Configuration settings to the default values:Set
Document Root Element NametoCustomer_Response.Set
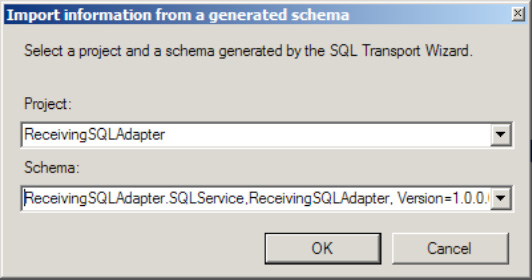
Document Target Namespacetohttp://SQLReceiveAdapter.On the SQL Command page, navigate to the deployed BizTalk project and schema to set the SQL command properly (as shown in Figure 6-28). The completed SQL Transport Properties dialog box should resemble Figure 6-29.
Note
BizTalk uses the root element name and the namespace to route the inbound XML file. If the root element name and the namespace do not match the root element name and namespace of the
SQLService.xsdfile you created in the BizTalk solution, you will receive document routing errors and suspended messages when BizTalk tries to route the message from the SQL receive adapter.Bind the deployed orchestration to the newly created send and receive ports.
Your final task is to test your solution. Here are the steps to follow:
Modify and recompile the
CustomerToBizTalkstored procedure. Remove theXMLDATAclause in theFOR XML AUTOstatement and recompile it. The resulting stored procedure should resemble Listing 6-8.Start your orchestration and SQL receive port, and validate that a single XML file is created for each customer in your Customer table with the
RecordStatusof 1. Also verify that the records in the Customer table have had their status set to 0 indicating that BizTalk has consumed the record. The resulting XML file should resemble Listing 6-9.Example 6.9. Customer Sample XML
<?xml version="1.0" encoding="utf-16" ?>
<Customer_Response xmlns="http://SQLReceiveAdapter">
  <Customer>
      <CustomerID>1</CustomerID>
      <CustomerName>Shauna Marie</CustomerName>
      <Address>9515 S Wally St</Address>
      <City>Bellevue</City>
      <Region>WA</Region>
      <PostalCode>98004</PostalCode>
      <RecordStatus>1</RecordStatus>
  </Customer>
 </Customer_Response>
Retrieving records via the SQL receive adapter is extremely useful and powerful when coupled with the use of stored procedures. Implementing the SQL receive adapter requires configuring and managing how records are retrieved from SQL. This recipe outlined how to use a stored procedure that selects records in a temporary table, updates the status of the individual record in the SQL table, and then returns the records to the SQL adapter. Additionally, this sample demonstrated how to use the FOR XML AUTO clause within a stored procedure.
The SQL receive adapter operates on the polling principle of retrieving records. The adapter will call the stored procedure on a configurable interval to retrieve records. However, the adapter does not maintain the state of which records it has consumed. Therefore, any stored procedure that the SQL receive adapter executes must maintain a level of state identifying the processed records. If you examine the stored procedure listed previously, you will notice that there is a RecordStatus column that is updated to 0 when the records are polled. You have many options for determining unprocessed records. For example, you can use the status flag, physically remove the record from the database, use the date range, and so on. If the stored procedure does not maintain state, BizTalk will continue consuming the same data.
In addition to maintaining state within the stored procedure, if you are returning a result via a select statement, then you must specify the FOR XML AUTO, XMLDATA clause for generating the SQLService.xsd schema. As explained, the XML AUTO clause instructs SQL Server to return the result set as XML, and the XMLDATA clause instructs SQL Server to return the schema layout for the returned result set. The SQL service adapter officially supports using the FOR XML AUTO clause.
You can also use the FOR XML Explicit clause, but it is not officially supported and should be used with care. Using FOR XML Explicit eliminates using the Add Generated Items Wizard to automatically generate the SQLService schema. However, you can create the SQLService schema manually. One benefit to using FOR XML Explicit over FOR XML AUTO is the greater level of control in the resulting XML structure that is returned to BizTalk. If you have a complicated XML message structure that is comprised of data from multiple tables, you can format the result set in the correct XML structure via the FOR XML Explicit clause. The select statement in Listing 6-10 demonstrates how to use the FOR XML Explicit clause.
Example 6.10. Return Result Set Using the FOR XML Explicit Clause
select    1    as Tag, NULL    as Parent
    , NULL    as [Customer!1!element]
    , CustomerID as [Customer!1!CustomerID!element]
    , CustomerName    as [Customer!1!CustomerName!element]
    , Address as [Customer!1!Address!element]
    , City as [Customer!1!City!element]
    , Region as [Customer!1!Region!element]
    , PostalCode as [Customer!1!PostalCode!element]
    , RecordStatus as [Customer!1!RecordStatus!element]
from    Customer
FOR XML EXPLICITThe SQL receive adapter contains many items for configuration. Table 6-6 lists the items worth noting. The SQL adapter receive location differs from other BizTalk receive locations in that each SQL receive location identifies a specific message type that is received from a database. If you expect to receive multiple types of messages, you must construct a SQL receive port for each unique message type. The SQL adapter is configured for each unique message type through the Document Root Element Name node and the Document Target Namespace node. Additionally, each SQL receive location is configured to execute a specific SQL stored procedure or command.
Table 6.6. SQL Receive Adapter Configuration
ID | Configuration Parameter | Description |
|---|---|---|
1 |
| Indicates whether to continue polling for new records in additional batches or whether to submit a single query result for the entire polling window. |
2 |
| Identifies how often to poll for records. |
3 |
| Identifies the unit of measure for polling. |
4 |
| Identifies the connection string for the database containing data to be polled. |
5 |
| Identifies the |
6 |
| Identifies the namespace that BizTalk will assign the inbound message. |
7 |
| Identifies the SQL command the SQL adapter will execute. |
8 |
| Identifies a unique identifier for the receive location. This value is autogenerated. |
In addition to the configuration items identified previously, you must verify that MSDTC is configured correctly on the target system that is hosting the SQL database because BizTalk enrolls every call from the SQL adapter into an MSDTC-styled transaction.
You want to programmatically configure an HTTP send port from an orchestration using a Message Assignment shape.
This solution will describe how to post a document using a send port configured with authentication to post via a secure HTTPS site. The following solution assumes you have a BizTalk project open in Visual Studio with a BizTalk orchestration and a schema that can be used to create an orchestration message. Here are the steps to follow:
Create a new orchestration message by right-clicking the
Messagesfolder in the Orchestration View window and selecting New Message. Enter msgSend for the message name, and give it a message type (this should be the schema of the document that will be sent via HTTP).Setting HTTP properties requires constructing the message that will be sent. Drop a Message Assignment shape in the orchestration. This will create a Construct Message shape that should be configured such that the
Message Constructedproperty is set to the message created in step 1.Double-click the Message Assignment shape, and enter the property settings as shown in Listing 6-11. Figure 6-30 shows the properties available in the Message Assignment Editor. Click OK when complete.
Example 6.11. Message Assignment Code
// Set HTTP send port properties; the username and password can be
// configurable by using the config file or BizTalk rules engine
// rather than hard-coded values
msgSend(HTTP.AuthenticationScheme) = "Basic";
msgSend(HTTP.Username) = "User"; // can be loaded from config file, also
msgSend(HTTP.Password) = "Password"; // can be loaded from config file
// configure additional parameters as appropriate
Note
When selecting properties from the drop-down list in the Message Assignment shape, you'll see all the properties you can set. Specific to HTTP, both the
SendandReceiveproperties are listed. A complete list ofSendproperties appears in Table 6-7.Drop a Send shape on the orchestration surface. Set the
Messageproperty to the message created in step 1.Right-click the port surface, and select New Configured Port. On the Port Binding page, set the parameters as indicated in the following substeps and shown in Figure 6-31:
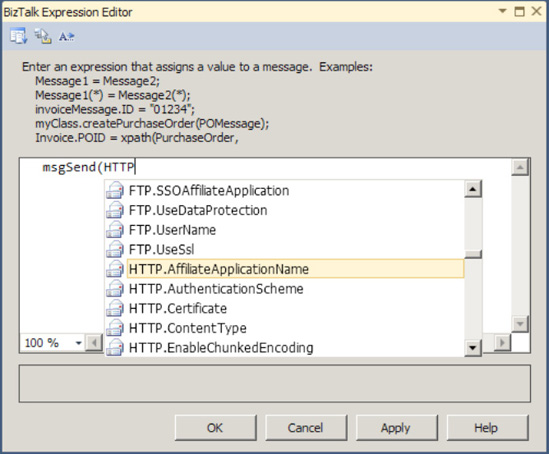
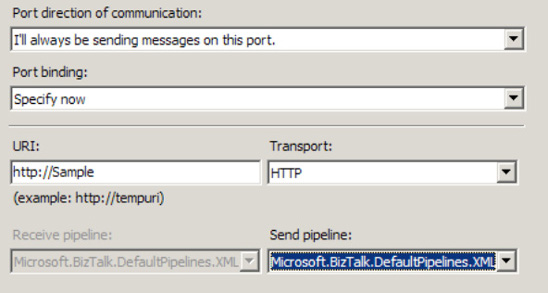
Table 6-7 describes the details of each of the port properties you can set for the HTTP port via code in an Expression shape of an orchestration. These are the same parameters you set when configuring an HTTP send port in the BizTalk Explorer.
Table 6.7. HTTP Port Parameters
Property | Type |
|---|---|
| When using SSO, you can specify an affiliate application. You enter the name of the application as a string. When using this property, the |
| You can set four types of authentication: |
| If you are using a certificate (for HTTPS), you should enter the thumbprint of the certificate as a string here. Thumbprints are typically found in the properties of the certificate and are 40-digit hexadecimal values. |
| The default value is |
| Boolean value that indicates whether to send the document in chunked packets of information. |
Properties available if using cookies. | |
| The HTTP headers may be available on inbound HTTP messages. |
| The HTTP adapter can be set to allow for 0 to 10 redirects. |
| Password used when posting to a secure site. |
| If a proxy server is used, enter the name of the server as a string. |
| Password for proxy server. The |
| Port for proxy server. An example would be 80. |
| Username for proxy server. The |
| By default, the timeout will be managed based on the size of the document. This can be overridden with a specific timeout value entered as a numeric entry (in seconds). |
| Properties available regarding the status code of the response. |
| Submission handle, if available. |
| If set to |
| Boolean value. Use other proxy properties in conjunction with this value. |
| HTTP headers, if available. |
| Username used when posting to a secure site. |
| A Boolean value indicating whether to use the SSO server. Use the |
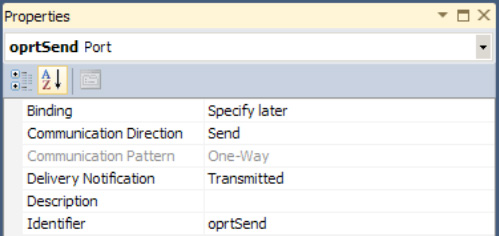
When sending documents via a send port, exceptions can occur—perhaps the HTTP server is unavailable or the URL is incorrect. In such cases, it is often useful to be able to catch the exception immediately in the orchestration, especially when specific error handling routines need to occur.
By default, send ports are set up to automatically retry in case of failure. This means an orchestration will call the send port and then continue processing asynchronously while the adapter manages the transmission of the document. If an exception is thrown, it is handled by the adapter and is never bubbled up to the orchestration. With the adapter operating asynchronously from the orchestration, exceptions that are thrown can result in lost messages and unexpected error messages.
To force the adapter to execute synchronously with the orchestration moving on to the next steps only when a message has been posted successfully by the adapter, you should set the Delivery Notification property on the send port to Transmitted, as shown in Figure 6-32.
You want to configure an HTTP receive location to allow posts from a client machine to BizTalk Server. Additionally, you want to understand how to configure IIS and create a virtual directory to allow the receive location to operate correctly.
This solution will describe how to configure an HTTP receive location to allow documents to be posted to BizTalk. The first task is to configure IIS to allow for the redirection of documents to BizTalk. The second task is to create a virtual directory to handle specific requests, and the third step is to configure the HTTP receive. The majority of servers will have IIS 7.0 installed, and this solution describes the steps necessary for 7.0 (IIS 5.0 and 6.0 have different configuration steps—refer to the BizTalk documentation for details). After IIS has been configured, you will work through the steps needed to create a virtual directory and configure an HTTP receive port.
To configure IIS 7.0, follow these steps:
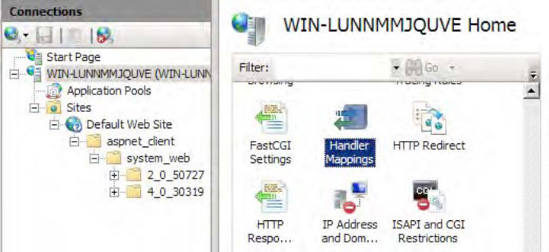
Open Internet Information Services Manager by selecting Control Panel→Administrative Tools.
Click the name of the server, and open the Handler Mappings in the IIS options (see Figure 6-33).
Under the Actions section, click Add Script Map, and set the properties as follows:
Set the Executable property to the location of BTSHTTPReceive.dll (browse to
BTSHTTPReceive.dlllocated in $Program FilesMicrosoft BizTalk Server 2010HttpReceive).Set the
Nameproperty toBTSHTTPReceive.Note
If an error occurs indicating that the file is already required by another process, you don't need to continue, because the HTTP receive adapter has already been created and configured appropriately. Cancel out, and move to step 3.
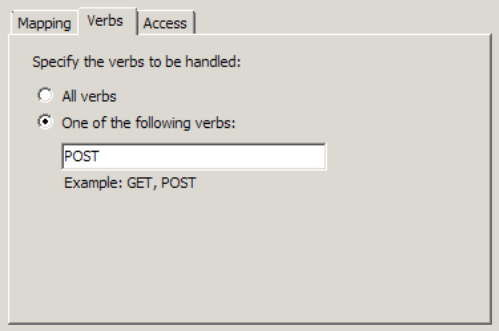
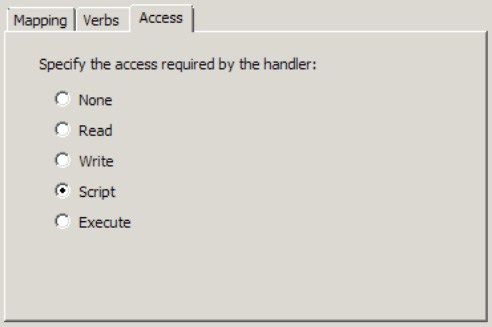
Click the Request Restrictions button. Set the value of POST on the Verbs tab, and the value of Script on the Access tab, as show in Figures 6-34 and 6-35.
Click OK, and save to exit Add Script Map settings.
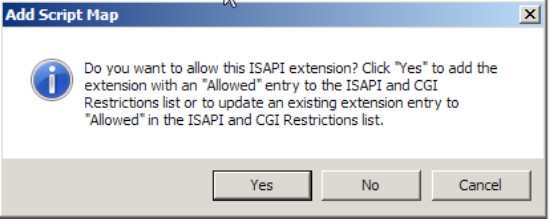
On the Add Script Map dialogue box that opens, click Yes (shown in Figure 6-36).
Once IIS is configured, the next order of business is to create a virtual directory. Each solution that requires an HTTP receive to be set up will require a separate virtual directory. BizTalk listens to this URL and, through the use of BTSHTTPReceive.dll and the HTTP receive adapter, passes the information to the BizTalk MessageBox.
The following steps demonstrate how to create a virtual directory. This directory is where clients will post HTTP requests to BizTalk.
In Internet Information Services Manager, expand the
Sitesfolder, right-click theDefault Web Sitefolder, and select Add Virtual Directory.Set the following properties:
The
Aliasof the virtual directory should be what you want exposed to clients. For example,SampleHTTPReceivewould be exposed to the client ashttp://[server]/SampleHTTPReceive.Set the
Physical pathproperty to the location of theBTSHTTPReceive.dllfile, generally located in $Program FilesMicrosoft BizTalk Server 2010HttpReceive.For the
Connect Asproperties, specify the appropriate credentials. The default isApplication user.Validate the setting by clicking Test Connection, and click OK when the test is complete to save the settings.
At this point, IIS and the virtual directory are set up to route requests to BizTalk Server. The next steps are to create a receive port and configure a receive location for HTTP. These will be specific to each solution, so you will need to set up separate instances for different BizTalk solutions.
Using the BizTalk Administration Console, right-click the
Receive Portsfolder, and select New→Request Response Receive Port. Give the receive port a name, and click OK to create the port.Right-click the
Receive Locationsfolder, and select New→Request Response Receive Location. Select the port you created in the previous step as the container port.In the Receive Location Properties dialog box that opens, use the following settings:
Set
Transport TypetoHTTP. This will automatically set the receive handler toBizTalkServerIsolatedHost.Set
Receive PipelinetoMicrosoft.BizTalk.DefaultPipelines.XMLReceive.Set
Send PipelinetoMicrosoft.BizTalk.DefaultPipelines.XMLTransmit.
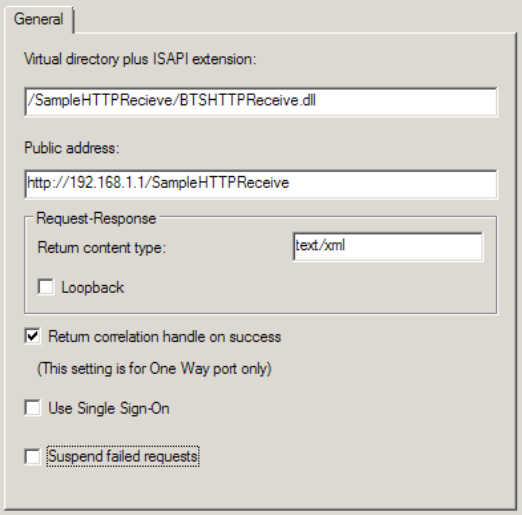
Click the Address (URI) ellipsis button, and use the following settings:
Set the
Virtual Directory plus ISAPIextension property to the virtual directory created during the IIS configuration earlier in this solution. The entry should follow this format:/SampleHTTPReceive/BTSHTTPReceive.dll.The
Public addressproperty is not used by BizTalk; instead, it is used for reference purposes only. The intention is for it to be configured such that it contains the full external address that clients would use to post to the receive location. The intended format for this reference field would behttp://[servername]/SampleHTTPReceive.The
Return Content-Typeproperty is generally set totext/xmlbut can be modified depending on the format of the response expected.The
Loopback flagis set when the request document is intended to be the response back. Generally, this flag is set for test purposes only. For this solution, it should be unchecked.The
Return correlation handle on successproperty is for one-way ports only. It is intended to allow the creation of a unique identifier to be able to correlate the request to the document sent. Regardless of the setting, it will be ignored in this solution, because you are creating a request-response port.The
Use Single Sign Onproperty is to be used in conjunction with SSO. Leave this property unchecked.If checked, the
Suspend Failed Requestsproperty will, on error, suspend the document in the BizTalk MessageBox and will send an accepted notification to the client that posted the request (meaning the client will have successfully posted the document, but the document will be in a suspended state and will require administrative attention). If unchecked, any errors receiving the document will result in an immediate response back to the client indicating failure. For this solution, keep this property unchecked.
Figure 6-37 shows the final configuration.
You can set several configurations at the HTTP receive adapter level that will affect the way the adapter functions. You can set certain properties in the Registry that will provide for more control and optimization over large implementations that use the HTTP adapter. In many cases, however, the server and solution infrastructure may require that this default be reduced or increased. You can set this property using the following steps:
In the Registry Editor, locate the following path:
HKEY_LOCAL_MACHINESYSTEMCurrentControlSetServicesBTSSvc.3.0.Right-click this path, and select New→Key. Enter HttpReceive for the key's name.
Right-click the
HTTPReceivekey, and select New→DWORD. Name the key RequestQueueSize. Give this a decimal value from 10 to 2048.
You can take the previous steps for the keys listed in Table 6-7.
Table 6.8. HTTP Receive Adapter Registry Entries
Description | |
|---|---|
| DWORD whose default is 0. Any nonzero number turns off this setting. Indicates whether communications back to the client will be sent using chunked encoding. |
| DWORD whose default is 2. Can be set to any value from 1 to 10. Indicates the number of threads per CPU that are allocated to the HTTP receive adapter. |
| DWORD whose default value is 256. Can be set anywhere from 10 to 2048. The value indicates the total number of concurrent requests that BizTalk will process simultaneously. |
You want to understand how to configure a static request/response SOAP send port using BizTalk Explorer to allow client machines posting to orchestrations that have been deployed as web services.
SOAP ports are generally two-way (solicit-response) ports, because consuming web services generally result in a response to the calling party. The following steps guide you through the process of configuring a two-way SOAP port:
In BizTalk Administration Console, right-click the
Send Portsfolder, and select New→Static Solicit-Response Send Port.On the Property Pages dialog box that opens, select a transport type of SOAP.
Click the ellipsis for the
Address (URI)property entry box. The Transport Properties dialog box will open with the General tab active.Configure the General tab according to the requirements of the web service, with the following guidelines. See Figure 6-38.
The value of the
Web Service URLproperty should be entered in the formathttp://webservice.asmx.The four authentication types are
Anonymous, Basic, Digest, andNTLM. The value selected for this property will depend on the requirements of the web service being consumed. Often, it will take some experimentation to determine the proper authentication settings, especially when additional security measures, such as certificates, are required.If a web service requires an SSL certificate, enter a reference to it in the
Certificate Thumbprintproperty. You can access the thumbprint through the certificate properties and copy and paste it into this property.
Configure the proxy settings on the Proxy tab according to any proxies that may be necessary to call the web service.
Configure the Web Service tab using the following guidelines:
Generally, all calls to web services should be handled through the orchestration web port; this provides the robust capabilities for posting over the supported protocols inherent to SOAP.
Occasionally, it may be necessary to specify a proxy class for a call to a web service. In such cases, a proxy class must be created. You can create a class using the command-line utility
WSDL.exe. This tool will create an assembly that can be referenced using theAssembly Nameproperty. Once referenced, the type and methods available on the original web service will be made available in the two remaining property fields.
Click OK to save the settings entered in the Transport Properties dialog box, and configure the remaining properties on the SOAP send adapter:
Set the Send and Receive Pipelines settings according to the needs of the solution (generally
XMLTransmitandXMLReceive).If a certificate is required for outbound encryption, set the
Certificate Nameproperty to the appropriate certificate. Only those certificates that have been installed on the machine will be available in the drop-down list.Set any inbound or outbound maps, and configure any filters that may be necessary.
Click OK to complete the configuration of the SOAP port.
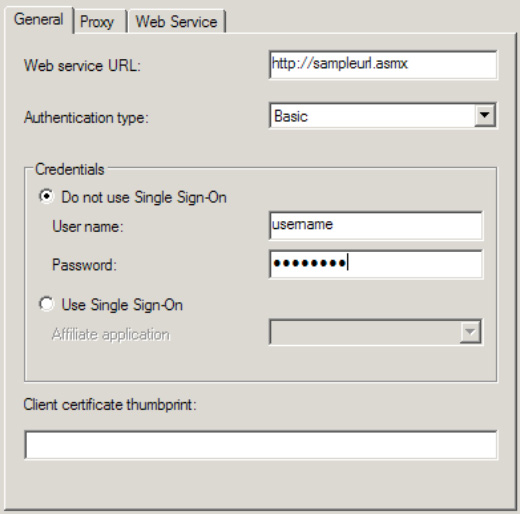
When calling a web service from an orchestration, it is often useful to be able to specify a dynamic URL. For instance, in a development environment, the URL being posted to will be a test URL, and the URL will need to change once the orchestration has been deployed to a production setting. You have several approaches to solving the need for supporting a dynamic URL, one of which is to set the address programmatically in an orchestration Expression shape.
One way to have a dynamic URL is to store the URL can be stored in a configuration file. Assuming that the BTSNTSvc.exe.config file is used to store a custom property, you can take the following steps:
In the
BTNTSvc.exe.configfile, add a new key as follows (add this to the<appSettings>node):[<appSettings>] <add key="WSURL" value="http://sample.asmx"/> [</appSettings>]
Drop an Expression shape on the orchestration. You can enter the following code in the orchestration to read the configuration file and to set the address on the web port created in the previous steps:
strURL = System.Configuration.ConfigurationSettings.AppSettings.Get("WSURL");
Port_1(Microsoft.XLANGs.BaseTypes.Address) = strURL;
You want to create an external .NET application that can be used by administrators to create and modify ports on BizTalk Server.
You can create and modify a variety of components programmatically using the BizTalk Explorer object model. This solution will walk you through creating a basic C# Windows Form application that calls the object model.
Note
The Microsoft.BizTalk.ExplorerOM.dll assembly can only be used from 32-bit systems. You can reference it in Visual Studio on a 64-bit system, but it will not work once the code is compiled.
Here are the steps to follow:
In Visual Studio, create a new project of type Windows Forms Application (as shown in Figure 6-39).
Add a reference to the assembly called Microsoft.BizTalk.ExplorerOM.dll. This assembly is located in $Program FilesMicrosoft BizTalk Server 2010Developer Tools.
Create a new button on the form. The code will be implemented in the code behind this button for this demonstration solution.
Double-click the button to access the code behind, and enter the information listed in Listing 6-12.
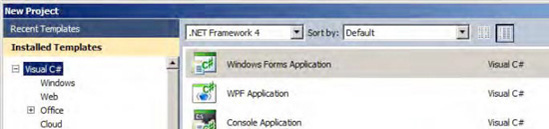
Example 6.12. Creating Ports in C#
private void button1_Click(object sender, EventArgs e)
{
 // instantiate new instance of Explorer OM
 BtsCatalogExplorer btsExp = new BtsCatalogExplorer();

 // connection string to the BizTalk management database where the ports will be created
 btsExp.ConnectionString = "Server='SR';Database='BizTalkMgmtDb';Integrated Security=true";

 // new BizTalk application
 Microsoft.BizTalk.ExplorerOM.Application app = btsExp.AddNewApplication();
 app.Name = "AppCreatedInCode";
 btsExp.SaveChanges();

 // new BizTalk File Send Port
 SendPort send = app.AddNewSendPort(false, false);
 send.Name = "SendCreatedInCode";
send.PrimaryTransport.TransportType = btsExp.ProtocolTypes["File"]; send.PrimaryTransport.Address = "C:\Drops"; send.SendPipeline = btsExp.Pipelines["Microsoft.BizTalk.DefaultPipelines.PassThruTransmit"]; // new BizTalk WCF-BasicHttp Receive Port ReceivePort receive = app.AddNewReceivePort(false); receive.Name = "ReceiveCreatedInCode"; receive.PrimaryReceiveLocation.TransportType = btsExp.ProtocolTypes["WCF-BasicHttp"]; receive.PrimaryReceiveLocation.Address = "http://demo/demofolder"; receive.PrimaryReceiveLocation.ReceivePipeline = btsExp.Pipelines["Microsoft.BizTalk.DefaultPipelines.XmlReceive"]; // save all of the changes btsExp.SaveChanges(); }
You can access a wide variety of functionality through the BizTalk ExplorerOM assembly, including ports, applications, orchestrations, bindings, and party information. When using the BizTalk Administration Console is not the ideal option, the Explorer Object Model opens up a number of programmatic options.