
BizTalk implementations can be generally defined as business processes, and business processes generally create metrics and data, which are needed for reporting purposes. The ability to rapidly generate and access such metrics and reports about business processes is essential to many parties, including managers, developers, and integration partners. One of the core components of BizTalk Server 2010 is the Business Activity Monitor (BAM) framework, which allows you to create, deploy, and view information about running or previously run processes. BAM implementations publish the metrics and reports and make them available to users through custom interfaces, which are updated in near real time as data progresses through the system. This chapter will introduce the steps necessary to build, deploy, and access BAM implementations.
A business process within BizTalk consists of the combination of all the pipelines, ports, orchestrations, maps, and other components needed for the successful completion of a specific task or set of tasks. You can trace the full life cycle—from the moment a document arrives through all the steps of processing to the ultimate delivery of any documents—using the tools available through the BAM framework. Business analysts and developers must work together to define which steps in the business process are important to track and how these steps will be reported to users.
BAM is tied directly to the central BizTalk engine (that is, processes and databases) through OLAP cubes. These cubes are created automatically when a developer deploys a BAM report and profile, typically by using a combination of Microsoft Excel pivot tables and the BizTalk Tracking Profile Editor. Once all the BizTalk components are deployed and a running instance of an orchestration is executing, all defined steps of the flow will be subscribed to via the OLAP cubes and published via BAM components to the user. Users can access the published data via the Web, SharePoint, Excel spreadsheets, or applications that have been customized to display the information.
The recipes in this chapter include detailed information about working with standard BAM development and deployments, working with the BAM API, and viewing information available via the BAM engine.
Note
There is a book focused solely on BAM, Pro BAM in BizTalk Server 2009 by George Dunphy, Harold Campos, Stephen Kaufman, Peter Kelcey, Sergei Moukhnitski, and David Peterson (Apress, 2009). Make sure to refer to it for a great in-depth study of the technology and how to apply it to various business scenarios.
You have business users requesting metrics, visibility, and business data from the execution of a deployed BizTalk solution and the associated artifacts. The business users are interested when any of the BizTalk processes execute the following steps: process begins, process ends, or process encounters exceptions. The business users are also interested in the following attributes of the messages consumed by the BizTalk processes: the transaction ID and transaction type.
This recipe outlines how to use Excel to create a BAM workbook that tracks milestones and business data for reporting. This recipe addresses the four categories of steps required in creating a BAM solution. Each category of steps plays an integral role in developing a useful, rich, and powerful BAM solution:
Creating the BAM activity workbook
Outlining the BAM view
Identifying aggregations, dimensions, and measures
Constructing the pivot table
Note
This recipe does not address how to use the Orchestration Designer for business analysts or the Tracking Profile Editor. These are covered in later recipes in this chapter.
BAM activities identify the milestones and tracking data an individual is interested in tracking. Milestones are the steps in an activity that are measured in time, and tracking data is the key data points in a process you are interested in tracking (such as a customer ID or name).
This category of steps outlines how to create a BAM activity in Excel. The activity defined in this recipe includes milestones that indicate when a process begins, ends, and encounters an exception. Additionally, the following steps outline how to create tracking data that captures the transaction ID and transaction type.
Note
All references in this recipe to Excel refer to Excel 2010. Previous versions of Excel will have slight variations to the steps outlined (the most obvious is that BAM is available on the main toolbar as opposed to showing under the Add-ins tab). Note that with the early version of BizTalk 2010, some errors could occur when using Excel 2010. If errors occur for you (such as the inability to save a workbook), roll back to using an earlier version of Excel. Later recipes in this chapter refer to Excel 2007.
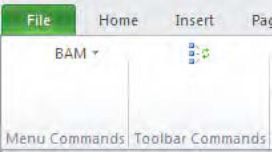
Create a new Excel workbook, select the BAM menu item, and choose BAM Activity. Choosing the BAM activity will launch the Business Activity Monitoring Activity Definition Wizard.
Note
If the BAM menu item is an Excel add-in, the easiest way to get the BAM functionality is to start with a copy of the file named
BAM.xlalocated in theExcelDirof the root BizTalk Server 2010 directory.In the Business Activity Monitoring Activity Definition Wizard, click the New Activity button to create a new activity. Name the new activity Process Activity.
Create the items listed in Table 11-1 for your activity, and click the OK button to complete the Business Activity Monitoring Activity Definition Wizard. The completed activity should resemble Figure 11-1.
Table 11.1. Activity Milestones and Key Tracking Data Items
ID
Item Name
Item Type
Data Type
Description
1
Begin
Business Milestones
Date Time
Identifies the date/time a process begins
2
EndSuccess
Business Milestones
Date Time
Identifies the date/time a process successfully ends
3
Exception
Business Milestones
Date Time
Identifies the date/time a process exception occurs
4
Transaction Id
Business Data – Text
Text (50)
Identifies the ID of the transaction being processed
5
Transaction Type
Business Data – Text
Text (50)
Click the OK button twice to complete the wizard and create a BAM view.

A BAM view is a representation of the milestones and business data tracked in one or more activities. A view may comprise multiple activities or multiple milestones from a single activity and can contain tracked data or milestones as well as provide aggregations or summaries of the tracked milestones and business data. Creating a BAM view is a necessary step because it defines which tracked milestones and business data to report. Typically, different views are created to show multiple audiences different aspects of the same tracked data.
This category of steps demonstrates how to outline your view and display tracked data items and milestones. The view created in this recipe summarizes how many processes execute successfully versus how many processes encounter an exception.
When the Business Activity Monitoring View Creation Wizard begins, click the Next button to advance the wizard and create a new view.
Note
If the wizard does not start, launch it by selecting BAM View from the BAM menu in the Add-ins section of Excel.
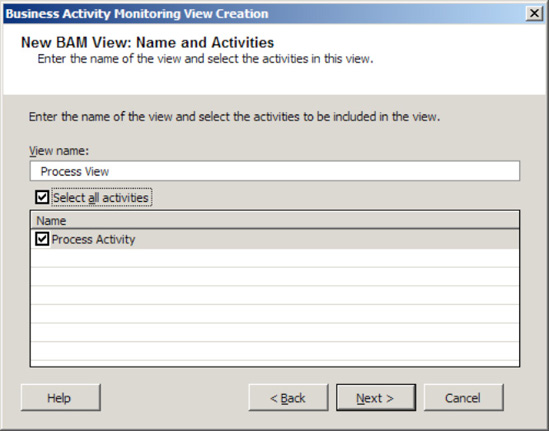
Name the view Process View, and select the Select All Activities box. The Business Activity Monitoring View Creation Wizard will resemble Figure 11-2. Click the Next button to advance the wizard.
On the New BAM View: View Items page of the Business Activity Monitoring View Creation Wizard, select the Select All Items box to add all the milestones and business data to the new view. Click the Next button to advance the wizard.
Click the New Group button to create a Group item, and select the box next to the milestones listed in Table 11-2. Figure 11-3 demonstrates the milestones to select.
Note
The Group milestone allows related milestones to be treated as a single milestone. In this example, grouping the EndSuccess and Exception milestones is useful to indicate the completion of the process regardless of whether it completed successfully or failed.
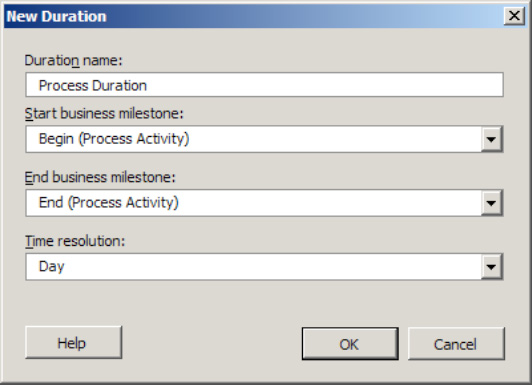
Create a New Duration item with the parameters listed in Table 11-3 to record the total process execution time. Figure 11-4 demonstrates the New Duration creation dialog box.
Note
A duration calculates the time between two business milestones and is useful when reporting the time elapsed between two milestones is important. In this sample, the duration will display the time elapsed for the process execution from the beginning of the process to the End milestone group created earlier.
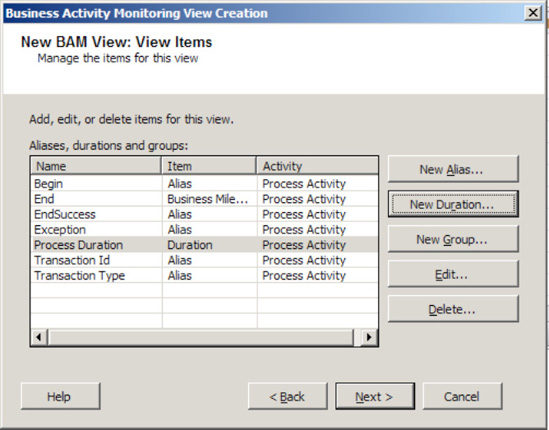
The completed Business Activity Monitoring View Creation Wizard should resemble Figure 11-5. Click the Next button to advance the wizard and create aggregations, dimensions, and measures.

Note
All names used for aliases, durations, groups, dimensions, and measures must be unique for a single view.
Aggregations, dimensions, and measures in your BAM solution provide rich functionality for deriving computations and information based on the tracked data and milestones. This category of steps is not required; however, it adds richness to a BAM solution. After completing this category of steps, you must also complete the steps outlined in the "Construct the Pivot Table" section to organize the derived results.
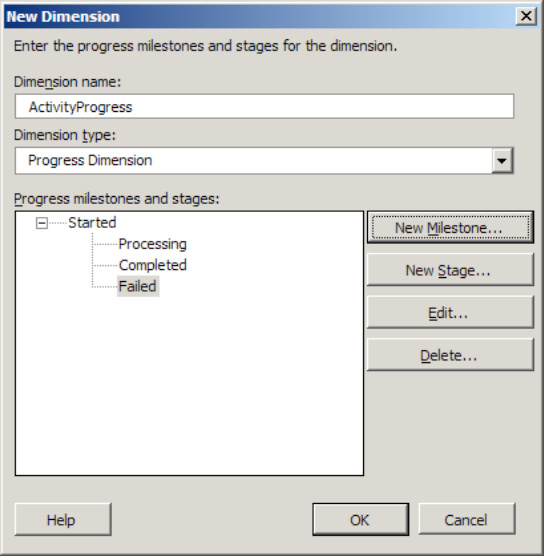
Click the New Dimension button and create a new progress dimension. Name it ActivityProgress.
Note
A progress dimension defines milestones and stages for a process. A progress dimension allows you to display how many processes are at an existing status at a given time. In this example, a progress dimension will display how many processes are in the middle of execution, how many encountered an exception, or how many processed without an exception. Table 11-4 lists the milestones and stages created in this example.
Table 11.4. Progress Dimension Items
Description
Started
The process begins as soon as a message is received. Started is a milestone, and each progress dimension must contain a milestone.
Processing
Processing is a transient stage and indicates a transition from when the process started to when it completes.
Completed
Completed is a milestone indicating the process has successfully completed.
Failed
Failed is a milestone indicating the process has failed to complete because of an exception.
Note
When defining a progress dimension, you must define the steps in your process and the transitions between the steps. Milestones define the steps, and stages define the transitions between milestones. Each progress dimension must begin with a milestone.
The following instructions detail how to create the items listed Table 11-4:
Click the New Milestone button to launch the New Progress Milestone dialog box. Create a new milestone, name it Started, and make it refer to the business milestone called Begin (Process Activity).
Click the New Stage button to launch the New Progress Stage dialog box. Create a new stage named Processing. You will not be able to select the business milestone, because the wizard automatically selects the milestone.
Click the New Milestone button to launch the New Progress Milestone dialog box. Create a new Milestone named Completed, and make it refer to the business milestone called EndSuccess (Process Activity).
Click the New Milestone button to launch the New Progress Milestone dialog box. Create a new Milestone named Failed, and make it refer to the business milestone called Exception (Process Activity).
Figure 11-6 demonstrates the completed progress dimension. Click the OK button to complete the New Dimension dialog box.
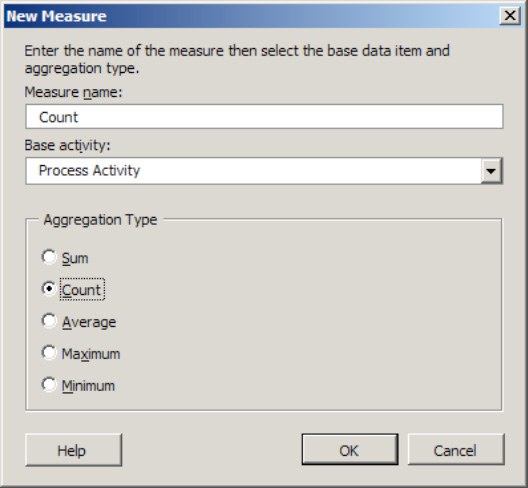
Create a new measure with the properties listed in Table 11-5. A new measure will provide a count of processes currently executing. Click OK to complete the New Measure dialog box. Figure 11-7 demonstrates the New Measure dialog box.
Click the Next button to complete the New BAM View: Aggregation Dimension and Measures page of the wizard.
Review the contents of the New BAM View: Summary page of the Business Activity Monitoring View Creation Wizard. Click the Next button, and finally, click the Finish button to complete the wizard.
Note
At this point, you have successfully created a BAM activity and view (including aggregations, measures, and dimensions). The next step is to complete the pivot table layout for the BAM view.
This final category of steps demonstrates how to lay out the computed items created in the earlier category of steps. If you did not complete the previous category of steps, you will not be presented with the option of creating a pivot table. The pivot table created in this recipe appears in the BAM portal and is the representation of the data for the user. An Excel pivot table allows you to lay out worksheet data in a grid to analyze trends over data as well as perform data aggregations. In this scenario, the progress dimension previously created is organized in the pivot table alongside the count measure also previously created.
After completing the Business Activity Monitoring View Creation Wizard, you will have a workbook with an empty pivot table that resembles Figure 11-8. The image displays the empty Pivot Table report and the Pivot Table Field List window. Data items from the Pivot Table Field List window are organized in the Pivot Table report.
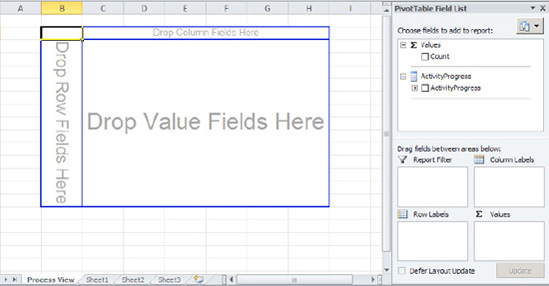
In Excel, drag the ActivityProgress dimension from the Pivot Table Field List window onto the Drop Row Fields Here section of the pivot table.
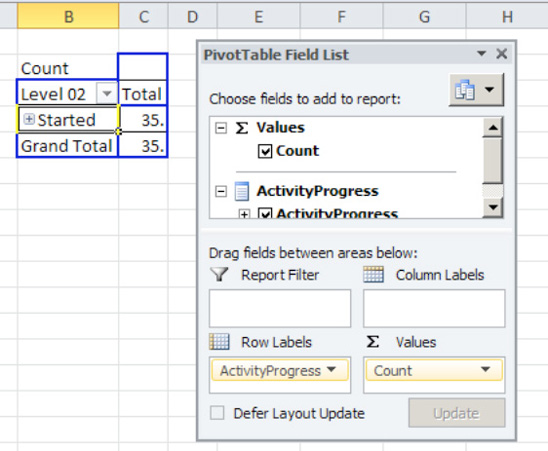
From the Pivot Table Field List window, drag the Count item to the Drop Value Fields Here section of the pivot table. The pivot table should resemble Figure 11-9.
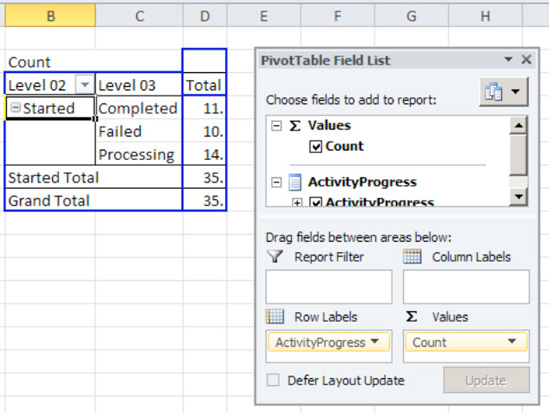
This step demonstrates how to expand the progress dimension to see all the defined stages and milestones. Double-click the Started milestone to expand and see the stages and milestones within the progress dimension. The completed pivot table will resemble Figure 11-10.
Mark the pivot table as a real-time aggregation by clicking the Real-Time Aggregation button in BAM add-ins area of the Excel toolbar ribbon. Figure 11-11 shows where the Real-Time Aggregation button is located.
Save the workbook when you are finished.
BAM is a flexible framework to expose key metrics about business processes modeled within BizTalk. Creating a BAM solution using the BizTalk tool set is a straightforward process requiring little custom development. As outlined earlier, creating and deploying a BAM solution requires four basic categories of steps.
The first category of steps in creating a BAM solution is defining the structure for recording data about a BizTalk process. The structure for recording process data is created in an Excel workbook via the BAM add-in tool. The workbook captures key performance indicators or milestones as defined by the user as well as defines how a user views the milestones. Keep in mind that the Excel workbook is independent from any of the BizTalk solution artifacts and serves only as a container for recording information and computing aggregations.
Using the BAM Excel workbook removes the need for the user to have familiarity with the physical BizTalk solution artifacts. In actuality, the user may be more interested in a logical process implemented through multiple BizTalk artifacts versus the specifics for a single artifact. Consider when you tell someone about a trip you have taken. Do you relay the highlights of the trip or all the travel details (such as flight number, gas station fill-ups, and so on)? The BAM workbook allows the user to specify the BizTalk process highlights to monitor.
Note
As previously mentioned, the BAM workbook is an integrated add-in tool within Excel. If you have the BAM add-in tool enabled, you will be able to work on only a single Excel workbook at a time. If you try to open multiple workbooks, you will receive an Excel alert stating you cannot have multiple workbooks for the single Excel instance at the same time. However, you can open a new instance of Excel if you need multiple workbooks opened at the same time. Figure 11-12 shows the Excel exception alert.

After creating the BAM workbook, the next step is to identify the key data items, milestones, or key performance indicators implemented through data aggregations. Again, keep in mind that the milestones are logical markers and are not tied directly to physical BizTalk artifacts. For example, a milestone could signify the start or completion of a process. After creating the milestone and deploying the workbook, you map the multiple BizTalk artifacts to that milestone or data item. A BAM activity is a reference to a group or collection of milestones or data items and can span multiple BizTalk artifacts. Table 11-6 describes the four types of items that can be created in a BAM activity. Please review the "Considerations" section of this recipe for additional information about relating multiple activities and grouping of activity items.
Table 11.6. BAM Activity Items
Milestone | Name | Description |
|---|---|---|
1 | Business Data – Milestone | Placeholder for a date/time marker. Use this type of milestone when interested when an event occurred. |
2 | Business Data – Text | Placeholder for a text type of data item. Use this type of milestone when reporting a specific textual value piece of data (such as a promoted property) that is a textual value. |
3 | Business Data – Integer | Placeholder for an integer type of data item. Use this type of milestone when reporting a specific number piece of data (such as a transaction ID). |
4 | Business Data – Decimal | Placeholder for a decimal type of data item. Use this type of milestone when reporting a specific piece of data requiring decimal precision (such as a dollar amount). |
After defining the BAM activity structure and necessary milestones, the next step is creating the view that will represent the tracked data items and milestones. The BAM view is a representation of the milestones and business data defined in a single activity or multiple activities. Views can contain both data and computed aggregations based on the data.
The BAM view also facilitates the creation of data aggregations. If you have distinct audiences interested in different data aggregations or representations of activity milestones, then using a BAM view to represent those views is advantageous. Additionally, you can restrict BAM views to specific audiences to limit the viewing of sensitive data or milestones. You can create a BAM view in one of two ways: using the Business Activity Monitoring View Creation Wizard or from the BAM add-in menu.
An optional task in creating a BAM view involves creating the necessary alias, duration, and group view items. These items are not required but offer extended desirable functionality to a BAM view. Consider view items as computed milestones that show the grouping of items or time durations between two milestones. Table 11-7 describes each view item.
Table 11.7. BAM Computation Milestones
Also optional when creating a BAM view is the inclusion of aggregations, dimensions, and measures based on the milestones and data items tracked. In this example, you created a measure to track the count of processes. Additionally, you created a progress dimension to show the progress of the process as it executes. These items are not required but offer additional flexibility to a BAM view.
The final category of steps involves laying out the items of your view into a pivot table for reporting. In this recipe, you created a pivot table that displays the progress of your solution and aggregations of that process through a progress dimension, aggregations, and measures.
If you have an interest in categorizing multiple milestones into a single group, you should look at using activity grouping. Considering the milestones to be included in an activity and considering the scope of the activity can be challenging. A single activity can reference multiple activities; however, it may also make sense (depending on the level of detail) to create a single activity with the necessary milestones. Again, imagine a trip with multiple legs and side trips containing many details. If the user is interested in many details about the overall trip as well as the individual legs of the trip, it may make sense to create multiple activities to represent the trip as a whole as well as the individual trip legs. Alternatively, if the user is interested only in the trip highlights, it may make sense to create a single activity with those highlights for the entire trip (including trip legs).
In the recipe sample, milestones indicate when a process begins, ends, encounters an exception, and defines data characteristics about the processed transaction. Typically, these milestones include enough information for a user interested in a high-level view about the health of a business process.
Also think about the number of processes. In this example, you created a single activity to report on the behavior of a business process. If you create a solution that has multiple related processes, you may need to create and relate multiple activities. Creating related activities is also necessary in situations where you have a process that involves a looping structure (such as an orchestration with a loop). In the situation where you have a loop structure in an orchestration, you would create one activity for the orchestration and an additional activity for the events occurring within the loop. The physical act of relating activities occurs in the Tracking Profile Editor (or via code).
Note
When creating related activities, verify that the activities are included in the same BAM view. Additionally, verify that a shared attribute (for example, MessageID) relates the two activities.
You have created a BAM activity and view within a BAM Excel workbook and must deploy the BAM artifacts within your environment.
Note
This recipe uses the BAM workbook created in Recipe 11-1 as the basis for the scenario.
Successfully deploying a BAM activity and view involves a number of steps, typically performed by a few different users. After a business analyst creates the BAM activity and view within the BAM Excel workbook, an administrator deploys the artifacts to the BizTalk environment. The first set of steps to use the BAM Management Utility to deploy the activity and view defined in the BAM Excel workbook is as follows:
Open a command prompt by navigating to Start→Run, typing CMD, and clicking OK.
Navigate to the folder containing the BAM Management Utility by typing the path similar to the following line at the command prompt, and pressing Enter:
cd "C:Program FilesMicrosoft BizTalk Server 2010Tracking"
Use the
deploy-allcommand to deploy the BAM activity and view defined in your BAM Excel workbook. For this solution, type the following line at the prompt, and press Enter:bm deploy-all -DefinitionFile:"C:BAMWorkbookBAMWorkbook.xls"
The status of the deploy operation appears in the console, as shown in Figure 11-13.
The next set of steps is for either a developer or an administrator to use the Tracking Profile Editor to define and deploy the mappings between the activities defined in the BAM Excel workbook and actual BizTalk artifacts, such as orchestrations and schemas. (BizTalk Server 2010 also allows pure messaging solutions to feed BAM.)
Open the Tracking Profile Editor by navigating to StartPrograms

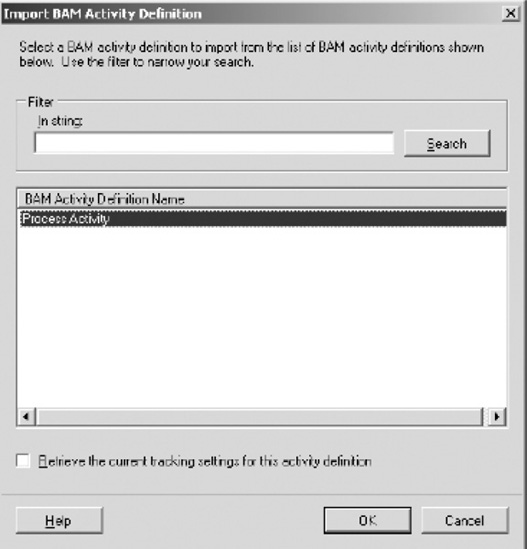
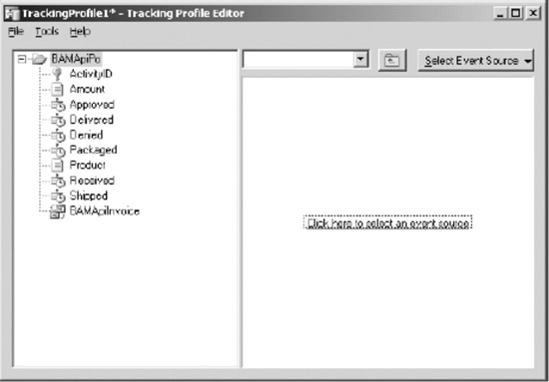
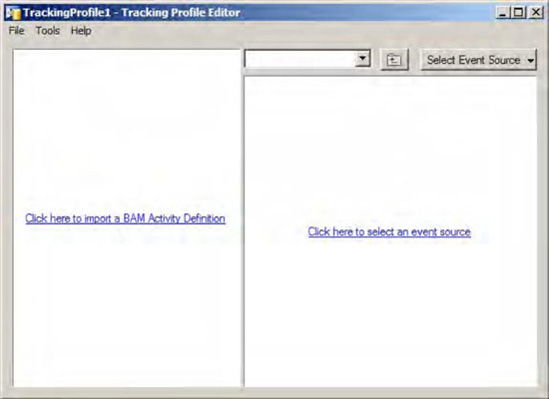
Import your BAM Excel workbook by clicking the Click Here to Import a BAM Activity Definition link. This link launches the Import BAM Activity Definition dialog box. Select the appropriate activity definition from the list. In this solution, select the activity definition named Process Activity, as shown in Figure 11-14.
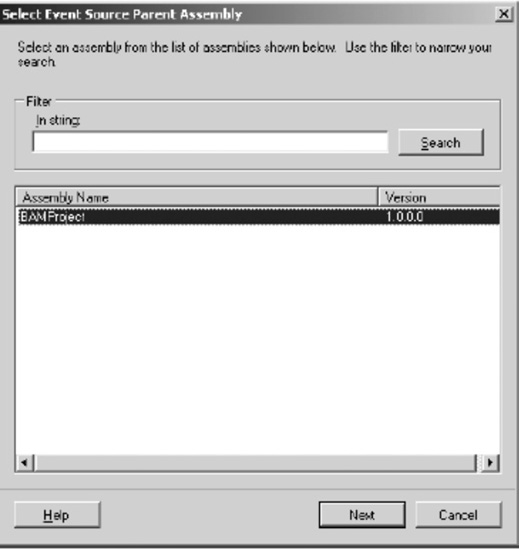
Select the BizTalk artifacts you need to map the activity definitions to by clicking the Click Here to Select an Event Source link. This link launches the Select Event Source Parent Assembly dialog box. Select the appropriate BizTalk assembly containing the artifacts you will map to the activity definitions; in this solution, select the assembly named BAMProject, as shown in Figure 11-15. Click Next to proceed.
Note
The list of assemblies contains all those BizTalk assemblies that have been deployed within your BizTalk environment.
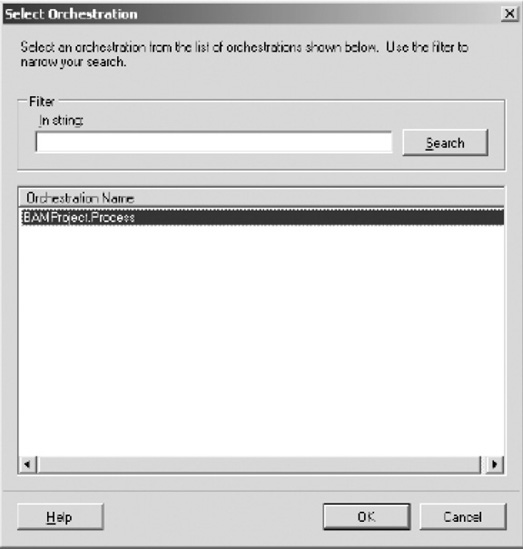
In the Select Orchestration dialog box displayed next, select the orchestration containing the workflow and the links to the schemas that define the activity definitions. In this solution, select the orchestration named
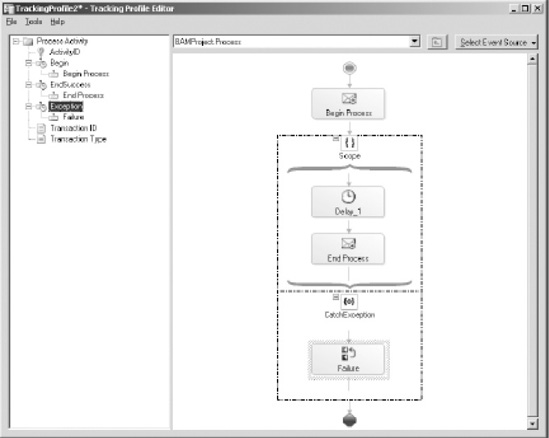
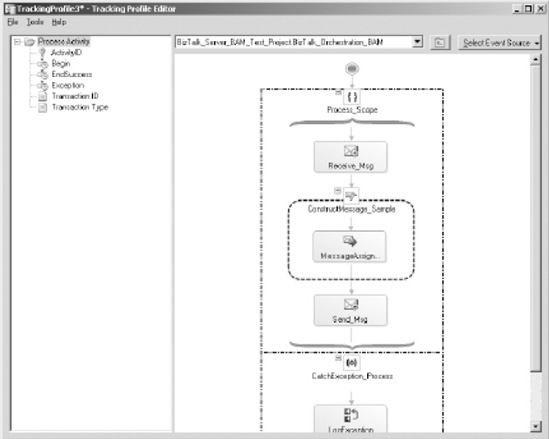
BAMProject.Process, as shown in Figure 11-16. Click OK.Now, map the orchestration steps in the right pane to the activity definition milestones in the left pane. Drag and drop the orchestration shapes to the activity definition milestones, as outlined in Table 11-8. Figure 11-17 shows how the Tracking Profile Editor looks after the orchestration steps have been mapped to the activity definition milestones.
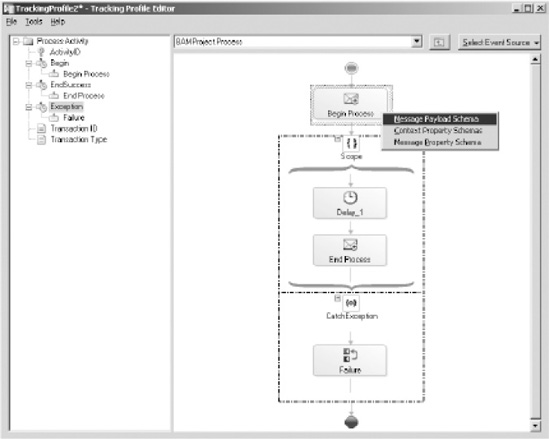
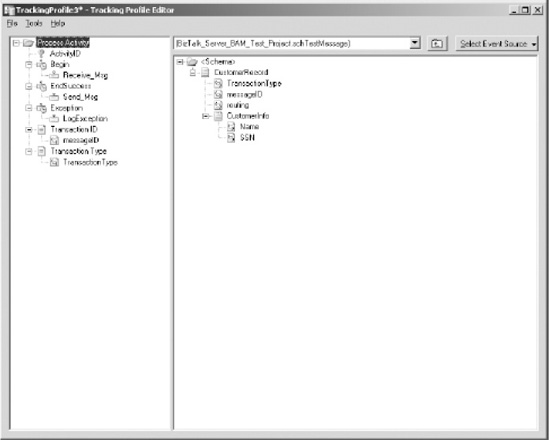
Next, map the appropriate schema fields to the activity definition business data. Since the message containing the schema data fields you need to map is received by the Begin Process shape in the orchestration, right-click this shape, and select Message Payload Schema, as shown in Figure 11-18.
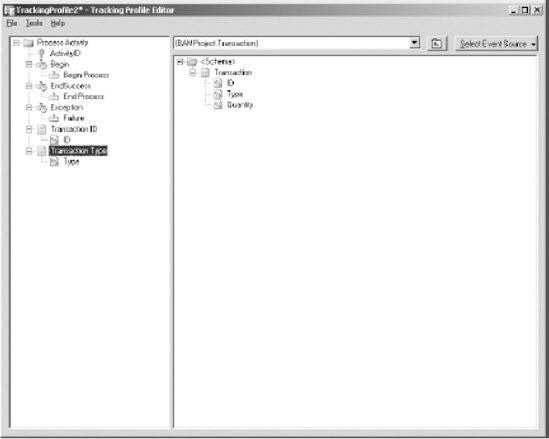
Map the appropriate schema fields in the right pane to the activity definition business data fields in the left pane. Drag and drop the schema fields to the activity definition business data fields as outlined in Table 11-9. Figure 11-19 shows how the Tracking Profile Editor looks after the orchestration steps and business data have been mapped to the activity definition milestones.
Save the tracking profile by selecting File
Deploy the tracking profile by selecting Tools
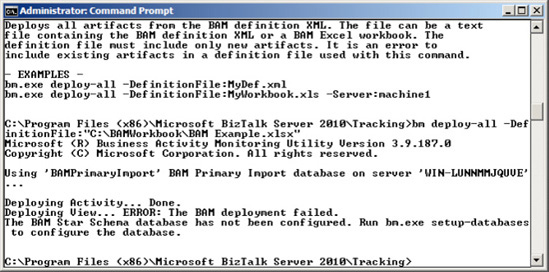
Deploying BAM activities and views involves two BizTalk tools: the BAM Management Utility and the Tracking Profile Editor. The BAM Management Utility is a command-line tool used for managing your BAM environment. It includes a number of commands, but the one we'll focus on is deploy-all. The deploy-all command takes the following parameters:
DefinitionFile: Path and file name of the BAM Excel workbook (or the exported XML file that can be generated from the BAM Excel workbook) containing the activities to deploy.Server: Name of the server to which to deploy the activities. If this parameter is not specified, the local server is used.Database: Name of the database to which to deploy the activities. If this parameter is not specified, theBAMPrimaryImportdatabase is used.
This command reads the BAM Excel workbook specified in the DefinitionFile parameter and creates SQL Server database artifacts based on the activities and view defined in the spreadsheet. Specifically, this command creates the following:
Tables within the BAM primary import database for capturing activity data in the live BizTalk environment.
SQL Server Integration Services packages for transferring data between the live BizTalk databases and the SQL Server Analysis Services cubes.
SQL Server Analysis Services OLAP cubes.
A live data copy of the Excel workbook in the same folder as the original spreadsheet. Use the live data workbook to view up-to-date data within BizTalk Server after completing the deployment steps (including those involving the Tracking Profile Editor).
Note
The BAM Management Utility has no update capabilities for BAM artifacts. You must first remove the old artifacts and then deploy the updated ones.
Use the Tracking Profile Editor to map the activities defined by the business analyst in the BAM Excel workbook to actual BizTalk artifacts, such as orchestration shapes and schema data fields. This task is absolutely critical in ensuring that the deployed BAM artifacts communicate the appropriate information. Although it is common to have a developer or administrator perform this task, this user should have a strong understanding of the business process. Applying the tracking profile places the hooks into the BizTalk Server environment used to record the necessary milestones and data fields, which map to the activities defined by the business analyst. The Tracking Profile Editor in BizTalk Server 2010 also provides functionality to feed BAM via pure-messaging scenarios (those that do not use orchestrations). To access schemas directly, click the Select Event Source drop-down list, and click Select Messaging Payload. This launches the Select Event Source Parent Assembly dialog box. Select the appropriate BizTalk assembly and then the appropriate schema.
Once the deployment steps have executed, you can see the activity data either through the live data copy of the BAM Excel workbook or through the BAM portal.
You need to create a solution that will track your company's business processes, compile the data into key performance indicators (KPIs), and develop a portal to display the information to executives. You have already created and deployed activities and views from a BAM worksheet to define and track the key performance indicators, and you would now like to consume that data from a portal.
Once you have developed and deployed BAM activities to track your KPIs, you may now consume the data from an ASP.NET portal without writing any code. You can accomplish this by utilizing out-of-the-box BizTalk reporting capabilities through the BAM portal. The BAM portal is a web-based portal built from ASP.NET that allows you to view and query cubed data created within the BAM framework. This recipe will cover three primary activities within the BAM portal:
Note
Installing the BAM Portal on 64-bit machines requires that IIS allow for 32-bit applications. This can be easily accomplished by running the following command line script: cscript %SYSTEMDRIVE%inetpubadminscriptsadsutil.vbs SET W3SVC/AppPools/Enable32bitAppOnWin64 0.
Take the following steps to access the BAM portal:
Deploy BAM activities and views.
Note
Please see the preceding BAM recipes in this chapter for further information about how to accomplish this task. If you do not have any activities and views deployed, you will not be able to view information in the portal.
Open the portal by navigating to Start
Once you have opened the portal, you will notice three primary panes: the header frame at the top, the view frame to the left, and the content frame to the right. If you have deployed activities and views, they will be available under the
MyViewstree.
BAM activities capture business processes milestones and business data at a specific point in time. An activity search allows you to define, save, open, and execute queries to retrieve that transactional business data. The activity search page has three main sections, as shown in Table 11-10.
Table 11.10. Sections of Activity Search Page
Description | |
|---|---|
Query | This section of the page allows you to define, save, and open queries. Queries let you constrain which activities to return in the results window. |
Column Chooser | This section of the page defines which columns to return in the result set. |
Results | The section of the page displays the result set retuned by executing the query against the BAM activity data. |
To perform an activity search, take the following actions:
Under the My Views tree, expand the view that correlates to the view name you have deployed.
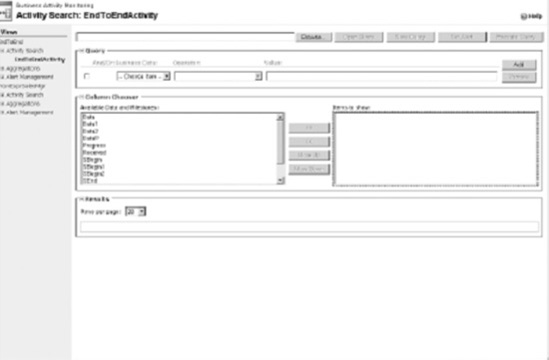
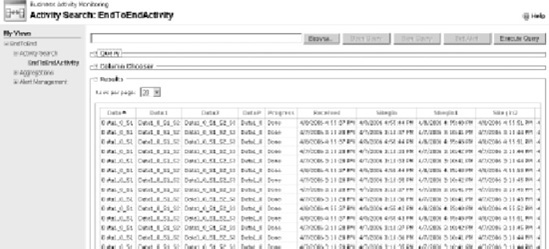
Expand the Activity Search node, and click a deployed activity. This action will open a query window like the window displayed in Figure 11-20.
Within the Query pane, build a query by configuring one or more constraints. To configure a constraint, follow these steps:
Note
You cannot create complex constraint logic, such as nested constraints. The portal will allow you to add constraints only with simple and/or relationships. By adding more than one constraint, an additional drop-down list will appear that will allow you to define the constraint relationship.
Within the Column Chooser pane, choose one or more columns to display in the Results pane.
Click Execute Query. The Results pane will display the query results.
Activity searches provide transactional business data from a specific point in time, and aggregations provide aggregated business data about a group of processes at a specific point in time. This aggregated data is processed and stored in OLAP cubes and accessed through pivot tables. The Aggregations page has two main sections, shown in Table 11-11.
Table 11.11. Sections of the Aggregations Page
Page Section | Description |
|---|---|
Pivot Table View | Pivot tables provide for a way to summarize and work with data separate from the core spreadsheet. This section contains a standard pivot table. The table automatically points to the BAM framework and specifically the activities and views you have deployed. |
Chart View | This section contains the chart view that displays, in chart form, the data filtering configured in the pivot table. It is also possible to change the chart view to any chart available through the office framework. |
To view an aggregation, take the following actions in the BAM portal:
Under the My Views tree, expand the view that correlates to the deployed view name.
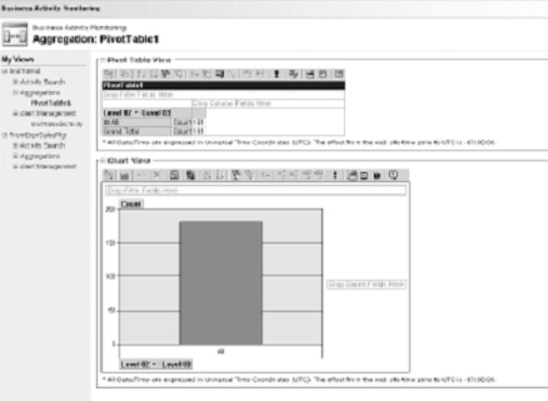
Expand the Aggregations node, and click a deployed pivot table. This action will open a window like the one displayed in Figure 11-21.
Note
If the BAM portal displays the "Safety settings on this machine prohibit accessing a data source on another domain" error in the pivot table, you need to change your security settings for Internet Explorer. Open the security settings by selecting the Tools
From the pivot table View toolbar, click the Field Chooser icon. This will display a list of fields available with your BAM view.
Drag one or more total or detail fields to the center of the pivot table.
Next, drag one or more column fields to the column section of the pivot table.
Close the Pivot Table Field List control. Figure 11-22 shows what the pivot table with data should look like.
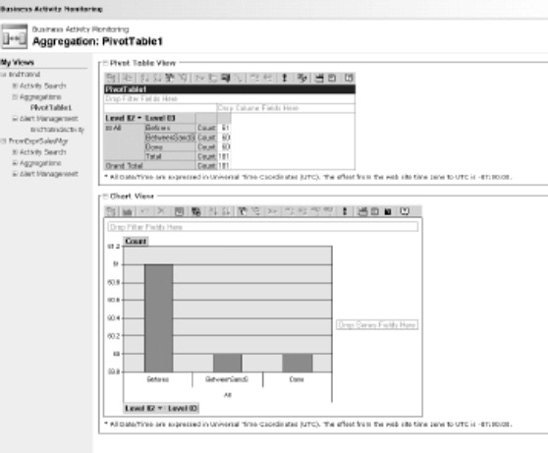
Note
The pivot table is a powerful tool, and this recipe does not go into the many features it provides. You should spend some time researching what this tool can provide and how to use it to its full potential.
The BAM portal is a feature in BizTalk 2010 that facilitates the rapid consumption of business transactional and aggregated data, without writing any code. The portal is self-configuring, fairly easy to set up, and provides rich data retrieval capabilities. This recipe has provided a high-level understanding of what you can do with the portal, but it has an additional powerful feature, BAM alerts. BAM alerts allow you to configure and receive alerts related to specific changes in business data.
The BAM portal provides several areas of configuration: the look and feel of the main or dashboard page, the web.config file, a network load balancing (NLB) clustering. By default, the main dashboard, or Getting Started page, displays navigation instructions to the user. The content for the main dashboard page is located in the MainPageContent.htm file, which is located in the root of the BAM portal web site folder and can be altered.
Another area of configuration is web.config. This configuration file is similar to standard web.config files and allows you to configure security as well as environment settings for the BAM portal. The web.config setting highlights include referencing the BAM web services that may be hosted on different machines in a distributed environment, referencing a different main dashboard page file, culture support, and service timeout configuration. Additionally, the types of alert notifications are customizable in web.config.
Finally, BAM fully supports high availability through clustering and can be scaled like other web applications through NLB. Please refer to the help file for specific instructions about how to change these settings.
You have to set up BAM to capture data analysis on your BizTalk processes. You need to monitor these processes and set up alerts based on business process conditions.
BizTalk's BAM tool enables alerts to be set up based on business data and associated query conditions. In this sample, you will be setting a BAM alert on a condition where the sales price of a good is less than $1.
Note
BAM alerts rely on the creation of a BAM view deployment.
The following steps show how to create a BAM alert:
Open the BAM portal by navigating to Start
On the portal home page, select the BAM view in the left pane.
Note
The portal will display all the deployed BAM views. Alerts are set up per BAM view.
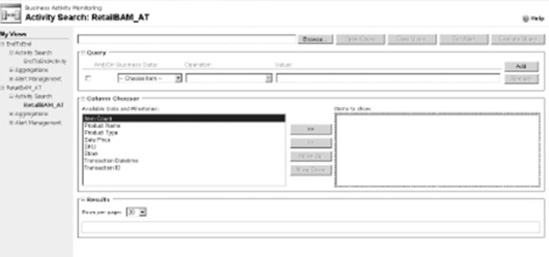
Click the Activity Search link; Figure 11-23 shows the Activity Search page.
Select your search criteria for the activity, and click Set Alert.
Note
It might be a good idea to execute the query first to provide a sanity check on the query results. You can set up an alert before or after query execution.
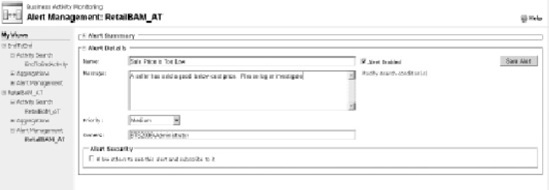
The Alert Details screen will now display. At this screen, enter the details for your alert:
Name: Enter the name of the alert.
Message: Describe the message that should be displayed when the alert is fired.
Priority: Assign relative priority. This would be used as a priority identifier within your solution.
Alert Security: Allow this alert to be seen and used by other users.
Click Save Alert to save the alert details, as shown in Figure 11-24.
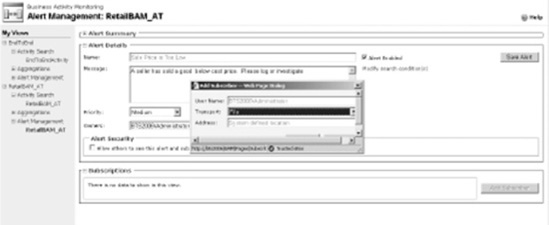
Next, you must set up a subscriber to identify who should be notified and when the alert is fired, so click the Add Subscriber button. The Add Subscriber dialog box appears, as shown in Figure 11-25.
In the Add Subscriber dialog box, select the transport option for the alert. In BAM alerting, you can set up subscribers for either an email address or a file location.
Click the Save button to complete the subscriber setup.
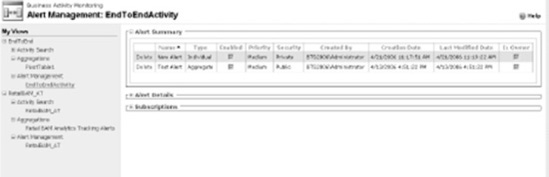
This completes the subscriber setup. Now, to review your newly created alert and subscription, click the Alert Management node under your view. On this page, you can view a list of alerts and associated alert and subscription detail, as shown in Figure 11-26.
Finally, review that your subscription works. In this sample, you set up a subscription for a file location. Run your business process with data that will cause the alert to fire. When this occurs, an alert should be found in the alert location, as shown in Figure 11-27.
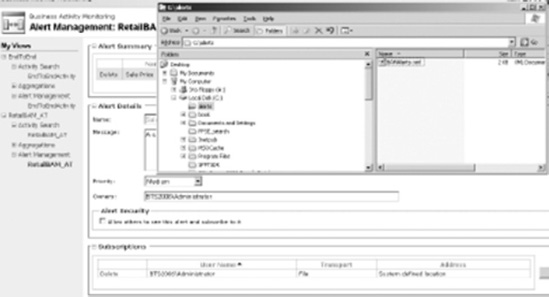
Note
The alert location is a static location, set up during BizTalk installation. This location should be shared and assigned with appropriate Active Directory permissions/security. In this sample, the share location was \localhostalerts.
BAM is a powerful tool in BizTalk that allows a solution that you can configure to monitor data passed through BizTalk without performing large amounts of custom development. BAM is based on SQL Server Reporting Services, and events are fundamentally triggered via SQL Server Notification Services. You must consider these prerequisites to successfully enable a BAM deployment:
Infrastructure: Ensure your SQL Server environment and Windows server security configuration are all in working order. This can be problematic and a necessary step in ensuring a secure environment.
BAM workbook: A BAM workbook with associated activities must be deployed in order to access BAM activity searches, aggregations, and associated alerts in the BAM portal.
Tracking Profile Editor: You must deploy a Tracking Profile Editor to see queries and alerts within the BAM portal.
BAM alerts location: You must specify a location to drop file alerts during installation/setup.
You can configure BAM alerts for aggregate or individual data conditions. You can create an alert initially or modify one after creation. An alert can be fired based on a condition of a row of data or as a condition of a summary of data (aggregate). To enable this, you have to set up individual data conditions by setting the alert in the activity search page (demonstrated in this sample) and set up aggregate alerts via acting on the pivot table on the Aggregations tab. Figure 11-28 shows this step.

You can set subscribers for BAM alerts via two transport mechanisms:
Email: Any valid email address or group alias, such as [email protected]. A link to the alert detail will be provided in the e-mail body.
File: Alerts will be dropped to the file location specified during product install.
A receive location can be set up to allow consumption back into the BizTalk process for further examination and process action. In addition, aggregate alerts can have threshold limits set to ensure that subscribers are not saturated with repeated messages.
When deploying alerts, it is important to remember the testing aspects and notification success. If a file alert cannot be published as a result of incorrect setup, the alert can be lost. An error will be indicated in the application event log. However, the alert instance itself cannot be salvaged.
You want to send custom events to BAM and be able to track these events as if they were published by a core BizTalk component (such as an orchestration).
The BAM Interceptor is part of the API that is available to interact with BAM from a .NET code base (BizTalk or otherwise). The Interceptor is used primarily by the core BizTalk components, such as orchestrations and pipelines, but can be tied to custom code by a developer. By calling the Interceptor and the associated API methods, you have full control over when and what is sent to deployed and tracked BAM instances.
When orchestrations execute, they constantly send events to the BAM Interceptor. Events that are being subscribed to (tracked events, set in the BAM Tracking Profile Editor) will be saved, and all others will be ignored. When external components to the orchestration are called (such as referenced assemblies), however, they do not log to BAM, and events that occur can be inferred only by the surrounding events sent from the orchestration.
This solution will walk through the sample that is included in the BizTalk SDK. You can find the SDK project files at Microsoft BizTalk Server 2010SDK SamplesBAMBamApiSample.
You must go through several key steps to interface with the BAM Interceptor:
Create and deploy a BAM definition, and import it into the Tracking Profile Editor.
Create an Interceptor instance, which can be used to interface with the BAM Interceptor. This contains the configuration needed to associate the data in the custom event being fired with the event in the BAM definition.
Implement the code to call the BAM Interceptor.
The first thing to do is to import the BAM definition and understand how it corresponds to the rest of the files in the SDK:
Run the
Setup.batfile. This will install the components.Open the BizTalk Tracking Profile Editor. Click File, and then select Import BAM Activity Definition. Assuming the BAM definition has been deployed successfully, the option to select BAMApiPo will be available, as shown in Figure 11-29.
During the setup process, two console applications are compiled. One of them is the
InterceptorConfig.exefile, which takes a series of inputs to determine how to map data logged to the Interceptor to the BAM definition. The second is theBAMApiSample.exefile, which references the output of theInterceptorConfig.exefile to determine how to push data to the BAM Interceptor.Open the
BAMApiSample.slnfile.First, examine the
InterceptorConfig.csfile to observe how it creates the binary file, which will be referenced byBAMApiSample. It creates an Interceptor instance, which is a binary file containing the information needed to map the values to the definition. The XPaths are in reference to the document, which is statically created withinBAMApiSample.An example of the mapping between the definition and
BAMApiSampleis as follows:locNewInvoice [in BAMApiSample] = Received Event [in Tracking Editor] @PoID [inBAMApiSample] = xpath in xml document to InvoiceID [in Tracking Editor]
Open the
PurchaseOrder_config.xmldocument to see all the mappings as configured byInterceptorConfig.exe. You can change these values; however, you also have to change the document inBAMApiSampleto match the new values.Assume for a moment that the only fields in the Tracking Profile Editor are Start and End. By simplifying the definition and the creation of the binary reference file, the solution becomes more manageable. Use the following steps to create an Interceptor instance based on the simplified definition.
In Visual Studio, create a new Visual C# Console Application project. This will allow code to be written that will produce the Interceptor instance.
Add a reference to the
Microsoft.BizTalk.Bam.EventObservation.dllassembly. This is located in theTrackingdirectory of the main BizTalk installation path.The code in
Mainwill look as shown in Listing 11-1.Example 11.1. Main Function to Create Binary File
using System; using System.IO; using System.Runtime.Serialization.Formatters.Binary; using Microsoft.BizTalk.Bam.EventObservation; // etc. static void Main(string[] args) { // the following creates a new instance based on the definition that // has been deployed to Tracking. If BAMApiPo does not exist as a valid // deployed definition, this code will fail. ActivityInterceptorConfiguration interceptorConfig = newActivityInterceptorConfiguration("BAMApiPo"); // registrations map the name of the tracked event to the // name that is in the binary file/Interceptor code. interceptorConfig.RegisterDataExtraction("Start","StartSample",""); interceptorConfig.RegisterDataExtraction("End","EndSample",""); // this is the indicator for when the Interceptor is to start and stop // listening for events. @ID is an XPath to where to locate the ID // in the document passed in (see code for calling Interceptor, below) interceptorConfig.RegisterStartNew("StartSample", "@ID"); interceptorConfig.RegisterEnd("EndSample"); // Create the Interceptor bin file BAMInterceptor interceptor = new BAMInterceptor(); interceptorConfig.UpdateInterceptor(interceptor); // write the file out BinaryFormatter format = new BinaryFormatter(); Stream file = File.Create("BAMApiSample.bin"); format.Serialize(file, interceptor); file.Close(); }
Build the solution. Run the executable. This will write out a binary file, which can now be referenced by the code to call the interceptor.
Additionally, an XML document could be generated, which would look like the following (this is not a required step):
<TraceInterceptorConfiguration xmlns:xsd="http://www.w3.org/2001/XMLSchema"
           xmlns:xsi="http://www.w3.org/2001/XMLSchema-instance">
        <TrackPoint Type="Start">
         <Location xsi:type="xsd:string">StartSample</Location>
         <ExtractionInfo xsi:type="xsd:string">@ID</ExtractionInfo>
        </TrackPoint>
        <TrackPoint Type="End">
         <Location xsi:type="xsd:string">EndSample</Location>
        </TrackPoint>
</TraceInterceptorConfiguration>
Now, open the
BAMApiSample.csfile to observe how it is structured. The key items to look at follow:The class
MainApp: This class contains the main function that constructs the XML document and event stream that will be used to call the BAM Interceptor.The class
DataExtractor: This class contains the extractor that returns the data within a given node of the XML document based on the XPath passed as a parameter. The XPath comes directly from the binary configuration file created by theInterceptorConfig.exefile.The
#IfInterceptor statements: All statements within these directives call the BAM Interceptor.
The following code is directly from one of the SDK's #If Interceptor directives. It shows how the binary file is loaded and how the OnStep method in the BAM Interceptor is called. In this case, the dataExtractor contains information about how to extract the data from a given node (with the XPath from the binary file), and locNewPo maps to the Received Activity in the Tracking Profile Editor.
BAMInterceptor interceptor=Global.LoadInterceptor("BAMApiPo_interceptor.bin");
interceptor.OnStep(Global.dataExtractor,"locNewPo",xePO,Global.es);The previous solution explored how to use the Interceptor API and introduced the concept of interaction with the BAM Interceptor. The functionality of this SDK sample is limited in use with true BizTalk implementations. The most likely use of calling the BAM Interceptor directly would be in the case of a custom assembly, which is called from an orchestration. Modifying the console application (BAMApiSample) to a .NET class is fairly straightforward.
Listing 11-2 shows a simplified approach to the application as a class that can be called directly from an Expression shape.
Example 11.2. Interceptor in a .NET Class
class Sample
{
 // the EventStream and DataExtractor tie into Interceptor events
 public static EventStream es=null;
 public static DataExtractor dataExtractor=new DataExtractor();

 public void PassDocument(System.Xml.XmlDocument xmlDoc)
 {
  // instantiate the interceptor by referencing the binary file
  Stream file=File.Open("C:BAMApiSample.bin", FileMode.Open, FileAccess.Read,
FileShare.Read); BinaryFormatter format=new BinaryFormatter(); BAMInterceptor interceptor=(BAMInterceptor)format.Deserialize(file); file.Close(); // send an event that will start the tracking // xmlDoc is the instance of the document passed in interceptor.OnStep(Sample.dataExtractor,"StartSample",xmlDoc,Sample.es); // end the tracking interceptor.OnStep(Sample.dataExtractor,"EndSample",xmlDoc,Sample.es); } // add functions for constructing the EventStream and the DataExtractor }
You have a deployed BizTalk solution and associated BAM artifacts. You have users viewing the BAM views and associated activities. The user would like additional information about one of the activity line items. Specifically, the user notices the process has terminated with an exception and would like the technical support team to investigate the exception. For this recipe, the sample BizTalk solution and BAM artifacts demonstrated are from the BAMEndToEnd sample project included in the SDKBAMSamples folder created with the BizTalk software installation.
This solution outlines how to use the BAM portal to view an activity line item and issue a technical assistance request for that activity line item. The following instructions assume you have deployed a BizTalk solution and the associated BAM artifacts and that the BizTalk solution has processed transactions. This solution outlines the steps required for creating a technical assistance service request from the BAM portal:
From the Start menu, select All Program Files
Locate the view, and perform the activity search on the activity in which you would like to request technical assistance. Figure 11-30 displays a sample activity search.
Click the activity line item in which you would like to request technical assistance. The Activity Status screen will display and detail information about the chosen line item as well as the Assistance button. You should see a screen similar to Figure 11-31.
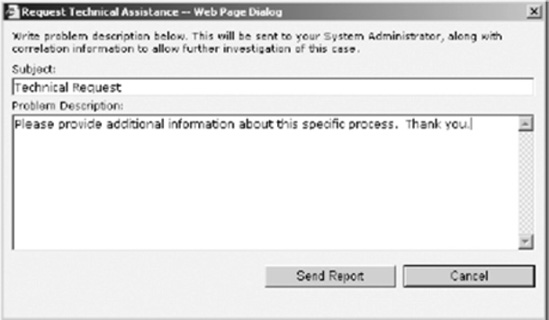
Click the Assistance button to open the Request Technical Assistance – Web Page Dialog dialog box, as shown in Figure 11-32. Enter the appropriate information for the technical request, and click the Send Report button.
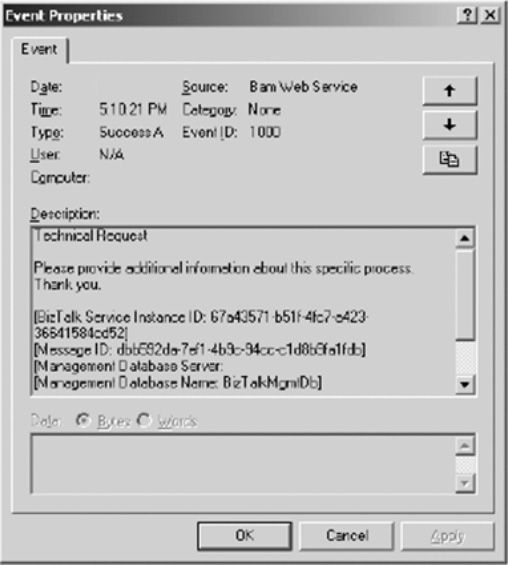
Open the Event Viewer to verify that an event log entry has been created for the submitted request. Figure 11-33 demonstrates the generated event log entry for the submitted technical assistance request. The entry will be displayed in the Event Viewer as a success audit.

The Request Technical Assistance functionality included with the BAM portal allows the user to request additional information about a specific activity instance without having context to the business artifacts or the team supporting the solution. To take the greatest advantage of the Request Technical Assistance functionality, the support team should implement an automated solution to monitor Event Viewer entries or exceptions (such as the Microsoft Operations Manager). Via an automated tool, the support team could receive an e-mail or perform some automated action once receiving the technical assistance request.
By default, the Request Technical Assistance functionality creates an entry only in the Event Viewer of the BizTalk Server. For more advanced functionality, investigate how to use a tool that monitors the Event Viewer for new events and performs action based on those events.
You have deployed a BAM workbook and the associated BizTalk artifacts. You need to map the BizTalk artifacts to the deployed BAM workbook milestones, data items, and key performance indicators. Additionally, you need to save the mapped profile for deployment to other environments.
Note
Recipe 11-2 introduced how to use the Tracking Profile Editor; this recipe takes a more in-depth look at how to use it.
The example reviewed as part of this recipe outlines how to use BizTalk's Tracking Profile Editor to map BizTalk artifacts to an Excel BAM workbook. The following sections outline the category of steps required for creating a tracking profile, mapping BizTalk artifacts to the deployed workbook activities within the Tracking Profile Editor, and finally applying the tracking profile to the deployed BizTalk artifacts. The three main categories of steps are as follows:
Select the activity and artifacts.
Map events and data items.
Save and apply the tracking profile.
To select the activity and artifacts, follow these specific steps:
From the Start menu, open the Tracking Profile Editor by selecting Start
Click the Click Here to Import BAM Activity Definition link to load the deployed BAM workbook and associated activity:
The BAM Import Activity dialog box will ask you to choose the activity to use in the Tracking Profile Editor. If you have deployed the BAM workbook created in Recipe 11-1, choose the Process Activity BAM activity.
Leave the Retrieve the Current Tracking Settings for This Activity Definition box unchecked, and click the OK button to select the activity.
Note
If you have already applied a tracking profile to the selected activity, you can retrieve the results by selecting the Retrieve the Current Tracking Settings for This Activity Definition box.
Click the Click Here to Select an Event Source to load the BizTalk artifacts that will be used during the mapping activity. Identify the assembly that contains the orchestration to map, and identify the specific orchestration that contains data for mapping.
Note
In this example, a basic orchestration has been created that performs a message receive and send and that implements a catch block for any exceptions. In this example, the name of the assembly is BizTalk Server BAM Test, and the name of the orchestration is
BizTalk_Orchestration_BAM.On the Select Event Source Parent Assembly page, locate the assembly that contains the orchestration you would like to map to the activity. Click the Next button to continue and to select the orchestration to map.
On the Select Orchestration page, select the name of the orchestration you would like to map to the activity. Click the OK button to complete the Event Source Wizard. Figure 11-35 displays the example with a sample orchestration.
To map events and data items, follow these steps:
Drag the orchestration shapes to the Activity nodes listed in Table 11-12.
Table 11.12. Sample Orchestration Step Mapping
Activity Node
Orchestration Step
Description
Begin
Drag the Receive_Msg shape to the Begin activity node.
Captures the successful receipt of a message, which indicates that the process began successfully
EndSuccess
Drag the Send_Msg shape to the End activity node.
Captures the successful sending of a message, which indicates that the process completed successfully
EndException
Drag the LogException shape to the EndException activity node.
Logs an exception occurred in the process
Right-click the Receive_Msg shape, and choose Message Payload Schema.
Expand the
<Schema>folder icon, and navigate to the data items that are to be reported in BAM.Drag each reportable data item to the correct Activity node. Table 11-13 outlines the mapping of sample orchestrations to the deployed BAM activities.
Table 11.13. Sample Orchestration Data Item Mapping
Figure 11-36 demonstrates the completed mapping between the sample orchestration and activity.
To save and apply the tracking profile, follow these steps:
From the Tools menu, select Apply Tracking Profile. Applying the tracking profile immediately sets the mapping to start recording data the next time the orchestration or process executes.
If you plan on deploying the tracking profile in other environments or would like to save a copy of the profile, then choose File
As mentioned earlier in this chapter, BAM is a powerful tool and architecture for monitoring predetermined milestones and business data. Implementing BAM requires identifying the milestones and business data to report and then mapping those data points to the physical BizTalk solution artifacts. You can map milestones and business data to physical solution artifacts via the Tracking Profile Editor or via the BAM APIs and custom code.
This recipe outlined how to use the BizTalk Tracking Profile Editor to map between a deployed BAM workbook and physical BizTalk solution artifacts. This example outlined a simple scenario involving the mapping of a deployed activity to a single orchestration and data points contained within the message processed by the single orchestration. However, the Tracking Profile Editor can map multiple BizTalk artifacts to a single BizTalk activity or multiple activities. When using the Tracking Profile Editor, keep in mind the three categories of steps that were completed in this recipe, as outlined in the following sections.
Before mapping an activity to a BizTalk solution artifact, you must choose the activity and the BizTalk artifact(s) that will be mapped. When you open the Tracking Profile Editor, you first select the activity from the list of deployed activities that will be receiving data. Once the activity loads, it will display each of the defined milestones and data items that were previously defined in the activity. The list of the milestones and data items is referred to as the activity tree. An activity tree lists the stages and business data items tracked in the deployed activity. When you load an activity in the Tracking Profile Editor, the stages identified in the activity and the business data items appear in the tree.
The basic premise of the Tracking Profile Editor is the ability to map from the deployed activity (which is a conceptual view of a business process) to the physical BizTalk solution. When loading an activity, in the Tracking Profile Editor the activity tree will list all the items created in the deployed activity.
Note
In addition to the list of activity items displayed in the activity tree, you can create four additional items. Please review the "Considerations" section of this recipe for more information about the additional items you can create.
After selecting the activity, the next step is to select the BizTalk artifacts that will be contributing data to the items listed in the activity tree.
The next category of steps involves the physical mapping between the BizTalk artifacts and the activity items listed in the activity tree. You map between a BizTalk artifact and an activity item by dragging the BizTalk artifact to the activity item. After dragging the BizTalk artifact to the activity item tree, the artifact will be listed in the activity tree.
The final category of steps applies the tracking profile to the deployed BizTalk artifacts and allows you to save the tracking profile for deploying in other environments or making adjustments later.
The activity tree typically lists the milestones and data items defined in an activity. However, you can also create four other types of items in the activity tree to further enrich your BAM solution. Table 11-14 outlines the items that are included as part of the deployed activity as well as the additional possible items available in the Tracking Profile Editor to help you map activity items to the solution artifacts.
Table 11.14. Activity Tree Items
Tracking Profile | Description | NotesEditor Item Icon |
|---|---|---|
Stage | Automatically created in the activity tree when defining a milestone within an activity. The stages are listed when an activity is loaded. | Orchestration steps are mapped to this shape. Some orchestration steps cannot be mapped to this shape including Termination shapes and any steps included within a Loop shape. |
Data Item | Automatically created in the activity tree when defining a data item within an activity. The data items are listed when an activity is loaded | You can specify data items from messages in orchestrations or pipelines. Additionally, you can specify context property information for those messages. |
Activity ID | Uniquely identifies the instance of an activity that has executed and is automatically included within the activity tree. | This value can be user generated and identified from a message. However, the field must be unique, because it is a key in a SQL Server table. If no value is mapped in the Tracking Profile Editor, BAM will automatically generate this value. |
Continuation | Inserts a new continuation folder within the activity tree. | Used in conjunction with ContinuationID to allow multiple components to populate the same activity. For example, if Orchestration A depends on Orchestration B and both contribute data to the same activity, then a continuation folder would be created and mapped to a data item in Orchestration A that is carried over to Orchestration B. |
ContinuationID | Inserts a new continuation ID folder within the activity tree. | ContinuationID is mapped to the data item in Orchestration B that was passed from Orchestration A. |
Relationship | Relationship folders are used to imply a relationship between one or more activities. | Relationships are especially useful in relating two activities for a single orchestration. For example, if you have an orchestration with a Loop shape, the orchestration and the Loop shape must be represented by separate activities. Via the relationship folder, you can create a relationship between the two activities. |
Document Reference URL | Allows the linking of a document related to this instance of the activity. | The file name can be mapped from either a schema value or a context property on the message. |
Activity continuation is the process of taking multiple BizTalk physical artifacts and combining data from those artifacts into a single activity. Combining data is a useful option when a business process spans multiple BizTalk solution artifacts. Think of the process of creating an activity as defining a database table structure with multiple columns representing the containers for the business data and milestones. When a process executes, it creates a new row in the activity database table recording the data as mapped in the Tracking Profile Editor. Multiple BizTalk artifacts reporting data to the same activity results in multiple rows created in the activity database table. For those artifacts to contribute to a single row in the activity, you need a continuation between the artifacts indicating their relationship.
A common business scenario where activity continuation is useful is the scenario of a life cycle of a purchase order. One company sends a purchase order to another company to purchase goods. The entity shipping the goods will typically send a shipment notice after receiving the purchase order. Additionally, the entity shipping the goods will usually send an invoice for payment of the shipped goods. Managing the sending a purchase order and the receipt of a shipment notice and invoice typically involves many BizTalk artifacts. However, it may be useful to have an end-to-end view of the purchase order life cycle (once issued to the receipt of an invoice) versus each artifact reporting independently. With activity continuation, all the artifacts involved in the life cycle of a purchase order can report information to a single activity, allowing for an end-to-end view of the purchase order life cycle.
Consider the following example: Orchestration A processes a message and transmits that message to Orchestration B for processing. When Orchestration B is finished, it sends a response message back to Orchestration A. When Orchestration A receives the response from Orchestration B, it completes processing. Figure 11-37 demonstrates the sample relationship between Orchestration A and B.
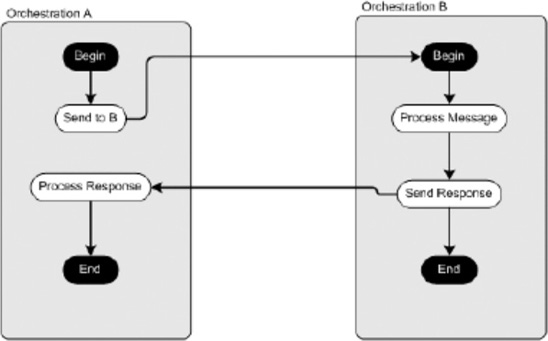
Both Orchestration A and Orchestration B can be mapped to the sample activity. However, when the orchestrations execute, two data rows will be created in the activity table to record the information from the orchestrations (one for Orchestration A and one for Orchestration B). If both orchestrations need to contribute data to the same row in the activity, you must create a continuation in the activity tree to indicate the continuation of activity between Orchestration A and Orchestration B.
The following items are required to create an activity continuation between two orchestrations:
A data item that relates the two orchestrations (or other BizTalk artifacts) and that can be an attribute in a message shared between the two orchestrations
A continuation folder that specifies the data item in a parent orchestration that relates the two orchestrations
A continuation ID folder identifies the data item in the child orchestration that relates the two orchestrations
Note
The name of continuation folder and the name of continuation ID folder must be identical in the activity tree. For example, if you create a continuation folder with the name of Continuation, you must create a continuation ID folder with the name of Continuation. You will receive an exception message if the continuation folder and continuation ID folder do not share the same name.
In the Orchestration A and Orchestration B example, the message ID in Orchestration A from the Send shape is mapped to the continuation folder. The same message ID in the Orchestration B Receive shape is mapped to the continuation ID folder. The message ID is the data item that links the two orchestrations and is also the data item in the continuation and continuation ID folders. The BAM end-to-end SDK sample included with the standard BizTalk installation provides a sample implementation of a continuation.
Activity relationships are different from activity continuations in that they allow implicit linking between multiple activities. Consider the Orchestration A and Orchestration B example. If both orchestrations represented different business processes, then it may not make sense to have them report to the same activity. If they report to different activities, it may be useful to represent that the activities have a relationship but are disparate. A real-world example of an activity relationship may be how a single purchase order represents multiple shipments. Each activity (purchase order and shipment) is a different activity but is related to the others.
Activity relationships are also necessary when needing to report on BizTalk orchestrations that contain the Loop shape. You can define the parent orchestration as one activity and the looping activity as a separate activity and still accurately report on the activity of the entire process.
When creating activity relationships, you must adhere to the following guidelines:
Related activities should belong to the same BAM view.
A relationship item must be created in each activity in the Tracking Profile Editor and must be given the appropriate name of the related activity.
Consider that Activity A reports on the activity in Orchestration A and Activity B reports on the activity in Orchestration B; you would create the relationships activity items listed in Table 11-15.
After specifying the activity items in each activity, the data item that represents the relationship between the activities must be mapped to each activity item. After creating the relationship item in Activity A, a data item (for example, the message ID) that is shared between the activities would need to be mapped to Activity A. The same data item (that is, the message ID) is then mapped to the ActivityID item of Activity B. Mapping the data item to the ActivityID creates the relationship between the first and second activity.