Business processes are changing at an unprecedented speed, and the IT systems that power business processes are being asked to keep up. In today's environment, to maintain a market advantage, organizations must react quickly to new markets, shifting consumer demand, shifting cost structures, and shifting business differentiators. The IT changes required to support dynamic business policies are taxing IT departments in terms of cycle time and hard costs.
At the root of this taxation are the complexities involved in designing and deploying traditional technical solutions. Current software development life cycle (SDLC) methodologies are time-consuming and expensive, and they often fail to deliver the set of features required by businesses within their time frames and budget targets. Although technologies such as .NET and BizTalk have shortened the cycle time to develop, test, and deploy solutions, often these technologies still don't meet the demanding cycle time requirements demanded by an agile business. For instance, consider a bank's business policy for granting credit to a customer. If you implement this logic within a BizTalk orchestration, the steps required to change the logic, compile the program, and redeploy are too numerous to enumerate here. In addition, this change requires that the system be taken offline while you enact the changes. Also, if the bank has a strong development methodology, it may require additional time to follow the process and obtain the necessary approvals. All this adds up to a sluggish, expensive process for changing the business policy.
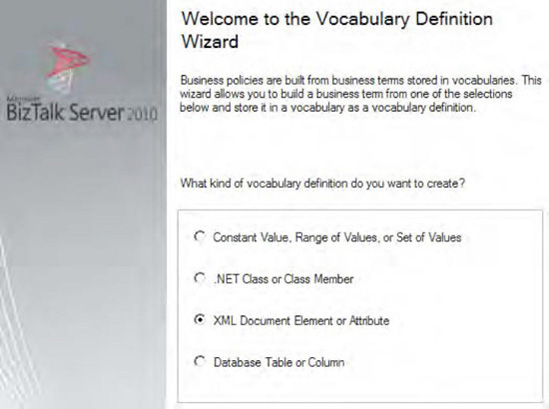
The business rules framework is BizTalk's answer to reducing the business agility problem faced by traditional technologies. The business rules framework is a rules execution engine that allows you to create business policies that you can develop, deploy, and dynamically execute quickly without bringing your BizTalk process down. The framework comprises policies, facts, vocabularies, and rules. In conjunction, these artifacts combine to create a powerful tool for quickly changing business rules in near real time.
You want to understand the process for creating business rule policies. These policies are core components to all business rule development.
The business rules framework consists of policies, rules, vocabularies, and facts. A business policy is the container in which business rules are defined, versioned, tested, deployed, and executed. From within the business policy editing window, the first step before creating rules is to create a policy. The policy then may contain one or more rules for deployment. To create a policy, take the following steps:
Open the Business Rule Composer by selecting Start

If the Open Rule Store dialogue box opens, enter the correct connection information (see Figure 7-1).
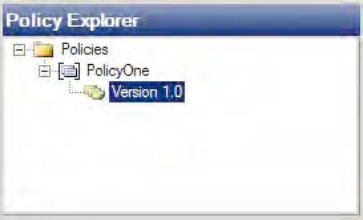
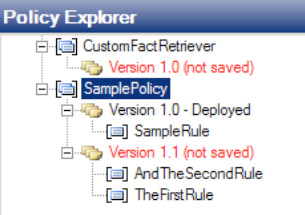
Within the Policy Explorer, right-click the Policies node, and click Add New Policy and give the policy a name.
By default, version 1.0 of the policy is created. You may change the version number if you want by selecting the version, navigating to the Properties window, and setting the
Versionproperty.Right-click the version, and choose Save. See Figure 7-2.

Creating a business rules policy is a relatively simplistic exercise but is the foundation to the business rules framework. Once you have created the policy, you can add rules and facts to the policy for testing and deployment. When calling the policy from BizTalk, the latest version will be selected for execution, unless you specify a specific version. The rules engine detects and deploys new versions of a policy, allowing changes to be made to the business policy in a live, deployed process. This creates a powerful environment to apply a dynamic business policy to deployed solutions with minimal work. The recipes in this chapter will guide you through adding rules, facts, and vocabularies to your business rules policy.
You need to create and test a simple business rule that a business process can use. The business process needs to validate a document and receive the result.
You need to perform a number of basic steps to create a rule. These include the following:
Define the rule logic.
Define the input schema and XML instance.
Define the output schema and XML instance.
Define the facts that the rule uses, such as constants, functions, and predicates (vocabularies).
The first step to creating a rule is determining the logic of the rule. This example will use the logic in Listing 7-1 to construct the rule.
Example 7.1. Rule Logic
If Age < Minimum Age Then Deny Application
If Age > or = Minimum Age Then Accept Application
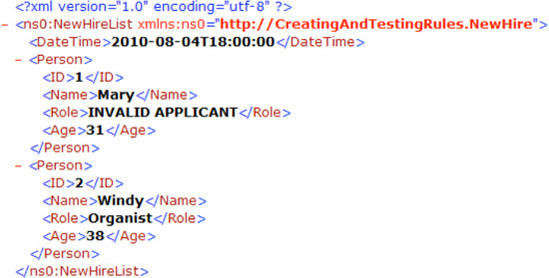
We will show how to execute the rule in Listing 7-1 against an XML document containing the data that will be validated. For this example, we will use the NewHire schema (Figure 7-3) with the schema and XML instance (Listing 7-2).
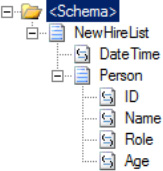
Example 7.2. NewHire XML Instance
<ns0:NewHireList xmlns:ns0="http://CreatingAndTestingRules.NewHire">
  <DateTime>2010-08-04T18:00:00</DateTime>
  <Person>
    <ID>1</ID>
    <Name>Mary</Name>
    <Role>Office Manager</Role>
    <Age>31</Age>
  </Person>
  <Person>
    <ID>2</ID>
    <Name>Windy</Name>
    <Role>Organist</Role>
    <Age>38</Age>
  </Person>
</ns0:NewHireList>
Note
The schema must define the <Age> element as an integer for the comparison to work in the business rule, which you will create in this solution. The rules engine will not implicitly convert a String to an Int.
The next step in this solution is to output a document. The document that is sent to the rules engine will be modified and returned to the calling entity. If the applicant's age is not a valid age, the document will be modified to display the text "INVALID APPLICANT" in the <Role> element (this element must exist in order for it to be set).
The following steps describe how to create the vocabulary using the Business Rule Composer:
Open the Business Rule Composer from the Start menu. If the Open Rule Store dialog box appears, select the appropriate SQL Server instance and authentication to log on (this should be the instance against which you want to develop).
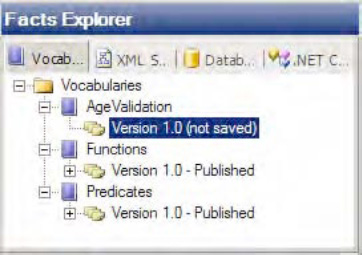
Add a new vocabulary, which will contain the definition for the
Minimum Ageconstant and theAgenode in the input XML document. To do this using the Facts Explorer, right-click theVocabulariesfolder, and create a new vocabulary namedAgeValidation. See Figure 7-4.To add the
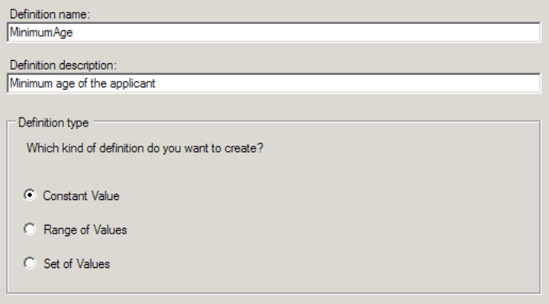
Minimum Ageconstant, right-click theVersionsubfolder created in the previous step, and select Add New Definition. The Vocabulary Definition Wizard appears. Once the wizard is open, do the following:Add a new constant by selecting the Constant Value option. Enter MinimumAge for the Definition Name field. Give a description of the minimum age of the applicant. Click Next. See Figure 7-5.
On the final page of the wizard, set Type to System.Int32, and set Value to 18. Set Display Name to an appropriate value. Click Finish.
o add the reference to the
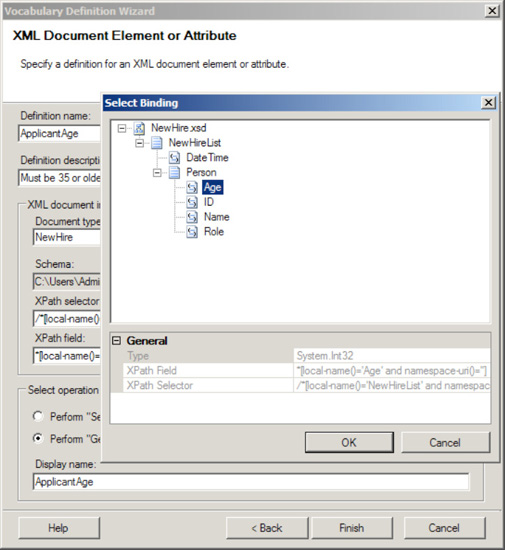
Agenode in theNewHireXML document, right-click the subfolder of the version that was created in step 2, and select Add New Definition. The wizard appears, and you should then perform the following steps:Select the XML Document Element or Attribute option, and click Next. See Figure 7-6.
Enter ApplicantAge for the Definition Name field. Give a description of the actual age of the applicant.
Click the Browse button, and find the
NewHireXSD schema. Once you have selected the schema, a new dialog box appears where you can select theAgenode. Select this node, and click OK (See Figure 7-7).In the Select Operation section, select the Perform "Get" Operation radio button.
Add a reference to the
Rolenode in theNewHireXML document. Following the same procedure as defined in step 4, use these substeps:Select the XML Document Element or Attribute option, and click Next.
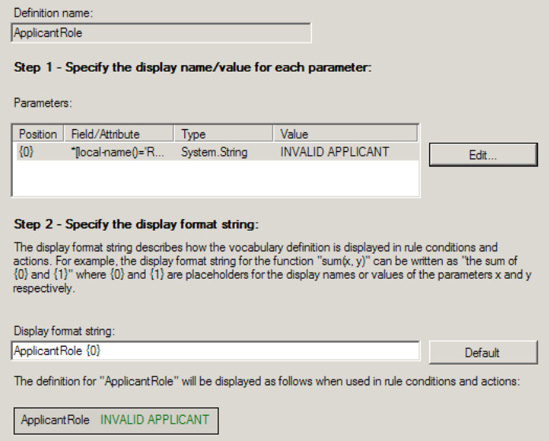
Enter ApplicantRole for the Definition Name field. Give a description of the role of the applicant, which will be set to INVALID APPLICANT.
Click the Browse button, and find the
NewHireXSD schema. Once you have selected the schema, a new dialog box appears where you can select theRolenode. Select this node, and click OK.In the Select Operation section, select the Perform "Set" Operation radio button. See Figure 7-8.
Click Next. On the final screen of the wizard, two steps are shown. For the first step, click the Edit button and set INVALID APPLICANT as the constant value. For the second step, keep the default values. Click Finish when this is complete. See Figure 7-9.
Now, publish the vocabulary by right-clicking the newly created
AgeValidationfolder and selecting Publish. This allows the vocabulary to be used by a policy, which is where you define an actual business rule.

The steps up to this point have been putting into place the components needed to create a business rule. A rule (or set of rules) is defined within a policy and references preexisting functions, predicates, and any custom-defined constants (such as what you defined in the previous steps). The following steps show how to create the actual business rule and policy and use the vocabulary created previously:
In the Policy Explorer, right-click the
Policiesfolder, and select Add New Policy. Enter SamplePolicy for the policy name.A version appears. Right-click this version, and select Add New Rule. Enter SampleRule for the rule name.
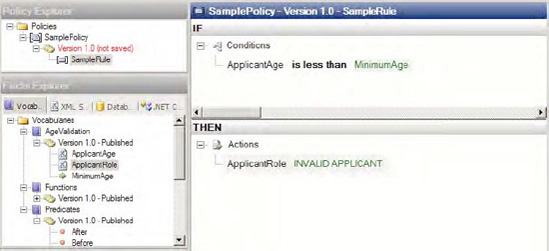
Select the rule you created in the previous step. You will see an empty condition in the right pane. Take the following steps to create the rule (see Figure 7-10 for a full picture of the completed steps).
In the Facts Explorer, expand the
Predicatesfolder, and select theLess Thanpredicate. Drag and drop this on the rule condition.On the
argument1entry in theIFsection of the rule composition window, drag and drop the custom vocabulary parameterApplicantAgeyou created in an earlier step.On the
argument2entry in theIFsection, drag and drop the custom vocabulary parameterMinimumAgeyou created earlier.In the
THENsection of the rule composition window, drop theApplicantRoleparameter (created earlier).
The rule is complete at this point. Save the rule (right-click Version, and select Save). You can now test the rule (and policy). Use these steps to validate and test the rule:
Right-click the
Versionfolder of the rule you just created, and select Test Policy.In the Select Facts dialog box that appears, click the schema name. The option to add an instance of the NewHireList XML will be available. You saw an example of this earlier in this recipe (refer to Listing 7-2). Click Add Instance, and browse to an instance of this XML document.
Once you have declared an instance, click the Test button. This causes the XML instance to be passed to the rule. A full trace appears in an Output window where you can verify whether the rule executed as expected (the value of the XML node should change).
Right-click the policy version, and select Publish.
Right-click the policy version, and select Deploy.
You can now call the rule and policy from an orchestration. To call the rule and policy from an orchestration, perform the following steps:
In an orchestration, create a message of the type that is to be passed into the rule and a message of the type that is expected back (in this case, the messages will both be the same
NewHireListXSD type).Drop a Call Rules shape in an Atomic Scope (or in an orchestration that has a transaction type of
Atomic).Right-click the Call Rules shape, and select the policy you created. There will be no input parameters.
Note
The document type must match the namespace of the schema that will call it for the rule to be callable from an orchestration.
The XML instance shown in Figure 7-11 represents the generated output from testing the business rule created in this solution.
There are additional uses of the rules engine, including the ability to store parameters that can be accessed from orchestrations. Similar in nature to a configuration file that stores parameters that may need to change (such as connection strings) once a solution is in production, these constants allow for runtime modifications. Benefits to using the rules engine to store configurable parameters include ease of access, simple user interface, and enhanced read/write permissions (compared with a text file containing configurable parameters).
To add parameters that can be accessed from an orchestration, there are two basic steps: create the parameters, and access the constants through the rules engine API.
The first step is to create the parameters in a vocabulary in the rules engine and save them. You don't need to publish them unless versioning would be helpful. If they are not published, it is easier to modify them at runtime, because all that is required is to right-click the value that needs to be changed and select Modify. Once you have saved the vocabulary, running instances of orchestrations that reference these parameters will pick up the new values.
The second step is to add .NET code to a BizTalk Helper class to access the vocabulary through the rules engine API. The code shown in Listing 7-3 can be placed into a .NET assembly and should be referenced by a BizTalk project. The method can then be called from an Expression shape within an orchestration. This code also allows for a specific version to be called, if desired.
Example 7.3. Accessing Constants Through the Rules Engine API
public bool blnGetVocabularyConstantValue(string strVocabularyName,
                                    string strConstantName,
                                    string strVersion,
                                    ref string strConstantValue,
                                    ref string strConstantType) {

   RuleStore rlsRuleStore;
   VocabularyInfoCollection vicVocabInfo;
   Vocabulary vocVocab;
   RuleSetDeploymentDriver rsdDriver = new RuleSetDeploymentDriver();
   Hashtable hshTable;
   LiteralDefinition litDef;
   Boolean blnConstantFound = false;

   rlsRuleStore = rsdDriver.GetRuleStore();

   if((strVersion == null) || (strVersion == "")) {
    vicVocabInfo = rlsRuleStore.GetVocabularies(strVocabularyName,
                               RuleStore.Filter.Latest);
   }
   else {
    vicVocabInfo = rlsRuleStore.GetVocabularies(strVocabularyName,
                               RuleStore.Filter.All);
   }

   // check to see that the vocabulary searched on has returned data
   if(vicVocabInfo.Count > 0) {
    for(int x=0;x<vicVocabInfo.Count;x++) {

    vocVocab = rlsRuleStore.GetVocabulary(vicVocabInfo[x]);

    // Check to see that the version equals the version being searched for
    // or that the version passed in was a wildcard (Null)
    if((strVersion == null) || (strVersion == "") ||
    ((vocVocab.CurrentVersion.MajorRevision + "." +
      vocVocab.CurrentVersion.MinorRevision) == strVersion)) {

     // Initialize the hashtable to the number of definitions on the vocabulary
hshTable = new Hashtable(vocVocab.Definitions.Count);
hshTable = (Hashtable)vocVocab.Definitions.SyncRoot;
// check that the constant being searched for exists in the vocabulary
if(hshTable.ContainsKey(strConstantName)) {
litDef = (LiteralDefinition)hshTable[strConstantName];
strConstantType = litDef.Value.GetType().ToString();
strConstantValue = litDef.Value.ToString();
blnConstantFound = true;
// exit loop
break;
}
}
}
}
return blnConstantFound;
}You can use the code in Listing 7-4 to invoke the previous class from an orchestration Expression shape. This allows for an alternate method of access to the rules engine without needing the standard call using the Call Rules shape and is useful when getting the value of a constant or other scalar value.
You need to understand how to use the Facts Explorer to create a vocabulary that will be used within a business rule fact. You want to be able to store constants, predicates, and so on, that can be changed easily without redeploying code.
This solution will demonstrate how to create a vocabulary using a node in an imported XML schema. Facts are those items that are used to create rules. The Facts Explorer has four tabs, as follows:
Vocabularies: These consist of all defined values that you can use when creating a rule, including constants, predicates, XML nodes, and so on.
XML Schemas: You can use all schemas imported onto this tab when creating vocabularies or predicates (actions). You can drag and drop nodes on the XML Schemas tab in the Vocabulary window.
Databases: You can add references to databases that will be used for creating facts on this tab. You can drag and drop tables onto the Vocabulary window.
NET Assemblies: Assemblies, like databases and XML schemas, can be references in the Facts Explorer and used to create vocabularies.
Use the following steps to import an XML schema and create a new vocabulary:
In the BizTalk Business Rule Composer, click the XML Schemas tab in the Facts Explorer.
Right-click the
Schemasfolder, and select Browse. Locate a schema to import, and click Open. This imports the full schema into the window.Create a new vocabulary by clicking the Vocabulary tab. Right-click the
Vocabulariesfolder, and select Add New Vocabulary. Give the vocabulary a name.Now, drag a node from the XML schema that was imported, and drop it on the vocabulary you created in the previous step. By holding down the mouse button as you drag the node, you can navigate between tabs.
The Vocabulary Definition Wizard immediately opens, with the XML Document or Attribute option automatically selected. Navigate through the wizard to finish creating the vocabulary. The fields will already be filled in for you.
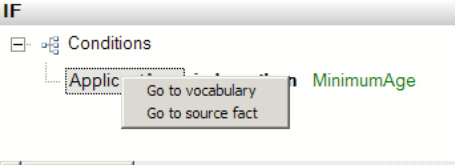
You can add the Database and .NET Assembly facts to the Vocabulary tab in a similar manner as described in this solution. Additionally, you can drop all facts in the condition or action (IF...THEN) of a rule. Once you have added a fact to a rule, right-clicking the condition or action allows you to browse to the original fact, as shown in Figure 7-12. Complex rules will have many facts referenced in them, and this allows you to keep track of all the disparate definitions.
You need to control the order in which the BizTalk rules engine executes rules. The order BizTalk executes rules in determines which rules take precedence, with the results of the last rule executing and potentially overwriting the results of the previous rules.
In many real-world scenarios, multiple business rules must execute in a predetermined order. In these situations, the second rule may overwrite the result of the first rule. Control the order in which the BizTalk rules engine executes rules by assigning a priority to each rule.
Note
This example assumes that the business rules already exist. For more information about creating business rules, please see the earlier recipes in this chapter.
The following steps demonstrate how to set the priority of a business rule:
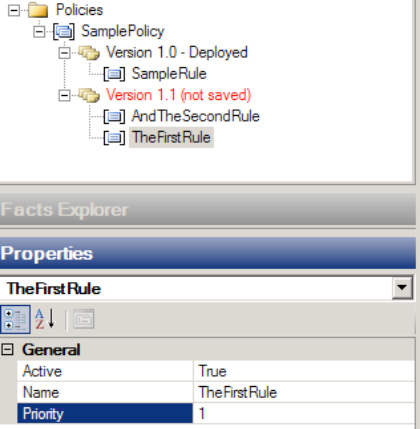
Navigate to the policy containing the rules.
Select the Use Preferred Shipper rule in the Policy Explorer, and change the
Priorityproperty to the value 1, as shown in Figure 7-13.
Note
The BizTalk rules engine executes higher-priority rules first. Since the promotional shipping rate rule should override the preferred shipper rule, it must execute after the preferred shipper rule and must have a lower priority.
The BizTalk rules engine executes high-priority rules first. Consequently, lower-priority rules execute after higher-priority ones and potentially can override the results of higher-priority rules. The BizTalk rules engine may execute rules with the same priority in any order. Remember that the priority of rules will affect the order BizTalk executes them in and has no direct effect on the importance of the rule's actions.
You need to define business rules using facts that an orchestration cannot provide. The facts may not be available in the orchestration, or you may need to reuse a fact across many instances of the orchestration.
A business rule performs actions when conditions defined in the Business Rule Composer are true. For example, an action may modify a value in a message. The BizTalk developer creates a condition from facts, which are pieces of information the rules engine can examine. Most often, the rules engine will examine facts from the messages BizTalk directly processes. The orchestration invoking the rules engine directly provides these facts. However, sometimes a rule needs to be based on facts that are not available in the orchestration. The rules engine can retrieve these external facts with a custom fact retriever.
In this example, a business rule will schedule a customer's service request only if the customer's address is in the Northwind database. The customer's address may be different each time the orchestration invokes the rules engine. The customer's address is called a short-term fact because the orchestration provides the fact every time it invokes the rules engine. However, instead of opening a new connection to the database each time the orchestration invokes the rules engine, this example reuses the same connection to the Northwind database over and over again. Reusing the database connection makes it a long-term fact. The BizTalk developer must provide long-term facts to the rules engine with the IFactRetriever interface. The custom fact retriever created in this recipe provides the connection to the Northwind database to the rules engine.
Note
The Northwind database is a sample database that can be downloaded from Microsoft's site.
Use the following steps to create the custom fact retriever:
Open Visual Studio, and create a new class library project.
Add a reference to the
Microsoft.RuleEngine.dllassembly. This assembly is located in the root of the BizTalk installation directory. This may be in either$Program FilesCommon FilesMicrosoft BizTalkor$Program FilesMicrosoft BizTalk Server 2010.Implement the
Microsoft.RuleEngine.IFactRetrieverinterface. This interface defines one method calledUpdateFacts.Within the
UpdateFactsmethod, add code to check whether thefactsHandleInparameter isnull. If thefactsHandleInparameter isnull, create and return an instance of theMicrosoft.RuleEngine.DataConnectionclass. If thefactsHandleInparameter is notnull, simply return it from the method. When completed, the code should appear as in Listing 7-6.Example 7.5. Completed Custom Fact Retriever
using System.Data.SqlClient;
using Microsoft.RuleEngine;

namespace CustomFactRetriever
{
    public class AssertDBConnection : IFactRetriever
    {
        public object UpdateFacts(RuleSetInfo ruleSetInfo,
                                  RuleEngine engine, object factsHandleIn)
        {
            object factsHandleOut;
            if (factsHandleIn == null)
            {
                SqlConnection SQLConn = new SqlConnection("
                                                 Initial Catalog=Northwind;
                                                 Data Source=(local);
                                                 Integrated Security=SSPI;");
                DataConnection RulesConn = new DataConnection("Northwind",
                                                     "Customers", SQLConn);
                engine.Assert(RulesConn);
                factsHandleOut = RulesConn;
            }
            else
                factsHandleOut = factsHandleIn;

            return factsHandleOut;
        }
    }
}
Compile the class library assembly, and deploy it to the Global Assembly Cache (GAC). This can be done via a command prompt using the gacutil /if command. After creating the custom fact retriever, define a vocabulary and business rules. This example will schedule a service appointment only if the customer's address is in the database.
Open the Business Rule Composer, and create a new policy with one rule. Define a vocabulary for accessing facts defined by an XML message. An orchestration must provide the message when the policy executes. This example gets the address a customer requested service at and decides whether to approve the service request.
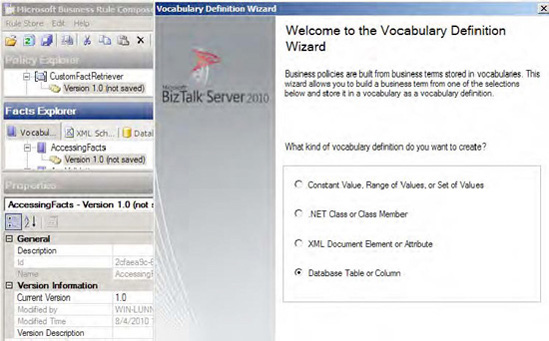
Right-click the new vocabulary's version, and select Add New Definition. Select the option to create a new database table or column definition in the vocabulary, and click Next, as shown in Figure 7-14.
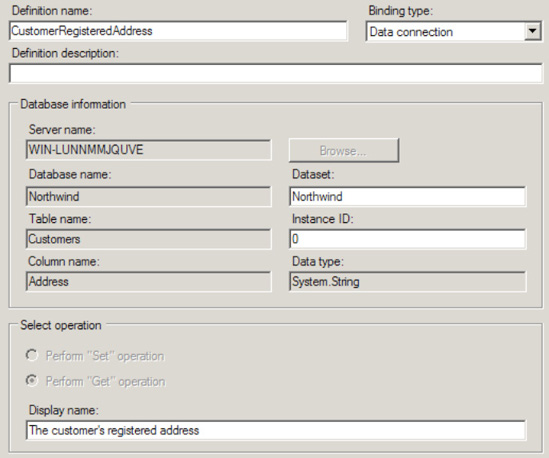
Give the definition an appropriate name, and leave the Binding Type set to Data Connection.
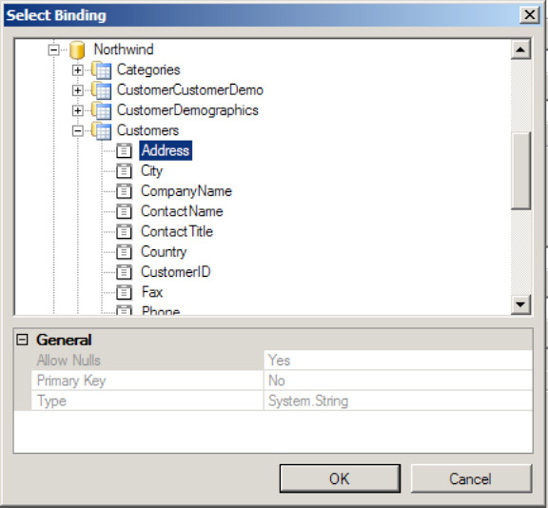
Within the Database Information section of the window, click the Browse button. After selecting a SQL Server instance with the Northwind database, browse to the Customers table. Select the Address column of the Customers table, as shown in Figure 7-15, and click OK.
Within the Select Operation section of the window, select the Perform "Get" Operation radio button. Set an appropriate display name for display in the Business Rules Composer. When complete, the Database Table or Database Table Column Definition window appears, as shown in Figure 7-16.
Click the Finish button to complete the vocabulary definition.
Select the policy version in the Policy Explorer section of the Business Rule Composer. The properties should appear in the lower-left region of the Business Rule Composer.
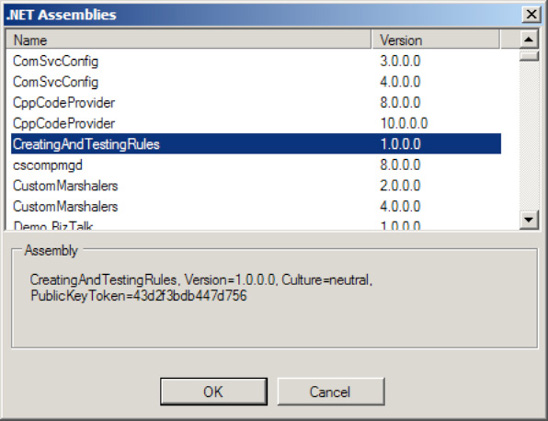
Select the
Fact Retrieverproperty of the policy version, and click the ellipsis that appears.In the Select Configuration component, click the Browse button. In the list of assemblies that appears, select the custom fact retriever created previously in this example (shown in Figure 7-17).
Note
If you cannot locate the custom fact retriever assembly, verify that it is deployed to the GAC.
Select the class to complete configuring the custom fact retriever.
After creating the custom fact retriever to retrieve the
DataConnectionand configuring the policy to use the custom fact retriever, it is time to define the rules. So, define the business rule to compare the requested service address with the customer addresses already in the Northwind database. If there is a match, the service request will be scheduled.Deploy the rules and invoke them from an orchestration, specifying the XML messages that the policy expects. The rules engine will invoke the
UpdateFactsmethod of the custom fact retriever. The method will add aDataConnectionfact to the Northwind database to the rules engine facts.
The rules engine examines facts provided either directly from an orchestration or from a custom fact retriever. The facts provided directly from an orchestration are called short-term facts, and the orchestration supplies them each time BizTalk invokes the rules engine. The facts provided from a custom fact retriever are called long-term facts, and they can be reused each time BizTalk invokes the rules engine.
A BizTalk orchestration can also treat the DataConnection in this example as a short-term fact. Accomplish this by creating a DataConnection in an Expression shape and including it as a parameter to the Call Rules shape. However, each orchestration instance would create its own DataConnection. You can improve the scalability and performance of the application by treating the DataConnection as a long-term fact and sharing it each time BizTalk invokes the rules engine.
In general, treating a fact as long-term is preferable under the following conditions:
The fact value can be shared each time BizTalk invokes the rules engine.
Retrieving the fact incurs a significant performance penalty.
Caching the fact value will still allow the rules to execute correctly.
The fact is not directly available in the orchestration that invokes the rules.
The rules engine invokes the custom fact retriever's UpdateFacts method each time the policy executes. This method decides when to update the facts. In this example, the UpdateFacts method examines the factsHandleIn parameter to check whether the DataConnection was already created. If the factsHandleIn parameter is null, the method creates the DataConnection, inserts it into the rules engine, and completes by returning the DataConnection object. The next time the rules engine invokes the method, the rules engine includes the object returned by the method in the factsHandleIn parameter. If the factsHandleIn parameter is not null, the method knows that it has already inserted the DataConnection into the rules engine, and it simply returns the same object.
Although this solution example uses a simple algorithm to decide when the long-term fact needs updating, the developer can implement a more sophisticated approach. For example, the developer could refresh the facts every hour by returning a DateTime object when the facts are refreshed and decide to update facts by comparing the last refresh time to the current time.
You are building a solution that must execute business rules based on dynamic information. These business rules are likely to change over time, and you want to minimize the impact on the solution when modifications are needed. To do this, you want to be able to call the rules engine from a .NET assembly.
Note
The problem within this recipe is the same as in Recipe 7-7. The solutions in the two recipes differ in how the business rules are executed.
This solution describes the steps necessary to call the business rules engine from a C# assembly. The steps detail how to build a .NET Windows application to process job applications and dynamically determine whether applicants meet a minimum age requirement. If the applicant is younger than a certain age, that person cannot be considered for employment. The minimum age is likely to change over time and needs to be easily configurable. The business rules engine that comes with BizTalk Server captures the business rule determining the minimum working age. Other recipes within this chapter detail the steps for creating rules.
Note
This recipe is based on the policy and vocabulary defined in Recipe 7-2.
This solution assumes that a rule exists in the business rules engine to determine whether an applicant meets the minimum age requirements. To call this rule from a .NET application, follow these steps:
Open the project containing the .NET application.
Add a project reference to the
Microsoft.RuleEngine.dllassembly, which contains the classes required to call the business rules engine. This may be in either$Program FilesCommon FilesMicrosoft BizTalkor$Program FilesMicrosoft BizTalk Server 2010.Create the necessary policy and fact objects, and execute the business rule policy, as shown in Listing 7-7.
Example 7.6. Calling a Business Rule from .NET
public void callSamplePolicy(ref System.Xml.XmlDocument newHireListDoc)
{
    // create the SamplePolicy policy object
    // specify policy name and version
    Microsoft.RuleEngine.Policy policy =
             new Microsoft.RuleEngine.Policy("SamplePolicy", 1, 0);

    // create the facts object array to hold the input parameters for the policy
    object[] facts = new object[1];

    // create the input parameter for the SamplePolicy policy
    // based on a typed BizTalk schema (fully qualified .NET type)
    Microsoft.RuleEngine.TypedXmlDocument typedXmlDoc =
      new Microsoft.RuleEngine.TypedXmlDocument("SampleSolution.NewHireList",
                                                                   newHireListDoc);

    // add the input parameter to the facts object array
    facts[0] = typedXmlDoc;

    // execute the policy against the facts
    policy.Execute(facts);
    policy.Dispose();

    // set the parameter object
    newHireListDoc.LoadXml(typedXmlDoc.Document.OuterXml);
}Although the business rules engine comes as part of BizTalk Server, this solution shows that .NET assemblies outside the BizTalk environment can call into it. This allows external applications to use the same rule framework that the integration hub does, enabling companies to consolidate their business rules functionality onto one platform.
Note
You can extend this solution by using a web/WCF service method to access the business rules engine, allowing code on any platform to call into a common rule framework.
For a .NET project to call into the business rules engine, it must reference the Microsoft.RuleEngine.dll assembly. This assembly contains the classes used to access the rules framework, including those to execute policies. In this solution, you first create an instance of the policy object, with the appropriate name and version. The name must exactly match the name of the policy you want to execute. This solution specifies SamplePolicy as the policy name, which maps to the highlighted name in Figure 7-18.
Following the policy name, you specify the major and minor versions of the policy you want to execute. You specify 1.0, which is the only version of the policy currently deployed. Alternatively, you could specify the name only when creating the policy object (no version parameters supplied to the policy's constructor method), which executes the most recently deployed version of the policy.
Next, you create a collection (array) of fact objects. This array holds all the objects necessary to execute the policy. These objects map to the different types of facts that the Business Rule Composer can create, including XML documents, .NET classes or class members, and database connections. The SamplePolicy policy uses only a single XML document fact, which you create next.
You use the Microsoft.RuleEngine.TypedXmlDocument class to create an XML document fact, specifying the document type (the fully qualified .NET type name) and XML document instance. Add this TypedXmlDocument to the fact collection.
Finally, you execute the policy against the facts collection. The facts collection is passed as a reference parameter, meaning any changes to the facts will be committed to the original instances. In this solution, the XML document fact will have the appropriate minimum age requirement logic applied.
It is also possible to execute a policy directly from an Expression shape within an orchestration. Listing 7-8 illustrates how you would execute the same policy as described in the "Solution" section of this recipe but from an Expression shape.
Example 7.7. Calling Policy from Expression Shape
// create the SamplePolicy policy object
// policy variable has type of Microsoft.RuleEngine.Policy. Create this in Orchestration View Variables
policy = new Microsoft.RuleEngine.Policy("SamplePolicy", 1, 0);

// create the input parameter for the OrderShipping policy
// typedXmlDoc variable has type of Microsoft.RuleEngine.TypedXmlDocument
// NewHireListMessage has type of SampleSolution.NewHireList
typedXmlDoc =
  new Microsoft.RuleEngine.TypedXmlDocument("SampleSolution.NewHireList",
                                                           NewHireListMessage);

// execute the policy against the facts
policy.Execute(typedXmlDoc);
policy.Dispose();
Although the policy executed in this recipe requires only a single XML document fact, facts can also be .NET classes or class members and data connections. By default, BizTalk Server requires you to provide an object instance for each fact used in a policy.
To pass a data connection fact to a policy, initialize a Microsoft.RuleEngine.DataConnection instance and pass it to the policy in the facts collection. If an update is being executed against the underlying database, you must also provide a transaction to the DataConnection object, as shown in Listing 7-9. If data is being retrieved only, no transaction is required.
Example 7.8. Providing a Transaction
// create SQL connection object
sqlConnection = new System.Data.SqlClient.SqlConnection("ConnectionString");

// create SQL transaction object
sqlTransaction = sqlConnection.BeginTransaction();

// create Data Connection object
dataConnection = new Microsoft.RuleEngine.DataConnection(
        "SqlDataSetName",
        "SqlTableName",
        sqlConnection,
        sqlTransaction);
The .NET assembly can add this DataConnection object instance to a fact collection and pass it to the policy for execution.
You are building a workflow that must execute business rules based on dynamic information. These business rules are likely to change over time, and you want to minimize the impact on the solution when modifications are needed.
Note
The problem within this recipe is the same as in Recipe 7-6. The solutions in the two recipes differ in how the business rules are executed.
This solution will demonstrate how to call the business rules engine from an orchestration, without using a .NET assembly. The basic problem is similar to the previous recipe. The key points of the problem are as follows:
Job applications must be processed, and it must be determined whether applicants meet the minimum age requirement.
If the applicant is younger than a certain age, then that person cannot be considered for employment.
The minimum age is likely to change over time and needs to be easily configurable.
Note
This recipe is based on the policy and vocabulary defined in Recipe 7-2.
This solution assumes that a rule exists in the business rules engine to determine whether an applicant meets the minimum age requirements. To call this rule from an orchestration, follow these steps:
Open the project containing the orchestration.
In the orchestration's Properties window, configure it to act as a long-running transaction by setting the Transaction Type property.
Create a new message, and specify the name and type. In this scenario, create a message named
NewHireListMessagedefined by theNewHireListschema.From the toolbox, drag the following onto the design surface in top-down order:
Receive shape to receive the initial order message—configure this shape to use the
NewHireListMessagemessage to activate the orchestration instance and to use an orchestration receive port. Make sure to set theActivateproperty toTrue.Send the shape to deliver the
NewHireListMessagemessage to an external port—configure this shape to use an orchestration send port.
From the toolbox, drag a Scope shape onto the design surface, in between the Receive and Send shapes configured in the previous step—configure this shape to act as an Atomic transaction.
From the toolbox, drag a Call Rules shape onto the design surface, inside the Scope shape configured in the previous step. Configure this shape by double-clicking it, which launches the Call Rules Policy Configuration dialog box. Select the appropriate business policy to call and the parameters to pass into the policy (
SamplePolicyin this scenario).
Calling the business rules engine from an orchestration is a straightforward task. It allows you to separate the business procedure and process flow from the business rules. This is particularly useful when the rules are used across many process flows, change frequently, or need audit logging and versioning capabilities.
This recipe's solution uses a message instance conforming to the NewHireList schema as an input parameter to the SamplePolicy business rule policy. This policy sets the <Role> element of the message to INVALID APPLICANT if the <Age> element is less than a certain age. You could then enhance the rule to apply different minimum age requirements for different roles or to retrieve real-time minimum age requirements from a government-run data source.
You could easily extend this solution to illustrate how the output from a business rule can facilitate business procedures and process flow within an orchestration. Business rule policies could define a complex set of rules to determine whether an applicant is valid for a role. As opposed to setting the <Role> element to INVALID APPLICANT, you could configure the policy to return a Boolean value indicating whether the applicant meets the minimum age requirements. The orchestration could then use this Boolean value in a Decide shape, allowing separate process flows to determine whether an applicant is valid for a role based on previous work experience, personal references, and salary requirements.
For an orchestration to successfully call a policy, you must make a few settings:
The Call Rules shape must be within an Atomic Scope shape (this necessitates that the orchestration's
Transactionproperty is set toLong Running).The policy must be published and deployed within the business rules engine.
An initialized instance of all variables referenced in the policy must be in the same scope as the Call Rules shape.
Although this solution uses only an XML message instance as input to the rules policy, policies can accept other types of input parameters as well. The Vocabulary Definition Wizard allows a .NET class or class member or a data table or column to be used as a business term. As previously stated, an initialized instance of all variables referenced in a policy must be in scope at the Call Rules shape in the orchestration. This means that if a .NET class and a data table or column are used in a policy, there must be an initialized instance of the .NET class and rules engine Microsoft.RuleEngine.DataConnection object available in the orchestration to pass into the policy as input parameters.
Note
If there is no instance matching an input used in a policy's rules, that input parameter will not appear in the Call Rules Policy Configuration dialog box's Parameter list. This will prevent the policy from being successfully called from the orchestration.
The policy used in this scenario references vocabulary definitions based on two XML elements in the NewHireList schema: <Age> and <Role>. Take care when creating these vocabulary definitions, or the rule policy won't be able to appropriately handle the orchestration message. Specifically, set the Document Type property of the business term to be the fully qualified type name. If the fully qualified .NET type name is not used to define the BizTalk schema, BizTalk Server will not have enough information to uniquely identify the data field.
A finer point regarding the Call Rules shape is that it treats input parameters as reference parameters, which means rules may modify the objects passed and return them to the orchestration. Given that messages are immutable (once they are created, they cannot be modified) in BizTalk, how does this work? The answer is that, behind the scenes, the policy creates a modified copy of the original message. Although this saves the developer's time when creating their orchestration, it also has an important side effect: all promoted properties on the original message are removed from the message context. If properties on the message need to be maintained, make a copy of the message to allow the message context to be reset after the business rules engine is called.
You want to know the components that make up a rules engine policy and perform the steps necessary to deploy and undeploy a policy to make the rule sets available to business processes.
Deploying a policy requires that several components be in place prior to the deployment. The deployment is quite straightforward, and you can deploy in several ways. This solution describes the prerequisites to the policy deployment and walks through the deployment steps using the Business Rule Composer.
A policy consists of one or more rules. A rule comprises a set of facts. In this solution, we describe the process to deploy and undeploy all the components that make up a policy. Your first task is to define any facts that may need to be used in any rules that are part of the policy:
Define all the custom facts. Using the Business Rule Composer, open the Facts Explorer. Define any vocabulary, schemas, databases, or .NET assemblies that may be needed for any rule.
Once your custom facts are completed, save and publish any vocabularies that may have been defined. Right-click the vocabulary version, which will be used by a rule, and click Save. Right-click the version again, and select Publish. Once you have published a vocabulary version, you cannot modify it directly. Instead, it must be versioned—you can do this by copying the most recent version and then pasting a new version. The new version can be modified.
Your next task is to create a new policy and add all the rules that are part of the policy. In the Policy Explorer, create a new policy, and add one or more rules. As you create each rule, reference the appropriate version of the vocabularies, which have been published.
Save, publish, and test the policy by right-clicking the policy version and selecting the appropriate menu item.
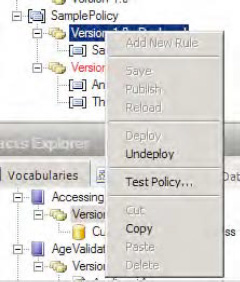
The final task is to actually deploy the policy. Once the policy has been deployed, it cannot be deleted unless it is first undeployed. In the same manner as the vocabularies, it cannot be modified unless a new version is first created. Deploy the policy as follows: right-click the policy version that is to be deployed, and select Deploy. You can undeploy policies by selecting Undeploy, as shown in Figure 7-19.
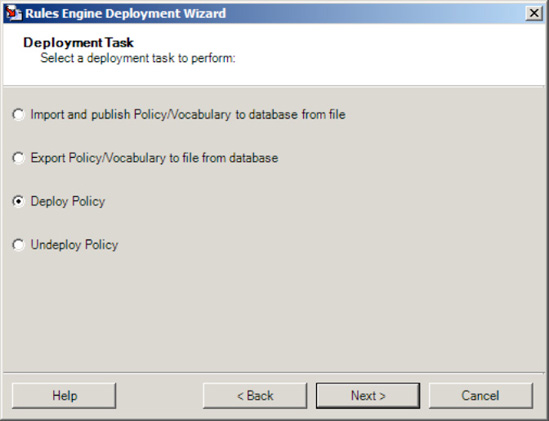
You have two basic approaches for deploying and undeploying policies. The first is to use the Business Rule Composer. Using the Business Rule Composer, you can define facts and policies that can be modified, published, and deployed. The second is to use the Rules Engine Deployment Wizard (see Figure 7-20). The wizard allows policy files to be exported and imported onto machines where they may not have been created.

Use the following basic steps to deploy a policy in a distributed environment (See Figure 7-21 for all options):
Export the policy file. Open the BizTalk Rules Engine Deployment Wizard on the machine where the policy was created. Select Export Policy/Vocabulary file from database. Walk through the options, selecting the policy you want to deploy on a target machine. This process will create an XML file (or multiple files if exporting multiple vocabularies and policies) that can be copied to another machine.
Copy the XML file(s) created in the first step to the target machine. Open the wizard on the target machine, and select the Import and publish Policy/Vocabulary to database from file option. Walk through the options to publish the data to the target machine's rules engine (the vocabularies must first be deployed, and all referenced .NET assemblies must be placed in the GAC).
Run the wizard again on the target machine. This time, select the Deploy Policy option. All policies and vocabularies that have not been deployed will be available in the drop-down list. Select the object(s) you want to deploy, and walk through the rest of the wizard. The vocabularies and policies can now be referenced on the target machine by orchestrations or other components.
To undeploy, follow step 3, selecting Undeploy Policy rather than Deploy Policy from the first option list. Only those vocabularies and policies that have been deployed successfully will be available for undeployment.