
If publish/subscribe messaging capabilities are at the heart of BizTalk, then process orchestration capabilities are BizTalk's brain. A BizTalk orchestration can define a complex integration process, coordinating the flow of information when simple data synchronization will not suffice. BizTalk provides a graphical design tool for defining these integration processes. These orchestration capabilities build upon the foundational publish/subscribe architecture of the BizTalk messaging runtime.
In the simplest cases, integration is strictly about receiving information from one system and delivering it to another. Accordingly, a BizTalk orchestration receives and sends messages through orchestration ports. However, many real-world situations require more than simple message delivery. With an orchestration, the BizTalk developer can graphically define additional processing steps in Visual Studio. For example, these processing steps may involve examining a message or invoking a .NET assembly and deciding on the appropriate actions to take. An orchestration can define an integration process with sequential processing steps or perform independent activities simultaneously. Define higher-level integration services in an orchestration by composing the messaging capabilities of BizTalk with additional integration processing logic. Future integration requirements can reuse the higher-level integration services to reduce implementation effort and enable greater agility.
BizTalk orchestrations support many of the capabilities needed to compose integration activities together, as follows:
Atomic and long-running transactions help ensure that all systems involved in an integration process come to a consistent result.
Transformations convert from a format understood by a source system to a format understood by a destination system.
Orchestrations can invoke an external .NET assembly or use expressions defined with custom code.
Exceptions can be handled by defining the scope of integration activities.
Orchestrations support transaction compensation and rollbacks.
BizTalk orchestrations also provide terrific support for interacting with services defined by interoperable contracts. With BizTalk 2010, an orchestration can directly consume Windows Communication Framework (WCF) services and ASMX .NET web services (WSDL), exposing the service operations within the graphical orchestration design environment. The BizTalk developer can also expose an orchestration as a service, which any service consumer can invoke without having to know that BizTalk technology implements the service.
You are building a solution that requires the implementation of a business process. You must configure an orchestration to receive messages, which begins the business process.
BizTalk Server orchestrations receive messages either through a Receive shape or directly from another orchestration as an orchestration input parameter. A Receive shape allows messages to be routed from the MessageBox to the orchestration, as demonstrated in this solution.
To create an orchestration that receives messages via a Receive shape, follow these steps:
Open a project that contains a schema that represents the message that will be received.
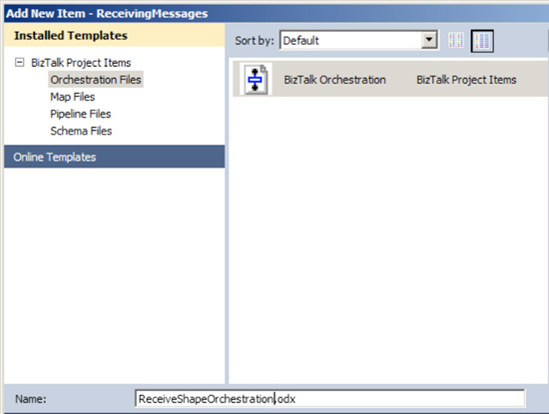
Right-click the project in Solution Explorer, and select Add→New Item.
In the Add New Item dialog box, select Orchestration Files from the Installed Templates list, choose the BizTalk Orchestration template, and give a descriptive name to your new orchestration, as shown in Figure 5-1. In our example, the orchestration is named
ReceiveShapeOrchestration. Then, click Add.In the Orchestration View window, expand the top node of the tree view (this node will have the same name as the orchestration), so that the
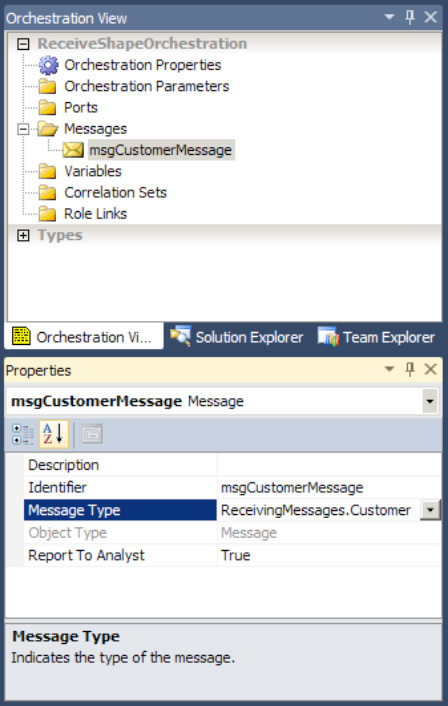
Messagesfolder is visible. (If the Orchestration View window is not visible, select View→Other Windows→Orchestration View.)Right-click the
Messagesfolder, and select New Message, which creates a message called Message_1 by default.Click the new message, and give it a descriptive name in the Properties window. In our example, the message is named
msgCustomerMessage.Click the
Message Typeproperty in the Properties window, and select the appropriate type to associate with the message, as shown in Figure 5-2. In our example, we select theCustomerSchemamessage type.Note
Notice all of the types available for setting the message. A very common option is to set a message to
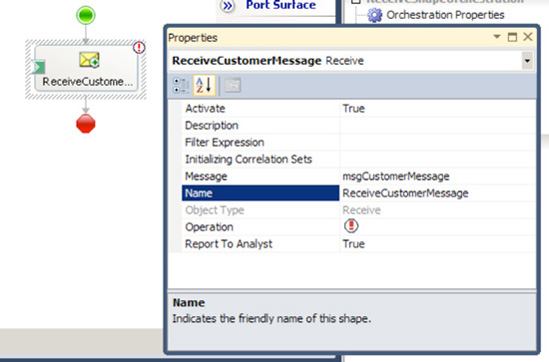
System.Xml.XmlDocument, which allows an XML document of any format to be received (rather than strongly typed against a specific XSD). Of course, subscribing to the genericXMLDocumentwill cause all documents on the MessageBox to be picked up, so make sure your filtering is set up!From the toolbox, drag a Receive shape onto the orchestration directly beneath the green circle at the top of the design surface.
Note
In addition to dragging and dropping shapes from the toolbox, you can also add shapes to an orchestration by right-clicking a section of the vertical process flow arrow and selecting Insert Shape.
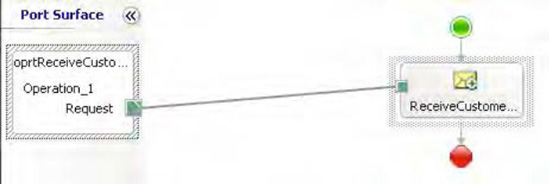
With the Receive shape selected, specify the shape's
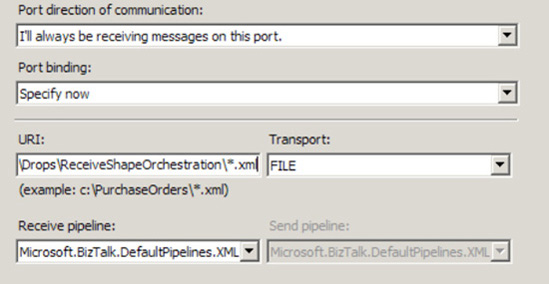
Name, Message, andActivateproperties, as shown in Figure 5-3. TheMessageproperty is set via a drop-down list, which is populated with all the messages that are in scope for the Receive shape. TheActiveproperty is also set via a drop-down list, with the choicesTrueorFalse. In our example, we useReceiveCustomerMessage, msgCustomerMessage(created in step 6), andTrue, respectively.To configure a port and port type for the orchestration to use to receive a message, right-click the Port Surface area, and select New Configured Port. This will start the Port Configuration Wizard.
Step through the Port Configuration Wizard, specifying the following items (accept all other defaulted values):
Port name:
oprtReceiveCustomerMessagePort.New port type name:
oprtTypeCustomerMessagePortType.Port binding: Select Specify Now, and configure the appropriate receive adapter to consume inbound messages, as shown in Figure 5-4. In this example, we configure the port to use the FILE adapter, which receives XML messages from the
C:UsersAdministratorDesktopDropsReceiveShapeOrchestrationfolder.
Warning
Using Specify Now as your method of port binding can make your development and deployment process easier, but be careful when using this feature. It is not the recommended method for production code, because you should not embed port bindings inside an orchestration. A better approach is to use a binding file.
Connect the orchestration port's request operation to the Receive shape, as shown in Figure 5-5.
The project can now be deployed. During the deployment process, the port will automatically be created, along with all bindings to the orchestration (this does not happen when a port is set up using the Specify Later option). Figure 5-6 shows the port created for this solution.

Understanding how messages are received into orchestrations is critical when designing and implementing orchestrations in BizTalk Server. Receive shapes are the most common method used to deliver messages to orchestrations. In this recipe's solution, we showed how to add a Receive shape to an orchestration, configure the Receive shape's Message Type and Activate properties, and connect it to a receive port.
If the Receive shape is the first shape in the orchestration, it must have its Activate property set to True. If an orchestration does not have an activating Receive shape, it must be called or started (instantiated) from another orchestration.
The data a Receive shape accepts is defined by its Message property, which relates to a message that has been defined within the orchestration. All messages in BizTalk are bound to a specific type, which can be an XSD schema or a .NET class. This allows orchestrations to receive instances of XSD schemas or .NET classes as inputs. While our example used a single Receive shape, orchestrations can use many Receive shapes to accept different types of messages at different points in the business logic.
Each Receive shape must be bound to an operation, or orchestration port. An orchestration port is the interface through which messages pass on their way into or out of orchestration instances. Orchestration ports define the direction messages flow (receiving into an orchestration, sending from an orchestration, or both), and are bound to a physical port, another orchestration, or directly to the MessageBox database. The topic of binding orchestrations is covered in more detail in Recipe 5-4, but it is important to understand the methods by which orchestration ports can be bound and how they affect the way messages are received into an orchestration:
Physical receive port: All messages that are consumed by the specified receive port are routed to the orchestration. This setting creates subscriptions in the MessageBox database, which deliver messages passing through the physical receive port to the orchestration port.
Another orchestration: Only those messages explicitly being passed from the calling orchestration are routed to the orchestration.
Directly to the MessageBox: All messages in the MessageBox database that validate against the Receive shape's message type are routed to the orchestration.
Each Receive shape has a number of properties associated with it, as listed in Table 5-1.
Table 5.1. Receive Shape Properties
Property | Description |
|---|---|
| Flag indicating whether the Receive shape activates the orchestration instance. |
| Summary of the Receive shape. |
| A filter that is applied to all messages being received via the Receive shape. |
| A list of correlation sets that are initialized as messages pass through the Receive shape. |
| A list of correlation sets that are followed as messages pass through the Receive shape. This property is not available on the first Receive shape of an orchestration. |
| The message that will be created when a document is passed through the Receive shape. A message with a message type of |
| Name of the Receive shape. |
| Name of the object type (read-only, automatically set to |
| Specifies through which orchestration port operation the Receive shape receives its message. |
| Flag indicating whether the message part should be exposed via the Visual Business Analyst Tool. |
The Filter Expression property allows you to be a bit more specific about which messages make it into your orchestration. Clicking the ellipsis in the input box for the Filter Expression property launches the Filter Expression dialog box. This dialog box allows you to create specific filters, which include one to many logical expressions that must be met in order for a message to be received into the orchestration. These logical expressions are based on a property, an operator, and a value and can be grouped by using the And and Or keywords.
A filter expression can be set on only a Receive shape that has its Activate property set to True. When the value portion of the filter expression is a string, you must put double quotes around the actual value for the expression to work properly.
The Initializing Correlation Sets and Following Correlation Sets properties specify which correlation is followed when messages are received on the Receive shape. Generally speaking, correlation sets allow you to send and receive messages in and out of orchestrations that directly relate to one another.
You want to send messages from within a BizTalk orchestration for processing by other orchestrations.
Within a BizTalk orchestration, messages are sent using the Send shape. To use the Send shape, follow these steps:
Open the BizTalk project that contains the orchestration with the messages you want to send. For this exercise, it is assumed that the orchestration is already configured to receive a message.
Drag a Send shape from the toolbox. Place the shape underneath the orchestration Receive shape.
In the Orchestration View window, expand the top node of the tree view so that the
Messagesfolder is visible.Right-click the
Messagesfolder, and select New Message, which creates a message.Click the new message, and give it a descriptive name in the Properties window (
msgCustomerin our example).Click the
Message Typeproperty in the Properties window, select theSchemanode, and select the appropriate schema. In this example, it uses theCustomer.xsdschema.Select the Send shape, and in the Properties window, assign the message to
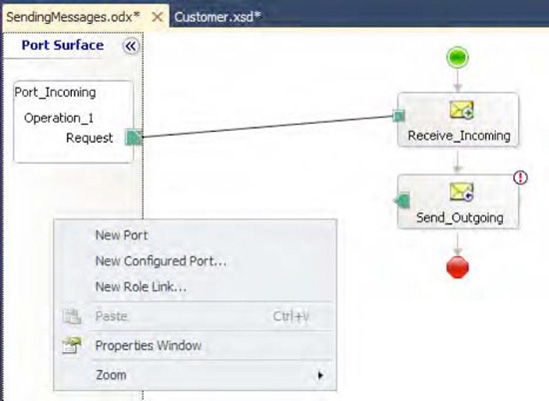
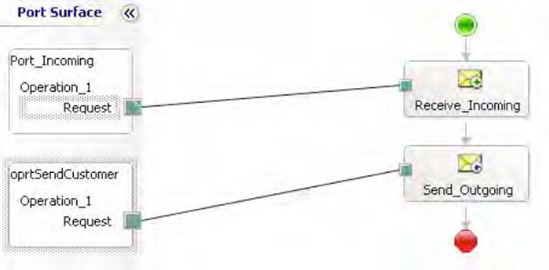
msgCustomer.To configure a port and port type for the orchestration to use to send a message, right-click Port Surface, and click New Port, as shown in Figure 5-7.
Click the exclamation mark (tool tip), and select "No port type has been specified." This starts the Port Configuration Wizard.
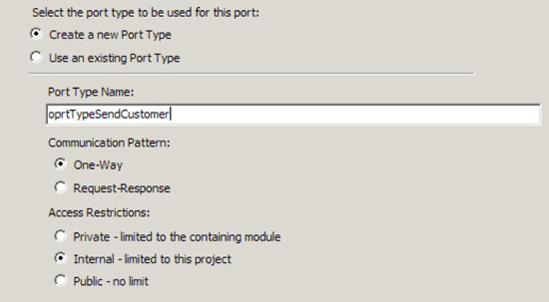
On the Select a Port Type page, name the port
oprtSendCustomer, and click Next.On the Configure Port page, enter the following details, as shown in Figure 5-8, and then click Next:
On the Port Binding page, select "I'll always be sending messages on this port" for the port direction of communication. For port binding, select Direct, and select the first radio button. Routing between ports will be defined by filter expressions on incoming messages in the MessageBox database. Click Finish after making your selections.
Note
In this example, we are implementing a standard publish/subscribe model; that is, the message implementation does not need to be physically specified. The BizTalk MessageBox database will be responsible for initializing one or more downstream messaging subscriptions.
From the port on the Port Surface area, click the green square, and drag it to the Send shape on the orchestration design surface, as shown in Figure 5-9.
In this recipe's solution, we demonstrated how to send messages out of an orchestration to BizTalk messaging and downstream BizTalk endpoints. To review, the following are the key steps to perform to send a message:
Identify a message to send. This can be a .NET class, multipart message, web reference message, or schema.
Create an orchestration port. Specify the port type and access restrictions.
Se et the port direction and binding (dynamic or direct) to BizTalk messaging artifacts.
When sending messages out of an orchestration, it is also important to consider the type of request you would like to implement. Should the message not be returned (one-way), or should the orchestration wait for a response (request/response)? In essence, the port choice should support the type of communication being implemented.
Another important consideration is the message context. Within the orchestration, is the message its own instance, or should it be aware of correlation implications? Within the Send shape, you have the ability to address correlation message context by setting the Following Correlation Sets or Initializing Correlation Sets property.
You are building an integration solution and receive multiple documents that together form a single logical message in your back-end system. You must group these documents into one message by using a multipart message in BizTalk Server.
Multipart messages are created in BizTalk Server orchestrations, as opposed to being created as schemas. Multipart messages are a collection of message parts, with each part having a specific type. Message part types can be defined by an XSD schema or a .NET class. This solution describes how to use XSD schemas to define each of the message parts.
To create an orchestration and a multipart message, follow these steps:
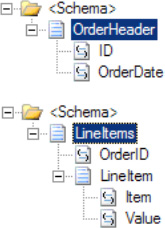
Open the project that contains the schemas. In this sample, we will use an order header schema and an order line item schema to demonstrate the use of multipart messages, as shown in Figure 5-10.
Right-click the project, and select Add→New Item.
In the Add New Item dialog box, select Orchestration Files from the Categories list and BizTalk Orchestration as the template, and give a descriptive name to your new orchestration. In our example, the orchestration is named
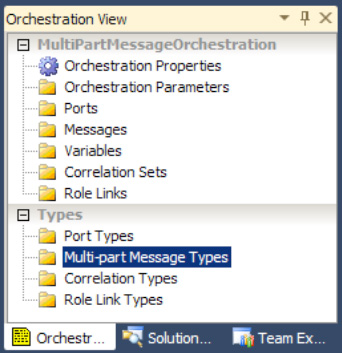
MultiPartMessageOrchestration. Then, click Add.In the Orchestration View window, expand the
Typesnode of the tree view so that theMulti-part Message Typesfolder is visible, as shown in Figure 5-11. (If the Orchestration View window is not visible, select View
Right-click the
Multi-part Message Typesfolder, and select New Multi-part Message Type, which creates a new multipart message type. A default message part is automatically added to all newly created multipart message types.Click the new multipart message type, and give it a descriptive name in the Properties window. In our example, the multipart message is named
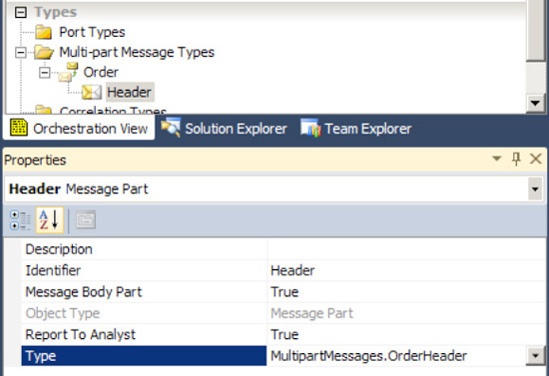
Order.Expand the new multipart message type, click the default message part, and give it a descriptive name in the Properties window. In our example, the message part is named
Header. Note that theMessage Body Partproperty is set toTrue.Click the
Typeproperty in the Properties window, and select the appropriate schema to associate with the message part, as shown in Figure 5-12. In our example, the schema is namedOrderHeader.Right-click the
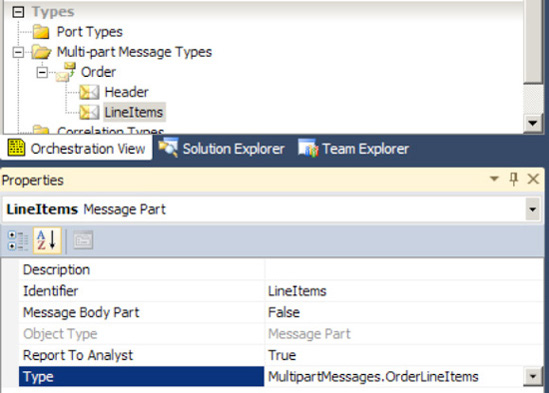
Ordermultipart message type, and select New Message Part, which creates a new message part.Click the new message part, and give it a descriptive name in the Properties window. In our example, the message part is named
LineItems. Note that theMessage Body Partproperty is set toFalse.Click the
Typeproperty in the Properties window, and select the appropriate schema to associate with the message part, as shown in Figure 5-13. In our example, the schema is namedOrderLineItems.In the Orchestration View window, expand the top node of the tree view so that the
Messagesfolder is visible.Right-click the
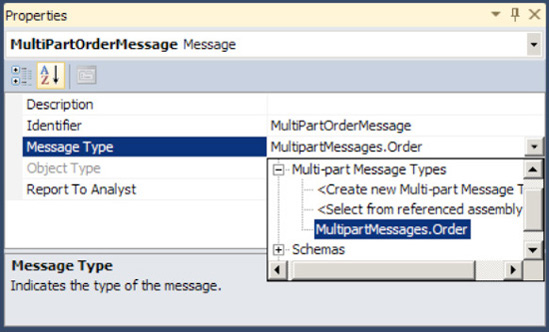
Messagesfolder, and select New Message, which creates a message.Click the new message, and give it a descriptive name in the Properties window. In our example, the message is named
MultiPartOrderMessage.Click the
Message Typeproperty in the Properties window, and select the appropriate type to associate with the message, as shown in Figure 5-14. In our example, we select theOrdermultipart message type.
Multipart messages allow for the grouping of multiple parts into a single message. In our solution, we group an order header document and an order line item document into a single order message.
All messages within BizTalk Server are multipart messages, although most of them just have a single part (the message body) and, therefore, are not created as a multipart message within orchestrations. Messages with a single part are treated slightly differently by BizTalk Server, as the single part is not displayed when referring to the message and the message is referred to directly.
The concept of messages having multiple parts is easier to grasp after creating a multipart message type within an orchestration, where you must explicitly create the different parts of a message. Each message part has a number of properties associated with it, as listed in Table 5-2.
Table 5.2. Message Part Properties
Property | Part |
|---|---|
| Summary of message part |
| Name of the message part |
| Flag indicating whether the message part contains the message body (every multipart message must have one and only one body part) |
| Flag indicating whether the message part should be exposed via the Visual Business Analyst Tool |
| The type defining the message part's content |
The type of message part can be either a .NET class or an XSD schema. If a .NET class is specified, the class must be XML-serializable or support custom serialization. If an XSD schema is used, the schema must be included in the same BizTalk Server project as the multipart message type or in a referenced assembly. By specifying the XmlDocument type, a message part can contain any valid XML document. The multipart message type has the properties listed in Table 5-3 associated with it.
Table 5.3. Multipart Message Type Properties
Property | Part |
|---|---|
| Name of the multipart message type |
| Flag indicating whether the multipart message type should be exposed via the Visual Business Analyst Tool |
| The scope of the multipart message type; choices are |
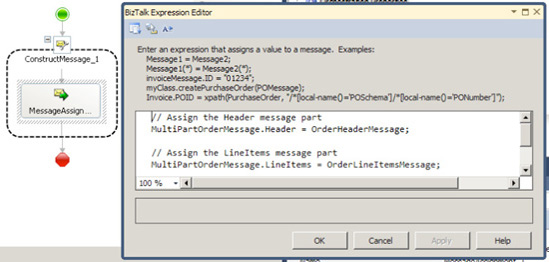
Once you have defined your multipart message types, you can create and access message instances of those types within the orchestration. Figure 5-15 illustrates how you can assign the Header and LineItems message parts of the Order message. In this example, the OrderHeaderMessage and OrderLineItemsMessage messages are instances of the Header and LineItems schemas.
Some common uses of multipart messages in BizTalk Server are when you are consuming a service or processing e-mail messages within orchestrations. When you add a web service reference to an orchestration, a multipart message type is generated automatically, with one part created for each message part defined in the web service's WSDL file. For those scenarios where e-mail messages are being processed, it is common to use multipart message types to handle MIME multipart messages; the body message part would contain the body of the e-mail, and subsequent parts could contain e-mail document attachments.
You need to bind an orchestration to a physical port, to associate a process with a BizTalk messaging port, and consequently, a downstream BizTalk process.
Binding orchestrations to physical ports is the activity that enables defined processes (orchestration) to be associated with physical connectivity and communication, such as file, HTTPS, or web/WCF service. BizTalk enables two methods of binding orchestrations. You can choose to specify the binding immediately within the BizTalk Orchestration Designer (by choosing the Specify Now option during the port binding process) or later using the BizTalk Administration Console (by choosing Specify Later). When you choose Specify Later, this indicates that binding information will not be determined at design time. This recipe demonstrates using the Specify Later option.
Deploy an orchestration, and choose the Specify Later method during the port binding process.
Open the BizTalk Administration Console and under the
Orchestrationstree, locate your orchestration.Right-click the orchestration, and select the Bind option. The Port Bindings Properties dialog box will appear, as shown in Figure 5-16.
For each orchestration port, select the desired BizTalk messaging port. The port choices available for selection will be filtered based on the port type (send or receive).
Binding orchestrations enables processes to be associated with BizTalk messaging ports and consequently, downstream BizTalk processes and artifacts.
Binding can be completed within the BizTalk Orchestration Designer (when you choose Specify Now) or within the BizTalk Administration Console (when you choose Specify Later). The two binding choices allow for separation between process and configuration activities for both task and environment orientation.
Consider the separation of roles between a developer and administrator. The developer would be responsible for development activities within BizTalk, whereas the administrator would be responsible for deployment activities. These activities can be abstracted to allow for environment-specific configuration, without development involvement or consideration. To illustrate this point, consider testing and production BizTalk environments, and how the specification of port values (such as URLs, file locations, and so on) and physical receive locations can be achieved via this abstraction.
You need to send a message from BizTalk Server but will not have all of the required information to do so until the orchestration is executing.
To be able to configure a send port at runtime, you create a dynamic send port within the orchestration. This recipe demonstrates how to configure the outbound dynamic send port in the Message Construct shape. The first step is to copy the contents of the inbound message to the outbound message. Listing 5-1 shows an example of a dynamic XML message.
Example 5.1. Sample Dynamic XML Message
<ns0:DynamicMessage xmlns:ns0="http://DynamicSendPortProject.xsdDynamicMessage">
  <Header>
    <FTPServer>myFTPServer.com</FTPServer>
    <FTPUserName>FTPUserName</FTPUserName>
    <FTPPassword>FTPPassword</FTPPassword>
    <Retry>3</Retry>
    <RetryInterval>5</RetryInterval>
    <FileName>FileName.xml</FileName>
  </Header>
  <Body>
    <Content>This is a test message.</Content>
  </Body>
</ns0:DynamicMessage>
Next, configure the address that BizTalk will use to communicate the message. The address uses the same format as a standard URL. In this example, we specify ftp:// to transmit the file via FTP. The FTP transport protocol requires additional properties to be specified (such as the username and password). Listing 5-2 shows an example of a construct message configuration.
The following steps outline the procedure:
Open the project containing the orchestration that will be processing the inbound message and sending that message via a dynamic send port.
Create a new orchestration send port with a port binding that is dynamic (named
oprtSendDynamicin this example).Note
You will be required to choose a send pipeline when configuring the send port. You can choose from any deployed send pipeline, any send pipeline referenced by your project, or any send pipeline that is part of your existing solution.
Verify that you have a message that contains all of the properties required for configuring the send port and that the properties are promoted or distinguished. Your message may look similar to the message shown earlier in Listing 5-1.
Select the Message Assignment shape from the BizTalk Orchestrations section of the toolbox, and drag it to the appropriate location within the orchestration.
Select the Message Assignment shape, and update the properties.
Update the Message Assignment shape to contain the information that constructs the outbound message as well as configures the properties on the outbound dynamic send port. Your construct message may look similar to the one shown earlier in Listing 5-2.
Example 5.2. Sample Message Assignment Code
// Construct Message
msgDynamicOut = msgDynamicIn;

// Set the FTP properties based on message content.
// Reference the send port to set properties.
oprtSendDynamic(Microsoft.XLANGs.BaseTypes.Address) =
    "ftp://" + msgDynamicIn.Header.FTPServer + "/"
    + msgDynamicIn.Header.FileName;

// Set message context properties for ftp.
msgDynamicOut(FTP.UserName) = msgDynamicIn.Header.FTPUserName;
msgDynamicOut(FTP.Password) = msgDynamicIn.Header.FTPPassword;
msgDynamicOut(BTS.RetryCount) =
                   System.Convert.ToInt32(msgDynamicIn.Header.Retry);
msgDynamicOut(BTS.RetryInterval) =
                   System.Convert.ToInt32(msgDynamicIn.Header.RetryInterval);
Complete the orchestration (as shown in Figure 5-17).

Dynamic ports allow the physical location of a physical send port (one-way or solicit-response) to be determined at runtime. The only requirement for a dynamic port is setting a pipeline at design time. The ability to specify the transport protocol and address at runtime allows for the flexibility of routing messages based solely on message content or on the output of message processing in an orchestration.
For example, implementing the SMTP send adapter to send an e-mail from BizTalk requires configuration information (SMTP server, e-mail recipient, and subject). Rather than specifying the configuration information at design time, you can use a dynamic port, which allows you to configure the information programmatically and modify it based on the message content or processing. Additionally, dynamic send ports can be set via content returned from the Business Rule Engine.
This recipe's solution demonstrated setting up a dynamic send port to send a message via FTP. The inbound message contains the message content as well as the configuration information for transmitting the message to the FTP recipient. The properties of the message are distinguished fields and are therefore easily referenced. Depending on the transport protocol being specified for the dynamic port, different properties will be required and optional.
Warning
If you attempt to set the Microsoft.XLANGs.BaseTypes.Address field with an orchestration port that is not a dynamic port in BizTalk, you will receive a compile-time error.
Table 5-4 shows the required and optional properties for configuring the dynamic send port communicating via FTP.
Table 5.4. Dynamic Send Port Properties
Name | Description |
|---|---|
| A required property that contains the location and possibly the file name of the output message to create. The |
| Specifies the FTP username. If you are specifying a different protocol in the URL, a username may not be required. |
| Specifies the FTP password. If you are specifying a different protocol in the URL, a password may not be required. |
| An optional property that specifies how many times to retry delivery of the message, in case there is a problem transmitting the message. |
| An optional property that specifies the retry interval in minutes. |
This recipe's solution demonstrated creating a dynamic send port in the orchestration. When the orchestration is deployed, the physical send port will be created, and specific binding of the orchestration to a physical send port is already done.
From within an orchestration, you would like to execute different processing based on the evaluation of available information.
A Decide shape is the equivalent of an If...Then...Else statement in standard programming. It allows you to direct different processing at runtime based on the evaluation of information. The following steps outline how to add a Decide shape to an orchestration and configure it.
Open the orchestration.
Select the Decide shape from the toolbox, and drag it to the appropriate location within the orchestration.
Select the Decide shape, and update its properties.
Select the rule branch named
Rule_1, and update its properties (click it, and set its properties in the Properties window).Change the default name if desired.
Add a description if desired.
Set the Report To Analyst property. Leave the property as True if you would like the shape to be visible to the Visual Business Analyst Tool.
Right-click the ellipsis next to the Expression property, and enter a valid Boolean expression for the rule.
To add an additional rule, right-click the Decide shape, and select New Rule Branch.
Note
To delete a branch, right-click the branch, and select Delete. To delete the Decide shape, right-click the shape, and select Delete.
Decide shapes can be used to complete different processing based on information available at runtime. The following is a simple example of using and configuring the Decide shape from within an orchestration. Assume you have a document as follows:
<Employee>
    <FirstName>John</FirstName>
    <LastName>Doe</LastName>
    <SSN>111-22-3333</SSN>
    <State>Washington</State>
    <HireDate>1999-05-31</HireDate>
</Employee>
From within an orchestration, you would like to complete different processing under the following scenarios:
The
Stateis"Washington", and anSSNis provided.The
Stateis"Washington", and noSSNis provided.The
Stateis not"Washington".
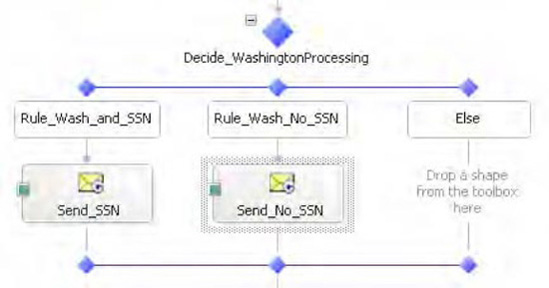
To set up this different processing based on these three scenarios, you add a Decide shape to the orchestration and configure two rule branches and the else branch. For the first rule branch, define the expression to ensure the state is Washington and that a Social Security number was provided, as shown in Figure 5-18.
Note
To access schema nodes from within an orchestration, you must set the nodes as distinguished fields from within the schema editor.

For the second rule branch, configure the expression to ensure the state is Washington and that no Social Security number was provided, as shown in Figure 5-19.

Note
Refer to the BizTalk help file for a complete list of valid operators in orchestration expressions. It uses what many refer to as ".NET Lite," which means only a subset of libraries are available for use.
The else branch will accommodate all other inbound documents where the state is not Washington. Figure 5-20 shows a completed orchestration with a Decide shape configured as described in this example. In this example, a document will be sent to different locations depending on whether the State is "Washington" and whether or not the document contains an SSN. If the State is not "Washington", no document will be sent. It is not required that the branch of a Decide shape contain any actions.
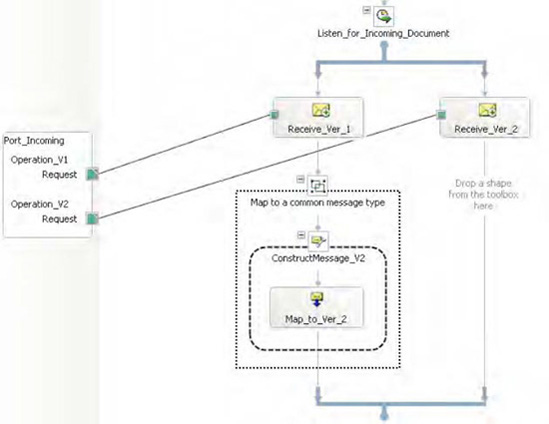
Instead of creating separate orchestrations with identical logic, you can have one orchestration that uses the Listen shape and multiple Receive shapes. The Listen shape enables an orchestration to listen for any messages matching the schemas of any Receive shapes within the Listen shape. A Listen shape can contain multiple Receive shapes, all listening for different messages. In this solution, we will look at how to create an orchestration that listens for either of two messages to arrive.
The first step in the process is to define two different schemas to represent the different documents for which the orchestration will be listening. A typical example of this would be two versions of the same schema, where the elements defined differ enough to warrant a completely different schema. For instance, several required nodes on version 1 may not exist on version 2. Another example would be two different schemas representing similar data (such as customer, order, and so on) from two different legacy systems. In both cases, you would need to have both of the documents instantiate the same orchestration and be subject to the same rules and workflow.
For this solution, we will assume the following two documents are being used, representing different versions of the Person schema:
<ns0:Person xmlns:ns0="http://SampleListenShape.Person.V2">
  <ID/>
  <Name/>
  <Role/>
  <Age/>
</ns0:Person>

<ns0:Person xmlns:ns0="http://SampleSolution.Person">
  <ID/>
  <FirstName/>
  <MiddleName/>
  <LastName/>
  <Role/>
  <Age/>
</ns0:Person>
In an empty orchestration, drop a Listen shape onto the design surface.
Add two Receive shapes within the Listen shape.
Set the
Activateproperty on both Receive shapes toTrue.Rename the Receive shapes to
Receive_Ver_1andReceive_Ver_2. This is for reference purposes only.Create two message variables in the orchestration (click the Orchestration tab, right-click Messages, and select New Message), named
msgVer1andmsgVer2, pointing them to the appropriate schema.Set the message type of
Receive_Ver_1tomsgVer1andReceive_Ver_2tomsgVer2.
Add a new port to the Port Surface with the following properties (using the Port Configuration Wizard).
Name the new port
Port_Receive_Incoming.Create a new port type of
PortType_ReceiveIncoming.Select "I'll always receive messages on this port."
Set the port binding to Specify Later, or give a file path and set it to Specify Now.
Create two operations on the port (there will be one created automatically). Right-click the port, name the operation
Operation_VI, and set the Message Type tomsgVer1. Repeat this to addOperation_V2with the Message Type set tomsgVer2.Add a map to transform the version 1 documents into version 2. This will allow the orchestration to work with one message type throughout.
Add a construct message with a Transform shape under the
Receive_Ver_1shape.Create a new map.
Set the source schema to
msgVer1and the destination schema tomsgVer2. The orchestration will resemble Figure 5-21.
At this point, the orchestration can be deployed, bound to a receive port, and started. If either version of the Person schema is dropped on the MessageBox (via a port or directly bound), the orchestration will instantiate.
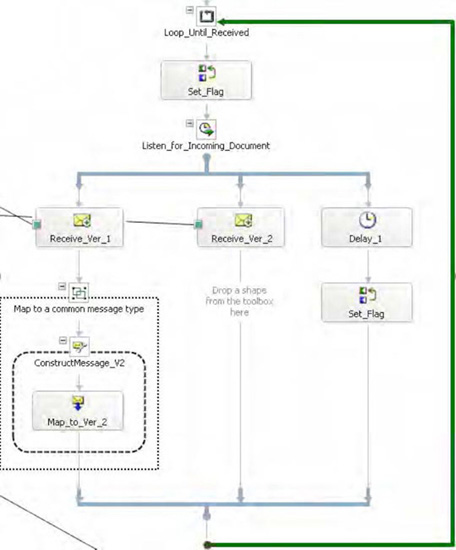
This recipe demonstrated how to uses the Listen shape with multiple Receive shapes. There are alternative ways to use the Listen shape. One of the most common is a combination of a Receive shape and a Delay shape. This can be used for polling behavior in a long-running orchestration. For example, an orchestration could be set up to listen for a document to be dropped on a file directory. If a file is not dropped within a certain amount of time (as specified in the Delay shape), a series of steps could take place (such as notifying an administrator). By adding a Loop shape, the orchestration could return to listening for the document to arrive. An example of this is shown in Figure 5-22.
You need to call a method contained in a .NET class library assembly. You want to understand how to reference this assembly within your BizTalk project and how to call it from an Expression shape.
This solution will walk you through referencing an external assembly and calling the assembly from code within an Expression shape. Assume that the assembly is called SampleClass.dll, which contains a class called Helper. The Helper class has a function to set a string of characters to uppercase, as shown in Listing 5-3.
Example 5.3. Sample C# Assembly
using System;
using System.Collections.Generic;
using System.Linq;
using System.Text;

namespace SampleClass
{
 [Serializable]
 public class SampleClass
 {
  public string strToUpperCase(string input)
  {
   input = input.ToUpper();
   return input;
  }
 }
}
Once the C# assembly has been built and the DLL is available, use the following steps to reference the assembly.
Open a BizTalk project in Visual Studio.
In the Solution Explorer, right-click
Referencesunder the project header, and select Add Reference.In the Add Reference dialog box, click the Browse tab, find the
SampleClass.dllassembly, and then click OK.Now that the assembly is available in the BizTalk project, create a new orchestration variable. With an orchestration open, click the Orchestration View window. Right-click the
Variablesfolder, and select New Variable from the drop-down menu.In the Properties window of the variable, set the following properties (see Figure 5-23):
Add a description, such as
Demonstration Object.Specify the variable's .NET type by clicking the drop-down box for the
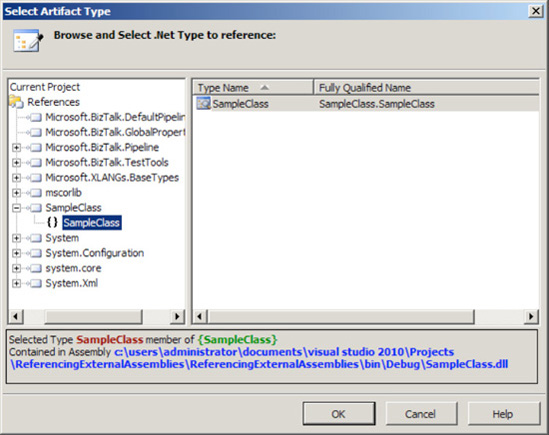
Typeproperty and selecting<.NET Class>. In the Select Artifact Type dialog box, select theSampleClassclass, as shown in Figure 5-24.
Drop an Expression shape in the orchestration, and enter the following code to invoke the external assembly, as shown in Figure 5-25.
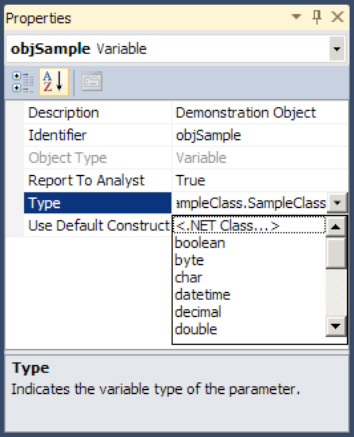

When creating a .NET class variable in BizTalk, an option exists to Use Default Constructor. This property causes an instance of the object to be constructed when the orchestration instantiates. If this property is set to False, the variable will need to be instantiated in an Expression shape through the new keyword (as in step 6 of the solution).
Another property that should be noted is on the referenced assembly itself: Copy Local. This property indicates whether the assembly referenced should be copied into the local bin directory when a project is built. Several factors will help decide whether the assembly should be copied locally; if a reference is to a dynamic assembly (such as another BizTalk project that is built at the same time as the project in which it is referenced), you probably will not want to copy the assembly locally.
It is important to note that when calling a .NET assembly that is not marked as serializable, it must be called from an atomic scope. When creating an assembly that will be used primarily by BizTalk, it is appropriate to mark all classes as serializable. The following example demonstrates doing this in C#.
[Serializable]
public class Example { }You have messages that conform to several different schema types. You wish to create a single orchestration to consume the messages and process them in a generic fashion.
BizTalk orchestrations deal with messages that are strongly typed. A strongly typed message conforms to a selected BizTalk schema or .NET class, and the message inherits its properties from this schema or class. An untyped message is configured to use System.Xml.XmlDocument as the message type and is not tied to a specific schema.
For example, a large business may receive purchase orders from several different systems, and each message must follow the same processing steps. Although the messages are similar, they differ in minor details and are strongly typed to different schemas. In order to process the messages from these disparate systems using the same process, you may wish to define a process with an untyped message to receive the different purchase order schemas into the same receive port.
Note
It is important that you have a basic understanding of receiving messages prior to implementing untyped messages.
To create an untyped message and use it within an orchestration, take the following steps:
In the Orchestration View window, expand the top node of the tree view (this node will have the same type name as the orchestration) so that the
Messagesfolder is visible.Right-click the
Messagesfolder, and select New Message, which creates a message.Click the new message, and give it a descriptive name in the Properties window. In this example, the message is named
incomingOrder.Click the
Message Typeproperty in the Properties window, and select the .NET typeSystem.Xml.XmlDocument.From the toolbox, drag a Receive shape onto the orchestration directly beneath the green circle at the top of the design surface.
With the Receive shape selected, specify the shape's
Name, Message, andActivateproperties. In our example, we useReceiveOrder, incomingOrder(created in step 3), andTrue, respectively.Right-click one of the Port Surface areas, and select New Configured Port. This will open the Port Configuration Wizard.
Step through the Port Configuration Wizard, specifying the following items (accept all other default values):
Port name:
ReceiveOrderPortNew port type name:
ReceiveOrderPortTypePort binding: Specify Later
Configure the Request: Connect the orchestration port's Request operation to the Receive shape.
Untyped messages are a deceptively complex and powerful BizTalk feature. Untyped messages are powerful, because they allow for abstracted processes. For instance, rather than create three processes for three different purchase orders that your company receives from trading partners, you could create a single process that handles the different messages in the same process. Although the single process may increase in complexity, it reduces the amount of maintainable code.
When implementing untyped messages, pay attention to the following areas:
Direct binding: Creating an untyped message that is directly bound to the MessageBox is not recommended. All schema-based messages within BizTalk have a base type of
System.Xml.XmlDocument. The implication of this fact is that using a message variable that is typed asSystem.Xml.XmlDocumentwill set up a receive subscription for all messages that are received into the MessageBox through the directly bound port. Since, in almost every case, this is not the desired functionality, take caution when implementing this type of scenario.Casting: Creating an untyped message will negate many of the common operations available for that schema type. For instance, accessing common promoted properties (
MessageDataBaseProperties) and using Transform shapes are not supported with untyped messages. It is possible, though, to cast between an untyped message and a typed message. To cast a message, create an instance of the typed message in a Construct/Assignment shape, and assign the untyped message to the typed message. You now have the ability to use the typed message with all associated orchestration functionality.Promoted properties: Although it is not possible to access common promoted properties (
MessageDataBaseProperties) for an untyped message, it is possible to create and access a type of promoted property known as aMessageContextPropertyBaseproperty for an untyped message. Refer to the BizTalk help file for more information about how to create this type of context property within your property schema. Setting theMessageContextPropertyBaseproperty is done in the same manner as setting other promoted properties.
Note
MessageContextPropertyBase properties of untyped messages may be set within the orchestration, but the context property cannot be filtered on within other services unless a correlation set containing the MessageContextPropertyBase property is first initialized. In addition, it is not possible to map on a send port, because the MessageType property, which is required to match a message to a map, is not promoted for untyped messages.
By considering direct binding, casting, and promoted properties, you can safeguard your solution from complex bugs that are difficult to identify and triage.
From within an orchestration, you would like to complete numerous activities at the same time and independently of one another.
A Parallel Action shape may be added to an orchestration to implement the concurrent processing of all parallel branches when the orchestration executes. Processing beyond the parallel branches will not occur until all branches of the Parallel Action shape have completed. The following steps outline how to add a Parallel Action shape to your orchestration.
Open the project containing the orchestration.
Open the orchestration.
Select the Parallel Action shape from the toolbox, and drag it to the appropriate location within the orchestration.
Select the Parallel Action shape and update its properties.
Change the default name if desired.
Add a description if desired.
To add an additional branch, right-click the Parallel Action shape, and select New Parallel Branch.
Note
To delete a branch, right-click the branch, and select Delete. To delete the Parallel Action shape, right-click the shape, and select Delete.
You can use the Parallel Action shape within an orchestration to create concurrent processing. Care should be taken when accessing data from within parallel actions to avoid contention or deadlock situations. This can also be avoided by using synchronized scopes in conjunction with parallel actions. Additionally, if an orchestration is terminated from within a branch of a Parallel Action shape, the process will terminate regardless of the status of the processing within the other parallel branches.
You can use the Loop shape in a BizTalk orchestration, in a manner similar to using a loop in any programming language, such as this looping logic:
int a = 0;
while(a < 3)
{
  System.Console.WriteLine(a);
  a = a + 1;
}
As an example, the following steps show how to implement a loop that terminates after a counter variable has been incremented to a certain value. The orchestration will loop three times, logging its progress to the Windows Event Viewer.
Note
The example demonstrates a complete orchestration that could be called from another orchestration using the Call or Start Orchestration shape. To make this a stand-alone orchestration, simply add a Receive shape as the first step and bind it to a port.
In an empty orchestration, create a new variable called
intCount. Make it of typeInt32. This will represent the loop counter.Drop an Expression shape on the design surface. Rename this shape to
Set_Count. Then double-click the shape, and type in the following code://initialize counter intCount = 0;
Drop a Loop shape below the
Set_Countshape. Double-click the Loop shape, and enter the following code (note there is no semicolon)://loop while count is less than 3
intCount < 3
Drop another Expression shape inside the Loop shape, and rename it
Increase_Count. Enter the following code://increase counter intCount = intCount + 1; //log to the event viewer System.Diagnostics.EventLog.WriteEntry("Count", System.Convert.ToString(intCount));
The orchestration is shown in Figure 5-26.
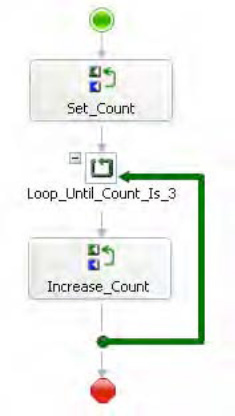
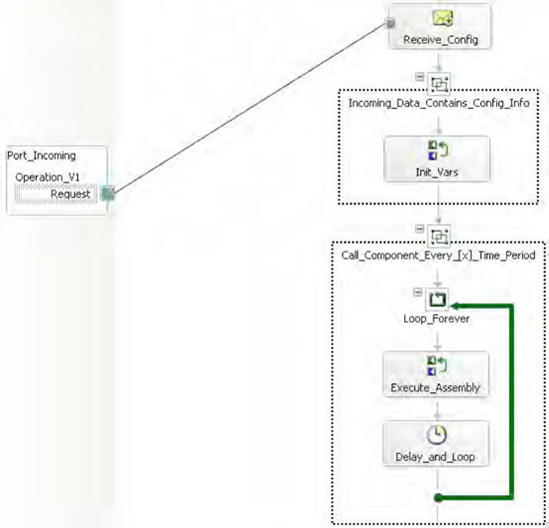
The Loop shape has many applications, from looping through XML documents to supplementing the Listen shape, exception handling routines, and so on. Orchestrations can mimic the behavior of long-running Windows services with the proper placement of a Loop shape. For example, if you need to poll for data on a timed interval, you could set up an orchestration to do this. An initial Receive shape would instantiate the orchestration and immediately enter a loop. Once in the loop, it would never exit, looping every [x] number of minutes to reexecute a series of steps. The orchestration would be long-running and would never end until terminated manually. An example of this type of orchestration is shown in Figure 5-27.
You would like to transform an XML message, or multiple XML messages, into the format of another specified XML schema.
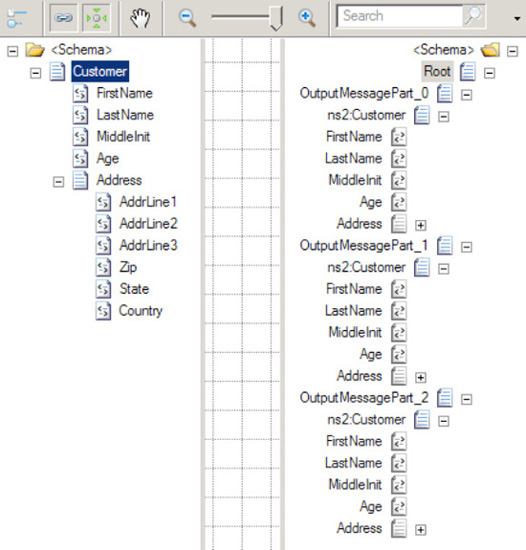
Using the Transform shape within the BizTalk Orchestration Designer allows you to transform XML messages into the format of another specified XML schema. As an example, assume an orchestration message (Customer schema) requires transformation (mapping) in preparation for a publication to another line-of-business application.
<Customer>
  <FirstName> </FirstName>
  <LastName> </LastName>
  <MiddleInit> </MiddleInit>
  <Age></Age>
  <Address>
  <AddrLine1> </AddrLine1>
  <AddrLine1> </AddrLine1>
  <AddrLine1> </AddrLine1>
  <Zip> </Zip>
  <State> </State>
  <Country></Country>
  </Address>
</Customer>
In this example, the outbound specification (CustomerRecord) has a different structure and form than that required by the line-of-business application.
<CustomerRecord >
  <Name> </Name>
  <MiddleInit> </MiddleInit>
  <Address> </Address>
  <Zip> </Zip>
  <State> </State>
  <Country> </Country>
  <DateTime> </DateTime>
</CustomerRecord>
To use the Transform shape within the Orchestration Designer, follow these steps:
Open the BizTalk project that contains the orchestration.
Ensure that two orchestration messages have been created. The
msgCustomersmessage should reference theCustomerschema, and themsgCustomerRecordsmessage should reference theCustomerRecordschema.Drag a Transform shape from the BizTalk Orchestrations section of the toolbox. Place the shape under the Receive shape on the design surface. This automatically creates a Construct Message container and a Transform shape.
Click the exclamation mark (tool tip) on the Transform message shape within the Construct Message boundary.
Click the missing or invalid mapping configuration value in the drop-down list. The Transform Configuration dialog box will appear.
In the Enter Configuration Information Input section of the Transform Configuration dialog box, select the Existing Map radio button. (The New Map option allows you to configure the Construct shape by creating a new map.)
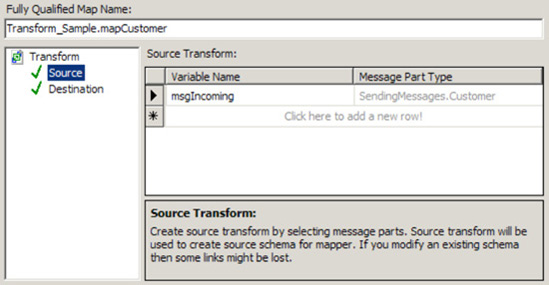
For the Fully Qualified Map Name Input option, select the map desired for the transformation. In this example, the
Transform_Sample.mapCustomermap was selected.Under the
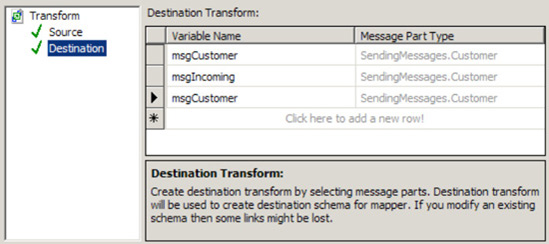
Transformnode, select Source. Then, click theSource_Transforminput, and select themsgCustomersorchestration message. This is the orchestration message assigned to the orchestration and is the same schema as that of the inbound map:Transform_Sample.mapCustomer.Under the
Transformnode, select Destination. Then, click theDestination_Transforminput, and select themsgCustomerRecordsorchestration message. This is the orchestration message assigned to the orchestration and is the same schema as that of the outbound map,Transform_Sample.mapCustomer. Figure 5-28 shows the completed configuration.Click OK to complete the configuration of the Transform shape. Notice that the Construct Message shape is automatically configured with the
Messages Constructedproperty ofCustomerRecords. This indicates that the message constructed in the message transform is that of the destination schema specified in the transform map.
The Transform shape allows you to map messages from one format to another within the BizTalk Orchestration Designer. This functionality assists in addressing common enterprise integration challenges, where destination processes and systems require a different format to that specified by the source process or system.
The Transform shape allows the assignment of an existing map or the creation of a new map within the Transform Configuration dialog box. Also, you can transform one or multiple source messages into one or multiple destination formats. To enable this, create a new map within the Transform shape configuration, by specifying multiple input messages and/or multiple destination messages. This will automatically create a map with the specified source and destination messages. This capability is useful when you need to partition message calls for the destination process or system. Figure 5-29 shows creating a destination with three schemas (two are identical in this example), and Figure 5-30 illustrates a BizTalk map with multiple messages.
Note
Native multiple message mapping can be done only inside an orchestration.
Message transformation may be required to perform deterministic data enrichment, required by the destination system. For example, this scenario is very common within the enterprise resource planning (ERP) application paradigm, where target integration processes (for example purchase orders, advance shipment notices, and invoices) require additional information to persist and update ERP process information based on the process and source context of a message.
A further consideration of using the Transform shape is that of implementing exception handling. By using the Transform shape in conjunction with a Scope shape, you can handle exceptions. Based on message transformation failure, orchestration logic can be implemented to take a course of action to handle the exception. This approach is different from that of implementing mapping within send or receive ports. Here, exceptions must be handled by the failure context of the port object.
Message transformation and message mapping are fundamental requirements for any enterprise integration platform, and BizTalk enables this capability via its mapping and orchestration tool set.
Within a BizTalk orchestration, you would like to reuse common process logic across BizTalk processes.
Within a BizTalk orchestration, you can call or start other orchestrations without sending a message outside an orchestration's context. BizTalk orchestrations can function as traditional functions, calling one another synchronously or asynchronously. Using the Call Orchestration shape allows a parent orchestration to call a child orchestration with a set of parameters and receive output back (synchronous). Using the Start Orchestration shape allows a parent orchestration to call a child orchestration with any set of parameters and move on, independent of receiving a result back (asynchronous).
As an example, assume that you would like to synchronously call an orchestration to perform a validation routine on a message.
Open the BizTalk project that contains the orchestration that you would like to perform the Call Orchestration functionality.
Drag a Call Orchestration shape from the toolbox onto your design surface.
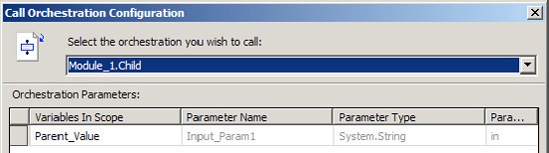
Click the exclamation mark (tool tip) on the shape. Select No Called Orchestration - Click to Configure. The Call Orchestration Configuration dialog box appears.
In the Call Orchestration Configuration dialog box, select the orchestration you wish to call, as shown in Figure 5-31. In this dialog box, you can also select parameters that can be passed by an orchestration. Parameters are passed in the form of .NET variables. Only orchestration types that have
Activationset toFalse—that is, only orchestrations that are invoked from another process—will be available for selection. In this instance, this is the calling orchestration rather than message instantiation.Click OK to complete the Call Orchestration shape configuration.
Orchestration shapes in the BizTalk Orchestration Designer allow for the calling of other orchestrations synchronously or asynchronously. The choice of shape depends on the scenario and design requirements specified for the operating solution.
Calling an orchestration synchronously gives you the ability to nest functionality, similar to calling a method synchronously in any programming language. Calling an orchestration asynchronously allows an orchestration's functionality to be abstracted and performed independently without creating dependencies on the calling and invoking orchestration process.
In addition to calling an orchestration, you can optionally pass parameters to the calling orchestration. Parameters can be used to complement or aid in message processing without the need for custom code development to construct process-centric message context logic. To achieve this within a BizTalk orchestration, parameters are defined in the form of .NET BizTalk type variables. For example, messages, variables, and correlation sets are all BizTalk type variables eligible to be passed with the calling orchestration. Figure 5-32 shows the configuration of a callable orchestration (note that there is no Receive shape required) with a single input parameter.

You need to send a message out of an orchestration and receive a response back into the same orchestration instance.
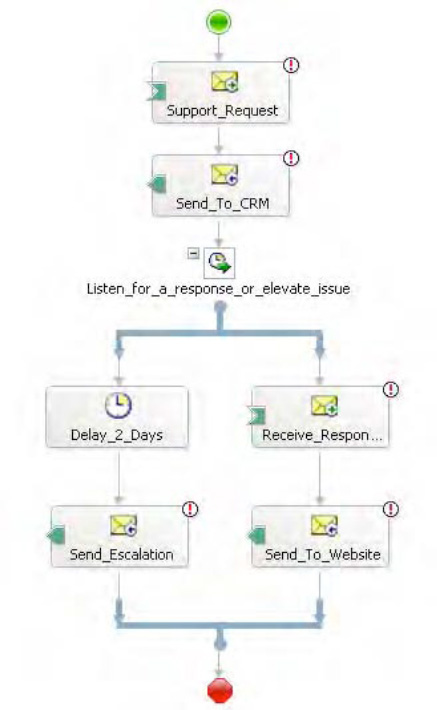
You can use a correlation set to tell an orchestration to accept only messages that have the same information as a message sent by the orchestration. As an example, suppose you have a customer support website where customers can place support requests and expect a response to appear on the website within two days. When a customer places a request, the website sends a support request message containing a unique SupportID to BizTalk, which BizTalk forwards to a customer relationship management (CRM) system. Once support personnel monitoring the CRM system respond to the customer request, the response containing the same SupportID goes through BizTalk and posts to the customer support website for the customer to view.
Occasionally, the support personnel cannot respond within two days, either because the request is not clear or because it is an extraordinarily tough request. When support personnel cannot solve the customer's request in time, the business policy is to elevate the request to a special support team that will work one-on-one with the customer to help with the problem. Unfortunately, the CRM system does not have the functionality to escalate the support request after the standard time period. However, fortunately for your customers, BizTalk can implement the business process and coordinate these two messages easily using correlation sets.
The same orchestration instance that forwards the request to the CRM system must receive the correlating response. In this example, BizTalk will know to receive the response with the same SupportID as the message forwarded to the other system.
Create an orchestration that defines the basic flow of messages. Figure 5-33 illustrates a basic message flow where the orchestration receives a message, forwards the message on to another system, and waits for a response. If the orchestration does not receive a response within a specified amount of time, the orchestration sends the original message to another location for higher priority processing.
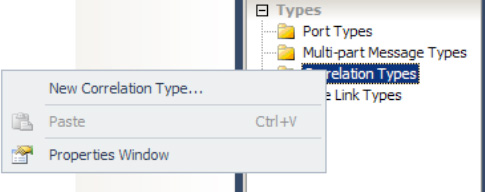
A correlation type defines the information that BizTalk uses to decide which orchestration instance gets the response. To create the correlation type, in the Orchestration View window, right-click
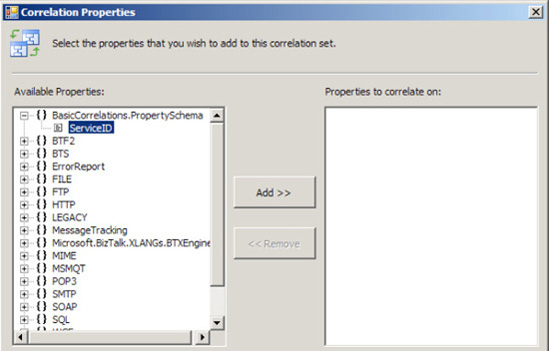
Correlation Types, and select New Correlation Type, as shown in Figure 5-34. The Correlation Properties dialog box appears.In the Correlation Properties dialog box, select the promoted property that defines the correlation information, and click the Add button. In this example, select the
ServiceIDpromoted property of theServiceRequestschema, as shown in Figure 5-35. Select OK to complete the creation of the new correlation type, and rename it toServiceIDType.Note
While a correlation set type can contain any promoted property, it cannot contain distinguished fields.
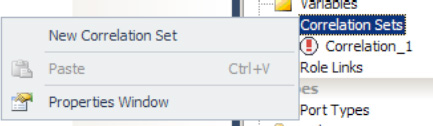
To create the correlation set, right-click
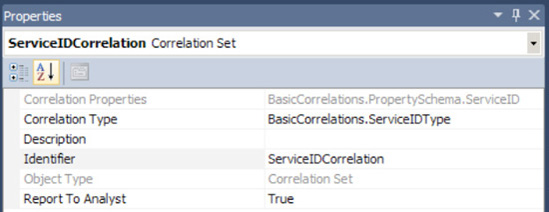
Correlation Setsin the Orchestration View window, and select New Correlation Set, as shown in Figure 5-36.In the Properties window, change the name of the new correlation set to
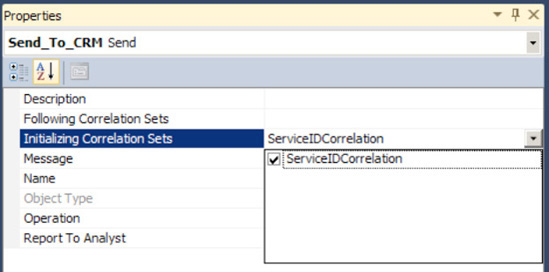
ServiceIDCorrelation, and set the correlation type to theServiceIDTypecreated in steps 2 and 3, as shown in Figure 5-37.Right-click the Send to CRM shape in the orchestration, and select Properties. In the Properties window, set the
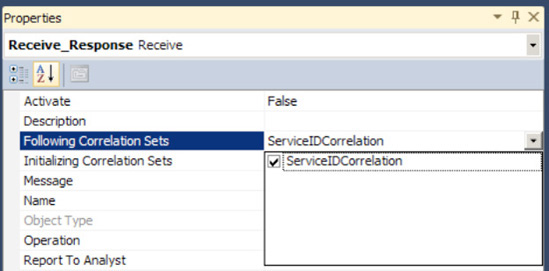
Initializing Correlation Setsproperty toServiceIDCorrelation, as shown in Figure 5-38.Right-click the Get CRM Response shape, and select Properties. In the Properties window, set the
Following Correlation Setsproperty toServiceIDCorrelation, as shown in Figure 5-39. This ensures that the orchestration will accept only messages with the same information at runtime, which is the specific support identifier in this example. While sending the outbound message, BizTalk creates an instance subscription with the properties of the correlation set to receive the correlated inbound message.
The orchestration in Figure 5-33 defines the basic flow of messages that BizTalk needs to coordinate. However, the time between when BizTalk sends the support message to the CRM system and receives a response could be as long as two days. You would expect that there could be any number of outstanding customer support requests during two days. Moreover, because many support requests are sent to the CRM system, many BizTalk orchestrations would be waiting concurrently for a response. Further, suppose one request has already taken over a day of research, when a new one arrives that will take only a few minutes to handle. BizTalk creates a new orchestration instance to forward each message to the CRM system, but how will BizTalk know which orchestration instance should receive the response message?
By using a correlation set, you can tell an orchestration to accept only messages that have the same information as a message sent by the orchestration. A correlation set is a container for holding information of a particular correlation type. A correlation type defines the correlation set, telling BizTalk the fields in a message that will create the correlation set. In this example, we have only one SupportID to keep track of, so we create only one correlation set. When BizTalk initially sends the support request to the CRM system, the orchestration instance initializes the correlation set containing the SupportID to keep track of the specific SupportID in the messages. The action receiving the response from the CRM system follows the same correlation set, meaning that the orchestration instance will accept only messages with the same SupportID as the message sent to the CRM system.
You are implementing an integration point where message order must be maintained. Messages must be delivered from your source system to your destination system in first-in/first-out (FIFO) sequence.
In scenarios where FIFO-ordered delivery is required, sequential convoys handle the race condition that occurs as BizTalk attempts to process subscriptions for messages received at the same time. Ordered message delivery is a common requirement that necessitates the use of sequential convoys. For example, FIFO processing of messages is usually required for financial transactions. It is easy to see why ordered delivery is required when looking at a simple example of a deposit and withdrawal from a bank account. If a customer has $0.00 in her account, makes a deposit of $10.00, and then makes a withdrawal of $5.00, it is important that these transactions are committed in the correct order. If the withdrawal transaction occurs first, the customer will likely be informed that she has insufficient funds, even though she has just made her deposit.
Sequential convoys are implemented by message correlation and ordered delivery flags in BizTalk Server, as outlined in the following steps.
Open the project that contains the schema. (We assume that an XSD schema used to define a financial transaction message is already created.)
Add a new orchestration to the project, and give it a descriptive name. In our example, the orchestration is named
SequentialConvoyOrchestration.Create a new message, and specify the name and type. In our example, we create a message named
FinancialTransactionMessage, which is defined by theFinancialTransactionSchemaschema.In the Orchestration View window, expand the
Typesnode of the tree view so that theCorrelation Typesfolder is visible.Right-click the
Correlation Typesfolder, and select New Correlation Type, which creates a correlation type and launches the Correlation Properties dialog box.In the Correlation Properties dialog box, select the properties that the convoy's correlation set will be based on. In our example, we select the
BTS.ReceivePortNameproperty, which indicates which receive port the message was received through.Click the new correlation type, and give it a descriptive name in the Properties window. In our example, the correlation type is named
ReceivePortNameCorrelationType.In the Orchestration View window, right-click the
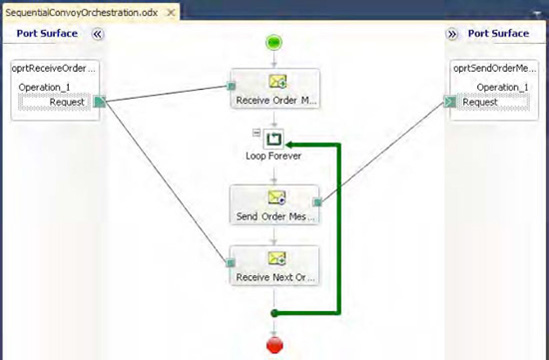
Correlation Setfolder, select New Correlation Set, and specify a name and correlation type. In our example, we create a correlation set namedReceivePortNameCorrelationSetand selectReceivePortNameCorrelationType.From the toolbox, drag the following onto the design surface in top-down order. The final orchestration is shown in Figure 5-40.
Receive shape to receive the initial order message: Configure this shape to use the
FinancialTransactionMessage, activate the orchestration, initializeReceivePortNameCorrelationSet, and to use an orchestration receive port.Loop shape to allow the orchestration to receive multiple messages: Configure this shape with the expression
Loop == true(allowing the orchestration to run in perpetuity).Send shape within the Loop shape: This delivers the financial transaction message the destination system. Configure this shape to use an orchestration send port.
Receive shape within the Loop shape: This receives the next message (based on the order messages were received) in the convoy. Configure this shape to use the
FinancialTransactionMessage, to follow theReceivePortNameCorrelationSetand to use the same orchestration receive port as the first Receive shape.
Build and deploy the BizTalk project.
Create a receive port and receive location to receive messages from the source system.
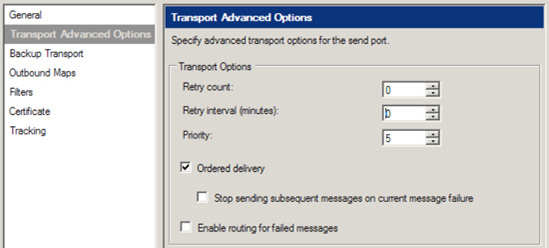
Create a send port to deliver messages to the destination system. In our solution, we send messages to an MSMQ queue named
TransactionOut. In the Transport Advanced Options section of the Send Port Properties dialog box, select the Ordered Delivery option, as shown in Figure 5-41.Bind the orchestration to the receive and send ports, configure the host for the orchestration, and start the orchestration.
In this solution, we show how a convoy can be used to sequentially handle messages within an orchestration. The sequential convoy consists of the ReceivePortNameCorrelationSet and the ordered delivery flags specified on the receive location and send port. The first Receive shape initializes the correlation set, which is based on the receive port name by which the order was consumed. Initializing a correlation set instructs BizTalk Server to associate the correlation type data with the orchestration instance. This allows BizTalk to route all messages that have identical correlation type criteria (in our case, all messages consumed by the receive port bound to the orchestration) to the same instance. The Ordered Processing flag further instructs BizTalk Server to maintain order when determining which message should be delivered next to the orchestration.
Note
The adapter used to receive messages into sequential convoy orchestrations must implement ordered delivery. If an adapter supports ordered delivery, the check box will appear on the Transport Advanced Options tab.
The Send shape in the orchestration delivers the financial transaction message to a destination system for further processing. The second Receive shape follows the correlation set, which allows the next message consumed by the receive port to be routed to the already running orchestration instance. Both the Send and second Receive shapes are contained within a loop, which runs in perpetuity. This results in a single orchestration instance that processes all messages for a given correlation set, in sequential order. This type of orchestration is sometimes referred to as a singleton orchestration.
The term convoy set is used to describe the correlation sets used to enforce convoy message handling. While our example used only a single correlation set, you can use multiple correlation sets to implement a sequential convoy. Regardless of how many correlation sets are used, sequential convoy sets must be initialized by the same Receive shape and then followed by a subsequent Receive shape.
Sequential convoys can also accept untyped messages (messages defined as being of type XmlDocument). You can see how this is important by extending the financial transaction scenario, and assuming that a deposit and withdrawal are actually different message types (defined by different schemas). In this case, a message type of XmlDocument would be used on the convoy Receive shapes.
While our example does implement a sequential convoy, you can fine-tune the solution to handle sequential processing in a more efficient and graceful manner. As it stands now, the SequentialConvoyOrchestration handles each message received from the source MSMQ queue in order. This essentially single-threads the integration point, significantly decreasing throughput. Single-threading does achieve FIFO processing, but it is a bit heavy-handed. In our example, all transactions do not have to be delivered in order—just those for a particular customer. By modifying the convoy set to be based on a customer ID field in the financial transaction schema (instead of the receive port name), you can allow transactions for different customers to be handled simultaneously. This change would take advantage of BizTalk Server's ability to process multiple messages simultaneously, increasing the performance of your solution.
Note
In this scenario, you must use a pipeline that promotes the customer ID property (such as the XmlReceive pipeline) on the receive location bound to the sequential convoy orchestration. The PassThru receive pipeline cannot be used in this scenario.
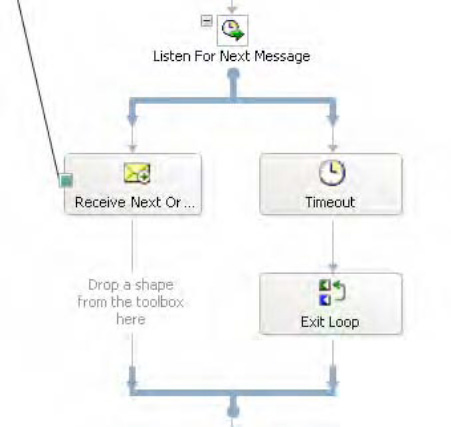
Changing the convoy set to include a customer ID field would also impact the number of orchestrations running in perpetuity. Each new customer ID would end up creating a new orchestration, which could result in hundreds, if not thousands, of constantly running instances. This situation is not particularly desirable from either a performance or management perspective. To address this issue, you can implement a timeout feature allowing the orchestration to terminate if subsequent messages are not received within a specified period of time. Take the following steps to implement this enhancement. The updated orchestration is shown in Figure 5-42.
Add a Listen shape in between the Send shape and second Receive shape.
Move the second Receive shape to the left-hand branch of the Listen shape.
Add a Delay shape to the right-hand branch of the Listen shape. Configure this shape to delay for the appropriate timeout duration. In our example, we set the timeout to be 10 seconds by using the following value for the
Delayproperty:new System.TimeSpan(0,0,0,10)
Add an Expression shape directly below the Delay shape. Configure this shape to exit the convoy by using the following expression:
Loop = false;
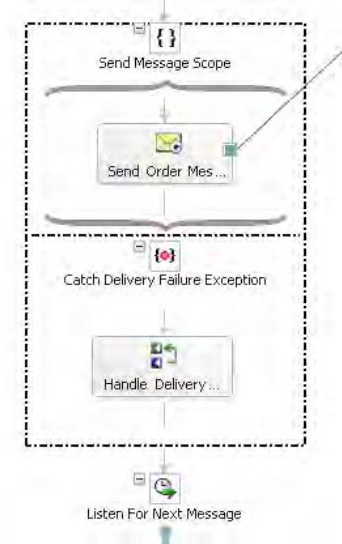
Finally, you can enhance the solution to ensure that messages are successfully delivered to the destination system before processing subsequent messages. In the current solution, messages are sent out of the orchestration to the MessageBox database via the orchestration port. Once this happens, the orchestration continues; there is no indication that the message was actually delivered to its end destination. For example, if the destination MSMQ queue was momentarily offline, a message may be suspended while subsequent messages may be delivered successfully. Take the following steps to implement this enhancement. The updated orchestration portion is shown in Figure 5-43.
Change the orchestration send port's
Delivery Notificationproperty toTransmitted.Add a Scope shape directly above the Send shape.
Move the Send shape inside the Scope shape.
Add an exception handler by right-clicking the Scope shape. Configure this shape to have an
Exception Object Typeproperty ofMicrosoft.XLANGs.BaseTypes.DeliveryFailureException. Enter a descriptive name for theException Object Nameproperty.Add an Expression shape inside the exception handler block added in the previous step. Configure this shape to appropriately handle delivery failure exceptions. In our solution, we simply write the event to the trace log via the following code:
System.Diagnostics.Trace.Write("Delivery Failure Exception Occurred - " +
deliveryFailureExc.Message);
You are implementing a data aggregation integration point, which requires data to be retrieved from multiple systems. Each source system publishes messages, and a message from each system must be received before further processing can take place.
A parallel convoy is a business process (orchestration) that receives multiple messages in parallel (at the same time) that relate to each other. Parallel convoys handle the race condition that occurs as BizTalk attempts to process subscriptions for messages received at the same time.
A common scenario requiring parallel convoys is where multiple messages for a specific event must be received before a business process can start. As an example, suppose your company's policy allows an order to be shipped only once payment has been approved and stock level has been verified. Payment approval comes from a financial system, and stock-level information comes from an inventory system. Once both systems publish their respective messages for a specific order, that order can be delivered to the customer.
Parallel convoys are implemented by message correlation and Parallel Action shapes in BizTalk Server, as shown in the following steps.
Open the project that contains the schemas. (We assume that XSD schemas used to define payment approval and stock-level verification messages are already created.)
Add a new orchestration to the project, and give it a descriptive name. In our example, the orchestration is named
ParallelConvoyOrchestration.Create two new messages, and specify the name and type of each. In our example, we create messages named
PaymentApprovalMessageandStockLevelConfirmationMessage, which are defined by thePaymentApprovalSchemaandStockLevelConfirmationSchemaschemas, respectively.In the Orchestration View window, expand the
Typesnode of the tree view so that theCorrelation Typesfolder is visible.Right-click the
Correlation Typesfolder, and select New Correlation Type, which creates a correlation type and launches the Correlation Properties dialog box.In the Correlation Properties dialog box, select the properties that the correlation will be based on. In our scenario, we select the
OrderIDproperty, which has been promoted from thePaymentApprovalSchemaandStockLevelConfirmationSchemaschemas.Click the new correlation type, and give it a descriptive name in the Properties window. In our example, the correlation type is named
OrderIDCorrelationType.In the Orchestration View window, right-click the
Correlation Setfolder, select New Correlation Set, and specify a name and correlation type. In our example, we create a correlation set namedOrderIDCorrelationSetand selectOrderIDCorrelationType.From the toolbox, drag the following onto the design surface in top-down order; the parallel convoy configuration is shown in Figure 5-44:
Parallel Actions shape to receive the response from the financial and inventory systems.
Receive shape to receive messages from the financial system. Place this shape on the left-hand branch of the Parallel Actions shape. Configure this shape to use the
PaymentApprovalMessage, to initialize theOrderIDCorrelationSet, to activate the orchestration, and to use an orchestration receive port.Receive shape to receive messages from the inventory system. Place this shape on the right-hand branch of the Parallel Actions shape. Configure this shape to use the
StockLevelConfirmationMessage, to initialize theOrderIDCorrelationSet, to activate the orchestration, and to use an orchestration receive port.Expression shape to deliver the ship the order. Configure this shape to send the order to the appropriate recipient. In our solution, we simply write a message to the trace log via the following code:
System.Diagnostics.Trace.Write("Shipping Order with ID = " +
      PaymentApprovalMessage
      (ParallelConvoyOrchestration.PropertySchema.OrderID));
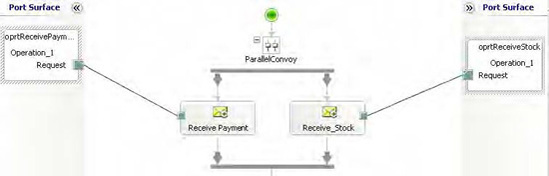
In this solution, we show how a convoy can be used to concurrently handle messages within an orchestration. The parallel convoy, also referred to as a concurrent convoy, consists of the OrderIDCorrelationSet and the Parallel Actions shape. Each Receive shape in the Parallel Actions shape initializes the correlation set, which is based on the order ID. Initializing a correlation set instructs BizTalk Server to associate the correlation type data with the orchestration instance. This allows BizTalk to route all messages that have identical correlation type criteria (in our case, all messages with a specific order ID) to the same instance.
Each of the Receive shapes has its Activate property set to True and its Initializing Correlation configured to the same correlation set. The Receive shape that receives the first message will handle the activation of the orchestration instance and the initializing of the correlation set. The second Receive shape will not activate a new orchestration instance (even though its Activate property is set to True) and will actually follow the correlation set that the other Receive shape initialized.
Based on this example, messages for two order IDs would be handled in the following manner:
A payment approval message for order ID 1 is received, which instantiates orchestration instance 1.
A stock-level confirmation message for order ID 2 is received, which instantiates orchestration instance 2.
A payment approval message for order ID 2 is received, which is correlated and delivered to orchestration 2. The orchestration continues processing, ships order ID 2, and terminates successfully.
A stock-level confirmation message for order ID 1 is received, which is correlated and delivered to orchestration 1. The orchestration continues processing, ships order ID 1, and terminates successfully.
While our example used only a single correlation set, multiple correlation sets can be used to implement a parallel convoy. Parallel convoys are defined as having a convoy set that is initialized on multiple branches of a Parallel Actions shape within an orchestration. Regardless of how many correlation sets are used, if multiple Receive shapes initialize a convoy set in a Parallel Actions shape, the same correlation sets must be initialized on all of the Receive shapes.
You need to get and/or set values in a message within an orchestration. There are a number of nodes that cannot be promoted because they are not unique, and you need to be able to access these values.
To access values in a message, you can use XPath. XPath queries are used to navigate the tree of a given XML document and are typically used within orchestration Message Assignment and Expression shapes. BizTalk XPath queries require two parameters: the first parameter references the XML message, and the second is the query path.
As an example, assume that an orchestration message called msgDemo contains the XML shown in Listing 5-4.
Example 5.4. Sample XML Instance for XPath Query Example
<ns0:NewHireList xmlns:ns0="http://SampleSolution.NewHireList">
  <DateTime>1999-04-05T18:00:00</DateTime>
  <ns1:Person xmlns:ns1="http://SampleSolution.Person">
    <ID>1</ID>
    <Name>S. Jonesy</Name>
    <Role>Embedded Programmer</Role>
    <Age>40</Age>
  </ns1:Person>
  <ns1:Person xmlns:ns1="http://SampleSolution.Person">
    <ID>2</ID>
    <Name>D. Hurley</Name>
    <Role>Artist</Role>
    <Age>45</Age>
  </ns1:Person>
</ns0:NewHireList>
The following steps demonstrate getting values, getting a node count, getting an entire XML node, and setting values.
To get the value of the
<DateTime>element, use the following XPath query. The output of this query is1999-04-05T18:00:00.xpath(msgDemo,"string(//*[local-name()='DateTime'])")
To get the value of the
<Name>element that is in the same<Person>node as the<ID>which is equal to 2, use the following XPath query. The output of this query will beD. Hurley.xpath(msgDemo,"string(//*[local-name()='Name' and ../* [local-name()='ID'] = '2'])")
To get the count of
<Person>nodes within the document, use the following XPath query. The output of this query is2.xpath(msgDemo,"count(//*[local-name()='Person'])")
To get the entire XML node representation of the second
<Person>node, use the following XPath query. Note that this requires formatting the query using theSystem.String.Formatfunction. The result of this query will be a full XML node.strXPathQuery = System.String.Format("//*[local-name()='Person'][{0}]",2); xmlDoc = xpath(msgIncoming,strXPathQuery); <ns1:Person xmlns:ns1="http://SampleSolution.Person"> <ID>2</ID> <Name>D. Hurley</Name> <Role>Artist</Role> <Age>45</Age> </ns1:Person>To set the value of the
<DateTime>element, use the following XPath query. Note that this must be done in a Message Assignment shape, since the value of the message is changing. The message used must first be constructed.xpath(msgDemo, "//*[local-name()='DateTime']") = strDateTime;
This recipe's solution demonstrated several of the many uses of XPath. One question that often arises is when to use XPath instead of using promoted properties. The ability to promote properties is limited. Elements that repeat within a schema cannot be promoted. Only unique values can be promoted. When you need to set the value of repeating nodes, XPath is the quickest and most versatile approach.
Any orchestration can have Scope shapes in it. Place other orchestration shapes within the Scope shape to define the expected behavior of the orchestration. If BizTalk encounters an exception performing the steps inside a Scope shape, it will jump to separate actions defined in an exception handler. The solution demonstrates how to add exception handling to an orchestration.
Create a new orchestration. Drag a Scope shape from the toolbox onto the orchestration design surface.
Right-click the name of the Scope shape, and select Properties from the context menu.
Set the
Transaction Typeproperty toNoneand theNameproperty toControlled Exceptions Scope.Right-click the name of the new Scope shape, and select New Exception Handler from the context menu, as shown in Figure 5-47.
Right-click the name of the exception handler created in the previous step, and select Properties Window from the context menu.
Set the
Exception Object Typeproperty toGeneral Exceptionand theNameproperty toLog Exception, as shown in Figure 5-46.From the toolbox, drag an Expression shape into the exception handler.
Double-click the Expression shape to open the Expression Editor, and add the following code to record the exception.
System.Diagnostics.EventLog.WriteEntry("A Simple BizTalk Source",
        "An exception was encountered in my sample orchestration.  ");
Build the orchestration logic inside the Scope shape. If BizTalk encounters an exception processing the orchestration logic, it will invoke the Expression shape.
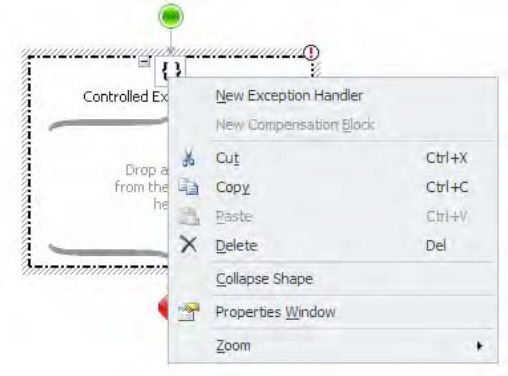
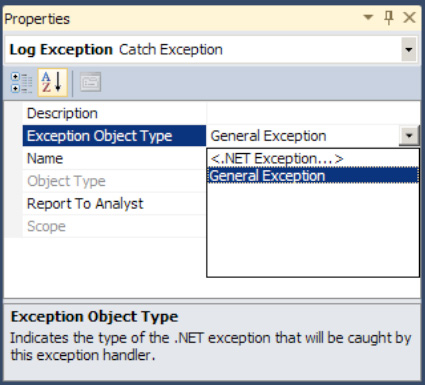
The BizTalk Orchestration Designer is a development tool. Just as when building a component with any other development tool, exception conditions can occur long after the component is constructed. The developer may misunderstand how the component should behave, or changes to the other systems BizTalk interacts with may cause exception conditions. Regardless of the cause, the developer always needs to plan for the unexpected.
Note
In addition to defining how an orchestration reacts to possible exception conditions, orchestration scopes can also define atomic or long-running transactions.
This recipe demonstrates how to respond to exception conditions by invoking an Expression shape that writes an error message to the Windows application log. However, an exception handler can define more rigorous error-resolution procedures. The compensation block can simply log the exception, can invoke an exception-handling framework, or can invoke another BizTalk orchestration defining a series of resolution actions. In addition, if an orchestration defines the procedures for resolving exceptions, then the BizTalk Business Activity Monitor (BAM) can generate reports on exception-resolution processes.
This solution's example uses the default General Exception object type, as shown earlier in Figure 5-46. This is useful when you want to log where and when errors occur but do not need specific information about the actual errors encountered.
An exception handler can identify more specific error information when the exception handler's Object Type property is set to any class inheriting from System.Exception. When the Object Type is a .NET Exception, as shown in Figure 5-47, the exception object can retrieve additional information such as an error message.
Modify the Expression shape as follows to include the error message in the application log entry.
System.Diagnostics.EventLog.WriteEntry("A Simple BizTalk Source",
         "An exception was encountered: " + ex.Message);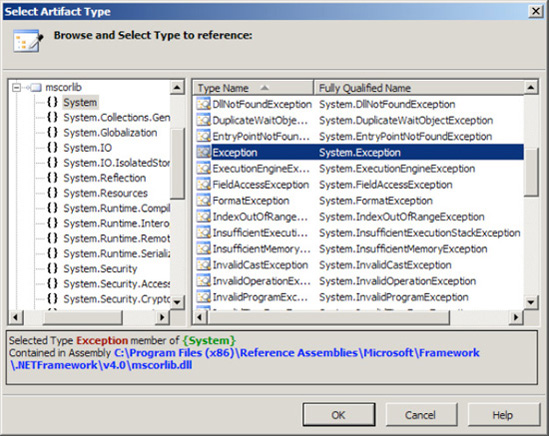
A single Scope shape can also specify multiple exception handlers to define different reactions to different exceptions encountered by the orchestration. When the Scope shape encounters an exception, it will check each exception handler from top to bottom. The Scope shape invokes the first exception handler matching the type of exception encountered and stops looking for a match. Therefore, more specific exception handlers must appear above more general exception handlers, or the general exception handler will handle all errors and the Scope shape will never invoke the specific exception handlers. Define an additional exception handler with the following steps.
Define the first exception handler as presented in this recipe's solution.
Right-click the name of the Scope shape, and select New Exception Handler.
Move the handler for the General Exception defined in the solution by selecting the name and dragging the mouse over the lower line defining the new exception handler. The General Exception handler should appear below the new one.
Right-click the name of the new exception handler, and select Properties Window.
Change the
Nameproperty toHandle Arithmetic Exception.For the
Exception Object Typeproperty, select<.NET Exception...>. In the Select Artifact Type dialog box that appears, select the Arithmetic Exception, as shown in Figure 5-48, and then click OK.Change the
Exception Object Nameproperty toex.Add shapes to the new exception handler to handle arithmetic exceptions specifically, as shown in Figure 5-49.
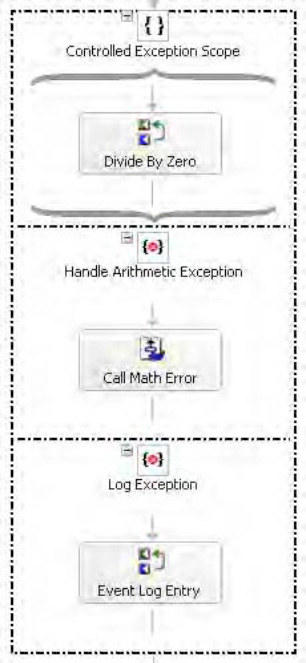
While a Scope shape will invoke only the first exception handler matching the type of exception encountered, sometimes there are consistent actions the orchestration should take for different kinds of errors. For example, what if the orchestration depicted in Figure 5-49 should call the orchestration for resolving math errors in addition to logging the exception to the application log? The Throw shape can propagate an exception from the Scope shape that initially catches it to an outer Scope shape defining the consistent error actions. Figure 5-50 depicts an example of a Scope shape contained within another Scope shape.
Note
You can drag and drop the catch blocks from one exception block to another.
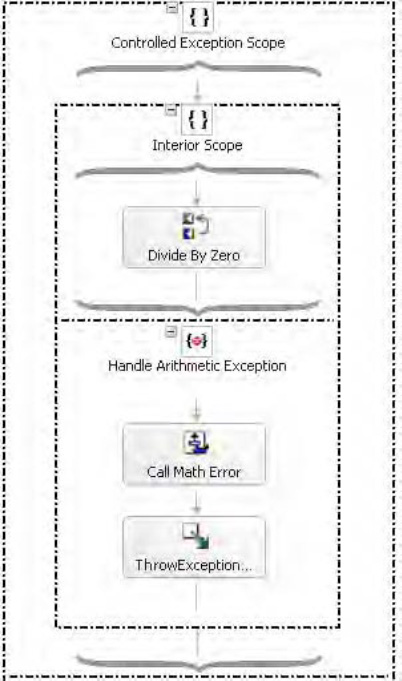
You are building an orchestration process that contains actions that must complete together as a group or fail as a group.
BizTalk supports the notion of completing small units of work following the Atomicity, Consistency, Isolation, and Durability (ACID) transaction model. The Atomic Scope shape implements the ACID transaction model. Atomic scopes are the most flexible and restrictive of the transaction models in BizTalk. The use of an atomic scope within BizTalk ensures that a group of steps either succeeds or fails together. The following instructions outline the steps required to create and configure an atomic scope.
Open the project containing the orchestration that will contain the atomic scope transaction.
Verify the
Transaction Typeproperty of the orchestration is set toLong Running. This is required for orchestrations containing atomic scopes.Select and drag the Scope shape from the BizTalk Orchestrations section of the toolbox to the appropriate location within the orchestration.
Note
Atomic scopes may not contain nested Atomic Scope or Long Running Scope shapes.
Select the Scope shape, and update the properties as follows.
Change
Transaction TypetoAtomic.Change
CompensationfromDefaulttoCustomif your scope will contain a compensation handler.Change
Isolation Levelto the correct value.Change
Nameif desired.Set the
Report To Analystproperty. Leave the property asTrueif you would like the shape to be visible to the Visual Business Analyst tool.Change the
Retryvalue fromTruetoFalseif you do not want the Scope shape to retry in the event of a failure. TheRetryvalue must be set toTrueif you plan on throwing an exception to cause the atomic scope to retry. However, setting the value totruedoes not mean the atomic scope will retry by default.Change the
Synchronizedvalue fromFalsetoTrueif you are using the Atomic Scope shape within a Parallel Actions shape and manipulating the same set of data.Change the
Timeoutvalue if desired. Scope timeouts indicate the period of time to wait (in seconds) before the transaction fails. Atomic scopes that contain a timeout value will stop the transaction and be suspended if the timeout value is reached.
Add the appropriate orchestration actions to the Atomic Scope shape.
BizTalk supports the ACID model by providing the following features:
Atomicity: Atomic Scope shapes guarantee all actions within the Scope shape are either performed completely or not performed at all.
Consistency: System properties (messages and variables) are preserved through the transaction. In the situation where an atomic scope cannot be committed and the system properties are updated, the system properties are rolled back to their previous state.
Note
All variables, regardless of whether they are local to the scope or global to the orchestration, will be rolled back to their previous state when an atomic scope fails.
Isolation: Each atomic scope allows controlled visibility to other scopes' and transactions' data.
Durability: Once an atomic scope has been committed, the only way the action can be undone is through the use of a BizTalk compensation handler.
Atomic scopes are extremely useful, but there is an associated cost with the use of any transactional model inside an orchestration. Consider the following when deciding whether to use an atomic scope:
Atomic scopes cannot contain a send and a receive port that are referencing the same two-way request/response orchestration port. For example, if you are referencing an HTTP/SOAP port in your orchestration, you cannot have the Send and Receive shapes in a single Atomic Scope shape. Additionally, you cannot have Send and Receive shapes that implement the same correlation set within the same Atomic Scope shape. The rationale for this is that as soon as context has left the orchestration (a message is sent via a Send shape), the atomic scope action is complete, and a response cannot be matched to the request.
If an Atomic Scope shape contains a Send, Receive, or Start Orchestration shape, BizTalk will wait to perform those actions until the scope has been committed. BizTalk considers the boundary of the transaction to be the point that a message has been committed to the BizTalk MessageBox.
A single atomic scope is not that expensive in the context to processing of an entire orchestration. However, the use of multiple atomic scopes can be expensive because BizTalk sets a checkpoint before and after an atomic scope is executed. Consider ways to combine multiple atomic scopes into fewer atomic scopes. The checkpoint takes place so that the orchestration can be resumed if it is suspended due to an exception in the atomic scope.
Note
Think of a checkpoint as BizTalk serializing its current processing state to persist and prepare for a rollback in the case of an exception in the atomic scope. The serialization and persistence of the current processing state reduces performance incrementally. The more atomic scopes in an orchestration, the more points of persistence that will be created and the greater the overall degradation in the performance of the orchestration.
An object that is not serializable (does not implement the
ISerializableinterface or is not marked with aserializableattribute) must be in an atomic scope. For example, if you are using theXmlNodeListobject, the variable must be declared local to the scope and referenced within the Atomic Scope shape. TheXmlDocumentdata type is an exception to this rule.Using an Atomic Scope shape to perform multiple send operations does not guarantee that the send operations will be rolled back in the case one send fails. For example, if you have two Send shapes each sending a message to a SQL database, if there is a failure in one or both SQL databases, the Atomic Scope shape does not guarantee that the data will be backed out from either database call. BizTalk considers the boundary of a transaction to be the point that a message is committed to the MessageBox. True rollbacks are guaranteed only in true Microsoft Distributed Transaction Coordinator (MSDTC) transactions.
Even though atomic scopes are the more restrictive of the two transaction models, they offer significant benefits over the use of long-running scopes. Atomic scopes allow the specification of an Isolation Level property, as follows:
Specifying
Serializablemeans that concurrent transactions will not be able to make data modifications until the transaction is committed.Specifying
Read Committedmeans that the existing transaction is prevented from accessing data modifications until the transaction is committed.Specifying
Repeated Readmeans that read locks are required until the existing transaction is committed.
Atomic scopes also implement a retry capability that is enabled through the use of the Retry flag. An atomic scope will retry if the Scope shape's Retry property is set to True and at least one of the following exceptions occurs:
Microsoft.XLANG.BaseTypes.RetryTransactionExceptionis thrown or in the event that BizTalk cannot commit the transaction. Additionally, all variables will be reset to their state prior to entry of the scope.Microsoft.XLANG.BaseTypes.PersistenceExceptionoccurs due to BizTalk's inability to persist state.
One challenge to using atomic scopes is the fact that you cannot have an exception handler on the Atomic Scope shape itself. Atomic scopes are defined to either succeed or fail, hence there is no direct need to have an exception handler. In the situation where an exception should be caught in an error handler, the items that cause an exception can be enclosed in a nontransactional scope (with an error handler) inside the atomic scope.
Consider the following scenario: you must pass a nonserializable object to a custom assembly that, in turn, makes a database call. You want to catch any communication exceptions and force the atomic scope to retry. One option for this scenario would be to implement an atomic scope to manipulate the nonserializable object and within that Atomic Scope shape, include a nontransactional Scope shape with an error handler that will throw a Microsoft.XLANG.BaseTypes.RetryTransactionException. This scenario would allow you use a nonserializable object and force a retry in the case of a communication problem.
Note
When throwing a RetryTransactionException to perform a retry, validate that conditions have changed so that you do not continually throw a RetryTransactionException and create an infinite retry loop.
Atomic Scope shapes (as well as other Scope shapes) support the notion of compensation to facilitate undoing a logical piece of work regardless of the successful commit. Suppose that the atomic scope executes and commits successfully, but there is a business-error problem with the message data. The atomic scope, from a technical aspect, executed and committed correctly. However, due to the business validation failing, the transaction must be undone. Compensations allow definition of a process that details how the previously committed atomic transaction is to be rolled back.
The structure of a compensation handler is similar to that of an exception handler but functionally different. BizTalk will use the default compensation handler if no custom compensation handler is defined. The default BizTalk compensation handler calls the compensation blocks of any nested transactions, in reverse order of completion. Compensation handlers must be called explicitly, unlike error handlers, through the use of the Compensation shape. A common use for a compensation handler is to create a message that indicates business data needs to be backed out of a specific system or process.
An Atomic Scope shape behaves like an MSDTC transaction but is not an explicit DTC transaction by default. To clarify, if you send a message to SQL Server via the SQL adapter, the actions performed in the SQL call will not roll back, and a compensation handler is required to back out any committed changes. The reason a compensation handler is required is due to the SQL adapter not enrolling in an explicit DTC transaction.
Atomic scopes do support the use of a DTC transaction as long as the objects referenced in the scope are serviced components (COM+ objects) derived from the System.EnterpriseServices.ServicedComponents class. Additionally, the isolation levels must agree and be compatible between transaction components and what is specified in the atomic scope. The atomic scope does not require a configuration value to be set on the shape itself, as it will automatically enroll in an MSDTC transaction if possible.
Listing 5-5 serves as an outline for what to include in your assembly for creating a serviced component. Your assembly must reference System.EnterpriseServices and System.Runtime.InteropServices (for the Guid attribute reference). Verify that your component is registered in the Global Assembly Cache (GAC) (for example, using gacutil) and that you also register the component in COM+ (for example, using regsvcs).
Example 5.5. Serviced Component
using System;
using System.EnterpriseServices;
using System.Runtime.InteropServices;

namespace MSDTCTestLibrary
{
    /// <summary>
    /// Summary description for Class1.
    /// </summary>
    ///
    [Guid("9943FB26-F4F5-4e80-B746-160AB9A6359E")]
    [Transaction(TransactionOption.Required)]
    public class ClassMSDTCTest : ServicedComponent
    {
        public ClassMSDTCTest(){}

        public String Test()
        {
            try
            {
                // Commit the transaction
                ContextUtil.SetComplete();
                return "Test";
            }
            catch (Exception ex)
            {
                // Abort the transaction
                ContextUtil.SetAbort();
                return ex.ToString();
            }

        }

    }
}You have separate tasks to accomplish in an orchestration that must all succeed or fail together. These tasks may take a long time to complete.
Long-running transactions can help ensure a single consistent outcome across multiple BizTalk tasks. As an example, suppose you have a web site where customers can make purchases using credit. Creating a new customer involves two steps. First, the customer needs a login to access your web site. Second, the customer also needs credit established to make purchases. Sometimes, your web site cannot create a login because the customer has chosen a login already assigned to another customer. Other times, BizTalk cannot establish credit for the customer. If one of these tasks succeeds and the other fails, the user may experience undesirable behavior on your web site.
By defining actions to reverse each of the two tasks required in this example, BizTalk can automatically reverse the effects of one task in the event that the other fails. If BizTalk creates a login but cannot establish credit, it will detect the failure and invoke the compensation logic to disable the login. If credit is established but BizTalk cannot create the login, it will invoke the compensation logic to suspend credit.
The following steps demonstrate how to set up a long-running transaction for this example.
Create a new BizTalk project, and add an orchestration.
Right-click the orchestration design surface, and select Properties Window.
Set the
Transaction Typeproperty toLong Running.Place a Receive shape on the design surface with the
Activateproperty set toTrue. Configure BizTalk to receive aNewCustomerMsgmessage.Place a Parallel Actions shape under the Receive shape.
Place a Scope shape under the left branch of the Parallel Actions shape.
Select the icon in the upper-right corner of the Create Login shape, and select Long Running from the menu, as shown in Figure 5-51.
Set the Send shape's
Messageproperty toNewCustomerMsg.Create a one-way send port named
CustomerActivation.Set the
CustomerActivationsend port'sDelivery Notificationproperty toTransmitted.Note
Use delivery notification to determine if a delivery failure occurs. BizTalk will not complete the long- running transaction until the messages with delivery notification are successfully delivered and will report an error if any of the messages are suspended.
Right-click the top portion of the Scope shape, and select New Compensation Block from the context menu, as shown in Figure 5-52.
Place a Send shape inside the compensation block, and attach it to a new port. This defines the actions to reverse the transaction if another transaction fails.
Repeat steps 6 to 13 to define the Create Credit Account scope.
Deploy the orchestration and bind the ports to file locations. To simulate delivery failure to the
CustomerActivationandCreditApplicationports, deny the BizTalk Application Users group access to the file locations bound to the orchestration ports.
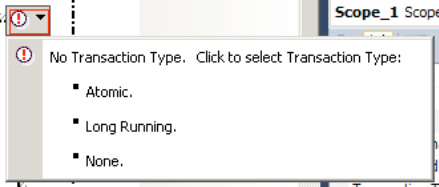
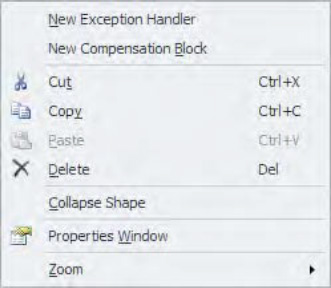
The goal of a transaction is to ensure that many separate tasks will all either succeed or fail together. With long-running transactions, BizTalk performs each task independently. If one task fails, then BizTalk must roll back the changes of the successful tasks. Rolling back successful tasks because of another's failure is called compensation. A BizTalk orchestration can determine when successful transactions need to compensate for a failed transaction, but the BizTalk developer must define the specific compensation logic.
The solution's example consists of two tasks, each with custom compensation logic defined. If BizTalk cannot establish credit for the customer, the Create Login transaction must compensate by taking actions to disable the login. Similarly, BizTalk compensates the Create Credit Account transaction by taking action to rescind credit. BizTalk will detect the error in the Create Credit Account transaction and call the compensation logic of all the long-running transactions in the same scope that have completed successfully. If the Create Login transaction also fails, then both transactions arrived at the same result, and BizTalk has nothing to compensate for. BizTalk will compensate only long-running transactions that complete successfully.
Long-running transactions are a great way to ensure a consistent outcome under circumstances such as the following:
Tasks take longer than a split-second to complete.
Results can be inconsistent for a short while before the compensating logic completes.
BizTalk needs to send or receive messages with a transport that cannot participate in an atomic transaction, like an ASMX web service.
In addition to long-running transactions, BizTalk scopes can also support atomic transactions. An atomic transaction differs by locking all the resources involved until the transaction knows they can all succeed. If they cannot all succeed, the transaction reverses all changes before releasing the resources. Because of this locking behavior, atomic transactions should be very quick. A long-running transaction executes each task separately and follows up with compensating logic if one task encounters an error. This approach allows separate tasks to have different results for a short time while the compensating logic executes but also allows greater processing flexibility.
You want to be able to catch all exceptions in the same way and be able to handle retries automatically with a configurable delay. You also want to be able to resubmit documents that have failed without losing context to what step in the orchestration flow was last executed.
The ExceptionHandlerPatternDemo project shows the use of the pattern, with a single Business Flow orchestration calling two different paths in a single Task Processing orchestration. Neither the Business Flow orchestration (SAMPLEMainBusinessFlow.odx) nor the Task Processing orchestration (SAMPLEExternalComponentCall.odx) are required in a true implementation. They are provided for demonstration purposes only. All of the files in the Common Schemas project and all of the files in the Exception Handler Buffer project are required, and need no modifications (aside from possible namespace modifications) to be used in any other solution.
The SAMPLEMainBusinessFlow orchestration demonstrates calling the other orchestrations with multiple input parameters (as demonstrated in the first Task Request grouping) and with an XML document that needs to be mapped (as demonstrated in the second Task Request grouping). Use the following steps to deploy and test the solution.
Open the
ExceptionHandlerPatternDemoproject.Deploy the project using Visual Studio. All of the files necessary for a complete deployment are included in the solution (including the strong name key). For ease of deployment, place the base folder,
ExceptionHandlerPatternDemo, on theC:drive root. If theC:drive is not available, several of the ports will need to be modified, as they reference physical paths for file send and receive locations.Once the orchestrations and schemas are deployed, bound, and started, drop the
SampleKickOff.xmlfile in theInputfolder. This will kick off the flow. Monitor the progress in the Windows Event Viewer (all steps are logged to the Event Viewer).
Based on a publish/subscribe architecture, the Exception Handler pattern can be used to buffer calls to components that may throw exceptions from the actual business flow of a process. The Exception Handler buffer allows for a common mechanism to catch, process, and retry exceptions (including notification to an administrator) that can be reused across multiple solutions. Figure 5-53 shows the high-level architecture of a request, and Figure 5-54 shows the high-level architecture of a response.
The orchestrations are built in such a way that the business workflow is separate from the actual calls to external tasks. The only orchestration that references anything besides ports that are directly bound to the MessageBox are the Task Processing orchestrations. So, too, these orchestrations are the only ones that will throw exceptions that need to be handled in a common way.
Any time an exception is thrown for any reason (such as a call to an external assembly throws an error, a web service is down, a database cannot be connected to, and so on), the Task Processing orchestration will catch the error, wrap the error information in a message, and return the message back to the Exception Handler orchestration. The Exception Handler orchestration will then decide whether to retry the call to the task (for system exceptions)—for example, if a database cannot be connected to, the orchestration will delay for a specified period of time and then retry—or simply notify an administrator and wait for a response. The response back from an administrator could indicate that the call to the task should be retried or that the entire process should be cancelled.
The Exception Handler pattern can be used in a variety of scenarios, with the following benefits:
It offers configurable automatic retries of system exceptions.
An administrator is notified (via any type of BTS adapter) for business rule exceptions and after a maximum number of automatic retries of system exceptions.
It allows multiple unrelated orchestrations to publish to a single version of the Exception Handler orchestration.
There are no uncaught or unhandled exceptions.
No messages end up suspended.
It offers complete visibility into the life cycle of an orchestration.
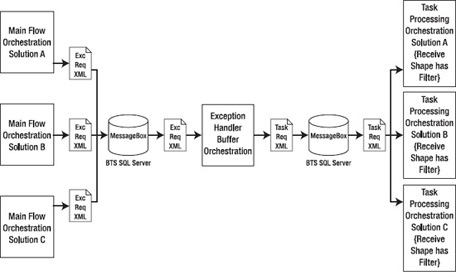
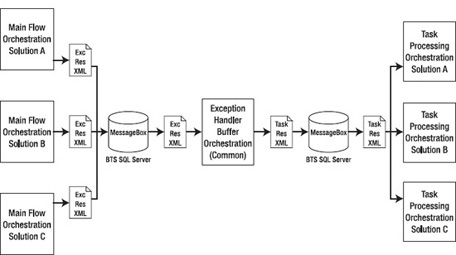
The orchestrations communicate with one another through the publish/subscribe model, meaning that the publishing orchestration drops a message on the BizTalk MessageBox to which the subscribing orchestration is subscribing. The following sections describe these schemas and how they are used.
This schema is published by the Business Flow orchestration(s) and subscribed to by the Exception Handler Buffer orchestration. It contains all of the data needed to call a task and all of the configurable information needed by the exception handler to process and retry exceptions (such as maximum number of retries, delay between retries, and so on). Table 5-5 shows the schema definition.
Table 5.5. Exception Handler Buffer Call Request Schema
Element | Description |
|---|---|
| A unique identifier that is assigned in the Main Flow orchestration and travels with each message through the entire request and full response. |
| The unique identifier specifying which Task Processing orchestration should instantiate based on the call. All Task Processing orchestration instances will subscribe to messages that are based on the |
| The name of the task that is to be executed in the Task Processing orchestration. The Task Processing orchestration can have multiple branches in a Decide shape. The branch that is executed is based on the value in this parameter. |
| Maximum number of retries for a task that has thrown an exception. For example, if a call is being made to a database, and the connection to the database is unavailable, the Task Processing orchestration will return an exception. The Exception Handler orchestration will then retry (after a delay) the call to the task. Use this parameter to specify the maximum number of retries before notifying an administrator. |
| Amount of time between retries. This parameter is in seconds. |
| If the call to the task is a call with one single simple type parameter (such as a string, integer, and so on), this parameter can be used. It is a distinguished field and can be easily accessed. |
| This is a repeating node allowing for multiple input parameters. Use this structure when multiple input parameters are needed. Values can be accessed using XPath queries in the Task Processing orchestration (see the demonstration for examples).
|
| This |
This schema is published by the Exception Handler orchestration and subscribed to by the Main Business Flow orchestration(s). It contains the output information needed by the Main Business Flow to determine what (if any) the result of the Task Processing orchestration call may have been. Table 5-6 shows the schema definition.
Table 5.6. Exception Handler Call Buffer Response Schema
Element | Description |
|---|---|
| A unique identifier that is assigned in the Main Flow orchestration and travels with each message through the entire request and full response. |
| Boolean value indicating success or failure of call. If an administrator canceled the process, this value would be returned as |
| If the response from the task is a single simple type parameter (such as a string, integer, and so on), this parameter can be used. It is a distinguished field and can be easily accessed. |
| This is a repeating node allowing for multiple output parameters. Use this structure when multiple output parameters are needed. Values can be set and accessed using XPath queries in the Task Processing orchestration (see the demonstration for examples).
|
| This |
This schema is published by the Exception Handler orchestration and is subscribed to by the Task Processing orchestration(s). All Task Processing orchestration instances subscribe to this schema type. Use a filter expression on the individual Task Processing orchestration's initial Receive shape to indicate which instance to kick off (based on the OrchestrationFilter parameter). Table 5-7 shows the schema definition.
Table 5.7. Task Processing Logic Call Schema
Description | |
|---|---|
| A unique identifier that is assigned in the Main Flow orchestration and travels with each message through the entire request and full response. |
| The unique identifier specifying which Task Processing orchestration should instantiate based on the call. All Task Processing orchestration instances will subscribe to messages that are based on the |
| The name of the Task that is to be executed in the Task Processing orchestration. The Task Processing orchestration can have multiple branches in a Decide shape. The branch that is executed is based on the value in this parameter. |
| If the call to the Task is a call with one simple type parameter (such as a string, integer, and so on), this parameter can be used. It is a distinguished field and can be easily accessed. |
| This is a repeating node allowing for multiple input parameters. Use this structure when multiple input parameters are needed. Values can be accessed using XPath queries in the Task Processing orchestration (see the demonstration for examples).
|
| This |
This schema is published by the Task Processing Logic orchestration(s) and subscribed to by the Exception Handler Buffer orchestration. It contains the output information needed by the Main Business Flow to determine what (if any) the result of the Task Processing orchestration call may have been and by the Exception Handler Buffer orchestration to determine what exceptions may be present and if the call needs to be retried (based on the presence of exceptions). Table 5-8 shows the schema definition.
Table 5.8. Task Processing Logic Response Schema
Description | |
|---|---|
| A unique identifier that is assigned in the Main Flow orchestration and travels with each message through the entire request and full response. |
| Boolean value indicating success or failure of call. This is not a success/failure indicating the result of the call, but an actual indicator of whether or not the call was made. If an exception was thrown, or an administrator canceled the process, this value would be returned as |
| The text of the exception message (if an exception was thrown). |
| The base exception type (if an exception was thrown). |
| The full stack trace thrown (if an exception was thrown). |
| If the response from the task is a single simple type parameter (such as a string, integer, and so on), this parameter can be used. It is a distinguished field and can be easily accessed. |
| This is a repeating node allowing for multiple output parameters. Use this structure when multiple output parameters are needed. Values can be set and accessed using XPath queries in the Task Processing orchestration (see the demonstration for examples).
|
| This |
This schema is published by the Exception Handler orchestration and is published to an administrator. This may be as simple as writing to a file, or it could be set up to write to a database or any other protocol desired. The Error To Administrator schema contains all of the information that an administrator would need to understand what error was thrown. Once the administrator is ready to resubmit the document to the process, the same schema type is resubmitted. Table 5-9 shows the schema definition.
Table 5.9. Error To Administrator Schema
Description | |
|---|---|
| A unique identifier that is assigned in the Main Flow orchestration and travels with each message through the entire request and full response. |
| Boolean value indicating that the administrator wants to cancel the entire process. There may be times when the exception being thrown may require some amount of rewrite. For whatever reason, an administrator may cancel the process by simply dropping the XML file back into the process with this flag set to |
| This node will contain the XML of the original message passed into the Exception Handler orchestration. |
| The text of the exception message (if an exception was thrown). |
| The base exception type (if an exception was thrown). |
| The full stack trace thrown (if an exception was thrown). |
You can send specific request types based on certain document elements by using role links. Role links offer the flexibility of defining functions or roles for the inbound and outbound ports of your orchestration. Additionally, role links also offer the flexibility of abstracting the interactions between orchestration and external parties.
The following instructions outline the steps required to create and configure role links within a BizTalk orchestration. Before implementing role links, you must create an orchestration and role links within the orchestration. Next, you must deploy the orchestration and create the parties that participate in the processes.
This solution uses two sample XML files to demonstrate how role links route messages based on message content. The first XML instance requires a manager party's approval, and the second XML instance requires a human resources (HR) department party's approval.
We've divided the solution for this recipe into several tasks, as described in the following sections.
First, you must create a BizTalk orchestration for this example.
Create a new BizTalk solution that will process new hire requests that require approvals. The message structure should match the sample outline in Listing 5-6.
Example 5.6. Sample New Hire XML Instance
<ns0:ApplicantApproval
    xmlns:ns0="http://Sample_Role_Link_Recipe.SampleNewHireRequest">
  <ApplicantID>1000</ApplicantID>
  <Approver>Manager</Approver>
  <Detail>

    <SSN>508-03-4433</SSN>
    <Name>Wally McFally</Name>
    <Position>Technician</Position>
  </Detail>
</ns0:ApplicantApproval>
Create an orchestration to process the new hire requests. The orchestration requires the artifacts listed in Table 5-10.
Table 5.10. Role Links Recipe Artifacts
Name | Type | Description |
|---|---|---|
| Receive port | The Receive port. |
| Receive shape | The Receive shape to receive messages. |
| Expression shape | The Expression shape to initialize role links for outbound message routing. |
| Send shape | Send shape for the outbound message. |
| Message matching schema defined in step 1. | The name of the message is crucial, because it must match the name referenced in the expression code that is entered to initialize role links. Make sure that the |
Next, you need to create and initialize the role links send port for message approval. The Role Link shape will contain a single Approval consumer role.
Select the Role Link shape form the BizTalk Orchestrations section of the toolbox, and drag the shape to the orchestration.
The Role Link Wizard will launch (see Figure 5-55). Follow the Role Link Wizard, and specify the following:
Click the Finish button to complete the wizard.
Once the wizard has completed, remove the Provider role from the newly created role link, as the Provider role will not be used in this example.
Note
When following the Role Link Wizard, select either the Provider role or Consumer role for your application. The Role Link Wizard will create both roles, but you are free to remove the role that does not apply to your given situation.
After creating the role link, the next task is to create a send port type implemented by the role link. A send port type is required because it defines the type of message a send port will send.
Right-click the Provider section of the Role Link shape, and choose Add Port Type.
In the Port Type Wizard, select Create a New Port Type, and enter
SendPortTypefor the name. Click the Finish button to complete the wizard.Connect the orchestration send port to the newly created send port type in the role link Consumer role. The orchestration should resemble Figure 5-56.
BizTalk uses the destination party for routing of the message. Add the following code to the Expression shape in your orchestration.
//set the approver name
       NewHireApproval(Microsoft.XLANGs.BaseTypes.DestinationParty) = new
Microsoft.XLANGs.BaseTypes.Party(msgNewHire.Approver, "OrganizationName");
Build and deploy the solution after completing the orchestration. When you deploy the solution, a new Consumer role is created in the
Role Linksfolder located in the BizTalk Administration Console.
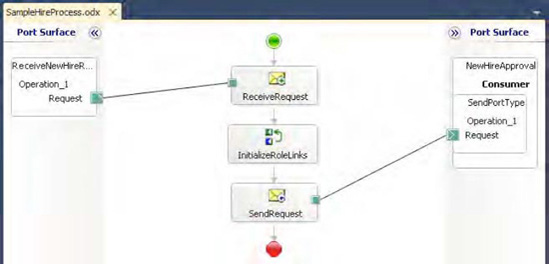
Note
The Expression shape code performs the party resolution. The line of code uses the Approver distinguished field to determine to which party to route the message. When you create a party, a party alias is also created to use for party resolution. In the Expression shape, we use the default alias, OrganizationName, which is created with each party. However, multiple aliases can be created for a party and then referenced in an Expression shape. For example, an alias of PhoneNumber could be created during the party creation and then referenced in the Expression shape.
The final steps involve creating the BizTalk parties and physical send ports for the solution. Within the BizTalk Administration Console, create the physical send ports and parties that will receive the approval messages.
Create a file send port named
HRPartySendPort. This is the send port for messages that are routed to the HR department.Create another file send port named
ManagerPartySendPort. This is the send port for messages that are routed to the manager department.Create a party named
ManagerParty. Make sure that theManagerPartyrefers to theManagerPartySendPort.Create a party named
HRParty. Make sure that theHRPartyrefers to theHRPartySendPort.Note
The
Approvername value in the message must match the name of the party you created. If a message is sent referencing an invalid party, BizTalk will suspend the message when trying to route the message to the party specified.Enlist the two parties within the Consumer role that was created when the orchestration was deployed.
After completing the preceding tasks, you will be able to enlist and start your solution to test the implemented role links. When you submit a message with Manager as the value for the Approver element, the message will be routed to the send port associated with the Manager party. When you submit a message with HR as the value for the Approver element, the message will be routed to the send port associated with the HR party.
Role links are extremely useful for loosely coupling your physical solution from the trading partner or disparate system. Processes that implement role links benefit from the abstraction by being able to stand independent of the implementation of the trading partner or subscribing system.
Imagine having a business process that is the same for multiple trading partners or systems. Some of the consumers of the process need the information in a flat file format or must receive the information using a proprietary communication protocol. You could implement this scenario through the use of dynamic ports or a send port group, but the maintenance of subscribers becomes a challenge. Updating a dynamic send port requires updating the process that provides the configuration information. Implementing role links allows the subscribers to be independent and updated without impacting other subscribers.
Implementing role links is straightforward and requires few steps in configuration. The first set of configuration steps is performed in the solution design-time environment. The final set of steps is performed after the process has been deployed. You must identify whether you are consuming or providing a service, identify the parties that will be interacting with the service, and specify the role under which the parties will operate. The Role Link Wizard in Visual Studio will create two default roles automatically. You are not required to use the two roles, and you can create additional roles after the wizard has executed.
The following are the required components when implementing role links:
Parties: The specific entities interacting with your organization's orchestration either providing or consuming information from that orchestration. Typically, each party represents a single organization that interacts with your organization.
Roles: Logical entities that define a specific business process. Roles either consume or provide services.
Role links: Describe the relationship or connection (link) between two roles. The Role Link shape within Visual Studio will launch the Role Link Wizard to assist in creating roles within your orchestration.
Role link types: Describe how your orchestration participates in the service. Role link types are similar to port types in that you specify whether you are consuming a message or publishing a message.
In the sample solution accompanying this recipe, a New Hire process has been created that contains a single Approver role. We required only a single role and removed one role from the role link after the wizard was complete. For the role created in our role link, we specified a send port type. Each role must implement a port type for communication to outside entities. The final step was to programmatically determine party resolution. For illustration purposes, an Expression shape implemented party resolution via code. BizTalk must always know which party will be receiving the message, and the party resolution can either be performed in the orchestration or within a pipeline.
You want to call a web service from within your business process, using the standard SOAP adapter.
When calling a web service, the first item that is needed is the Web Services Description Language (WSDL). The WSDL contains the interfaces indicating how a web service can be called. BizTalk imports this WSDL and turns it into a schema that can be read in the same way as a standard XSD, with each web method defining its own schema. This solution will walk through the steps required to reference a WSDL, create a message to post to a web service (via a web method), and get the web service result message.
Open a BizTalk project in Visual Studio.
In the Solution Explorer, right-click the
Referencesnode under the project header, and select Add Service Reference.In the Add Service Reference dialog box, you can manually enter the URL of the WSDL into the URL box at the top of the window. This can be a standard web URL (
http://) or a file path to a WSDL or SVC file (useful for developing in a disconnected environment). Alternatively, use any of the other Browse methods to locate the service.After entering a valid URL path, all available web services will be displayed (see Figure 5-57). Select the desired web service from this list. Make sure that the namespace shown in the text box is appropriate (usually, you will want to rename this to something more descriptive than the default; the name entered here will be how the web service is referred to in the rest of the project)
Click the OK button. The newly referenced web service should now appear under the
Service Referencesfolder in the Solution Explorer (see Figure 5-58).In an orchestration, right-click Port Surface, and select New Configured Port. This will start the Port Configuration Wizard. Use the following settings to configure the new port.
Name the port appropriately.
For Port Type, select Existing Port Type. In the window that appears, highlight the web port that is a post (as opposed to a response back), and then click Next.
The final screen should be automatically configured indicating that BizTalk will always be set to sending a request and receiving a response, with the port binding set to Specify Now. There is no need to make any changes. Click Next, and then click Finish.
Note
Web service calls can be request/response (two-way) or simply request (one-way). Some of the parameters in the configuration will be slightly different in the case of a one-way web service.
In the orchestration, add a new Send shape. This shape will require a message to be associated with it. You will want to create a message that has the same type as the outgoing port you configured in step 6, as follows:
In the Orchestration View window, right-click the
Messagesfolder, and select New Message.Give this message an appropriate name, such as
msgRequest.In the Properties window of the message, click the
Message Typedrop-down list, expandWeb Message Types, and select the message type that corresponds to the port type you indicated in step 6.Set the Send shape
Message Typeproperty to this message.
Connect the Send shape to the outgoing method on the port created in step 6.
Drop a Receive shape on the orchestration, immediately after the Send shape created in step 7. You will need to create a message that has the same type as the response back from the web service call, as follows:
In the Orchestration View window, right-click the
Messagesfolder, and select New Message.Give this message an appropriate name, such as
msgResponse.In the Properties window of the message, click the
Message Typedrop-down list, expandWeb Message Types, and select the message type that corresponds to the response of the web service web method indicated in step 6.Set the Receive shape
Message Typeproperty to this message.
Create an instance of the message that you are sending to the web service (
msgRequest). This can be done through a map or a Message Assignment shape. The following steps will show how to do this through a map.Drop a Transform shape in the orchestration immediately before the Send shape created in step 6. This will automatically create a Construct Message shape.
In the Properties window of the Construct Message shape, click the
Messages Constructedproperty, and select the message created in step 6 (msgRequest).Double-click the Transform shape. In the Transform Configuration dialog box, the target document should be
msgRequest, and the source document can be any document (you will need to create a message, not included in these steps, of any given schema type and set it to the source).After setting the source and target schemas, click OK. The map should open, and you can map fields as needed.
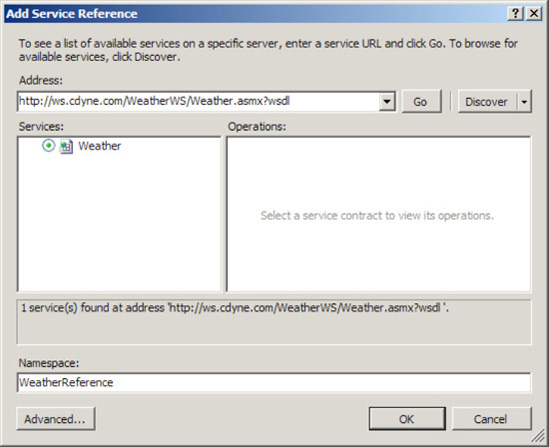
The complexity around calling and mapping to web services is greatly reduced by using a BizTalk orchestration, the standard SOAP adapter, and the steps described in this solution. However, there may be times when these steps do not provide the result needed. In cases where the called web service is too complex a structure to consume, the web service could be called from an external .NET component, removing the complexity of calling it from BizTalk altogether.
Calling a web service from an external assembly lets developers use the full functionality of .NET to make the call. While complex web services with arrays or strongly typed data sets can be called from an orchestration, moving the call to an external component may be easier.
There are important benefits to calling a web service with the BizTalk SOAP adapter and following the steps described in this solution. The ability to turn the WSDL into a schema, the ability to have retries automatically occur, and the simplicity of creating the message through the BizTalk Mapper are all excellent reasons to invoke the web service from within an orchestration.
You would like to expose an orchestration process as a service to be called from an outside application.
Using BizTalk, an orchestration can be exposed as a service via the BizTalk WCF Service Publishing Wizard. Using this tool, the effort to expose an orchestration as a service is considerably simplified. To expose an orchestration as a service, take the following steps:
Open the BizTalk WCF Services Publishing Wizard by selecting Start→Programs→BizTalk 2010
BizTalk WCF Services Publishing Wizard.
On the WCF Service Type page, click the Service Endpoint radio button.
Set the Adapter name to WCF-BasicHttp (see Figure 5-59).
On the next page, you will have the option of publishing a schema or an orchestration as a WCF service. Select the orchestration option.
On the BizTalk Assembly page, browse to the DLL that contains the orchestration you are publishing.
On the Orchestration and Ports screen, ensure that the ports you want to expose are selected.
On the WCF Service Properties page, set the namespace to a descriptive value.
On the WCF Service Location, browse to the web directory where this will be published (see Figure 5-60).
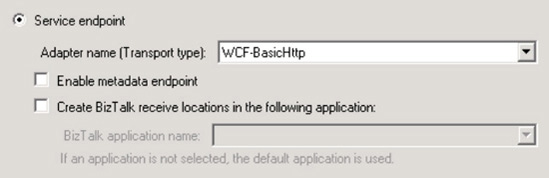
Exposing orchestrations as services allows you to reuse orchestration processes by creating BizTalk configurations to support the passing of a service call to a BizTalk orchestration. This way, you can take advantage of core BizTalk capabilities such as error handling, document tracking, and integration into downstream BizTalk via the publish/subscribe architecture. In addition, you can extend outside your BizTalk environment, to enable a service-oriented approach, composite application paradigms, and so on.
The WCF Services Publishing Wizard interrogates the BizTalk orchestration and receive ports and creates a service application to support the calling of the target BizTalk orchestration. This is achieved by creating a service (SVC) that calls a C# .NET code behind that implements the mechanism of publishing the message instance to the BizTalk MessageBox.
Just as BizTalk orchestrations can be exposed as services, so too can XSD schemas. XSD schema services are also generated using the WCF Services Publishing Wizard, where one or more XSD schemas are selected and corresponding services are generated. The service handles sending the message directly to the BizTalk MessageBox, offering a way to implement publish/subscribe without the need to create a BizTalk orchestration.
You are developing an orchestration and need to use pipeline-processing stages within the workflow. Specifically, you need to validate a document and batch multiple messages into a single interchange. You want the orchestration to be efficient, minimizing the interactions between the orchestration and the MessageBox database.
BizTalk Server exposes a programmatic interface into pipelines, allowing you to call both receive and send pipelines directly from orchestrations. Assume your orchestration has the following steps:
Receive an order message in an industry-standard format.
Transform the message to a canonical version of the order schema.
Send the canonical order message to an external application for processing.
Receive a status message from the external application indicating the success or failure of the message processing.
In addition to the orchestration, you have also created a receive pipeline to validate the canonical order schema, an envelope, and a send pipeline to batch the canonical order and order response documents into a single interchange.
Open your orchestration in Visual Studio, and perform the following steps to implement the pipeline calls:
From the toolbox, drag the following shapes onto the orchestration design surface:
Drag a Scope shape named
Execute Receive Pipelinedirectly below theConstruct Canonical OrderMessage shape, and set theTransaction Typeproperty toAtomic.Tip
The orchestration's
Transaction Typeproperty must be set toLong Runningin order for it to hold an Atomic Scope shape.Drag an Expression shape named
Execute Receive Pipelineinside the Scope shape added in the previous step.Drag a Construct Message shape named
Construct Validated Messagedirectly below theExecute Receive PipelineExpression shape (also inside theExecute Receive PipelineScope shape), and set theMessages Constructedproperty to a message defined by your validating schema—in this solution, a message namedCanonicalOrderValidatedMessagedefined by the canonical order schema.Drag a Message Assignment shape named
Assign Validated Messageinside the construct message shape added in the previous step.Drag a Construct Message shape named
Construct Batched Messagedirectly below theReceive Order Statusreceive shape, and set theMessages Constructedproperty to an XML message—in this solution, a message namedBatchedOrderMessageof typeSystem.Xml.XmlDocument.Drag a Message Assignment shape named
Assign Batched Messageinside the construct message shape added in the previous step.
Add a reference in your BizTalk project to the
Microsoft.XLANGs.Pipeline.dll(found in the root BizTalk installation folder), which holds the classes required for calling pipelines from orchestrations.Create a new variable named
ValidatePipelineOutputof typeMicrosoft.XLANGs.Pipeline.ReceivePipelineOutputMessagesin theExecute Receive PipelineScope shape. This variable will hold the validated output of the call to the receive pipeline, containing the validated canonical order message.Add the following code to the
Execute Receive PipelineExpression shape in order to call the appropriate receive pipeline:ValidatePipelineOutput = Microsoft.XLANGs .Pipeline.XLANGPipelineManager.ExecuteReceivePipeline (typeof(OrderProcessing.ValidateCanonical OrderSchemaReceivePipeline), CanonicalOrderMessage);Add the following code to the Assign Validated Message shape in order to extract the validated canonical order message:
CanonicalOrderValidatedMessage = null;
       ValidatePipelineOutput.MoveNext();
ValidatePipelineOutput.GetCurrent(CanonicalOrderValidatedMessage);
Note
To handle multiple output messages from a receive pipeline (when using an envelope for message debatching, for example), you may need to use a loop in order to iterate through the message collection and handle each appropriately.
Create a new variable named
BatchingPipelineInputof typeMicrosoft.XLANGs.Pipeline.SendPipelineInputMessages. This variable will hold the output of the call to the send pipeline, containing the batched order messages.Add the following code to the Assign Flat File Message shape to call the appropriate send pipeline (
BatchedOrderMessagesis a BizTalk message of typeSystem.XML.XmlDocumentand is used to hold the output of theExecuteSendPipelinemethod call):BatchedOrderMessages = null; BatchingPipelineInput.Add(CanonicalOrderValidatedMessage); BatchingPipelineInput.Add(CanonicalOrderStatusMessage); Microsoft.XLANGs.Pipeline.XLANGPipelineManager.ExecuteSendPipeline (typeof(OrderProcessing.BatchOrderAndStatusMessagesSendPipeline), BatchingPipelineInput, BatchedOrderMessages);Build and deploy the solution.
This solution shows how to leverage pipeline processing directly from orchestrations. First, we discuss the mainline process involved in the solution. Then, we discuss exception handling.
The Microsoft.XLANGs.Pipeline.XLANGPipelineManager class exposes an API for calling pipelines programmatically.
Note
To use this class, you must add a reference in your BizTalk project to the Microsoft.XLANGs.Pipeline assembly.
In this scenario, you needed to use both a receive pipeline and a send pipeline. The receive pipeline allows you to validate a message that you create in the orchestration. You call the receive pipeline via the ExecuteReceivePipeline method, which has the following signature:
Type: The fully qualified type of the receive pipeline you need to call. You format this parameter astypeof(FullyQualifiedNameOfReceivePipeline). You can easily find the fully qualified type name of your receive pipeline by clicking the pipeline file in the Solution Explorer and viewing theFully Qualified Nameproperty.XLANGMessage: The XLANG message object you need to pass into the receive pipeline.
This method returns an instance of the Microsoft.XLANGs.Pipeline.ReceivePipelineOutputMessages class, which contains an enumeration of output messages from the receive pipeline. In this solution, the pipeline produces a single message, and you are able to easily extract the message by using the MoveNext and GetCurrent methods of the class. If multiple messages could be returned by the receive pipeline, you would need to loop through the ReceivePipelineOutputMessages object to extract each message. You can accomplish this by using a Loop shape configured with ValidatePipelineOutput.MoveNext() as the expression and an Assign Message shape configured with ValidatePipelineOutput.GetCurrent(CanonicalOrderValidatedMessage); as the expression.
Note
You must place the code (usually contained within an Expression shape) that calls the receive pipeline in an Atomic Scope shape, because the ReceivePipelineOutputMessages class is not serializeable and cannot be persisted to the MessageBox.
The send pipeline batches multiple messages within the orchestration into a single interchange. You call the send pipeline via the ExecuteSendPipeline method, which has the following signature:
Type: The fully qualified type of the send pipeline you need to call. You format this parameter astypeof(FullyQualifiedNameOfSendPipeline).SendPipelineInputMessage: The collection of messages you need to pass into the send pipeline.XLANGMessage: The XLANG message object you will receive as output from the send pipeline.
Note
You must place the code that calls the send pipeline in a Message Assignment shape, because the ExecuteSendPipeline method constructs the XLANGMessage it passes as an output parameter.
Although calling pipelines from an orchestration generally results in the same functionality and processing as when they are executed via BizTalk messaging objects, you need to be aware of some differences. One of the most important discrepancies is the input and output XLANG message objects that are passed to ExecuteReceivePipeline and ExecuteSendPipeline, respectively. Although XLANG message objects allow you define them as being of any type (XmlDocument, String, DateTime, and so on), the XLANG message instances you pass to the pipeline execute methods must be XML documents. This means that the XLANG message objects should be defined by either the System.Xml.XmlDocument type or an XML schema to ensure consistent behavior. This limitation is because the pipeline execution methods treat their XLANG message parameters as XmlDocument objects. Although it is possible to use a different type to define your XLANG message objects (such as System.String), it is advised you do so with caution and careful consideration and validate that any data written to the message is in XML format.
Note
One shortcoming of this limitation is that it is not straightforward to call a send pipeline that assembles an XML document into flat file format, because the flat file string is returned as an XmlDocument object but likely does not conform to XML.
Another difference to be aware of is how tracking and monitoring data is handled. When calling pipelines from an orchestration, pipeline components leveraging the BAM Interceptor API are not supported, and the assembler/disassembler stages do not process tracking information. Additionally, transactional pipeline components are not supported when called from orchestrations.
Any errors occurring in pipelines called from orchestrations cause an XLANGPipelineManagerException exception object to be thrown. Messages are not suspended, as they would be if the pipeline were executed by a messaging object (receive location or send port). This exception object can be handled via a catch exception block, which is configured on a Scope shape within an orchestration. Once the exception is caught, the exception's properties can be interrogated and the event handled appropriately.
Using an invalid document (using a character in the Identifier element, which expects an integer value) in this solution produces the following error:
There was a failure executing pipeline "OrderProcessing.ValidateCanonicalOrderSchema
    ReceivePipeline".
Error details:
    "The 'Identifier' element has an invalid value according to its data type.".

Exception type: XLANGPipelineManagerException
Source: Microsoft.XLANGs.Pipeline
Target Site: Microsoft.XLANGs.Pipeline.ReceivePipelineOutputMessages ExecutePipeline
    (Microsoft.BizTalk.PipelineOM.ReceivePipeline, Microsoft.
    XLANGs.BaseTypes.XLANGMessage)
As you can see, the exception thrown has a type of XLANGPipelineManagerException, and the description indicates the specific validation failure.