Messaging is the core functionality provided within BizTalk Server. On a very basic level, it is the plumbing that moves messages from one location to another. A number of different parts or objects make up this plumbing, taking actions at each step of a message's path through BizTalk Server. Generally speaking, messaging objects can be split into two categories: receive and send. Figure 4-1 outlines the stages a message goes through as it is processed.
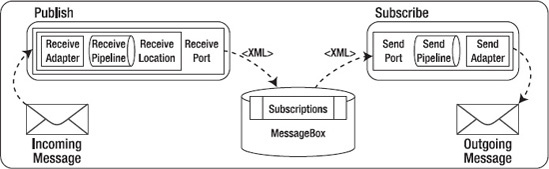
The receive objects enable the publishing side of BizTalk Server's publish/subscribe architecture. They publish messages into the MessageBox database, the central repository for all messages handled by BizTalk Server. The following objects are involved with receiving messages:
Receive location: Handles the actual retrieval of messages from a specified location. The following are the main objects included within receive locations:
The receive adapter defines the location and method (file, MSMQ, SQL, and so on) to retrieve messages.
The receive pipeline allows decoding, decryption, disassembling, and validating messages against a schema. Receive pipelines also enable party resolution. A custom pipeline component can implement custom logic.
Receive port: Groups one to many receive locations and defines any transformation (or mapping) that occurs on messages being received by the receive port.
The send objects enable the subscribing side of BizTalk Server's publish/subscribe architecture. They subscribe to messages in the MessageBox database and deliver the messages onward to destination locations. The following objects are involved with sending messages:
Send port: Handles the actual delivery of messages to a specified location. The following are the main objects included within send ports:
A filter defines the subscriptions for the send port. Promoted properties define these subscriptions and determine which messages the send port will handle. (See Recipe 1-3 for details on promoted properties.)
A map defines any transformation occurring on messages sent through the send port. (See Chapter 2 for details on document mapping.)
The send pipeline allows assembling, validating against a schema, encoding, and encrypting messages. A customer pipeline component can also implement custom logic.
Send port group: Groups one to many send ports and defines the filter(s) used to determine the messages handled by the send ports.
As the MessageBox database receives a message, BizTalk Server checks to see what active subscriptions (send port filters, for example) there are for that message and routes the message to each of the appropriate subscribers. This publish/subscribe architecture facilitates adding new consumers of information, making it easy to deliver messages to additional systems if needed. Once the MessageBox database receives a message, BizTalk can deliver it to any number of subscribing destination systems.
While the MessageBox database holds all messages that are processed by BizTalk Server, messaging objects (receive ports, receive locations, send ports, and send port groups) are stored in the Management database. In BizTalk Server 2010, messaging objects can be associated with an application, which is a logical grouping of all objects related to a specific application or solution (including messaging objects, orchestrations, schemas, and so on). The application concept facilitates the management of a wide variety of BizTalk objects that are essentially part of one unit of work.
Messaging objects are created and managed through the BizTalk Administration Console. A number of other tools are also available for managing messaging objects. This chapter focuses on using the tools provided with BizTalk Server to "lay the pipes" for your integration solutions.
Note
In previous editions of BizTalk Server, some administration could be done through BizTalk Explorer in Visual Studio. This option is no longer available in BizTalk 2010.
You have messages from an external application or system that you want to receive into BizTalk Server.
In BizTalk, receive ports and receive locations are configured to receive data from other applications, systems, or processes. As an example, the following solution describes the procedure for configuring a one-way receive port and a location to receive data from another application via a file input.
Open the BizTalk Administration Console.
Under the appropriate BizTalk application, right-click the
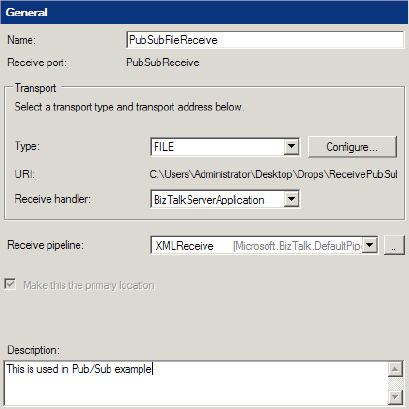
Receive Portsfolder, and add a new one-way receive port.In the Name text box, name the receive port (
PubSubReceivein our example).Click the Receive Locations tab, and create a new receive location.
In the Name text box, enter a name for this location (
PubSubFileReceivein this example).Set the properties as follows (see Figure 4-2), and then click OK.
Type: FILE
URI (address): Click the ellipsis, and navigate to or enter the path to a location where the sample instance will be dropped (in this example,
C:UsersAdministratorDesktopDropsReceivePubSub)Receive pipeline:
Microsoft.BizTalk.DefaultPipelines.XMLReceive pipeline
Receive ports and receive locations are used in tandem to receive data into the BizTalk environment. Data could be from an internal application or an external entity across the Internet, for instance. Receive locations are tied to a receive port; however, there can be many receive locations per port. There are two types of receive ports:
Static one-way: A port defined to receive data into BizTalk.
Request response port: A port that is used to receive data, but then submit a response back to the sending entity. An example of this could be a web service or HTTP request (request/response–based transport).
Within the receive port configuration, an XML message can be transformed via inbound maps.
Associated with a receive port are one to many receive locations. Receive locations are the physical entry point into the BizTalk MessageBox. The following receive location options can be configured:
General: Configure the transport type and location. The transport type includes all BizTalk out-of-the-box adapters (FILE, MSMQ, SQL, HTTP, and so on). The location includes the physical location, input masking, authentication, and batching options based on the transport type.
Receive handler: The physical BizTalk host the receive location is to run under.
Receive pipeline: Receive pipelines are BizTalk components that support various types of message construction. In addition, pipelines can be extended via .NET code through the BizTalk interface
iComponent. Common uses of pipelines are to enable message transformation for non-XML messages, such as a flat file format or a recordset from a database. In addition, receive pipelines can also be specified for well-formed XML messages.Service window: Service window properties enable constraints on when a receive location is active by date and time filters. This might be useful when dealing with cost-prohibitive communication entities or nondedicated transport.
You have a document that you would like to send to a downstream application, partner, or process.
You use a send port to send documents from the BizTalk Server platform to other applications, partners, or processes. Send ports are configured using the BizTalk Administration Console and can be used in a pure messaging scenario (no orchestration) or from an orchestration.
Note
The ability to configure BizTalk artifacts via the BizTalk Explorer in Visual Studio is no longer available in BizTalk Server 2010.
The steps for creating and configuring a send port are as follows:
From the BizTalk Administration Console, right-click Send Ports, and select New

Static one-way port: Static indicates that the properties are fixed and set at design time. One-way indicates that there will be no response back to BizTalk after the message is sent.
Static solicit-response port: Static indicates that the properties are fixed and set at design time. Solicit-response indicates that there will be a response back to BizTalk after the message is sent
Dynamic one-way port: Dynamic indicates that properties will be set at runtime to define the ultimate destination of the message. One-way indicates that there will be no response back to BizTalk after the message is sent.
Dynamic solicit-response port: Dynamic indicates that properties will be set at runtime to define the ultimate destination of the message. Solicit-response indicates that there will be a response back to BizTalk after the message is sent.
The Send Port Properties dialog box will appear. Send port configurations are divided into these categories: General, Transport, Maps, Filters, Certificates, and Tracking properties. Set the properties as required (see the "How It Works" section). Then, click OK to save the configurations and create the send port.
Send ports are one of the fundamental BizTalk artifacts and are used to send any types of messages or data from the BizTalk platform to physical locations, systems, or processes. Determining the type of send port to create is important when constructing a solution. You may use send ports in pure messaging or orchestration-based solutions.
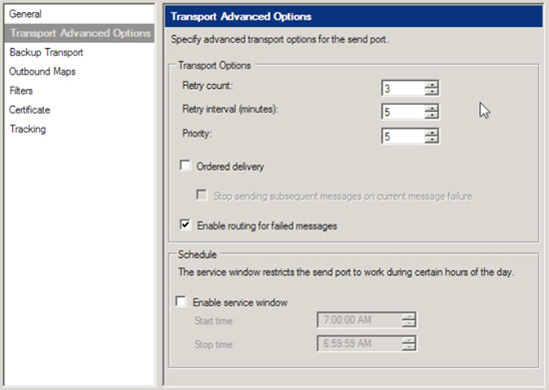
You can configure various properties for send ports. Transport properties are available only for static port types (one-way or solicit-response). Both a primary and a secondary transport can be defined. The secondary transport will take effect if an error is encountered sending to the primary transport and all retries as defined by the primary transport Retry Count setting were also attempted. Table 4-1 describes the Transport properties.
Table 4.1. Send Port Transport Properties
Property | Description |
|---|---|
| The type of adapter. If you chose a solicit-response port type, only those adapters that support solicit-response, such as HTTP and SOAP, will be available in the drop-down list. |
| Click the Configure button to launch a window for configuring the properties specific to the adapter chosen as the transport type. |
| Represents the number of times BizTalk Server will retry sending the message if there is a problem during transmission. |
| Represents the number of minutes between retry intervals. |
| When set to |
| With this checked, failed messages will have certain context properties promoted so that they can be routed to orchestrations or send ports. |
| When set to |
| Indicates when BizTalk will start sending messages if |
| Indicates when BizTalk will stop sending messages if |
Send properties are the general properties that apply to all send ports. Table 4-2 describes the send properties.
Table 4.2. Send Port Send Properties
Property | Description |
|---|---|
| Sets how messages will be tracked. There are a number of options around tracking message bodies and message properties.These can be invaluable in troubleshooting or accessing failed documents. |
| A drop-down list of all certificates installed and available for use on the send port. |
| The certificate's thumbprint, which will fill in automatically if a certificate name is selected. |
| A drop-down list of the send pipelines available. You can select a pipeline for processing messages sent over this send port. |
| A drop-down list of the receive pipelines available. For solicit-response send ports, you can select a pipeline for processing the responses received over this port. |
Filters are used to create subscriptions when orchestrations are not part of the scenario. From the Filters dialog box, you can create one or more filter expressions, which are used to filter messages to the send port. There is a set of BizTalk properties for use in filtering, and promoted message properties can be used for filtering as well. If you bind a send port directly to an orchestration port, the filters do not apply. Maps are used to transform the document being sent. You may edit one or more maps to the collection, but there may only be one map with a given source schema. Only maps deployed in assemblies are available for selection.
Send ports have few requirements for basic operation. For example, you must specify the transport mechanism, the transport location (such as the HTTP URL), and the BizTalk pipeline that will process the message outbound from BizTalk.
Before receiving an XML message, you would like to transform a message into a predetermined XML format.
Within BizTalk, you can map source messages into a destination format. You can map with a receive port, an orchestration, or send port. Here, we will outline the steps for mapping in a receive port.
Open a receive port that you wish to configure a map on.
Note
Remember that when setting a map on a receive port, it will apply to all receive location associated with that port.
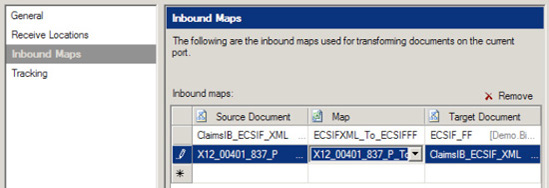
In the grid that opens, select a deployed map.It will automatically fill in the source and target schemas, based on the map.A receive port can have multiple maps associated with it.See Figure 4-3.
This recipe's solution described how to configure a receive port to perform inbound mapping transformation. Remember that when you're using a receive port, the inbound message must be in an XML format. If inbound mapping is configured, the message must also conform to the schema of that specified in the inbound format of the map in question. If the message does not match, the message will fail in the map, and the message interchange will be marked for exception processing.
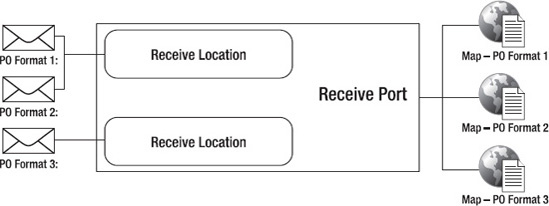
Another key concept to keep in mind when configuring receive port maps is that more than one map can be specified on a receive port. Multiple XML schemas can be accepted by the receive port; it is not tied to one specific schema. For example, if you have three purchase order document formats arriving from external entities, you could transform each format to a common (canonical) format via port maps on the receive port. This process is commonly referred to as document normalization. In this instance, you could have three maps to support each format and a single receive port to satisfy the solution. This scenario is demonstrated in Figure 4-4.
A key consideration when applying receive port maps is how you plan to handle exceptions, such as an XML message that does not conform to a map, invalid XML received, and data enrichment required during or before transformation. All of these exceptions could be handled within a port map or receive location, or with downstream BizTalk orchestration functionality.
You want BizTalk Server to send the same message to multiple downstream systems for further processing.
To demonstrate how to send a message to multiple systems, we will use the example of sending data to an enterprise resource planning (ERP) system. Suppose that you have an orchestration that sends sales order information to your company's ERP system. The business requires sales order information to be available to other departments in your company that do not have access to the ERP system. The business would like to see the data available via the internal data warehouse. Additionally, the business requires minimal downtime for the existing deployed solution due to the need to process orders 24 hours a day, 7 days a week.
The solution is to create a send port to the data warehouse and create a send port group that will manage sending messages from the orchestration to the existing ERP send port as well as the new data warehouse send port. This recipe assumes that the orchestration already exists.
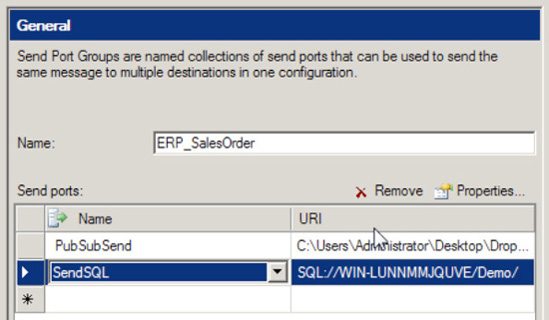
To create the new send port group, in the BizTalk Administration Console, right-click Send Port Groups, and select New
In the Send Port Group Properties dialog box, add one or more existing send ports, as shown in Figure 4-5.
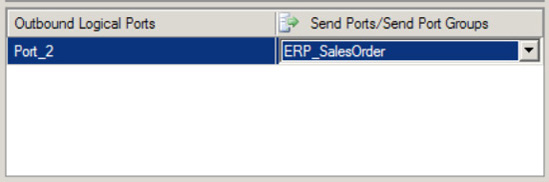
Update the send port binding of the deployed orchestration, and choose the send port group, as shown in Figure 4-6.
Verify the send port group and referenced send ports are enlisted and started before testing the updated orchestration binding.
Send port groups are collections of send ports through which BizTalk Server can publish the same message to multiple destinations using a single configuration. Send port groups are similar to send ports in their ability to be bound to orchestrations, as well as be implemented in pure messaging scenarios (via filter subscriptions).
Send ports that are included in a send port group process messages in two ways:
As a participant in a send port group
As a direct recipient of messages routed from BizTalk
Send port groups are incredibly useful in the situations where multiple parties are subscribing to the same message using different messaging protocols or different message formats. For example, one subscriber could receive an XML version of a message, and a separate subscriber could receive a flat file version of that same message, without extra coding or changes to the orchestration that produced the message. Another good use for a send port group is to keep backup files of the transactions sent from BizTalk to external subscribers. Without changing the existing orchestration and with little effort, you can implement a new send port and send port group that creates a backup of the existing message.
Send ports that are included in a send port group operate differently from send ports operating independently. Keep the following considerations in mind when using send port groups:
Filters: Filters on send port groups do not override filters on individual send ports. Filters used on both send ports and a send port group operate in a cumulative nature. If the same filter is used on a send port group as well as the individual send ports within the group, it is likely that duplicate messages will be sent. Special care must be given if filters are implemented on both send ports and send port groups.
One-way static ports: Send port groups can use only static one-way send ports. The strength of send port groups is the ability to send the same message to multiple subscribers. However, one limitation of send port groups is that they can include only static one-way send ports.
Operating states: The operating state between send ports and send port groups is in dependent. The states between send ports and send port groups are identical:
Bound: The send port or send port group has been physically linked to an orchestration.
Enlisted: The send port or send port group has been associated with the message to which it will be subscribing from the MessageBox.
Started: The send port or send port group is ready to process messages matching the appropriate message subscription.
Enlisted ports: You must verify that both send ports and their parent send port groups have been enlisted and started before messages will be sent. Additionally, send ports must be enlisted or started before a send port group can be started. However, a send port group can be enlisted, regardless of the state of the individual send ports it references. The send port group must be stopped before all of the individual send ports can be unenlisted.
Table 4-3 shows how state affects the behavior of message processing.
Send port groups are powerful tools for allowing multiple subscribers to subscribe to the same message. Individual mappings for each subscriber can be maintained and implemented without affecting other subscribers. Additionally, send port groups allow the ability to resubmit suspended messages, if there is a communication problem, to a single system without having to resubmit to other systems in the send port group.
You have an inbound or outbound document that requires validation beyond checking for well-formed XML.
You can use a send or receive pipeline to perform a strict validation of an instance of an XML document by providing validation against an XSD schema. BizTalk Server provides an XML Validator pipeline component for validating XML (schema) documents. If the inbound or outbound document is not XML, it must be converted to XML prior to validation. The following steps define how to create a receive pipeline that can be used to validate an XML document. The steps are similar to those for configuring a send pipeline.
Open the project that will contain the pipeline.
Right-click the project, and select Add
In the Add New Item dialog box, select Receive Pipeline, and provide a name. Then click Add.
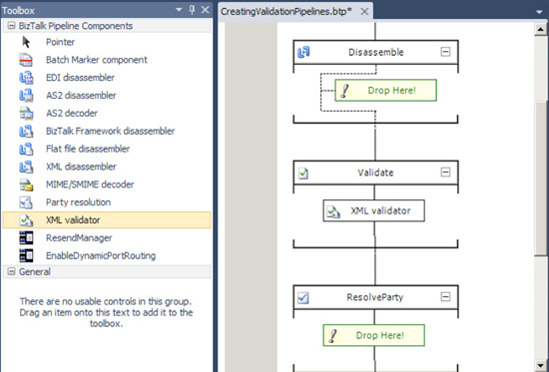
Drag the XML Validator component from the BizTalk Pipeline Components section of the toolbox to the Drop Here location under the Validate label, as shown in Figure 4-7.
Select the ellipsis next to the
Document Schemasproperty for the XML Validator component (in the Properties window) to launch the Schema Collection Property Editor dialog box, shown in Figure 4-8.Use the Schema Collection Property Editor to add schemas to the collection, and then click OK.
Build and deploy the project.
Now that you have created the validation pipeline, when configuring the Receive Pipeline property of a receive location, select the pipeline from the list of available receive pipelines.

Strict validation of an XML document is achieved with the use of a validation pipeline. The XMLReceive receive pipeline and XMLTransmit send pipeline that come with BizTalk Server will validate only that an XML document is well formed. It will not perform strict validation of the document, including data types and restriction values (length, enumerations, patterns, and so on).
You use the XML Validator pipeline component to validate the instance document. This component may be placed in any pipeline stage, except the Disassemble or Assemble stages. If you do not add a schema using the Schema Collection Property Editor dialog box for the component, the component will attempt to locate an appropriate schema to validate against based on the namespace and root node of the document. If no schema is found to validate against, or the document fails validation, an error will occur, and the instance will be terminated.
You need to guarantee that only the intended recipient of a message can understand it by encrypting the message. The recipient needs to verify the message sender by checking a digital signature included with the message.
You can implement an encryption mechanism for outgoing messages, as well as a decryption mechanism for the inbound messages. As an example, suppose that you need BizTalk to send this message shown in Listing 4-1 across the Internet to move the requested amount of money between the specified accounts. This message contains sensitive information, including bank account numbers and a Social Security number.
Example 4.1. Sensitive Information
<ns0:MoneyTransfer xmlns:ns0="http://Creating_EncryptionPipelines.Confidential">
    <TransferAmount>108.37</TransferAmount>
    <TransferInitDate>2005-09-30</TransferInitDate>
    <FromAccount>0987-654-321</FromAccount>
    <ToAccount>1234-567-890</ToAccount>
    <RequestedBySSN>123-45-6789</RequestedBySSN>
    <RequestedByName>StacyR</RequestedByName>
</ns0:MoneyTransfer>
BizTalk sends the message with the encryption pipeline constructed in this recipe. The message becomes encrypted, as shown in Listing 4-2. No one but the intended recipient can understand the message.
Example 4.2. Encrypted Message
Content-ID: {51572541-E6CE-4DD6-913C-B7C7558D2269}
Content-Description: body
Bcc:
MIME-Version: 1.0
Content-type: application/x-pkcs7-mime; smime-type=enveloped-data; name="smime.p7m"
Content-Transfer-Encoding: base64

MIAGCSqGSIb3DQEHA6CAMIACAQAxgbwwgbkCAQAwIjAUMRIwEAYDVQQDEwlkZXZvbmx5Y2ECCmEI
BAMAAAAAAAIwDQYJKoZIhvcNAQEBBQAEgYAH+kU66z4r4lZYzq1eOKNf0Yt1HVMBaYL61W5wrTPt
...
qQ+ubHBbgHMXyJl/SPylOtSN9XeQGZgBGKb2j+MeB0NEjHlRE22aDnazailnmgu2x588820wnQAA
AAAAAAAAAAA=
The message recipient decrypts the message with the decryption pipeline constructed in this recipe, obtaining the same message as before encryption (see Listing 4-1).
The following sections show how to enable message encryption and decryption.
To implement an encryption mechanism for outgoing message, follow these steps on the BizTalk Server responsible for encrypting the message and sending it:
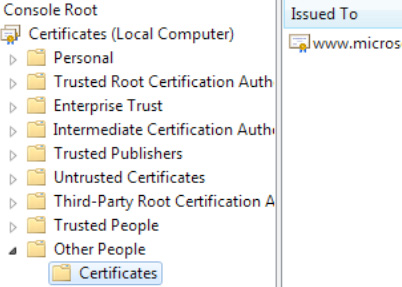
Obtain the public key certificate from the party that will securely receive the message, and install it in the
Local ComputerOther Peoplefolder, as shown in Figure 4-9.Note
BizTalk provides native support for MIME encryption decryption using X.509 version 3 certificates. Microsoft Certificate Services can generate the certificates used by BizTalk.
Note
The certificate store can be opened by typing mmc at a command prompt. Click File
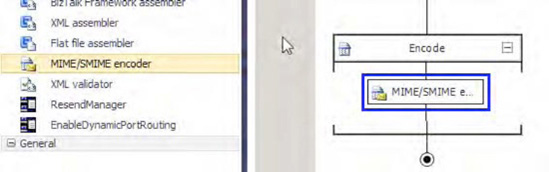
Create an empty BizTalk solution, and add a new send pipeline to the solution (right-click the project, select Add
Drag the MIME/SMIME Encoder component from the BizTalk Pipeline Components section of the toolbox to the Encode stage of the send pipeline, as shown in Figure 4-10.
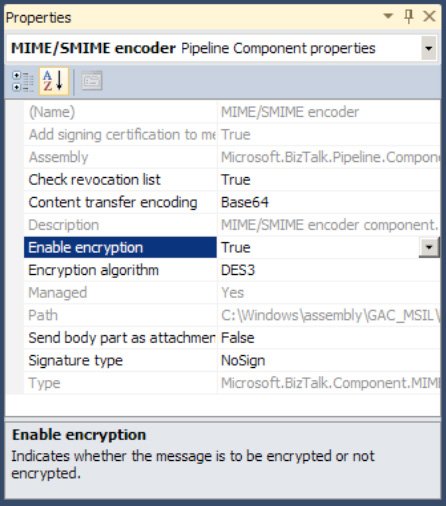
Right-click the encoder in the pipeline, and select Properties. Change the value of the
Enable encryptionproperty toTrue, as shown in Figure 4-11.Build and deploy the BizTalk project containing the send pipeline.
Create a send port to deliver the message to the recipient, using any transport adapter desired.
In the Send section of the Send Port Properties dialog box, select the send pipeline with the MIME/SMIME encoder component. Then select the public-key certificate of the message receiver for the
Certificate Nameproperty.
To configure a decryption mechanism for an incoming message, follow these steps on the BizTalk Server responsible for decrypting the message upon receipt:
Obtain a certificate from a certification authority (CA) containing a private key.
Log in to the BizTalk Server with the BizTalk service account credentials. Open the certificate file containing the private key, and install it into the
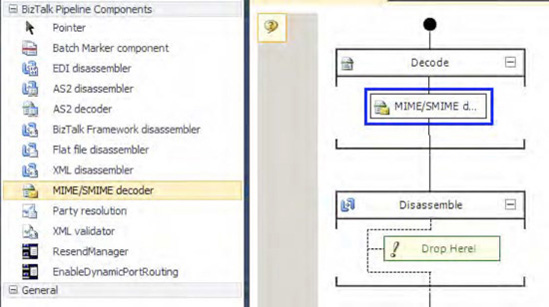
Current UserPersonalCertificatesfolder of the BizTalk service account.Create an empty BizTalk solution, and add a new receive pipeline to the solution (right-click the project, select Add
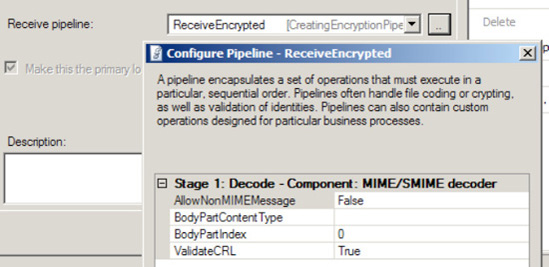
Drag the MIME/SMIME Decoder component from the BizTalk Pipeline Components section of the toolbox to the Decode stage of the receive pipeline, as shown in Figure 4-12.
Build and deploy the BizTalk project containing the receive pipeline.
Create a receive port and a receive location to accept the encrypted message from the sender, using any desired transport adapter.
In the Receive Location Properties dialog box, specify the receive pipeline with the MIME/SMIME decoder, as shown in Figure 4-13.
Using the BizTalk Administration Console, open Platform Settings and select Host Instances. Right click the BizTalk host that will receive the encrypted message and select Properties.
Specify the decryption certificate BizTalk will use to receive messages. Secure messages by pasting the thumbprint of the certificate containing the private key into the Thumbprint field in the Certificates section of the Host Properties dialog box.
Organizations often deal with confidential information that only the message sender and recipient should understand. For example, financial information may contain sensitive information such as Social Security or bank account numbers. Medical information may contain private information protected by law. Use the encryption capabilities of BizTalk to protect the confidentiality of sensitive information, while still allowing two parties to share it easily.
BizTalk can transmit encrypted information across a network securely. This is particularly important when transmitting messages over a public network, such as the Internet. If the two parties must keep the message confidential, encryption can ensure only the intended recipient can understand it.
One option for ensuring the confidentiality of messages is to use a secure transport like HTTPS. Securing the message transport can be effective, but the transport generally secures only communication directly between two machines on a network. When a message has several network hops before it arrives at the final destination, each hop must be secured individually, providing multiple chances for a configuration error to expose the sensitive information. For example, HTTPS may securely transmit a message to a trading partner, but then be transmitted without encryption over an insecure transport within the trading partner's internal network. To ensure a higher level of confidentiality, you should encrypt the contents of the message, rather than depend on the communication protocol. Message content encryption provides confidentiality over any transport, including transports or BizTalk adapters that cannot support encryption, such as the FTP and SMTP adapters.
BizTalk's encryption capabilities use certificates containing cryptographic key pairs of a public key and a private key. The owner of a certificate can share the public key freely with anyone who wants to send the owner confidential information. However, only the certificate's owner should know its private key.
To encrypt a message, the sender obtains the public key of the message recipient and applies an encryption algorithm to the message. The recipient uses the corresponding private key and the same algorithm to decrypt and understand the message. Certificate owners must fiercely protect private keys because anyone who possesses a private key can decrypt messages encrypted with the corresponding public key. However, certificate owners must distribute public keys to anyone who wishes to send an encrypted message.
BizTalk can securely transmit information to many recipients, using a different certificate for each recipient. BizTalk will detect all certificates placed in the Local ComputerOther People certificate store of the local machine. For example, if you have several trading partners that you must securely exchange information with over the Internet, you can configure a different send port for each trading partner and specify a different public key certificate in each send port.
The decryption certificate must be in the private store of the BizTalk service account receiving encrypted messages. While BizTalk can use any number of public keys to send encrypted information, each BizTalk host can have only one decryption certificate. Each certificate contains a unique identifier called a thumbprint, which BizTalk uses to identify the correct certificate from this store to decrypt messages. The thumbprint is calculated by applying a hashing algorithm to the certificate.
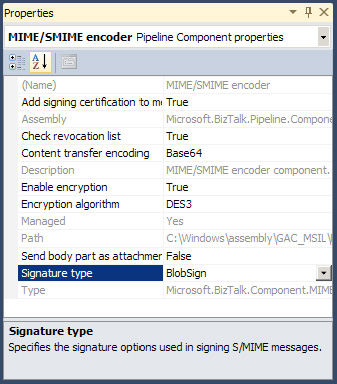
In addition to encryption, BizTalk can also add a digital signature to encrypted messages. The message recipient can verify the signature using the sender's public key to be guaranteed that the message originated with the original sender and was not modified while in transit. To enable message signing, set the Signature type property of the MIME/SMIME encoder component, as shown in Figure 4-14.
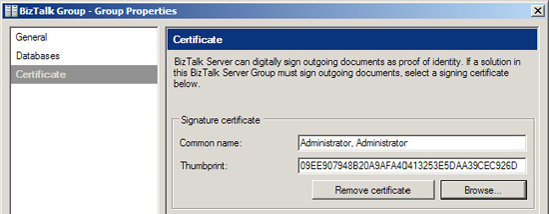
While each BizTalk host can have a unique decryption certificate, an entire BizTalk group can have only one signing certificate. Specify the signing certificate by entering the thumbprint of the certificate in the Group Properties dialog box for the BizTalk group, as shown in Figure 4-15. This can be accessed by right-clicking the BizTalk Group in BizTalk Administration Console and selecting Properties.
You are integrating two systems that can communicate only via flat file messages and must provide the mechanisms for receiving and sending the messages within BizTalk Server.
Create a flat file receive and send pipeline, as follows (these steps assume that a flat file schema has already been created):
Open a project that contains a flat file schema.
Right-click the project, and select Add
In the Add New Item dialog box, select Receive Pipeline from the list of templates. Give a descriptive name to your new pipeline, as shown in Figure 4-16, and then click Add.
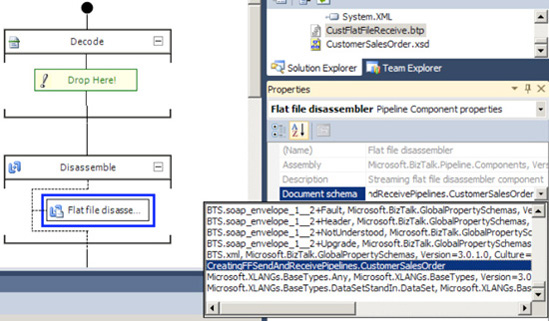
From the BizTalk Pipeline Components section of the toolbox, drag and drop a Flat File Disassembler component into the Disassemble stage of the receive pipeline.
With the Flat File Disassembler component highlighted, set the
Document schemaproperty in the Properties window to the flat file schema (CustomerSalesOrderin the example), as shown in Figure 4-17.Note
Setting the
Document schemaproperty is required when using the Flat File Disassembler component. All other properties are optional.Save the receive pipeline.
Now create the Send Pipeline. Right-click the project, and select Add
In the Add New Item dialog box, choose Send Pipeline from the list of templates. Give a descriptive name to your new pipeline, as shown in Figure 4-18, and then click Add.
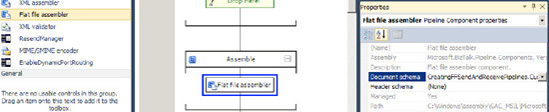
From the Pipeline Components section of the toolbox, drag and drop a Flat file assembler component into the Assemble stage of the send pipeline.
With the Flat File Assembler component highlighted, set the
Document schemaproperty in the Properties window to the flat file schema, as shown in Figure 4-19.Note
If the
Document schemaproperty is not specified, runtime schema discovery will be attempted. During schema discovery, BizTalk Server attempts to determine the correct flat file schema to assemble the message with, based on the namespace and root node of the message.Save the send pipeline.
Build and deploy the solution.

Once the flat file schema and pipelines (CustomerSalesOrder, CustFlatFileReceive, and CustFlatFileSend in this example) have been deployed, BizTalk Server can use them in message processing.
Many systems in use today were designed and engineered prior to the advent of XML. To communicate with these systems, it is often necessary to use flat file formats such as positional, delimited, or a combination of the two. In our example, a simple positional flat file message is parsed into XML as BizTalk Server receives the document. BizTalk Server then assembles the XML back into its correct flat file format when sending the message to the appropriate subscribers.
More specifically, the custom receive pipeline created in the example (CustFlatFileReceive) is used in a receive location that retrieves inbound flat file messages. This receive pipeline disassembles the flat file message into an XML document by leveraging the out-of-the-box Flat File Disassembler pipeline component. By setting the Document schema property on the Flat File Disassembler component, BizTalk Server is instructed to apply the correct schema to inbound documents, thereby producing the appropriate XML representation of the original flat file.
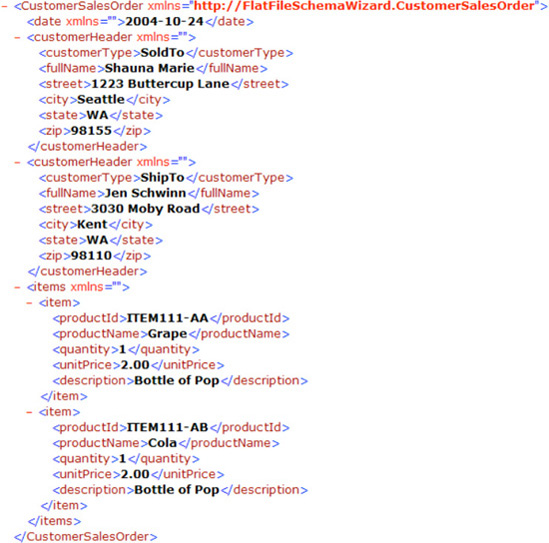
Figure 4-20 represents one possible instance of the inbound flat file document.

When passed through the FlatFileReceive pipeline created in the solution (which can be implemented via a receive location), BizTalk Server disassembles the flat file into the following XML message, based on the details defined within the CustomerSalesOrder.xsd schema (see Figure 4-21).
Since the CustFlatFileSend pipeline (which can be implemented via a send port) is configured to assemble instances of the CustomerSalesOrder.xsd message type back into flat file format, the original flat file document would be output again (as shown previously in Figure 4-20).
As well as the required Document schema property, you can configure other optional properties for the Flat File Disassembler component, as shown in Table 4-4.
Table 4.4. Flat File Disassembler Optional Properties
Description | |
|---|---|
| Defines the schema to apply to any header included in the flat file message. |
| Specifies if the flat file header should be stored in the message context (properties). The message context contains metadata about the message and is attached to the message throughout its lifetime in BizTalk Server. |
| Specifies if the flat file disassembler should attempt to recover from errors occurring during message processing. |
| Defines the schema to apply to any trailer included in the flat file message. |
| Specifies if the configured schemas (document, header, and trailer schemas) should be used to validate their respective message parts (document, header, and trailer, respectively). |
The custom send pipeline created is then used in a send port to deliver flat file messages to subscribers. This send pipeline assembles the XML messages back into flat file format by using the Flat File Assembler pipeline component provided with BizTalk Server. By setting the Document schema property on the Flat File Assembler component, BizTalk Server is instructed to apply the correct schema to outbound documents, thereby producing the appropriate flat file representations of the original XML document.
Along with the required Document schema property, you can set the optional properties listed in Table 4-5 for the Flat File Assembler component.
Table 4.5. Flat File Assembler Optional Properties
You can configure encoding of outbound messages in a number of different locations, and you should understand the logic BizTalk Server uses to determine which to use if there are discrepancies. Table 4-6 lists the methods that can be used to specify message encoding, ordered to reflect their precedence. If none of the methods listed in Table 4-6 is used to configure message encoding, UTF-8 is used.
Table 4.6. Methods for Encoding Outbound Messages
You can also configure flat files through their message headers. In addition to configuring the header schema via the Flat File Disassembler or Flat File Assembler pipeline components, you can use the XMLNORM.HeaderSpecName message context property.
One common challenge encountered when receiving flat file messages from source systems is determining which schema to apply to different messages. This is particularly important when multiple message types (for example, customer and order message types) are received from the same location. Since flat file messages are not inherently self-describing, as XML messages are, it can be difficult to determine which flat file message schema to apply to the inbound messages. In these scenarios, you can use a solution similar to the Schema Resolver Component SDK example that comes with BizTalk Server. This example shows how to implement a custom Flat File Disassembler pipeline component to dynamically associate message types to inbound instances based on an identifier contained in each instance message.
Finally, to assist in testing the assembling and disassembling of flat file messages, the FFAsm.exe and FFDasm.exe tools are provided with BizTalk Server. These tools allow you to run the flat file assembler and disassembler directly against instance messages. These tools can be particularly useful and time-saving when working with large or complex flat file schemas.
The BizTalk custom pipeline component can promote a context property of an inbound message. The component does not alter the content of the original message, but rather creates a property and promotes the property to the message context.
As an example of implementing a custom pipeline, we will use the code shown in Listing 4-3, which is a complete C# class library that will compile into a complete custom pipeline assembly.
Example 4.3. Sample Pipeline Assembly Class Library
//---------------------------------------------------------------------
// File: PropertyPromotionPipelineExample.cs
//
// Summary: A sample of how to write a pipeline component that
//           creates a context property.
//---------------------------------------------------------------------

using System;
using System.IO;
using System.Collections;
using System.ComponentModel;
using System.Resources;
using System.Reflection;
// BizTalk classes
using Microsoft.BizTalk.Message.Interop;
using Microsoft.BizTalk.Component.Interop;

namespace PropertyPromotionPipelineExample
{
    /// <summary>
    /// BizTalk Server custom pipeline component that creates
    /// a custom context property for the inbound message.

    /// </summary>
    ///
    // Attribute declarations to identify this class is a pipeline component
    // and that the assembly can be used in any pipeline stage
    [ComponentCategory(CategoryTypes.CATID_PipelineComponent)]
    [ComponentCategory(CategoryTypes.CATID_Any)]
    [System.Runtime.InteropServices.Guid("63ed4b26-63cd-4d29-9661-f584c94cf858")]
    public class PropertyPromotionPipelineExample :
        Microsoft.BizTalk.Component.Interop.IBaseComponent
        , Microsoft.BizTalk.Component.Interop.IComponent
, Microsoft.BizTalk.Component.Interop.IComponentUI
, Microsoft.BizTalk.Component.Interop.IPersistPropertyBag
{
//Key for storage on property bag:
private string m_propbagkey_customproprop
= "SAMPLECUSTOMPROPROP";
private string m_propbagkey_custompropropnamespace
= "SAMPLECUSTOMPROPROPNAMESPACE";
//Var to store design time value
private string m_propname = "";
private string m_propnamespace = "";
static ResourceManager resManager = new ResourceManager("SampleCustom
PipelineComponent.SampleCustomPipelineComponent", Assembly.GetExecutingAssembly());
public PropertyPromotionPipelineExample ()
{
// Default constructor logic
}
#region Public Properties
// Display the following public properties for design time
public string CustomContextPropertyName
{
get { return m_propname;}
set { m_propname = value;}
}
// Display the following public properties for design time
public string CustomContextPropertyNamespace
{
get { return m_propnamespace;}
set { m_propnamespace = value;}
}
#endregion
#region IBaseComponent members defines Description, Name, and Version
public string Description
{
get
{
return "Sample Custom Pipeline Component";
}
}
public string Name
{
get
{
return "Sample Custom Pipeline Component";
}
}public string Version
{
get
{
return "1.0";
}
}
#endregion
#region IComponent members contains the main implementation
public IBaseMessage Execute(IPipelineContext pContext
, IBaseMessage pInMsg)
{
// Create custom context property on message
pInMsg.Context.Promote(m_propname, m_propnamespace, string.Empty);
return pInMsg;
}
#endregion
#region IComponentUI members contains design time information
// Include a validate method used by BizTalk
public IEnumerator Validate(object obj)
{
IEnumerator enumerator = null;
// Return a null
return enumerator;
}
// We do not have an icon for this custom component
[Browsable(false)]
public System.IntPtr Icon
{
get
{
// No icon associated with this pipeline component
return IntPtr.Zero;
}
}
#endregion
#region IPersistPropertyBag members contains placeholders
public void GetClassID(out Guid classid)
{
// Return class ID of this component for usage from unmanaged code.
classid = new System.Guid("63ed4b26-63cd-4d29-9661-f584c94cf858");
}
public void InitNew()
{
// Initialization not implemented
}
public void Load(IPropertyBag propertyBag, Int32 errorlog)
{
// Load configuration property for component.string val = (string)ReadPropertyBag(propertyBag,
m_propbagkey_customproprop);
if (val != null)
m_propname = val;
val = (string)ReadPropertyBag(propertyBag,
m_propbagkey_custompropropnamespace);
if (val != null)
m_propnamespace = val;
}
public void Save(IPropertyBag propertyBag
, Boolean clearDirty, Boolean saveAllProperties)
{
// Saves the current component configuration into the property bag.
object val = (object)m_propname;
WritePropertyBag(propertyBag,
m_propbagkey_customproprop, val);
val = (object)m_propnamespace;
WritePropertyBag(propertyBag,
m_propbagkey_custompropropnamespace, val);
}
private static object ReadPropertyBag(IPropertyBag propertyBag
, string propertyName)
{
// Reads property value from property bag.
object val = null;
try
{
propertyBag.Read(propertyName, out val, 0);
}
catch(ArgumentException)
{
return val;
}
catch(Exception ex)
{
throw new ApplicationException(ex.Message);
}
return val;
}
private static void WritePropertyBag(IPropertyBag propertyBag
, string propertyName, object val)
{
// Writes property values into a property bag.
try
{
propertyBag.Write(propertyName, ref val);
}
catch(Exception ex){
throw new ApplicationException(ex.Message);
}
}
#endregion
}
}Use the following steps to create, install, and implement a custom pipeline component.
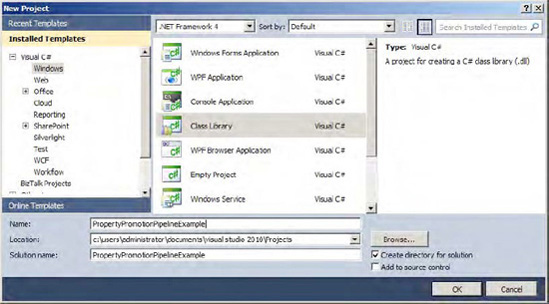
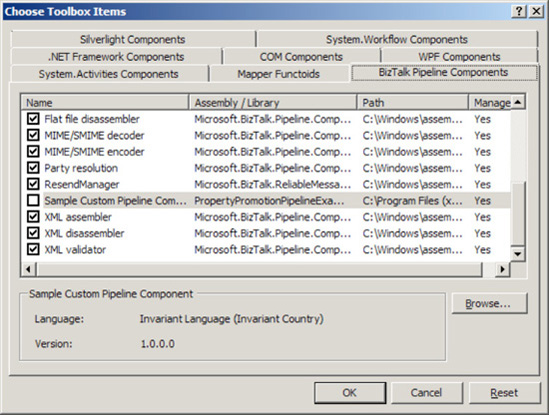
Create a new Class Library .NET project as shown in Figure 4-22. Custom pipeline components can be coded in any .NET language. This example is implemented in C#.
Add a reference to the
Microsoft.BizTalk.Pipeline.dllassembly located in the%Program FilesMicrosoft BizTalk Server 2010directory.Develop the custom component code, which should match that shown in Listing 4-3.
Build the component, and place a copy of the assembly in the pipeline components folder located where BizTalk is installed (for example,
C:Program FilesMicrosoft BizTalk Server 2010Pipeline Components).To add the pipeline component to the Visual Studio toolbox, select ToolsChoose Toolbox Items. In the dialog box, select the BizTalk Pipeline Components tab, and then select the pipeline assembly created in step 4. The component should appear in your toolbox, as shown in Figure 4-23.
To add and configure the custom component as a receive pipeline, create a new BizTalk solution with the following items (see Figure 4-24 for the full solution layout):

BizTalk includes out-of-the-box functionality for processing messages within receive and send pipelines. However, situations may arise where custom processing of messages is required. For example, you may need custom message validation, processing of flat files, or formatting of messages to HTML that BizTalk does not natively support. Custom pipeline components offer incredible flexibility for preprocessing or postprocessing messages via send and receive pipelines. Additionally, custom pipeline components can coexist with native BizTalk pipeline components in the same pipeline.
In BizTalk solutions where message content or context determines routing, you may need to route messages based on the lack of existence of a property. BizTalk does not have the ability to route on the lack of property existence. However, you can use a custom pipeline component to create a property that is always part of a message. Rather than check for the existence of the property, you can check whether the property contains an empty string value. The solution that accompanies this recipe creates a custom pipeline component that creates a context property for every message that is processed by the component.
Creating custom pipeline components may seem like an extensive task due to the code required for hosting the component in a BizTalk pipeline, as well as setting the design-time properties. In actuality, there is a single method that contains the processing logic, and the remainder of the code supports the component design-time properties.
Your first task in creating a custom pipeline component is to create a project reference to the Microsoft.BizTalk.Pipeline.dll file contained in the main BizTalk installation folder. After you have added the appropriate project reference, you must consider the implementation of the custom pipeline component. There are three logical areas to a custom pipeline component to consider:
The following sections describe each of these areas in more detail.
Consider how you plan on using the custom component, such as in a send or receive pipeline. Additionally, consider the pipeline stage in which you plan on implementing the custom component. The attributes and class declaration indicate to Visual Studio that the assembly is a custom pipeline component. If you do not properly identify that you are creating a BizTalk custom pipeline component, you will not be able to add the component to the Visual Studio toolbox or be able to add the component to a pipeline stage. Here is the header section from the sample code shown previously in Listing 4-3:
[ComponentCategory(CategoryTypes.CATID_PipelineComponent)]
    [ComponentCategory(CategoryTypes.CATID_Any)]
    [System.Runtime.InteropServices.Guid("63ed4b26-63cd-4d29-9661-f584c94cf858")]
    public class PropertyPromotionPipelineExample :
        Microsoft.BizTalk.Component.Interop.IBaseComponent
        , Microsoft.BizTalk.Component.Interop.IComponent
        , Microsoft.BizTalk.Component.Interop.IComponentUI
        , Microsoft.BizTalk.Component.Interop.IPersistPropertyBag
The sample custom component is identified, via the ComponentCategory attributes, as a pipeline component for use in any pipeline stage. Additionally, the class declaration specifies that four interfaces (IBaseComponent, IComponent, IComponentUI, and IPersistPropertyBag) will be implemented within the class. The GUID is required for use in COM interop with unmanaged code.
Custom component design-time properties are exposed via public declarations and appropriate get/set methods. The following is the section of Listing 4-3 that demonstrates how two design-time properties are exposed.
#region Public Properties
        // Display the following public properties for design time
        public string CustomContextPropertyName
        {
            get {    return m_propname;}
            set {    m_propname = value;}
        }

        // Display the following public properties for design time
        public string CustomContextPropertyNamespace
        {
            get {    return m_propnamespace;}
            set {    m_propnamespace = value;}
        }
#endregionThe final logical area required in the creation of a custom pipeline component is the implementation of four interfaces, as summarized in Table 4-7. The four interfaces provide the design-time and runtime implementations for the custom component and serve as a guide. Not all of the interfaces must contain code, and the IComponent interface contains the function that performs the message processing.
Note
If the custom component is to reside in either the Assemble or Disassemble pipeline stages, the component must also implement the appropriate assemble/disassemble interface.
Table 4.7. Interface Implementation
Interface | Description | Implementation Notes |
|---|---|---|
| Properties related to the basic information about the custom component. | Contains three properties that enable the engine to retrieve the component name, version, and description. |
| Defines the properties for displaying the custom component in the design-time user interface as well as the validation rules for design-time properties. | Contains two methods: one that allows the validation of the component's configuration and another that provides a pointer reference to the icon that will be displayed in the development tool set for the custom component. If null is set for the pointer, the default icon will be used. |
| Custom pipeline properties that are displayed at runtime when using the custom assembly in a pipeline. | Enables a component to store and receive its configuration information. |
| Defines the method used by all pipeline components. Assembler/disassembler custom components implement their own interface. | Contains the main function that performs the heavy lifting and processing of the inbound/outbound message. This method takes as parameters the pipeline context and incoming message. |
IBaseComponent contains three read-only properties that return the description, version, and name of the component to the design-time environment and other tools interested in basic component information. Implementing the IBaseComponent is straightforward and requires implementing only the three read-only properties. Here is the section of the code in Listing 4-3 that demonstrates the implementation of the three properties.
#region IBaseComponent members defines Description, Name, and Version
        public string Description
        {
            get
            {
                return "Sample Custom Pipeline Component";
            }
        }

        public string Name
        {
            get
            {
                return "Sample Custom Pipeline Component";
            }
        }

        public string Version
        {
            get
            {
                return "1.0";
            }
        }
    #endregion
IComponentUI serves to present the component icon in the design-time tool set. The two methods implemented in the IComponentUI are Icon and Validate. The Icon method provides a pointer to the graphic icon displayed in the design-time user interface. If no icon is specified, Visual Studio will display the default icon in the BizTalk Pipeline Components section of the Toolbox. The Validate method allows processing of any design-time properties. For example, if you have a custom design-time property that requires information, you can include validation rules within the Validate method to verify the design-time information entered.
The following portion of Listing 4-3 shows both the Validate and Icon methods. In the solution example included with this recipe, the default Visual Studio icon will be used, and no special validation rules are required for the specified user data.
#region IComponentUI members contains design time information
        // Include a validate method used by BizTalk
        public IEnumerator Validate(object obj)
        {
            IEnumerator enumerator = null;
            // Return a null
                return enumerator;
        }
        // We do not have an icon for this custom component
        [Browsable(false)]
        public System.IntPtr Icon
        {
get
{
// No icon associated with this pipeline component
return IntPtr.Zero;
}
}
#endregionThe purpose of the IPersistPropertyBag interface is to provide access to your object to unmanaged code. If you are familiar with .NET, then you may have used property bags in other projects. IPersistPropertyBag also allows access to design-time configuration values. There are four public methods that exist in the IPersistPropertyBag interface: GetClassID, initNew, Load, and Save. The GetClassID function must return a unique ID that represents the component. The initNew function can be used to establish structures (data, caching, and memory) used by the other IPersistPropertyBag methods. The final functions facilitate the loading and saving of property values. In the solution example accompanying this recipe, two additional methods were created to wrap the actual read/write functions of the property bag; however, the read and write functions could also be called directly from the Load and Save functions.
The following portion of the code from Listing 4-3 demonstrates the implementation of the four IPersistPropertyBag functions as well as the two helper functions.
#region IPersistPropertyBag members contains placeholders
        public void GetClassID(out Guid classid)
        {
            // Return class ID of this component for usage from unmanaged code.
            classid = new System.Guid("63ed4b26-63cd-4d29-9661-f584c94cf858");
        }

        public void InitNew()
        {
            // Initialization not implemented
        }

        public void Load(IPropertyBag propertyBag, Int32 errorlog)
        {
            // Load configuration property for component.
            string val = (string)ReadPropertyBag(propertyBag,
                    m_propbagkey_customproprop);

            if (val != null)
                m_propname = val;
            val = (string)ReadPropertyBag(propertyBag,
                    m_propbagkey_custompropropnamespace);
            if (val != null)
                m_propnamespace = val;
        }

        public void Save(IPropertyBag propertyBag
                , Boolean clearDirty, Boolean saveAllProperties)
        {
// Saves the current component configuration into the property bag.
object val = (object)m_propname;
WritePropertyBag(propertyBag,
m_propbagkey_customproprop, val);
val = (object)m_propnamespace;
WritePropertyBag(propertyBag,
m_propbagkey_custompropropnamespace, val);
}
private static object ReadPropertyBag(IPropertyBag propertyBag
, string propertyName)
{
// Reads property value from property bag.
object val = null;
try
{
propertyBag.Read(propertyName, out val, 0);
}
catch(ArgumentException)
{
return val;
}
catch(Exception ex)
{
throw new ApplicationException(ex.Message);
}
return val;
}
private static void WritePropertyBag(IPropertyBag propertyBag
, string propertyName, object val)
{
// Writes property values into a property bag.
try
{
propertyBag.Write(propertyName, ref val);
}
catch(Exception ex)
{
throw new ApplicationException(ex.Message);
}
}
#endregionIComponent is the most important interface in the component, as it contains the processing logic for messages. This interface contains a single method, Execute, which takes two parameters. BizTalk calls the Execute method to process the message, and then passes the message and the context of the message as the two parameters. The following outlines the Execute method declaration and the two required parameters in Listing 4-3.
#region IComponent members contains the main implementation
        public IBaseMessage Execute(IPipelineContext pContext
                                , IBaseMessage pInMsg)
        {
            // Create custom context property on message
            pInMsg.Context.Promote(m_propname, m_propnamespace, string.Empty);
            return pInMsg;
        }
#endregion
The IPipelineContext parameter refers to the environment in which the component is running. For example, the IPipelineContext object contains pipeline property information, including the pipeline stage in which the component is running. The IPipelineContext object also contains a resource tracker, which cleans up objects. The IBaseMessage object contains the inbound message. The main purpose of the custom component is to perform some level of processing on the inbound message object.
The Execute method returns the IBaseMessage object, which represents all parts of the processed message (such as the message content and context). You may perform any type of message or context processing if you return the IBaseMessage object at the end of the function. When BizTalk processes messages through pipelines, it streams the messages, rather than passing the whole messages. Additionally, the message passed through the pipeline is a read-only data object. The solution example accompanying this recipe demonstrates only adding a context property and does not demonstrate updating the content of the message. You must perform the following steps if you plan to alter the message content:
Create a memory stream object to hold the contents on the updated message or a copy of the inbound message. Remember that an inbound message is read-only, and you need a new container to perform updates to the inbound message. The new memory stream object is a container for the updated message.
Process the inbound message stream. The easiest way of processing the inbound message is to copy the stream to a string and load the message into an
XMLDocument. However, using anXMLDocumentobject does not perform well and is not recommended for a production-type solution. A better method involves using a stream reader to manipulate the inbound stream. Consider the following approaches for manipulating the inbound memory stream:Use
Stream.Read()as the primary mechanism for dealing with message content.Use
XMLReader.Read()as the secondary mechanism for dealing with message content.Use the XML message in the DOM as a last resort option due to the performance hit. Specifically, if you're dealing with large messages, do not load the entire message into the DOM for processing.
Set the message body part. After processing the message, you must return the updated message. If you used a memory stream object, you can set the return
IBaseMessage.Dataobject to the memory stream object. Remember to rewind the updated memory stream object so you are passing the whole message and not the end of the memory stream. The pipeline processor will not attempt to rewind the stream, and you will receive a pipeline if the stream is not rewound.Add the memory stream to the resource tracker. If you used a new memory stream object, make sure to add the memory stream object to the
IPipelineContext.Resourcetracker for cleanup.
Pipelines are the first line of processing before a message is received by the BizTalk MessageBox or before the message is received by a target system. Out-of-the-box functionality supports the ability to perform straightforward processing of messages. There may be situations that require more complex processing, data validation, or interaction with .NET objects. In those situations, implementing a custom pipeline component offers the flexibility of adding processing logic within the BizTalk framework.
The main function required for implementing a custom pipeline component is the Execute function in the IComponent interface. The other interfaces serve for design-time and component interactions with the runtime engine.
Manipulation of the inbound message requires making a copy of the inbound message stream, as the inbound message stream is read-only. Before a memory stream can be returned to the IBaseMessage.Data object, it must be rewound, as the BizTalk pipeline engine does not perform this function. You should also clean up memory stream objects by adding the object to the pipeline resource tracker.
Note
There are several pipeline component creation tools available on the Internet that may be used to reduce overall coding effort.
You need to implement custom logic within a pipeline for an integration solution you are building. Based on the solution's requirements, message delivery must be guaranteed, with no messages being lost once they are received by BizTalk Server. Any errors within the custom pipeline must result in a notification e-mail being sent to the appropriate system administrators.
BizTalk Server 2010 has some very convenient, easy-to-use error-handling functionality called error reporting, which enables simplified handling of pipeline (and other) errors. Error reporting is specified on receive and send ports within the BizTalk Administration Console, as shown in Figure 4-25.
By enabling this feature on a port, you instruct BizTalk Server to take a number of steps in the event an error is encountered during message processing (which includes adapter, pipeline, mapping, and routing processing). Specifically, a clone of the errored message is created, with all the original promoted properties demoted. The message does, however, have the appropriate error reporting properties promoted, such as the failure code and receive port/send port name. This message is then delivered to the MessageBox, and can be subscribed to by an SMTP send port via the error reporting promoted properties. This SMTP send port can be configured to deliver notification messages to a system administrator.
Note
If error reporting is enabled, and an error occurs when BizTalk Server attempts to deliver the cloned message to the MessageBox, the original message is placed in the suspended queue.
Error reporting allows a variety of receive/send port errors to be trapped and managed. The details of the error are promoted as properties on a copy of the original message, which is sent to the MessageBox database. This allows you to handle error messages just like any other message: via subscriptions. You can define error-handling mechanisms specific to a single integration point, an application, or an entire BizTalk environment. Your error-handling mechanisms can be a simple notification e-mail (as shown in this solution), or a complex set of processes implemented as orchestrations.
The Error Reporting properties are available on Filters in send ports and orchestrations (See Figure 4-26). This allows messages to be routed to the appropriate destinations.
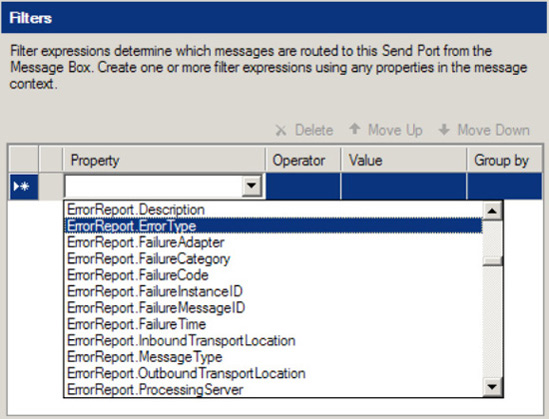
Table 4-8 shows the error-reporting properties promoted on errored messages.
Table 4.8. Error-Reporting Properties Promoted on Errored Messages
Property | Description |
|---|---|
| The code identifying the error. |
| The category of the failure. |
| The BizTalk message type of the failed message. This property may be empty if BizTalk Server could not determine the type of message. |
| The name of the receive port where the failure occurred. This property is populated and promoted only if the failure occurred on a receive port. |
| The URI of the receive location where the failure occurred. This property is populated and promoted only if the failure occurred on a receive port. |
The name of the send port where the failure occurred. This property is populated and promoted only if the failure occurred on a send port. | |
| The URI of the send port where the failure occurred. This property is populated and promoted only if the failure occurred on a send port. |
| The type of message that the error report contains. |
| The ID of the related routing failure report message in the MessageBox. The routing failure report message contains the properties (context) of the original message and can be queried to provide additional information about the errored message. |
A message fails at some point in your BizTalk solution (such as a receive port, map, or orchestration) and ends up as a suspended message on the BizTalk MessageBox. You want to be able to subscribe to these suspended messages and route them to a file drop.
This solution will introduce the method needed to subscribe to suspended messages by demonstrating how to use a receive port/filtered send port combination. The receive port will listen for messages of a certain type to arrive on the MessageBox. The send port will subscribe to all error messages generated by the receive port. All messages that are picked up by the receive port will fail because of not having a subscriber, and an error message will be written to the MessageBox. These messages will then be immediately routed to the send port, and a file will be written out to a specified file location.
The following steps walk through the steps necessary for creating the receive port:
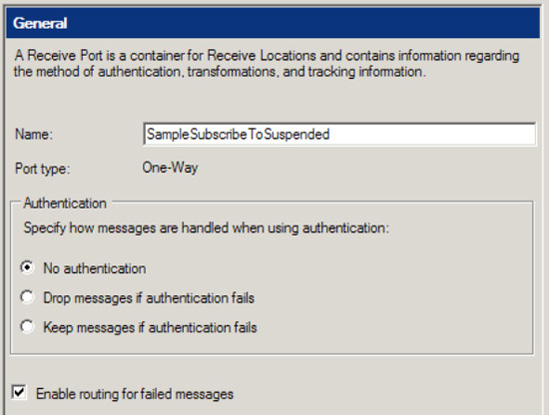
Creating a new one-way receive port in the BizTalk Administration Console. Enter the name of this port as SampleSubscribeToSuspended.
On the General Tab, click the Enable Routing for Failed Messages box, as shown in Figure 4-27.
On the Receive Locations tab, add a receive location to the port. Give a valid file path for the address of this location (such as
C:drop).Click OK. The receive port has been successfully configured and created.
Right-click the receive location, and enable it.
The following steps walk through the steps necessary for the send port. You can set up additional subscribers—for instance, an orchestration—to allow for more complex processing. In this solution, the send port will simply write the suspended message out to a file drop. For any properties not listed in the following steps, keep the default values.
Create a new one-way send port in the BizTalk Administration Console. Enter the name of this port as SampleSuspendedToFile.
On the General tab, set Transport Type to File, and enter a valid file path to which to write outgoing files. Set
Send PipelinetoPassThruTransmit.On the Filters tab, click the Property drop-down list, and select
ErrorReport.ReceivePortName. Set the value equal to the name of the receive port created in the earlier steps (SampleSubscribeToSuspended). Do not use quotes.Click OK. You have successfully configured and created the send port.
Do not enlist or start the send port at this time. At this point, the solution is complete—aside from the enlistment of the send port. Dropping a file on the receive location will cause the receive port to throw an exception and log to the Event Viewer—there is no subscriber. The error message has been routed to the MessageBox, but there is no subscriber for it either.
Now, enlist and start the send port. The receive location will fail to find a subscriber. This time, however, the error will be routed to the send port, and the message will be written out to the send port file location.
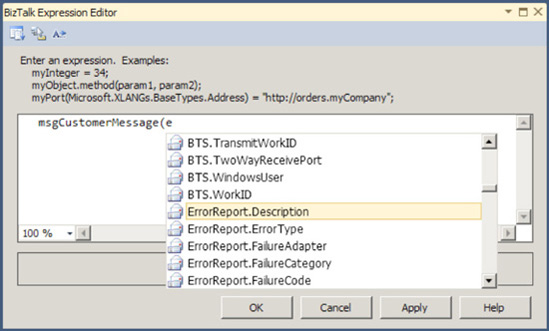
A number of properties are available on the ErrorReport object. This solution worked with one of these, ReceivePortName. Building a more complex solution using an orchestration will allow access to all the remaining properties. For example, assume that instead of a send port subscribing to the ErrorReport as shown in this solution, you have an orchestration with a receive port. The orchestration will receive the message, and you can then access the ErrorReport properties in the send port filter, receive filter of an orchestration, or within an Expression shape, as shown in Figure 4-28.