
The BizTalk tool set enables exchanging information among computer systems. Each area of BizTalk's rich set of capabilities addresses the common development tasks of building an integration solution. For example, BizTalk has tools for the common task of translating information from a structure understood by a source computer system into a structure understood by a destination computer system. Other BizTalk tools focus on defining integration processes or patterns of information flows.
This chapter focuses on the capabilities of the BizTalk Editor tool. The BizTalk product team designed the Editor tool specifically for defining the structure of the information that flows through BizTalk. BizTalk calls these definitions schemas, and the BizTalk Editor creates them.
For example, suppose a customer message flows through BizTalk. This message may contain customer demographic information such as occupation and gender, logistical information such as address, and information about the particular products of interest to the customer. BizTalk needs to collect and organize this information in a structured format to fully utilize it.
Sometimes, BizTalk needs to examine messages to handle them correctly. For example, suppose additional verification steps are needed if a customer's purchase is very expensive and outside normal buying patterns. A BizTalk schema can promote the purchase amount and make it available throughout BizTalk. BizTalk can examine the purchase amount and take an additional step to send a notification message to the customer's representative. This property promotion process creates a property schema defining information about the message. The BizTalk runtime engine uses property schemas extensively, capturing information such as the location where BizTalk accepts a message or the message's intended destination.
XML standards form the core of BizTalk. At no time is this more evident than when defining messages with the BizTalk Editor development tool. Use the Editor to define the structure of information. For example, you can create a hierarchy in which a customer message contains a demographic section, an address section, and a section for customer preferences. Each of these sections can contain details relevant only to that section.
The XML Schema Definition (XSD) language natively defines message structure to BizTalk. Since the Editor defines messages in XSD by default, any XSD-compliant XML editor can define BizTalk messages. However, the BizTalk Editor supports many of the rich capabilities of XSD, such as importing common schemas to facilitate reuse and consistency across message formats.
In addition to message structure, the BizTalk Editor can also define the data types of specific fields, thus completing the message definition. These data type definitions can be interoperable XSD primitive types, such as xs:string or xs:decimal, or complex data types. For example, complex types may require values adhering to regular expressions or a list of enumerated values enforced with the schema.
Finally, while XML standards are the core for BizTalk messages and the Editor, a message structure can extend beyond XML to apply to other formats such as a comma-delimited flat file representation. BizTalk can efficiently parse a diverse population of message formats into XML for processing within the core BizTalk runtime engine. XML must still define the message structure and fields, but a schema can specify additional information defining how the XML message translates to and from the file format.
As part of your business process or messaging solution, you need to create an XML schema from scratch. You can't generate a schema based off of an existing XML document, as this schema represents data that has not been modeled before.
The following steps outline how to create a simple schema and add it to your BizTalk project.
Open an existing project or create a new project in Visual Studio.
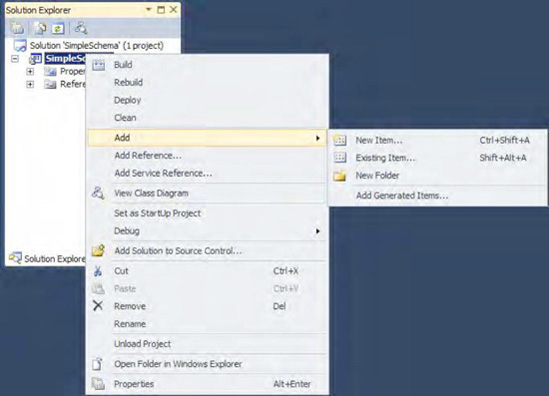
As shown in Figure 2-1, right-click the project name in the Solution Explorer and select Add

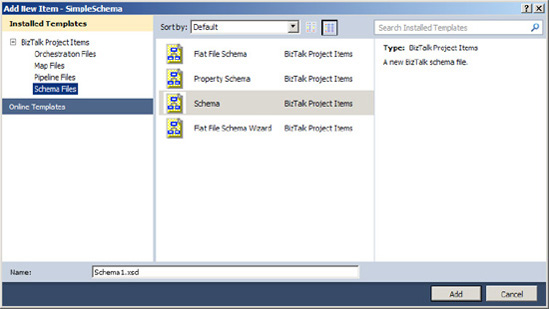
The Add New Item dialog box will appear, as shown in Figure 2-2. Select Schema as the type of item, type in a name for the item, and click OK.
To change the name of the root node, right-click the node, and select Rename.
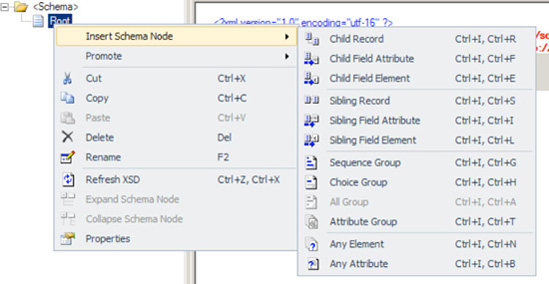
To add nodes, right-click a node, and select Insert Schema Nodes. Then select from the following options, as shown in Figure 2-3:
Child Record, to add a new record indented one level from the selected node
Child Field Attribute, to add a new attribute node indented one level from the selected node
Child Field Element, to add a new element node indented one level from the selected node
Sibling Record, to add a new record node at the same level of the selected node
Sibling Field Attribute, to add a new attribute node at the same level of the selected node
Sibling Field Element, to add a new element node at the same level of the selected node
Select a node to view and modify its properties.
XML schemas are the foundation of all scenarios and document exchanges with BizTalk Server. Once you have created your schema, you can create your scenario. Whether it is a pure messaging solution or involves business process automation scenarios implemented as orchestrations, the schema is available to all other projects and solutions simply by referencing it. Additionally, once you have created your schema, you can generate instances of the document that will adhere to the schema definition. This feature makes it very easy to create test data.
To generate a test instance, follow these steps:
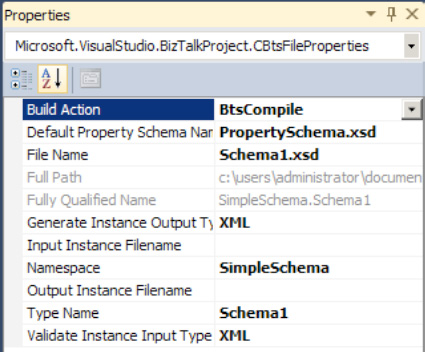
Open the schema Properties, shown in Figure 2-4, by right-clicking the schema in the Solution Explorer and selecting Properties.
Type a path and file name next to Output Instance Filename, or select the ellipsis to use the common file dialog box to browse to a file location and name the file. Then click OK.
Right-click the schema, and select Generate Instance. A test instance of the document will be created and named based on the Output Instance Filename property specified.
Similarly, BizTalk Server provides the ability to validate that an instance of a document adheres to a schema definition. To validate an instance, follow these steps:
Open the schema Properties by right-clicking the schema name in the Solution Explorer and selecting Properties.
Type a path and file name next to Input Instance Filename, or select the ellipsis to use the common file dialog box to browse to a file location and select a file. Then click OK.
Right-click the schema, and select Validate Instance. The document specified in the Input Instance Filename property will be validated against the schema.
In many situations, you will need to consume XML documents in BizTalk that already exist. Rather than creating the schema by hand, you can have BizTalk automatically generate the schema for you. The steps for doing this are as follows:
In a BizTalk project, right-click the project in Solution Explorer, and select Add
In the dialogue box that opens, select Generate Schemas.
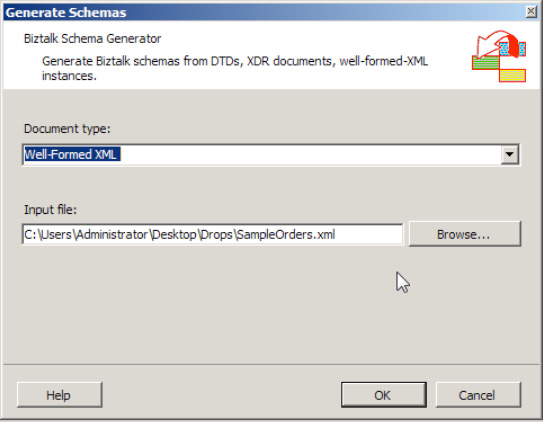
The Generate Schemas window appears. Set the Document type value to "Well-Formed XML (Not Loaded)" and set the "Input file" value to the pre-=existing instance of the XML that you are basing the schema on. See Figure 2-5.
Note
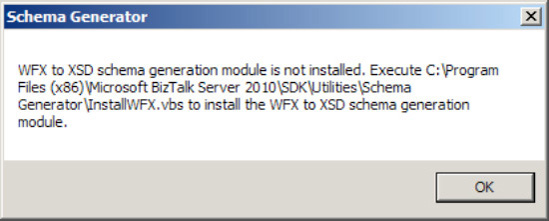
You may get an error similar to that shown in Figure 2-6. If so, simply run the
InstallWFX.vbsscript in the file path specified in the error message and run the schema generator tool again.Click OK. The schema will be automatically created and added to your BizTalk project.
BizTalk Server uses a combination of namespaces and root nodes to resolve schema references. Therefore, it is possible to have two schemas with the same root node as long as their namespace designation is different. By default, the BizTalk Editor will set the namespace of a schema to http://[solution].[schema], where solution refers to the name of the solution file and schema refers to the name of the schema file. This default namespace designation may be modified as follows:
When you modify the Target Namespace property, BizTalk Server will automatically modify the Default Namespace (element name xmlns) of the schema to match the Target Namespace. Once the two schemas with the same root node have different namespace designations, they may be used without any conflicts.
Namespaces are used to allow elements and attributes from different schemas to share names. For example, two schemas may have an element named FirstName. If the schemas did not have different namespaces, BizTalk Server would not know which FirstName you were referencing. In addition to adopting naming standards and conventions for all BizTalk artifacts, you should adopt a standard for namespaces in schemas. An example of a standard is as follows:
http://[Company Name].[Project].BizTalk.Schemas.[Schema].[Version]
where Company Name is your company name, Project is the name of the project, Schema is the name of the schema, and Version is the version number of the schema.
Note
"EDI" should not be used in the namespace of any project that uses the BizTalk EDI engine. During runtime, you may run into conflicts with this that will not allow your components to function as expected.
You have a scenario where you want to subscribe to a message differently based on the contents or context of the message, and you need to understand how BizTalk Server exposes this metadata.
In order to promote instance-specific data fields (data that resides in the actual message instances, such as a customer name or the ID of an order), you must create a property schema. You then promote the specific schema elements, attributes, or records you need to subscribe to into the property schema. This task is accomplished in Visual Studio, and can be done in one of two ways: quick promotion and regular promotion. For more information on both of these methods, see Recipe 2-5, which describes how to create a property schema.
In addition to instance-specific data fields, a number of system- or exchange-specific properties are automatically promoted by BizTalk Server. A description of these exchange-specific properties, and the fundamental difference between them and instance-specific properties, is provided in the following "How It Works" section.
All properties that have been promoted, regardless of whether they are associated with a specific instance or the message exchange in general, are available for subscription by other BizTalk Server objects, including send ports, send port groups, and orchestrations. Promoted properties are also available for tracking purposes, which allow them to be used in troubleshooting and reporting.
The importance of promoted properties in BizTalk Server's publish/subscribe architecture cannot be overstated. Understanding how they work is absolutely critical when designing and building an integration solution.
From a simplistic perspective, a publish/subscribe integration architecture involves source systems publishing or outputting messages to a centralized hub. After the hub receives these messages, it delivers them to the destination, or subscribing, systems. Within BizTalk Server, promoted properties are the key data that determine which messages are delivered to subscribing systems or processes. Without promoted properties, messages would be received by BizTalk Server, but they would not be sent out, resulting in a sort of black hole of messages. This would obviously not be a good situation, and BizTalk Server will actually throw an error if a message is received without having a system or process that subscribes to it. This keeps with the theory that it is not a good idea for a publish/subscribe integration hub to accept messages for which it does not have a subscriber.
A term that is commonly used to describe a message's promoted properties is message context. The message context includes all the instance-specific and exchange-specific data fields and essentially is the metadata that the messaging engine of BizTalk Server uses to process messages. As previously noted, instance-specific properties are those that pertain to a specific message instance, and they must be promoted explicitly during development. A common example of this type of property is an XML element containing a unique ID, which may capture an important data field such as an order number. From a message schema, XML elements, attributes, and records may be promoted.
Note
In order for an XML record to be promoted, its ContentType property must be set to SimpleContent. All promoted properties, regardless of whether they are populated by XML elements, attributes, or records, have a maximum length of 255 characters.
Along with being the key data elements allowing message subscription, promoted properties are also commonly used in orchestrations to determine business process. Orchestrations can handle messages dynamically by interrogating promoted properties that hold key metadata elements of a message. For example, sales orders being delivered domestically may need to be handled differently than those being sent overseas. By capturing the destination country of an order in the document schema and flagging the element as a promoted property, this data element can easily be used as a decision point in the orchestration. Domestic orders could be handled on one branch of decision logic, and international orders handled on another. It is important to note here that as an alternative to using promoted properties, the actual XML message could be interrogated within the orchestration to determine the destination of a sales order. While this method could be used, leveraging promoted properties simplifies programming and has performance benefits, as promoted properties can be accessed directly without incurring the cost of opening the entire XML message.
For additional performance gains, distinguished fields can be used as opposed to promoted properties within orchestrations. Distinguished fields provide functionality similar to promoted properties (allowing access to instance- or exchange-specific metadata items on a message), with a few key differences:
Distinguished fields are available only within a single orchestration instance, and they are not available to other BizTalk Server objects, such as receive locations, send ports, send port groups, and tracking utilities.
Distinguished fields can be of any length; promoted properties have a maximum length of 255 characters.
Distinguished fields have less of a performance impact than promoted properties, as they are not persisted to the MessageBox database. Instead, they are essentially XPath aliases, which simply point to the appropriate XML data field. Additionally, adding the
DistinguishedFieldattribute to a field on a .NET class allows it to be exposed as a distinguished field.Distinguished fields are accessed through a reference to the name of the message, the name of the record structure containing the distinguished field (which could include multiple levels of child records), and the name of the distinguished field, with each named item separated by periods:
MessageName.RecordName.ChildRecordName.DistinguishedFieldName. Promoted properties, on the other hand, are accessed through a reference to the name of the message, the name of the property schema, and a name of the promoted property, via the following format:MessageName(PropertySchemaName.PromotedPropertyName).
Certain scenarios will call for sensitive information, such as a bank account number, to be used as a promoted property. To allow for enhanced troubleshooting and detailed reporting, promoted properties can be viewed in tools such as the Group Hub reports in the BizTalk Admin Console and Business Activity Monitor (BAM). Based on privacy regulations, these data fields may need to be hidden from these tools, which can be accomplished by setting the promoted property's Sensitive Information property to True (this configuration is applied on the property schema).
System- or exchange-specific properties are those that are automatically promoted by BizTalk Server and allow the successful processing of those documents by the messaging engine. The fundamental difference between the two types of properties is that exchange-specific properties can all be determined without looking into the actual contents, or payload, of the message. Instance-specific properties, on the other hand, are all populated with actual values within a message instance.
Exchange-specific properties come in various types. Table 2-1 lists the default exchange-specific property types that come with a complete installation of BizTalk Server. Additional properties may be added as other BizTalk related items are installed, such as the MQ Series adapter.
Table 2.1. Default Exchange-Specific Property Types
Description | |
|---|---|
Properties that support the BizTalk Framework. These are very rarely used in the routing of documents. | |
Properties that support core BizTalk Server messaging. These are extremely common in routing and include things like | |
EDI (EDI) | These are the base EDI properties are available when the BizTalk EDI components have been installed. They include envelope information, party information, and other data related to EDI message processing. |
AS2 (EdiIntAS) | These properties are related to AS2 (also known as EDI over the Internet) messages and are available on messages processed using the AS2 protocol. |
EDI Override (EDIOverride) | These properties are used primarily to override the values of EDI messages at runtime. They include envelope segments and several other related properties. |
Error Reporting (ErrorReport) | Properties that support error reporting and handling. These are used when subscribing to documents that have failed on ports that have been enabled for routing of failed documents. |
Legacy (LEGACY) | Properties that support BizTalk Server 2002 properties. |
Message Tracking (MessageTracking) | Properties that support message tracking. |
Orchestration (Microsoft.BizTalk.XLANGs.BTXEngine) | Properties that support the BizTalk Server orchestration engine. |
MIME (MIME) | Properties that support the processing of MIME-encoded messages. |
Various BizTalk Adapters (FILE, FTP, HTTP, MQSeries, MSMQ, MSMQT, POP3, SMTP, SOAP, SQL, WCF, WSS, etc.) | Properties that support the different adapters, both standard (such as File and FTP) and third-party adapters. These properties are available for documents that have been processed using the specific adapter (for example, if a message was received on a File adapter, the file promoted properties will be populated). |
XML Document (XMLNorm) | Properties that support the processing of XML documents. |
BizTalk Server processes promoted properties as messages are received into or sent out of the MessageBox. Specifically, pipelines handle this task. System- or exchange-specific properties are promoted by default, through pipelines such as XML or PassThru (both the receive and send variety). For instance-specific properties to be promoted, a pipeline other than the PassThru must be used, as this pipeline does not attempt to match messages to their associated schemas (and therefore property schemas).
As properties are promoted, their XSD data types are converted to Common Language Runtime (CLR) data types. Table 2-2 shows XSD data types and their associated CLR data types.
Table 2.2. XSD Data Types and Associated CLR Data Types
XSD | CLR | XSD | CLR |
|---|---|---|---|
anyURI | String | Name | String |
Boolean | Boolean | NCName | String |
byte | sbyte | negativeInteger | Decimal |
date | DateTime | NMTOKEN | String |
dateTime | DateTime | nonNegativeInteger | Decimal |
decimal | Decimal | nonPositiveInteger | Decimal |
double | Double | normalizedString | String |
ENTITY | String | NOTATION | String |
float | Single | positiveInteger | Decimal |
gDay | DateTime | QName | String |
gMonth | DateTime | short | Int16 |
gMonthDay | DateTime | string | String |
ID | String | time | DateTime |
IDREF | String | token | String |
int | Int32 | unsignedByte | Byte |
integer | Decimal | unsignedInt | Uint32 |
language | String | unsignedShort | Uint16 |
In addition to pipelines, orchestrations may also be used to explicitly set promoted properties. This is important if your business process requires the copying or creation of messages. Since messages are immutable (meaning once a message has been created, it cannot be modified) in BizTalk Server, a new message must be created prior to any of its promoted properties being set. When a message is constructed in an orchestration as a copy of another message, the message context (its promoted properties), by default, are all copied to the new message. Once this new message is created, its properties may be explicitly set to something different than in the original message. This must be done in the same Message Assignment shape in the orchestration as the duplicate message.
Note
When a copy of a message is created in an orchestration, it is important to consider how the properties on the original message are configured. If any of its properties are configured to use MessageContextPropertyBase for the Property Schema Base (a property of the promoted field found in the property schema), they will not be copied to the new message in the orchestration. By contrast, all those properties that are configured to use the MessageDataPropertyBase (the default value) for the Property Schema Base will be copied to the new message. For more information about the Property Schema Base property, see Recipe 2-5.
Property schemas allow you to promote properties so that they can be used when setting up filter expressions. As long as the PassThruReceive pipeline is not used, these promoted properties are added to the message context during pipeline processing. Once added to the message context, they can be used as filter expressions on send ports. These properties are also available to be evaluated or modified in orchestrations. To create a property schema and promote a property, follow these steps:
Open the project that contains the schema.
Double-click to open the schema.
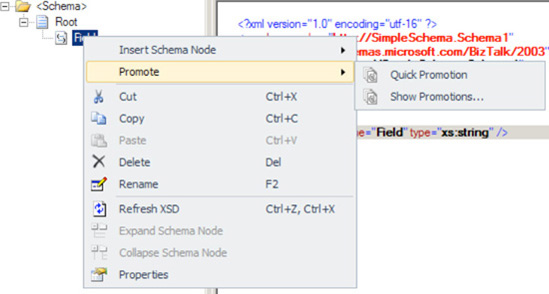
Select the node that you wish to promote.
Right-click and select Promote
You will be asked if you wish to add the property schema to the project. Click OK. The property schema is created with a reference to the promoted property, as well as a default property of
Property1. This may be removed from the property schema.Note
You may also add a property schema by highlighting the project in the Solution Explorer and selecting Add
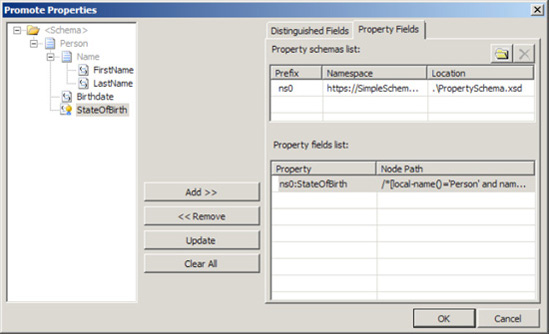
To view all promoted properties, select any node in the schema and select Promote
Select the Property Fields tab to view all of the promoted properties, as shown in Figure 2-8.
You may promote additional fields directly from this dialog box, or repeat steps 3 and 4 to promote other fields.
Once you have deployed the solution with the promoted properties, they may be used to perform content-based routing on the documents. Following is a simple example of content-based routing. Assume you have the following two documents:
<Person>
<Name>
<FirstName>John</FirstName>
<LastName>Doe</LastName>
</Name>
<Birthdate>1979-05-31</BirthDate>
<StateOfBirth>Washington</StateOfBirth>
</Person>
<Person>
<Name>
<FirstName>Sam</FirstName>
<LastName>Evans</LastName>
</Name>
<Birthdate>1973-03-15</BirthDate>
<StateOfBirth>California</StateOfBirth>
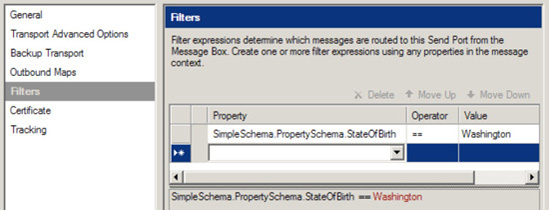
</Person>You would like to send each of these documents to a different destination based on the StateOfBirth field. After creating a simple schema to represent these documents, the StateOfBirth element is promoted using the steps outlined in the "Solution" section. Once the project is built and deployed, you are able to reference the promoted property when creating a send port filter expression. In this example, two distinct send ports are created. Figure 2-9 shows the filter expression on the first send port. The subscription is based on the value of the StateOfBirth field being equal to Washington.
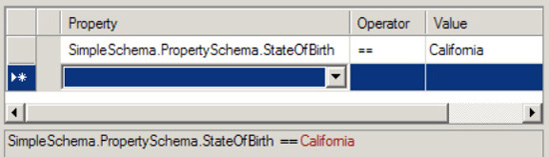
On the second send port, the subscription is based on the value of the StateOfBirth field being equal to California, as shown in Figure 2-10.
Although this example is simple, it is easy to see how you can leverage this feature to create content-based routing scenarios through the use of promoted properties.
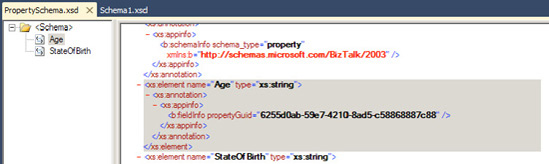
It is also possible to create message context properties that do not exist in the message itself, but only in the message context. This may be valuable when you are not allowed to modify the schema but would like to associate additional information with the document. This may be accomplished by adding a node to a property schema and setting its Property Schema Base property to MessageContextPropertyBase. This property is then available and can be set in an orchestration, and ultimately, the document may be routed based on its value. For example, perhaps you would like to calculate the age for each person processed in the preceding example, but you cannot add an Age element to the schema. As opposed to adding a node to the schema, a node is added to the property schema, as shown in Figure 2-11.
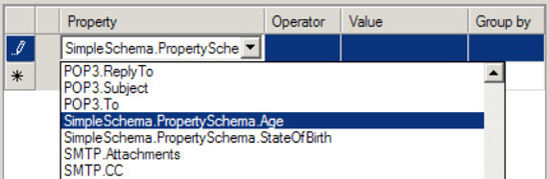
After building and redeploying the solution, a second property, Age, is now available (see Figure 2-12) for generating filter expressions.
To complete the scenario, you would do the following:
Create an orchestration that subscribes to all of the documents with no value for
Age.In this orchestration, calculate the
Agevalue based on the birth date, and set the property accordingly.Send the document back into the MessageBox database.
Add a second filter expression to the existing send ports to subscribe based on the
StateOfBirthand if theAgevalue is present.
In summary, content-based routing is a typical scenario, and property schemas are used to extend the message context properties that come with BizTalk Server.
You can use the XSD Import method within the BizTalk Editor to reuse an existing common XML object structure within another, as opposed to manually creating an entire schema. As an example, assume you have two simple XML structures, Customer and Address:
<Customer>
  <FirstName> </FirstName>
  <LastName> </LastName>
  <MiddleInit> </MiddleInit>
  <Age></Age>
</Customer>

<Address>
  <AddrLine1> </AddrLine1>
  <AddrLine2> </AddrLine2>
  <AddrLine3> </AddrLine3>
  <Zip> </Zip>
  <State> </State>
  <Country> </Country>
</Address>
To use the XSD Import method to allow this scenario within BizTalk, follow these steps:
Open the project that contains the existing schema (in this case, the
Customerschema).Double-click the
Customerschema to open it.Right-click the root node of the
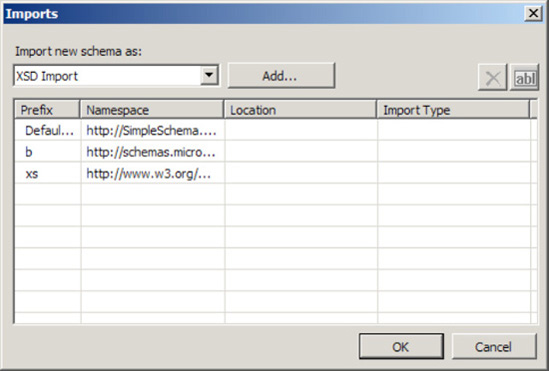
Customerschema, and select Properties.In the Properties window, click the ellipsis next to Imports to open the Imports dialog box, which is shown in Figure 2-13.
Select XSD Import as the import type, and click the Add button.
In the BizTalk Type Picker dialog box, select the
Schemastree node, and select theAddressschema.
Note
In this example, the Address schema is within the current BizTalk project. If the schema existed outside the BizTalk project, the schema could be imported by selecting the Reference tree node.
The preceding procedure imports the Address schema into the Customer schema. To use the Address schema, follow these steps:
The Customer schema is now referencing and using the Address schema via the Imports schema method within the BizTalk tool set.
Within the BizTalk tool set, there are a variety of ways in which you can construct XML schemas. The choices revolve around common architecture principles such as reuse, development best practices for schema organization, and fundamental development preferences.
This example illustrated using the Imports method for referencing schema. The Imports dialog box offers three choices for achieving the schema reference activity (step 5 of the recipe):
Include: This method physically includes a schema definition within another. The common usage would be to create a static reference of a schema during the schema build process. This choice could be used to leverage previously defined XSD schema (for example, publicly available schema). The include schema must be the same target namespace of the schema you are including. Alternatively, the target namespace of the include schema can be blank.
Import: The most commonly used import method within BizTalk, the Import option includes XSD
Importsstatements within the source schema definition. By using this option, namespaces and XSD object structures within the target schema are available for use within the source schema in read-only fashion. The practical application for this choice revolves around common reuse, such as reuse of an existing schema artifact or use of a publicly available XML schema.Redefine: The least-common import method within BizTalk, the Redefine option, like the Import option, allows namespaces and XSD object references to be used within the source definition. However, the Redefine option allows objects and data structures to be overridden within the source definition. Common uses could be to create an inheritance model or to reuse and customize an existing XSD structure.
This example demonstrated referencing other schemas within the BizTalk tool set. However, while BizTalk provides and implements standard XSD instructions to achieve this functionality, common architecture usage and choices should not be ignored to ensure the correct schema reference method is selected.
You would like to reference an XML schema in your BizTalk project, because you want to reuse an existing BizTalk artifact or prebuilt schema component.
As an example, assume you have a simple Customer XML schema (CustomerSchema.dll) stored in an existing BizTalk project:
<Customer>
  <FirstName> </FirstName>
  <LastName> </LastName>
  <MiddleInit> </MiddleInit>
  <Age></Age>
</Customer>
To reference an existing schema, follow these steps:
Open your source project.
Within the Solution Explorer, right-click the
Referencestree node, and select Add Reference.Select the Projects tab in the Add References dialog box if the schema you are after is in the same project, or click the Browse tab, navigate to
CustomerSchema.dll, and then click the OK button.
You now have referenced CustomerSchema.dll and can use the inherent BizTalk artifacts in your current project. For example, suppose that you want to use the DLL in a new map within your current project. Follow these steps:
Right-click the project, and select Add
In the Add New Item dialog box, double-click Map. This opens a blank map with left and right panes where you can enter the source and destination schema, respectively.
Click Open Source Schema in the left pane.
In the BizTalk Type Picker dialog box, select the
Referencestree node, and select the Client Schema reference.Select the
Schemasnode.Select the
Customerschema.
Referencing schemas gives you the ability to reuse and reference existing BizTalk artifacts, as you would normally reference other .NET artifacts. While this can be powerful, you should always keep in mind partitioning and change scenarios. For example, if you were to reference an existing deployed artifact, to make changes to the referenced artifact, you would need to remove the referenced artifact in the dependent project.
Note
One of the most important things you can do is plan how to organize your BizTalk artifacts into separate projects (and, in turn, assemblies). Intelligent namespacing is the first step, separating schemas into appropriate projects is the next. Since schemas are referenced by maps and by orchestrations, the map and orchestration artifacts often should be kept in their own, separate projects. Using small assemblies that have just a few artifacts is the ideal approach, as these are far more easy to update and redeploy than other methods of organization.
This example explored how to reference a schema artifact in another project. BizTalk also gives you the ability to reference schemas in Schema Import tasks. For information on how to import schema references, refer to Recipe 2-6.
You are receiving a message that contains multiple records in a batch fashion. In order to import this information into the appropriate systems, each record must be handled individually, as opposed to processing them all in a single batch.
Envelopes allow you to define a container schema that wraps a number of child schemas or subschemas. By defining which child records it contains, the envelope allows BizTalk Server to access the subrecords individually (a process commonly known as debatching) and process them as distinct messages. For this solution, it is assumed that the schema defining the child record has already been created (see Recipe 2-1 for how to create a schema). In this case, our child record schema is Order – the incoming document contains one or more "Orders," and we want to split these into individual orders using an envelope.
To create an envelope schema, follow these steps:
Open the project that contains the child record schema. In this case, "Order" would be the child record.
Right-click the project, and select Add
Select Schema Files from the BizTalk Project Items category and Schema from the list of templates. Enter a descriptive name for your new schema and then click Add. In this case,
OrderEnvelopewill be used.Right-click the
Rootnode of the new schema, and change it to the root name of the incoming schema containing the batch of records (OrderEnvelopein this example).Click the
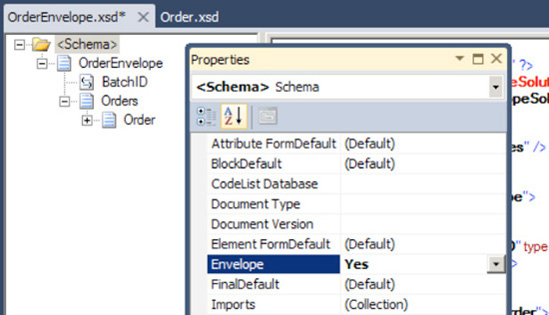
Schemanode (directly above the newly renamed root node), and change theEnvelopeproperty of the schema toYes(in the Properties window), as shown in Figure 2-14.Right-click the newly renamed root node, and select Insert Schema Node
Right-click the record that will contain the child records (
Ordersin this example) and select Insert Schema NodeRight-click the container child record (
Orderin this example), and select Insert Schema NodeClick the root node (
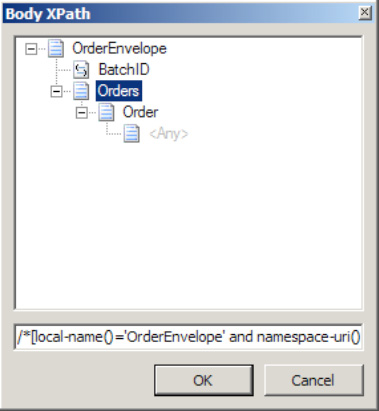
OrderEnvelopein this example), and click theBody XPathproperty of the schema (in the Properties window), which will open the Body XPath dialog box.Navigate through the schema structure displayed in the tree view, and select the container record for the child records you wish to process individually (the
Ordersrecord in this example), as shown in Figure 2-16. Then click OK.Build and deploy the solution.
The next step is to create the receive port, receive location, and send port. The basics are as follows:
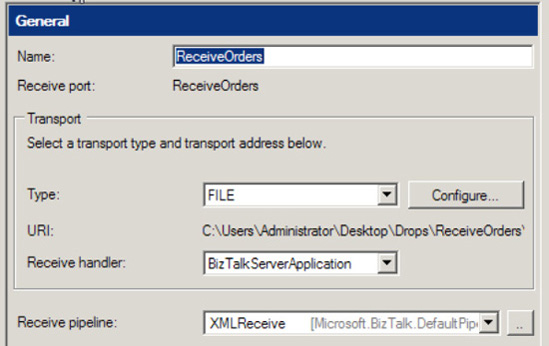
Create a Receive Port and an associated File Receive Location. Set the Receive pipeline property as XMLReceive. See Figure 2-17.
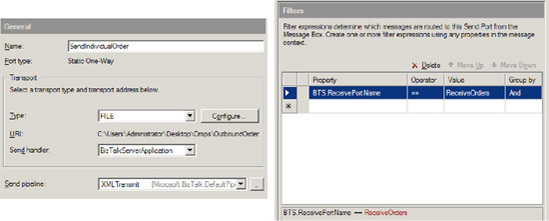
Create a File Send Port. Set the filter to subscribe to the Receive Port (BTS.ReceivePortName) and the Send Pipeline property to XMLTransmit. See Figure 2-18.
Enlist the Send Port and enable the Receive Location.
Drop an instance of the Orders XML document on the File Receive Location. The split of the inbound Orders document will occur automatically in the pipelines.
Note
You can create a sample instance to work from by right-clicking the OrderEnvelope schema and selecting Generate Instance. Paste this into Notepad or some other text editor. Next, right-click the Order schema, and select Generate Instance. Paste this into the correct node in the Orders document in the text editor. Save this manually created document and use it as a test input document.
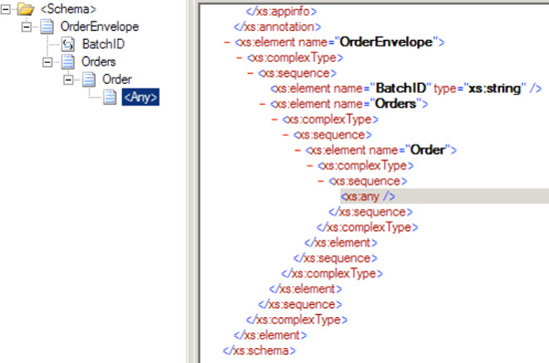
Envelopes provide the means to group multiple messages into one XML document. In the preceding example, the envelope was used to disassemble individual order documents from a single enveloped document containing a batch of orders. Once the envelope and document schemas (OrderEnvelope and Order in the example) have been deployed, BizTalk Server has the ability to leverage the two in message processing. The following XML represents one possible instance of the envelope schema:
<ns0:OrderEnvelope xmlns:ns0="http://EnvelopeSolution.OrderEnvelope">
  <BatchID>BatchID_0</BatchID>
  <Orders>
    <ns0:Order xmlns:ns0="http://EnvelopeSolution.Order">
      <OrderID>1</OrderID>
      <OrderAmount>1.00</OrderAmount>
    </ns0:Order>
    <ns0:Order xmlns:ns0="http://EnvelopeSolution.Order">
      <OrderID>2</OrderID>
      <OrderAmount>2.00</OrderAmount>
    </ns0:Order>
  </Orders>
</ns0:OrderEnvelope>
When passed through an XML disassembler pipeline component in BizTalk Server, the preceding XML message will produce the following two XML documents, which can be processed individually:
<ns0:Order xmlns:ns0="http://EnvelopeSolution.Order">
  <OrderID>1</OrderID>
  <OrderAmount>1.00</OrderAmount>
</ns0:Order>

<ns0:Order xmlns:ns0="http://EnvelopeSolution.Order">
  <OrderID>2</OrderID>
  <OrderAmount>2.00</OrderAmount>
</ns0:Order>
As these order documents are split up into separate messages within BizTalk Server, they can undergo different forms of business logic or be delivered to a different destination, depending on their properties (see Recipe 2-4 for more information about property-based subscriptions).
The key data element that allows envelope processing in BizTalk server is the Body XPath property. This data element acts as a pointer to the container record that encapsulates or surrounds the child records. On the OrderEnvelope root node, the Body XPath property was set to the Orders record, which contains the individual Order records. In envelope schemas containing a single root node, the Body XPath property must be set to that root node.
For envelope schemas with multiple root nodes, the following apply:
If the
Root Referenceproperty is not set on the envelope schema, theBody XPathproperty must be set for all root nodes.If the
Root Referenceproperty is set on the envelope schema, theBody XPathproperty must be set for the root node configured in theRoot Referenceproperty. TheBody XPathproperty can be set for the other root nodes, but it is not required.It is not required to set the
Root Referenceproperty, but theBody XPathproperty must always be set on at least one root node.
In addition to encapsulating multiple messages, envelopes can also supply header information that applies to all the records it contains. In the example, the BatchID element is defined once at the envelope level, but applies to all the individual order documents. This functionality of supplementing the individual message data with header data or metadata can be seen in the common example of SOAP envelopes (see Recipe 2-13 for more information about SOAP envelopes).
Within BizTalk Server, envelope processing for received messages occurs in the disassemble stage of a receive pipeline. The out-of-the-box XML receive pipeline handles the removing and parsing of any envelope data contained within the inbound document. The subschemas are dynamically determined at runtime by the envelope's properties (specifically, the Body XPath), and used to validate the child documents' structure and split each out into an individual message.
A custom receive pipeline can also be used to more precisely process inbound enveloped documents. By leveraging the XML disassembler pipeline component, the envelope and document (child document) schemas can be set explicitly in the properties of the component. All envelope and document schemas explicitly set should have unique target namespaces.
Note
If envelope or document schemas are explicitly set on an XML disassembler component, only documents matching those schemas will be processed within the pipeline. The order of envelope schemas is enforced based on the configuration within the Envelope property on the XML disassembler component. In contrast, the order of the document schemas is not enforced.
After the inbound enveloped document has been debatched into individual messages, the disassembler promotes any properties of the envelope to each individual message. In the example, if the BatchID had been configured as a promoted property, it would have been attached to each individual message during disassembly.
Implementing envelopes for outbound messages is also possible within BizTalk Server. This process is handled in the assembling stage of a send pipeline. By leveraging the XML assembler pipeline component in a custom send pipeline, the envelope schemas can explicitly be set in the properties of the component. As it passes through the custom pipeline, the message will be wrapped in the specified envelope(s) and have the appropriate message properties demoted to the envelope(s). If a batch of outbound messages is sent through the custom send pipeline, the batch of messages will all be combined into a single document and wrapped in the specified envelope.
In addition to having a single envelope, a group of messages can be wrapped in a series of nested envelopes. Using nested envelopes provides a flexible way for transferring message batches that have a complex structure or relationship.
While the preceding solution used BizTalk Server's pipeline capabilities to handle inbound envelope processing, there are other implementation options to consider when designing a solution. A loop can be used within an orchestration to iterate over child records within an enveloped document, splitting out each submessage individually using XPath queries or a node list object. An orchestration can also be used to call out to an external assembly to handle message debatching. When determining which method to use, it is important to consider the following:
Does the entire batch need to be handled transactionally (for example, if one of the messages fails to process correctly, should the entire batch be canceled)?
• Do the individual records within the batch need to be processed in a specific order (for example, in the same order in which they appear in the original document)?
Does there need to be any event or notification after all messages in the batch are successfully processed?
Is business logic (orchestration) implemented on each individual message after it has been debatched?
If your business scenario would lead you to answer yes to any of these questions, using an orchestration to handle the parsing of an enveloped document may be required. The main benefit of using an orchestration is enhanced control over the processing of the individual messages. The order of the messages can be maintained; scopes can be used to implement transactionality across the entire message batch; compensating and error handling are more robust; and it is simple to implement logic required when all messages within a batch have completed processing. The major downsides to using orchestrations for debatching are performance and ease of modification to the solution (as changing the orchestration requires you to redeploy the BizTalk Server solution).
If the requirements of your business scenario allow for envelope processing to be handled via pipelines, you will realize performance gains. Additionally, the solution will be simplified by minimizing the number of implemented artifacts.
You want to create an address data type that can be reused, rather than creating the same set of data for every address type.
You can use XSD complex types within the BizTalk Editor. As an example, assume that you need to create your own complex data type for storing shipping addresses for an Order schema:
<Order> <CompanyName> </CompanyName> <OrderID> </ OrderID> <OrderDate> </OrderDate> <OrderAmount></ OrderAmount ><ShipTo><CompanyID> </CompanyID>
<AddressLine1> </AddressLine1><AddressLine2> </AddressLine2><AddressLine3> </AddressLine4><Zip> </Zip></ShipTo><ShipFrom><CompanyID> </CompanyID><AddressLine1> </AddressLine1><AddressLine2> </AddressLine2><AddressLine3> </AddressLine4><Zip> </Zip></ShipFrom></Order>
For this example, the Order schema has been built with Order Header nodes and the <ShipTo> record. The following steps outline how to create a complex type to be the data type for the <ShipTo> and <ShipFrom> addresses. You will model the data type of the existing <ShipTo> record.
Open the project that contains the schema.
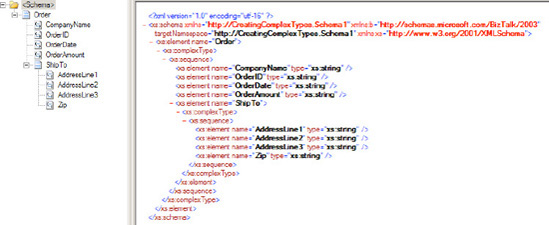
Double-click the schema (the
Orderschema in this example) to open it, as shown in Figure 2-19.Click the existing record on which you want to base the complex type (the
<ShipTo>record in theOrderschema in this example).In the Properties window, click Data Structure Type, and type Address in the box. This step will now automatically recognize the record as a complex data type.
Now you can reuse the complex type. For example, here are the steps to create a record that uses the sample complex type:
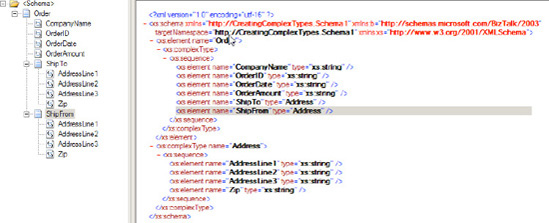
This procedure creates the Address complex type element structure under the ShipFrom record. A sequence instruction is created under both the ShipFrom and ShipTo records to implement the complex type. Figure 2-20 shows the finished schema.
The example demonstrated creating a complex type data type based on an existing schema record within the schema. By XSD definition, a complex type is an element (record) that has child elements or attributes. Complex types can be used to implement custom schema rules and XSD data structure considerations for records, elements, and attributes. For example, you might use complex data types for validation rules via XSD regular expressions, schema cardinality, and order. In addition, you can make data type references to your complex types, allowing you to reuse record structures and XSD implementations.
A complex type is derived from the base data type anyType; that is, in the purest form, a complex type is in essence a stand-alone base type, in which you can define your own XSD structure representation and schema rules.
Note
A simple type is an element that in itself is defined and does not have children. For example, you might have a simple type named Order ID, which has a length limit of six and must start with an A character. In this instance, an XSD length restriction could be defined, along with a regular expression to check that the order starts with the letter A: <OrderID> Axxxxx </ OrderID>.
You have field elements or attributes in your schema for which you want to restrict the valid content beyond data type, enumerations, length, and minimum and maximum values.
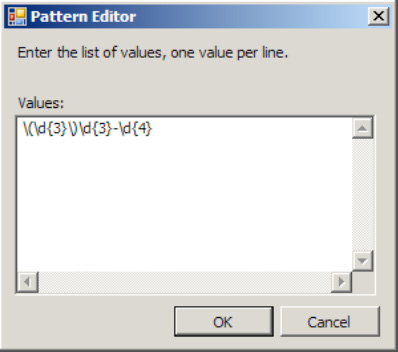
You can use the Pattern property of a field element or attribute to place a collection of regular expressions. Regular expressions are used to do pattern matching against the inbound data for the node. If the inbound data adheres to the pattern(s) defined for a node, then the input instance document will pass XML validation. If the inbound data for the node does not match the pattern(s), then the input instance document will fail XML validation. From within the BizTalk Editor, follow these steps to add a regular expression to a field element or an attribute:
Select the field element or attribute node to which you wish to add restriction patterns.
Right-click and select Properties.
Set the
Derived Byproperty toRestriction. This will enable theRestrictionproperties within the Properties window.Select the ellipsis next to the
Patternproperty to launch the Pattern Editor dialog box, as shown in Figure 2-21.Add one to many valid regular expressions, and then click OK. The BizTalk Editor will add these restriction patterns to the schema definition.
Note
Although XSD regular expressions are similar to those in other programming languages that allow for pattern matching, there are some differences. Refer to the W3C specification for the specifics of the regular expression syntax for XSD.
More restrictive validation of the input data may be of value for numerous types of data, such as phone numbers, IP addresses, and Social Security numbers. In these cases, you can use regular expressions to restrict the type of data that will be considered valid.
Once you have created a schema that has nodes with pattern value restrictions, you can use the Generate Instance and Validate Instance capabilities of the BizTalk Editor to test your patterns. See Recipe 2-1 for more information about these two features.
Note
If you have pattern restrictions for a node(s) in your schema, the Generate Instance option will not create an instance document with valid data for those nodes. You will need to edit the instance document created. However, the Validate Instance option will validate the schema, including restriction patterns.
At runtime, neither the PassThruReceive nor the XMLReceive pipeline will complete a strict validation of the inbound document against the schema including the pattern matching. To complete a thorough validation of an inbound document, you must create a validation pipeline and add the document schema to the Document Schema property of the XML validator. If the document fails schema validation in the pipeline, the instance will terminate.
In practice, it may be more beneficial to handle the strict validation of data more gracefully than terminating the instance when the validation fails. This is especially true if the document is coming from an outside source or from a system that is outside your control. However, restriction patterns can be used to safeguard downstream systems and processes from bad data.
You are consuming an inbound message in a flat file structure and must represent the data in an XML schema. The inbound flat file contains records that are both positional and delimited.
Note
Delimited files contain characters (such as commas) that separate the data. Files that are positional in nature contain data items that are a predefined length within the file. The physical position of the data defines what the data represents.
The solution outlined in this recipe consumes an inbound flat file schema message that may have a structure similar to the flat file shown in Listing 2-1. Additionally, this recipe outlines the steps required to manually create a schema for a flat file. BizTalk 2010 also includes a Flat File Wizard for creating flat file schemas (see Recipe 2-12)
Note
The number bar at the top of Listing 2-1 is included for reference only and is not part of the file content. The number bar is for counting the position of the characters.
Example 2.1. CustomerSalesOrder.txt
123456789012345678901234567890123456789012345678912345678901234567890
ORDER2004-10-24
SoldTo Shauna Marie    1223 Buttercup Lane Seattle       WA 98155
ShipTo Jen Schwinn     3030 Moby Road      Kent          WA 98110
ITEMS,ITEM111-AA|Grape|1|2.00|Bottle of Pop,ITEM111-AB|Cola|
1|2.00|Bottle of Pop
Additionally, the outbound BizTalk schema may have a structure similar to the XML file shown in Listing 2-2.
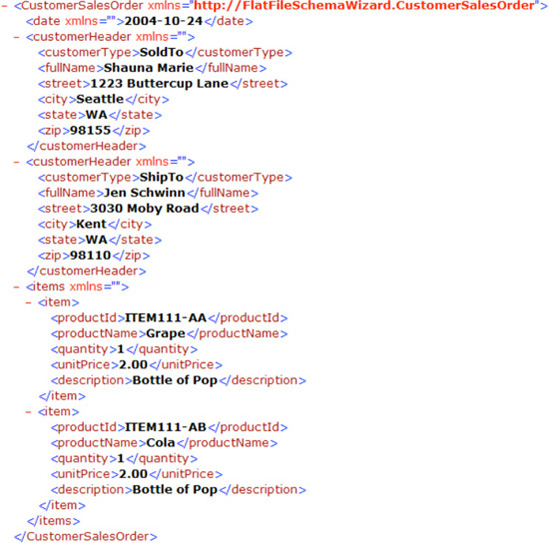
Example 2.2. CustomerSalesOrder.xml
<ns0:order xmlns:ns0="http://Schema_Chapter_Project.CustomerSalesOrder">
  <date>10/24/2004</date>
  <customerHeader>
    <customerType>SoldTo</customerType>
    <fullName>Shauna Marie</fullName>
    <street>1223 Buttercup Lane</street>
    <city>Seattle</city>
    <state>WA</state>
    <postal>98155</postal>
  </customerHeader>
  <customerHeader>
    <customerType>ShipTo</customerType>
    <fullName>Jen Schwinn</fullName>
    <street>3030 Moby Road</street>
    <city>Kent</city>
    <state>WA</state>
    <postal>98110</postal>
  </customerHeader>
  <items>
    <item>
      <productId>ITEM111-AA</productId>
      <productName>Grape</productName>
      <quantity>1</quantity>
      <unityPrice>2.00</unityPrice>
      <description>Bottle of Pop</description>
    </item>
    <item>
      <productId>ITEM111-AB</productId>
      <productName>Cola</productName>
      <quantity>1</quantity>
      <unityPrice>2.00</unityPrice>
      <description>Bottle of Pop</description>
    </item>
  </items>
</ns0:order>
Follow these steps to create the flat file schema:
Create a new BizTalk schema, and select the Flat File Schema template.
Determine the structure and layout of your message schema. The structure and layout of the message schema will largely determine how the inbound document is parsed. In the XML sample in Listing 2-2, all data fields were defined as string elements. The
customerHeader, items, anditemnodes are defined as records.Select the root node (the
ordersnode in this example), and specify the child delimiter to be a carriage return and a line feed (CRLF). The most straightforward way to set the delimiter to a CRLF is by setting thechild delimiter typeto beHexadecimal.Set
child orderto beInfix.Set
tag identifierto readORDER. Thetag identifierproperty tells the schema where the data begins for the message. The children data for the root node oforderare delimited by commas that appear in the middle of the data.Based on the fact that there are two instances of
customerHeaderinformation, themax cardinalityproperty forcustomerHeaderrecord must be set to2.Set the structure for
customerHeadertopositional, since all of the child elements that represent customer information are related in a positional format within the flat file. Each child node that exists undercustomerHeadermust have the position defined for the length of the data and the offset for where that value begins in the file. The way the value is represented starts from the left of the data element. For the length and offset of each element, see Table 2-3.Set the
next node tagvalue toITEMSsinceItemsis the next heading in the flat file.Identify the
delimiteras a comma, and set thechild-ordertoprefix, since each item will be prefixed with a comma to indicate the beginning of that item.Make sure that
child delimiter typeis set tocharacter. Selectitem, and make sure thechild delimiteris set to the pipe character (|), since the attributes for the items are delimited by the pipe character in the flat file.Set the pipe character to
infix, since each line has pipe characters set in between the delimited characteristics.
Table 2.3. Customer Header Child Elements
Element | Positional Length | Offset |
|---|---|---|
| 7 | 0 |
| 16 | 0 |
| 20 | 0 |
| 14 | 0 |
| 3 | 0 |
| 5 | 0 |
To test the flat file output of the schema, follow these steps:
To test the flat file schema to see the XML generated based on the provided flat file, follow these steps:
Verify that
Generate Instance Output Typeon your schema readsXML. TheXMLproperty allows the schema to process the inbound flat file and translate that flat file to an XML representation.Right-click the schema, and select Validate Instance. You should see the XML version of the processed flat file.
BizTalk is capable of processing both positional and delimited data, either in individual files or in a single file. The child delimiter is the key concept to keep in mind when creating a flat file schema. Any parent-level record that contains child elements or attributes must define whether the data in the flat file for those child records is delimited or positional and how the data is delimited.
Based on the layout of the destination message schema, you should consider the following when dealing with records versus dealing with child elements and attributes:
Records: If you use records to group child elements or attributes, consider how the child records will be demarcated. Will the child data be delimited, or is the child data positional? In the example in Listing 2-1, each line of data is delimited by a CRLF. Knowing that each line of data is delimited by a CRLF aids in determining whether the output schema must support that specific delimiter. The basic line delimiter information points to the need of specifying a delimiter of a CRLF for the parent record of the output schema.
Tag identifiers: Records may contain tag identifiers to distinguish one type of record from another record. A tag value also allows you to identify where data begins in the file.
Positional elements/attributes: In the XML example in Listing 2-2, the
customerHeaderdata is stored in positional format. For each child node, you must provide the offset (where to start reading the data) and the length for that data item. Additionally, the parent record must specify that the child data structure isPositional.Delimited elements/attributes: The flat file example in Listing 2-1 shows multiple items occurring on the same line delimited by the pipe (|) character. The attributes related to a single item are then further delimited by the comma character. The item's parent record must specify that the child data structure is
Delimited. Additionally, the child delimiter for the item's parent record must specify that each item is delimited by a pipe character.Cardinality for records: By default, BizTalk sets the cardinality field for records and elements/attributes to a default value of
1. The value of1means that you expect to receive a maximum and minimum of one instance of that record and associated child values. If you expect an inbound flat file to contain more than a single record instance, you must change themax occursvalue to a number equal tounboundedor the number of instances you expect to receive.Wrap characters: If the incoming data contains characters that have been identified as delimiting characters (for example, commas), those characters can be ignored through the use of wrap characters. For example, if the record contained the name
Shauna, Marieand you wanted to have the comma included as part of the name, you could define a wrap character of"(double quote) and enclose the name within the wrap character:"Shauna, Marie". BizTalk will treat any special characters defined within a set of wrap characters as field-level data.Escape characters: The purpose of escape characters is very similar to that of wrap characters. Escape characters specify the character to be used to escape reserved characters, and then the reserved characters will be treated as literal characters in a message.
If the records are delimited, you must determine how the records are delimited. For managing CRLF type transactions, child delimiter type is set to hexadecimal, and the delimiter is set to 0x0D 0x0A. If the delimiter is a character value like a comma, set child delimiter type to character. The other key consideration for using delimiters is defining the child-order of the delimiter:
If the delimiter appears after the set of data, the
child-orderof the delimiter ispostfix.If the delimiter appears before the set of data, the delimiter is
prefix.If the delimiter appears in the middle of the set of data, the delimiter is
infix.
The default child-order for a record is conditional default. The conditional default value means that if a tag value has been set for that record, then the child-order will be prefix. Otherwise, the child-order will be infix.
If the records are positional, you must determine the spacing of the delimited data. In the example, it was assumed that there were no spaces between the data (offsets set to 0) and the beginning of the data fields started at the left of each data value.
Another key consideration to keep in mind is the cardinality of the data groupings. When a BizTalk schema is created, by default, the cardinality is set to 1 (even if no cardinality value is explicitly set for a field). In the example, keeping the cardinality of the items set to the default would have caused some data to be lost when parsing both the customerHeader values and the item values. In the example, the cardinality of max value was changed to 2 to account for both the shipTo and soldTo values.
You are receiving an order file in flat file format from one of your customers. You would like to use the Flat File Schema Wizard to expedite the creation of an XML schema.
To demonstrate how to use the Flat File Schema Wizard, we will use the flat file sample shown in Listing 2-1 (used in Recipe 2-11). To create the flat file schema using the Flat File Schema Wizard, follow these steps:
Open a new BizTalk Server project.
Right-click the project, and select Add
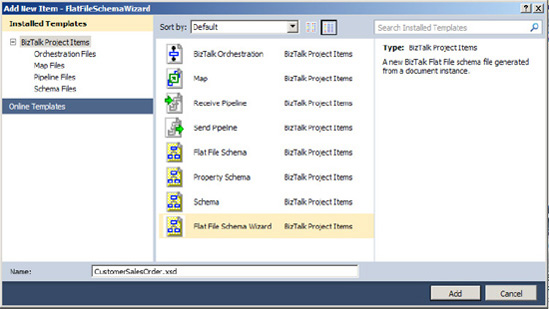
In the Add New Item dialog box, select the Flat File Schema Wizard template. Click Add. Figure 2-22 demonstrates this step.
On the Welcome screen of the BizTalk Server Flat File Wizard page, click Next.
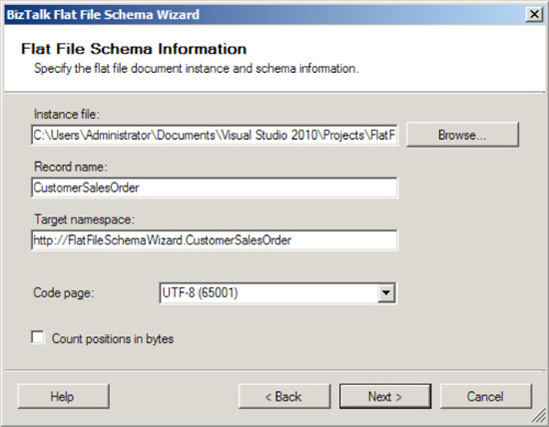
On the Flat File Schema Information page (shown in Figure 2-23), specify the information that will be used as input to generate the specifics of the desired flat file schema:
Instance File: Use this to specify where your source instance file is located.
Record Name: Specify the
Rootnode of the schema you want to create. For this example, enter CustomerSalesOrder.Target Namespace: Specify the namespace of the schema you'd like to create.
Code Page: This identifies the encoding format of a file. In this instance, use the default, which is UTF-8 (65001).
Count Positions in Bytes: This specifies whether positions are calculated by bytes. If this box is not checked, positions will calculated by characters.
Click Next.
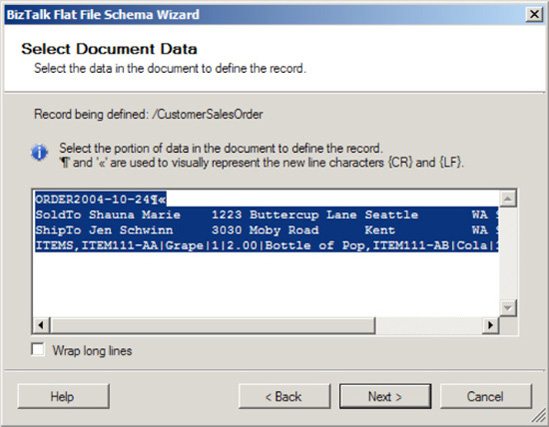
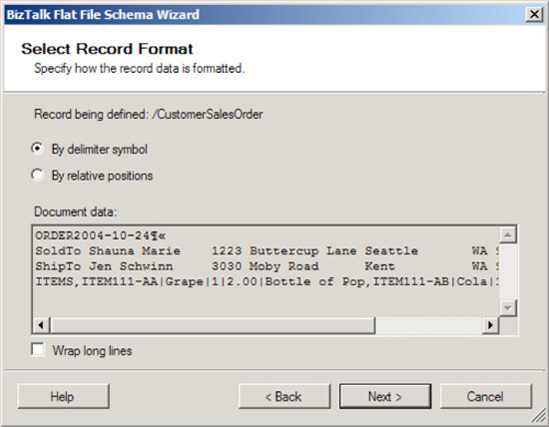
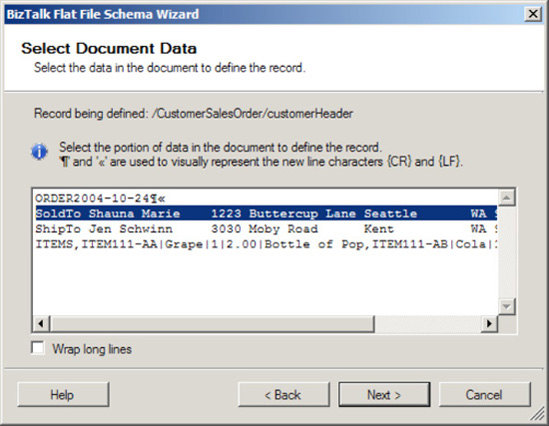
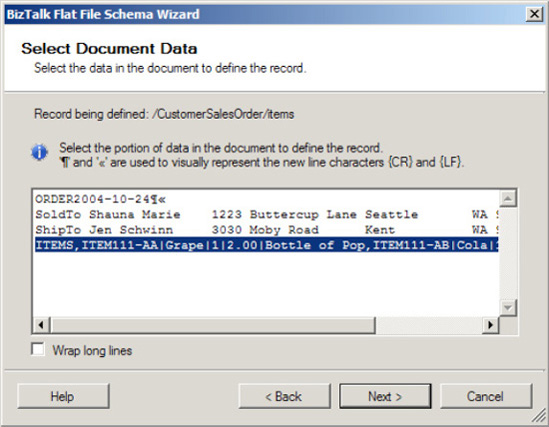
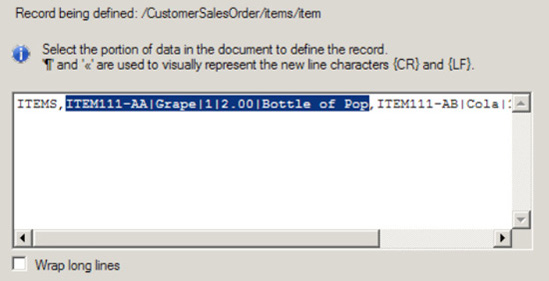
On the Select Document Data page, specify the data contents that will be used to generate the schema. The data contents are based on the instance file specified on the Flat File Schema Information page. Highlight the contents of the file that will be used to define the document data, as shown in Figure 2-24.
Click Next.
Now define the record format. In this example, the record is delimited by a carriage return and a line feed, as shown by the record identifier
ORDER2004-10-24. Select the By Delimiter Symbol radio button, as shown in Figure 2-25.Click Next.
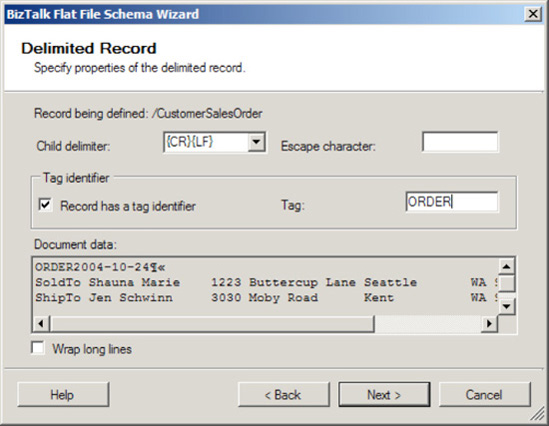
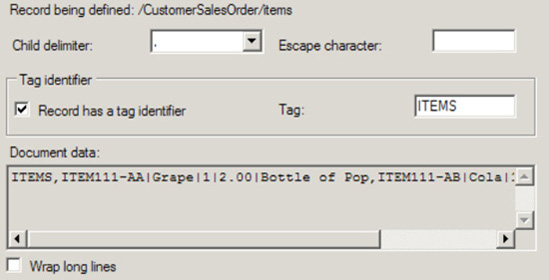
Now, specify the properties of the record (as shown in Figure 2-26). This step will define the makeup of the record to represent
CustomerSalesOrder:Specify the child delimiter. Given that the record is defined by delimiter, select the child delimiter {CR}{LF}.
Select the Record Has a Tag Identifier box. In this example, the tag identifier will be ORDER.
Note
ORDER is the identifier based on it being the text identifier that is specified in the source record. This text will be searched for to identify the continuation or creation of a new record. Not all text files will have a record tag identifier; in these cases, leave this box unchecked.
Click Next.
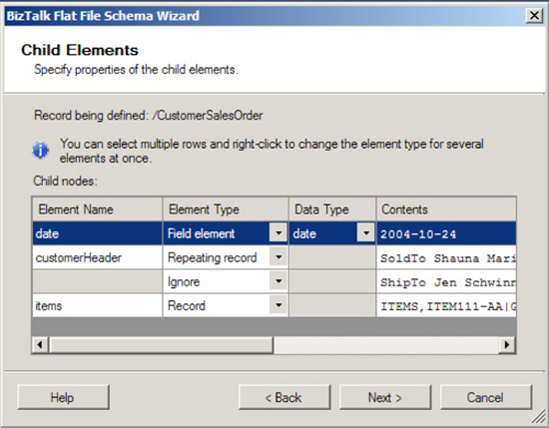
Now, specify the properties of the child elements for the record (as shown in Figure 2-27). This step will identify the makeup of the elements for
CustomerSalesOrder. Using the grid on the Child Elements page, define the record's child elements. In this example, set the values shown in Table 2-4.Click Next.
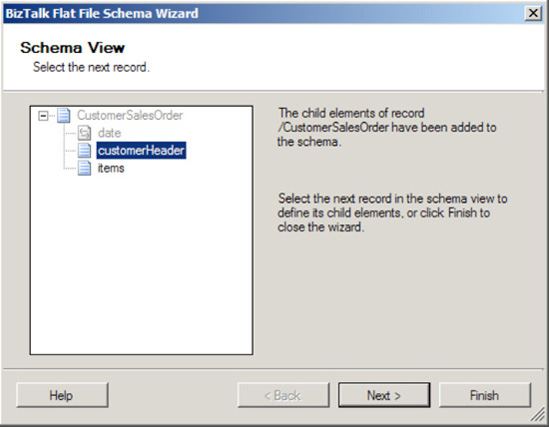
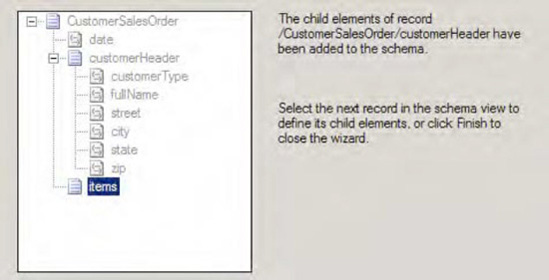
On the Schema View page, the fundamental structure of the
CustomerSalesOrderschema appears. Now, you'll define the individual characteristics of the child records of the schema. Figure 2-28 shows the page showing the schema structure.Select the
customerHeaderelement. Click Next to continue.On the Select Document Data page, select the data that will be used to define the
customerHeaderrecord by ensuring the first line is selected, as shown in Figure 2-29.Click Next.
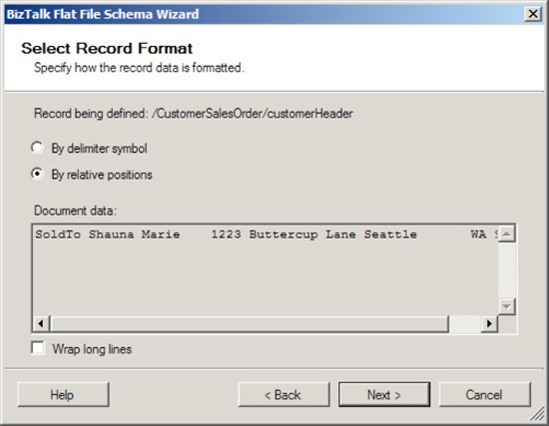
Now, you will select the record format for the customer header. In this example, select the By Relative Positions radio button, as shown in Figure 2-30.
Click Next.
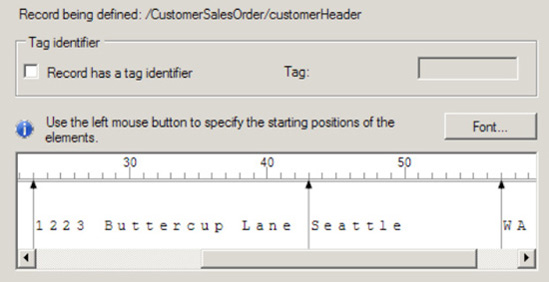
The wizard will give a visual representation of the record's element positions. Use this tool by selecting the starting position of each record element. You can do this by clicking the mouse at each element's starting point, as shown in Figure 2-31.
Click Next.
Next, you will specify the properties of the child elements for the customer header record. This step will identify the makeup of the elements for
CustomerSalesOrder/customerHeader. These XML elements are derived from the positional representation of the record elements on the previous page. So, using the grid on the Child Elements page, define the record's child elements. In this example, set the values shown in Table 2-5.Click Next.
On the Schema View page, the
CustomerSalesOrderschema appears with an updatedcustomerHeaderstructure, as shown in Figure 2-32. Next, you'll define the characteristics of theitemsrecord, so click Next.On the Select Document Data page, select the data that will be used to define the
itemsrecord. Ensure the items data line is selected, as shown in Figure 2-33.Click Next.
Now you will select the record format for the items data. In this example, select the By Delimiter Symbol radio button.
Click Next.
Next, you will specify the properties of the
itemsrecord (as shown in Figure 2-34). This step will define the makeup of the record to representCustomerSalesOrder/items:Click Next.
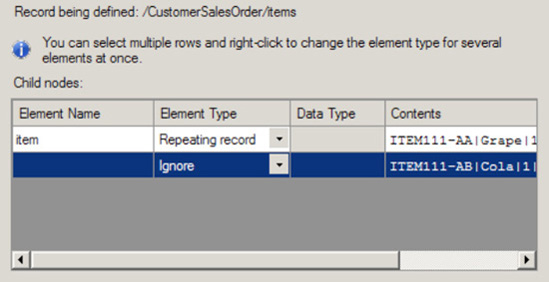
You will now specify the properties of the child elements for the
itemsrecord (as shown in Figure 2-35). This step will identify the makeup of the elements for theCustomerSalesOrder/itemsthat are derived from the delimiter specified on the previous page. Using the grid in the Child Elements page, define theitemsrecord's child elements. In this example, set the values shown in Table 2-6.Click Next.
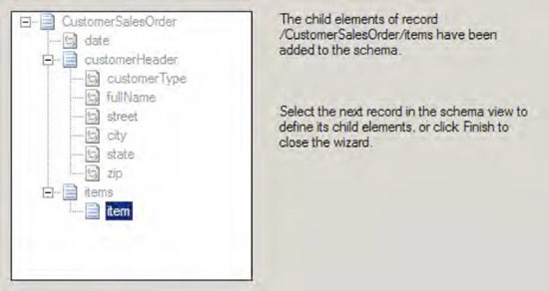
On the Schema View page, the structure of the
CustomerSalesOrderschema is updated. Now, you can define the individual characteristics of theitemsrecord's child elements. Figure 2-36 shows the page with the schema structure.Make sure the
itemelement is selected. Click Next to continue.On the Select Document Data page, select the data that will be used to define the
itemrecord. Ensure the items line is selected, as shown in Figure 2-37.Click Next.
Now, select the record format for the items data. This example will use delimited, so select the By Delimiter Symbol radio button, and click Next.
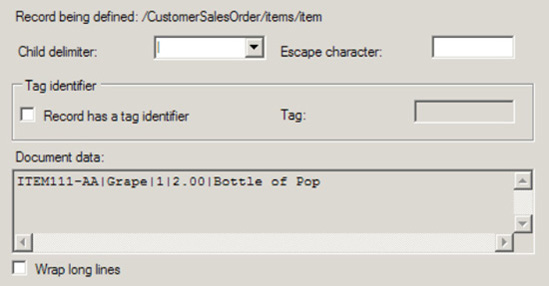
Next, you will specify the properties of the items data elements. This step will define the makeup of the data elements to represent
CustomerSalesOrder/items. You'll now specify the child delimiter: given that the record is defined by the pipe delimiter (|), select the child delimiter |, as shown in Figure 2-38.Next, you will specify the properties of the child elements for the
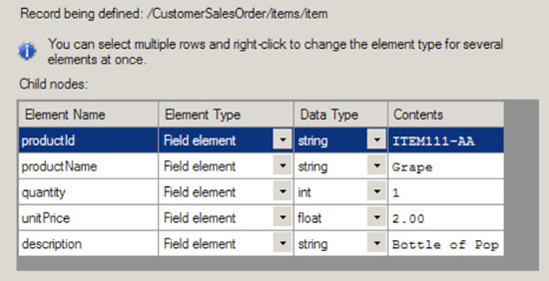
itemsrecord (as shown in Figure 2-39). This step will identify the makeup of the elements for theCustomerSalesOrder/items/itemand are derived from the delimited specification. Using the grid on the Child Elements page, define the record's child elements. In this example, set the values as shown in Table 2-7.Click Next.
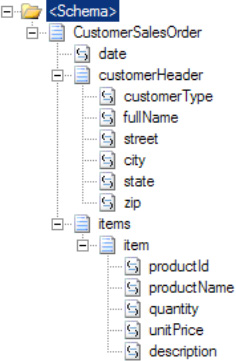
This completes the creation of the schema, so click Finish to complete the schema. Figure 2-40 shows the finished product.
To test the schema, check that the Input Instance File in the properties is set to a valid flat file instance. Right-click the
CustomerSalesOrder.xsdfile in Solution Explorer, and select Validate. This will generate an XML version of the flat file, which is shown in Figure 2-41.
In this recipe, we demonstrated how to use the Flat File Schema Wizard. To recap the scenario, you used the wizard to create a fairly complex illustration of a flat file to XML schema creation using different positional and delimited flat file references at the record, line, and field levels. The tool allows a developer to reverse engineer a schema based on a sample flat file instance.
Not demonstrated in this example but a common consideration when working with flat files is the usage of escape characters. You can accommodate escape characters when defining the properties at the record, line, or field level.
The Flat File Schema Wizard makes the process of defining schemas simpler, because the user sees the schema being modeled through the process and, in addition, is not exposed to the complexity of the schema syntax.
As helpful as the tool might be, it is still important to understand what the requirements are for the schema and how specifically the file will be implemented. Given this, you should spend some design time trying to understand exactly what the schema will do and how this relates to other processes (such as other interfaces and other trading partners).
You are using the publish/subscribe method in your orchestration architecture with many different schemas, and there are a number of common fields that need to be passed with all documents delivered to the BizTalk MessageBox (using direct binding on all ports). You want to be able to pass these fields without adding them to all of the individual schemas.
Assume that you have three XML instances schemas as follows (XML instances are shown for clarification):
<Person>
  <ID>ID_0</ID>
  <TraceFlag>true</TraceFlag>
  <Name>Name_1</Name>
</Person>

<Company>
  <ID>ID_0</ID>
  <TraceFlag>true</TraceFlag>
  <CompanyName>CompanyName_2</CompanyName>
</Company>

<Address>
  <ID>ID_0</ID>
  <TraceFlag>true</TraceFlag>
  <AddressLine>AddressLine_1</AddressLine>
</Address>
Two of the elements are common in all three of the schemas and represent values that are common: ID represents a common tracking ID, and TraceFlag represents whether logging should occur in an orchestration. The elements are not truly part of the description of a Person, Company, or Address, but their values need to be available. Your goal is to move these common fields out of the schemas so that they look as follows:
<Person>
  <Name>Name_1</Name>
</Person>


<Company>
  <CompanyName>CompanyName_2</CompanyName>
</Company>

<Address>
  <AddressLine>AddressLine_1</AddressLine>
</Address>
All messages in BizTalk are passed through the MessageBox wrapped in a SOAP envelope. A SOAP envelope consists of two sections: the Header and the Body, wrapped in an envelope, as shown in Listing 2-3. The Header can be common across all schemas, while the Body contains the actual XML instance of any given schema. Adding and accessing fields within orchestrations at the SOAP Header level is made available in a simple and straightforward way. This is a powerful and useful tool that has multiple applications depending on the solution architecture.
Example 2.3. Sample SOAP Envelope Structure
<soap:Envelope xmlns:xsi="http://www.w3.org/2001/XMLSchema-instance"
 xmlns:xsd="http://www.w3.org/2001/XMLSchema"
 xmlns:soap="http://schemas.xmlsoap.org/soap/envelope/"
  <soap:Header>
        <MessageId>uuid:bbbb-cccc-dddd-eeee</MessageId>
        <TraceFlag>true</TraceFlag>
  </soap:Header>
  <soap:Body>
        <Person><Name>Name_1</Name></Person>
  </soap:Body>
</soap:Envelope>
In Listing 2-3, the Header contains two fields and the Body consists of an XML document that is an instance of the Person schema. This is an actual representation of what a document looks like when placed in the MessageBox by an orchestration when using the SOAPHeader property schema and Person schema described in this recipe.
By default, BizTalk will strip the XML document out of the envelope's Body and deliver it to the appropriate subscribers. These subscribers see the XML document that was originally contained in the Body and do not have context to the Header. However, if a SOAPHeader property schema has been defined, the subscriber will also have access to the envelope's Header information.
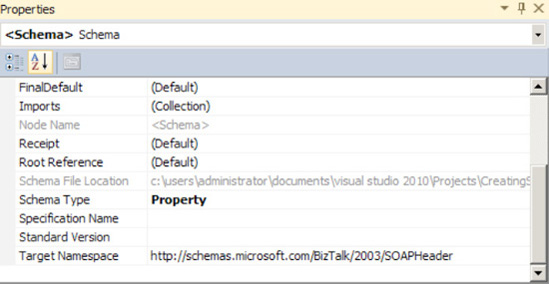
The SOAPHeader property schema shows which fields will be promoted and available at the Header level on all schemas within a given project. The SOAPHeader property schema must reference the namespace http://schemas.microsoft.com/BizTalk/2003/SOAPHeader and have each of the elements on it with their Property Schema Base set to MessageContextPropertyBase. The steps for creating a SOAPHeader property schema are as follows:
Add a new schema to a BizTalk project.
In the Properties window of the schema, set the
Target Namespaceto the BizTalkSOAPHeadernamespace and theSchema TypetoProperty, as shown in Figure 2-42.Add the desired elements to the schema. There is no root node on a
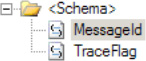
SOAPHeaderproperty schema; it has only elements. In this example, there would be two elements added to the schema:MessageIdandTraceFlag. See Figure 2-43.On each element created, set the
Property Schema Basein the Properties window toMessageContextPropertyBase, as shown in Figure 2-44.Build and deploy the solution.

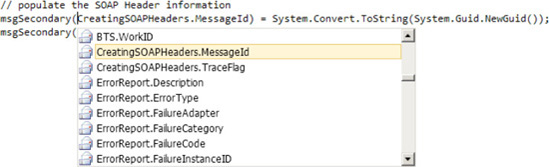
Once compiled, the elements in the SOAPHeader property schema will be available on all messages within an orchestration and can be accessed and set in Expression shapes and Message Assignment shapes. Listing 2-4 shows how to set these elements.
Example 2.4. Setting Properties in a Message Assignment Shape
// populate the SOAP Header information
strMessageId = "111-222-333-444";
blnTraceFlag = true;

msgAddress(CreatingSOAPHeaders.MessageId) = strMessageId;
msgAddress(CreatingSOAPHeaders.TraceFlag) = blnTraceFlag;

msgPerson(CreatingSOAPHeaders.MessageId) = strMessageId;
msgPerson(CreatingSOAPHeaders.TraceFlag) = blnTraceFlag;

msgCompany(CreatingSOAPHeaders.MessageId) = strMessageId;
msgCompany(CreatingSOAPHeaders.TraceFlag) = blnTraceFlag;
Note
The value available in the properties of the messages will be equal to the namespace given the SOAP Header schema. In this project, it was set to CreatingSOAPHeaders; therefore, all of the properties will be listed, as shown in Figure 2-45.
The project accompanying this recipe (CreatingSOAPHeaders) demonstrates the practical application of the SOAP Header. The basic architecture of the solution is this:
Primary orchestration receives an incoming document from a file receive location.
Orchestration sets the promoted SOAP Header properties in a Message Assignment shape.
Orchestration delivers the message to the BizTalk MessageBox via direct binding on a port.
A secondary orchestration subscribes to the MessageBox and is instantiated when a document matching the schema it is subscribing to arrives.
The secondary orchestration reads the values of the SOAP Header and writes them to the Windows event viewer.
Figure 2-46 illustrates the flow of the primary orchestration and the use of a Message Assignment shape to set the SOAP Header properties before delivering to the MessageBox (port_2 is direct binding).

The secondary orchestration subscribes to the MessageBox and writes the values of the SOAP Header properties to the Windows Event Log. Figure 2-47 shows the secondary orchestration.

How do you access incoming documents wrapped in SOAP envelopes? Incoming documents can be wrapped in a SOAP envelope (by an external client to BizTalk), but by default, only those that are delivered via a SOAP transport receive location will be automatically promoted and made available within an orchestration.
For example, with orchestrations exposed as web services, additional properties can be set at the SOAP Header level using the BizTalk Web Services Publishing Wizard. These properties are then available to any client who calls the web service, accessible in the same way as all of the standard web methods and properties. However, if the delivery of a message wrapped in a SOAP envelope via a different transport is required (such as MSMQ or file drop), you need to use a custom pipeline component.
Listing 2-5 demonstrates a process to promote incoming values to the SOAPHeader property schema. This example is a complete custom pipeline intended to be placed on the decode stage of a BizTalk custom pipeline, followed by a standard XML disassembler. It demonstrates how to do the following:
Load the incoming message stream into an XML document, which can be accessed via the Document Object Model (DOM).
Load the
MessageIdvalue located at the Header level of the incoming SOAP envelope. The incoming message matches the structure of the document shown in Listing 2-3.Promote the field to the SOAP Header, and make it available once the document is delivered to the MessageBox.
Return the document within the Body of the SOAP envelope as a stream.
Example 2.5. Pipeline Property Promotion
public IBaseMessage Execute(IPipelineContext pc, IBaseMessage inmsg)
{
        try
        {
                string strMessageId = "";

                // declare XML Document
                System.Xml.XmlDocument xmlDoc = new System.Xml.XmlDocument();

                // prepare the fields to be promoted
                xmlDoc.Load(inmsg.BodyPart.Data);

                // if values are not present, default to empty string
                try
                {
                        strMessageId = xmlDoc.SelectSingleNode
("//*[local-name()='Header'/*[local-name()='MessageID']").
InnerText;
                }
                catch {}


                // strip off the envelope and return just what is within the Body
                System.IO.MemoryStream ms = new
System.IO.MemoryStream(System.Text.Encoding.UTF8.GetBytes
(xmlDoc.SelectSingleNode("//*[local-name()='Body']").InnerXml));

                inmsg.BodyPart.Data = ms;

                // promote the SOAP Header fields
                inmsg.Context.Promote("MessageId",
"http://schemas.microsoft.com/BizTalk/2003/SOAPHeader"
.ToString(),strMessageId);

                }
                catch (Exception ex)
                {
                throw new Exception("Pipeline component exception - " + ex.Message);
                }
        return inmsg;
    }