- Deploying containers to your Kubernetes cluster
- Working with Terraform to configure Kubernetes
- Creating an automated deployment pipeline for your application
- Using Bitbucket Pipelines for continuous delivery
In this chapter, we bring an early version of our microservices application to production. Having just created an empty Kubernetes cluster in the previous chapter, we are now ready to deploy containers to it.
First, we’ll deploy our MongoDB database and RabbitMQ servers. Then, we’ll deploy our first microservice to the Kubernetes cluster: the video-streaming microservice we created way back in chapter 2 (you’ve come such a long way since then).
After learning how to use Terraform to deploy containers to Kubernetes, we’ll wrap up our deployment process in an automated continuous delivery (CD) pipeline. At that point, updating our infrastructure and application will be achieved by pushing code changes to our hosted code repository. Exciting times!
If you find this chapter difficult to follow, don’t worry. This chapter and the previous one are probably the most difficult chapters in the book, so please push through! Following along with the examples is the best way to gain experience. At the end of this chapter, your application will be live in production, and you need to know for yourself how good that feels!
7.1 New and familiar tools
This chapter revisits both Kubernetes and Terraform. But now, we’ll use Terraform to deploy containers and microservices to our Kubernetes cluster. We are also introduced to Bitbucket Pipelines, a hosted service we’ll use to create a CD pipeline for our microservices application.
Table 7.1 New and familiar tools in chapter 7
7.2 Getting the code
To follow along with this chapter, you need to download the code or clone the repository.
-
You can clone the code using Git like this:
git clone https://github.com/bootstrapping-microservices/chapter-7.git
For help on installing and using Git, see chapter 2. If you have problems with the code, log an issue against the repository in GitHub.
7.3 Continuing to evolve our infrastructure
In the previous chapter, you had a choice for following along with the examples. It went like this:
-
Iteratively evolve our infrastructure while following the examples in chapters 6 and 7. We started with chapter-6/example-1 and then progressively copied in the code from each new example.
-
Build fresh infrastructure for each example. The examples in chapters 6 and 7 can also be run standalone, so we can easily start our infrastructure from any point by jumping into any examples and invoking Terraform.
You might have chosen to follow along using the iterative and evolutionary approach (the first option). If so, you can continue to do that in this chapter, where the examples are designed to follow on directly from the previous chapter. Continue to copy files from each new example into your working directory as you did in chapter 6. If, instead, you are running each example by itself or jumping directly to particular examples that interest you (the second option), you can also continue to do that in this chapter.
Whichever way you work, be sure to change the value of the app_name variable at the top of variables.tf to a name that is unique to you. This must be unique! If you call your application FlixTube, it’s going to overlap with resources that myself or other readers of this book have created.
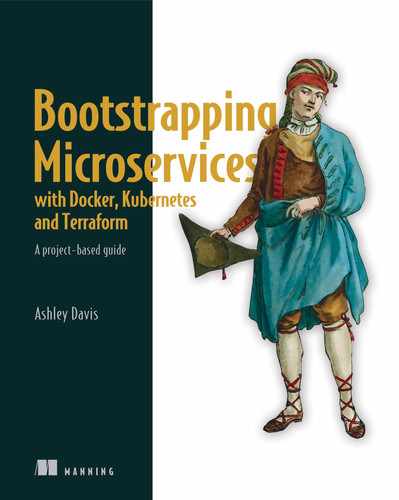
Figure 7.1 illustrates what we’ll implement in this chapter. We’ll create an automated deployment pipeline to deploy a MongoDB database server, to deploy a RabbitMQ server, and most importantly, to deploy our first microservice.
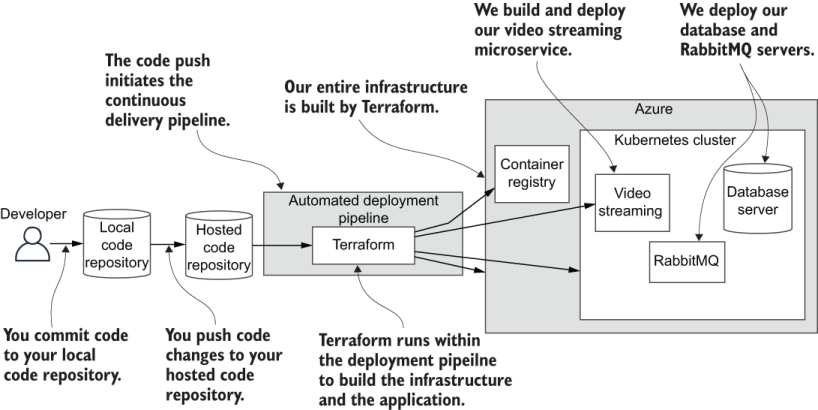
Figure 7.1 The continuous delivery (CD) pipeline and application we build in this chapter
7.4 Continuous delivery (CD)
Continuous delivery (CD) is a technique in software development where we do frequent automated deployments of our updated code to a production (or testing) environment. This is an important aspect of our application because it’s how we reliably and frequently deliver features into the hands of our customers. Getting feedback from customers is vital to building a product that’s relevant. CD allows us to quickly and safely get code changes into production and promotes a rapid pace of development.
So far, we have managed to keep our entire deployment process scripted with Terraform. That won’t always be the case with more complex production systems, but it suffices for our example application and helps to keep things simple. It also makes it easier for us to instantiate our deployment process within the CD pipeline.
Figure 7.2 shows you what our CD pipeline will look like by the end of this chapter. Pushing code changes to our Bitbucket code repository initiates automated deployment. This executes our Terraform code and updates our application that is hosted in the Kubernetes cluster.
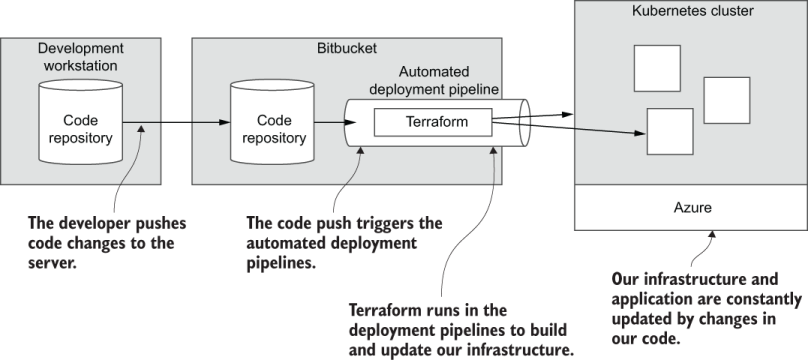
Figure 7.2 With infrastructure as code, we can use code to create our infrastructure.
The Terraform code that we write must be simple and as bullet-proof as possible. That’s because, ultimately, it’s more difficult to debug code running in a hosted CD pipeline! This is why our deployment code should be simple, have minimal moving parts, and be well tested.
Like any other code, we’ll test our deployment code on our development workstation (or personal computer) before it goes to production. A large part of this chapter (and the previous chapter) consists of prototyping and testing our deployment pipeline before we get anywhere near CD.
If CD in any way sounds complex or difficult, let me reassure you that it is not. Continuous delivery, in fact, is little more than the ability to host an automatically invoked shell script in the cloud. Our deployment shell script will be invoked automatically when we push code changes to our code repository.
Note If you can write a shell script (it’s not difficult), then you can build a CD pipeline. As mentioned, CD isn’t difficult; although, what you put in the shell script might be.
For the examples in this chapter, we’ll create a deployment shell script and invoke Terraform from it to do our deployment. Before we tackle creating the deployment shell script and moving it to our CD pipeline, we will first learn how to deploy containers to Kubernetes using Terraform. Once we are through that, setting up our CD pipeline will be relatively easy.
7.5 Deploying containers with Terraform
In the previous chapter, we learned how to create infrastructure with Terraform. We created a private container registry and a Kubernetes cluster. In this chapter, we use Terraform again, but this time to deploy containers to our cluster. Before we can do that, we must first configure the Kubernetes provider for Terraform.
7.5.1 Configuring the Kubernetes provider
We are now moving to example-1 in the chapter 7 code repository. Depending on how you were working in chapter 6 (see section 6.8.1), you can either update your working project with the new code or just start fresh with example-1 for this chapter. The following listing shows the new code we’ll add to providers.tf to configure the Kubernetes provider.
Listing 7.1 Setting up the Kubernetes provider (extract from chapter-7/example-1/scripts/providers.tf)
... code omitted ...
provider "kubernetes" {                                            ①
    version = "1.10.0"                                             ②
    host = azurerm_kubernetes_cluster
    ➥ .cluster.kube_config[0].host                                ③
    client_certificate = base64decode(azurerm_kubernetes_cluster
    ➥ .cluster.kube_config[0].client_certificate)                 ③
    client_key = base64decode(azurerm_kubernetes_cluster
    ➥ .cluster.kube_config[0].client_key)
    cluster_ca_certificate = base64decode(azurerm_kubernetes_cluster
    ➥ .cluster.kube_config[0]
    ➥ .cluster_ca_certificate)                                    ③
}
① Configures the Kubernetes provider
② Fixes the version number of the provider
③ Sets the connection and authentication details for our Kubernetes cluster
You might be interested to know that this is where we configure the connection and authentication details for our Kubernetes cluster. In this code file, those values are automatically pulled from the other Terraform code file that created our cluster (see kubernetes-cluster.tf).
You could just as easily replace these values with the details for a cluster that you created separately. For instance, you might have created your cluster manually in the Azure portal GUI or with the Azure CLI tool. You may have used a completely separate Terraform project to create your cluster as well. (We’ll talk about separating our code in this way in chapter 11.) Either way, as long as you have the connection details for your cluster (like the ones we noted in section 6.11.3), then you can use them here to connect to it.
If you are following along, you now need to invoke terraform init. You need to do this regardless of whether you are evolving your working project or starting fresh with example-1. We added a new provider to our Terraform project and the init command is what downloads the plugin for it.
7.5.2 Deploying our database
The first container we’ll deploy to Kubernetes is for our MongoDB database server. Eventually, this is where we’ll host separate databases for each of our microservices.
Listing 7.2 shows the Terraform code to deploy a database server to our cluster. This script creates a Kubernetes deployment that instantiates a container from the public Docker image for MongoDB. It then creates a Kubernetes service that makes the deployment accessible by other containers via DNS. This is how other containers can connect to our database. You can learn more about Kubernetes concepts like deployments and services in the Kubernetes documentation at https://kubernetes.io/ docs/concepts/.
Listing 7.2 Deploying your database (chapter-7/example-1/scripts/database.tf)
resource "kubernetes_deployment" "database" {       ①
  metadata {                                        ②
    name = "database"                               ③
    labels = {
      pod = "database"                              ④
    }
  }
  spec {
    replicas = 1                                    ⑤
    selector {                                      ⑥
      match_labels = {
        pod = "database"
      }
    }                                               ⑥

    template {                                      ⑦
      metadata {                                    ⑧
        labels = {
          pod = "database"                          ⑨
        }
      }
      spec {
        container {                                 ⑩
          image = "mongo:4.2.8"                     ⑪
          name  = "database"                        ⑫
          port {
            container_port = 27017                  ⑬
          }
        }
      }
    }
  }
}
resource "kubernetes_service" "database" {          ⑭
    metadata {
        name = "database"                           ⑮
    }
    spec {
        selector = {
            pod = kubernetes_deployment.database
            ➥ .metadata[0].labels.pod              ⑯
        }
        port {
            port = 27017                            ⑰
        }
        type = "LoadBalancer"                       ⑱
    }
}
① Declares a Kubernetes deployment for our MongoDB database server, causing the MongoDB container to be instantiated into our Kubernetes cluster
② Sets metadata for the deployment
③ Sets the name of the deployment
⑤ Sets the number of replicas (or copies) to create for pods in this deployment
⑥ Attaches the deployment to its pods by matching labels
⑦ Template for pods that are created by this deployment
⑩ Specifies details for the single container instantiated in the pod
⑪ Sets the image from which to instantiate the container
⑫ Sets the name of the container
⑬ Shows the ports in the container to be exposed; in this case, the default port for MongoDB (optional, primarily informational)
⑭ Declares a Kubernetes service that creates a DNS record so the database is accessible by other containers within the cluster
⑮ Sets the name of the service
⑯ Attaches the service to the deployment by matching labels
⑰ Sets the port that is exposed by this service
⑱ Exposes the service to the external world using an Azure load balancer. This allocates an externally accessible IP address for the database. We can use this to test our deployment.
You can see toward the end of listing 7.2 that we attached an Azure load balancer to the Kubernetes service to expose our database to the outside world. The real purpose of a load balancer is something we’ll talk about in chapters 10 and 11, but here, we simply use it to access the database in our cluster from our development workstation. This is something we couldn’t do if the container was hidden within the cluster.
From a security perspective, exposing our database like this is a big no-no. This means that anyone (including those with nefarious intent) could make changes to our database. Be assured that this situation is only temporary! We have only exposed our database for testing (which we’ll do in a moment) at this early stage in our infrastructure. After testing, we’ll lock it down so that it’s accessible only from within the cluster.
7.5.3 Preparing for continuous delivery
We are in the middle of prototyping and testing our deployment code on our development workstation. In the process, we’ll prepare to run this code in our CD pipeline. That means we need our code to run in a fully automated fashion, so we should now factor out any human interaction.
If you remember back to section 6.11.2, we created an Azure service principal that allows our Kubernetes cluster to authenticate with Azure. It needs this so that it can create load balancers for our services such as in listing 7.2, where we requested an external endpoint for our database service. Then, in section 6.11.3, when invoking terraform apply, we manually supplied values for the client_id and client_secret variables. For that, we typed in the values from the appId and password fields from our service principal.
Manually typing in values like this doesn’t work in a CD pipeline. This has to be automated! It’s also kind of annoying having to constantly type these values while we are prototyping our Terraform code.
Now we will set these values through command-line arguments. First, though, you must remember the details for your service principal. If the one you created in section 6.11.2 is still operational, and you have the details noted down, you can reuse that. Otherwise, run through the instructions in section 6.11.2 again to create or update your service principal. Then take note of the appId and password fields. Now invoke terraform apply for example-1 while setting client_id and client_secret as command-line arguments:
terraform apply -var="client_id=a2016492-068c-4f37-a32b-6e6196b65488"
➥ -var="client_secret=deb781f5-29e7-42c7-bed8-80781411973a" -auto-approve
Just remember to replace the values for client_id and client_secret with the values for your own service principal according to this template:
terraform apply -var="client_id=<your-client-id>"
➥ -var="client_secret=<your-client-secret>" -auto-approve
You can see we also continue to use the -auto-approve command-line option that we started using in section 6.9.2. Setting the variables and enabling automatic approval puts our Terraform project in a fully automatic mode. No human intervention is required, and this means we’ll be able to execute this code completely unattended in our CD pipeline.
7.5.4 Testing the new database server
After invoking terraform apply in the previous section, you should now have a database server running in your Kubernetes cluster. In order to test that our database is up, we have attached an Azure load balancer to it (as shown in listing 7.2). This is a temporary measure so that we can make our database externally accessible and test it to be sure that it is working.
Finding the external IP address
To find out the external IP address that’s been allocated to the database service, we can either use the Kubernetes CLI tool (Kubectl) or the Kubernetes dashboard that we set up earlier (section 6.12). We can use Kubectl to list the services we have in our cluster:
kubectl get services
If you have trouble using Kubectl and connecting to your cluster, refer back to section 6.12.1. The output looks something like this:
NAME       TYPE         CLUSTER-IP  EXTERNAL-IP    PORT(S)
database   LoadBalancer 10.0.226.64 168.62.216.232 27017:30390/TCP
kubernetes ClusterIP    10.0.0.1    <none>         443/TCP
Pick out the database service (e.g., the name we gave it in listing 7.2) and note the IP address in the EXTERNAL-IP column. You can also see the MongoDB default port 27017 listed in the PORT(S) column. This is the IP address and port to access our database from outside the cluster. Alternatively, we can open the Kubernetes dashboard (as per section 6.12.3) and navigate to the Services section to find these details.
Now using Robo 3T (like in section 4.5.2) or another database viewer, connect to your database server with the external IP address that you jotted down for it. Make sure you use port number 27017 to connect. If all is well, you should be able to connect to your database and view its default content (we haven’t added anything specific yet, however).
7.5.5 Deploying and testing RabbitMQ
In the same way as with our database server, but with a slightly different configuration, we now move to example-2. In that, we deploy a RabbitMQ server to our Kubernetes cluster.
Listing 7.3 is similar to listing 7.2. It creates a Kubernetes deployment that instantiates a RabbitMQ server in a container. It creates a Kubernetes service that makes the container accessible via DNS within the cluster. Again, we attach an Azure load balancer to the Kubernetes service so that we can make it accessible from outside the cluster for testing. Then, we can use the RabbitMQ dashboard to check that RabbitMQ is functional.
Listing 7.3 Deploying your RabbitMQ server (chapter-7/example-2/scripts/rabbit.tf)
resource "kubernetes_deployment" "rabbit" {             ①
  metadata {
    name = "rabbit"
    labels = {
      pod = "rabbit"
    }
  }
  spec {
    replicas = 1
    selector {
      match_labels = {
        pod = "rabbit"
      }
    }
    template {
      metadata {
        labels = {
          pod = "rabbit"
        }
      }

      spec {
        container {
          image = "rabbitmq:3.8.5-management"          ②
          name  = "rabbit"
          port {
            container_port = 5672
          }
        }
      }
    }
  }
}
resource "kubernetes_service" "rabbit" {               ③
    metadata {
        name = "rabbit"
    }
    spec {
        selector = {
            pod = kubernetes_deployment.rabbit.metadata[0].labels.pod
        }
        port {
            port = 5672
        }
    }
}
resource "kubernetes_service" "rabbit_dashboard" {     ③
    metadata {
        name = "rabbit-dashboard"
    }
    spec {
        selector = {
            pod = kubernetes_deployment.rabbit.metadata[0].labels.pod
        }
        port {
            port = 15672
        }
        type = "LoadBalancer"                          ④
    }
}
① Declares a Kubernetes deployment to deploy our RabbitMQ server. This is what instantiates the RabbitMQ container in our Kubernetes cluster.
② Instantiates the container from the public RabbitMQ image
③ Declares a Kubernetes service that creates a DNS record so the RabbitMQ server is accessible by other containers within the cluster
④ Creates an Azure load balancer for the service, which allocates an externally accessible IP address for the dashboard. We can use this to test the deployment.
Now run terraform apply (with the same command-line arguments as earlier in section 7.5.3). Then deploy RabbitMQ to your Kubernetes cluster.
Again, we have configured our service (the service that exposes the RabbitMQ dashboard) to be externally accessible using an Azure load balancer. Now we can use Kubectl or the Kubernetes dashboard to find the external IP address that has been allocated. Refer back to section 7.5.4 to remember how we did this for our database. Take note of the external IP address, and use your browser to open the RabbitMQ management dashboard. You can login with the default user name guest and the default password guest.
For example, if the IP address for your RabbitMQ dashboard is 40.112.161.104, then you would point your browser at http://40.112.161.104:15672/. The port number for the dashboard is 15672. However, the IP address for your own service will be different from mine. Make sure you replace it with the one that was allocated to your RabbitMQ instance.
7.5.6 Tightening our security
We have tested our MongoDB and RabbitMQ servers through external endpoints. Exposing these servers to the world is like asking for trouble! Now that we have tested, let’s remove the external access and tighten our security. This is as simple as removing the following line from our scripts:
type = "LoadBalancer"
That’s exactly what we’ll do from example-3 onward. When you update your working project with the example-3 code and next invoke terraform apply, external access to MongoDB and RabbitMQ will be removed, tightening the security for our application.
7.5.7 What have we achieved?
After creating our Kubernetes cluster in the previous chapter, in this chapter, we have now started populating it with containers. After setting up the Kubernetes provider for Terraform, we created new Terraform scripts to deploy a MongoDB database and a RabbitMQ server.
We temporarily exposed our servers to the outside world for testing. After testing, we tightened our security by removing those external IPs-for security’s sake, we don’t want the outside world able to access our internal infrastructure.
7.6 Deploying our first microservice with Terraform
We have already deployed some publicly available Docker images to our cluster (MongoDB and RabbitMQ). Now, let’s move on to example-3 and deploy our first microservice to the cluster.
Although we are still deploying a container from a Docker image, this time the image is built from our own private code. Before we can deploy a container from it, we must be able to build an image and publish it (just like we practiced in chapter 3) to the private container registry that we created in section 6.9 of the previous chapter.
7.6.1 Using local variables to compute configuration
To make things easier and to keep our Terraform code a bit more compact, we’ll make use of Terraform local variables to compose and share some common configuration values within our newest code file video-streaming.tf. This new file is responsible for building, publishing, and deploying our video-streaming microservice.
The next listing is an extract from the new code file. It shows the declaration of multiple local variables that we’ll use in the rest of the script.
Listing 7.4 Using local variables for configuration (extract from chapter-7/example-3/scripts/video-streaming.tf)
locals {
    service_name = "video-streaming"                              ①
    login_server = azurerm_container_registry.container_registry
    ➥ .login_server                                              ②
    username = azurerm_container_registry                         ②
    ➥ .container_registry.admin_username                         ②
    password = azurerm_container_registry                         ②
    ➥ .container_registry.admin_password                         ②
    image_tag = "${local.login_server}/${local.service_name}:${
    ➥ var.app_version}"                                          ③
}
# ... code omitted here ...
① Sets the name of this deployment service that we use throughout this code file
② Sets the connection details for our private container registry. These details are pulled from the Terraform file that creates the registry.
③ Composes the tag for the video-streaming microservices’ Docker image
Note how the image_tag local variable is composed of multiple other variables, especially the app_version variable, which we use to tag each successive image with a new version number. The image_tag variable is also how we tag our images to publish these to our container registry.
7.6.2 Building and publishing the Docker image
Now, let’s look at the Terraform code that builds and publishes the Docker image for our video-streaming microservice. This code has three tasks:
You learned how to do all these things in chapter 3. Here, we’ll automate this with Terraform.
In listing 7.5, we continue to look at the code in video-streaming.tf. While there is a Docker provider available to use with Terraform, unfortunately, it doesn’t have the ability to do the tasks we need. That’s why we are making use of Terraform’s catch-all null_resource and its local-exec feature to invoke the Docker commands that we need.
We can use null_resource to create Terraform resources that don’t have any particular resource type. We use local-exec to invoke commands on the local computer. If this listing looks like a big dirty hack, especially the use of timestamp to force the Docker image to build, well that’s because it is a big dirty hack!
We are using this as a workaround to keep things simple and keep our entire deployment process in Terraform. Long term, we don’t want code like this in production. Eventually, we’ll migrate away from this hacky starting point and implement a much cleaner solution. But you’ll have to wait until chapter 11 to see what that looks like.
Listing 7.5 Build and publish a Docker image (extract from chapter-7/example-3/scripts/video-streaming.tf)
# ... code omitted here ...
resource "null_resource" "docker_build" {                        ①
    triggers = {
        always_run = timestamp()                                 ②
    }
    provisioner "local-exec" {                                   ③
        command = "docker build -t ${local.image_tag} --file
        ➥ ../${local.service_name}/Dockerfile-prod
        ➥ ../${local.service_name}"
    }                                                            ③
}
resource "null_resource" "docker_login" {                        ①
    depends_on = [ null_resource.docker_build ]                  ④
    triggers = {
        always_run = timestamp()                                 ②
    }
    provisioner "local-exec" {                                   ⑤
        command = "docker login ${local.login_server}
        ➥-username ${local.username}
        ➥-password ${local.password}"                           ⑥
    }
}
resource "null_resource" "docker_push" {                         ①
    depends_on = [ null_resource.docker_login ]                  ④
    triggers = {
        always_run = timestamp()                                 ②
    }
    provisioner "local-exec" {                                   ⑦
        command = "docker push ${local.image_tag}"
    }
}
# ... code omitted here ...
① Declares our Docker commands using Terraform’s null_resource
② Forces our commands to always be invoked
④ Sets a dependency on the previous command because we can’t publish our image until after we build it
⑤ Invokes a command to authenticate with our container registry
⑥ Authenticates with our registry
⑦ Pushes the image to our registry
I’ll be the first to admit that our use (some would say, abuse) of null_resource in listing 7.5 is not ideal. If only the Docker provider supported build and push operations directly (why doesn’t it?), we wouldn’t need this ugly code! Unfortunately, this is the way it is at the moment, but maybe in the future, there will be a more elegant solution. In chapter 11, we’ll talk about fixing this when we move away from the mono-repo (single code repository) structure towards a multi-repo (many code repositories) structure.
7.6.3 Authentication with the container registry
After building and publishing the Docker image for our microservice, we must now give the cluster permission to pull the image from the container registry. You can see how this is accomplished in listing 7.6 as we continue to look at video-streaming.tf. In the listing, we create a Kubernetes secret to contain our Docker credentials. This is a secure way to store sensitive data in our cluster.
Listing 7.6 Authentication with the container registry (extract from chapter-7/example-3/scripts/video-streaming.tf)
# ... code omitted here ...
locals {                                                       ①
    dockercreds = {                                            ②
        auths = {
            "${local.login_server}" = {
                auth = base64encode("${local.username}:${local.password}")
            }
        }
    }                                                          ②
}
resource "kubernetes_secret" "docker_credentials" {            ③
    metadata {
        name = "docker-credentials"
    }
    data = {
        ".dockerconfigjson" =
         ➥ jsonencode(local.dockercreds)                      ④
    }
    type = "kubernetes.io/dockerconfigjson"                    ⑤
}
# ... code omitted here ...
① Defines more local variables for use in this code file
② Creates a variable that contains the authentication details for our container registry
③ Declares a Kubernetes secret to securely store our authentication credentials
④ Sets the data for the secret
Again, we have written code that feels rather awkward. It would be nice if the Docker providers had a more elegant way to express this, and maybe in the future, they will provide that.
7.6.4 Deploying the video-streaming microservice
We now have the Terraform code to build and publish our video-streaming microservice. We also have a Kubernetes secret that contains our registry credentials. Now we can write the code to deploy our microservice.
Listing 7.7 shows the remainder of the code in video-streaming.tf. The rest of the file is similar to the code we saw in listings 7.2 and 7.3, which deploy containers for MongoDB and RabbitMQ. We have a Kubernetes deployment that instantiates a container for our video-streaming microservices and a Kubernetes service to make it accessible by DNS within the cluster. Also, yet again, we attach an Azure load balancer to the Kubernetes service to make it externally accessible so we can test our microservice in the cluster from our development workstation.
The major difference here is that the image for our microservice is private and pulled from our own private container registry, whereas MongoDB and RabbitMQ are public images. To facilitate this, we have added an explicit dependency (using depends_on that you can see in the listing). This dependency causes our Docker image to be built and published prior to the creation of the Kubernetes deployment. Also, note how the registry credentials are provided via image_pull_secrets.
Listing 7.7 Deploying the video-streaming microservice (extract from chapter-7/example-3/scripts/video-streaming.tf)
# ... code omitted here ...
resource "kubernetes_deployment"
➥ "service_deployment" {                                                 ①
    depends_on = [ null_resource.docker_push ]                            ②
    metadata {
        name = local.service_name                                         ③
    labels = {
            pod = local.service_name                                      ③
        }
    }
    spec {
        replicas = 1
        selector {
            match_labels = {
                pod = local.service_name                                  ③
            }
        }
        template {
            metadata {
                labels = {
                    pod = local.service_name
                }
            }
            spec {
                container {
                    image = local.image_tag                               ④
                    name  = local.service_name
                    env {
                        name = "PORT"
                        value = "80"
                    }
                }
                image_pull_secrets {                                      ⑤
                    name =                                                ⑤
                 ➥ kubernetes_secret.docker_credentials.metadata[0].name  ⑤
                }                                                         ⑤
            }
        }
    }
}
resource "kubernetes_service" "service" {                                 ⑥
    metadata {
        name = local.service_name
    }
    spec {
        selector = {
            pod = kubernetes_deployment.service_deployment.metadata[0].labels.pod
        }
        port {
            port = 80
        }
        type = "LoadBalancer"                                             ⑦
    }
}
① Declares a Kubernetes deployment to deploy our video-streaming microservice. This instantiates the container for the microservice into our Kubernetes cluster.
② Creates a dependency that causes our Docker image to be built and published before the container is deployed
③ Uses local variables to share configuration across this code file
④ The image is pulled from our private container registry.
⑤ Specifies authentication credentials for our container registry so Kubernetes can pull the image
⑥ Declares a Kubernetes service that creates a DNS record to make the microservice accessible within the cluster
⑦ Uses the Azure load balancer to create an external IP address for this service. We can use this to test that the deployed microservice is working.
At the end of listing 7.7, you can see that we have attached an Azure load balancer to the Kubernetes service to create an external endpoint. We have temporarily exposed a container to the outside world for testing purposes. This allows us to check our video-streaming microservice from the web browser to verify that it is functional. Be assured that the final FlixTube example application has restricted external endpoints! You’ll have to wait until chapter 9 to see that.
7.6.5 Testing your microservice
Let’s get this microservice deployed already! Invoke terraform apply and deploy the video-streaming microservice to your Kubernetes cluster:
terraform apply -var="app_version=1" -var="client_id=<your-client-id>"
➥ -var="client_secret=<your-client-secret>" -auto-approve
Note that we are now setting the app_version variable. We’ll set this to version 1 initially and increment it each time we publish a new version of the image for our microservice. Remember to replace the values for client_id and client_secret with those for your own service principal as shown in sections 6.11.2 and 7.5.3.
After this has completed, look up the external IP address for the video-streaming microservice as you did for the database service in section 7.5.4. Now open your web browser at that IP address and navigate to the /video route. For example, if your IP address is 40.112.161.104, then point your browser at http://40.112.161.104/video. Just remember to use your own external IP address. You should now see the familiar video playing in your browser.
7.6.6 What have we achieved?
After first deploying containers for MongoDB and RabbitMQ, we’ve now packaged, published, and deployed our first microservice! Along the way, we learned how to use Terraform local variables to compose and share configuration details for use in multiple places. This saved us from having to type in those details many times and will be convenient later, when we need to change these.
We used Docker to build and publish the image for our microservice. Authentication from the cluster to the container registry (to pull the image) was a bit tricky, but we created a Kubernetes secret to handle that.
Ultimately, we deployed and tested our video-streaming microservice, and we finished prototyping our deployment pipeline. It’s now time to put the deployment process on automatic by creating our CD pipeline.
7.7 Continuous delivery with Bitbucket Pipelines
Up until this point in chapters 6 and 7, we have manually invoked Terraform to execute our infrastructure code and build the infrastructure for our application. Doing this is a part of the normal process of prototyping our deployment code.
Like any coding task, we need to develop and test our code locally before we can run that code in production. It’s especially important in this situation because this code runs in a hosted service, and it can be quite difficult to debug problems that occur there. We’d like this code to be as bulletproof as possible before it leaves our development workstation.
Running Terraform locally is also the best way to learn it and understand infrastructure as code. But the whole point of using Terraform and infrastructure as code is to automate our deployment pipeline. We don’t want to manually invoke Terraform for every change to our infrastructure or microservices. We’d like to deploy changes frequently, and we want it to be automated and streamlined so that we can spend the majority of our time building features rather than deploying our software. In addition, automation also greatly reduces the potential for human error.
Now we’ll create our CD pipeline with Bitbucket Pipelines. This is a hosted service from Atlassian that we’ll use to run our deployment process in an automated fashion. It makes our deployment process as simple as a code push. Pushing code changes to our hosted code repository will automatically invoke our deployment pipeline.
7.7.1 Why Bitbucket Pipelines?
There are many good hosted services for CD, and these are all quite similar. If you learn one, you’ll find that the others aren’t that different.
Bitbucket Pipelines is convenient because it’s included with Bitbucket from Atlassian so we can have our code and CD pipeline together. You can’t complain about the price! Atlassian provides a good starter tier with free private repositories and a limited amount of free build minutes per month to spend on your CD pipeline. This gives us some space to host a small build pipeline completely for free.
Note It doesn’t really matter which hosted service we use. For example, GitHub and GitLab both offer similar services that are configured in a similar way. Bitbucket Pipelines appears in this book because it is what I currently use in production, even though I have used GitLab in the past, and I continue to use GitHub for most of my open source coding.
I like to think of CD simply as a way to automatically run a shell script in the cloud. That’s a simplification of course, but it might help you understand that CD is not particularly complex or mysterious. Creating a shell script for our deployment is also useful because we can easily test it locally.
7.7.2 Importing the example code to Bitbucket
To use Bitbucket Pipelines, we must first have our code committed to a Bitbucket code repository. We’ll now move onto code example-4. This is the same as example-3, but it includes the extra configuration we need for our CD pipeline.
Also, at this point, you should destroy your previously created infrastructure with terraform destroy (if you haven’t done that already). The infrastructure you created previously was our prototype infrastructure. From here on in, we’ll use our CD pipeline to create production infrastructure, and we don’t want these to overlap.
To start, you need to sign up for a Bitbucket account, assuming you don’t have one already. Sign in or sign up here: https://bitbucket.org.
Create the hosted code repository
When signed into your account, click the button to create a new code repository. Choose a name for your new repo and fill out the details (an example is shown in figure 7.3).
Figure 7.3 Creating a new Bitbucket code repository
After creating your code repository, you are presented with a page like figure 7.4. This gives instructions to get code into the repository. These are just standard Git commands, but it’s convenient that these give us the exact commands we need to import our code.
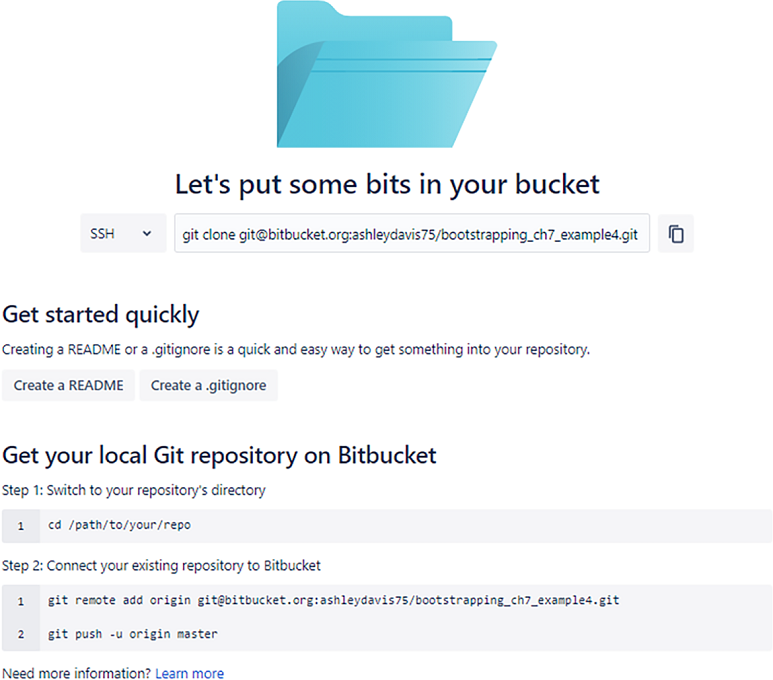
Figure 7.4 Instructions from Bitbucket to get your code into the new repository
Before importing the example-4 code to our new repo, let’s make a fresh copy of it so that we don’t mess up the chapter-7 repo:
cp -r chapter-7/example-4 bootstrapping_ch7_example4
Go into the new directory and initialize a new empty Git repository:
cd bootstrapping_ch7_example4
git init
Now commit all the files to the new repo:
git add .
git commit -m "First commit"
Now we can follow the instructions given by Bitbucket (as shown in figure 7.4). The commands that are given to you will be different because we have different Bitbucket accounts. The first command is to add the remote repo as the origin for the local one. For example
git remote add origin
➥ [email protected]:ashleydavis75/bootstrapping_ch7_example4.git
Remember to replace the URL for the remote repository with your own details. Here is the template you should use:
git remote add origin [email protected]:<your-user-name>/<your-repo-name>.git
Now push your code to your hosted repository:
git push -u origin master
At this point, you need to enter your credentials. To avoid doing that for every push, I recommend that you set up an SSH key, which is fairly easy to do on every platform, following these instructions from Bitbucket Support:
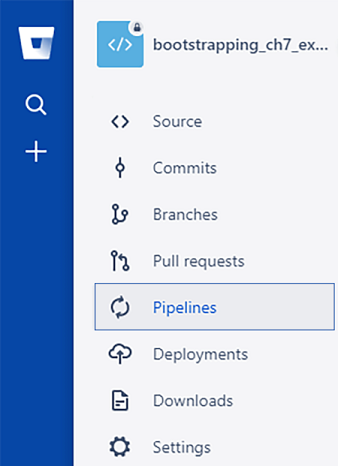
Figure 7.5 Navigating to the Pipelines page for your repository
https://confluence.atlassian.com/bitbucket/set-up-an-ssh-key-728138079.html
In the future, you can push code changes with the shortened command:
git push
We have created our hosted code repository and pushed the example code to it. Now, we can enable Bitbucket Pipelines for this repository. Navigate to the Pipelines page (as in figure 7.5).
The example code includes a bitbucket-pipelines.yaml configuration file. Bitbucket detects this file, and you can now click the Enable button (as shown in figure 7.6), which enables Bitbucket Pipelines for this code repository. (Note that you may need to scroll down so you can see the Enable button.)

Figure 7.6 Click the Enable button to enable Bitbucket Pipelines
7.7.3 Creating a deployment shell script
Most CD pipelines can be boiled down to a shell script with inputs provided by environment variables. Taking this approach is useful for two reasons:
-
Our deployment pipeline is somewhat portable between CD providers.
-
We can easily test our deployment pipeline locally by executing the shell script.
Creating a deployment shell script gives us some freedom. That’s nice, but it’s also essential for local testing of our deployment pipeline. We need to make sure this code is bulletproof before we try to execute it unattended in the cloud.
We’ve spent most of this chapter prototyping and testing our deployment code, so we are already quite sure that it works. We just need to wrap it up in a shell script. The shell script included in example-4 is shown in the following listing. It’s simple, and that’s because we’ve been able to keep our deployment code entirely in Terraform. Our shell script simply invokes Terraform.
Listing 7.8 A shell script for deployment (chapter-7/example-4/scripts/deploy.sh)
set -u                                            ①
: "$VERSION"
: "$ARM_CLIENT_ID"
: "$ARM_CLIENT_SECRET"
: "$ARM_TENANT_ID"
: "$ARM_SUBSCRIPTION_ID"                          ①
cd ./scripts                                      ②
export KUBERNETES_SERVICE_HOST=""                 ③
terraform init                                    ④
terraform apply -auto-approve                    ⑤
    -var "app_version=$VERSION"                  ⑥
    -var "client_id=$ARM_CLIENT_ID"
    -var "client_secret=$ARM_CLIENT_SECRET"       ⑥
① Checks that expected input environment variables are provided
② Invokes Terraform from the directory that contains our deployment scripts
③ Workaround for a problem with the Kubernetes provider (an explanation follows)
④ Initializes Terraform and download providers
⑥ Sets Terraform variables from environment variables
One interesting thing to note in this script is how it checks for the input environment variables. These are the current version number for our application (used to tag our Docker images) and the authentication details for our Azure account. We’ll soon see where these variables come from.
You are probably wondering why we are setting the KUBERNETES_SERVICE _HOST environment variable. This is a workaround for a problem that occurs when attempting to use the Kubernetes provider for Terraform within a Kubernetes pod. (Did I just short circuit your brain?) It appears that Bitbucket Pipelines quietly runs our CD pipeline in a pod within Bitbucket’s own Kubernetes cluster. This makes sense, and it’s an awesome use case for Kubernetes. The problem that results from this shouldn’t happen, but it does. We empty out the KUBERNETES_SERVICE_HOST environment variable to fool the Kubernetes provider and to avoid the issue.
We shouldn’t have to care about things like this, but sometimes working with early tools (Terraform is pre-version 1), we sometimes have to cope with unusual issues in Terraform or its provider plugins. Possibly, by the time you read this, the problem will have been corrected, and this workaround won’t be needed. If you are curious and want to learn more, you can read about it here:
https://github.com/terraform-providers/terraform-provider-kubernetes/issues/679
7.7.4 Managing Terraform state
Now we return to the tricky issue of managing Terraform state. Cast your mind back to section 6.8.7 in the previous chapter. You’ll recall that Terraform has a state file so that it has a memory of the infrastructure it created.
The question now is how do we persist the state file in our CD pipeline? The nature of CD pipelines is that each invocation happens in a fresh container instance. That’s why we must invoke terraform init in our deployment shell script for each and every deployment.
How do we manage the Terraform state file? We must persist it between instances of the CD pipeline so that subsequent invocations of Terraform have a memory of what was created earlier. That’s so it isn’t blindly trying to recreate infrastructure that it already created. Terraform has a solution to this. We can provide external storage in which Terraform can store its state file. This allows the state file to be stored separately to the CD pipeline.
The following listing shows our configuration for the Azure backend. Through this configuration, we set an Azure storage account as the backend for the storage of our Terraform state.
Listing 7.9 Configuring backend storage (chapter-7/example-4/scripts/backend.tf)
terraform {
    backend "azurerm" {                       ①
        resource_group_name  = "terraform"    ②
        storage_account_name = "terraform"    ②
        container_name       = "terraform"    ②
        key = "terraform.tfstate"             ③
    }                                         ①
}
① Sets configuration for the Azure storage backend
② Sets the name of the resource group, storage account, and container for use by Terraform
③ Names the storage blob where the Terraform state is stored
Before Terraform will work in your CD pipeline, we have to create a separate Azure storage account for it to use. First, choose a name to use for your storage account. I have used the name terraform as you can see in listing 7.9. Unfortunately, you can’t use that because the names of storage accounts must be globally unique (which is kind of annoying).
Open the Azure portal in your browser and create a new storage account with the name you have chosen under a resource group with that same name. (See section 4.4.1 in chapter 4 for a refresher on creating a storage account.)
In your new storage account, also create a container (a storage container, not a Docker container) with the same name. You can use any name you want for this (although, there are restrictions for names of storage accounts). I used the name terraform for the resource group, storage account, and container names. I used that name just to indicate that these are all purely for use by Terraform running in our CD pipeline. This new storage account isn’t otherwise used by our infrastructure or application.
Once you have created the storage account and container, edit backend.tf (shown in listing 7.9) and replace each instance of terraform with the name that you have selected. At this stage, you can commit these changes to your local code repository, but don’t push them to Bitbucket yet! We still have some configuration to do before our CD pipeline will work.
7.7.5 The Bitbucket Pipelines script
The final piece of our CD pipeline is the bitbucket-pipelines.yaml configuration file. This YAML file is what we use to configure our CD pipeline. To use Bitbucket Pipelines, you must have this file in the root of your code repository. It simply doesn’t work without it.
Listing 7.10 shows bitbucket-pipelines.yaml from example-4. You can see that we use this file simply as a wrapper for our shell script from listing 7.8. There’s a bit more to it than this, of course, but not much! With Bitbucket Pipelines enabled for our Bitbucket code repository, this YAML file now invokes our deployment shell script when code is pushed to the hosted code repository.
Listing 7.10 Configuring our Bitbucket Pipelines automated deployment pipeline (chapter-7/example-4/bitbucket-pipelines.yaml)
image: hashicorp/terraform:0.12.6                       ①
pipelines:
    default:                                            ②
      - step:                                           ③
          name: Build and deploy
          services:
            - docker                                    ④
          script:
            - export VERSION=$BITBUCKET_BUILD_NUMBER    ⑤
            -  chmod +x ./scripts/deploy.sh             ⑥
            - ./scripts/deploy.sh                       ⑦
① Sets the base image for the container within which the CD pipeline is executed. We use the Terraform base image so that we have access to the Terraform tool within our CD pipeline.
② Configures the default pipeline for our repo. We can also have separate pipelines for each branch.
③ Defines a step in our deployment pipeline (here, it’s only a single step)
④ Enables the Docker service. This lets us use Docker from within our Terraform code.
⑤ Sets the VERSION environment variable to the Bitbucket build number
⑥ Ensures that our deployment script is executable
⑦ Executes our deployment script. This is the core of our deployment pipeline.
Note in listing 7.10 how the first line of the file sets the base image for the CD pipeline’s container. Bitbucket instantiates a new container from this image each time our CD pipeline is triggered. We automatically have access to the Terraform tool because it’s pre-installed in the base image. If we weren’t using Terraform, we could select a different base image. Check out the following line of code from listing 7.10:
export VERSION=$BITBUCKET_BUILD_NUMBER
This is one method of passing environment variables into our deployment shell script, and here we have set the version number for our application. We are setting this from Bitbucket Pipeline’s BITBUCKET_BUILD_NUMBER environment variable, which simply counts the number of times the CD pipeline has been triggered. This is a convenient way to generate version numbers for the images created within our CD pipeline. Bitbucket Pipelines also has many other built-in environment variables that can be useful. For more information, see
https://confluence.atlassian.com/bitbucket/variables-in-pipelines-794502608.html
7.7.6 Configuring environment variables
In the previous section, you saw one example of how to input an environment variable to our deployment shell script. There are still other environment variables we have yet to provide.
We could set these inline in bitbucket-pipelines.yaml as we did with the VERSION environment variable in listing 7.10, but we shouldn’t do that for our Azure credentials. These are sensitive, and for security reasons, we don’t want to include those in our code repository. Instead, we’ll configure these as repository variables through the Bitbucket GUI. Navigate to the Repository Variables page under the Settings option for your code repository (shown in fig-ure 7.7).
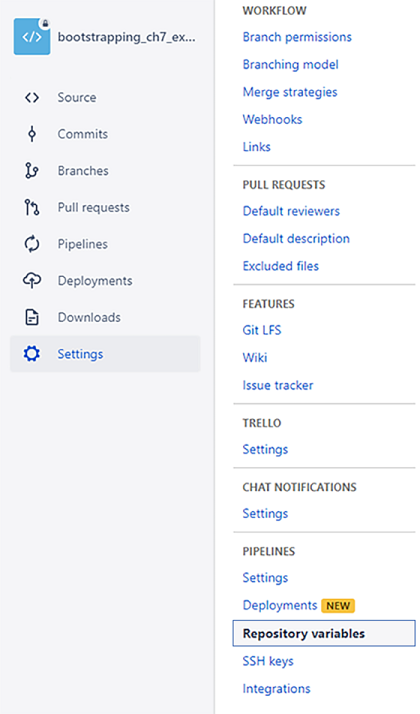
Figure 7.7 Navigating to Repository Variables for your code repository
Now create repository variables and enter their values as shown in figure 7.8. Feel free to check the Secured option for an extra layer of security for these sensitive values. These values are passed to our CD pipeline as environment variables.
When creating these variables, you must enter authentication credentials for your own Azure account and Azure service principal. The values for ARM_ CLIENT_ID and ARM_CLIENT_SECRET are the appId and password fields from your service principal you created back in section 6.11.2. The values for ARM_TENANT_ID and ARM_SUBSCRIPTION_ID are the details for your Azure account that you can see using the command az account show like we also did in section 6.11.2.
These authentication details must be set somewhere. If you recall, back in section 6.6.2, we used the command az login on our development workstation to authenticate with Azure. This command doesn’t work in our CD pipeline because no human interaction is possible. To allow Terraform to authenticate with Azure to build and update our infrastructure, we must pass these authentication details into our pipeline.
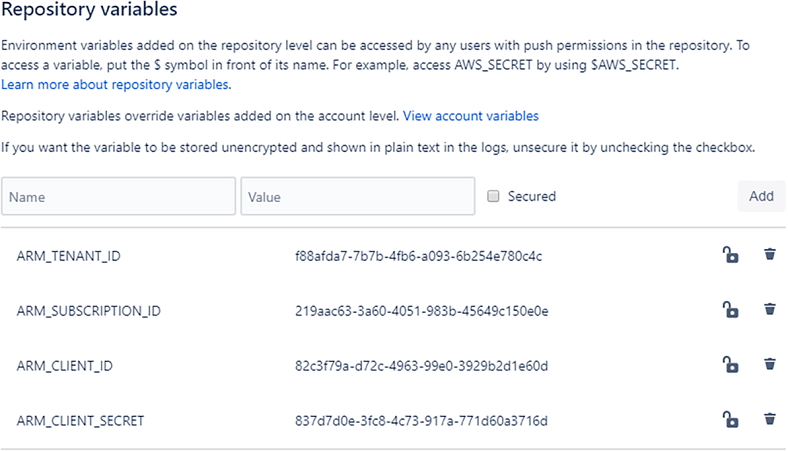
Figure 7.8 Creating repository variables to specify Azure authentication credentials
7.7.7 Testing your deployment pipeline
OK, we are finally ready to test our CD pipeline! We have created a Bitbucket code repository and pushed to it a copy of the example-4 code. We have enabled and configured Bitbucket Pipelines for the repository, and we have a CD pipeline; we just need to trigger it!
We can trigger the pipeline simply by pushing code to it. You probably already have an unpushed code change ready to go. If you were following along, you committed changes to backend.tf earlier in section 7.7.4. Go ahead now and push those changes:
git push
If you pushed those code changes earlier, that’s not a big deal. Make a simple change now (e.g., add a blank line to one of the code files) and then commit it and push it to trigger the CD pipeline. You can repeat this process as many times as you like while testing and debugging your CD pipeline.
You can monitor pipeline invocations in the Pipelines page under your Bitbucket repository (like that in figure 7.9). You can see in this example that my first pipeline invocation failed and that the second invocation has just started (denoted by the word “Pending”).
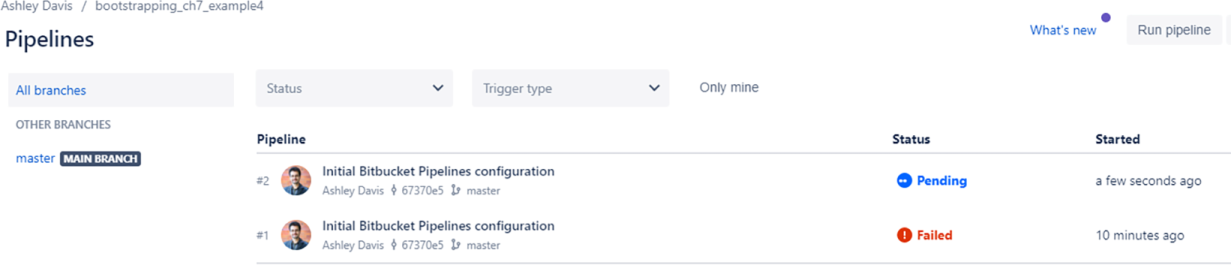
Figure 7.9 Monitoring pipeline invocations from the Pipelines page
You can drill down into any of the pipeline invocations to find out what happened. Of course, you will need to do this in the future to find out what went wrong after it fails.
As an example, I clicked down into my second invocation (the one that completed successfully). You can see what it looks like in figure 7.10. You’ll note that the complete output from the deployment shell script is displayed here. This should be familiar to you by now because it’s the same output we saw earlier when testing our Terraform code locally.

Figure 7.10 Viewing a successful CD pipeline invocation
7.7.8 Debugging your deployment pipeline
We now have a CD pipeline. Changing our infrastructure and deploying our application is now synonymous with changing our code: what we call infrastructure as code.
You probably have a new question now: how do I debug my deployment pipeline? You might be wondering about this after seeing my failed pipeline from figure 7.9. Or, possibly, because you might already have had your own failed pipeline!
The first step is to thoroughly test any changes to your deployment code locally on your own development workstation. Then, we can catch many issues before our deployment code gets to the CD pipeline.
When you do get a failed pipeline, you’ll need to drill down into it, read the output, and try to understand the problem. Understanding the problem is the hard bit; fixing the problem is usually easy once we know what it is.
You can see an example of a problem in figure 7.11, when I drilled down to figure out why my first pipeline invocation failed. I read the error message here and realized it failed because I hadn’t provided the required environment variables. I had invoked this pipeline prior to configuring the repository variables as we did in section 7.7.6. That’s an easy mistake to make, and you might have made it yourself if you were a bit too gung-ho in pushing the changes we made in section 7.7.4.
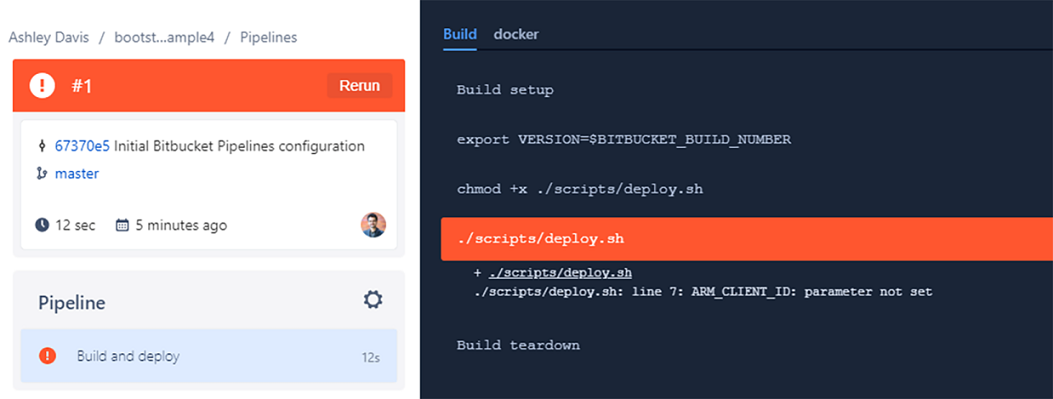
Figure 7.11 Viewing a failed CD pipeline and reading the error message
When debugging your pipeline, you should note that you can use any of the common commands to help you. Commands such as cd, ls, pwd, and cat can be used to navigate and inspect the filesystem within the CD pipeline’s container. This gives you a variety of ways to understand what’s going on in there. Hopefully, this small but invaluable tip will assist your future CD pipeline debugging!
7.7.9 What have we achieved?
You just created your first CD pipeline, and you used it to deploy production infrastructure and containers. This is real progress!
There are many services for CD, but we used Bitbucket Pipelines from Atlassian. We created a repository on Bitbucket and imported the code from example-4. We then created a shell script to wrap up our deployment.
Although there are many vendors for CD, building a CD pipeline usually amounts to not much more than invoking a shell script. That’s useful because a shell script is something we can test locally before we try to run it in our CD pipeline. The deployment shell script we created is simple. That’s because our entire deployment process is in Terraform code, so we simply invoked Terraform to create our infrastructure and deploy our containers.
7.8 Continue your learning
In this chapter, we deployed our fledgling microservices application to the Kubernetes cluster that we created in the previous chapter. In future chapters, we’ll continue to flesh out the FlixTube application into a complete application.
As always, there is so much more to be learned than we can cover here. As we get deeper into development, you will undoubtedly need to dive deeper while you are working. Here are the books that will help you do that:
-
Core Kubernetes by Jay Vyas and Chris Love (Manning, est. Summer 2021)
-
Terraform in Action by Scott Winkler (Manning, est. Spring 2021)
-
GitOps and Kubernetes by Billy Yuen, Alexander Matyushentsev, et. al. (Manning, est. Spring 2021)
-
Kubernetes Quickly by William Denniss (Manning, est. Summer 2021)
-
Learn Kubernetes in a Month of Lunches by Elton Stoneman (Manning, est. February 2021)
To learn about Atlassian Bitbucket, see the Bitbucket website:
To learn more about CD with Bitbucket Pipelines, see
Learn more about Kubernetes concepts in the Kubernetes documentation at
Summary
-
Continuous delivery (CD) is a technique where production infrastructure and software are continuously updated as changes are made to the code.
-
We used Terraform to script the configuration and deployment of multiple containers onto our Kubernetes cluster.
-
We deployed a MongoDB database server and a RabbitMQ server for use by our microservices.
-
We used Terraform to build and publish the Docker image for our first microservice, the video-streaming microservice, which we then deployed to our Kubernetes cluster.
-
We created a shell script to wrap up our deployment pipeline.
-
We moved our code to a private Bitbucket code repository and configured Bitbucket Pipelines to create a CD pipeline for our application.
-
Our Bitbucket Pipelines file was simple; it only invoked our deployment shell script.
-
Having the shell script is important because it allows us to test and debug our deployment pipeline on our development workstation. Doing testing and debugging within the CD pipeline is more difficult.
-
We learned how to use the Bitbucket interface to configure environment variables as input to our deployment pipeline.
-
We learned how to persist Terraform state using Azure storage.