- Automated testing of microservices
- Unit testing and integration testing with Jest
- End-to-end testing with Cypress
- Adding automated testing to your continuous delivery pipeline
To this point in the book while building microservices, we have tested our code manually. In this chapter, though, we’ll shift up a gear and learn how to apply automated testing to our microservices.
So far, we have primarily done our testing by running our code and visually inspecting the output. In various chapters, we used our web browser, the output from the command line, or changes in the local filesystem to check the results of our code. In other chapters, we used more specific tools like Robo3T in chapter 3 or the RabbitMQ dashboard in chapter 5.
Methods of manual testing are many and varied. I want you to know that manual testing is OK and perfectly valid. You should start with manual testing and continue with it until you are comfortable enough to use automated testing, and your product is well enough understood that it’s worth making the investment in that. I can recommend tools for manual testing like Postman or REST Client for Visual Studio Code. These will help you to manually test your REST APIs.
At a point, though, manual testing becomes tedious and time-consuming. You will want to turn to automated testing. Of course, automated testing is generally useful in the realm of software development, but with microservices, it becomes essential as we grow our application. It’s also important for small teams because, at some point, the burden of manual testing becomes overwhelming to the point that all you’ll be doing is testing. There’s no reason you should carry a heavy testing burden when great testing tools are within easy reach!
Think of this chapter as a guided tour through the testing landscape as it applies to microservices. We’ll start with an introduction to testing, then we’ll look at more advanced examples of unit testing, integration testing, and end-to-end testing.
Automated testing is an advanced topic. I’ve included it in this book because I believe it really is essential for scaling microservices. If you haven’t done automated testing before, you might find this chapter a little overwhelming. Hopefully not, but otherwise, feel free to skip this chapter and come back to it again later. Just know that automated testing is important and that even though you don’t need it in the early days, eventually you will definitely need it.
8.1 New tools
As modern developers, we are spoiled with great testing tools that are free, easily available, and straightforward to learn. In this chapter, we’ll learn automated testing with two popular and important testing tools. We’ll use Jest and Cypress to test our microservices to ensure these are robust.
Jest is a tool for testing JavaScript code; Cypress is a tool we’ll use for end-to-end testing. Both Jest and Cypress are written in JavaScript. If you are building microservices in a different language than JavaScript, then you probably wouldn’t pick Jest. Instead, you’d pick the best testing tool for your particular language.
Cypress is a great tool for testing web pages regardless of what language you use in the backend. If you aren’t using JavaScript as the language for your microservices, Cypress is still a great choice for your end-to-end testing.
Toward the end of the chapter, we’ll learn how to add automated testing to the continuous delivery (CD) pipeline we started in the previous chapter. This means our tests will be invoked automatically as we push code changes to our hosted code repository. That’s important because it makes the testing process a checkpoint before production. Broken code or failing tests will automatically halt deployment and alert us to problems as these are automatically detected.
Table 8.1 New tools in chapter 8
8.2 Getting the code
To follow along with this chapter you need to download the code or clone the repository.
-
You can clone the code using Git like this:
git clone https://github.com/bootstrapping-microservices/chapter-8.git
For help on installing and using Git, see chapter 2. If you have problems with the code, log an issue against the repository in GitHub.
8.3 Testing for microservices
Like any code that we write, microservices need to be well tested so we can know the code is robust, difficult to break, and can gracefully handle problems. Testing gives us peace of mind that our code functions in both normal and unexpected circumstances.
Effective testing emulates production as closely as possible. This includes both the environment, the configuration of the code, and the test data that we use. Using Docker and Docker Compose allows us to configure our testing environment to be like the production environment.
This makes the “it worked on my computer” excuse for broken code much less useful in modern development. Usually, when it works on your computer (in a correctly configured Docker environment), you can be fairly sure it’s going to work in the production environment. Having a stable environment for our code is a crucial factor for reliable testing.
Manual testing is a good starting point and is a skill worth cultivating. But at a certain point, automated testing is necessary to scale up our application. As the number of microservices grows, we will rely more and more on automation to keep the application running and to help us maintain a rapid pace of development. In the previous chapter, we created our CD pipeline to automate deployment. Now, let’s turn our attention to bringing automated testing online.
8.4 Automated testing
Automated testing, put simply, is code-driven testing. We write code to exercise our code and verify that it works correctly. This sounds like circular logic, but we break out of it after a single iteration. We have our application code or code under test and then we have our test code (or just tests).
Often the test code directly invokes the code under test, but it can also be invoked indirectly, for example, through HTTP requests or RabbitMQ messages. The test code then verifies that the result is correct, either by checking the output or checking the behavior.
Throughout this chapter, you’ll learn a handful of automated testing techniques. You’ll be able to apply these techniques over and over again to create a comprehensive suite of tests for your application.
Testing for microservices can be applied at multiple levels. We can test individual functions, we can test whole microservices, we can test groups of microservices together, or we can test the whole application (until the application grows too large; more about that later). These levels of testing are related to the following three types of automated testing:
-
End-to-end testing —Tests groups of microservices and/or the entire application including the front end
You may have heard of these types of testing before. If not, don’t worry because we’ll look at each in turn.
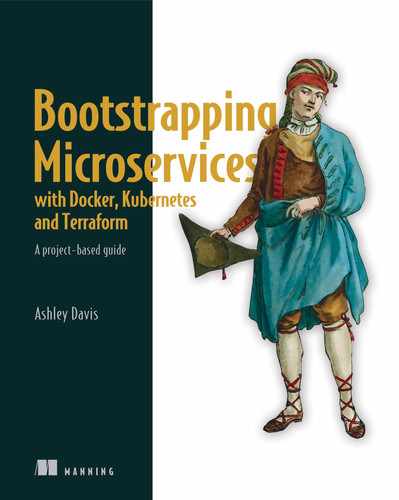
Figure 8.1 shows a diagram that is called the testing pyramid. It relates the types of automated testing to each other and gives you an idea of how many of each type of test you should have in your test suite.
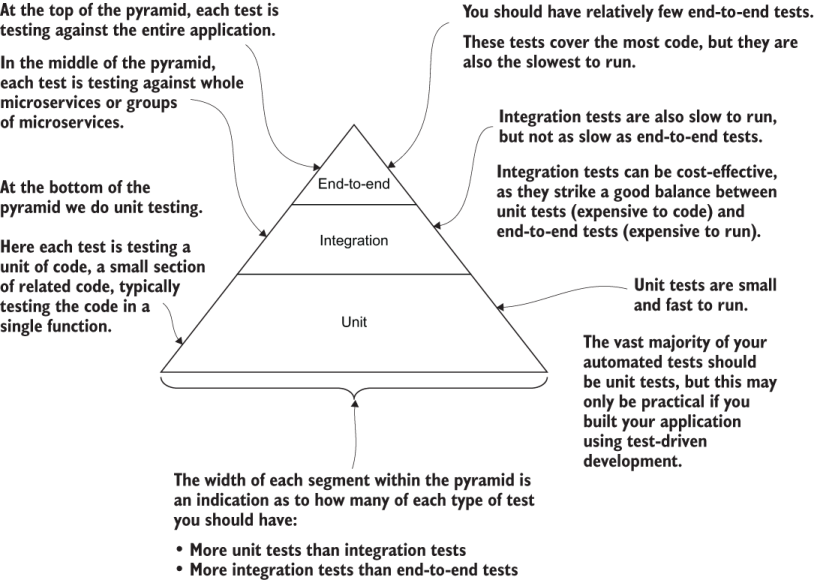
Figure 8.1 The testing pyramid indicates the relative amounts of each type of test we should have.
Unit tests run quickly, so you can afford to have many of these. These are, therefore, at the foundation of the testing pyramid. Integration testing and end-to-end testing are higher in the pyramid. These types of tests are slower to run, so you can’t afford to have as many of those. (The diminishing area as we go up the pyramid indicates that we’ll have less and less of these types of tests.) This means we should have fewer integration tests than unit tests and fewer end-to-end tests than integration tests.
Figure 8.2 illustrates what end-to-end testing looks like for a cut-down version of FlixTube. In that figure, I show end-to-end testing first, because it’s the type of testing most like manual testing; that is, we test against the whole application in a manner similar to how our customer would use it.
End-to-end testing is the easiest type of testing to understand, even though it’s actually quite involved, and we don’t get to it until near the end of this chapter. End-to-end testing is closest to manual testing because we have to load the entire application to test it, just like we do when testing manually. Figure 8.2 shows running Cypress tests against a cut-down version of our whole application that is running on Docker Compose.

Figure 8.2 End-to-end testing of a simplified version of FlixTube using Cypress
Automated testing coupled with CD is like an early warning system. When the alarm goes off, we can be thankful, as it gives us the opportunity to stop problems going into production and potentially impacting our customers. Automated testing (like automated deployment) is best started early in the project because trying to bolt automated testing onto a legacy application (one not designed to be tested) can be extremely difficult.
But don’t start automated testing too early in the development lifecycle. It’s a balancing act. When starting a new product, you should first begin with a prototyping phase prior to adding automated testing. Prototyping allows you to experiment with your product before committing to it. If you aren’t sure exactly what your product is yet (e.g., you are still experimenting) or if you are still trying to validate your business model, then you might want to hold off on automated testing and stick with manual testing for a bit longer.
Building infrastructure for testing is a significant investment in your product. For the purpose of this chapter, let’s imagine that we are ready to make the automated testing commitment for FlixTube.
Note The true payoff with automated testing is that it will save you from countless hours of routine testing, not to mention that it can stop deployment of broken code that might have otherwise gone into production and caused havoc.
As amazing as automated testing is, it is not a panacea! It is not a replacement for good exploratory testing (e.g., manual testing) by actual humans. That still needs to happen because it’s the only way to find the bugs that the development team couldn’t even imagine.
Automated testing isn’t just about proving that your code works. It also serves as an invaluable communication tool, a kind of executable documentation that demonstrates how the code is intended to be used. It also gives you a safe framework in which to refactor and restructure your application. This allows you to continuously move towards a simpler and more elegant architecture. Let’s now work through each type of testing and look at examples of tests applied to the metadata microservice and then to the FlixTube application.
8.5 Testing with Jest
Testing is a huge topic, so let’s start by looking at some simpler examples that aren’t directly related to microservices. The code we’ll look at in this section is generally applicable for testing JavaScript code, regardless of whether that code is in a front end, a backend, or even in a mobile or desktop application.
If you can already write an automated test with Jest, and you understand mocking, feel free to skip this section and move directly to section 8.6. In that section, we’ll start to relate automated testing to microservices.
For this section, imagine we are creating a JavaScript math library for use in our microservices. We’ll use Jest to do our testing. That’s a JavaScript testing tool and framework. Figure 8.3 gives you an idea of how we’ll use it.
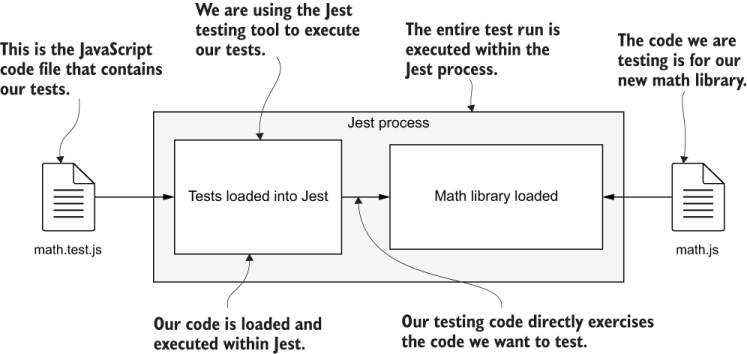
Figure 8.3 Automated testing with Jest
In the figure, on the left, we have math.test.js. This is a file that contains the tests that we’ll run against our math library. On the right, we have math.js. This is the file that contains the code for our math library. When we run Jest, it loads our test code, which in turn, runs the code we are testing. From our tests, we can directly invoke our code to test it and then verify in the result that everything went as expected.
8.5.1 Why Jest?
Jest is arguably the most popular testing tool and framework for JavaScript. It is easy to set up with minimal configuration, so it’s great for beginners. It’s fast, and it can run tests in parallel. Jest also has great support for live reloading; you can run it in watch mode, where it reloads by itself while you are coding.
Jest was created by Facebook, so you know it has great support behind it. But it also has a huge following and many contributors outside of Facebook. The API is extensive, supports multiple styles of testing, and has various ways of validating tests and creating mocks. And Jest has great support for creating mock objects.
There are other great features that we won’t even touch on in this chapter. (At the end of the chapter, you’ll find a link to learn more about Jest.) Jest is open source and free to use. You can find the code here:
https://github.com/facebook/jest
8.5.2 Setting up Jest
We’ll start by looking at example-1 in the chapter-8 code repository. This example is small enough that you can type it out directly if you like. If you don’t want to do that, you can get the code from GitHub to follow along.
You can run these tests for yourself and make changes to those to see what happens. Example-1 already has Jest in its package.json, so we’ll simply install dependencies for the project:
cd chapter-8/example-1
npm install
You can install Jest into a new Node.js project like this:
npm install --save-dev jest
We used the --save-dev argument to save Jest as a dev dependency in package.json. Jest is something we’ll only use in our development or testing environment, so we save it as a dev dependency so that it’s excluded from our production environment.
If you look in the package.json file, you’ll see that I’ve installed Jest version 26.2.2. When you install Jest in the future, you will see a later version. Much of what you learn here will still be valid because Jest is stable (it’s up to version 26!).
The following listing shows the Jest configuration from example-1. This is actually the default configuration that was generated by Jest. I didn’t change it except to remove comments.
Listing 8.1 Configuration file for Jest (chapter-8/example-1/jest.config.js)
module.exports = {
  clearMocks: true,          ①
  testEnvironment: "node",   ②
};
① Automatically clears mocks between every test (I’ll explain mocks soon)
② This is the environment for testing Node.js.
When starting a fresh project, create your own Jest configuration file like this:
npx jest --init
When you initialize your Jest configuration, it asks you a few questions. If you accept all the defaults, then your configuration file will look similar to listing 8.1. I only changed clearMocks to true (default is false) to help stop tests from interfering with each other.
Just to remind you, npx is a command that comes with Node.js and allows us to run npm modules as command-line applications. There are many npm installable modules that work this way, including Jest. You might recall the wait-port command we used with npx back in chapter 5.
When you generate the configuration file as in the listing, you’ll see it contains many options that are commented out. Reading through the generated configuration file is a great way to understand what’s possible with Jest. Because it’s not necessary for this example, I removed the comments to have a minimal configuration.
Figure 8.4 shows the structure of the example-1 Node.js project with Jest installed. You can see the familiar package.json and package-lock.json files that are in every Node.js project that we learned about in chapter 2. As for Jest, note that this project contains the Jest configuration file (content shown in listing 8.1) and the files for our code and tests. The code for our maths library is in math.js, and the code for our tests is in math.test.js. As with any other npm module, Jest itself is installed under the node_modules directory.
Figure 8.4 The structure of a fairly typical Node.js project with Jest installed
Note that the test file is named after the code that it tests. When creating math.test.js, we simply appended .test.js to the name of our library. This naming convention is how Jest locates our test code. Jest automatically loads code with .test in the name. This is a default convention with Jest, but we can configure it differently if we want a different convention.
Notice how the test file (math.test.js) is right next to the code file (math.js) in the same directory. This is another convention, and one that is fairly common. We could have placed these two files anywhere within the directory structure of our project, and it wouldn’t make much difference. Another common convention is to have all tests separated from the application code and located under a test or tests subdirectory that is next to or just under the src subdirectory.
You might have noticed that the Jest configuration file is actually a JavaScript file itself. This means you can use JavaScript code in your configuration. It’s actually quite common for JavaScript and Node.js tools to have an executable configuration file, and I think it’s pretty cool that JavaScript can be used as its own configuration language.
8.5.3 The math library to test
Now imagine we have added the first function to our new math library. The following listing shows the square function. This is a simple function that takes one number and returns the square of that number.
Listing 8.2 A starting point for our new math library (chapter-8/example-1/src/math.js)
function square(n) {     ①
    return n * n;        ①
}                        ①
...                      ②
module.exports = {
    square,              ③
    ...                  ④
};
① A simple JavaScript function computes the square of a number. This is the code we’ll test.
② You can add more functions for your math library here as you develop it.
③ Exports the “square” function so we can use it in our code modules. This is also how we access it from our test code.
④ Other functions are exported here as you add them to your math library.
In the future, we would add many more functions to math.js. But for now, we’ll keep it short so it can be a simple demonstration of automated testing.
8.5.4 Your first Jest test
The square function is a simple function with a simple result, and more complex functions always depend on simpler functions like this. To be sure that the complex functions work, we must first test the simple functions. Yes, even though this function is simple, we still want to test it.
Of course, this is JavaScript. We can easily test this function manually using the Node.js REPL. But it’s almost as easy to get this function covered under automated testing, which (combined with many other tests for many other functions) can save us time in the future. Not to mention that I’m demonstrating testing here, so if only for that purpose alone, let’s write our first automated test.
Listing 8.3 shows the code that tests our nascent math library. The describe function defines a test suite called square function. The test function defines our first test called can square two.
Listing 8.3 A first test with Jest (chapter-8/example-1/src/math.test.js)
const { square } = require("./math");      ①
describe("square function", () => {        ②
    test("can square two", () => {         ③
        const result = square(2);          ④
        expect(result).toBe(4);            ⑤
    });                                    ③
});                                        ②
① Imports the code we are testing
② Creates a test suite called “square function”
③ Creates a test called “can square two”
④ Invokes the “square” function and captures the result
⑤ Sets an expectation that the result will be 4. If the expectation is not satisfied, the test fails.
We have named this test suite after the function it is testing. You can imagine in the future that we might have other test suites in this file for other functions in our maths library (you’ll see some more examples of this soon).
In listing 8.3, we imported our square function from the file math.js. In our test can square two, we then called it with the number 2 as input. You can see that the name of the test implies what the test is actually doing.
Note A good name for a test allows you to instantly understand what is being tested.
We then use the expect and toBe functions to verify that the result of the square function is the number 4. Various combinations of functions can be chained onto the expect function (see the Jest docs for more examples at https://jestjs.io/docs/ en/expect, which gives a rich syntax for describing the expected output of the code being tested).
8.5.5 Running your first test
Now that we have looked at the code to test and the tests themselves, we are ready to run Jest and see what a successful test run looks like (trust me, I already know this code works). From the terminal in the example-1 directory, run the tests as follows:
npx jest
You can see the output of the successful test run in figure 8.5. We have one test and one test suite, both have completed successfully.
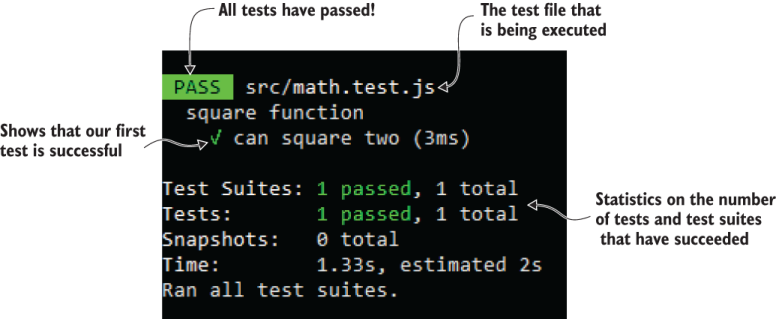
Figure 8.5 The output of our successful test run with Jest
8.5.6 Live reload with Jest
Live reloading is important for developer productivity, especially while testing. While coding and writing tests, you can run Jest in live reload mode as follows:
npx jest --watchAll
That command works for all projects and runs all tests when any code changes. If you are using Git, you can also use this command:
npx jest --watch
The second version has better performance because it uses Git to know which files have changed (rather than just blindly running all the tests). This is a great way to work. Change some code and the tests automatically run and show you if anything has been broken!
8.5.7 Interpreting test failures
All is good and well when our tests are passing, but what about when we have a problem in our code and our tests are failing? Don’t wait until you accidentally break your code to find out!
Let’s try it now. It’s as simple as changing the behavior of our code. For instance, try changing the square function to return the wrong result:
function square(n) {
    return n & n;
}
Notice how I replaced the multiplication operator with the binary AND operator. Let’s see what our tests have to say about this.
You can see the output of the now failing test in figure 8.6. When a test fails, Jest finishes with a nonzero exit code. This indicates that a failure happened. We’ll make use of this later in our CD pipeline to prevent deployment in circumstances when our tests have failed.
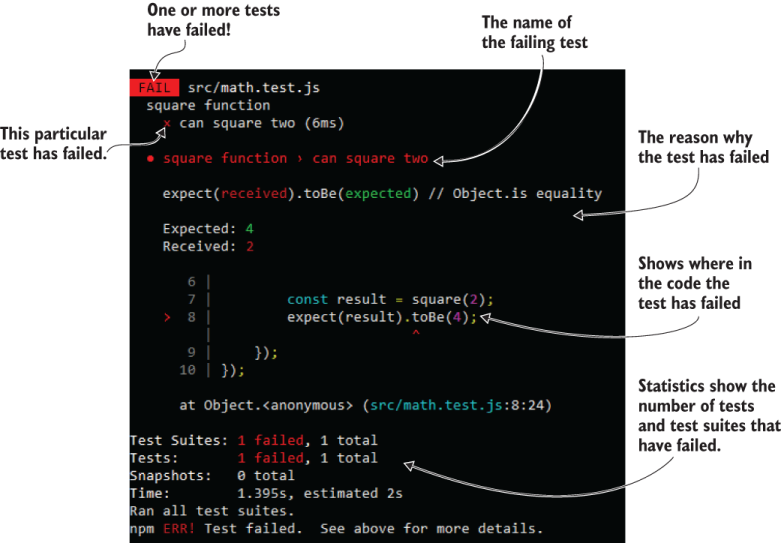
Figure 8.6 The output of a failed test in Jest
This test failed because we changed the expected behavior of our code. We broke our own code on purpose to see the result, but you can also imagine how a simple typo in our regular development process could have caused this problem in production code. If you didn’t have the automated test in place, this problem could easily fall through the cracks of manual testing and later be discovered by a customer. That’s embarrassing, to say the least, but it can cause real problems for our business, depending on the nature of the actual bug.
Of course, the intention here is not just to test the square function. That by itself won’t be effective. What we need is to have a large proportion of our code covered by such tests.
A large body of tests gives us an automatic verification system that we run to prove, without a doubt, that our code works as intended. More importantly, it proves to us that our code continues to work in the future as we evolve it. It’s handy to note that you can simulate failing code anywhere you like by throwing an exception like this:
throw new Error("This shouldn't happen.");
The best way to be fearless in the face of errors is to ruthlessly try and cause those in your own code. Once you have seen all the errors, it takes away the fear, and you can focus on understanding and fixing the problem. Simulating or causing problems in code to make sure that our application handles it gracefully is known as chaos engineering (check the end of chapter 10 for a reference to learn more about this).
8.5.8 Invoking Jest with npm
In chapter 2, we introduced the idea of adding npm scripts to our package.json file so that we can use the conventional npm commands like npm start. In chapter 2, we also configured the start script. We’ll do the same for the test script here. Once we have configured package.json for this, we can run our test suite by typing:
npm test
This convention means that we can easily run tests for any Node.js project. We don’t have to know if the project is using Jest or some other testing tool! Indeed, you’ll see later in this chapter how we’ll also run Cypress tests with the same command. The following listing shows our package.json with a test script to run our Jest tests.
Listing 8.4 Package.json with npm scripts for running Jest (chapter-8/example-1/package.json)
{
  "name": "example-1",
  "version": "1.0.0",
  "scripts": {
    "test": "jest",                     ①
    "test:watch": "jest --watchAll"     ②
  },
  "devDependencies": {
    "jest": "^25.4.0"                   ③
  },
  "dependencies": {
                                        ④
  }
}
① Setup for running Jest by invoking “npm test”
② Setup for running Jest in live reload mode
③ Installs Jest as a dev dependency
④ This project doesn’t have any production dependencies yet.
Note also in listing 8.4, there’s an npm script called test:watch. This is configured so that we can run our tests in live reload mode like this:
npm run test:watch
The test:watch script is my own personal convention-it isn’t an npm standard. I use it so that no matter which testing tool I use, I can easily remember how to run my tests with live reload enabled.
8.5.9 Populating your test suite
So far, we have only seen a single test, but I’d also like to give you a taste of what it looks like as we grow this test suite. Listing 8.5 shows what math.test.js looks like after adding a second test. (Example-1 doesn’t actually contain this new test, but feel free to add it yourself and experiment with it.)
Listing 8.5 Adding the next test (additions to chapter-8/example-1/src/math.test.js)
const { square } = require("./math");
describe("square function", () => {
    test("can square two", () => {
        ...                            ①
    });
    test("can square zero", () => {    ②
        const result = square(0);
        expect(result).toBe(0);
    });                                ②
    ...                                ③

});
...                                    ④
① Omits the previous test for brevity
② Creates the test “can square zero”
③ Add more tests to your “square” function test suite here
④ Add more tests suites for the math library here
As listing 8.5 shows, we can add more tests to our square function test suite by adding more instances of the test function nested inside the test suite’s describe function.
The new test, can square zero, is an example of an edge case. We don’t need to add any more tests for squaring positive numbers; can square two is enough to cover all positive cases, so we could rename it can square positive number. Then to complete this small test suite for the square function, you should probably also add a test called can square negative number. I’ll leave that to you if you’d like to continue working on this.
As we develop our math library, we’ll add more math functions and more test suites. For example, we’ll add functions like squareRoot and average and their test suites square root function and average function. Remember, we named our test file math.test.js, and that name is general enough that we can add new test suites to it using the describe function.
We could also have separate JavaScript code files for each test suite, for instance, square.test.js, square-root.test.js and average.test.js. Note that these are all appended with .test.js so that Jest can automatically find them. As we add new libraries in the future, we’ll add new test files, as many as we need, to contain all the tests that we create.
You can structure your tests in any way you want. That means you can name those how you like and structure these across files to suit your own needs. When working for a company, however, you’ll be expected to follow their existing style and conventions. Whatever convention you follow, I would only ask (on behalf of developers everywhere) that you use meaningful names for your tests. Names that make it easy to understand the purpose of the test. Thank you very much.
8.5.10 Mocking with Jest
JavaScript is a great language for creating mocks! The dynamic nature of JavaScript makes it particularly easy to create automated tests as well. But what is mocking?
Definition Mocking is where we replace real dependencies in our code with fake or simulated versions of those.
The dependencies that we replace can be functions, objects, or even entire code modules. In JavaScript, it’s easy to create functions and piece together new objects and data structures that we can use as mocks.
Why do we do this? The purpose of mocking is to isolate the code we are testing. Isolating particular sections of code allows us to focus on just testing only that code and nothing else. Isolation is important for unit testing and test-driven development.
Not only does mocking help isolate the code we are testing, but it can also entirely eliminate the code and processes that would make testing slow. For example, we can eliminate database queries, network transactions, and filesystem operations. These are the kinds of things that can take a huge amount of time compared to the code we are testing.
In section 8.6, we’ll learn about unit testing and see a real example of mocking, but let’s first understand mocking by examining a simple example. Let’s say that instead of using the multiply operator in our square function, we’ll use the multiply function as follows:
function square(n) {
    return multiply(n, n);
}
You might well ask, why are we using a function to do multiplication when there’s already a perfectly good operator? That’s a good point. Well, I introduced the multiply function here primarily because I need a simple example by which to explain mocking. But if you’d like, I can also concoct a great reason why we need this!
Let’s just say that we want our math library to work with abstract data types. Instead of working with ordinary numbers, we want it to be able to work with vectors (arrays of numbers), and in this case, the multiply function could very well be an extremely complex function that does the computation in parallel on a graphics processing unit (GPU).
Now to isolate our code in the square function (which arguably isn’t much), we need to mock the multiply function. That means we must replace it with another function-one that we can control. We can do this using a primitive form of dependency injection (DI). DI is a technique where we inject dependencies into our code rather than hard-coding them. We control what the dependencies are, and that’s useful for isolating code for unit testing. In this case, we inject the multiply function into the square function like this:
function square(n, multiply) {
    return multiply(n, n);
}
This works because functions are first-class citizens in JavaScript, and these can be passed around like any other value or object. Now let’s make use of this from our test. When we call the square function, we’ll pass in our mock version of multiply:
test("can square two", () => {
    const mockMultiply = (n1, n2) => {          ①
        expect(n1).toBe(2);                     ②
        expect(n2).toBe(2);                     ②
        return 4;                               ③
    };                                          ①
    const result = square(2, mockMultiply);     ④
    expect(result).toBe(4);                     ⑤
});
① Creates a mock version of the “multiply” function
② Expects the “square” function to pass the right inputs to the “multiply” function
③ Hard-codes the mock function to return 4
④ Passes the mock function into the “square” function instead of the real “multiply” function
⑤ Expects to get back the hard-coded value of 4
You are now probably wondering, what’s the point of all this? Given that our mock function returns a hard-coded value of 4, what are we actually testing here? You can read it like this: “we are testing that the square function invokes the multiply function with inputs 2 and 2, and the result received from multiply is the value returned from the square function.”
You might note at this point that we have just implemented the square function, tested it, and proved that it works-and the real version of the multiply function doesn’t even exist yet! This is one of the superpowers of test-driven development (TDD). TDD allows us to reliably test incomplete versions of our code. If that doesn’t impress you, I don’t know what will!
To make this code work for real, we still need to implement the multiply function. This can, in turn, have automated tests applied to it.
OK, so this is a crazy made-up example, but we needed a way to introduce the concept of mocking. It’s pretty rare to see DI implemented at such a granular level as I have demonstrated just now. Coming up soon, though, you’ll see a more realistic example that replaces entire code modules with mocks.
8.5.11 What have we achieved?
We have seen a simple example of testing with Jest and how mocking is used to isolate the code we are testing. Let’s wrap up this section with a general recipe for testing with Jest.
-
Create a file for your test that matches Jest’s naming convention (e.g., math.test.js).
-
Wrap your entire test suite in a call to the
describefunction and give it a descriptive name. -
Add each test using a call to the
testfunction and give each a descriptive name. -
Run your tests using
npx jestornpm test(if configured in package.json).
...                                            ②
describe("the name the test suite", () => {    ③
    ...                                        ④
    test("test 1", () => {                     ⑤
        ...                                    ⑥
    });

    ...                                        ⑦

    test("test N", () => {                     ⑤
        ...                                    ⑥
    });

});
...                                            ⑧
① Import functions and code modules go here.
② Global mocks shared between tests in this file go here.
③ Calls to the “describe” function, which defines test suites, go here.
④ Mocks shared between tests in this test suite go here.
⑤ Calls to the “test” function, which defines each test
⑥ Code for the test goes here.
⑧ More test suites can go here.
test("the name of the test", () => {   ①
    ...                                ②


});
① Calls to the “test” function, which defines each test. Use a meaningful name for each test!
② Mocks used only in this test go here.
③ Calls the function(s) to be tested and records any result
④ Inspect results and mocks and states the expectations of the test
8.6 Unit testing
Unit testing for microservices works the same as any other kind of unit testing. We aim to test a single unit of code by itself and in isolation from other code. What is a unit? Typically, each test exercises a single function or one aspect of a single function.
What’s important with unit testing is the isolation. When we test isolated code, we focus our testing efforts on just that small piece of code. For example, we’d like to test the code for our metadata microservice, but we don’t care to test the code for say the Express library or the MongoDB library. Those are dependencies that we assume have already been tested. Instead, we want to test only the code that we have created. To focus on our own code, we must eliminate all other code.
Isolation of code is achieved by mocking its dependencies. What this means in terms of our metadata microservice is that we’ll substitute the real Express and MongoDB libraries for fake instances that we can control and bend to our will.
Isolation is what makes unit tests run fast. Integration and end-to-end tests don’t isolate code. In those types of testing, we exercise the integration of code modules rather than isolated pieces of code.
When running unit tests, we won’t start a real HTTP server or connect to a real database. This is the kind of thing that makes unit tests run quickly, and it’s why these are at the foundation of the testing pyramid (figure 8.1). We can afford to have 100s or even 1000s of unit tests for our code, and we won’t have to wait a long time for our suite of unit tests to complete.
We’ll be using Jest to execute our unit tests. Figure 8.7 shows what we’ll do with it. Our test code from index.test.js (on the left) is loaded by Jest. Our code to be tested, the code for our metadata microservice from index.js (on the right) is loaded by our test code.
We’ll mock Express and MongoDB instead of using the real thing. The test code “starts” our microservice. I say starts in quotes because we won’t be starting it in the usual way. Unlike in normal execution, Express is mocked so we aren’t starting a real HTTP server. Likewise, MongoDB is mocked so we aren’t connecting to a real database.
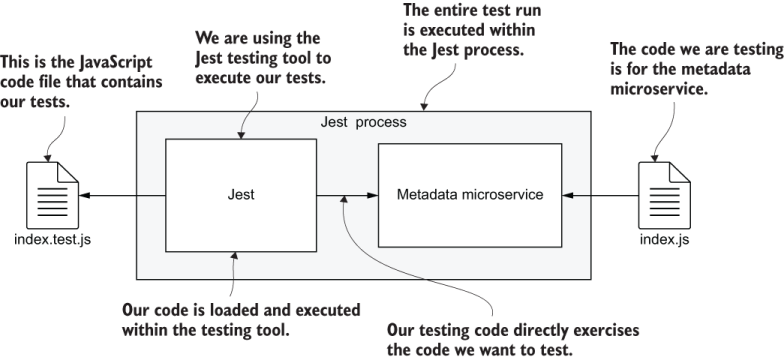
Figure 8.7 Unit testing the metadata microservice with Jest
8.6.1 The metadata microservice
We now move on to example-2 in the chapter 8 code repository. To follow along, you’ll need to install dependencies:
cd chapter-8/example2
npm install
Listing 8.6 shows the code we will test. This is a fledgling microservice that will become FlixTube’s metadata microservice. This is a REST API whose purpose is to collect, store, search, and manage the metadata associated with each video. The basic setup in the listing is not too different from our first microservice back in chapter 2.
Listing 8.6 The metadata microservice for unit testing (chapter-8/example-2/src/index.js)
const express = require("express");
const mongodb = require("mongodb");
function connectDb(dbhost, dbname) {
    return mongodb.MongoClient.connect(dbhost, {
            useUnifiedTopology: true
        })
        .then(client => {
            const db = client.db(dbname);
            return {
                db: db,
                close: () => {
                    return client.close();
                },
            };
        });
}
function setupHandlers(microservice) {
    const videosCollection = microservice.db.collection("videos");
    microservice.app.get("/videos", (req, res) => {        ①
        return videosCollection.find()                     ②
            .toArray()
            .then(videos => {
                res.json({                                 ③
                    videos: videos
                });
            })
            .catch(err => {
                ... error reporting omitted ...
                res.sendStatus(500);
            });
    });
    ...                                                    ④
}
function startHttpServer(dbConn) {                         ⑤
    return new Promise(resolve => {                        ⑥
        const app = express();
        const microservice = {                             ⑦
            app: app,
            db: dbConn.db,
        }
        setupHandlers(microservice);
        const port = process.env
        ➥ .PORT && parseInt(process.env.PORT) || 3000;
        const server = app.listen(port, () => {
            microservice.close = () => {                   ⑧
                return new Promise(resolve => {
                    server.close(() => {                   ⑨
            resolve();
        });
                })
                .then(() => {
                    return dbConn.close();                 ⑩
                });
            };
            resolve(microservice);
        });
    });
}
function startMicroservice(dbhost, dbname) {               ⑪
    return connectDb(dbhost, dbname)
        .then(dbConn => {
            return startHttpServer(dbConn);
        });
}
function main() {                                          ⑫
    ... error checking for environment variables omitted ...

    const DBNAME = process.env.DBNAME;

    return startMicroservice(DBHOST, DBNAME);
}
if (require.main === module) {                             ⑬
    main()                                                 ⑭
        .then(() => console.log("Microservice online."))
        .catch(err => {
            console.error("Microservice failed to start.");
            console.error(err && err.stack || err);
        });
}
else {                                                     ⑮
    module.exports = {                                     ⑯
        startMicroservice,
    };
}
① Handles requests to the /videos route
② Returns a promise so we can await the result in the test
③ Retrieves the records from the database
④ Other handlers can go here later.
⑤ Starts the Express HTTP server
⑥ Wraps in a promise so we can be notified when the server starts
⑦ Creates an object that represents our microservice
⑧ Creates a function that can be used to shutdown the microservice
⑪ A new helper function to collect code to execute when the microservice starts
⑫ The main entry point for the microservice
⑬ Starts the microservice normally, if this script is the main module
⑮ Otherwise, runs the microservice under test
⑯ Exports the function to start the microservice so we can call it from the test
Listing 8.6 starts a HTTP server using the Express library and connects to a MongoDB database using the MongoDB library. We added a single handler function for the HTTP GET /videos route. This route retrieves an array of video metadata from the database.
The code we test here will be exercised by calling the function startMicroservice. This is a new function we added to our microservice to help make it more testable. Calling startMicroservice returns a JavaScript object that represents the microservice. We aren’t storing the returned object yet. We don’t need that for unit testing, but we will need it later when we come to integration testing.
We’ve made this change to the structure of our microservice in an effort to design for testing, and we’ll often find ourselves doing this, adapting our code to make it more amenable to testing. Note that we aren’t limited to calling startMicroservice. We could, in fact, call any exported function from any of our code modules. Keep that in mind because it’s what unit testing is really all about: testing each and every function individually. Now, let’s create some tests to confirm that our microservice started and that the /videos route retrieves the expected data.
8.6.2 Creating unit tests with Jest
Before we can unit test our code, we need to be able to create mocks for the dependencies. For this example, the dependencies we have are Express and MongoDB. In other situations, you will have different dependencies, like the amqp library for interacting with RabbitMQ.
Listing 8.7 shows the code for our tests. This file defines a single test suite called metadata microservice that contains three tests. We have called the file index.test.js to indicate that it tests code contained in the main source file index.js. As you continue to develop your microservice, you’ll end up having many more files like this, with tests to cover all the code in your microservice.
The first part of the test suite is devoted to setting up mocks for the Express and MongoDB libraries. Note the use of jest.fn to create mock functions that we can use to detect if the function was called, and if so, then what arguments were passed to it. Next, note the use of jest.doMock, which allows us to mock entire Node.js modules. These tools are powerful and allow us to replace Express and MongoDB without having to adjust the code we are testing.
The first test in listing 8.7 checks that the HTTP server has been started on port 3000. The second test checks that a handler for the /videos route has been registered. The third test directly invokes the /videos route handler function and checks that it retrieves the required data from the database.
This example is actually quite advanced, but I wanted to get straight to the point and show you some unit testing that is relevant to microservices. If you struggle to understand this code, don’t be too concerned. Just try to read it, get the gist of it, and understand which parts of it are for mocking and which parts are for testing.
Listing 8.7 Testing the metadata microservice with Jest (chapter-8/example-2/src/index.test.js)
describe("metadata microservice", () => {                     ①
    const mockListenFn = jest.fn(
    ➥ (port, callback) => callback());                       ②
    const mockGetFn = jest.fn();                              ③
    jest.doMock("express", () => {                            ④
        return () => {                                        ⑤
            return {                                          ⑥
                listen: mockListenFn,
                get: mockGetFn,
            };
        };
    });
    const mockVideosCollection = {};                          ⑦
    const mockDb = {                                          ⑧
        collection: () => {
            return mockVideosCollection;
        }
    };
    const mockMongoClient = {                                 ⑨
        db: () => {
            return mockDb;
        }
    };

    jest.doMock("mongodb", () => {                            ⑩
        return {
            MongoClient: {                                    ⑪
                connect: async () => {                        ⑫
                    return mockMongoClient;
                }
            }
        };
    });
    const { startMicroservice } =
    ➥ require("./index");                                    ⑬

    test("microservice starts web server
    ➥ on startup", async () => {                             ⑭

        await startMicroservice();                            ⑮
        expect(mockListenFn.mock
        ➥ .calls.length).toEqual(1);                         ⑯
        expect(mockListenFn.mock
        ➥ .calls[0][0]).toEqual(3000);                       ⑰
    });
    test("/videos route is handled", async () => {            ⑱

        await startMicroservice();                            ⑲
        expect(mockGetFn).toHaveBeenCalled();
        const videosRoute = mockGetFn.mock.calls[0][0];
        expect(videosRoute).toEqual("/videos");               ⑳
    });
    test("/videos route retrieves data via
    ➥ videos collection", async () => {                      ㉑
        await startMicroservice();                            ㉒
        const mockRequest = {};                               ㉓
        const mockJsonFn = jest.fn();
        const mockResponse = {
            json: mockJsonFn
        };                                                    ㉓
        const mockRecord1 = {};                               ㉔
        const mockRecord2 = {};
        mockVideosCollection.find = () => {
            return {
                toArray: async () => {                        ㉕
                    return [ mockRecord1, mockRecord2 ];
                }
            };
        };                                                    ㉖
        const videosRouteHandler =
           ➥ mockGetFn.mock.calls[0][1];                        ㉗
        await videosRouteHandler(mockRequest,
        ➥ mockResponse);                                     ㉘
        expect(mockJsonFn.mock
        ➥ .calls.length).toEqual(1);                         ㉙
        expect(mockJsonFn.mock.calls[0][0]).toEqual({
            videos: [ mockRecord1, mockRecord2 ],             ㉚
        });
    });
    ...                                                       ㉛
});
① Defines the test suite for the “metadata microservice”
② Creates a mock “listen” function
③ Creates a mock “get” function
④ Creates a mock for the Express library
⑤ The Express library is a factory function that creates the Express app object.
⑥ Returns a mock for the Express app object
⑦ A mock for the MongoDB videos collection
⑧ A mock for the MongoDB database
⑨ A mock for the MongoDB client object
⑩ Creates a mock for the MongoDB module
⑫ A mock for the connect function
⑬ Imports the code we are testing
⑭ Tests that the microservice starts the HTTP server correctly
⑯ Expects only 1 call to the “listen” function
⑰ Expects that port 3000 was passed to “listen”
⑱ Tests that the /videos route is handled by the HTTP server
⑲ Expects the Express “get” function has been called
⑳ Expects that the parameter to “get” was /videos
㉑ Tests that the /videos route retrieves data from the videos collection in the database
㉓ Mock Express “request” and “response” objects passed to our Express route handler
㉔ Mocks the “find” function to return some mock database records
㉕ Mocks the structure of the MongoDB library
㉖ Mocks the “find” function to return some mock database records
㉗ Extracts the /videos route “handler” function
㉘ Invokes the “handler” function
㉙ Expects that the “json” function is called
㉚ Expects that the mock records were retrieved from the database
You may have noticed in listing 8.7 that I’m using async and await keywords. I use these a lot in my day-to-day coding, but I haven’t used these yet in this book. The reason I’ve introduced these here is that they fit nicely into Jest tests and make asynchronous code significantly easier to read.
You might be wondering where the jest variable actually comes from because there is no require statement in listing 8.7 that imports it! This is standard JavaScript, and normally, it would be a problem, but this code is running under Jest. Jest automatically imports the jest variable for us. How nice of it to save us a line of code like that.
A large section at the start of listing 8.7 is dedicated to creating the mocks that replace Express and MongoDB. We used jest.fn and jest.doMock to create mocks. Jest has many other useful functions for mocking and specifying the expectations of the test. See the reference at the end of this chapter to read more about that.
We replaced Express and MongoDB with new JavaScript objects, thus providing our own implementations for the dependencies of the code we are testing. When the code calls these functions, it calls the replacement versions and not the usual ones from the real Express and MongoDB libraries.
If we didn’t replace Express and MongoDB, then calling startMicroservice would start the real HTTP server and connect to the real database. That normal operation is exactly what we want to avoid when unit testing! It’s the kind of thing that makes automated tests run slowly. It won’t seem like much of a difference right now because, for the moment, we are only talking about a tiny number of tests. But when you get to running 100s or even 1000s of tests, you will definitely see a big difference.
8.6.3 Running the tests
After writing the code and the tests, we are ready to run Jest. From the terminal in the example-1 directory, run the tests as follows:
npx jest
npm test
The output should show one passing test suite with three passing tests.
8.6.4 What have we achieved?
We’ve learned the basics of unit testing with Jest. We mocked the Express and MongoDB libraries, and we tested that our microservice can start and that its /videos route can retrieve records from the database.
This might not seem like much, but you can continue to create tests like this to cover code across all of your microservices. You might even want to try test-driven development (TDD), also known as test-first development, where you write code for tests before writing the actual code being tested.
This is a powerful technique that can help you achieve 100% test coverage, a feat that can prove difficult without TDD. At the end of this chapter, you’ll find references to learn more about this test-focused method of development if you so desire.
8.7 Integration testing
The next step up the testing pyramid (figure 8.1) is integration testing. It’s called integration testing because, instead of testing code modules in isolation (as we did with unit testing), the emphasis is now on testing code modules functioning together in an integrated fashion. When it comes to microservices, integration testing usually means that we are testing an entire microservice, including all the code modules and code libraries that it depends upon.
It would be nice if unit testing was enough to solve all our problems. Unit testing is effective because unit tests are extremely fast to run. The speed of unit tests means that we’ll be more likely to run these frequently and thus catch problems quickly. Unfortunately though, many problems can still be hidden in the integration between code modules where they can’t be detected by unit tests.
In a way, integration testing is actually easier than unit testing because we don’t have to be concerned with mocking. In fact, if mocking seems too hard, you might find it much easier to start with integration testing. Earlier, when unit testing, we mocked dependencies for Express and MongoDB. We won’t be doing that with integration testing. Instead, we’ll allow the microservice we are testing to start a real HTTP server and connect to a real database.
Despite the fact that it is easier to write integration tests than unit tests, the setup for integration testing is more difficult. Using a real HTTP server limits the parallelization of our testing because we can only run a single HTTP server at a time on port 3000 (or indeed any other port). Using a real MongoDB database means that we’ll need to have a database available for use by the code we are testing.
On top of that, starting the HTTP server and connecting to the database is time-consuming. This is what makes integration tests particularly slow compared to unit tests. All things considered, I won’t be surprised if you are now convinced that it’s actually unit testing that’s easier than integration testing!
Note Using the right combination of tests is a balancing act, and we do need integration tests because that’s the only way to find problems in the integrated code.
Typically, when we run integration tests against a microservice, we’ll interact with it through its official HTTP interface instead of directly, calling its functions as we did for unit testing. There are other ways we could interact with it, depending on how the microservice is implemented. For example, if the microservice uses RabbitMQ, then we can also interact with it by sending it messages.
Figure 8.8 shows what we’ll do with integration testing in this section. Again, we are using Jest to test our metadata microservice, but this time, we won’t be making use of Jest’s mocking facilities. Instead of directly calling code in our microservice to test it, we’ll send it HTTP requests and check the responses that come back.
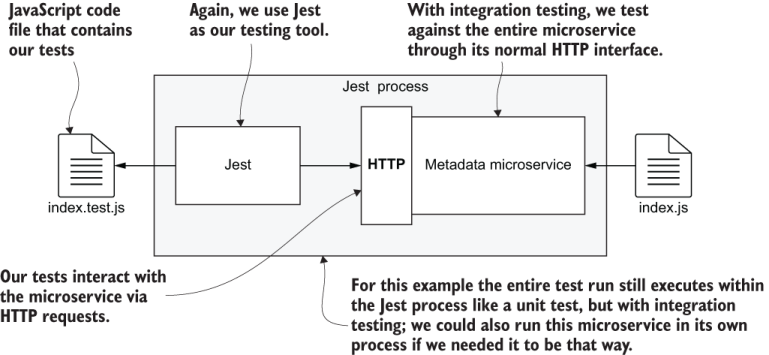
Figure 8.8 Integration testing a microservice with Jest
8.7.1 The code to test
Now we can move to example-3 in the chapter-8 code repository. You can continue to follow along and run these tests. The code we’ll test is the same code as in example-2; nothing has changed, so look back to listing 8.6 if you’d like to revise that code.
8.7.2 Running a MongoDB database
When doing integration testing, we won’t replace our database with a mock version. Instead, we need a real database, and we need to be able to load realistic test data.
To run the integration tests for example-3, you’ll need a real MongoDB database up and running. It’s not too difficult to download and install MongoDB. You can install it on your development workstation if you haven’t already done so. Follow the instructions for your platform here:
https://docs.mongodb.com/manual/installation/
As an alternative, I’ve included a Docker Compose file in example-3 that starts MongoDB in a Docker container. You can start it like this:
cd example-2
docker-compose up
8.7.3 Loading database fixtures
With a database up and running, now we need a way to load database fixtures on demand. A database fixture is a fixed set of test data that we can load into our database for testing. It’s called a fixture because we use it to seed our database with a well-known or specific set of data.
Doing this is particularly easy with Jest as we can simply create a JavaScript helper function to load data directly into our database through the regular MongoDB Node.js library. MongoDB is already included in the example-3 package.json, and you can install all dependencies for example-2 like this:
npm install
MongoDB can be installed in a new project as follows:
npm install --save mongodb
Note that we’ll use the --save argument instead of --save-dev because MongoDB is actually used in our production microservice, not just in the test code. Even though we use it for testing, we also need it installed as a production dependency rather than a dev dependency.
Listing 8.8 shows a simple function that we can use for loading test data. We can call this function from our test code, and you’ll see an example of that soon. We simply need to specify the name of the collection and the data records to load.
In listing 8.8, note how we are accessing the microservice’s database through the db field of our microservice object (which is saved in a variable as you can see in listing 8.6). This saves having to make multiple connections to the database. We don’t need to do that because the microservice has already made the connection, and we can reuse it.
Listing 8.8 A helper function to load a database fixture (extract from chapter-8/example-3/src/index.test.js)
// ...
async function
➥ loadDatabaseFixture(collectionName, records) {                    ①
    await microservice.db.dropDatabase();                            ②
    const collection = microservice.db.collection(collectionName);
    await collection.insertMany(records);                            ③
}
// ...
① A helper function to load a database fixture
② Resets the database (don’t try this in production!)
③ Inserts the test data (our database fixture) into the database
One of the reasons we use MongoDB in the first place is because it makes it so easy to load test data. You can, of course, do this kind of thing with any database. It’s just that some databases, like traditional SQL databases, tend to be more difficult to deal with.
The helper function in listing 8.8 allows us to store test data inline with our test code and to load it on demand into our database. This is quite convenient, but it’s also possible to store our test data in distinct data files. That can make it a bit easier to organize. In the section coming up on end-to-end testing, you’ll see a different way to load database fixtures.
8.7.4 Creating an integration test with Jest
Creating an integration test with Jest is much the same as creating a unit test with Jest. Because we aren’t doing any mocking, it actually simplifies our test code quite a bit.
Instead of invoking code directly in our microservice, we’ll use HTTP requests to trigger the code we’d like to test. To make HTTP requests, we can use either the Node.js low-level http library that we used in chapter 5 or a library installed through npm. In this case, we’ll use the Axios library, which is a more modern library that directly supports async/await, so it fits nicely with Jest’s support for asynchronous coding.
Example-3 already has Axios added to the package.json file. If you installed all dependencies for example-3, then you already have it. Otherwise, you can install Axios in a new project like this:
npm install --save-dev axios
We are using the --save-dev argument here because, in this case, we’ll only use Axios in our tests. For that reason, it can be a dev dependency. If you plan to use Axios in your production code though, be sure to install it as a regular dependency using --save instead of --save-dev.
Listing 8.9 shows the code for our integration tests. This is similar to the code for our unit tests, but instead of mocking dependencies and directly calling into the code to be tested, we are starting our metadata microservice as a real HTTP server. We then use Axios to send HTTP requests to it.
Be careful that you don’t run listing 8.9 against a production database! The function that loads the database fixture first drops the entire database. Make sure you only ever run this against a test database! And always backup your production database, just to be on the safe side!
Listing 8.9 Code for integration testing the metadata microservice with Jest (chapter-8/example-3/src/index.test.js)
const axios = require("axios");
const mongodb = require("mongodb");
describe("metadata microservice", () => {

    const BASE_URL = "http://localhost:3000";
    const DBHOST = "mongodb://localhost:27017";                 ①
    const DBNAME = "testdb";
    const { startMicroservice } = require("./index");
    let microservice;
    beforeAll(async () => {
        microservice =
        ➥ await startMicroservice(DBHOST, DBNAME);             ②
    });
    afterAll(async () => {
        await microservice.close();                             ③
    });
    function httpGet(route) {
        const url = `${BASE_URL}${route}`;
        return axios.get(url);
    }
    async function
    ➥ loadDatabaseFixture(collectionName, records) {           ④
        await microservice.db.dropDatabase();
        const collection = microservice.db
        ➥ .collection(collectionName);
        await collection.insertMany(records);
    }                                                           ④

    test("/videos route retrieves data via
       ➥ videos collection", async () => {                       ⑤
        const id1 = new mongodb.ObjectId();                     ⑥
        const id2 = new mongodb.ObjectId();
        const videoPath1 = "my-video-1.mp4";
        const videoPath2 = "my-video-2.mp4";
        const testVideos = [
            {
                _id: id1,
                videoPath: videoPath1
            },
            {
                _id: id2,
                videoPath: videoPath2
            },
        ];                                                      ⑥
        await
        ➥ loadDatabaseFixture("videos", testVideos);           ⑦

        const response = await httpGet("/videos");              ⑧
        expect(response.status).toEqual(200);
        const videos = response.data.videos;                    ⑨
        expect(videos.length).toEqual(2);
        expect(videos[0]._id).toEqual(id1.toString());
        expect(videos[0].videoPath).toEqual(videoPath1);
        expect(videos[1]._id).toEqual(id2.toString());
        expect(videos[1].videoPath).toEqual(videoPath2);        ⑨
    });
    ...                                                         ⑩
});
① Sets the base URL for our database server
② Starts the microservice, including the HTTP server and the database connection
④ The helper function that loads test data (a database fixture) into our database. We defined this function in listing 8.8.
⑤ Tests that a list of videos can be retrieved via a HTTP request to the /videos route
⑥ Creates test data to load into the database
⑦ Loads the database fixture into the videos collection of the database
⑧ Makes a HTTP request to the route we are testing
⑨ Expects that the received data matches our test data
In listing 8.9, there is only one test, but we can easily add more as we develop the microservice. Here again, we test the /videos route. This time, though, we do it through its normal HTTP interface, and the microservice is using a real database instead of a mock.
We aren’t testing that the HTTP server starts as we did in the unit tests. That was easy to test then because we had mocked the Express library. Now, though, we aren’t mocking anything so it’s difficult to explicitly confirm if the HTTP server was started correctly. Although, we can see that we are making a HTTP request to the microservice, which implicitly tests that our HTTP server is functioning.
Note in listing 8.9 how we use Jest’s beforeAll function to start our microservice before testing, and then the afterAll function to shutdown the microservice. See how we are saving a reference to the microservice object. This means we can access its database connection and shutdown the microservice when done. Shutting down our microservice is something we never considered before, but it’s important here because this might not be the only test suite, and we don’t want to leave this microservice running longer than necessary.
You might have realized that as we add more tests to this test suite, we’ll run multiple tests against the same microservice. It’s not ideal to share the microservice across multiple tests in this way because it makes it difficult to know if each test is independent of the others. But it is significantly faster to do it this way than to separately start and stop the microservice for each test in turn. We could do that to make the test suite more reliable, but you’ll be waiting a lot longer for it to finish!
8.7.5 Running the test
Running integration tests with Jest is the same as running unit tests. Type
npx jest
Or, because we configured it in package.json, type
npm test
Try running this integration test for yourself. Also, try changing code to break the test as we did earlier when unit testing.
8.7.6 What have we achieved?
In this section, we learned the basics of running integration tests with Jest. It’s pretty much like unit testing, but we left out the mocking. As a result, we ran our code integrated with its dependencies.
When doing integration testing, we are not trying to isolate the code under test (that was the point of unit testing), and we aren’t trying to mock any dependencies (which is what helps achieve that isolation). We are, instead, aiming to test the code in its integrated state! That is to say, we are testing it in combination with other code: code in other modules and code in external libraries.
In a sense, integration testing is easier than unit testing because we don’t have the concerns of isolation and mocking. Creating integration testing can also be a more efficient use of our time than writing unit tests. That’s because integration tests tend to cover more code, and as such, you need to spend less time writing tests.
The big problem with integration tests is that these are slower than unit tests. That is why they have a higher position in the testing pyramid. Consider the unit and integration tests that we have already seen in this chapter. These have tested basically the same thing. But in the case of integration testing, we started a real live HTTP server that connects to a real database. That makes integration tests much slower to execute than unit tests.
8.8 End-to-end testing
Now we take the final step up the testing pyramid (figure 8.1). We come to end-to-end testing. This is similar to integration testing except now we aim to test against our whole application, or at least, some cut-down version of it. Here we hope to test our application in its entirety and as close as we can to how it appears in its production environment.
End-to-end testing is possibly the easiest form of testing yet. We don’t have to do any mocking, as we did with unit tests. However, we do need database fixtures so that we can load realistic test data.
Traditionally, it would have been difficult to do end-to-end testing against a distributed application. That’s because it takes a lot of effort to start all the services. Fortunately, we are now empowered by Docker Compose, which we learned in chapters 4 and 5 and have used since to develop our application. We will now use Docker Compose as a convenient way to boot our microservices application for automated end-to-end testing.
At this point, we are leaving Jest behind and moving onto Cypress, a testing tool for loading and testing web pages. Cypress is powerful and has many features. Here you’ll only learn the basics, but that’s enough to get started and give you a taste of what it can do. We’ll use Cypress to run tests against our application through its front end as served by the gateway microservice. You can see what this looks like in figure 8.9.
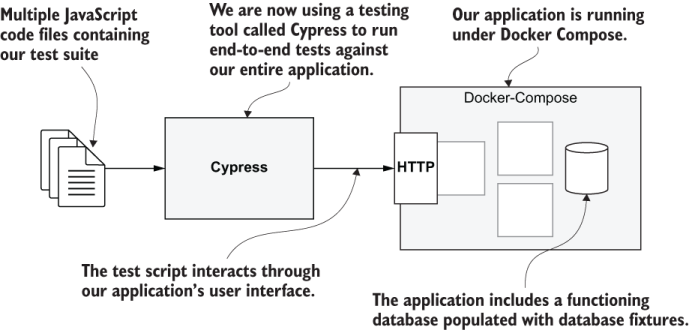
Figure 8.9 End-to-end testing our entire application with Cypress and Docker Compose
Running end-to-end tests requires that we start our whole application and do the testing in a web browser. This makes end-to-end tests the slowest of all the types of testing and is what earns these their place at the top of the testing pyramid.
That said, having a handful of end-to-end tests should be an important part of your testing strategy. End-to-end testing covers a lot of ground, so even though these can take significant time to run, they deliver a lot of bang for buck. Also, this type of testing exercises your application through the front end, which happens to be the point of view of your customer. Needless to say, this is the most important perspective from which we can test our application, and it is the primary reason we place such a high value on end-to-end tests.
We now move on to example-4, the final example for chapter 8. Example-4 contains a docker-compose.yaml that boots a cut-down version of FlixTube.
8.8.1 Why Cypress?
Cypress is simply a fantastic all-in-one-tool for testing web pages. It’s a visual solution and has a great user interface; we can actually watch it going through the motions of testing our application’s front end. You can get a feel for what this looks like in figure 8.10, but to truly understand how powerful it is, you must try it for yourself.
Cypress uses Chrome by default for running tests, but it also automatically detects other browsers on our workstations. We can easily switch between these for cross-browser testing.
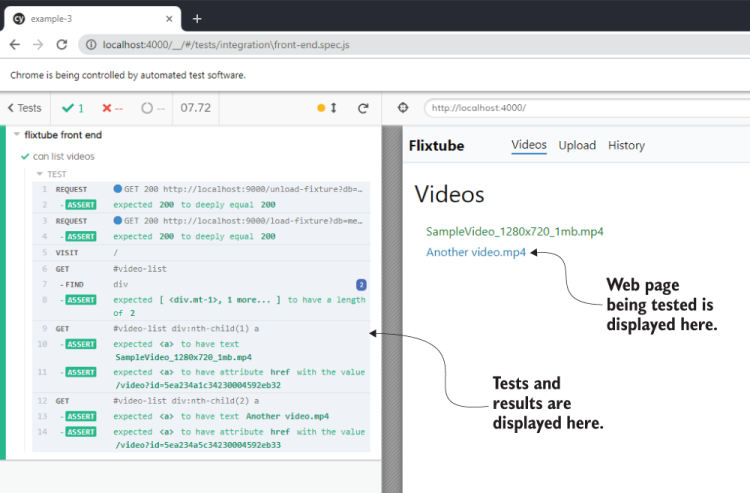
Figure 8.10 The Cypress UI (user interface)
Cypress has a great user interface, but it can also run from the terminal in headless mode, which means the UI is hidden. During development, we’ll spend a lot of time using the Cypress UI to visually test our front end. Ultimately, we’ll run it in headless mode so that it fits into our CD pipeline.
When running in headless mode, we can’t directly see Cypress interacting with our front end, but Cypress has a super cool feature: it records videos of its test runs. This feature really comes into its own for automated testing. When a Cypress test fails, you can extract the video of the failing test from your CD server so that you can see what happened!
When running the Cypress UI, it automatically supports live reload. All you need to do is to update your code and tests, and Cypress automatically reloads and runs your tests again. Like all the great modern tools, Cypress is open source. You can find the code for it on GitHub here:
https://github.com/cypress-io/cypress
Cypress has other great features that will no doubt impress you. There are references at the end of the chapter so you can continue to learn more about Cypress.
It’s not all roses with Cypress, however, and I’d be remiss if I didn’t point out a major problem with it. Cypress is based on the Electron framework. This means that it’s large and can be quite slow to download/install. This also means it can be difficult, though still possible, to make it work efficiently in your CD pipeline.
For this book and FlixTube, we integrate Cypress and our end-to-end tests into a single code repository. For real projects in the future, though, you might want to split your Cypress tests out to a separate testing repository. Although, normally, it’s nice to keep our tests collocated with the code being tested, with Cypress (because it’s so big), it can make sense to have these in separate repositories.
8.8.2 Installing Cypress
Example-4 already has Cypress added to its package.json. You can install dependencies like this:
cd chapter-8/example-4
npm install
You can install Cypress to a new project like this:
npm install --save-dev cypress
Because Cypress, like Jest, is a tool only required for testing, we’ll use --save-dev to save it as a dev dependency. As mentioned, Cypress is large and installation can take some time. Now might be a good time for a coffee break!
You can see in figure 8.11 the structure of the example-4 project with Cypress installed. This is similar to other project structures we have worked with in earlier chapters. We have a docker-compose.yaml file to build and run our application, and we have code for our microservices in subdirectories.
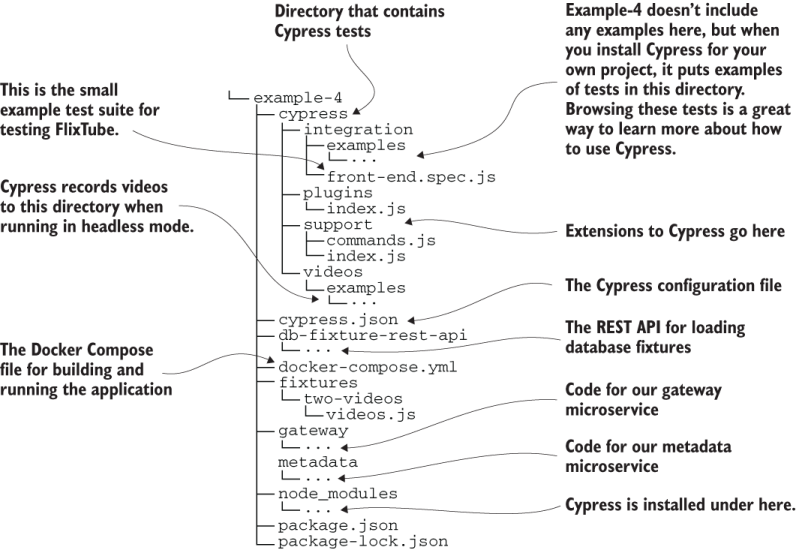
Figure 8.11 Example-4 project structure with Cypress installed
Some of the structure that you see in figure 8.11 is automatically created for you the first time you start Cypress in a new project. Particularly, Cypress creates many example test files under the subdirectory cypress/integration/examples. I haven’t included those examples in the chapter-8 code repository, but you can easily generate these yourself by installing Cypress in a new project and running it. You should try doing that because browsing through those example tests is a great way to learn more about the capabilities of Cypress.
Listing 8.10 shows the Cypress configuration file. This is a JSON file where we can set configuration options for Cypress. For this example, we only need two options. The first is the baseUrl, where we set the base URL for the web page we are testing. We’ll run it locally (by booting our application with Docker Composer), so the hostname is localhost.
The container that runs our gateway is configured to serve the front end on port 4000, which makes the base URL http://localhost:4000. Setting the base URL in the Cypress configuration file is optional. But it’s useful in that we can easily redirect our entire Cypress test suite to a new location just by changing that line in the configuration file.
Listing 8.10 Configuration file for Cypress (chapter-8/example-4/cypress.json)
{
    "baseUrl": "http://localhost:4000",           ①
    "dbFixturesUrl": "http://localhost:9000"      ②
}
① Sets the base URL that we will use to run tests against
② Sets the URL for the database fixtures REST API
The other field we set in listing 8.10 is not a standard Cypress configuration option. We need a way to load database fixtures into our database. For reasons that I’ll explain soon, we’ll use a separate REST API to do that. The dbFixturesUrl field in the configuration file sets the base URL for that REST API.
8.8.3 Starting the Cypress UI
Now we are ready to start Cypress and run some tests. In your terminal, run the following command from example-4 in the chapter-8 code repository:
npx cypress open
This opens the first level of the Cypress UI and shows a list of your Cypress test suites. Example-4 only contains a single test suite. Double click the test suite named front-end.spec.js to open the next level of the Cypress UI.
What you see now is a single test to run against the FlixTube UI. The test runs automatically, but at this point, the test should fail because we haven’t started our application yet.
8.8.4 Setting up database fixtures
Before we start our application, we must be able to load database fixtures. When using Jest earlier, we were able to load data into our database directly from the test code. We can’t do this directly from Cypress because it runs in the browser (Cypress is an Electron application-based on the Chromium rendering engine, the basis for the Chrome web browser), and the regular MongoDB npm library doesn’t work there. We need a different solution for loading database fixtures.
To load test data into our database, we’ll use a separate REST API to manage our database. That means we can make HTTP requests to load and unload database fixtures. We are already using Docker Compose, so it’s not difficult to add an extra container into our application. Figure 8.12 shows the structure of our application including the new database fixtures REST API.
Creating such a REST API is quite a bit of work. However, I already have one that I’ve used for testing projects in the past. I’ve included a copy of the code for it under the example-4 project (find it under example-4/db-fixtures-rest-api). You can also find a standalone copy of the code on GitHub:
https://github.com/ashleydavis/db-fixture-rest-api
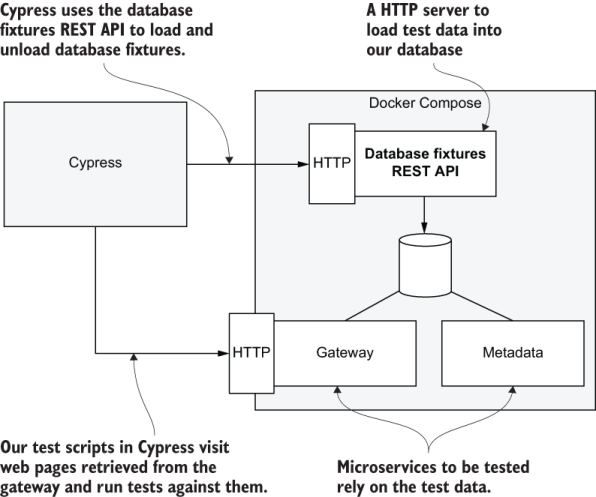
Figure 8.12 Using the database fixtures REST API to seed our database with test data prior to running tests with Cypress
We won’t cover the internals of the database fixtures REST API in this book. We have to draw the line somewhere, but feel free to look over this code on your own. Learning to read the code of others is a valuable experience. Be assured that you won’t find anything particularly new here; after all, it’s just a Node.js REST API built on Express. That’s similar to the microservices you have already seen in this book.
Listing 8.11 is an extract from the example-4 docker-compose.yaml file. It shows that we integrate the database fixtures REST API into our application the same way as any other microservice.
Listing 8.11 Loading the db fixtures REST API with Docker Compose (extract from chapter-8/example-3/docker-compose.yaml)
version: '3'
services:
  db:                                    ①
    image: mongo:4.2.0
    container_name: db
    ports:
      - "27017:27017"
    expose:
      - "27017"
    restart: always                      ①
  db-fixture-rest-api:                   ②
    image: db-fixture-rest-api
    build:
      context: ./db-fixture-rest-api
      dockerfile: Dockerfile
    container_name: db-fixture-rest-api
    ports:
     - "9000:80"
    environment:
     - PORT=80
     - DBHOST=mongodb://db:27017
     - FIXTURES_DIR=fixtures
    volumes:
     - ./fixtures:/usr/src/app/fixtures:z
    depends_on:
      - db
    restart: always                      ②
    ...                                  ③
① Configures a MongoDB database server
② Configures the database fixtures REST API
③ The gateway and metadata microservices are defined here.
Listing 8.11 adds the database fixtures REST API to our application, but we still need a way to talk to it from our Cypress tests. For that, we’ll make an extension to Cypress that we can use from our tests to load database fixtures.
Listing 8.12 is a snippet of code that shows how we can add a new command to Cypress. This is an example of how we can extend Cypress to do new things. This particular command is called loadFixture, and we’ll use it in our Cypress tests to load database fixtures.
Listing 8.12 Loading a database fixture under Cypress (extract from chapter-8/example-3/cypress/support/commands.js)
Cypress.Commands.add('loadFixture',
➥ (databaseName, fixtureName) => {                       ①
    cy.unloadFixture(databaseName, fixtureName);          ②
    const dbFixturesUrl =
    ➥ Cypress.config("dbFixturesUrl");                   ③
    const route = "/load-fixture?db=" + databaseName +
    ➥ "&fix=" + fixtureName;
    cy.request("GET", dbFixturesUrl + route)              ④
        .then(response => {
            expect(response.status).to.eql(200);          ⑤
        });
});
① Defines a Cypress command (an extension to Cypress) to load database fixtures via the new REST API
② Unloads test data from the previous test (by calling another helper function)
③ Reads the URL of the REST API from the Cypress configuration file
④ Makes a HTTP GET request to the REST API to load the database fixture
⑤ Expects that the fixture was successfully loaded (fails the test otherwise)
The loadFixture command makes a HTTP GET request to the database fixtures REST API and causes it to load a database fixture from a file (in this case, example-4/fixtures/two-videos/videos.js). In a moment, you’ll see how we invoke this command from our test code.
8.8.5 Booting your application
We have Cypress installed and ready to go, and we have the ability to load database fixtures. Before we can test our application, we must boot it!
Listing 8.11 was an extract of the Docker Compose file for example-4. The complete file contains the configuration for a cut-down version of FlixTube with gateway and metadata microservices. This is nowhere near the full application, but it’s enough that we can write a test to confirm that the list of videos is retrieved from the database and displayed in the front end.
In this case, I’ve simplified FlixTube just so that I can present it as a simple example for this chapter. Generally, though, it’s good to know that we always have the option of cutting back our application to make it easier to test. As our application grows larger, it will eventually become too big to be tested on a single computer using end-to-end tests. At this point, we are forced to chop up our application into smaller testable units. Now, let’s start the application using our old friend Docker Compose:
docker-compose up --build
8.8.6 Creating an end-to-end test with Cypress
Writing end-to-end tests with Cypress is a bit different from writing tests with Jest. In listing 8.13, we use a similar overall structure composed of describe and it functions instead of describe and test (we used those with Jest). describe and it come from the Mocha style of testing.
Mocha is a different testing framework for JavaScript that is still popular, so you might have already heard about it. Cypress happens to be based on Mocha, and that is why these tests look the way they do. Jest actually supports the describe and it format as well, so if you wanted, you could use that same format with both testing tools.
Listing 8.13 An end-to-end test of FlixTube with Cypress (extract from chapter-8/example-4/cypress/integration/front-end.spec.js)
describe("flixtube front end", () => {                      ①
    it("can list videos", () => {                           ②
        cy.loadFixture("metadata", "two-videos");           ③

        cy.visit("/");                                      ④
        cy.get("#video-list").find("div").
        ➥ should("have.length", 2);                        ⑤
        cy.get("#video-list div:nth-child(1) a")            ⑥
            .should("have.text", "SampleVideo_1280x720_1mb.mp4")
            .should("have.attr", "href",
            ➥ "/video?id=5ea234a1c34230004592eb32");       ⑥
        cy.get("#video-list div:nth-child(2) a")            ⑦
            .should("have.text", "Another video.mp4")
            .should("have.attr", "href",
            ➥ "/video?id=5ea234a5c34230004592eb33");       ⑦
    });
});
② Tests that we can load the list of videos in the FlixTube UI
③ Loads the fixture named two-videos into the videos collection of the metadata database
④ Makes Cypress visit the FlixTube home page
⑤ Verifies the details of the first video
⑥ Checks that two videos (those loaded from the database fixture) are displayed in the UI
⑦ Verifies the details of the second video
The first line of code in our test is a call to our loadFixtures command, accessed through the Cypress cy object. The Cypress interface also contains many other functions for loading, interacting with, and testing web pages.
On the next line, we call cy.visit. This is the most important thing you need to know about Cypress. This function is how you make Cypress visit a web page. All other Cypress commands operate relative to the page that is visited.
Here we are visiting the / (root) route on our web page. Note that this is relative to the base URL that we specified earlier in the Cypress configuration file. This navigates the Cypress browser to the FlixTube home page.
Next, we use cy.get to get an element from the browser’s DOM hierarchy and run tests against it. It checks that we have two videos in the video list and then checks the names and links for each. We know these videos should be displayed in the front end because we have seeded our metadata microservice’s database with the two-videos database fixture on the first line of this test. That database fixture loads test data (you can see it in example-4/fixtures/two-videos/videos.js) into the database with all the details of these two videos.
If you already have Cypress open, then you’ll have run this test already. The result should look like figure 8.10. You might need to refresh the Cypress UI to run the test after you started the application in the previous section. At this point, you can experiment with breaking this code and seeing the tests fail, just like we did earlier with the unit and integration tests.
Here’s an example. Open the file example-4/gateway/src/views/video-list.hbs. This is the HTML that is rendered for the FlixTube home page (in the format of a Handlebars template). Try changing this HTML so that something different is displayed for each video in the list. Once you break the tests, you’ll see red for failure instead of the green for success that was shown in figure 8.10.
Just be careful that you never run this test against a production database. Loading a database fixture wipes out the relevant database collections, and you never want to lose production data. You shouldn’t be able to do this in production anyway, because you would never run the database fixtures REST API in production! That gives us the capability to load database fixtures, but we only need it for development and testing environments.
Note Running the database fixtures REST API in a production environment also gives external access to your database. This is a recipe for disaster, so be careful never to instantiate it in production.
There’s so much more you can do with Cypress! This includes clicking buttons
cy.get(".some-button").click();
and typing values into input fields:
cy.get(".some-input").type("Hello world");
Cypress even provides facilities to mock your backend REST APIs. You can use this to isolate the user interface for testing! This allows you to do a kind of TDD for user interfaces which, frankly, I find quite amazing. There are references at the end of this chapter so you can continue learning about Cypress.
8.8.7 Invoking Cypress with npm
Now we can get set up to invoke our Cypress tests with npm just like we did with Jest. Example-4 is a separate project to the other examples, and we use a different testing tool (Cypress instead of Jest). Nevertheless, we’d like to be able to run Cypress with the conventional npm test script like this:
npm test
Listing 8.14 shows the setup in package.json to make this work. We have configured the test script to invoke cypress run, which executes Cypress in headless mode. This allows us to run Cypress tests from the terminal just like we did earlier with Jest tests.
Listing 8.14 Package.json with npm scripts for running Cypress (chapter-8/example-4/package.json)
{
  "name": "example-4",
  "version": "1.0.0",
  "scripts": {
    "test:watch": "cypress open",    ①
    "test": "cypress run"            ②
  },
  "dependencies": {},
  "devDependencies": {
    "cypress": "^4.4.1",
    "mongodb": "^3.5.6"
  }
}
① Invoking the command “npm run cypress” opens the Cypress UI
② Invoking “npm test” runs Cypress in headless mode to run tests entirely from the command line
The other script we set up is npm run test:watch to invoke cypress open, which opens the Cypress UI. I like this configuration because I feel that running the Cypress UI (which automatically does live reload) is functionally similar to running Jest in live reload mode (with Jest’s --watch/--watchAll argument). When I want this functionality, I simply invoke npm run test:watch, and I don’t have to think about whether I’m in a Jest project or a Cypress project. I just get the result that I’m expecting.
8.8.8 What have we achieved?
We’ve almost come to the end of our journey through the testing landscape. We’ve seen unit testing, integration testing, and now end-to-end testing.
We’ve understood the relative performance of tests: integration tests are slower than unit tests and end-to-end tests are slower than integration tests. And we’ve seen how each unit test covers only a small amount of isolated code. Integration and end-to-end testing can be very effective because these cover much more code with fewer tests.
The question now is how many of each type of test should you have? The answer to this is never set in stone.
But what I can say is that you can, and probably should, have 100s or 1,000s of unit tests. You’ll need to have much fewer integration tests and very few end-to-end tests. It’s difficult to say how many because it really depends on how long you are willing to wait for a test to run to completion. If you are happy to wait overnight or over a weekend for your test suite to complete, then you can probably afford to have 100s or 1,000s of end-to-end tests as well.
As developers, though, we crave fast and comprehensive feedback. For this, you can’t beat unit tests. If you can have a huge amount of code coverage through many extremely fast unit tests, then this is what you should have! That’s because this is what will get used by your developers as they are coding throughout every moment of their working day. If your test suite is slow, developers will tend not to use it and not to update it. That’s not good for anyone.
At the end of the day, it’s not black and white. There isn’t even a clear distinction between the different types of tests. Where does unit testing end and integration testing begin? It’s not clear. All tests fall on a spectrum, and it’s a spectrum with many shades of grey.
8.9 Automated testing in the CD pipeline
We have a suite of automated tests. Now we arrive at the real point of automated testing: to put it on automatic!
To truly be automatic, our tests need to operate directly on our hosted code repository. When a developer pushes code changes to the code repository, we’d like to automatically run the test suite to check the health of the code. To achieve this, we must add the tests to our CD pipeline, where they will be an automatic checkpoint in front of production deployment. If the tests pass, our code goes to production. If they fail, our code will not be deployed. It’s as simple as that. Figure 8.13 illustrates this scenario.
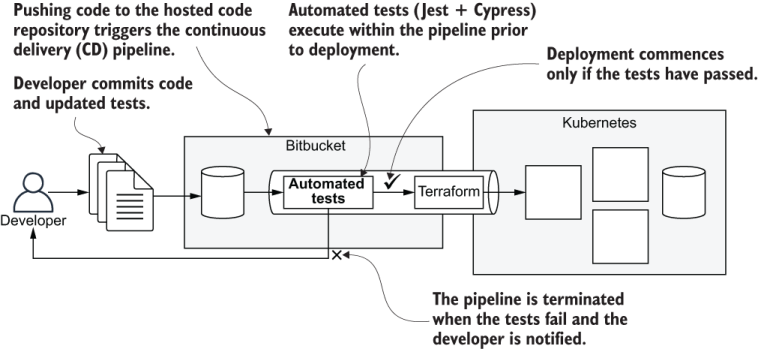
Figure 8.13 Automated testing within the CD pipeline
The reason we spent time earlier discussing the configuration of the npm test script in package.json is because that’s how we’ll integrate our automated tests into our CD pipeline. As we learned in the previous chapter, a CD pipeline can be as simple as running a shell script (even though some vendors offer fancy GUIs). Adding our automated tests then is easy. Assuming our npm test script is configured, we can simply invoke the following from our deployment shell script:
npm test
As an example, let’s consider adding automated tests to example-4 from chapter 7. Listing 8.15 shows the YAML file for configuring Bitbucket Pipelines. This is the same as the one we used in chapter 7, but now we are invoking npm test prior to invoking the deployment script.
If the automated tests fail, that is to say, that if npm test returns a nonzero exit code, which both Jest and Cypress do if any tests fail, then the pipeline itself fails and is aborted. Failing tests, therefore, prevent deployment to production.
Listing 8.15 Running tests in the CD pipeline (an update to chapter-7/example-4/bitbucket-pipelines.yaml)
image: hashicorp/terraform:0.12.6
pipelines:
    default:
      - step:
          name: Build and deploy
          services:
            - docker
          script:
            - export VERSION=$BITBUCKET_BUILD_NUMBER
            - cd video-streaming && npm install
            ➥ && npm test                             ①
            - chmod +x ./scripts/deploy.sh
            - ./scripts/deploy.sh
① Runs tests for the video-streaming microservice from chapter 7
Having Jest running in our CD pipeline is fairly easy. The npm install in listing 8.15 installs it.
Running Cypress is more complicated. Because Cypress is so big, you’ll need to configure caching in your CD server so that Cypress isn’t redownloaded every time the pipeline is invoked. That’s getting a bit too involved and is specific to your CD provider, so we don’t cover it in this book.
We also need a command in our deployment script that boots our application before running the Cypress tests. This makes things more difficult and is much more advanced. Although beyond the scope of this book, it’s definitely worthwhile that you look into this so you can have end-to-end tests running automatically in your deployment pipeline.
8.10 Review of testing
Before finishing the chapter, here is a quick review of Jest and Cypress and how we use these to run tests.
Table 8.2 Review of testing commands
8.11 Continue your learning
In this chapter, we learned the basics of automated testing. There’s enough here to kick start your own testing regime, but testing is such a huge subject and is a specialization in its own right. To explore the subject further, refer to the following books:
-
Unit Testing Principles, Practices, and Patterns by Vladimir Khorikov (Manning, 2020)
-
The Art of Unit Testing, 2nd ed., by Roy Osherove (Manning, 2013)
-
Testing Java Microservices by Alex Soto Bueno, Andy Gumbrecht, and Jason Porter (Manning, 2018)
-
Testing Microservices with Mountebank by Brandon Byars (Manning, 2018)
Also see Exploring JavaScript Testing by Elyse Kolker Gordon (Manning, 2019), which is a free collection of chapters about testing from other books available from Manning:
To learn more about Jest, see the Jest web page and Getting Started guide here:
To learn more about Cypress, see the Cypress web page and documentation here:
-
https://docs.cypress.io/guides/getting-started/installing-cypress.html
-
https://docs.cypress.io/guides/core-concepts/introduction-to-cypress.html
Summary
-
Automated testing is essential for scaling up to large numbers of microservices.
-
You learned how unit testing, integration testing, and end-to-end testing fit together in the testing pyramid.
-
We created and executed unit tests and integration tests using Jest.
-
We created end-to-end tests using Docker Compose and Cypress.
-
You learned how to use database fixtures to populate your database with test data for integration and end-to-end testing.
-
You learned how to fit automated testing into your continuous delivery (CD) pipeline.