- Revisiting the tools you’ve learned so far
- Understanding the layout, structure, and main code paths of FlixTube
- Building, running, and testing FlixTube in development
- Using Terraform to deploy FlixTube to production
- Building the continuous delivery pipeline for FlixTube
Getting to chapter 9 has been a long road to travel. Along the way, we used numerous tools to build microservices, test those, and deploy them to production. In this chapter, we’ll see the fruits of our labor come together in the completed version of the FlixTube example application.
Through this chapter, we’ll learn how FlixTube works as a whole and meet some new microservices. We’ll revise and consolidate our skills and demonstrate those skills in the context of a complete, although still relatively simple, microservices application.
We will start by building and running FlixTube in development. Next, we’ll run our tests from chapter 8 against it. Ultimately, we’ll deploy FlixTube to our production Kubernetes cluster and create a continuous delivery (CD) pipeline for it.
9.1 No new tools!
Congratulations! You have already learned all the main tools you need to start building microservices applications. There is, of course, a deeper level of knowledge to be acquired. There are also many other useful tools that you could learn, and new tools will arrive on the scene in the future.
But, for the purposes of this book, we have learned the minimum amount of tooling to build products based on microservices. As you dive deeper into ongoing development, you’ll find problems that are specific to your project, and you’ll need to dive deeper into these tools. You’ll need to learn a deeper level of Docker, Kubernetes, and Terraform. For now, though, we have enough tools in our toolbox to complete our first version of FlixTube. So let’s get to it.
9.2 Getting the code
To follow along with this chapter, you need to download the code or clone the repository.
-
You can clone the code using Git like this:
git clone https://github.com/bootstrapping-microservices/chapter-9.git
For help on installing and using Git, see chapter 2. If you have problems with the code, log an issue against the repository in GitHub.
9.3 Revisiting essential skills
As we work through the complete FlixTube example, we will exercise the essential skills we have learned to build, run, test, and deploy microservices. When you see it in a list like this, you realize just how much ground we have covered!
-
Packaging and publishing our microservices with Docker (from chapters 3 and 6)
-
Building and running our application in development with Docker Compose (from chapters 4 and 5)
-
Storing and retrieving data using a database (from chapter 4)
-
Storing and retrieving files using external file storage (from chapter 4)
-
Communication between microservices with HTTP requests and RabbitMQ messages (from chapter 5)
-
Deploying the application to a Kubernetes cluster using Terraform (from chapters 6 and 7)
Figure 9.1 illustrates the skills we will revisit and shows their context in the scheme of things. To make the most of this chapter, follow along with the examples. You should get FlixTube running for yourself so you can study it and understand how it works. To test and improve your understanding, you should try making your own changes. Practice is the best way to cement these skills in your mind.
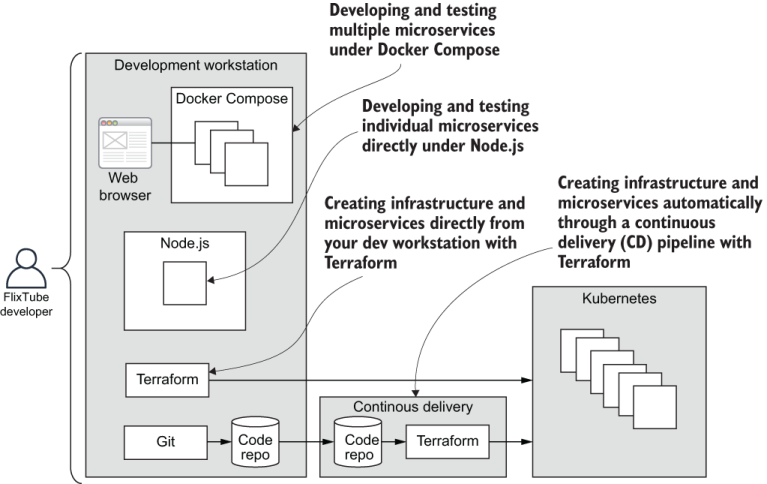
Figure 9.1 Essential skills we revisit in this chapter
9.4 Overview of FlixTube
The code for this chapter only includes a single example: the complete FlixTube project. You can find it in the example-1 subdirectory of the chapter 9 code repository. Let’s start with a bird’s eye view of its structure. Figure 9.2 shows the latest incarnation of FlixTube.
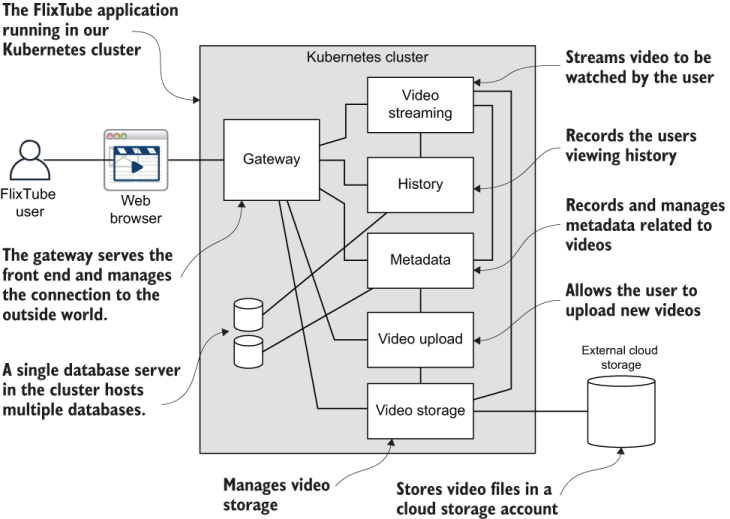
Figure 9.2 Overview of the completed FlixTube example application
9.4.1 FlixTube microservices
You already know some of the microservices shown in figure 9.2. For example
There are also some new microservices that you haven’t seen yet: gateway and video upload. Table 9.1 lists the purpose for each of these microservices.
Table 9.1 FlixTube microservices
|
The entry point to the application. Serves the front end and provides a REST API. |
|
|
Responsible for storing and retrieving videos from external cloud storage. |
9.4.2 Microservice project structure
Before we look at the project structure for the entire application, let’s first revisit the structure of an individual Node.js microservice. Open the metadata directory under example-1 in the chapter 9 code repository to follow along.
Using the metadata microservice as an example, figure 9.3 describes the layout of its project. This is a typical Node.js project, and all of FlixTube’s microservices have virtually this same structure.
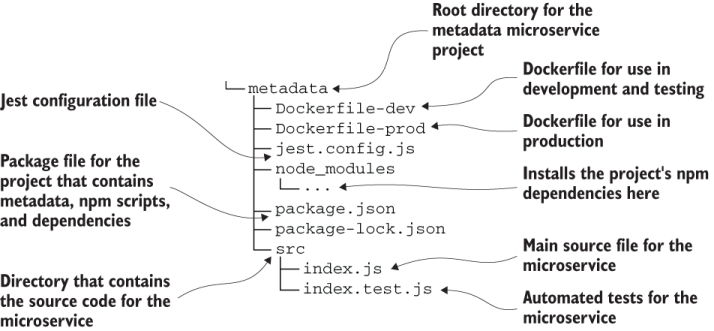
Figure 9.3 The structure of a Node.js microservice project (the metadata microservice)
9.4.3 FlixTube project structure
Now, let’s look at the structure of the whole FlixTube project. Figure 9.4 shows its layout, including subdirectories for each microservice. Open the example-1 directory from the chapter 9 code repository to take a look for yourself.
For simplicity, FlixTube was built in a single code repository. Using a single repo is a great way to learn development with microservices (it makes it simpler for you), and in general, even after you are an expert in microservices, using a single repo is a simple and convenient way to bootstrap a new microservices application. Of course, using a single repo is also a convenient way for me to share the example code with you.
Having said all that, microservices in production are usually never contained in a single code repository. Using a single repository removes the biggest advantages of using microservices: that they can be independently deployed. Having all the microservices in the single repo means that these will be deployed together (unless you have an unusually smart CD pipeline).

Figure 9.4 The structure of the entire FlixTube project
In real-life situations, microservices are almost always split into separate repositories, and usually, there is a separate repository for each microservice. For the moment, for simplicity and convenience, we’ll continue with FlixTube in a single repository. In chapter 11, we’ll talk about mono- vs. multi-repos and how we can take FlixTube forward by splitting it out to separate code repositories.
9.5 Running FlixTube in development
Our first step is to have FlixTube running on our development workstation (or personal computer). Figure 9.5 shows how it looks in development. Note that we have replaced the video-storage microservice with a mock version of it. We’ll discuss the why and how of this soon.
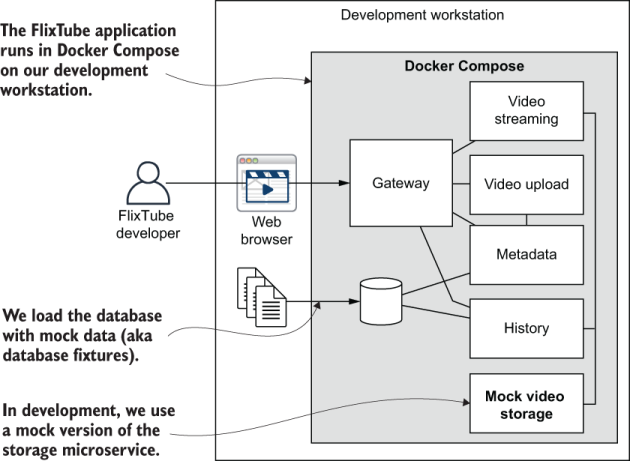
Figure 9.5 FlixTube as it now looks in development
9.5.1 Booting a microservice
Before booting the whole application, it’s worth revising how we start an individual microservice. When developing a new microservice or focusing our current work on an existing microservice, we’ll frequently need to run that microservice on its own outside the context of the application.
We are using Node.js for our microservices, so that means running our microservices directly under Node.js on our development workstations. If you followed along in chapter 2 and chapter 8, you’ll already have Node.js installed. If not, return to section 2.5.4 in chapter 2 for instructions. Before running a Node.js project, you must first install dependencies like this:
npm install
To run a Node.js project, use the npm start script convention:
npm start
This invokes a command line that is specified in the project’s package.json file. All microservices in FlixTube follow this common Node.js convention. That means you know how to start any microservice in FlixTube to run it standalone in production mode.
What’s more appropriate during ongoing development is to run the microservice in development mode. This enables live reload (first covered in section 2.6.8), so we can edit our code and have the microservice restart itself automatically to include the changes. We use the start:dev script (my personal convention) to run any of the FlixTube microservices in development mode:
npm run start:dev
(You can revise further on production mode, development mode, and live reload. To learn more, return to sections 2.6.7 and 2.6.8 in chapter 2.)
You may have noticed that most of the FlixTube microservices now have dependencies that make them more difficult to start on their own. Most of these either need a database or a RabbitMQ server. Some of them require both. We can deal with this in any of the following ways:
-
Install MongoDB and RabbitMQ on your development workstation. This is annoying in the short term, but quite useful in the long term.
-
Instantiate MongoDB and RabbitMQ servers containers using Docker or Docker Compose. This is a convenient, effective, and simple way to do this.
-
Mock the libraries for MongoDB, RabbitMQ and other dependencies. This is similar to what we did in chapter 8. You’ll probably want to do this for your automated testing.
9.5.2 Booting the application
Now let’s boot the entire FlixTube application using Docker Compose, the useful tool we first encountered in chapter 4 and have used since. Frequently, during day-to-day product development, we’ll build and restart our application, and Docker Compose makes this much simpler. Often, we’ll take time out to focus on an individual microservice, but we’ll still frequently want to test our larger application while we evolve its constituent microservices.
If you followed along in chapters 4, 5, and 8, you will already have Docker Compose installed. If not, refer back to section 4.3.2 and install it so you can follow along. You should now open the example-1 subdirectory from chapter 9 in VS Code to see the code for yourself.
Listing 9.1 reminds us of what a Docker Compose file (docker-compose.yaml) looks like. FlixTube’s version of this file is the biggest in this book, so listing 9.1 has been abbreviated for brevity. Most entries in this file are similar, so these can be safely omitted. If you’ve seen one, you’ve basically seen them all.
Listing 9.1 The Docker Compose file for booting FlixTube in development (abbreviated from chapter-9/example-1/docker-compose.yaml)
version: '3'
services:
  db:                                    ①
    image: mongo:4.2.0
    container_name: db
    # ... code omitted for brevity ...

  rabbit:                               ②
    image: rabbitmq:3.8.1-management
    container_name: rabbit
    # ... code omitted ...
  db-fixture-rest-api:                  ③
    image: db-fixture-rest-api
    build:
      context: ./db-fixture-rest-api
      dockerfile: Dockerfile
    container_name: db-fixture-rest-api
    # ... code omitted ...
  video-streaming:                      ④
    image: video-streaming
    build:
      context: ./video-streaming
      dockerfile: Dockerfile-dev
    container_name: video-streaming
    # ... code omitted ...
  # ... other microservices omitted     ⑤
① Starts the container for the MongoDB database
② Starts the container for the RabbitMQ server
③ Starts the REST API for loading database fixtures
④ Builds and starts the video-streaming microservice
⑤ All the other FlixTube microservices go here.
Most FlixTube microservices have been omitted from listing 9.1, but one you can see is our old friend, the video-streaming microservice. There is also the setup for our database (covered in chapter 4), RabbitMQ (covered in chapter 5), and the database fixtures REST API we will use in our automated testing (covered in chapter 8). Now use Docker Compose to build and start FlixTube:
cd example-1
docker-compose up --build
It takes some time to build and start, especially if you haven’t done this before. Docker needs to download and cache the base images.
Now, with the FlixTube application running, open your browser and navigate to http://localhost:4000 to see FlixTube’s main page. You’ll notice FlixTube has a shiny new user interface (UI)! We’ll talk more about that soon. For now, take some time to explore FlixTube’s UI:
When you have finished development, don’t forget to shutdown FlixTube so that it’s not continuing to consume resources on your development workstation. You can do that by pressing Ctrl-C in the terminal where Docker Compose is running and by then invoking
docker-compose down
9.6 Testing FlixTube in development
Testing is essential to the practice of development. We can and should do manual testing, but nothing beats automated testing for efficiency, reliability, and repeatability.
In chapter 8, we looked at multiple ways of testing using Jest and Cypress. We’ll revisit those again here. The various tests that we looked at in that chapter are repeated here in the chapter 9 code repo. We’ll run those now against the completed FlixTube example.
Of course, any real application will have many more tests than the few we are running here. This is just a demonstration, and I haven’t aimed for anything near complete test coverage. Follow along in the coming sections, and try running these tests for yourself.
9.6.1 Testing a microservice with Jest
The metadata microservice in FlixTube includes the Jest unit tests from chapter 8. Before running the tests, you’ll need to install dependencies:
cd chapter-9/example-1/metadata
npm install
Now run the tests using the standard npm test script convention as follows:
npm test
This executes the associated command line in the metadata microservice’s package .json file that we configured in chapter 8. Figure 9.6 shows the results of a successful test run.
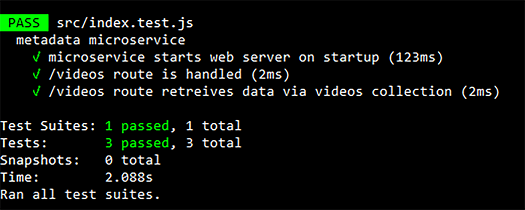
Figure 9.6 A successful run of the automated tests for the metadata microservice using Jest
You can also run the tests in live reload mode, which means you can edit your code, and the tests will restart automatically. We do this using another npm script called test:watch (my own personal convention):
npm run test:watch
To revise Jest in more detail, return to section 8.5. To revisit the Jest setup for npm and live reload, see section 8.5.8.
9.6.2 Testing the application with Cypress
We can also run the Cypress end-to-end test from chapter 8 against the FlixTube application. In chapter 8, we ran this test against a cutdown version of FlixTube. Here though, we run it against the full application. To run this test, you’ll need to install dependencies for the FlixTube project:
cd chapter-9/example-1
npm install
Be sure to actually start the application if you haven’t done so already:
docker-compose up --build
Now, run the regular npm test script, which in this case is configured to invoke Cypress:
npm test
That runs Cypress from the terminal in headless mode. During development, we’ll want to bring up the Cypress UI, as shown in figure 9.7. In this case, we’ll use the test:watch script that we configured to start the Cypress UI:
npm run test:watch

Figure 9.7 A successful test run of the automated tests for the FlixTube UI using Cypress
With the Cypress UI running, we can make code changes that affect our front end and see the results in a very visual way. To revise Cypress in more detail, return to section 8.8. To revisit Cypress setup for npm, go to section 8.8.7.
9.7 FlixTube deep dive
By now, you should understand FlixTube from a high level. You know the microservices and the purposes of each. You know how to build, run, and test the application on your development workstation. Before we deploy FlixTube to production, let’s first understand some of its deeper details. Throughout this section, we’ll look at various aspects of FlixTube:
9.7.1 Database fixtures
We first talked about database fixtures in chapter 8, where we used these to load our database with realistic sets of data prior to running automated tests. We saw database fixtures used for automated testing, but these are also useful for manual testing and even for product demonstrations. Being able to boot your application and have it ready to show, complete with realistic data, is extremely useful!
When unit testing with Jest, we didn’t need any data because we mocked the MongoDB database library and were able to replace real data with fake data provided through the mock version of the database library. When integration testing with Jest, we were able to interact with our MongoDB database within our test code by directly using the MongoDB library. This meant we could have test data inline in our test code, but it was convenient not to have to create separate data files for it.
When doing end-to-end testing with Cypress, we had to find a different solution. Because Cypress tests run in the browser (Cypress is built on Electron, which is based on Chrome), we don’t have access to the MongoDB library (which only runs under Node.js). In this case, we don’t have direct access to manipulate our MongoDB database.
To solve this problem, I created the database fixtures REST API. This is a REST API that looks similar to any of the other microservices you have seen in this book. We won’t look at its code directly, but if you’d like to look at it yourself, you’ll find that it’s already quite familiar. The code for the REST API is included in the chapter 8 code repository and copied to the chapter 9 code repository so that we can use it when running our tests against FlixTube. Additionally, you can find the original source code for it on GitHub at https://github.com/ashleydavis/db-fixture-rest-api. You can see the setup for the REST API’s container in the Docker Compose file earlier in listing 9.1.
For an understanding of what a database fixture looks like, see listing 9.2. In general, our database fixtures are stored under the fixtures subdirectory of chapter-9/ example-1.
FlixTube only has one database fixture in the file videos.js (shown in listing 9.2). The name of the file denotes the database collection that the data will be stored in. The data from this fixture will be loaded into the videos collection.
The directory that contains the file denotes the name of the fixture. In this case, the name of the directory is two-videos, so the name of the database fixture is two-videos. I’ve given the fixture this name because its purpose is to load metadata for two videos into our database. In general, we should give meaningful names to our database fixtures so that we can easily remember their purpose.
Each database fixture can consist of many files. Even though here we only have one file for our two-videos fixture, it could have more such files to set the contents of other collections in our database.
Listing 9.2 An example database fixture for FlixTube (chapter-9/example-1/fixtures/two-videos/videos.js)
const mongodb = require("mongodb");                       ①
module.exports = [                                        ②
    {
        _id:
        ➥ mongodb.ObjectId("5ea234a1c34230004592eb32"),  ③
        name: "SampleVideo_1280x720_1mb.mp4"              ④
    },
    {
        _id:
        ➥ mongodb.ObjectId("5ea234a5c34230004592eb33"),  ③
        name: "Another video.mp4"                         ④
    }
];
① Imports the MongoDB library so we can create database IDs
② Exports the data that’s inserted into the videos collection of the metadata database
③ Creates database IDs for new records
④ Sets the filenames for the videos
If you ran the Cypress test earlier in section 9.6.2, then you have already used this database fixture! Note that the fixture shown in listing 9.2 is actually a JavaScript file. We can use either JSON format or JavaScript for these database fixtures. JSON is appropriate for static data, but JavaScript is a great option for generating dynamic data. That gives us a lot of flexibility for producing test data. In listing 9.2, see how we use the MongoDB library to produce database IDs for our test data.
9.7.2 Mocking storage
For convenience during development, we replaced the Azure version of the video-storage microservice with a mock version. This is similar to the mocking we used in section 8.5.10. Except, rather than replacing functions, objects, and libraries with mock versions, we now replace an entire microservice with a fake version. Figure 9.8 shows what FlixTube looks like when Azure storage has been replaced by the mock storage microservice.
Our mock storage microservice is not a complete fake though! It still does the job of storage, but instead of using cloud storage, it stores videos in the local filesystem. The main reason we do this is not just for testing; it’s for the convenience and performance of being able to limit our entire application to our development workstation.
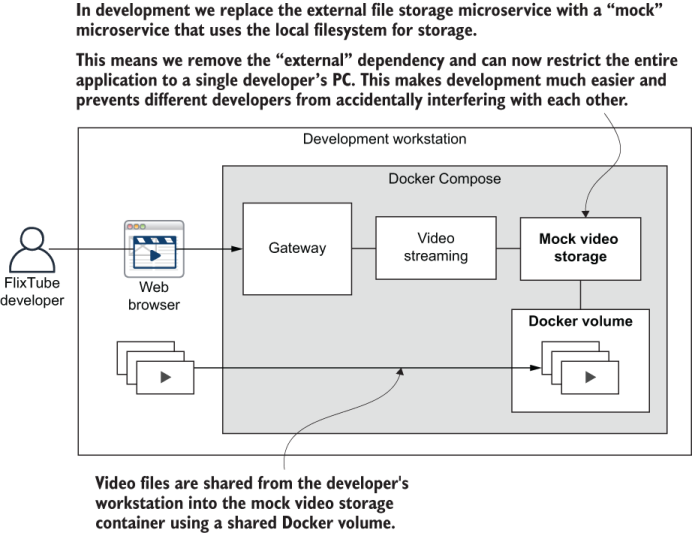
Figure 9.8 Replacing cloud storage with a mock microservice for more convenient and efficient use during development
When running in development, we’d prefer to eliminate external dependencies like connections to cloud storage. In this case, limiting our storage to the local filesystem makes the setup for development easier. Performance is improved because videos are stored locally and not sent out to the cloud. Besides this change, FlixTube works as normal, and the other microservices have no idea that the Azure storage microservice has been kicked out and replaced with a mock version.
Being able to replace complex microservices with simpler mock versions is not just convenient, it might also be necessary at some point in the future. Right now, FlixTube is a small application, but you can imagine as it grows into the world-dominating streaming service it is destined to be that it will become too big to run on a single computer.
At that point, we need to use every trick in the book to make it fit. This includes cutting out microservices that we don’t need; for example, you could remove the history microservice from the Docker Compose file if you don’t need to test it.
Note Removing or replacing big complex microservices-possibly even whole groups of microservices-is an important technique for reducing the size of our application so that it can fit on a single computer and be able to run during development.
Listing 9.3 shows the setup of our mock storage microservice in FlixTube’s Docker Compose file. It looks similar to the configuration of the Azure storage microservice. One thing that’s different is the storage subdirectory that is shared between the host operating system and the container. This is the directory where uploaded videos are stored. Sharing it like this means that we can inspect uploaded videos ourselves on the host OS to test that the microservice is functioning correctly.
Listing 9.3 Mock storage microservice setup in the Docker Compose file (extract from chapter-9/example-1/docker-compose.yaml)
  video-storage:                        ①
    image: mock-storage
    build:
      context: ./mock-storage           ②
      dockerfile: Dockerfile-dev
    container_name: video-storage
    volumes:
      - /tmp/mock-storage/npm-cache:/root/.npm:z
      - ./mock-storage/src:/usr/src/app/src:z
      - ./mock-storage/storage:
      ➥ /usr/src/app/storage:z         ③
    ports:
     - "4005:80"
    environment:
      - PORT=80
    restart: "no"
① Sets the DNS name as video-storage. (The other microservices don’t know that the Azure storage microservice has been replaced with a mock version.)
② Instead of building the container from the azure-storage subdirectory, we build the mock version from the mock-storage subdirectory.
③ Shares the storage directory between the host OS and the container and stores the videos in this directory. You can inspect them from the host to ensure the mock storage microservice works correctly.
It’s a great option for development to be able to replace microservices with mocks. It can help make development easier, but there are times when we need to focus on the real version of the microservice; we need to test it rather than the mock version. At those times, we can simply swap the mock version for the real version in the Docker Compose file. If you like, you can try this for yourself.
Listing 9.4 shows the commented out configuration for the real storage microservice. Simply uncomment this and then comment out the configuration for the mock version. Now rebuild and restart your application. You can now test the real storage microservice in development!
Listing 9.4 The real storage microservice commented out (extract from chapter-9/example-1/docker-compose.yaml)
  # video-storage:                     ①
  #   image: azure-storage             ①
  #   build:                           ①
  #     context: ./azure-storage       ①
  #     dockerfile: Dockerfile-dev     ①
  #   container_name: video-storage    ①
  #   ... code omitted for brevity ... ①
① Uncomment this to include the Azure storage microservice in the application during development. To make this work, you must then comment out the mock storage microservice (shown in listing 9.3), effectively replacing it with the real one.
Listing 9.5 shows the code for the mock storage microservice. The mock version replaces the /video and /upload routes from the real storage microservice with versions that use the local filesystem. The mock microservice is a drop-in replacement because its REST API conforms to the interface of the real microservice.
Listing 9.5 The mock storage microservice (extract from chapter-9/example-1/mock-storage/src/index.js)
const express = require("express");
const fs = require("fs");
const path = require("path");
const app = express();
const storagePath =
➥ path.join(__dirname, "../storage");                      ①
app.get("/video", (req, res) => {                           ②
    const videoId = req.query.id;
    const localFilePath = path.join(storagePath, videoId);
    res.sendFile(localFilePath);                            ③
});
app.post("/upload", (req, res) => {                         ④
    const videoId = req.headers.id;
    const localFilePath = path.join(storagePath, videoId);
    const fileWriteStream =
    ➥ fs.createWriteStream(localFilePath);
    req.pipe(fileWriteStream)                               ⑤
        .on("error", err => {
            console.error("Upload failed.");
            console.error(err && err.stack || err);
        })
        .on("finish", () => {
            res.sendStatus(200);
        });                                                 ⑤
});
const port = process.env.PORT && parseInt(process.env.PORT) || 3000;
app.listen(port, () => {
    console.log(`Microservice online`);
});
① Sets the path for storing videos in the local filesystem
② HTTP GET route handler that streams a video from storage
③ Sends the local file directly as a response to the HTTP request
④ HTTP POST route handler that uploads a video to storage
⑤ Streams the body of the incoming HTTP request (the uploaded file) into a local file
9.7.3 The gateway
FlixTube has a single gateway microservice. It’s called a gateway because it acts as a gateway into the application for our users. For the current version of FlixTube, this is the single entry point to the whole application. The gateway provides the front-end UI that allows our users to interact with FlixTube in their web browser. It also provides a REST API so the front end can interact with the backend.
FlixTube doesn’t support any kind of authentication yet, but in the future, we’d probably like to upgrade the gateway to authenticate our users. A FlixTube user would have to sign in before the gateway allows them to interact with the backend.
Figure 9.9 shows a potential future for FlixTube with more than one gateway. This illustrates a well-known pattern called backends for front ends. Each front end has its own gateway. There is one gateway for access by a web browser; another gateway for access by a mobile app; and another gateway for the FlixTube admin portal.
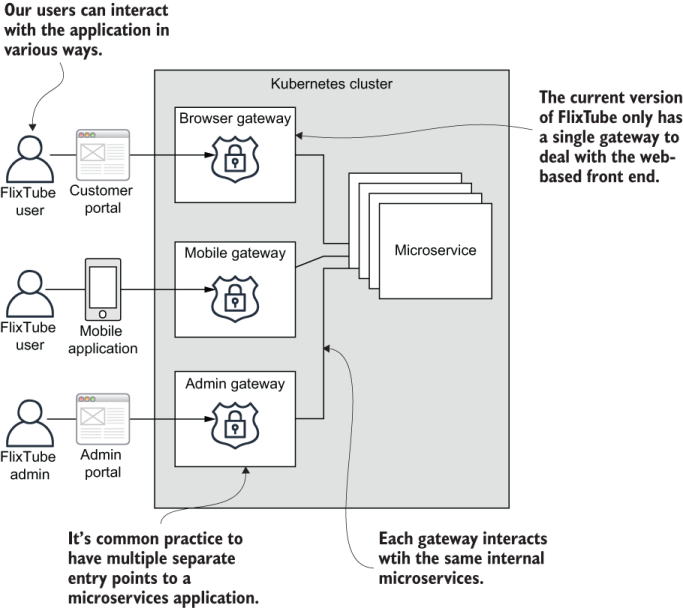
Figure 9.9 What FlixTube would look like with multiple gateways
If possible, we’d want to keep things simple and to support only a single gateway. It’s completely OK to share a gateway across multiple types of front ends. But if we find our front ends having different requirements (for instance, different forms of authentication between web and mobile or different security considerations between the web and admin portals), then backends for front ends is a pattern that can help.
If we do expand to have multiple gateways, we’d then want to use separate hostnames or subdomains to access them. For example, the main gateway for the browser could use flixtube.com, the mobile gateway using mobile.flixtube.com, and the admin portal using admin.flixtube.com. To assign domain names to your application, you’ll need to use a DNS provider to buy domain names and configure each one to point to the IP address of a particular gateway microservice.
Forwarding HTTP requests into the cluster is one of the main jobs of a gateway microservice. We’ll see code examples of this in upcoming sections. A more advanced gateway (FlixTube isn’t this advanced yet) will have REST API routes that issue requests to multiple internal microservices. Then it will integrate multiple responses into a single response that is returned to the front end.
For example, imagine a REST API that retrieves an individual user’s history. This might require HTTP requests to a user account microservice (FlixTube doesn’t have this yet) and the history microservice before integrating a response and sending it to the front end. In this theoretical example, the gateway has merged the responses of both HTTP requests.
9.7.4 The user interface (UI)
If you haven’t had a chance to explore FlixTube’s UI, do so now. Build and start the application as discussed in section 9.5.2, then navigate your web browser to http:// localhost:4000.
Figure 9.10 shows the main page of FlixTube (the video list) after some videos have been uploaded to it. We can click any video in the list to watch it. We can click between Videos, Upload, and History, in the navigation bar at the top to switch among the main pages.
FlixTube is implemented as a traditional server-rendered web page, rather than as a modern single-page application (an SPA) rendered in the browser. If FlixTube were a real commercial application, it would most likely be coded as an SPA using React, Angular, or Vue.
FlixTube uses server-side rendering via Express and the Handlebars template engine with vanilla JavaScript in the front end. The FlixTube front end is plain old HTML, CSS, and JavaScript with no fancy modern frameworks.
Why not use one of the popular modern SPA frameworks? Well, the simple reason is that it’s outside the scope of this book. This book isn’t about UIs and that’s why the front end is as simple as it can be. (Besides that, I didn’t want to choose sides and stoke the war between the SPA framework disciples, but all the cool kids use React, right?).

Figure 9.10 The main page of the FlixTube UI shows the list of videos that have been uploaded.
Listing 9.6 is an extract from the gateway microservice’s main code file. It shows the HTTP GET route that renders the main page. The main page shows the list of uploaded videos. This route handler starts by requesting data from the metadata microservice. We then render the web page using the video-list template and input the list of videos as the template’s data.
Listing 9.6 The gateway code that renders the video list web page (extract from chapter-9/example-1/gateway/src/index.js)
app.get("/", (req, res) => {                                 ①
    http.request(                                            ②
        {
            host: `metadata`,
            path: `/videos`,
            method: `GET`,
        },
        (response) => {
            let data = "";
            response.on("data", chunk => {
                data += chunk;
            });
            response.on("end", () => {
                res.render("video-list", {
                 ➥ videos: JSON.parse(data).videos });       ③
            });
            response.on("error", err => {
                console.error("Failed to get video list.");
                console.error(err || `Status code:
                ➥ {response.statusCode}`);
                res.sendStatus(500);
            });
        }
    ).end();                                                 ②
});
① Declares a HTTP GET route handler that retrieves the main web page and shows the list of uploaded videos
② Makes a HTTP request to the metadata service to get the list of videos
③ Renders a web page using the video-list template (listing 9.8 shows the template). We pass the array of videos in as the data for rendering the template.
The code to make the HTTP request in listing 9.6 is using the built-in Node.js http.request function, so it’s quite verbose. After seeing Axios in chapter 8, you might wonder why I haven’t used it instead.
Axios is a fantastic modern library and I highly recommend it! It is simple to use, quite flexible, and it works well with the new async and await keywords in Java-Script. The reason it’s not used in this chapter is that it’s easier to control the built-in libraries as a Node.js stream, which we aren’t using just yet, but you will see examples of that soon.
I didn’t use a JavaScript framework for FlixTube, but I did use a CSS framework (Tailwind CSS). That’s so that I could make a nice UI without having to mess about with the nuts and bolts of CSS.
Listing 9.7 shows the main page of FlixTube. This is a HTML document contained within a Handlebars template. Handlebars is a simple and powerful template library that we can use to generate web pages based on data. If you look back to listing 9.6, you’ll see that the list of videos is passed as the template data. Now in listing 9.7, you can see that we are generating a sequence of HTML div elements from this template data.
When the web browser requests the main page, the gateway microservice requests the data from the metadata microservice. From that data, it renders the HTML to display to the user in their web browser.
Listing 9.7 The Handlebars template for the video list web page (chapter-9/example-1/gateway/src/views/video-list.hbs)
<!doctype html>                                                   ①
<html lang="en">
    <head>
        <meta charset="utf-8">
        <title>FlixTube: Home</title>
        <link rel="stylesheet"
        ➥ href="css/tailwind.min.css">                           ②
        <link rel="stylesheet" href="css/app.css">                ③
    </head>
    <body>
        <div class="flex flex-col">
            <div class="border-b-2 bg-gray-100">                  ④
                <div class="nav flex flex-row items-center mt-1 p-2">
                    <div class="text-xl font-bold">
                        FlixTube
                    </div>
                    <div class="ml-16 border-b-2 border-blue-600">
                        <a href="/">Videos</a>
                    </div>
                    <div class="ml-4">
                        <a href="/upload">Upload</a>
                    </div>
                    <div class="ml-4">
                        <a href="/history">History</a>
                    </div>
                </div>
            </div>                                                ④
            <div class="m-4">                                     ⑤
                <h1>Videos</h1>
                <div id="video-list" class="m-4">                 ⑥
                    {{#if videos}}                                ⑦
                        {{#each videos}}                          ⑦
                            <div class="mt-1">                    ⑧
                                <a href="/video?id={{this._id}}">
                                ➥ {{this.name}}</a>              ⑨
                            </div>                                ⑧
                        {{/each}}
                    {{else}}
                        No videos uploaded yet.                   ⑩
                    {{/if}}
                </div>
            </div>
        </div>
    </body>
</html>
② Includes Tailwind CSS. Using a CSS framework makes CSS much easier to deal with!
③ Includes FlixTube-specific CSS
④ Renders a navigation bar at the top of the web page
⑤ The main content for the web page
⑥ Container for the list of videos
⑦ Handlebars syntax for rendering the template from data
⑧ This element is repeatedly rendered for each video.
⑨ Renders a link to the video from the template data
⑩ Displays a message before uploading videos
9.7.5 Video streaming
At the heart of FlixTube is video streaming. We first looked at this back in chapter 2, and it’s been a theme throughout the book. Now, it’s time to see how video streaming works in the completed FlixTube example application. Some of this will be revision, but it’s important to see how it works in the bigger context now that we have the gateway microservice and the UI.
Figure 9.11 illustrates the path of a streaming video, starting with external cloud storage on the left and ending with display to the user in the web browser on the right. The streaming video passes through three microservices on its journey to the user. Let’s now follow that journey through the code.
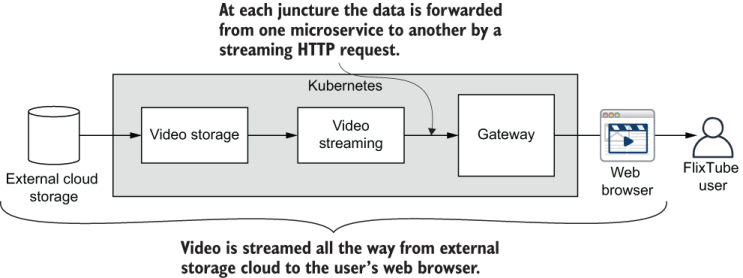
Figure 9.11 The path of streaming video through FlixTube
Listing 9.8 is an extract that shows where the streaming video journey starts in the Azure version of the video-storage microservice. The HTTP GET /video route retrieves a video from Azure storage and streams it to the HTTP response. The details of how this works aren’t important at the moment, but if you’d like to know, see section 4.4.1.
Listing 9.8 Streaming video from Azure storage (extract from chapter-9/example-1/azure-storage/src/index.js)
app.get("/video", (req, res) => {                      ①
    const videoId = req.query.id;                      ②

    const blobService = createBlobService();
    streamVideoFromAzure(blobService, videoId, res)    ③
        .catch(err => {                                ④
            // ... error reporting omitted ...
            res.sendStatus(500);
        });                                            ④
});
① The HTTP GET route handler retrieves streaming video from the video-storage microservice.
② Inputs the ID of the video to be retrieved as a HTTP query parameter
③ Streams the video from Azure storage to the HTTP response
④ Handles any errors that might occur
Continuing our journey to the video-streaming microservice, listing 9.9 is an extract showing how the HTTP GET /video route pipes the streaming video from video storage to its own HTTP response using Node.js streams.
The video-streaming microservice also has another job. It broadcasts the “video viewed” message to other microservices in the application. This kind of event-driven programming means that we can later decide to have other microservices respond to the event without us having to update the code for the video-streaming microservice.
As it stands, you might remember from section 5.8 in chapter 5, it is the history microservice that picks up this message and uses it to record the user’s viewing history. This use of indirect messaging keeps the video-streaming and history microservices nicely decoupled from each other. It also highlights one of the reasons why microservices applications are so flexible and extensible.
Listing 9.9 Forwarding streaming video through the video-streaming microservice (extract from chapter-9/example-1/video-streaming/src/index.js)
app.get("/video", (req, res) => {                          ①
    const videoId = req.query.id;
    const forwardRequest = http.request(                   ②
        {
            host: `video-storage`,
            path: `/video?id=${videoId}`,
            method: 'GET',
            headers: req.headers,
        },
        forwardResponse => {
            res.writeHeader(forwardResponse.statusCode,
            ➥ forwardResponse.headers);
            forwardResponse.pipe(res);                     ③
        }
    );

    req.pipe(forwardRequest);                              ②
    broadcastViewedMessage(messageChannel, videoId);       ④
});
① Defines a HTTP GET route handler that retrieves streaming video from the video-streaming microservice
② Forwards the HTTP GET request to the video-storage microservice
③ Pipes the response (using Node.js streams) from the video-storage microservice to the response for this request
④ Broadcasts the video viewed message for other microservices to know that the user is watching a video
Our video streaming journey continues to the gateway microservice, the last stop before the UI. The HTTP GET /video route in listing 9.10 pipes the streaming video from the video-streaming microservice to its own HTTP response. This is where the video leaves the cluster, thus delivering the video to the front end.
Listing 9.10 Forwarding streaming video through the gateway microservice (extractfrom chapter-9/example-1/gateway/src/index.js)+
app.get("/api/video", (req, res) => {             ①

    const forwardRequest = http.request(          ②
        {
            host: `video-streaming`,
            path: `/video?id=${req.query.id}`,
            method: 'GET',
        },
        forwardResponse => {
            res.writeHeader(forwardResponse.statusCode,
                    ➥ forwardResponse.headers);
            forwardResponse.pipe(res);            ③
        }
    );

    req.pipe(forwardRequest);                     ②
});
① Defines a HTTP GET route handler that retrieves streaming video from the gateway microservice
② Forwards the HTTP GET request to the video-streaming microservice
③ Pipes the response (using Node.js streams) from the video-streaming microservice to the response for this request
Our video-streaming journey concludes in the UI. You can see the HTML video element in listing 9.11. The source element and its src field triggers the HTTP GET request to the gateway, which triggers the request to video streaming, which triggers the request to video storage. The streaming video is then piped all the way back through video storage, through video streaming, through the gateway, and finally, displayed to the user through the video element in their web browser.
Listing 9.11 Playing the video in the front end with the HTML video element (extract from chapter-9/example-1/gateway/src/views/play-video.hbs)
<video controls autoplay muted>                       ①
    <source src={{video.url}} type="video/mp4">       ②
    Your browser does not support the video tag.
</video>
① Uses the HTML video element to display streaming video in the front end
② Links to the /api/video route in the gateway microservice to retrieve streaming video for display in the video element
9.7.6 Video upload
Video streaming is just one side of the FlixTube equation. The other is video upload, which is how we add videos to FlixTube in the first place. Video upload isn’t something we have yet seen in the book, although, it’s similar to how video streaming works, so you won’t have any trouble with it.
Figure 9.12 illustrates the path of video upload through the application. A video file is selected by the user and uploaded from the FlixTube front end. The uploaded video arrives in the cluster at the gateway microservice before being forwarded through the video upload microservice to the video-storage microservice. There it is safely secured in the external cloud storage. Again we’ll follow this journey through the code.
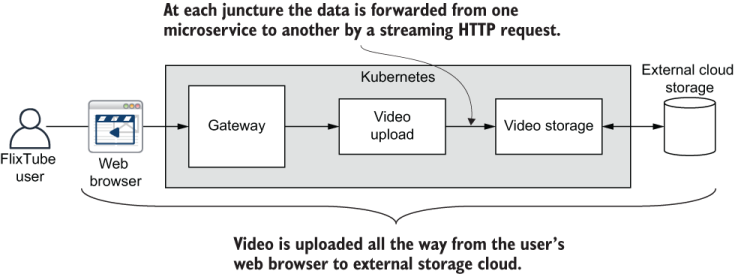
Figure 9.12 The path of a video upload through FlixTube.
Figure 9.13 is a screenshot of FlixTube’s Upload web page. If you followed along in section 9.5.2, you will have already seen this and tried uploading a video. The user clicks Choose File and selects a file to upload. Once the upload completes, the UI is updated (as seen in figure 9.13) to give some feedback that the upload completed without error. If an error occurs, the error is displayed instead.
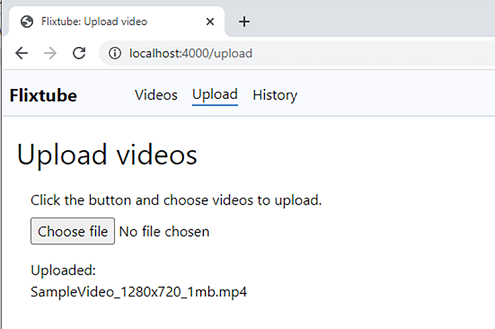
Figure 9.13 The FlixTube UI for uploading videos
Listing 9.12 is a snippet of the front-end code that uploads the video to the backend. This is using the fetch function to upload the video via a HTTP POST request. At this point, you might rightly be thinking why are we using yet another HTTP request library?
Well, normally, we would use something like the Axios library in the front end. However, this is a vanilla JavaScript web page with no build process. That makes it rather difficult to install an npm package like Axios and use it in our front-end JavaScript code; we don’t have a way to bundle it into our front end.
The simplest approach that remains is to use something that comes with the browser to make the HTTP request. We could do this using the good old XMLHttpRequest, but that’s kind of complicated. Instead, we’ll use the more modern fetch function, which is also significantly simpler to use. Unfortunately, fetch isn’t implemented in older versions of web browsers, and that may impact our user base. Fortunately, we only use it here in place of not being able to use Axios.
Listing 9.12 Using fetch to upload videos in the front-end code (extract from chapter-9/example-1/gateway/public/js/upload.js)
fetch("/api/upload", {                                ①
        body: file,                                   ②
        method: "POST",                               ③
        headers: {                                    ④
            "File-Name": file.name,
            "Content-Type": file.type,
        },                                            ④
    })
    .then(() => {
        // ... Update the UI after the upload ...     ⑤
    })
    .catch((err) => {
        // ... Handle the upload error ...            ⑥
    });
① Uses the browser’s “fetch” function to make a HTTP request to the /api/video route
② Sets the file to upload as the body of the HTTP request
③ Sets the HTTP method to POST
④ Stores the filename and mime type in the request headers
⑤ Executes after the request is successful
⑥ Executes if the request fails
After the upload from the web browser, the HTTP POST request lands in the gateway where it is handled by the /api/upload route shown in the following listing. Here we see the request forwarded to the video-upload microservice.
Listing 9.13 The gateway microservice forwards the HTTP POST to the video-upload microservice (extract from chapter-9/example-1/gateway/src/index.js)
app.post("/api/upload", (req, res) => {        ①
    const forwardRequest = http.request(       ②
        {
            host: `video-upload`,
            path: `/upload`,
            method: 'POST',
            headers: req.headers,
        },
        forwardResponse => {
            res.writeHeader(forwardResponse.statusCode,
            ➥ forwardResponse.headers);
            forwardResponse.pipe(res);         ③
        }
    );

    req.pipe(forwardRequest);                  ④
});
① Defines a HTTP POST route handler that uploads a video to the gateway microservice
② Forwards the request to the video-upload microservice
③ Pipes the response (using Node.js streams) from the video-upload microservice to the response for this request
④ Pipes the request itself (the body of the request is the video) to another request
Listing 9.14 shows how the video-upload microservice handles the incoming video. At this point, we create a unique ID for the video by creating an instance of MongoDB’s ObjectId class. The request is then forwarded to the video-storage microservice.
After the upload is successful, the message “video uploaded” is broadcast to let the other microservice services know that a new video is available within the system. The metadata microservice handles this message and records the new video in its database.
Listing 9.14 Handling video upload via HTTP POST (extract from chapter-9/example-1/video-upload/src/index.js)
app.post("/upload", (req, res) => {                   ①
    const fileName = req.headers["file-name"];        ②
    const videoId = new mongodb.ObjectId();           ③
    const newHeaders = Object.assign({}, req.headers,
    ➥ { id: videoId });                              ④
    streamToHttpPost(req, `video-storage`,
    ➥ `/upload`, newHeaders)                         ⑤
        .then(() => {
            res.sendStatus(200);                      ⑥
        })
        .then(() => {
            // Broadcast message to the world.
            broadcastVideoUploadedMessage(            ⑦
                /* params omitted */
            );
        })
        .catch(err => {
            console.error(`Failed to capture uploaded file ${fileName}.`);
            console.error(err);
            console.error(err.stack);
        });
});
① Defines a HTTP POST route handler that uploads a video to the video-upload microservice
② Extracts the original filename from the request header
③ Creates a unique ID for the new video
④ Adds the video ID to the headers
⑤ Forwards the HTTP request to the video-storage microservice
⑥ Successfully captures the video for the video-storage microservice. This is the most important thing; we can’t lose our user’s data!
⑦ Broadcasts the video uploaded message so that other microservices know a new video has uploaded.
Finally, the uploaded video arrives in the video-storage microservice, which you can see in listing 9.15. From here the video is saved into Azure storage. Once this whole chain has completed, we have successfully saved a copy of the video the user has uploaded. If you’d like to dive deeper into how a file is added to Azure storage, load the full index.js for the video-storage microservice into VS Code.
Listing 9.15 Streaming the video from HTTP POST to Azure Storage (extract from chapter-9/example-1/azure-storage/src/index.js)
app.post("/upload", (req, res) => {                ①
    const videoId = req.headers.id;                ②
    const mimeType = req.headers["content-type"];  ②
    const blobService = createBlobService();
    uploadStreamToAzure(req, mimeType,
    ➥ videoId, blobService)                       ③
        .then(() => {
            res.sendStatus(200);                   ④
        })
        .catch(err => {
            // ... error reporting omitted ...
            res.sendStatus(500);                   ⑤
        });
});
① HTTP POST route handler that uploads a video to Azure Storage
② Extracts video details from the request headers
③ Streams the video from the HTTP request to Azure Storage
④ Indicates a successful upload
⑤ Indicates that the upload failed
9.8 Manually deploying FlixTube to production with Terraform
If you already have FlixTube up and running in development, that’s a huge step! In order to make FlixTube available for use by the general public, we now must deploy it to production using the same tools and techniques that we used previously in chapters 6 and 7.
These next two sections are the most challenging in this chapter, but if you can follow along and get through these, it’s going to be a great experience for you. If at any time it seems too difficult, feel free to go back and revisit chapters 6 and 7, which have more detailed instructions.
Ultimately, we aim to have a CD pipeline for FlixTube that automatically deploys to production whenever we push updated code to our hosted code repository. Before we get to that though, we must first manually deploy FlixTube. Here’s why:
-
When first developing your deployment scripts, you’ll do so incrementally. As you evolve your deployment scripts, you’ll need a way to test these, get feedback, and fix issues.
-
In the future, if you discover issues in your CD pipeline, you’ll need to have the skills to run deployment scripts in development. This is necessary so that you can figure out and fix problems.
Figure 9.14 highlights what we’ll do. We’ll use Terraform to create our infrastructure in the cloud. We’ll then use Docker to package and publish our images, and we’ll use Terraform to deploy containers to our Kubernetes cluster.
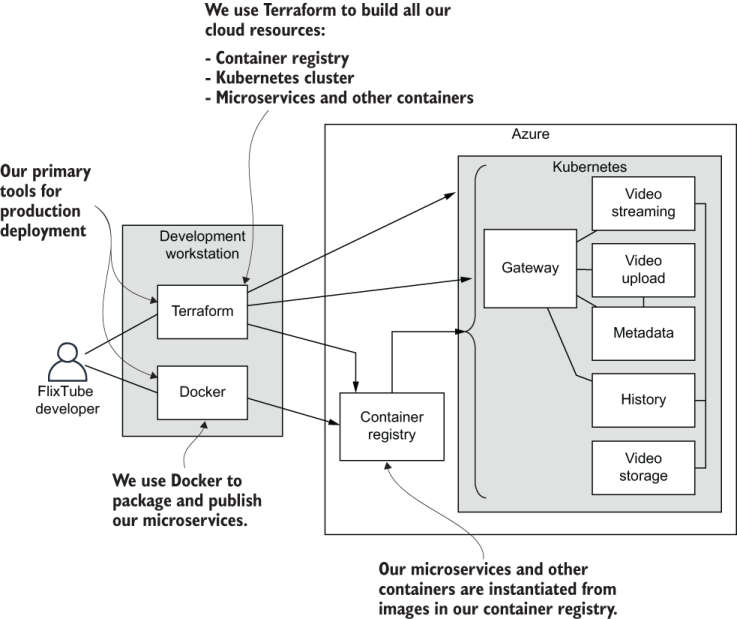
Figure 9.14 Using Terraform to manually deploy FlixTube from the development workstation to production
9.8.1 The Terraform scripts structure
Figure 9.15 shows the layout of the scripts directory for FlixTube. You’ll recognize some of the code files here from chapters 6 and 7, but there are also some that are new.
Notably, we now see our first use of a Terraform module. The file main.tf in the modules/microservice directory is a reusable Terraform code module. We can use it to deploy all of our microservice without having to repeat this code. We’ll look at the code for this module in a moment.
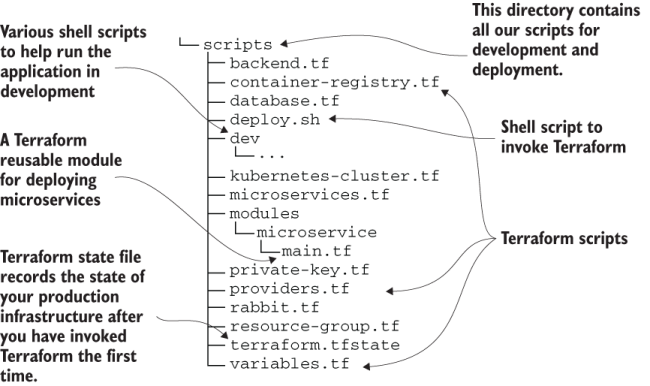
Figure 9.15 The scripts subdirectory contains the Terraform scripts to deploy FlixTube to production
9.8.2 Prerequisites
To deploy FlixTube, you’ll need a few tools installed. You’ll already have these if you followed along in chapters 6 and 7; if not, you can install these now. First, you need the Azure CLI tool. Check if it’s installed like this:
az --version
If you don’t already have the Azure CLI tool, follow the installation instructions here:
https://docs.microsoft.com/en-us/cli/azure/install-azure-cli
You also need Terraform installed. Check if you have it like this:
terraform --version
Otherwise, install the latest version from here:
https://www.terraform.io/downloads.html
9.8.3 Azure authentication
Before deploying infrastructure to Azure, you’ll first need to authenticate with your account. If you followed along in chapters 6 and 7, you have already done this. If not, then refer back to section 6.6.2 for detailed instructions. Use the Azure CLI tool to check which account you are currently using by typing
az account show
Copy the output because you’ll soon need values from the id field (your Azure subscription ID) and the tenantID field.
Note Make sure you are using the right account! It might be embarrassing if you accidentally deploy infrastructure to your work account.
You also need to create a service principal that your Kubernetes cluster uses to interact with your Azure account (for example, when it creates an Azure load balancer for you). If you already have a service principal from chapter 6, you can reuse that now; otherwise, create a new one like this:
az ad sp create-for-rbac --role="Contributor"
➥-scopes="/subscriptions/<subscription-id>"
Be sure to replace <subscription-id> with your actual subscription ID that you noted a moment ago. Then copy the output, which you’ll need soon. The values you’ll need are from appId (which we call client_id in our Terraform script) and password (which we call client_secret) fields. For a more detailed description of creating a service principal, see section 6.11.2.
9.8.4 Configuring storage
To deploy FlixTube to production, you also need an Azure storage account. The Azure storage microservice uses this account to store and retrieve videos. If you followed along in chapter 4, you already have an account, and you can reuse that if you like. Otherwise, follow the instructions in section 4.4.1 to create a storage account.
You’ll need to create a videos container in your storage account. Note that this isn’t a Docker container ; it’s the container concept from Azure storage, a container in which we can store arbitrary files. Make a note of your storage account name and access key. You’ll need these soon.
9.8.5 Deploying the application
Now it’s time to invoke Terraform to evaluate our scripts and deploy FlixTube to production. First, we must initialize Terraform. To do this, initialize Terraform and install the various providers that we need:
cd chapter-9/example-1/scripts
terraform init
Now invoke Terraform to deploy our infrastructure:
terraform apply
Before it begins, you must provide values for the following input variables:
-
app_version—You can just type 1 the first time. For subsequent times that you invoketerraform apply, you should increment this number. -
client_id—The ID of your Azure service principal that you jotted down in section 9.8.3. -
storage_account_name—The name of your Azure storage account for storing videos that you jotted down in section 9.8.4. -
storage_access_key—The access key for your storage account.
Deploying FlixTube will take some time. Feel free to make a cup of tea (or several).
9.8.6 Checking that it works
To check that FlixTube is deployed and functioning, we can load its front end into our web browser. For that, though, we must know its IP address. Just like we did in various sections from chapter 7, we can use the Kubernetes CLI tool to do this:
kubectl get services
To remember how to install and use Kubectl, revisit section 6.12. You can see the tabular output from Kubectl that is shown in figure 9.16. Find the IP address in the EXTERNAL-IP column for the gateway container. Copy the IP address into your web browser.
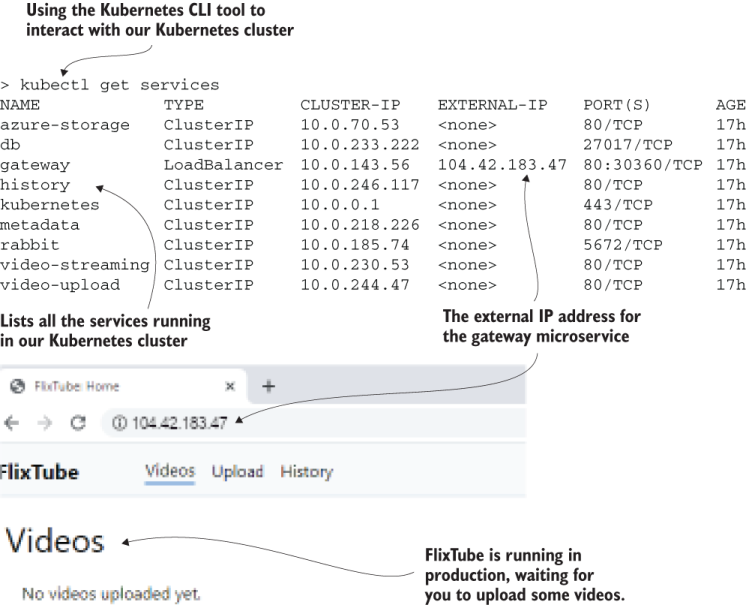
Figure 9.16 Using the Kubernetes command-line tool to get the IP address of the gateway so we can test FlixTube in the browser
You don’t need to use any particular port number. We used port 4000 to access the dev version of FlixTube, but FlixTube in production is configured to use port 80. This is the default port for HTTP (because it’s the default, we don’t need to specify it).
You might have noticed that we are using the HTTP protocol here. That’s why the browser says “Not secure” next to Fixtube’s IP address. For security purposes, we should actually be using (like all modern web servers) the secure version of HTTP, called HTTPS. This stands for Hypertext Transfer Protocol Secure, and we’ll mention it again in chapter 11. If all has gone according to plan, you should now be able to navigate the FlixTube UI to upload and play videos.
At this point, feel free to experiment with FlixTube and Terraform however you like. You can make changes to the FlixTube or Terraform code and then apply your changes using terraform apply. Do this as many times as you like.
9.8.7 Teardown
When you are done with FlixTube, make sure you clean it all up. Running this infrastructure in the cloud will cost you money. If you only just created your Azure account, you’ll be using the free credit that it gives you to try it out, but let’s not waste it. Destroy your infrastructure when you are finished with it:
terraform destroy
9.8.8 Terraform modules
Much of Terraform code in the chapter 9 code repository is the same as that already seen in chapters 6 and 7. However, there’s one new thing that needs further explanation.
Remember the Terraform code to deploy a microservice? If you need a refresher, skim over section 7.6. We could get by with simply repeating that same code over and over for each microservice in FlixTube. But most of the code is the same, so it’s not an efficient way of working. To cope with this, we’ll bring in a more advanced feature of Terraform: Terraform modules.
Terraform modules allow us to write reusable code modules that we can use in different circumstances by supplying different input variables. Listing 9.16 shows the Terraform module that is used to deploy each of FlixTube’s six microservices. This looks, more or less, just like any other Terraform code file.
The listing starts with a Kubernetes deployment that instantiates a microservice into our Kubernetes cluster. It ends with a Kubernetes service that makes the microservice accessible within the cluster via DNS. Note that the type field of the Kubernetes service is parameterized so that we can enable or disable an Azure load balancer for the microservice. You’ll learn more about what a load balancer can do in the next chapter. For now, this is so we can allocate an IP address to the gateway microservices and make it accessible to the outside world. (This is how our customers will interact with our application.)
There’s nothing else particularly special about the Terraform code in listing 9.16, other than it being located in the modules/microservice subdirectory. Note the numerous input variables defined at the start of the listing. These are normal Terraform variables, but in this instance, these are the inputs that allow us to customize the module’s behavior. For example, we can set the name of the microservice through the service_name variable. We must also pass in details of the container registry that hosts the images for the microservices. Another significant variable is env. This allows us to configure the set of environment variables individually for each microservice.
Listing 9.16 A reusable Terraform module deploys a microservice to Kubernetes (abbreviated from chapter-9/example-1/scripts/modules/microservice/main.tf)
variable "app_version" {}                                                   ①
variable "service_name" {}
variable "dns_name" {
    default = ""
}
variable "login_server" {}
variable "username" {}
variable "password" {}
variable "service_type" {
    default = "ClusterIP"
}
variable "session_affinity" {
    default = ""
}
variable "env" {
    default = {}
    type = map(string)
}                                                                           ①
locals {                                                                    ②
    image_tag = "${var.login_server}/${var.service_name}:${var.app_version}"②
}                                                                           ②
# ... much code omitted for brevity ...
resource "kubernetes_deployment"
➥ "service_deployment" {                                                   ③
    depends_on = [ null_resource.docker_push ]
    metadata {
        name = var.service_name                                             ④
    labels = {
            pod = var.service_name
        }
    }
    spec {
        replicas = 1
        selector {
            match_labels = {
                pod = var.service_name
            }
        }
        template {
            metadata {
                labels = {
                    pod = var.service_name
                }
            }
            spec {
                container {
                    image = local.image_tag
                    name  = var.service_name                                ④
                    env {
                        name = "PORT"
                        value = "80"
                    }
                    dynamic "env" {                                         ⑤
                        for_each = var.env
                        content {
                          name = env.key
                          value = env.value
                        }
                    }                                                       ⑤
               }
                image_pull_secrets {
                    name =
                    ➥ kubernetes_secret.docker_credentials.metadata[0].name
                }
            }
        }
resource "kubernetes_service" "service" {                                   ⑥
    metadata {
        name = var.dns_name != ""
        ➥ ? var.dns_name : var.service_name                                ⑦
    }
    spec {
        selector = {
            pod = kubernetes_deployment.service_deployment.metadata[0].labels.pod
        }
        session_affinity = var.session_affinity                             ⑦
        port {
            port        = 80
            target_port = 80
        }
        type             = var.service_type                                 ⑧
① Defines variables that are inputs to this Terraform module
② Defines local variables to use in this module
③ Deploys a container to our Kubernetes cluster
④ Uses variables to customize the configuration of this module for each microservice
⑤ Uses variables to setup environment variables that are specific for each microservice
⑥ Deploys a service that makes the container accessible from other containers via DNS
⑦ Uses variables to customize the configuration of this module for each microservice
⑧ Uses variables to customize the configuration of this module for each microservice
Listing 9.17 shows how we use the Terraform module to deploy our microservices. Only the gateway microservice is shown. The others are omitted because they all look much the same, although, some have different configurations for their environment variables. In the following listing, note how the module is imported, how its source file is specified, and how environment variables are configured.
Listing 9.17 The Terraform microservice module deploys the gateway microservice to Kubernetes (abbreviated from chapter-9/example-1/scripts/microservices.tf)
locals {                                                                     ①
    login_server = azurerm_container_registry.container_registry.login_server①
    username = azurerm_container_registry.container_registry.admin_username  ①
    password = azurerm_container_registry.container_registry.admin_password  ①
    rabbit = "amqp://guest:guest@rabbit:5672"                                ①
    database = "mongodb://db:27017"                                          ①
}                                                                            ①
module "gateway-microservice" {                                            ②
                                                                           ②
    source ="./modules/microservice"                                       ②③
                                                                           ②
    service_name = "gateway"                                               ②④
    service_type = "LoadBalancer"                                          ②④
    session_affinity = "ClientIP"                                          ②④
    login_server = local.login_server                                      ②④
    username = local.username                                              ②④
    password = local.password                                              ②④
    app_version = var.app_version                                          ②④
                                                                           ②
    env = {                                                                ②⑤
        RABBIT: local.rabbit                                               ②⑤
    }                                                                      ②⑤
}                                                                          ②
# ... all other microservices omitted for brevity ...
① Sets local variables for use across this script
② Imports the microservice Terraform module (the one from listing 9.16) to deploy our gateway microservice
③ Specifies the source of the module loaded from the subdirectory ./modules/microservice, which contains the file main.tf (the one from listing 9.16)
④ Sets input variables to configure the microservice module for the gateway microservice
⑤ Configures environment variables that are specific to the individual microservice
Terraform modules are a more advanced feature of Terraform, and there’s still plenty more in Terraform for you to explore. See the end of this chapter for a reference to go deeper into Terraform.
9.9 Continuous delivery to production
After manually deploying FlixTube to production, we are now ready to bring the continuous delivery (CD) pipeline online.
You can follow along, but this can be even more challenging than the previous section, especially if something goes wrong! You might have to go back to manual deployment (what we just did in section 9.7) to figure out the problem.
As we did in chapter 7, we’ll create our CD pipeline with Bitbucket Pipelines. It should be fairly easy for you to transfer this over to any other CD platform. Like I said in chapter 7, a CD pipeline is really just a glorified shell script, even when some providers also give you a fancy UI.
Porting your deployment shell script from one provider to another isn’t difficult. However, Bitbucket is good value because it provides a free tier. It’s worthwhile following the instructions here to practice getting this working before you try taking it to a different CD provider. Figure 9.17 illustrates the structure of FlixTube’s CD pipeline.
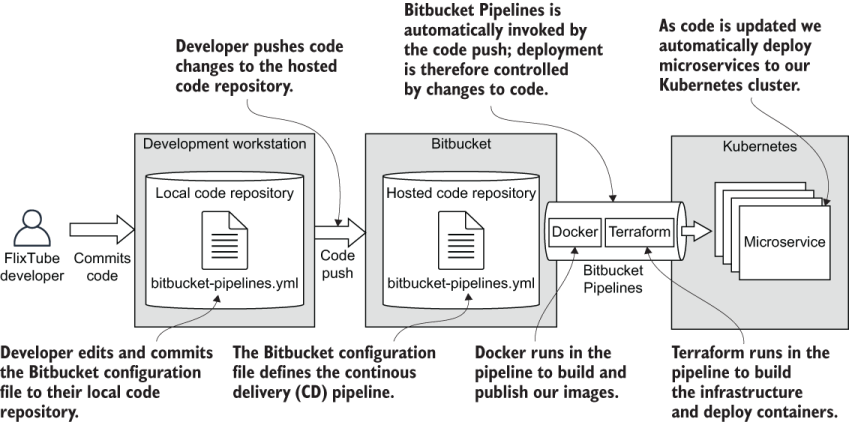
Figure 9.17 The continuous delivery (CD) pipeline for FlixTube
9.9.1 Prerequisites
You’ll need an account with Bitbucket. You’ll already have this if you followed along in chapter 7. Otherwise, signup for a free account at https://bitbucket.org.
9.9.2 Setting up your code repository
The next step is to import FlixTube’s code into a Bitbucket code repository. Copy the entire contents of the example-1 subdirectory from the chapter 9 code repository to a new location. Create a fresh Git repo here and then push the code to your hosted Bitbucket repository. Next, enable Bitbucket Pipelines for the repository. Revisit section 7.7.2 for detailed instructions on the Bitbucket repository setup.
Now, configure your environment variables for the repository. You need to add variables for Azure authentication just like you did in section 7.7.6. For security reasons, we’ll store sensitive configuration details as repository variables instead of storing these in the code. Like we did in chapter 7, add variables for ARM_CLIENT_ID, ARM_CLIENT_SECRET, ARM_TENANT_ID, and ARM_SUBSCRIPTION_ID. You noted down the values for these variables earlier in section 9.8.3.
In addition, we need to add some new variables to authenticate the video-storage microservice’s access to the Azure storage account where we store the videos. For that, also add variables for STORAGE_ACCOUNT_NAME and STORAGE_ACCESS_KEY and set these to the values you noted in section 9.8.4.
9.9.3 Preparing the backend
Before the first invocation of your CD pipeline, you need to configure the backend so that Terraform’s state file persists between subsequent invocations. For a refresher on Terraform state, revisit section 6.8.7 and section 7.7.4.
Create a different Azure storage container for use by Terraform. You can use the one you created in chapter 7 for this purpose or create a new one. Don’t reuse the videos container for this! That would be using the one container for different purposes, and that’s the kind of thing that ultimately makes it more difficult to understand and reason about your application.
The Terraform script backend.tf is already configured to store the Terraform state in our Azure storage account. You just need to uncomment the code in that file (you commented it while you were manually deploying FlixTube). Make sure you set the details to your own storage account and container.
Listing 9.18 shows backend.tf after we have uncommented the code. Make sure you rename the resource group and storage account to those that exist in your own Azure account. You’ll also need to create an Azure storage container called terraform. Terraform will persist its state into this container under the name terraform.tfstate.
Listing 9.18 Terraform backend configuration (chapter-9/example-1/scripts/backend.tf)
terraform {
    backend "azurerm" {
        resource_group_name  =
        ➥ "<your-resource-group>"              ①
        storage_account_name =
        ➥ "<your-storage-account>"             ②
        container_name = "terraform"            ③
        key = "terraform.tfstate"               ④
    }
}
① Sets the name of the resource group that contains the storage account. Rename this to a resource group that exists in your Azure account.
② Sets the name of the storage account in which we store the Terraform state. Rename this to a storage account that exists in your Azure account.
③ The name of the container in which we store the Terraform state. No need to rename this, but make sure the container exists in your Azure account.
④ The name of the file in which we store the Terraform state. This can be set to anything, but we are using the default name of the Terraform state file because that makes sense and we can easily remember what it means.
9.9.4 The deployment shell script
As mentioned earlier, a shell script is usually what’s at the heart of any CD pipeline. Listing 9.19 is the deployment shell script for FlixTube. Note that it’s barely different from the deployment script from chapter 7. In listing 9.19, some of the code is omitted for brevity, and there’s a couple of extra environment variables being passed through to Terraform.
Most of our deployment code is in Terraform code, that’s why this shell script remains so small. There is plenty more we could do directly in this shell script if we wanted, for example, building and publishing Docker images. But for FlixTube, at least, we have managed to contain our entire deployment within the Terraform code. To revise the deployment shell script in more detail, revisit section 7.7.3.
Listing 9.19 A shell script for deployment using Terraform (extract from chapter-9/example-1/scripts/deploy.sh)
cd ./scripts                                              ①
terraform init                                            ②
terraform apply -auto-approve                            ③
    -var "app_version=$VERSION"                          ④
    -var "client_id=$ARM_CLIENT_ID"                      ④
    -var "client_secret=$ARM_CLIENT_SECRET"              ④
    -var "storage_account_name=$STORAGE_ACCOUNT_NAME"    ④
    -var "storage_access_key=$STORAGE_ACCESS_KEY"         ④
① Changes to the directory that contains our Terraform scripts
② Invokes Terraform initialization
③ Invokes Terraform apply with auto approve enabled, then runs our Terraform scripts and deploys our infrastructure and microservices
④ Passing environment variables through for our Terraform scripts
9.9.5 FlixTube’s CD configuration
The final piece of the CD pipeline puzzle is the configuration file. For Bitbucket Pipelines, this is a YAML file that is placed in the root of your code repository. It’s called bitbucket-pipelines.yaml. Some other CD providers use similar YAML formats.
Listing 9.20 shows the simple CD pipeline configuration for FlixTube. This is simple because all we are really doing here is invoking the deployment shell script that we saw in listing 9.19. For more details on Bitbucket Pipelines configuration, revisit section 7.7.5.
Listing 9.20 CD configuration for Bitbucket Pipelines (chapter-9/example-1/bitbucket-pipelines.yaml)
image: hashicorp/terraform:0.12.6
pipelines:
    default:
      - step:
          name: Build and deploy
          services:
            - docker
          script:
            - export VERSION=$BITBUCKET_BUILD_NUMBER
            -  chmod +x ./scripts/deploy.sh
            - ./scripts/deploy.sh               ①
① Invokes our deployment shell script
9.9.6 Testing the continuous delivery (CD) pipeline
Now we are ready to test our CD pipeline. Assuming your repository is configured and you have enabled Bitbucket Pipelines (see section 9.9.2), we need to push an update to the code. We can also trigger a CD pipeline manually in the Bitbucket Pipelines dashboard, but the usual way to trigger deployment is to change some code and push the change to our hosted repository. Let’s test that it works.
Try pushing a code change-only a small change is necessary. Maybe change some text in the UI? Then save the file, commit the change, and push it to Bitbucket. You can then watch in the Bitbucket Pipelines dashboard as the pipeline is triggered.
Note The first time the pipeline is invoked, it will take some time as it deploys the first instance of your infrastructure and microservices.
Once it’s ready, you can again use kubectl get services (like in section 9.8.6) to get the IP address of the gateway to load in your web browser and do some testing. Now you are all set up for continuous deployment! Any code changes you push to Bitbucket will automatically be deployed to production.
9.9.7 Adding automated testing
A final step that you can take with your CD pipeline is to add automated testing. The example code for chapter 9 includes some automated tests that you might have tried out earlier in section 9.6. Adding automated testing to your application is as simple as putting the right commands in the right places.
This is simplified because we are following conventions. This means we only need to know one command and that is npm test. We don’t have to remember whether we are using Jest, Cypress, or some other JavaScript testing framework. Whatever we use, we only need to make sure that the script for npm test is configured to invoke it.
As for the right place to invoke this command, that’s more difficult because we have our entire application in a single repository and configured with a single CD pipeline. We could invoke npm test from our deployment shell script (listing 9.21) or directly from our Bitbucket Pipelines configuration file (listing 9.22). Listings 9.21 and 9.22 show both ways this might work for the metadata microservice.
As you might imagine, this is just the tip of the iceberg. As we build more automated tests for our other microservices, we’ll have to invoke npm test repeatedly for each microservice. That doesn’t seem elegant, but it will be resolved when we transition to a multi-repo scalable deployment architecture. Just hold on until chapter 11 for more on that.
Listing 9.21 Adding automated tests to the deployment shell script
set -e              ①
cd ./metadata       ②
npm install         ③
npm test            ④
cd ..               ⑤

cd ./scripts
terraform init
terraform apply -auto-approve
    -var "app_version=$VERSION"
    -var "client_id=$ARM_CLIENT_ID"
    -var "client_secret=$ARM_CLIENT_SECRET"
① Causes subsequent failing commands in the shell script to fail the entire script
② Changes directory to the metadata microservice
③ Installs dependencies (this installs Jest)
④ Runs the tests. If this fails, the shell aborts with an error code. This in turn aborts the CD pipelinewith an error.
⑤ Changes directory back to the main project
Listing 9.22 Adding automated tests directly to the CD configuration file
image: hashicorp/terraform:0.12.6
pipelines:
    default:
      - step:
          name: Build and deploy
          services:
            - docker
          script:
            - cd metadata && npm install && npm test     ①
            - export VERSION=$BITBUCKET_BUILD_NUMBER
            -  chmod +x ./scripts/deploy.sh
            - ./scripts/deploy.sh
① Invokes our automated tests directly from the Bitbucket Pipelines configuration file. If the tests fail, the CD pipeline aborts with an error.
We might even invoke our automated tests directly from our Terraform code. But, arguably, with building and publishing Docker images, we are already doing too much in Terraform. We have taken it beyond its original purpose of provisioning our cloud infrastructure, even though this is a convenient way to bootstrap our microservices application. In chapter 11, we talk about how to refactor our development and deployment processes as we scale up FlixTube.
As noted in chapter 8, running Cypress in the CD pipeline is essentially the same, although, with some additional difficulties. Again we’ll invoke npm test, but with it configured to invoke Cypress instead of Jest.
The problem with Cypress is that it is big! Installing it into our CD pipeline each time the pipeline is invoked is slow and inefficient (especially if you are paying by the minute for the amount of time your pipeline is executing). If you want to use Cypress in your CD pipeline, then you are going to have to learn how to use the caching facilities from your CD provider. But I’m afraid this book is already too long, so you’ll have to tackle that on your own. You can learn more about caching in Bitbucket Pipelines here:
https://support.atlassian.com/bitbucket-cloud/docs/cache-dependencies/
9.10 Review
Congratulations! If you followed along in the chapter, you now have FlixTube running in production, and you are all set to continue evolving FlixTube. You can make code changes, test them in development, and then deploy updates to production using CD. Use table 9.2 to review the commands used in this chapter.
Table 9.2 Review of commands in chapter 9 (continued)
9.11 FlixTube in the future
Where to now for FlixTube? That’s for you to imagine! In chapter 11, we’ll discuss the technical aspects of FlixTube’s future:
-
How do we scale up our development and deployment processes as the application grows and the size of the development team increases?
For now, just imagine the types of microservices you’d like to add to FlixTube in the future. Figure 9.18 gives you some inspiration as to what it might look like as it grows.
9.12 Continue your learning
In this chapter, we studied the structure and layout of the FlixTube example application. We built, ran, and tested it in development. Then we deployed it to production through its CD pipeline.
You have FlixTube running, so what now? Reading any book will only take you so far. The key to you retaining these skills is to practice, practice, and then practice some more. Experiment with the code. Try to add features. Try to add new microservices. Try to break FlixTube just to see what happens. Practicing the art of development is what takes you to the next level.
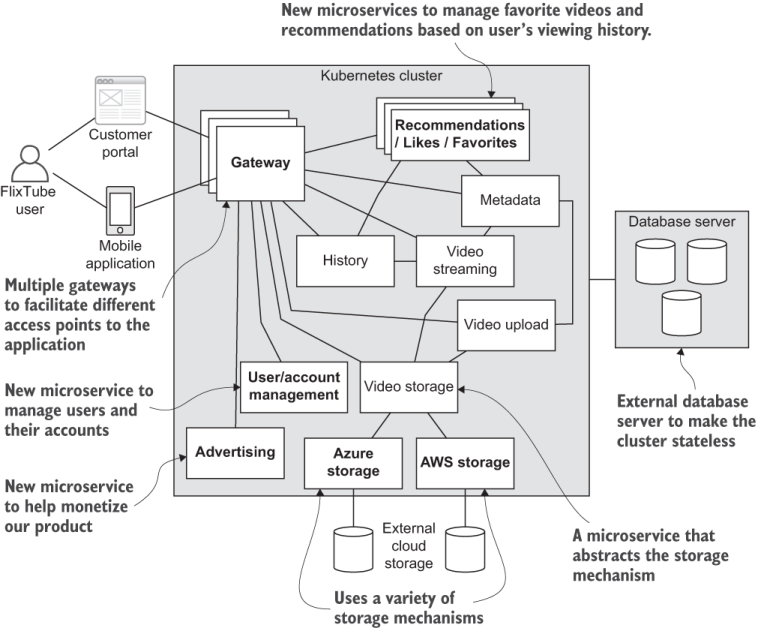
Figure 9.18 What FlixTube could look like in the future
Development is not without challenges. In fact, it is a never-ending rollercoaster of problems and solutions. When you hit problems with any tool or technology, go back and review the appropriate chapter in this book. You might find the answer you need. Otherwise, you’ll need to go deeper and explore other resources.
The final chapters in this book contain guidance that will help you navigate your future development path with microservices. The references at the end of each chapter (including this one) will help you continue your learning journey. But just remember that your key to success and your key to retaining these skills is consistent practice.
To learn about UI development, see the following books:
-
Getting MEAN with Mongo, Express, Angular, and Node, 2nd ed., by Simon D. Holmes and Clive Harber (Manning, 2019)
To learn more about development with microservices, see these books:
-
Microservices in Action by Morgan Bruce, Paulo A. Pereira (Manning, 2018)
-
Microservices in .NET Core, 2nd ed., by Christian Horsdal Gammelgaard (Manning, 2020)
-
Developing Microservice APIs with Python by José Haro Peralta (Manning, est, Spring 2021)
To dive deeper into Terraform, see this book:
Summary
-
We learned how FlixTube works as a whole and met some new microservices along the way.
-
We revisited some of the essential tools needed to build, run, test, and deploy microservices.
-
We ran an individual microservice from our FlixTube application in production mode and in development mode, which enables live reload, before booting the entire application.
-
To make FlixTube available for use by the general public, we deployed it to production and brought the continuous delivery (CD) pipeline online.