
Learn the difference between WebSocket and MQTT
Learn why WebSocket is important
Add WebSocket functionality to the broker and test it
Add access level controls
The Difference Between WebSocket and Normal MQTT
WebSocket provides an always-open communication channel as opposed to a channel with normal HTTP, which opens and closes for each request. WebSocket provides a duplex channel of communication but does not necessarily follow the MQTT protocol. You can have a raw WebSocket implemented and have two devices communicate with it.
MQTT on top of WebSocket adds powerful functionalities. It enables WebSocket clients to choose what they would like to receive, by way of message subscriptions. It also adds a capability to publish a message or information from a client to several other clients via the broker, which in normal circumstances is tedious to implement with basic WebSocket communication. On top of that, additional goodies that come with MQTT make it even better, such as retained messages, QoS, last will and testament (LWT), and so forth.
Why Is WebSocket Important?
From our own IoT platform perspective, it is a fundamental expectation to provide multiple methods to connect the platform to various devices. This is why we selected the HTTP REST interface and MQTT for that purpose. Since both protocols and techniques have their own set of pros and cons, however, being able to combine them provides a significant uplift in the application architecture.
Imagine how your web application can benefit if it is able to communicate live with all the other application users as well as a connected device to the platform. The power it yields to the web application by making it capable of controlling those devices—right from the web browser—is a good reason for enabling WebSocket on MQTT.
Additionally, all systems and things can speak MQTT and/or HTTP and benefit from everything we are incorporating into our IoT platform.
Adding WebSocket to Our MQTT Configuration
The first two sections are the same as earlier, adding a local listener and a secure MQTT port. The third section adds a listener on port 8443, and on the next line, it declares this port as following WebSocket. Note that the port number is not standardized for MQTT over WebSocket, so we chose the closest variant that works in most of the network environments—even behind corporate firewalls.
Testing WebSocket
We can now check WebSocket functionality with a publicly available, browser-based MQTT client from the Eclipse Foundation, which can be accessed at www.eclipse.org/paho/clients/js/utility/ .
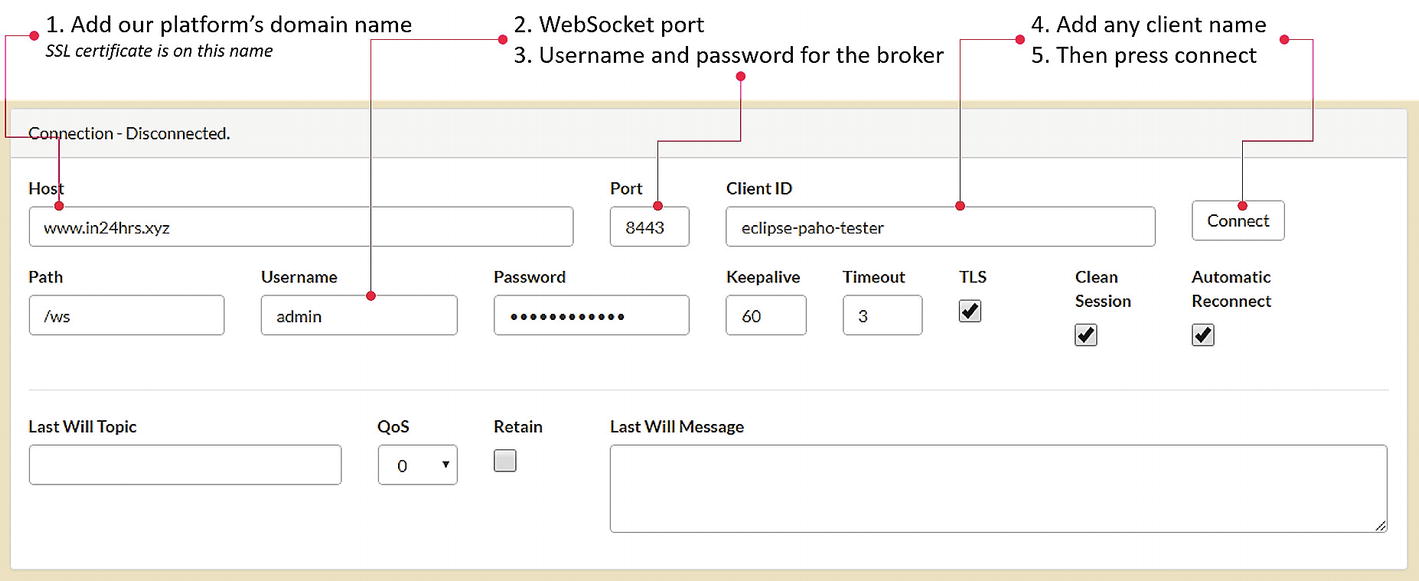
Eclipse Paho utility for testing MQTT WebSocket
Now subscribe to any topic and try publishing on that topic; you should get the message. You can also try this with our /pub API, so that if you publish something on this API, you see the message appearing on the interface. Similarly, if you publish something from this page, you are able to retrieve the same message from our /get API in the browser. This utility also enables you to publish LWT messages and retained messages. Overall, this client utility can be used for future testing of the platform and MQTT in general.
Additionally, you can download the JavaScript library file from the download section of this utility (or simply view-source and download paho-mqtt.js) from the code. This file is an open source client implementation for WebSocket that can be easily used for your own applications in conjunction with our IoT platform.
Let’s Add User Access Controls
When we configured our MQTT broker, we disallowed anonymous logins and thus secured it to a certain level by making it compulsory to provide username-password credentials. However, this does not prevent legitimate users from snooping around in each other’s data. Moreover, anyone can publish or receive anything, which is rather unacceptable.
That is why MQTT has another configuration setup known as ACL, or access control lists . By using ACLs, we can control access to topics for each user or client. We essentially want to allow only authorized publishers to publish certain topics and authorized subscribers to listen to those broadcasts.
Remember that the broker will treat the entire line as a comment if it starts with #. In the settings, %c and %u are used as wildcard patterns, and each represents a client ID and username, respectively.
The first section is the general settings. Here we have given read rights to general users on the timestamp and its subtopics. Remember that we completely denied anonymous connections on our platform, which means that this section of settings will never be used.
The second section defines settings for two users. The first user has an admin username and read and write access to # (i.e., all the topics). The second user has a my_app_name username and read access to our timestamp topic. Additionally, a full access for read and write is given to the myapp/%c/# topic. This means that any client that connects with a my_app_name username and a unique client ID (e.g., device_1 or similar) is able to read and write on myapp/device_1/#. This way, we can cordon off all the clients within the myapp application domain. Here, no connected client is able to publish on any topic other than the one defined and is only able to subscribe to timestamp.
The last section defines pattern-based settings. Again, we are defining that all clients who do not have the previously mentioned usernames are able to subscribe to the timestamp topic.
Additionally, we are allowing all clients to publish or subscribe on their user-specific topic defined by the users/%u/# pattern, which allows them to write or publish on %c/up/# and subscribe or read on %c/dn/#. This means that if a client with ID device_1 connects with the foo_bar username, then it is able to publish and subscribe on users/foo_bar/#, to publish on device_1/up/#, and to subscribe to device_1/dn/#. Any other publication or subscription that does not match the given pattern will not be honored.
The username-password combination can be reused by multiple applications and/or things; therefore, any changes to user settings would affect all of them. In general, the client ID must be unique when connecting to the broker. Therefore, any access controls in the pattern settings that are based on the client ID apply to only that single client.
Once the ACL file is updated, save and close it. Then create all the user profiles that have been included in the ACL file using the mosquitto_passwd utility .
Note
Topic names, usernames, and client names are generally case sensitive; not just in ACLs but in the overall MQTT paradigm, things are case sensitive.
Let’s Check If This Is Working
It is handy to have a local MQTT client installed on your PC for this testing. There are many options to choose from, including MQTT-FX and MQTTlense. You can search for appropriate programs based on your local machine/PC setup.
Since we already have enabled WebSocket, you can also test this with WebSocket-based clients, such as the Paho utility.
With no ACL in use, we are free to subscribe and publish to any topic. If ACLs are active, the broker will follow the access listed in ACL.
When we connect with the admin username, we are able to subscribe and publish on any topic. This is because we have granted all access to the admin user. However, if we connect with the my_app_name username and try to publish any message, the broker will not publish the message unless it follows the allowed topic pattern as per the ACL.

Broker denies the publish based on ACL settings but sends PUBACK = publish an acknowledgment
Note
For MQTT version 3.1.1, there is no way to inform the client of failure or denial to publish by the broker. This is changing with MQTT version 5.0, in which clients will know that the broker did not publish their message and the reason why.
The pattern settings and the general settings are additive in nature. This means that if the pattern settings do not allow an operation, but the general settings do, then the broker will allow it.
Pattern settings override user settings. Therefore, if the pattern settings allow a client to publish/subscribe to a topic, then the broker will allow it, regardless of the user settings.
- Scenario 1
General settings = blank or configured
User settings = blank
Pattern settings = blank
The result is access to all topics denied.
- Scenario 2
General settings = blank or configured
User settings = configured
Pattern settings = blank
The result depends on the user settings; the broker ignores general settings.
- Scenario 3
General settings = blank or configured
User settings = blank or configured
Pattern settings = configured
The result is pattern settings override user settings.
Using the Forever Tool with the Message Broker
We are using the forever utility to keep Node-RED up and running. We now enable our message broker to do so. This way, if the broker goes down, the forever application will bring it up. While forever can work easily with Node.js-based applications, using it for the Mosquitto broker means additional work is needed.
This command starts our message broker in the background and keeps it running forever. All the output from the broker is available in the mqtt.log file for review. To check how many applications are running currently with the forever tool, type forever list; in the command line, which gives a list of all the applications running and their uptime and other information.
Summary
Now we have a fully functional MQTT message broker and a partially functional REST API, a working time-series storage, and some utility functions.
In the next chapter, we create the remaining REST APIs and add a message router to the platform. We also add utility APIs to the platform to make it fully ready.