Since we are ready with the foundation for building meaningful APIs on top of it, in this chapter, we will
Create data access APIs
Develop utility APIs
Data Access APIs
As a part of the wish list, we had requirements labeled D1 and D2, which were primarily for accessing data records from the time-series data storage. We covered this when creating core services in Chapter 7. We also covered the D4 requirement for message publishing APIs over HTTP.
The next API that we will create helps us get one or several data records based on a specified condition for topic or payload, or both. This condition can be a topic or payload pattern, and be timestamp dependent, such as needing data for a particular period of time.
All of our data access APIs have a similar structure; each has an HTTP input node create query functional block followed by a MySQL node. The output of the MySQL query will go through a prepare response functional node, and then we will send the output through an HTTP response.
Each HTTP input node has a unique endpoint structure and method assigned, which can be used in an API call to invoke that sequence of flow. In the create query node, we will build an appropriate query to fetch the data requested, and pass it to the MySQL node, which does the actual querying work. In the prepare response node, we have nothing for now, but then we can add some type of formatting or add a few more objects in the response JSON for augmenting the API functionality further. Figure 9-1 shows what our condition-based data access API looks like.
Figure 9-1
Condition-based data request API sequence
Here our endpoint is /get/topicLike/:topic/payloadLike/:payload/last/:count, where the topic and payload inputs are wildcard based. Since we are querying an indefinite number of records, we are making it compulsory to add the number of records requested with the count parameter.
The following code snippet shows code written for the create query function block.
// Create query
// if no authentication filter defined or available
// set the default value as 1
if(!msg.req.authFilter)
msg.req.authFilter = 1;
// wildcard used for API query is * and this needs to be converted into SQL wildcard character %
msg.topic = "SELECT id,topic,payload,timestamp" +
" FROM thingData WHERE" +
" topic LIKE '" + msg.req.params.topic.replace(/*/g, "%") + "'" +
" AND" +
" payload LIKE '" + msg.req.params.payload.replace(/*/g, "%") + "'" +
" AND deleted=0" +
" AND (" + msg.req.authFilter + ")" +
" ORDER BY ID DESC" +
" LIMIT " + msg.req.params.count + ";";
return msg;
In the preceding code, the first two lines are of critical importance. Although we are not doing it until the end of this chapter, we are preparing our code to be adaptable for authentication filtering. We check if the authFilter object is available, and if it is not available (i.e., its value is not set), we set it to the default value of 1 for now. Setting this to 1 ensures that our code and API will work until we add authentication functionality. In an ideal scenario, this should be set to default 0, so that there will not be any data returned if authFilter is not set.
In the query that we are building later, we replace wildcard character * with an actual SQL wildcard character, which is %. We are deliberately not using % in the API query to avoid it mixing with HTML encoding that might happen in upstream applications. And we are using * as a wildcard because most of the typical topics or payloads do not have that character in common.
However, if you are building your IoT platform for a certain domain-specific application, you could easily change it to suit your requirements. Just remember to change it appropriately wherever we have used it in our code.
In the rest of the query, we also check for non-deleted records. Notice the other condition that we have added with authFilter. In the scenario where no authFilter is provided, the default value is 1. That part of the condition looks like AND (1), which in a SQL sense would simply mean true, and thus would not change the rest of the query. If that value becomes zero, this makes the condition AND (0), and thus would mean false in SQL. That would essentially negate the rest of the conditions so that there will be no output.
It is important to note that authFilter does not necessarily hold only 1 or 0; it can very well have another SQL condition that will then combine with the rest of the query to provide meaningful output. In later stages, we will replace authFilter with an auth-based query pattern.
Now this query will produce all the records matching our criteria and limit the output for the record count that we asked for, and then send it in a JSON response to the API caller. The following is the call to this API using cURL.
# curl -X GET "https://www.in24hrs.xyz:1880/get/topicLike/my*/payloadLike/*/last/5"
In output 3, notice that although we had 2 in the request count, the response was only one data record because there would have been only one record that was matching our topic and payload pattern requirement. This is the same case with output 1 as well.
Adding Time-Based Filters
In addition to the pattern-based data APIs, we will add time-based APIs. Here we create three endpoints: one for getting records on the specified topic or topic pattern created after the specified timestamp, one for records created before the specified timestamp, and one for records created between the two timestamps.
The flow sequence for this is shown in Figure 9-2.
Figure 9-2
Time-based data request API sequence
We have three endpoints here.
/get/:topic/after/:time/last/:count. topic is the topic name of the data records to be searched. The time parameter is the timestamp in UNIX style for search criteria. We will search for records that were created after this timestamp. And since there could be multiple records that satisfy this criterion, we are making it compulsory to add a number of records requested with the count parameter.
/get/:topic/before/:time/last/:count. The same endpoint as after the query, but here we search for records created before the timestamp specified.
/get/:topic/during/:start/:end/last/:count. Here we are providing starting and ending timestamps to search records created during the timestamps.
Accordingly, based on the endpoint used, the create query function block is slightly different because the query is different for each. All three code snippets are shown next.
// Create 'AFTER' query
// if no authentication filter defined or available
// set the default value as 1
if(!msg.req.authFilter)
msg.req.authFilter = 1;
// wildcard used for API query is * and this needs to be converted into SQL wildcard character %
msg.topic = "SELECT id,topic,payload,timestamp" +
" FROM thingData WHERE" +
" topic LIKE '" + msg.req.params.topic.replace(/*/g, "%") + "'" +
" AND" +
" timestamp >= '" + msg.req.params.time + "'" +
" AND deleted=0" +
" AND (" + msg.req.authFilter + ")" +
" ORDER BY ID DESC" +
" LIMIT " + msg.req.params.count + ";";
return msg;
// Create 'BEFORE' query
// if no authentication filter defined or available
// set the default value as 1
if(!msg.req.authFilter)
msg.req.authFilter = 1;
// wildcard used for API query is * and this needs to be converted into SQL wildcard character %
msg.topic = "SELECT id,topic,payload,timestamp" +
" FROM thingData WHERE" +
" topic LIKE '" + msg.req.params.topic.replace(/*/g, "%") + "'" +
" AND" +
" timestamp <= '" + msg.req.params.time + "'" +
" AND deleted=0" +
" AND (" + msg.req.authFilter + ")" +
" ORDER BY ID DESC" +
" LIMIT " + msg.req.params.count + ";";
return msg;
// Create 'DURING' query
// if no authentication filter defined or available
// set the default value as 1
if(!msg.req.authFilter)
msg.req.authFilter = 1;
// wildcard used for API query is * and this needs to be converted into SQL wildcard character %
msg.topic = "SELECT id,topic,payload,timestamp" +
" FROM thingData WHERE" +
" topic LIKE '" + msg.req.params.topic.replace(/*/g, "%") + "'" +
" AND" +
" timestamp >= '" + msg.req.params.start + "'" +
" AND" +
" timestamp <='" + msg.req.params.end + "'" +
" AND deleted=0" +
" AND (" + msg.req.authFilter + ")" +
" ORDER BY ID DESC" +
" LIMIT " + msg.req.params.count + ";";
return msg;
In the preceding three code snippets, everything is the same except one part of the query, where we are adding a condition to check for the timestamps. The query is self-explanatory since it searches for timestamps with less-than or greater-than conditions.
We are using a common block for the output sequence because all the endpoints are of a similar nature. The following cURL-based tests show how the API can be used. Remember that you can also test these APIs in a web browser.
# curl -X GET "https://www.in24hrs.xyz:1880/get/mytopic/last/7"
In the preceding test outputs, the first output is for listing all the available records under the mytopic topic. As you can see, there are only three available. The next three outputs demonstrate how each API is called and its output.
Data Deletion APIs
We will achieve data deletion in two distinct manners. One is recoverable while the other is not. For recoverable deletions, we will use the deleted data table field. For all the queries, we have always searched for deleted=0 in the condition. Now, all we must do is set deleted=1 whenever we want a record to be marked as deleted. It’s that simple.
Let’s create an API that caters to the following requirements.
D5. Delete a single data record.
D6. Delete several data records in a series.
D7. Delete one or several records based on certain conditions.
The flow sequence for this is shown in Figure 9-3, where we have created four API endpoints.
Figure 9-3
Delete API sequence
The first endpoint is /delete/:topic/id/:id, where the topic is a topic name that we are referring to. id is the record ID of the topic record that is to be deleted. You must have seen that every time we published or requested data, it is always returned with id and contents; that is, the id we are referring to here in the API. The following snippet shows the create query block for this endpoint.
// if no authentication filter defined or available
// set the default value as 1
if(!msg.req.authFilter)
msg.req.authFilter = 1;
msg.topic = "UPDATE thingData" +
" SET deleted=1" +
" WHERE" +
" topic='" + msg.req.params.topic + "'" +
" AND (" + msg.req.authFilter + ")" +
" AND id=" + msg.req.params.id + ";";
return msg;
In the preceding snippet, note how we are updating the record that matches a given topic and relevant ID and setting the deleted flag to 1. Note that we are keeping the record in time-series data storage and if needed, you can write another API to undelete the record in the same way, but this time, you set deleted=0 to do so.
The following snippet shows how we are handling /delete/:topic API. It is the same as the previous endpoint but with one difference: no specific record ID has been provided.
// if no authentication filter defined or available
// set the default value as 1
if(!msg.req.authFilter)
msg.req.authFilter = 1;
msg.topic = "UPDATE thingData" +
" SET deleted=1 " +
" WHERE" +
" topic='" + msg.req.params.topic + "'" +
" AND (" + msg.req.authFilter + ");";
return msg;
In the preceding code, we are marking all the records of the given topic as deleted instead of marking just one. This is a bulk delete API. This time, we will also modify the prepare response function node. For queries other than SELECT, the MySQL node returns different output values. We do not need all of those values because only two are for our direct use for the API.
// Prepare response
msg.payload = {
"found": msg.payload.affectedRows,
"changed": msg.payload.changedRows,
};
return msg;
In the preceding code, affectedRows is the count of rows that matched the query criterion, while changedRows is the count of rows that were changed with new data. We will now try this API with cURL.
# curl -X GET "https://www.in24hrs.xyz:1880/get/timestamp/last/5"
As you can see in the preceding three commands, with the first command, we are checking the available records. Note that we have timestamp data from ID 32 to 36. In the second command, we are deleting a record with ID 34. In the third command, we are again checking the last five records. In output 3, we can see that ID 34 is not returned.
The last two endpoints are for deleting the specified count of records from the beginning of the record set or from the end of it. The API is /delete/:topic/last/:count for deleting a specified number of the latest data records. /delete/:topic/first/:count is for deleting a specified number of records from the beginning of the record set for the specified topic.
// if required record count is not specified
// set default to 1
if(!msg.req.params.count)
msg.req.params.count = 1;
// if no authentication filter defined or available
// set the default value as 1
if(!msg.req.authFilter)
msg.req.authFilter = 1;
msg.topic = "DELETE thingData" +
" WHERE deleted=1" +
" AND" +
" topic='" + msg.req.params.topic + "'" +
" AND (" + msg.req.authFilter + ")" +
" ORDER BY id DESC LIMIT " + msg.req.params.count + ";";
return msg;
The preceding snippet is for deleting the latest count of records. The code for another API is the same, but instead of ordering records in descending order with DESC, we use an ascending order with ASC. For all the operations, you can check in time-series data storage; these records are still there, however, they have the deleted flag set to 1.
These two APIs are useful if you want to implement regular removal of stored data that is old; a delete-first-few API could be handy.
Removing Data Records Completely
What if we want to completely remove the data from the time-series data storage? This is where we create another set of APIs like the delete API. We can call it purge API. Figure 9-4 shows the created sequence.
Figure 9-4
Purge API sequence
While the endpoints are created to follow the same syntax, the code is slightly different. The following is the code snippet for the first endpoint.
// if no authentication filter defined or available
// set the default value as 1
if(!msg.req.authFilter)
msg.req.authFilter = 1;
msg.topic = "DELETE thingData" +
" WHERE deleted=1" +
" AND" +
" topic='" + msg.req.params.topic + "'" +
" AND (" + msg.req.authFilter + ")" +
" AND id=" + msg.req.params.id + ";";
return msg;
Notice how we are using a DELETE query. Here we are checking for a specified topic and ID, and whether the deleted status is set or not. This means that we cannot purge the record if it is not deleted. To completely remove a data record from time-series storage, we need two consecutive operations: delete followed by a purge.
// Purge several records
// if no authentication filter defined or available
// set the default value as 1
if(!msg.req.authFilter)
msg.req.authFilter = 1;
msg.topic = "DELETE thingData" +
" WHERE deleted=1" +
" AND" +
" topic='" + msg.req.params.topic + "'" +
" AND (" + msg.req.authFilter + ");";
return msg;
// Purge first few records
// if required record count is not specified
// set default to 1
if(!msg.req.params.count)
msg.req.params.count = 1;
// if no authentication filter defined or available
// set the default value as 1
if(!msg.req.authFilter)
msg.req.authFilter = 1;
msg.topic = "DELETE thingData" +
" WHERE deleted=1" +
" AND" +
" topic='" + msg.req.params.topic + "'" +
" AND (" + msg.req.authFilter + ")" +
" ORDER BY id ASC LIMIT " + msg.req.params.count + ";";
return msg;
A query to purge the last few records is similar to that for the first few, except the ordering keyword must be changed from ASC to DESC.
For now, we have completed the data API as per our wish list. There are still many areas for improvement, which can further strengthen the API while keeping it simple and straightforward. We will review these aspects later.
Adding Microservices to the Platform
Microservices are non-structured functionalities that are used by applications and devices alike. We listed seven microservices on our platform wish list. Now we will build all of them.
Getting the Current Timestamp
We built a current timestamp publishing service in the previous chapter, which fulfills requirement M1. We will now add a polling-based timestamp service. It will be a simple API, as shown in Figure 9-5. For the devices or applications that missed the latest timestamp broadcast and cannot wait until the next broadcast, this service is quite useful. With this microservice availability, you can also force an application or device to update its clock based on a random timestamp request.
Figure 9-5
Microservice to request a current timestamp
This is the simplest API we have on our IoT platform. It can be accessed on the /timestamp endpoint. The prepare timestamp function node has only a few lines of code, as follows.
msg.payload = {
timestamp: (new Date()).getTime().toString()
};
return msg;
We are creating a new date object, converting it into a UNIX-styled timestamp, and then formatting it as a string before packing it into a message object.
# curl -X GET "https://www.in24hrs.xyz:1880/timestamp"
Output
{"timestamp":"1544201700375"}
A quick command-line test using cURL shows the output in a UNIX-styled microsecond timestamp.
Random Code Generator
Let’s create another quick utility to generate a random alphanumeric string of a given length. This is a particularly handy service for creating tokens, default passwords, or API keys. Figure 9-6 shows the sequence for this service.
Figure 9-6
Microservice to request random code of a specified length
The code snippet for the prepare random code function node is shown next.
var randomString = function(length) {
var text = "";
var possible = "ABCDEFGHIJKLMNOPQRSTUVWXYZabcdefghijklmnopqrstuvwxyz0123456789";
for(var i = 0; i < length; i++) {
text += possible.charAt(Math.floor(Math.random() * possible.length));
}
return text;
}
msg.payload = {
code: randomString(msg.req.params.len)
};
return msg;
We first defined a function that can generate a random string of a given length. After the function definition, we simply pass the output of this function to the message object and send it through as an output. The command-line testing for this API is shown next.
# curl -X GET "https://www.in24hrs.xyz:1880/randomcode/32"
Output 1
{"code":"ASQ6t9PidHZ0BKxIsQfguD72fp0DcErq"}
# curl -X GET "https://www.in24hrs.xyz:1880/randomcode/8"
Output 2
{"code":"rU5rB3Db"}
# curl -X GET "https://www.in24hrs.xyz:1880/randomcode/64"
As you can see, we are now able to generate random strings of varied sizes. As such, there is no limit on the maximum length of the random string that you can generate; however, typically 32 or 64 bytes are commonly used, and 128 bytes in some cases. It is totally dependent on each use case.
Adding New Modules to Node-RED
Before we create the remaining three microservices, we need to install additional Node-RED modules. These nodes are UUID, Sendgrid (for email service), and Twilio (for the text-messaging service).
To install additional nodes, select the Manage Palette option in the main menu of the Node-RED interface. Click the Install tab and type a search term, contrib-uuid. You see a contributed package, node-red-contrib-uuid, as shown in Figure 9-7. Press the Install button to add the node to the node palette.
Figure 9-7
Installing additional nodes from the palette manager
We search and install node-red-contrib-sendgrid and node-red-node-twilio the same way (see Figure 9-7). Note that, by default, Node-RED has an email node for sending and receiving emails. You can try using that node too; however, I have seen that it does not offer much customization and can be painful to maintain due to security restrictions by mail accounts and clients. Sendgrid, on the other hand, is an automated email-sending program.
UUID Generator
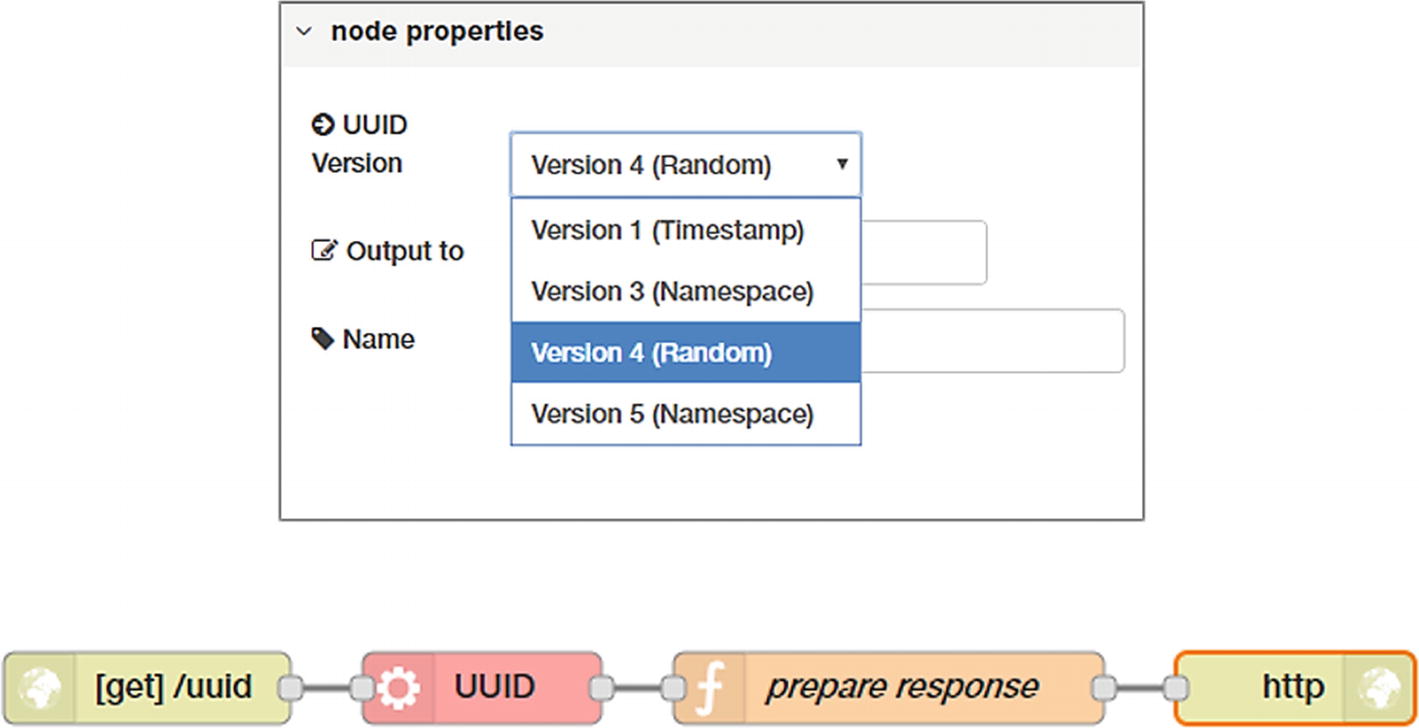
Now that we have all the required nodes installed, let’s create a UUID generator microservice. The flow sequence for the UUID generation API is shown in Figure 9-8, along with settings for a UUID node.
Figure 9-8
UUID generation node settings and flow sequence
We have set a UUID node to generate random codes; however, you can also try generating them based on a specific namespace or timestamps. When UUIDs are generated based on a namespace and timestamps, most of the content is nearly the same and follows a certain pattern. UUID node outputs the code in msg.payload in string format, which we convert into a message object in a prepare response node, as shown in the following code.
// Prepare response
msg.payload = {
uuid: msg.payload
}
return msg;
Let’s quickly check the functionality of this API with cURL; the endpoint here is /uuid.
# curl -X GET "https://www.in24hrs.xyz:1880/uuid"
Output
{"uuid":"a304fad2-36d1-4fda-9e2d-da820524ce6f"}
Email and Text Message Microservice APIs
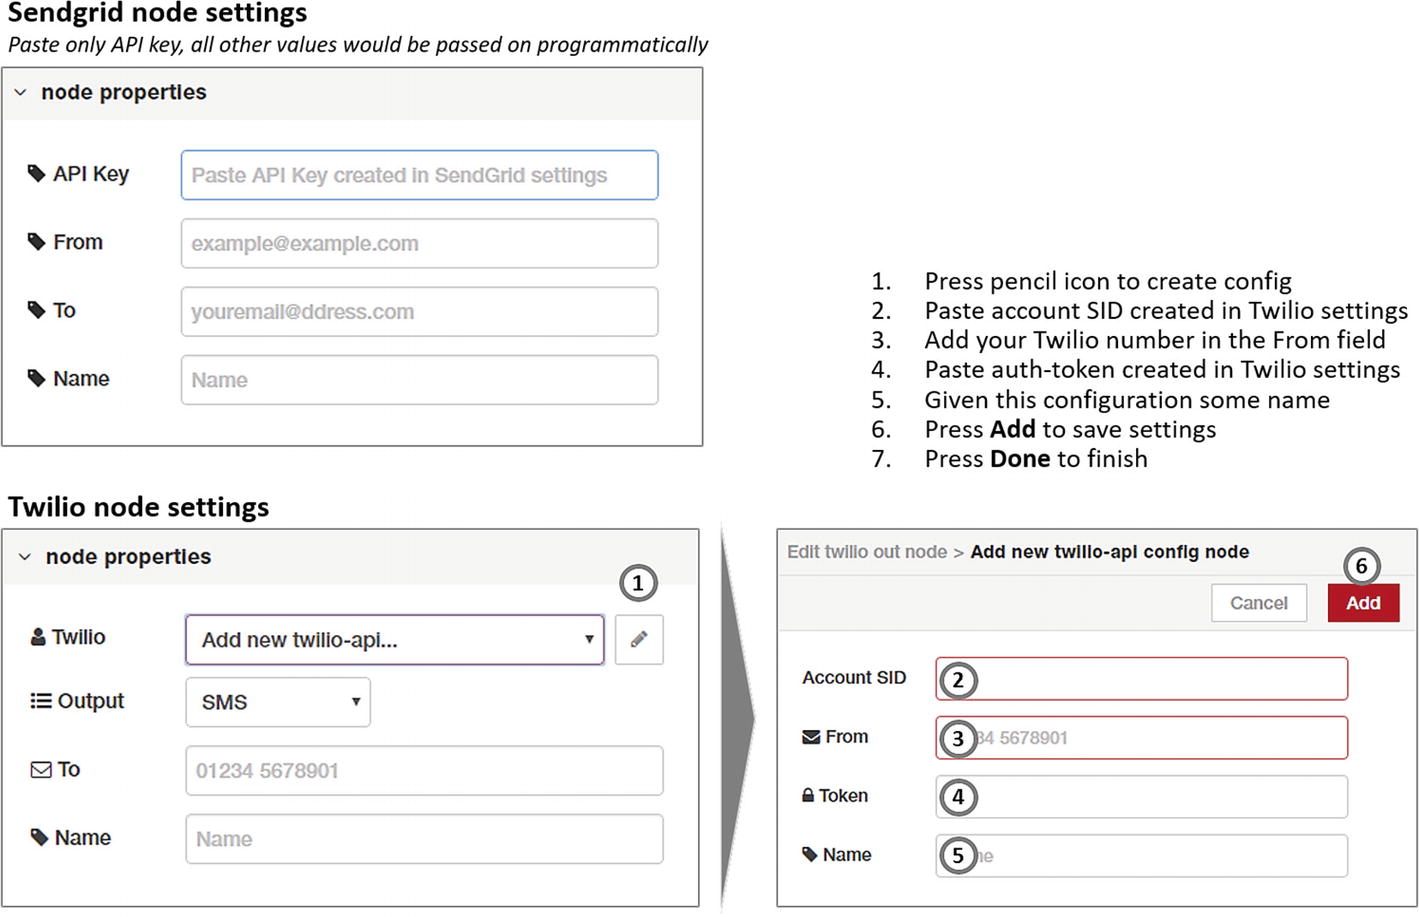
To use Twilio and Sendgrid, you must have an account with each of them. You can register for a Twilio account at www.twilio.com and for a Sendgrid account at https://sendgrid.com. When you create an account, you get various credentials. Jot down the credentials safely because you will need them to configure both nodes for the first time (see Figure 9-9).
Figure 9-9
Node settings for Twilio and Sendgrid nodes
Configuration of Nodes
To begin, drag both nodes to the workspace from the left-hand side of the Node palette.
Once placed on the workspace canvas, double-click the sendgrid node and provide the API key in its settings window. That is all we need to do to set up the sendgrid node. The rest of the values, such as From and To email addresses, are provided when we build the service. You can name this node if needed; otherwise, it will have the default name, sendgrid.
Now double-click the twilio node and then press the pencil icon to create a Twilio configuration. This opens another dialog box, where three important inputs are needed. Paste your Account SID, Twilio number, and authentication token (as provided on your Twilio account page). You can then assign a name to the config if needed, and click Add to save this config.
This configuration is saved separately and can be used by multiple nodes later. Upon saving this confirmation, you are back on the twilio node settings dialog box. Select this configuration from the drop-down menu (there is only one the first time). No other fields need to be changed because we will change them programmatically later.
SMS Sending Utility
With the configuration settings in place, let’s create a SMS API with the flow sequence shown in Figure 9-10.
Figure 9-10
Send text message flow sequence
Here our endpoint is defined as /sms/to/:to/message/:message, where to is the target mobile number to which we want to send a text message, and message is the actual body of the text message.
Notice that the twilio node does not have an output, so there is no direct way to know if our SMS sending request was successful. Being asynchronous in nature, Twilio provides callback functionality in its account settings. You can specify a callback URL, which is called upon successful message delivery or upon failure to do so. Interestingly, we can create another API for this purpose and process all the delivery reports as needed by the application. I will leave it to you to explore this option because it is not complex, and it does not form a critical part of the platform.
Accordingly, two function blocks do the processing. The first function prepares the message for dispatch via the twilio node, while the other prepares the HTTP API response. The following shows code for both.
// Prepare message
msg.topic = msg.req.params.to;
msg.payload = msg.req.params.message;
return msg;
// Prepare response
msg.payload = {
"smsTo": msg.topic,
"message": msg.payload,
"status": "queued"
};
return msg;
The twilio node needs the target number in the topic part of the message and the message body in the payload. In the prepare message function node, we prepare this message packet as per this requirement.
The prepare response node simply responds to the API caller with the status as queued, along with echoing back what was sent to it. Once deployed, this flow can be checked with the following cURL command and the target mobile should receive a message (Hi) in their SMS inbox.
# curl -X GET "https://www.in24hrs.xyz:1880/sms/to/+1234567890/message/Hi"
Now that our text-messaging API is working as expected, we will create a flow sequence for an email-sending functionality (see Figure 9-11). It is almost like the text-message-sending flow.
Figure 9-11
Send email flow sequence
For sending email messages, we have simplified a version of the API with the /email/to/:to/subject/:subject/message/:message endpoint, where the parameters are self-explanatory. The first parameter, to, provides the target email address to which email needs to be sent, followed by the email subject and message body in the message parameter.
The sendgrid node requires inputs to be given in the msg object, and it does not have any output. We are therefore adding a prepare response function that responds to the API caller.
As shown in the code snippets, the first part is for preparation of email input to the sendgrid node. We are also able to pass Cc and Bcc email addresses to the sendgrid node; however, we have not included them in our API endpoint. Should you need to add them, you can easily extend the API to incorporate those parameters. Additionally, we must provide a valid From email address for this node; in most cases, this should be your application’s generic email address, or it could be a do-not-reply address.
I find it useful to provide an existing valid email address in this parameter so that when a receiver responds, there is someone to answer to that email.
If you wish to send larger-size email messages, then perhaps a GET API will not suffice, due to length limitations. In that case, you can easily convert this API to POST and utilize the increased capacity. Like Twilio, Sendgrid provides a callback URL configuration in its account settings, and you can configure an API where the email-sending status is reported. Various statuses are reported—mainly events such as email sent, delivered, opened, dropped, bounced, blocked, and so forth. This setting is available under the Mail settings in the Event Notification menu on the Sendgrid control panel.
Summary
In this chapter, we built data access APIs, microservices, and required utilities as per our wish list. We have one more microservice to build, which is dependent on the rule engine block’s functionality.
The rule engine and authentication are two important components/blocks in our platform, and in the next chapter, we will build them.