With the wish list of requirements and a detailed understanding of the block-level architecture of our IoT platform, it is time to kick off the work.
In this chapter, we will
Initialize our cloud instance
Install basic and advanced software stacks, as required
Add security profiles to the fundamental stack
Create and configure a time-series database
Give our platform a domain name
This is the longest chapter in the book and a very important one too. To make the most of it, I recommend that you read through the whole chapter first, and then jump into the hands-on implementation in the second round. This way, if anything is missing or needed, you will not be stuck in the middle of the implementation.
Initializing the Cloud Instance
This is the very first step in building our platform. I suggest that you have handy every prerequisite discussed in the previous chapter.
Register and Create
First, we register and initialize an instance on DigitalOcean, and then install the base software stack. Let’s head to www.digitalocean.com to register.
Note
If you are new to DigitalOcean, you can go to the following URL to get a $10 referral bonus: https://bit.ly/in24hrs.
Once you are registered and logged into the control panel, we can start creating the new cloud instance. DigitalOcean (DO) calls these instances droplets. For simplicity, we will refer to our cloud instance as an instance throughout the process.
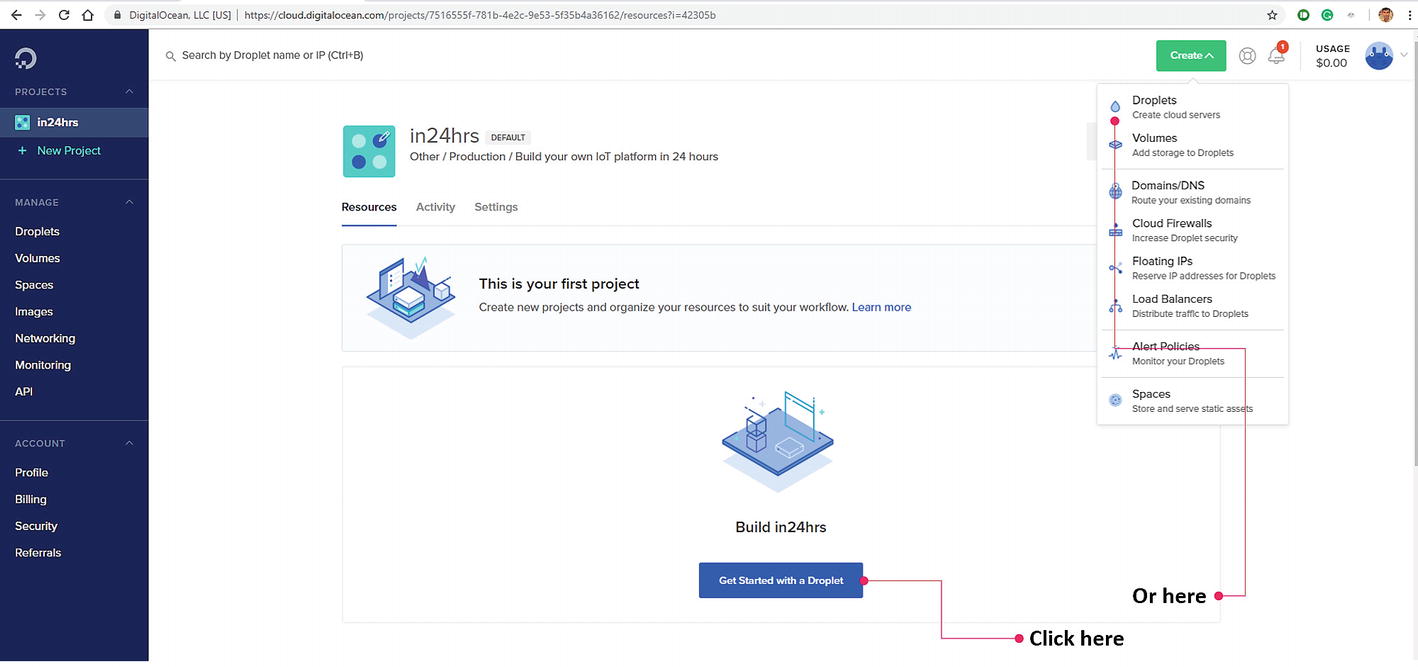
If this is the first time that you are logging in and there are no instances that already exist, you may see a large blue button to initiate that creation of an instance. Alternatively, you can also click the green Create button in the top-right corner of the page and choose the Droplets option from the drop-down menu. Refer to the Figure 5-1 for more details. This takes you to the instance creation page. On this page, you specify various configuration options for our instance—select memory, space, and so forth. You have the option to select extensions or additional features. Although the most popular defaults are preselected, I highly recommend that you make a conscious choice for each specification.
Figure 5-1
Creating our cloud instance on DigitalOcean
Choosing an Operating System Image
In this step, we choose the operating system for our IoT platform, and as I explained earlier, we will select the Ubuntu distribution; however, there are many other options to choose from. Refer to the Figure 5-2 for more details. Under Container Distributions, we see containerized OS images. In the One-Click Apps section, we see many preconfigured options to simply get started. This option seems attractive, but it is worthwhile to spend time choosing what we install.
Figure 5-2
Select Ubuntu as an operating system image of choice
For advanced usages, DigitalOcean offers a custom image option, where we can upload a customized OS image. In many cases, this option is handy when we want to replicate our IoT platform in multiple instances. In this case, we can simply copy our existing image (with everything installed) and upload it to the new instance. This makes things much faster and more scalable.
Choosing the Size
Now that we have chosen the OS image, we need to specify the amount of RAM and disk space that we want. Since we need approximately 2 GB of RAM and about 50 GB of disk space for effective basic functioning, we will select the second choice from the standard table on the left-hand side as shown in the Figure 5-3. In the future, if we need to expand the instance specifications, we can easily do that with just a few clicks in about 5 minutes. Remember, we talked about building basic infrastructure in such a way that it can be scaled at any size we want; this is the way to do it. After selecting 2 GB RAM and 50 GB disk space, we have 2 TB of data transfer allowance. This is more than enough to begin with, and it will be enough for a long time—before our platform becomes very busy.
Figure 5-3
We will need approximately 2 GB of RAM and about 50 GB of disk space
Note that CPU optimized instances are more suited for applications that heavily rely on CPU rather than RAM or disk and IO. Our IoT platform will eventually get to an enterprise-level system; however, at this stage, we are selecting only standard options. This also keeps the budget under control.
When we select a 64-bit operation system, as we did in the earlier step, 4 GB or more of RAM is advisable because we lose any benefits of the 64-bit system with a limited memory operation. From experience, it does not pose much of a problem, but it is easy to upscale, so let’s go ahead with what we have selected so far.
Choosing a Datacenter Region
Now comes the step to select a datacenter region for our cloud instance as shown in the Figure 5-4. The only criterion that drives this selection is where our users are. Keeping servers near our end-users’ geographic location improves performance by reducing server latency. If the user base is expected to be all over the world, the selection of a datacenter in the central part of the globe makes sense because it will keep latency almost the same for everyone. Although not an optimum choice, it is the best option when starting with just one small cloud instance. This is the reason that we select the London datacenter for our IoT platform since it is closer to the UTC.
Figure 5-4
Select the datacenter closer to UTC and activate additional options
We will select additional options that allow us to easily use private networking and monitor our cloud instance. The private networking option enables an additional networking interface in the same datacenter for the instance. This way, if we have multiple cloud instances in the same datacenter, we can directly communicate with other instances without routing the traffic outside of the datacenter. IPv6 enables access to our cloud instance over IPv6. Remember that IPv6 is about future proofing, so there is no need to race to implement it, and you can reasonably ignore (and untick) this option.
Selecting the Monitoring option adds the DigitalOcean agent to your OS to collect extended metrics and create alert policies. This feature is free (at the time of writing of this book) and is helpful in monitoring and understanding traffic and other metrics related to our cloud instance.
Finalizing and Creating the Instance
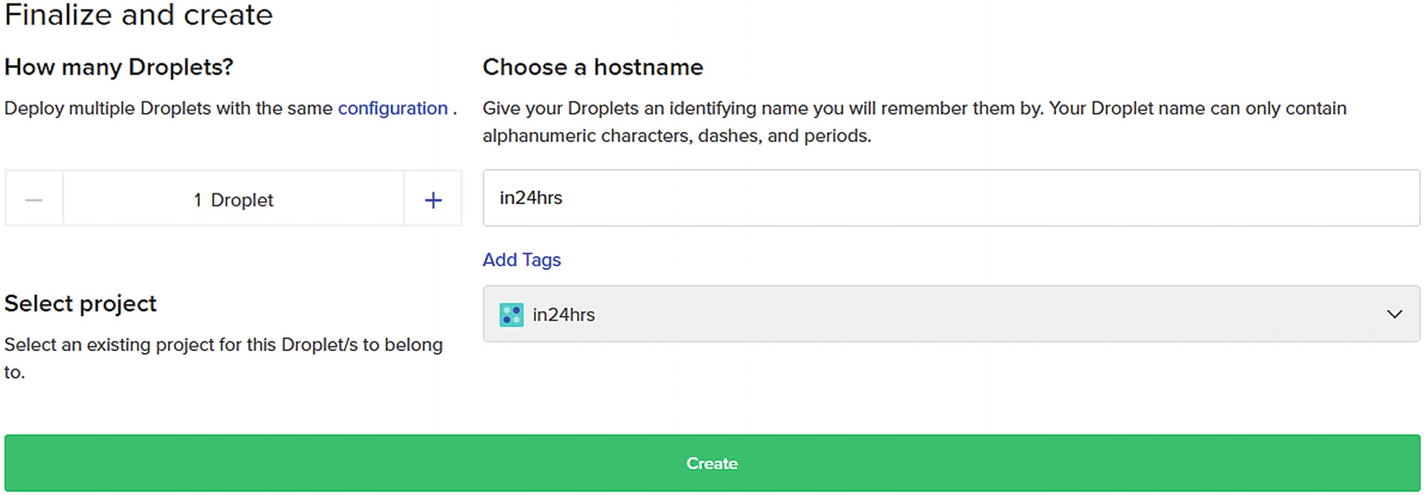
Once we have chosen all the options, it is time to finalize the process and select a hostname for our cloud instance, as shown in the Figure 5-5. A hostname is used for control panel information and the server’s hostname. Enter the hostname, keep the droplet (cloud instance) quantity at 1 because we are creating only one instance, and then click the Create button. This shows us a progress bar of our cloud instance creation.
Figure 5-5
Give a meaningful hostname and then create
When the process is complete, the IP address is assigned to our cloud instance and is visible on the control panel as shown in the Figure 5-6. Let’s make a note of it because it is used all throughout the process. As seen in Figure 5-6, the IP address assigned to our cloud instance is 139.59.164.101.
Figure 5-6
IP address for our cloud instance is displayed once process is complete
Note
The assigned IP address is different in your case. Throughout this book, you should replace my IP address with your own. In some places, symbolic representation has been used, such as <INSTANCE_IP>. Remember to replace it with your actual IP address.
Connecting to Our Cloud Instance
Once the cloud instance is created, DigitalOcean will send an email that contains the IP address, the username, and the temporary password to log in the first time. Check for this email in your inbox; an email is sent to the same email address that was used during the registration of the account.
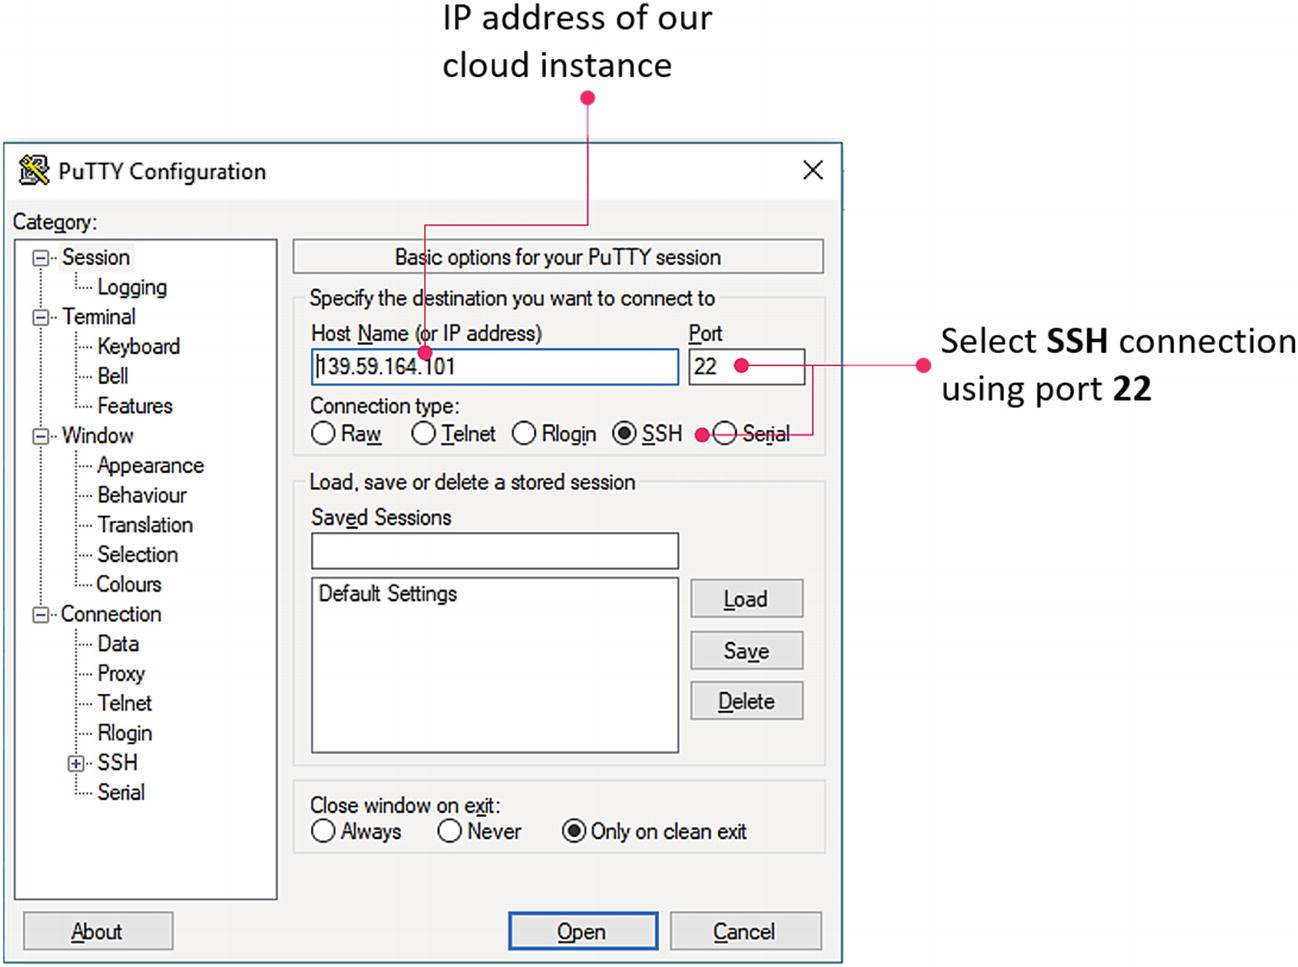
If you are using Linux or macOS, you can simply use the terminal to enter the ssh command to connect with our cloud instance. To connect, enter the following command:
# ssh root@<INSTANCE IP>
I have verified that on the latest Windows command line, the preceding command works as is. Depending on your IP address, the command will change. Note that the username in our case is root. Usually, the default Ubuntu OS distribution username is root. Since I use a Windows machine, I used PuTTY software for connectivity. The main dialog box of PuTTY program is shown in the Figure 5-7.
Figure 5-7
PuTTY connects with cloud instance on Windows OS
For the first connection, PuTTY shows a security alert dialog box that states that the server’s host key is not cached in the registry. We should connect to this computer only if we know it will be secure. Since we are connecting to our own cloud instance, we hit the Yes button and move to the next step.
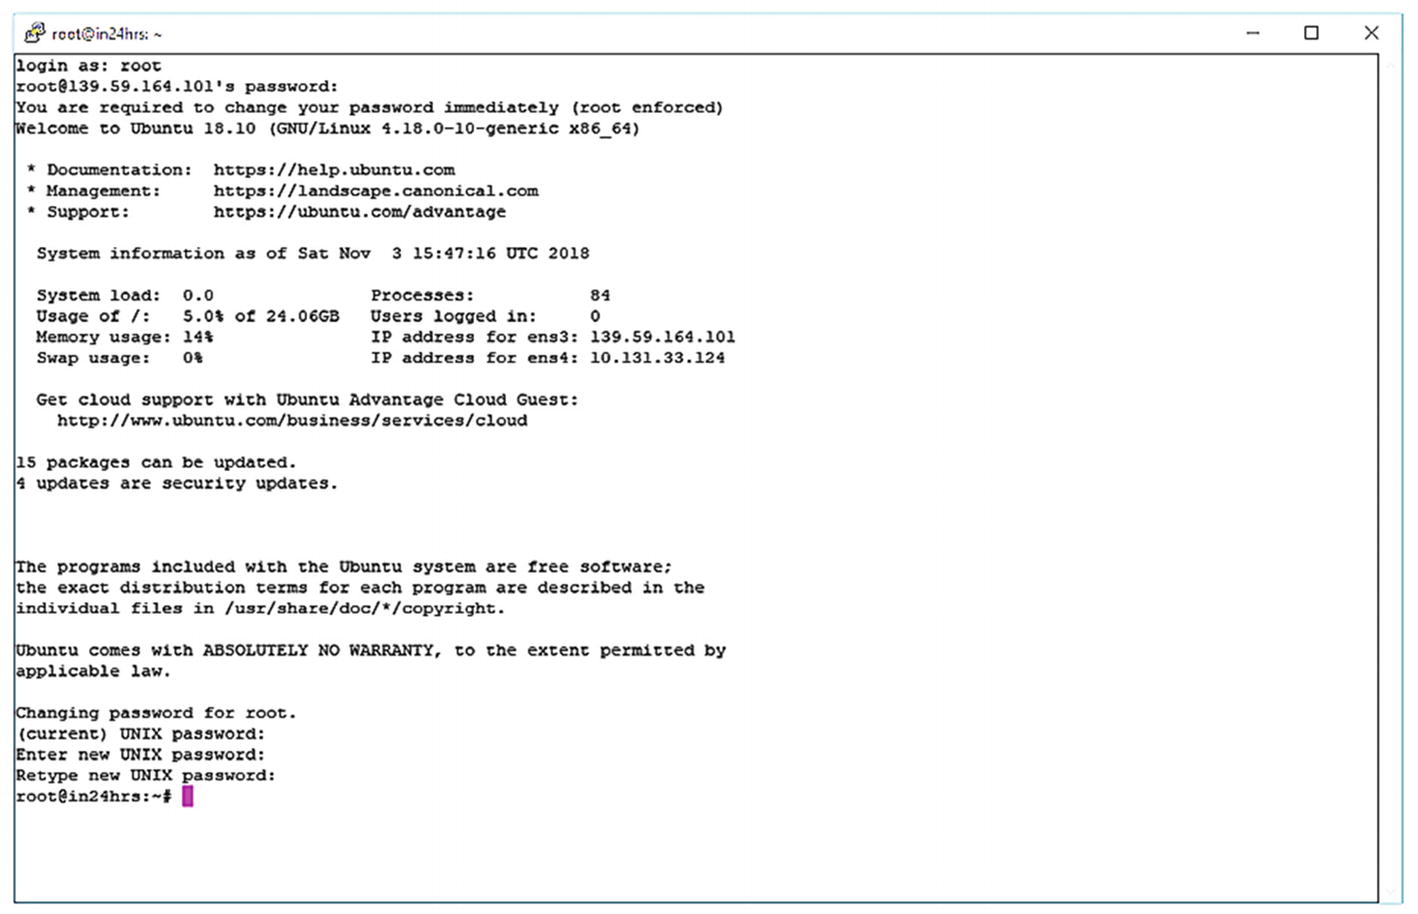
At the outset, the system prompts a password change. We begin by entering the default (temporary) password that we received via email. Once entered, we can change it to a new password of our choice.
Once we are logged in, the command prompt changes, and we see a welcome screen (see Figure 5-8). This marks the completion of the first step of initializing our cloud instance.
Figure 5-8
The welcome screen for our cloud instance marks the completion of the first step
Although not essential, we can also create a floating IP (a.k.a. elastic IP) for our cloud instance. It essentially provides an additional public static IP address that we can use to access our cloud instance without replacing its original IP.
Now that we have our cloud instance initialized and ready for further deployment, the installation of a LAMP stack is the next logical step. A LAMP stack is a set of open source software used to create websites and web applications. LAMP is an acronym that stands for Linux-Apache-MySQL-PHP. It consists of the Linux operating system, an Apache HTTP Server, a MySQL relational database management system, and the PHP programming language.
Even before we start any kind of installation, let’s get the base security up and running. We will start with enabling the firewall on our instance. Ubuntu servers use a firewall, and we can make sure that only connections to certain services are allowed by enabling it. We can set up a basic firewall very easily using this application.
Uncomplicated Firewall (UFW) is a program for managing a netfilter firewall designed to be easy to use. It uses a command-line interface consisting of a small number of simple commands and uses iptables for configuration. UFW is available by default in all Ubuntu installations after 8.04 LTS. (Uncomplicated Firewall, n.d.)
Applications can register their profiles with UFW after installation. UFW manages these applications by name, and we can see that the very service we have been using to connect with our cloud instance, the SSH utility, is already registered under OpenSSH. We can see which applications are registered by using UFW with the following command:
# ufw app list
Output
Available applications:
OpenSSH
To make sure that the firewall allows SSH connections after enabling it, we will allow these connections, and then enable the firewall with the following two commands:
# ufw allow OpenSSH
# ufw enable
When we command enabling the firewall, the system prompts that it may disrupt the operation; press Y for yes in this case. Once the firewall is enabled, we can check the status with the status command.
# ufw status
Output
Status: active
To Action From
-- ------ ----
OpenSSH ALLOW Anywhere
OpenSSH (v6) ALLOW Anywhere (v6)
Now except SSH. The firewall is blocking all the connections, and we have to configure additional applications each time we install them to accept inward traffic.
Installing Apache
Apache HTTP Server, colloquially called Apache, is a free and open source cross-platform web server software, released under the terms of Apache License 2.0. Apache is developed and maintained by an open community of developers under the auspices of the Apache Software Foundation. (Apache, n.d.)
It is among the most popular web servers in the world. It is well documented and is in wide use, and therefore a better choice. We can install Apache with the help of Ubuntu’s package manager, called apt. Installation takes only two commands. During the process, it prompts for the extra disk it is going to use. Keep pressing Y and then Enter to continue until the installation is completed.
# apt update
# apt install apache2
Note
We have selected a single core instance for our purposes. However, as you move up to multicore processors, Apache may not provide the best performance. Eventually, options like NGINX should be evaluated.
Now that we have enabled the firewall, web server traffic will not be allowed, despite installing Apache. We have to add the Apache profile to the configuration. We allow web traffic with the following commands:
# ufw app list
Output
Available applications:
Apache
Apache Full
Apache Secure
OpenSSH
# sudo ufw app info "Apache Full"
Output
Profile: Apache Full
Title: Web Server (HTTP,HTTPS)
Description: Apache v2 is the next generation of the omnipresent Apache web
server.
Ports:
80,443/tcp
# sudo ufw allow in "Apache Full"
Output
Rule added
Rule added (v6)
In the preceding commands, the first command displays all the apps that have an application profile under UFW. Since we added Apache, it is shown in the command output. In the second command, we are checking that the Apache Full configuration allows web traffic at the HTTP (port 80) and HTTPS (port 443) ports. And with the third command, the profile is added to the UFW program.
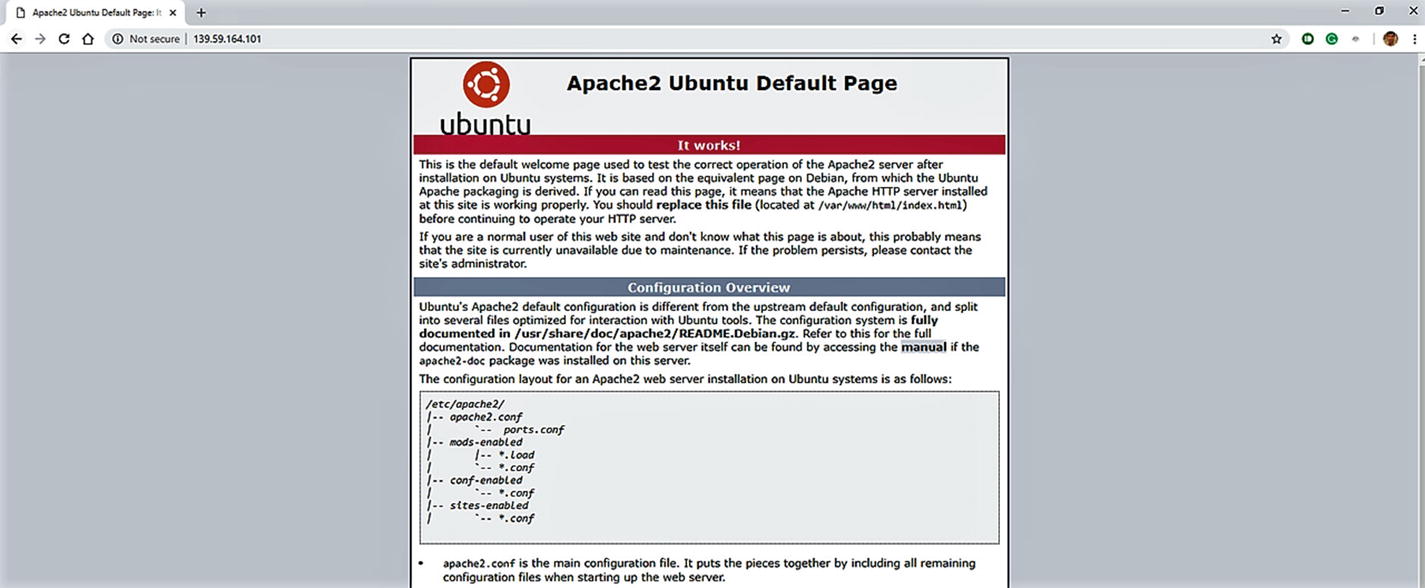
At this stage, if we open our web browser and navigate to our cloud instance IP, we see the default Apache webpage (see Figure 5-9). It shows that Apache is now installed and working as expected.
Figure 5-9
Default Apache webpage
Installing MySQL
With our web server installed and up and running, it is time to install the database management system. Since we have chosen MySQL, it will be a straightforward task with only a few commands, as follows:
# apt install mysql-server
When the preceding command is executed, the system prompts for the extra disk it is going to use. We keep pressing Y and then Enter to continue until the installation is completed. Apparently, MySQL comes with a default configuration installed, and it is a good idea to secure our installation right now. After the MySQL installation, there is a preinstalled script that helps us secure our database system. To start the process, execute the following command:
# mysql_secure_installation
This asks if we want to configure the validate password plugin. We will select Y for yes and continue providing additional passwords as prompted. When we provide a new password, the script shows the password strength for the root password we entered, and we have an opportunity to change it if we want to. We will skip this step and enter N for no at this stage.
For the rest of the questions, we keep pressing the Y and Enter keys at each prompt from the script. This essentially removes some default anonymous users and the test database. It also disables remote root logins and loads these new rules so that MySQL immediately enforces the changes that we just made.
For Ubuntu systems running the latest MySQL versions, the root user is authenticated using the auth_socket plugin by default instead of with a password. In many cases, it complicates the access, especially when we want other applications and external programs to connect with MySQL. We need to change it, and we can do this with the following commands, starting with opening the MySQL prompt on the command line.
# mysql
Output
Welcome to the MySQL monitor. Commands end with ; or g.
Your MySQL connection id is 7
Server version: 5.7.24-0ubuntu0.18.10.1 (Ubuntu)
Copyright (c) 2000, 2018, Oracle and/or its affiliates. All rights reserved.
Oracle is a registered trademark of Oracle Corporation and/or its
affiliates. Other names may be trademarks of their respective
owners.
Type 'help;' or 'h' for help. Type 'c' to clear the current input statement.
mysql> SELECT user,authentication_string,plugin,host FROM mysql.user WHERE user="root";
The second command lists the authentication method for the root user. And as we can see that the method is not what we want (i.e., password), we change it with an another command. We need a strong password handy while we issue the very first command.
mysql> ALTER USER 'root'@'localhost' IDENTIFIED WITH mysql_native_password BY 'your-password';
Output
Query OK, 0 rows affected (0.00 sec)
mysql> FLUSH PRIVILEGES;
Output
Query OK, 0 rows affected (0.00 sec)
mysql> SELECT user,authentication_string,plugin,host FROM mysql.user WHERE user="root";
The first command provides a strong password of your choice. The second command reloads the table, and the new changes go into effect immediately. With the next command, we double-check the status of the authentication method for the root user, and as we can see in the output, it has changed as needed. With that, we can now exit the MySQL prompt with the exit command.
At this point, MySQL is installed, and we can install the final key component of LAMP stack—PHP.
Installing PHP
PHP stands for Hypertext Preprocessor, which is an open source, server-side scripting language for the development of web applications and services.
We will use Ubuntu’s apt package manager to install PHP.
# apt install php libapache2-mod-php php-mysql
As you can see, in addition to the PHP package, we are also installing a few more packages. This will enable us to run PHP code on the Apache web server and communicate with the MySQL database easily. When the preceding command is executed, the system prompts for the extra disk that it is going to use. We keep pressing Y and then Enter to continue until the installation is completed.
By default, an Apache web server serves HTML files as a preference, and then looks for CGI and Perl files if the HTML file is not available. If the CGI or Perl file is not found, then it checks for a PHP file. However, since we wish to use PHP for our server-side programs in all cases, we need to change this behavior. We change the Apache directory configuration with the following commands:
# nano /etc/apache2/mods-enabled/dir.conf
This opens the configuration file in the default Ubuntu editor, called nano. This file has default file names listed in order, as shown next.
Once the changes are done, the file can be saved by pressing Ctrl+X and then typing Y, followed by pressing Enter. This exits us from the editor. We restart the Apache web server to make these changes effective by using the following command:
# systemctl restart apache2
This silently restarts Apache web server and reloads the configurations with the new changes. However, we still need to validate that these changes are effective. To do so, we create a test PHP program file and verify it within the browser by navigating to the IP address of our cloud instance. To create a new test program, we open a new file with this command and add a few basic lines in the file.
# nano /var/www/html/test.php
Add these contents to the file
<?php
echo("Hi...PHP is working !");
?>
Once finished, we save and close with the Ctrl+X combination followed by typing Y and then pressing Enter. Now when we navigate to http://<INSTANCE_IP>/test.php, we should see the message as shown in the Figure 5-10.
Figure 5-10
Working PHP page in browser
At this stage, our LAMP stack is fully functional, but before we move on to doing something useful with it, we need to strengthen the security. We also need to enable easy and efficient access to MySQL, preferably in a web browser environment, which can be done with the help of the phpMyAdmin program.
Securing the Instance and Software
Since we need an easy and efficient way to access MySQL functionality from the browser and at the same time maintain secure access, phpMyAdmin seems to be a better choice. phpMyAdmin is a free and open source administration tool for MySQL. As a portable web application written primarily in PHP, it has become one of the most popular MySQL administration tools. (phpMyAdmin, n.d.)
To begin the installation, we will first update the package index of our cloud instance. This is followed by the installation of base files for phpMyAdmin with the following two commands:
# apt update
# apt install phpmyadmin php-mbstring php-gettext
Note
While php-mbstring (multibyte string manipulation) and php-gettext (text handling) are not security-related packages, they are necessary for phpMyAdmin’s functioning, and therefore required to be installed.
At this stage of the installation process, the system asks a few questions. On the first screen, we will select apache2 as the server; we use the spacebar to mark our selection while we move our choices using arrow keys. Once selected, the installation continues and then asks the next question with another prompt —"configure database for phpmyadmin with dbconfig-common". Select Yes.
Finally, it asks you to choose and confirm your MySQL application password for phpMyAdmin. After you input that, the installation is complete. At this stage, the installation has added the phpMyAdmin Apache configuration file to the /etc/apache2/conf-enabled/ directory, where it is read automatically. The only thing we now need to do is explicitly enable the mbstring PHP extension, which we can do by entering the following:
# phpenmod mbstring
# systemctl restart apache2
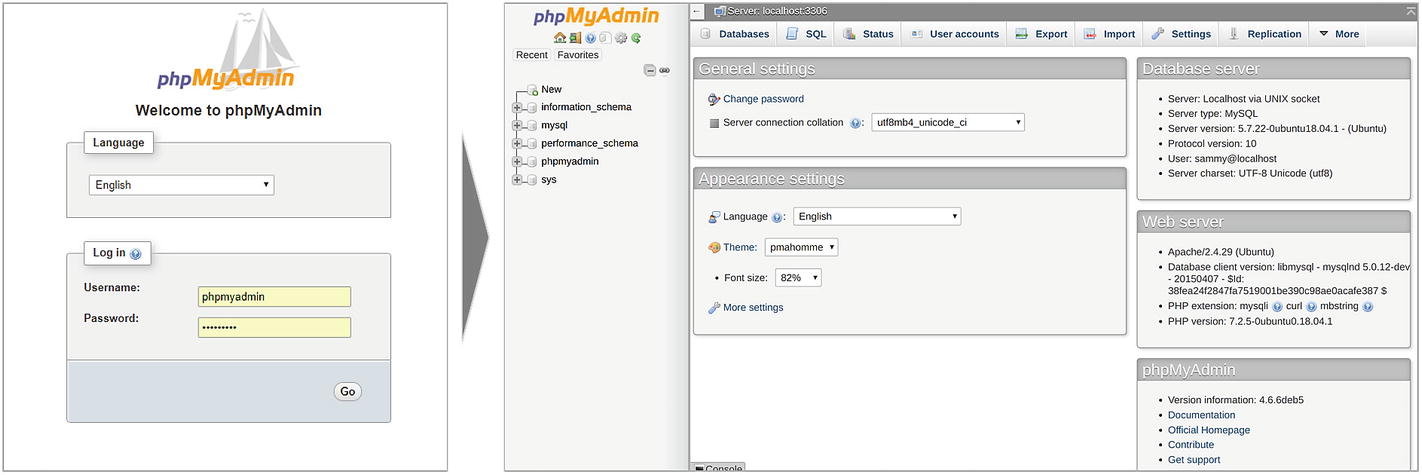
Now we can access the MySQL database with phpMyAdmin by navigating to http://<INSTANCE_IP>/phpmyadmin. It asks for credentials, which we just created. Upon providing the correct credentials, we are able to access our MySQL database in the browser, as shown in Figure 5-11.
Figure 5-11
phpMyAdmin login screen and main interface in web browser
Let’s secure our phpMyAdmin instance. As we navigate to the phpMyAdmin page in the browser, we notice that the application asks for credentials. However, if the page is not accessed over SSL, our credentials could very well be intercepted. Moreover, the phpMyAdmin tool is so widely used that it is often a target of attack. However, we can add an extra layer of security by placing another credential gateway in front of the application. That means the user is unable to navigate to the login page without entering first-level credentials.
We can add this extra layer of security with the help of a commonly used method in Apache web servers (i.e., using .htaccess), authentication, and authorization functionality.
In the first step, we enable the use of .htaccess file overrides by editing the Apache configuration file for phpMyAdmin. This file is available in the configuration directory.
Note that in the preceding file extract, we have added a directive as AllowOverride All within the <Directory /usr/share/phpmyadmin> section. This enables the use of the .htaccess file for authentication and authorization. Now we will create this required .htaccess file with four lines that allow authentication.
# nano /usr/share/phpmyadmin/.htaccess
Add following contents to the file
AuthType Basic
AuthName "Restricted Files"
AuthUserFile /etc/phpmyadmin/.htpasswd
Require valid-user
By adding the preceding contents, we are enabling a basic type of authentication that is done with the help of a password file. The second line in the file sets the message for the authentication dialog box. As a general guideline and best practice, let’s keep it generic and simply state "Restricted Files" so that the message does not give away too much information about what is behind the restriction.
The third line states the name of the password file and its location. Ideally, it should be outside of the directory being protected. And the final line asserts the authorization function, which stops unauthorized users from entering the directory and accessing the phpMyAdmin application. We will save and close with the Ctrl+X combination, followed by Y, and then Enter.
The next step is to create this password file and create the first user with a password. This is accomplished with the help of the htpasswd utility and the following commands:
The first command creates the new file, named .htpasswd, and then adds a new user to it. Once we execute this command, the system prompts for a password and confirms it for this user. The passwords are stored in the hashed format in the file.
Notice that the second command is without the -c option, so it does not create a new file; instead, it uses an existing file (created by the first command) and adds another user as needed. We can add as many users as we want.
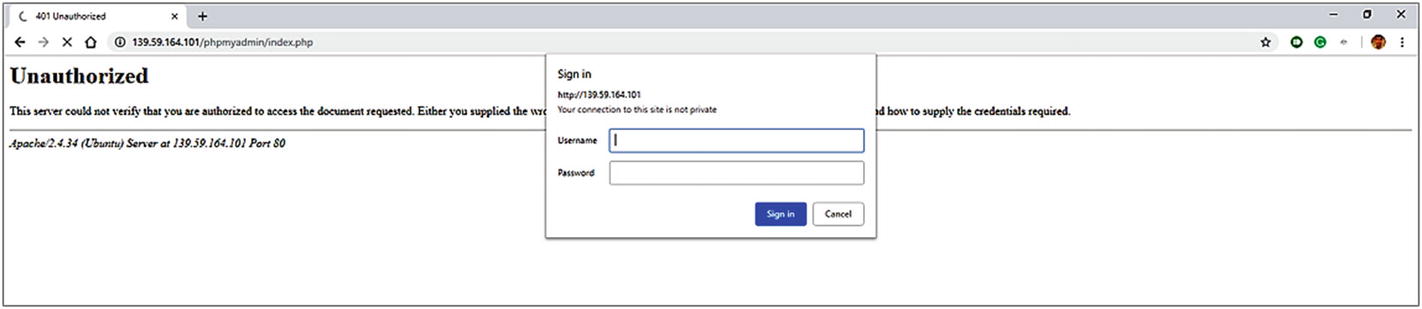
Now if we navigate to http://<INSTANCE_IP>/phpmyadmin, the browser first asks for Apache authentication before presenting the phpMyAdmin login page, as shown in Figure 5-12. Once we input the correct credentials, we are presented with the usual phpMyAdmin login page.
Figure 5-12
Additional security for phpMyAdmin
At this stage, phpMyAdmin is fully configured and ready for use. Using this interface makes it easy for us to create databases and tables, and to perform various database operations. This comes in handy as we progress to create time-series data storage and add various other data tables to use in the platform.
It’s Easier with a Domain Name
While it is easy (for now) to access our cloud instance with its IP address, it will be even easier to use it with a proper fully qualified domain name (FQDN). It will also enable us to add transport layer security with TLS/SSL.
Apparently, Let’s Encrypt makes it a policy to not issue SSL certificates for IP addresses. We are unable to use the certificate by continuing with the IP address. Technically, we can install the certificate, but it is useless. Moreover, many browsers do not honor SSL over a bare IP address. So, it is a good idea to get a domain name for our IoT platform now. There are various options to get the required domain name. A simple search in Google shows the best options for you.
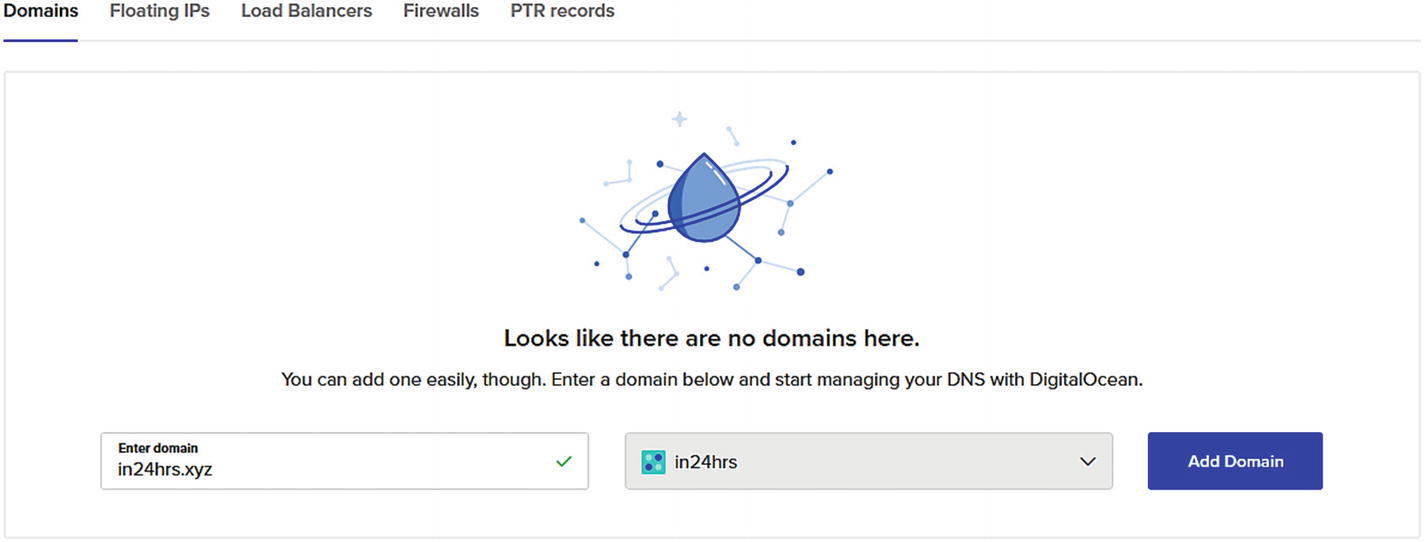
The first step is to get the desired domain from a domain registrar, and then head to the DigitalOcean control panel to make the required changes to the cloud instance DNS records. Instead of using a generic reference to the example.com domain, I used my own domain name, in24hrs.xyz, for ongoing references in this book.
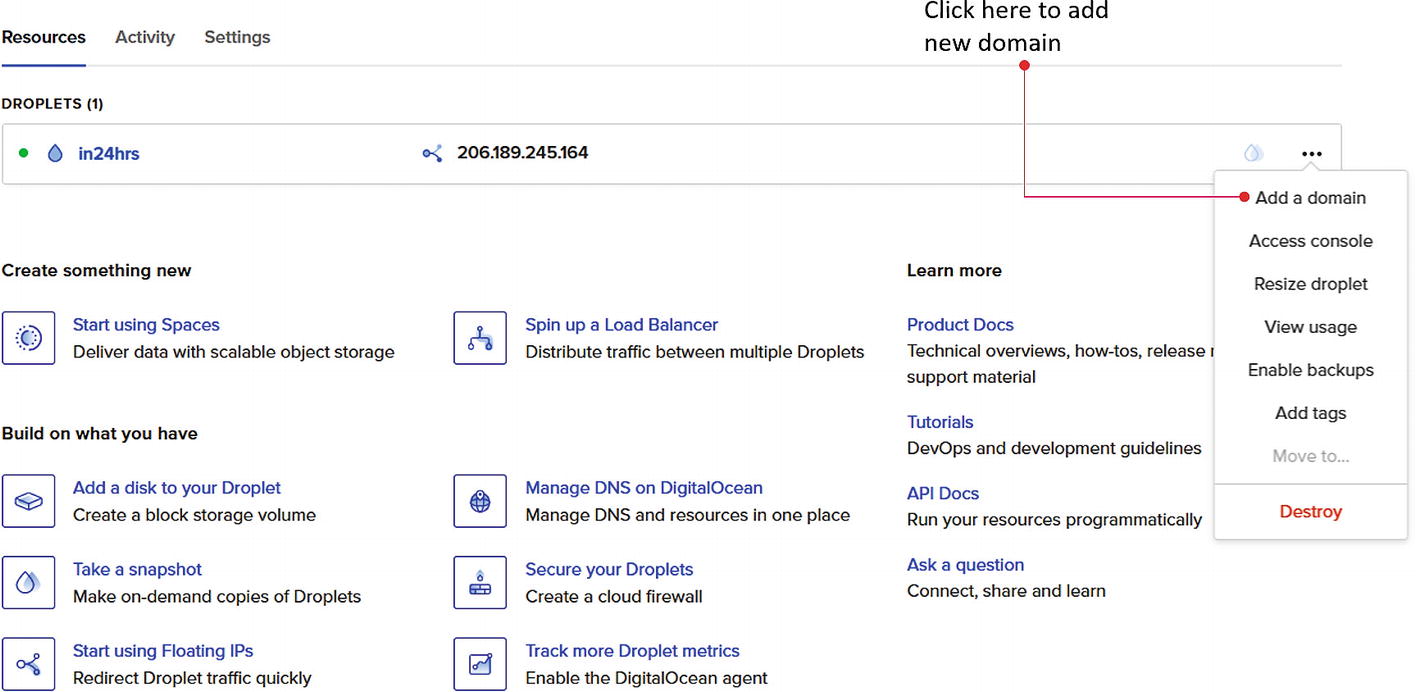
Once a desired domain name is available, click Add Domain on the control panel, as shown in Figures 5-13 and 5-14 respectively.
Figure 5-13
Adding a new domain on our cloud instance
Figure 5-14
Provide domain name and click Add Domain
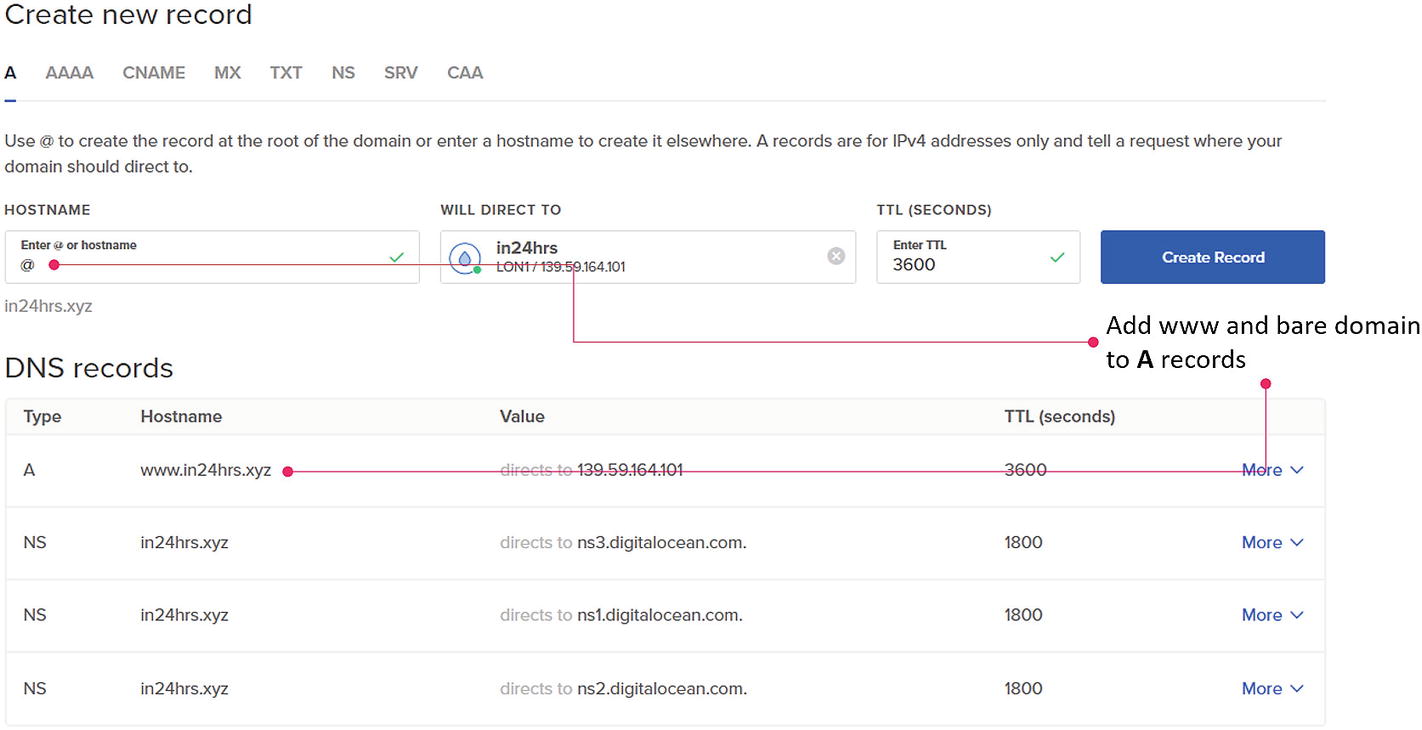
In the next step, we update our nameservers with a domain registrar. This process usually differs by registrar, and each domain registrar has a step-by-step tutorial to explain how to change nameservers on their control panels. Note that DigitalOcean has the following three nameservers, which need to be updated in the domain registry:
ns1.digitalocean.com
ns2.digitalocean.com
ns3.digitalocean.com
After our domain name is configured and the relevant records have been updated on the control panel, we set up SSL certificates for our domain name. SSL certificates are available with various providers and the cost of those certificates could range from a few hundred dollars to thousands of dollars. However, there are many credible authorities that provide SSL certificates for free without compromising security; we will use one of those. If you already have an SSL certificate purchased from another authority, you can upload it on the cloud instance, and then go directly to the Apache configuration update step.
Note
Remember to use your chosen domain name when executing these steps and commands.
Note that before we begin the next steps, you need to set up the following two DNS records on your server control panel, which is also shown in Figure 5-15.
A record with in24hrs.xyz pointing to your server's public IP address.
A record with www.in24hrs.xyz pointing to your server's public IP address.
Figure 5-15
Change A records in control panel
Usually, nameserver and record changes take about an hour to reflect completely across the Web. After an hour, if we navigate to www.in24hrs.xyz in the browser, it should take us to the default Apache webpage on our cloud instance, as shown in Figure 5-9.
Add Virtual Hosts to Our Web Server
We need to have virtual hosts set up for Apache to use and configure our domain name effectively. The first step is to create a separate directory for our newly added domain. This is followed by assigning the ownership of the directory with the $USER environmental variable.
# mkdir -p /var/www/in24hrs.xyz/html
# chown -R $USER:$USER /var/www/in24hrs.xyz/html
Let’s make sure that permissions have been set up correctly.
# chmod -R 755 /var/www/in24hrs.xyz
Now we will create a simple webpage to be displayed when we navigate to our domain name in the browser. We will create a PHP file since we already gave it preference in an earlier setup.
# nano /var/www/in24hrs.xyz/html/index.php
Add following contents to the file
<?php
echo("Hi...this is our webpage with domain name !");
?>
For the Apache web server to serve this content, we need to create a virtual host file with the correct directives, and enable that configuration subsequently. We will also turn off the web server’s default configuration and keep a separate copy of it for future reference and as a fallback option.
To activate the new configuration, you need to run:
systemctl reload apache2
We will now disable the default configuration, and then run a configuration test to check for any errors that we might have made during the process. If you get an error, check for any typos and missing characters in the virtual host file.
# a2dissite 000-default.conf
Output
Site 000-default disabled.
To activate the new configuration, you need to run:
systemctl reload apache2
# apache2ctl configtest
Output
Syntax OK
# systemctl restart apache2
With the last command, the Apache web server restarts and reloads the new configuration that we created earlier. At this stage, if we navigate to www.in24hrs.xyz, we should see the message Hi...this is our webpage with domain name! in our web browser, as shown in Figure 5-16.
Figure 5-16
We are now able to access our cloud instance with a domain name
Installing SSL Certificates
In this process, we will use Let’s Encrypt, which is a certificate authority (CA) that provides an easy and automated way to obtain, install, and maintain free TLS/SSL certificates. This process is simplified and automated with the help of a software client called Certbot. Certbot attempts to automate almost all the required steps and needs only minor manual effort.
We will install Certbot from an active Ubuntu software repository, which tends to be the most updated version, with the following command:
# add-apt-repository ppa:certbot/certbot
Press Enter to accept the prompt, and the installation will progress. Then we will install Certbot’s Apache package with the apt package manager.
# apt install python-certbot-apache
Since we have enabled UFW for the firewall, and we already enabled HTTPS traffic through Apache Full configuration, we should be good with firewall settings at this stage. If this is not done already, you need to do it before proceeding.
We will now obtain an SSL certificate for our domain name with the following command:
This command runs Certbot with an Apache plugin. The -d parameter specifies the domain names for which we are requesting SSL certificates. Since we are running this command for the very first time, it may prompt for an email address. Agree to the terms of service and so forth. Afterward, the script proceeds with verbose output, as follows:
Performing the following challenges:
http-01 challenge for in24hrs.xyz
http-01 challenge for www.in24hrs.xyz
Enabled Apache rewrite module
Waiting for verification...
Cleaning up challenges
Created an SSL vhost at /etc/apache2/sites-available/in24hrs.xyz-le-ssl.conf
Enabled Apache socache_shmcb module
Enabled Apache ssl module
Deploying Certificate to VirtualHost /etc/apache2/sites-available/in24hrs.xyz-le-ssl.conf
Enabling available site: /etc/apache2/sites-available/in24hrs.xyz-le-ssl.conf
Deploying Certificate to VirtualHost /etc/apache2/sites-available/in24hrs.xyz-le-ssl.conf
Once the certificate is deployed on our cloud instance, it asks us whether we want to make the HTTPS changes mandatory; to this we select option 2, and the configuration is updated accordingly. Once the configuration is updated, Apache web server reloads the configuration and restarts.
Please choose whether or not to redirect HTTP traffic to HTTPS, removing HTTP access.
1: No redirect - Make no further changes to the webserver configuration.
2: Redirect - Make all requests redirect to secure HTTPS access. Choose this for new sites, or if you're confident your site works on HTTPS. You can undo this change by editing your web server's configuration.
Congratulations! You have successfully enabled https://in24hrs.xyz and
https://www.in24hrs.xyz
The preceding settings also ensure that HTTP traffic is redirected to HTTPS. To check if everything is working as expected, navigate to www.in24hrs.xyz in your browser, you should see the output as shown in Figure 5-17. Our certificates are downloaded, installed, and loaded automatically, and they will be automatically renewed on a quarterly basis—thanks to Certbot automation.
Figure 5-17
HTTPS enabled on domain name
When navigating to www.in24hrs.xyz, you will notice that the browser is now showing a lock icon next to the website name (usually, it is green in Firefox and gray in Chrome).
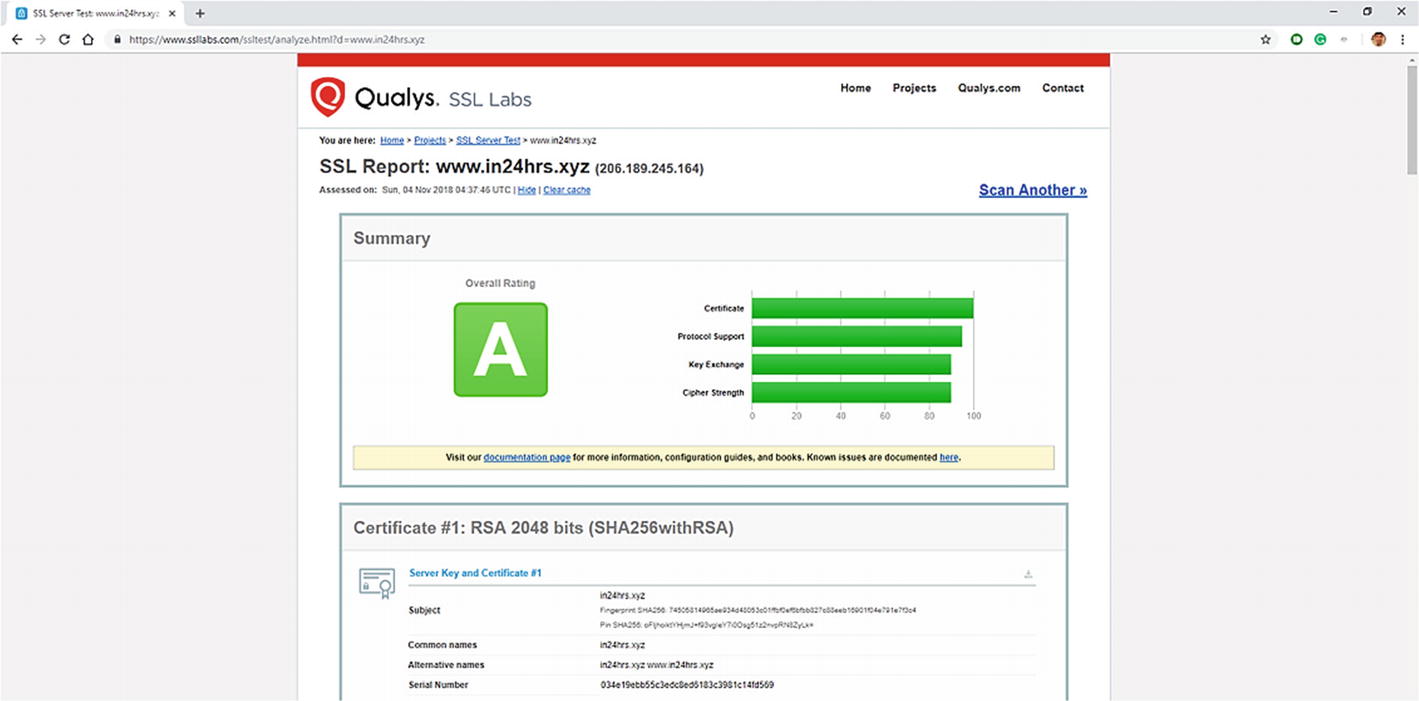
We can check our cloud instance SSL certificates at www.ssllabs.com/ssltest/analyze.html?d=www.in24hrs.xyz, here the website will perform some tests and tell us the level of security through SSL report on the given website being tested as shown in Figure 5-18.
Figure 5-18
SSL certificates are valid and has an A
At this stage, our general web interface is ready and available to use over SSL. We are also able to use phpMyAdmin over SSL, which will strengthen database security further.
Installing Node.js and Node-RED
Node.js is a JavaScript platform for general-purpose programming that allows users to build network applications quickly. By leveraging JavaScript on both the front and back end, Node.js makes development more consistent and integrated. (DigitalOcean, n.d.)
We will use Ubuntu’s apt package manager to update and install Node.js on our cloud instance with the following commands:
# apt update
# apt install nodejs
# apt install npm
In the preceding three commands, the first command refreshes the local package index, and the next command installs Node.js on our instance. We are also installing the node package manager, NPM, which helps us update and add node packages to our instance as needed.
For each of the installations, we are prompted with the amount of disk space being used; we are selecting Y for yes in both cases.
Upon successful installation, we can check the installed version of each application with the following commands:
# nodejs -v
Output
V8.11.4
# npm -v
Output
5.8.0
Once we have installed the node package manager, it is easier to install Node-RED with the same package manager. We will install Node-RED as a global module so that it will add the node-red command to our cloud’s system path.
npm install -g --unsafe-perm node-red
The preceding command installs Node-RED and its dependencies at once. Ideally, if we navigate with our browser, we are able to use Node-RED directly. However, recall that we enabled the firewall with UFW and closed off all the inbound traffic unless explicitly approved. Due to this, we are unable to access Node-RED without enabling this traffic.
Additionally, since we have also mandated all the inbound traffic to be over HTTPS, we need to modify the Node-RED configuration to enable HTTPS. By default, Node-RED can run without SSL. Node-RED runs on default port 1880; therefore, we will enable traffic on that port first.
# ufw allow 1880/tcp
Output
Rule added
Rule added (v6)
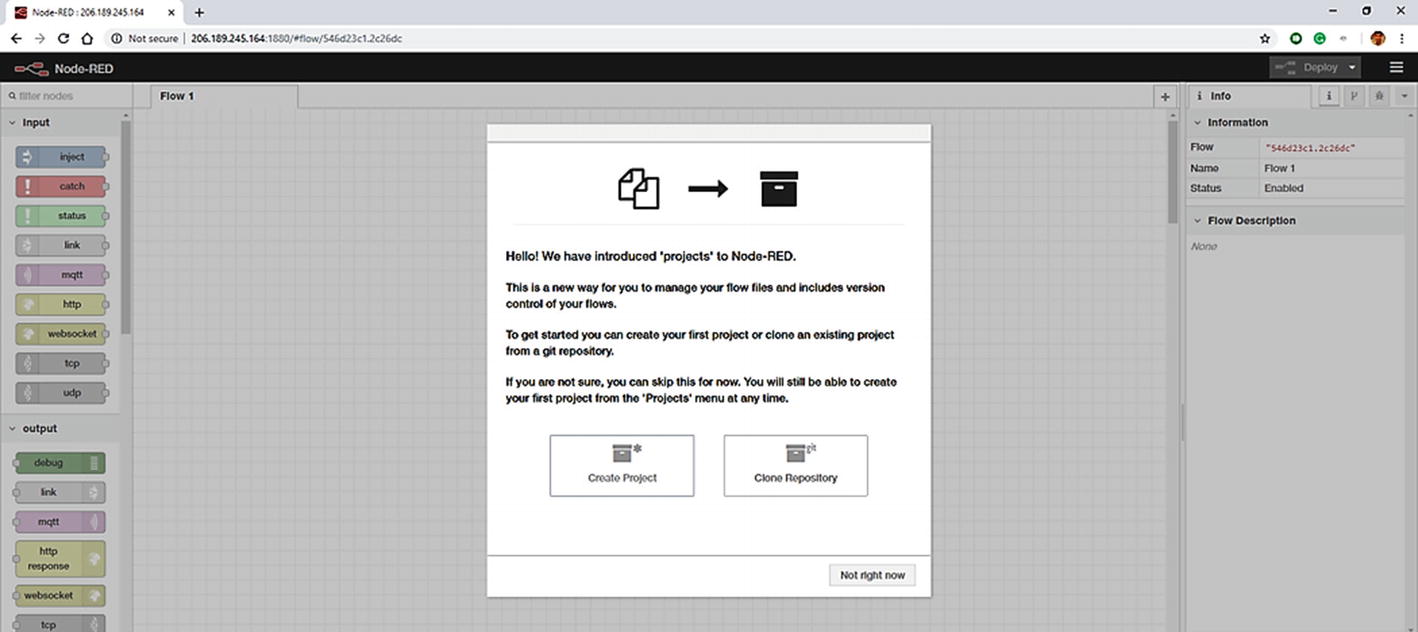
At this stage, we can run Node-RED and check that the default interface is loading by navigating to our website by using our public IP address, http://<INSTANCE_IP>:1880 as shown in Figure 5-19. This is because we have not yet enabled SSL for Node-RED, and so we are unable to access it with our domain name directly. Run Node-RED now with the following command, and then navigate to the address mentioned earlier.
# node-red
Figure 5-19
Accessing Node-RED admin panel using public IP address
Modifying Node-RED Settings
Let’s modify the Node-RED configuration for better accessibility and functionality now. This primarily involves modifying the settings.js file that is available in the node-red root directory. We will do these changes using any standard editor available on our system (i.e., nano).
Note that at this stage, we are able to access the cloud instance using any compatible FTP program, such as FileZilla, using our normal root login credentials. FileZilla enables us to download a file from our cloud server, and then open, edit, and save it before uploading it back to the instance.
This can be done in three easy steps.
1.
Connect the FileZilla FTP client to our cloud instance with a public IP address and login credentials.
2.
Locate the file you want to edit. Then right-click the file that you want to edit. This opens the file with the default editor program installed on your computer. In most cases, it is Notepad, TextMate, or Notepad++.
3.
Edit the file as needed, and then save it. When you save the file, FileZilla displays a window that alerts you about the file being changed and asks whether you wish to upload the file back to the server. If the file already exists, it also asks if you want to overwrite the existing file. After clicking the Yes option, a newly edited/created file is uploaded in the destination folder.
Caution
When using the edit feature in FileZilla, all the uploads are live. This means that when you upload the changed or new file, changes are in effect almost immediately on the cloud instance or website. I recommend that you download the copy of the original file while making any changes, and then consciously upload it when done. It is also a good practice to maintain an exact replica of important folders on our cloud server on your local machine, so that you can easily navigate to required files as needed.
Now let’s get back to editing the settings file. Starting at the beginning of the file, we uncomment the fs module declaration and make it available, as follows:
// The `https` setting requires the `fs` module. Uncomment the following
// to make it available:
var fs = require("fs");
Enabling the fs module is required because we want to enable HTTPS on our Node-RED instance. At line 93 in the settings file, we uncomment the admin root path. This enables us to access the Node-RED editor at different endpoints than the root URL. While it is not mandatory to do this, it is useful because we can then utilize the root URL for any other purpose, such as hosting different webpages and information pages, and so forth.
// The following property can be used to specify a different root path.
// If set to false, this is disabled.
httpAdminRoot: '/admin',
Now let’s modify a block between lines 138 and 147. This block enables HTTPS for Node-RED, and we must provide a private key and a certificate file name to enable it. We must provide the full file path, which we can obtain in one of two ways. We can refer to the SSL installation output, on which the end of the process script shows where files are stored, or alternatively, the path can be copied from the Apache configuration file that is available at /etc/apache2/sites-available/in24hrs.xyz.conf.
// The following property can be used to enable HTTPS
// See http://nodejs.org/api/https.html#https_https_createserver_options_requestlistener
// for details on its contents.
// See the comment at the top of this file on how to load the `fs` module used by
Since we are building our own IoT platform, which will eventually be used on various systems and devices, cross-origin resource sharing is required. It is a good idea to enable it right now in the settings file by uncommenting the relevant block between lines 162 and 165, as follows.
// The following property can be used to configure cross-origin resource sharing in the HTTP nodes.
// See https://github.com/troygoode/node-cors#configuration-options for details on its contents. The following is a basic permissive set of options:
httpNodeCors: {
origin: "*",
methods: "GET,PUT,POST,DELETE"
},
A completely modified settings.js file can be downloaded from the GitHub repository.
Securing our Node-RED Editor
With the new file saved on the disk, now we can run our Node-RED instance using our domain name over HTTPS instead of a public IP. Check that the editor interface is loading by navigating to our website at www.in24hrs.xyz:1880/admin.
You can see the editor directly without any authentication or login page, and now we will fix that by enabling security for Node-RED. To begin, we have to install some admin tools for Node-RED with the following commands:
# npm install -g node-red-admin
Some errors or warnings may appear at this stage, but they can be ignored for now. In the next step, we create a user/password credential pair for the Node-RED editor login with the following command:
# node-red-admin hash-pw
The tool prompts for the password that we wish to use, and then prints the hash, which can be copied and pasted into the settings.js file in the next step.
Let’s open the settings file and have a look at the code block near line 122. We will uncomment that code block and add a username in plain text; the password is hash, which we copied in the previous step. I have created two users, so there are two different hashes for each of them. For one user, admin, we are allowing full access; for a guest user, it is read-only access.
// Securing Node-RED
// -----------------
// To password protect the Node-RED editor and admin API, the following property can be used. See http://nodered.org/docs/security.html for details.
Once this change has completed and the settings file is uploaded, we have to restart the program with the node-red command, and then navigate to www.in24hrs.xyz:1880/admin. This time, we see a login page asking for credentials, as shown in Figure 5-20.
Figure 5-20
Secured Node-RED editor login
When we start Node-RED, it runs on the command line with verbose output, which essentially means that we cannot do anything else while it is running. We can run Node-RED as a service in the background with a simple command, as follows:
# node-red > node-red.log &
With this command, the Node-RED output log is redirected to the node-red.log file, and & at the end tells Ubuntu to run the program as daemon (i.e., in the background).
Summary
We now have a fully operational cloud instance that has almost all the essentials that we need to build our own IoT platform. The next step is to start building the plumbing of the platform by adding the required blocks of services.
As explained in previous chapters, the message broker is one of the critical components, and therefore it is important that we understand its functionality. I elaborate on the message broker in the next chapter.