Faculty of Computers & Information, Menoufia University, Shibin El Kom, Egypt
In the previous chapter, we accessed the Android camera using the Camera widget. Kivy canvases were introduced to adjust the camera rotation. In order to limit the effect of a given canvas instruction to just some widgets, the PushMatrix and PopMatrix instructions were discussed. After that, we created an Android Kivy application to continuously capture images and send them to the Flask server, which displays them in an HTML page.
In this chapter, we create a more convenient design by separating the buttons into different screens. Kivy supports the Screen class for building screens and the ScreenManager class for managing such screens. We can navigate from one screen to another. The chapter starts by discussing how to create custom widgets, which will help us understand how to create an application with multiple screens.
Modifying Existing Widgets
Kivy supports a number of existing widgets, such as Button, Label, TextInput, and more. It supports modifying existing widgets to override their default behaviors. We can use the Label widget as a test case.
The Label class includes some default values as its properties. For example, the text property is by default set to an empty string, the text color is white, and default font size is equal to 15 SP (Scale-Independent Pixel). We will override these three properties according to the KV code shown in Listing 4-1. The text of the label is set to "Hello", the text color is red, and the font size is 50 SP.
Label:
text: "Hello"
color: 1,0,0,1
font_size: "50sp"
Listing 4-1
Overriding Properties of a Widget Inside the KV File
The Python code shown in Listing 4-2 creates a new class named TestApp that extends the kivy.app.App class for building a new application. It assumes you saved the previous KV code in a file named test.kv.
import kivy.app
class TestApp(kivy.app.App):
pass
app = TestApp()
app.run()
Listing 4-2
The Generic Code for Building a Kivy Application
When you run the application, you’ll see the result in Figure 4-1. The properties are changed correctly. You might wonder if these properties stay changed for new labels. We can answer this question by creating a new label widget.
Figure 4-1
A Kivy application with only a Label widget
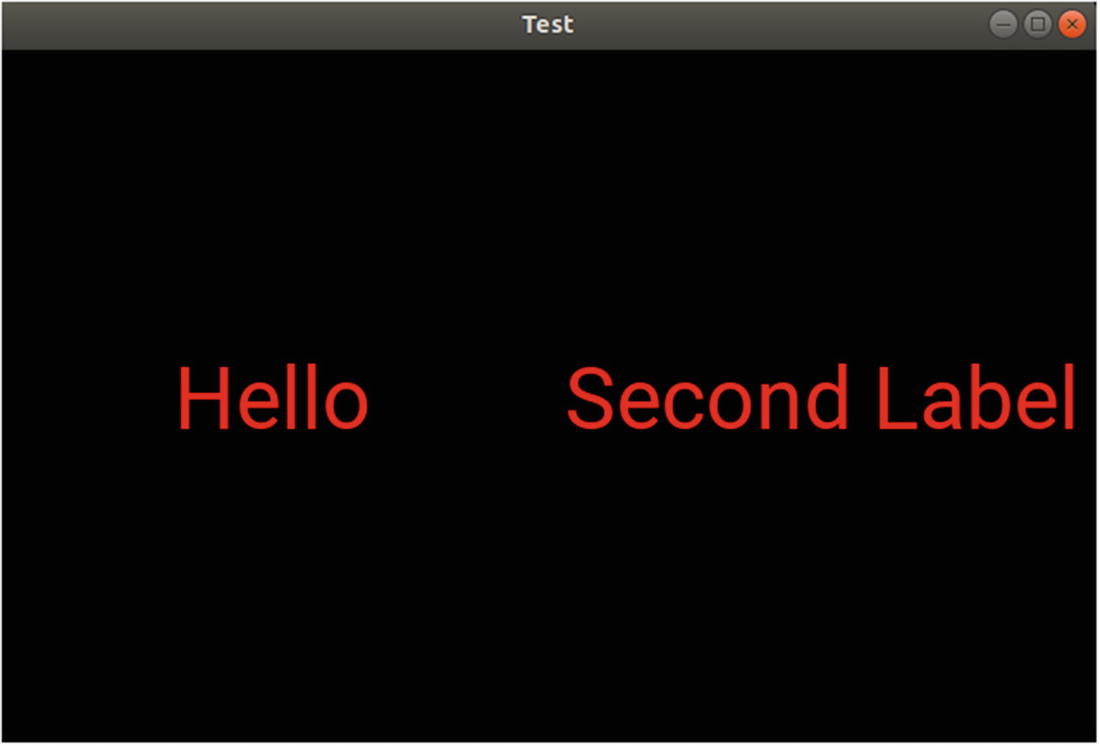
The new KV code in Listing 4-3 creates a BoxLayout that holds both labels. The first label has its properties set according to the previous example, while the second label has just its text changed to “Second Label”.
BoxLayout:
Label:
text: "Hello"
color: 1,0,0,1
font_size: "50sp"
Label:
text: "Second Label"
Listing 4-3
Adding Two Label Widgets to the Application Inside the BoxLayout Root Widget
After running the application, the second label does not have the color and font size changed according to the window in Figure 4-2. The reason is that both labels are independent instances of the Label class. When a new instance is created, it inherits the default values of the properties from the Label class. If some properties are changed for a given instance, it does not mean they will be changed for the other instances. In order to make both labels have the same text color, we can change the color property of the Label class. As a result, all of its instances will inherit this color.
Figure 4-2
Overriding the properties of only one Label widget while leaving the other set to the default
In order to edit a class in the KV file, the class name is inserted between <> without any indentation. The KV file in Listing 4-4 overrides the text color and font size properties of the Label class. By creating two instances of the Label class, both will inherit the text color and font size according to Figure 4-3.
BoxLayout:
Label:
text: "Hello"
Label:
text: "Second Label"
<Label>:
color: 1,0,0,1
font_size: "50sp"
Listing 4-4
Editing a Class in the KV Language
Figure 4-3
Changing the properties of all Label widgets
Creating Custom Widgets
The code in Listing 4-4 modifies the Label class so that all of its instances will have the text color and font size specified. The previous properties are lost. Sometimes, we might be interested in the previous default values for such properties.
In order to keep the previous properties of the Label class, we can create a new custom class that extends the Label class. This custom class inherits the default properties of the parent Label class and we can also modify some of its properties.
The KV code in Listing 4-5 creates a new custom class named CustomLabel that inherits the Label class. As a result, if you need to create a label widget with the default properties, you instantiate the Label class. To use the modified properties, instantiate the CustomLabel class. In this example, the first label is an instance of the CustomLabel class in which the text color and font size are changed. The second label is an instance of the Label class with the default values for these two properties.
BoxLayout:
CustomLabel:
text: "Hello"
Label:
text: "Second Label"
<CustomLabel@Label>:
color: 1,0,0,1
font_size: "50sp"
Listing 4-5
Creating a New Custom Label Widget by Extending the Label Class Inside the KV File
The result after running the application with this KV file is shown in Figure 4-4.
Figure 4-4
Using the custom Label widget
Defining Custom Classes in Python
In Listing 4-5, a new custom class named CustomLabel is created in the KV file that both inherits the Label class and modifies some of its properties. Doing the inheritance inside the KV file limits the capabilities of the new class, as we can’t write functions inside it.
We can create the new class and do the inheritance inside the Python code. Then, we will just refer to this class in the KV file to modify its properties. This helps when writing Python functions inside the new custom class. The example in Listing 4-6 creates a new empty class named CustomLabel that extends the Label class.
import kivy.app
import kivy.uix.label
class CustomLabel(kivy.uix.label.Label):
pass
class TestApp(kivy.app.App):
pass
app = TestApp()
app.run()
Listing 4-6
Inheriting the Label Class Within the Python File
The content of the test.kv file is shown in Listing 4-7. Note that we simply referred to the existing class inside KV rather than creating it, as in the previous section.
BoxLayout:
CustomLabel:
text: "Hello"
Label:
text: "Second Label"
<CustomLabel>:
color: 1,0,0,1
font_size: "50sp"
Listing 4-7
Referring to the Custom Class Created in the Python File Inside the KV File
We can change the previous application a bit by creating a class in the Python file named MyLayout that extends the BoxLayout class, as shown in Listing 4-8. Because this class inherits the BoxLayout class, we can use it everywhere that BoxLayout is used. For example, we can replace the BoxLayout inside the KV file with the new class.
import kivy.app
import kivy.uix.label
import kivy.uix.boxlayout
class CustomLabel(kivy.uix.label.Label):
pass
class MyLayout(kivy.uix.boxlayout.BoxLayout):
pass
class TestApp(kivy.app.App):
def build(self):
return MyLayout()
app = TestApp()
app.run()
Listing 4-8
Creating a New Custom Layout by Extending the BoxLayout Class
The new KV file is given in Listing 4-9. It references the custom MyLayout class by adding its name between <>. This class has two child widgets, which are CustomLabel and Label.
Note that we have to define the build() function inside the TestApp class to return an instance of the MyLayout class. This is because the KV file does not return a layout by itself for the TestApp. The KV file simply creates two custom widgets named MyLayout and CustomLabel.
<MyLayout>:
CustomLabel:
text: "Hello"
Label:
text: "Second Label"
<CustomLabel>:
color: 1,0,0,1
font_size: "50sp"
Listing 4-9
Referencing the Custom BoxLayout Class Inside the KV File
We can also return the layout for the TestApp class inside the KV file according to the KV file in Listing 4-10. In this case, the KV file defined two new widgets and returned a widget named MyLayout. This widget represents the layout of the TestApp class. The Python code does not have to implement the build() function at the current time.
MyLayout:
<MyLayout>:
CustomLabel:
text: "Hello"
Label:
text: "Second Label"
<CustomLabel>:
color: 1,0,0,1
font_size: "50sp"
Listing 4-10
Using the Custom BoxLayout Class
At this point, we are able to create a new class inside the Python file that extends a widget class, refer to it inside the KV file, and modify some of its properties. This enables us to start learning how to create an application with multiple screens.
Creating and Managing Screens
Previously, a custom class is created that extends the kivy.app.App class when building an application. The application has a window in which we can add widgets. All widgets are inside a single screen. Sometimes, we need to organize the widgets of the same application into different screens where each screen does a different job. The screen in Kivy is similar to the activity in Android. An Android application can have more than one activity and a Kivy application might have more than one screen.
In order to create a screen, rather than extending the kivy.app.App class, we will extend the kivy.uix.screenmanager.Screen class. Listing 4-11 shows the Python file that creates two classes named Screen1 and Screen2, one for each screen, extending the Screen class. There is also an application class named TestApp.
import kivy.app
import kivy.uix.screenmanager
class Screen1(kivy.uix.screenmanager.Screen):
pass
class Screen2(kivy.uix.screenmanager.Screen):
pass
class TestApp(kivy.app.App):
pass
app = TestApp()
app.run()
Listing 4-11
Creating Two Screens by Extending the Screen Class
From the Python code in Listing 4-11, two empty screens are created. Their layout is given in the test.kv file associated with this application, as shown in Listing 4-12. Note that the screen class name is written between <>. Each screen has a name property. The names of the two screens are Screen1 and Screen2. There is a screen manager that has two children, which are the two screens. The screen manager has a property named current, which tells which screen is currently active in the window. This property accepts the screen name. Each screen has a property named manager, which corresponds to the manager of the screen. We can use it to access the manager within the KV file.
ScreenManager:
Screen1:
Screen2:
<Screen1>:
name: "Screen1"
Button:
text: "Button @ Screen 1"
on_press: root.manager.current = "Screen2"
<Screen2>:
name: "Screen2"
Button:
text: "Button @ Screen 2"
on_press: root.manager.current = "Screen1"
Listing 4-12
Defining the Layout of the Two Screens and Adding Them as Children to the ScreenManager Class
In order to move from one screen to another, we add a button to each screen. When such a button is pressed, the current screen is changed using the root.manager.current property. Inside the first screen, the current screen changes to the second screen. The reverse occurs to the second screen. If the current property is not specified inside the screen manager, it defaults to the first screen inside the manager. Figure 4-5 shows the result after running the application.
Figure 4-5
The first screen added within the ScreenManager appears as the application startup screen
Clicking on the button changes the current screen using the current property of the manager, as shown in Figure 4-6.
Figure 4-6
Moving from one screen to another
We can explicitly specify which screen should be displayed when the application starts using the current property, as given in Listing 4-13. When the application starts, it will open the second screen.
ScreenManager:
current: "Screen2"
Screen1:
Screen2:
Listing 4-13
Using the current Property of the ScreenManager Class to Explicitly Specify the Startup Screen
Accessing Widgets Inside Screens
After adding the screens and their manager, the widget tree appears as follows. The root widget is the ScreenManager, which holds two child Screen widgets. Each screen has a Button widget. It is important to study the widget tree in order to understand how to access a specific widget in the tree.
Application
Root (ScreenManager)
Screen1
1.
Button
Screen2
1.
Button
Assume we need to access the button in the first screen from the KV file. How do we do that? First, we need to access the application itself using the app keyword. Then, the root widget of the application is accessed using the root keyword. Note that the root widget is a ScreenManager. Thus, the current command is app.root. The children inside the root widget are screens that can be accessed using the screens property. The app.root.screens command returns a list of the available screens inside the manager, as shown in the next line:
The first screen is the first element of the list and thus can be accessed using index 0. Thus, the complete command for accessing the first screen is app.root.screens[0].
After accessing the target screen, we can access the button inside it using the ids dictionary as we used to do. Assume that the button has an ID of b1. If that’s the case, the command to access the button would be as follows:
app.root.screens[0].ids["b1"]
After creating screens and controlling them using the screen manager, we can start modifying the previous project to separate the widgets across two screens.
Modifying the Live Camera Capture Application to Use Screens
In Listings 3-37 and 3-38 of the previous chapter, a Kivy application was created that continuously captures images to be sent to an HTTP server where the received images are displayed in an HTML page. All widgets required to configure and capture images were on the same screen. In this section, they will be separated into different screens, where each screen has a specific job to do.
The first step is to prepare the Python file by adding two screens. The first screen configures the server with the width and height of the images to be captured. The second screen captures the images and sends them to the server. The modified Python code in Listing 4-14 has two new classes, named Configure and Capture, that extend the Screen class.
t = threading.Thread(target=self.send_files_server, args=(files, url))
t.start()
def build(self):
pass
def send_files_server(self, files, url):
try:
requests.post(url, files=files)
except requests.exceptions.ConnectionError:
self.root.screens[1].ids['capture'].text = "Connection Error! Make Sure Server is Active."
app = PycamApp()
app.run()
Listing 4-14
Using the Screen Class to Redesign the Live Camera Capture Application Created in Listing 3-37
The widget tree inside the KV file is shown here. Note that the widgets are separated across the two screens.
Application
Root (ScreenManager)
Configure Screen
BoxLayout
Label
TextInput (ip_address)
TextInput (port_number)
Button (cam_size)
Capture Screen
BoxLayout
Camera (camera)
Button (capture)
The KV file of the application is shown in Listing 4-15, where each screen has a BoxLayout for grouping its widgets. The Configure screen has a Label widget that displays instructions for the users. There are two TextInput widgets where the user enters the IPv4 address and port number at which the server listens for requests. It also includes the Button widget used for sending a POST message by the dimensions of the camera. The Capture screen includes the Camera widget itself and a button for starting capturing images.
Both screens are grouped under the ScreenManager. Note that the Configure screen is the first screen to be added to the manager and thus it will be displayed when the application starts.
ScreenManager:
Configure:
Capture:
<Capture>:
name: "capture"
BoxLayout:
orientation: "vertical"
Camera:
id: camera
size_hint_y: 18
resolution: (1024, 1024)
allow_stretch: True
play: True
canvas.before:
PushMatrix:
Rotate:
angle: -90
origin: root.width/2, root.height/2
canvas.after:
PopMatrix:
Button:
id: capture
font_size: 30
text: "Capture"
size_hint_y: 1
on_press: app.capture()
<Configure>:
name: "configure"
BoxLayout:
orientation: "vertical"
Label:
text: "1) Enter the IPv4 address of the server.
2) Enter the port number.
3) Press the Configure Server button.
Make sure that the server is active."
font_size: 20
text_size: self.width, None
size_hint_y: 1
TextInput:
text: "192.168.43.231"
font_size: 30
id: ip_address
size_hint_y: 1
TextInput:
text: "6666"
font_size: 30
id: port_number
size_hint_y: 1
Button:
id: cam_size
font_size: 30
text_size: self.width, None
text: "Configure Server"
size_hint_y: 1
on_press: app.cam_size()
Listing 4-15
The KV File of the Live Camera Capture Project After Using Screens
Once the user presses the button that configures the server, the Camera widget dimensions are returned and a POST message is sent to the server based on the IPv4 address and port number retrieved from the TextInput widgets. The first screen is shown in Figure 4-7.
Figure 4-7
The main screen of the application where the IP and port number are specified
After the message is sent successfully, the current screen of the manager is changed to the Capture screen, which is shown in Figure 4-8. In this screen, the user can press the capture button in order to start capturing and sending the captured images to the server.
Figure 4-8
The second screen in the application where images can be captured and sent to the server
Notice how the widgets are accessed from the widget tree. As discussed in the previous section, the ScreenManager is the root and has two screens. Each screen has a number of widgets that can be accessed using their IDs. For example, the Camera widget can be accessed from the KV file using the following command.
app.root.screens[1].ids['camera']
In this project, we are not interested in referring to widgets from the KV file but from the Python file. For example, the Camera widget must be accessed from inside the cam_size() function of the PycamApp class. In this case, the difference compared to the previous command is how to access the application. It can be referenced using the self keyword. Thus, the command used to access the Camera widget inside Python is as follows.
self.root.screens[1].ids['camera']
We use screen with index 1 because the Camera widget resides inside it. This way, we successfully access a widget from the second screen with index 1. If we need to access the TextInput widget with an ID of ip_address, which is available in the first screen from the Python code, then the next command is used. Just specify the index of the screen in addition to the ID of the widget.
self.root.screens[0].ids['ip_address']
To access the port number, the next command is used:
self.root.screens[0].ids['port_number']
After completing both the server-side and client-side applications, we can start publishing them.
Publishing the Server-Side Application
In order to create an executable file from the Python project, we can use the PyInstaller library. We can install this library using the pip install pyinstaller command.
Before building the executable file, we can change the server application a bit. This is because it does not allow us to change the IPv4 address and port number. We used to execute the server application using the following terminal command:
ahmedgad@ubuntu:~/Desktop$ python3 FlaskServer.py
When executing a Python file from the terminal, some arguments are passed to it inside sys.argv list. If no arguments are specified in the terminal, then there will be a single item in the list holding the Python script name, which can be accessed according to the following command:
sys.argv[0]
Arguments can be listed after the name of the Python script. For example, the next command passes the IPv4 address and port number as arguments to the script.
In order to access the IPv4 address inside the Python script and store it in a variable named ip_address, we use the next command. The index 1 is used, as it is the second argument in the list.
ip_address = sys.argv[1]
By the same token, the port number is stored into the port_number variable using the next command. Note that index 2 is used.
port_number = sys.argv[2]
The new Python code of the server application listed in Listing 4-16 fetches the IPv4 address and port number from the terminal arguments. Inside the app.run() method, the host and port arguments take their values from the ip_address and port_number variables rather than being statically defined.
html_code = '<html><head><meta http-equiv="refresh" content="1"><title>Displaying Uploaded Image</title></head><body><h1>Uploaded Image to the Flask Server</h1><img src="data:;base64,'+im_base64.decode('utf8')+'" alt="Uploaded Image at the Flask Server"/></body></html>'
# The HTML page is not required to be opened from the Python code but open it yourself externally.
Modified Python Code for the Server-Side Application for Fetching the IPv4 Address and Port Number from the Command-Line Arguments
After being installed, the project can be turned into an executable file using the following command. Just replace the <python-file-name> with the Python filename of the server. The --onefile option makes PyInstaller generate a single binary file. Be sure to execute this command at the location in which the Python file is executed as long as its complete path is not specified.
pyinstaller --onefile <python-file-name>.py
After the command completes, the binary file will exist inside the dist folder, named according to the Python filename. PyInstaller creates an executable file for the OS being used. If the command is executed in a Linux machine, then a Linux binary is produced. If executed in Windows, then a Windows executable file (.exe) will be created.
The executable file can be hosted in a repository of your choice, where users can download and run the server. The Linux executable file is available at this page for download under the the CamShare name: https://www.linux-apps.com/p/1279651. Thus, in order to run the server, just download the file and run the following terminal command. Remember to change the path of the terminal according to the current path of CamShare.
Publishing the Client-Side Android Application to Google Play
The previous APK files are just for debugging and cannot be published at Google Play, as it accepts only release APKs. In order to create a release version of the application, we use this next command:
It is important to sign your release APK in order for it to be accepted at Google Play. For the instructions about signing an APK, read this page: https://github.com/kivy/kivy/wiki/Creating-a-Release-APK. Also remember to set the target API level to at least 26, as discussed previously.
You can download the Android app, connect it to the server, and capture images that will be displayed in an HTML page on the server.
Summary
As a summary, this chapter introduced building custom widgets by extending the Kivy widgets. This allows us to edit their properties once and use them many times. The chapter also introduced the Screen and ScreenManager classes for organizing the application widgets across multiple screens. For specifying which screen appears as soon as the application starts, the current property of the ScreenManager is set to the name of the desired screen. The screens are used to redesign the interface of the live camera capture project in Chapter 3.
In the next chapter, the Kivy concepts introduced in this and all previous chapters will be applied in order to create a multi-level cross-platform game in which a player collects a number of randomly distributed coins across the screen. There will be monsters that try to kill the player. The next chapter moves the reader from zero to hero by making game development very easy and explaining each line of code.