Faculty of Computers & Information, Menoufia University, Shibin El Kom, Egypt
The previous chapter introduced Kivy so that we could start building cross-platform applications. As a way of applying concepts, we created an Android application that captures images and continuously sends them to a Flask server.
This chapter applies those same concepts by creating a multi-level cross-platform game where the player has a mission in each level, which is to collect coins that are randomly distributed on the screen. Monsters try to kill the players while they collect coins. The game functions successfully in different platforms without us having to change a single line of code. Before you learn how to build the game, we’ll introduce some new concepts, including FloatLayout and animation.
FloatLayout
In the previous chapters, the BoxLayout widget was used to group multiple widgets. Widgets are added to this layout in an ordered manner—either horizontally or vertically according to the orientation. The widget’s size is calculated by the layout with minor control over it. In the game we are going to create in this chapter, some widgets will not follow a pre-defined order. We need to customize their sizes and freely move them to any position. For example, the main character is placed according to the touch position. For this reason, we will use the FloatLayout widget. It places the widgets according to the x and y coordinates specified in each widget.
Listing 5-1 shows the generic code used to build a Kivy application in which the child class is named TestApp.
import kivy.app
class TestApp(kivy.app.App):
pass
app = TestApp()
app.run()
Listing 5-1
Generic Python Code to Build a Kivy Application
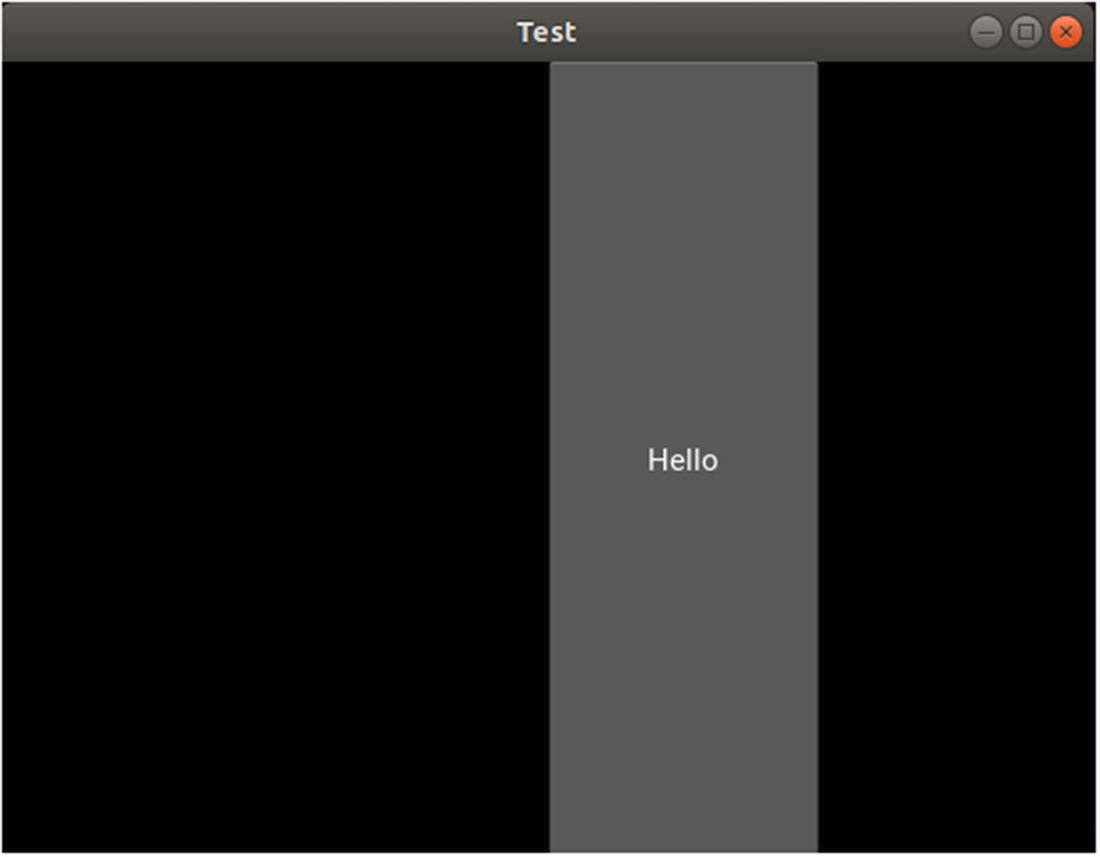
Based on the class name, the KV file must be named test.kv in order to implicitly detect it. The test.kv file content is shown in Listing 5-2. There is just a FloatLayout widget with a child, called Button. Note that there are two important fields in the Button widget—size_hint and pos_hint. Compared to BoxLayout, widgets added using FloatLayout may not extend the entire width or height of the screen.
FloatLayout:
Button:
size_hint: (1/4, 1/4)
pos_hint: {'x': 0.5,'y': 0.5}
text: "Hello"
Listing 5-2
KV File with FloatLayout as the Root Widget
If you run the application, you’ll see the window in Figure 5-1.
Figure 5-1
A button added within the FloatLayout
By default, widgets are added to the parent in the (0, 0) position, which corresponds to the bottom-left corner of the window. Thus, we need to move the widgets to avoid placing them on top of each other. The pos_hint field accepts a dictionary with two fields specifying the distance between the bottom-left corner of a widget and the bottom-left corner of the window. The distance is relative to the parent size.
A value of 0.5 for x means that the button will be away from the left size of the window by 50% of the parent width. A value of 0.5 for y means that the button will be far from the bottom of the window by 50% of the parent height. This way, the bottom-left corner of the Button widget starts at the center of the layout. Note that relative positioning is an efficient way of working with screens of differing sizes.
The size_hint field specifies the size of the widget relative to its parent size. It accepts a tuple that holds the relative width and height of the widget. In this example, the width and height of the button are set to 1/4, meaning that the button size is 40% of the parent size (i.e., one quarter).
Note that the pos_hint and size_hint fields are not guaranteed to change the size or the position of the widget. A widget just gives a hint to the parent that it prefers to set its position and size according to the values specified. Some layouts listen to its request as to which layouts neglect it. In the previous example, if FloatLayout is replaced with BoxLayout according to the code in Listing 5-3, some hints are not applied to the layout according to Figure 5-2. Note that the default orientation is horizontal.
BoxLayout:
Button:
size_hint: (1/4, 1/4)
pos_hint: {'x': 0.5,'y': 0.5}
text: "Hello"
Listing 5-3
Horizontal BoxLayout Orientation Does Not Listen to the Width Hint
Because the button is the only child in its horizontal BoxLayout parent, its bottom-left corner is expected to start from the (0, 0) position. According to Figure 5-2, the button does not start from the (0, 0) position. Its x coordinate starts at 0 as expected, but its y coordinate starts at half the parent’s height. As a result, the parent just listened to the hint about the Y position.
Figure 5-2
The button extends the entire width of the screen even if the width hint is set to 1/4
Regarding the button size, it is expected to cover the entire window, as it is the only child in the parent. This does not happen in the previous example. The height is 1/4 of the parent height, but the width extends the entire width of the parent.
As a summary of what happened when the pos_hint and size_hint fields are used with BoxLayout, just the height and the Y position change, while the width and the X position did not change. The reason is that a BoxLayout with a horizontal orientation just listens to hints related to the Y axis (e.g., height and Y position). If vertical orientation is used according to Listing 5-4, the width and the X position will change, but the height and the Y position will not according to Figure 5-3. This is why FloatLayout is used to dynamically position and size widgets.
BoxLayout:
orientation: 'vertical'
Button:
size_hint: (1/4, 1/4)
pos_hint: {'x': 0.5,'y': 0.5}
text: "Hello"
Listing 5-4
Vertical Orientation for BoxLayout Does Not Listen to the Height Hint
Figure 5-3
The button extends the entire height of the screen even if the height hint is set to 1/4
Note that the pos_hint field changes both the X and Y coordinates. If we are just interested in changing one rather than both, we can specify that in the dictionary. Note that there are other items to be specified in the dictionary such as top, right, center_x, and center_y.
In addition, the size_hint field specifies both the width and height. We can use size_hint_x to specify the width or the size_hint_y for the height. Because BoxLayout with a horizontal orientation does not change the X position and the width of the widgets, we can avoid specifying them. Listing 5-5 produces the same results while using fewer hints.
BoxLayout:
Button:
size_hint_y: 1/4
pos_hint: {'y': 0.5}
text: "Hello"
Listing 5-5
Just Specifying the Height Hint Using size_hint_y
Assume we want to add two widgets to the FloatLayout, where the first widget starts at the (0, 0) position and extends to the center of the layout and the second widget starts at 75% of the width and height of the parent and extends to its top-right corner. Listing 5-6 shows the KV file needed to build such a widget tree. The result is shown in Figure 5-4.
FloatLayout:
Button:
size_hint: (0.5, 0.5)
text: "First Button"
Button:
size_hint: (0.25, 0.25)
pos_hint: {'x': 0.75, 'y': 0.75}
text: "Second Button"
Listing 5-6
Adding Two Buttons Inside FloatLayout
Figure 5-4
Adding two buttons within FloatLayout
The size_hint field of the first button size is set to 0.5 to both the width and the height to make its size 50% of the window size. Its pos_hint is omitted, as the widget by default starts at the (0, 0) position.
The pos_hint of the second button is set to 0.75 for both x and y to make it start at a location that’s 75% of the way from the width and height of the parent. Its size_hint is set to 0.25 to make the button extend to the top-right corner.
Animation
In order to create a game in Kivy, animation is essential. It makes things go smoothly. For example, we might be interested in animating a monster that moves along a specified path. In Kivy, animations can be created by simply using the kivy.animation.Animation class. Let’s create an application with an image widget and animate it by changing its position.
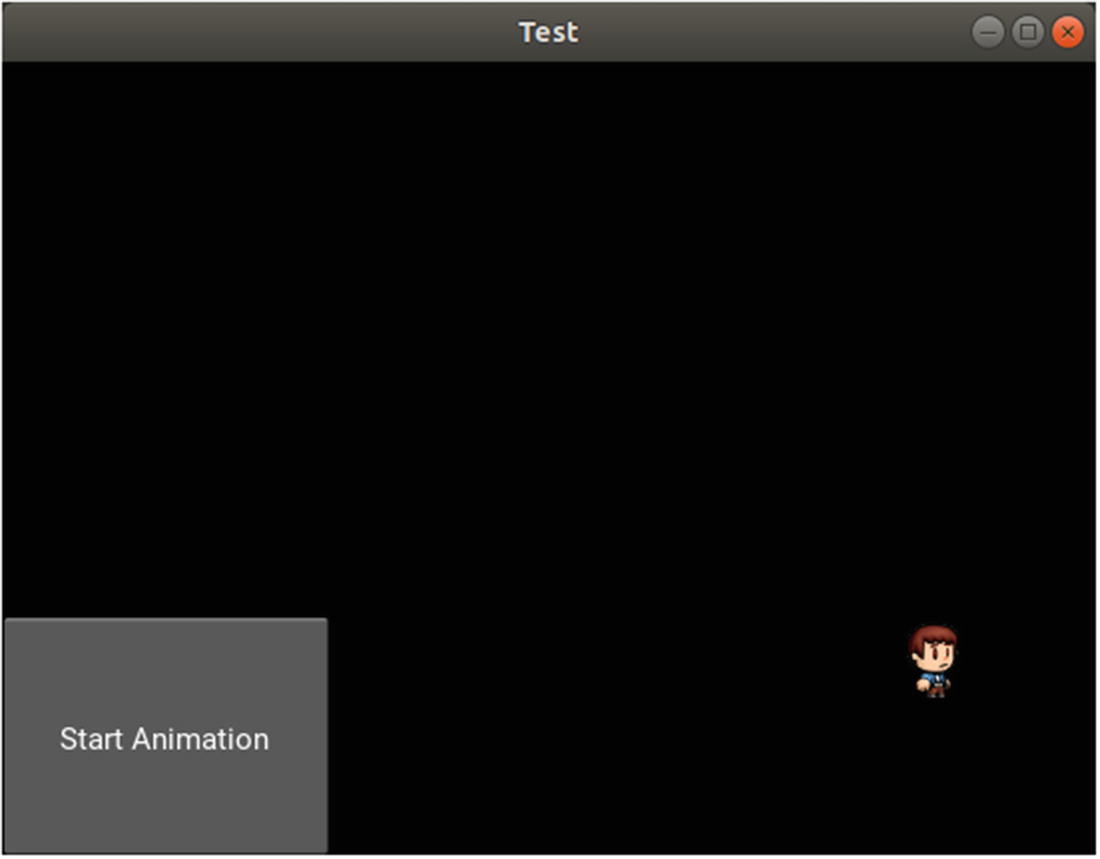
Listing 5-7 shows the KV file of the application. The root widget is FloatLayout, which contains two child widgets. The first child widget is an Image widget with the character_image ID and it displays the image specified by the source field. When set to True, the allow_stretch property stretches the image to cover the entire area of the Image widget.
There is a Button widget that starts the animation when it’s pressed. For this reason, a function named start_char_animation() within the Python file is associated with the on_press event.
FloatLayout:
Image:
id: character_image
size_hint: (0.15, 0.15)
pos_hint: {'x': 0.2, 'y': 0.6}
allow_stretch: True
source: "character.png"
Button:
size_hint: (0.3, 0.3)
text: "Start Animation"
on_press: app.start_char_animation()
Listing 5-7
Adding an Image to the Widget Tree Using the Image Widget
The Python file implementation is shown in Listing 5-8. Inside the TestApp class, the start_char_animation() function is implemented. An instance of the kivy.animation.Animation class is created in the char_animation variable. This class accepts the properties of the target widget to be animated. Because we are interested in changing the position of the Image widget, the pos_hint property is given as an input argument to the Animation class constructor.
Note that it is not possible to animate a property that’s not defined in the widget. For example, we cannot animate the width property because it is not defined in the widget.
In order to animate a property in a widget, we must provide the property name and its new value. The animation starts from the previous value of the property, which in this case is the value specified by the pos_hint field in the KV file, which is {'x': 0.2, 'y': 0.6}, and ends at the value specified in the constructor of the Animation class, which is {'x': 0.8, 'y': 0.6}. Because there is just a change in the x position, the image will move horizontally.
The start() method of the Animation class is called in order to start the animation. This method accepts the ID of the target widget in which we are looking to animate the properties specified in the Animation class constructor.
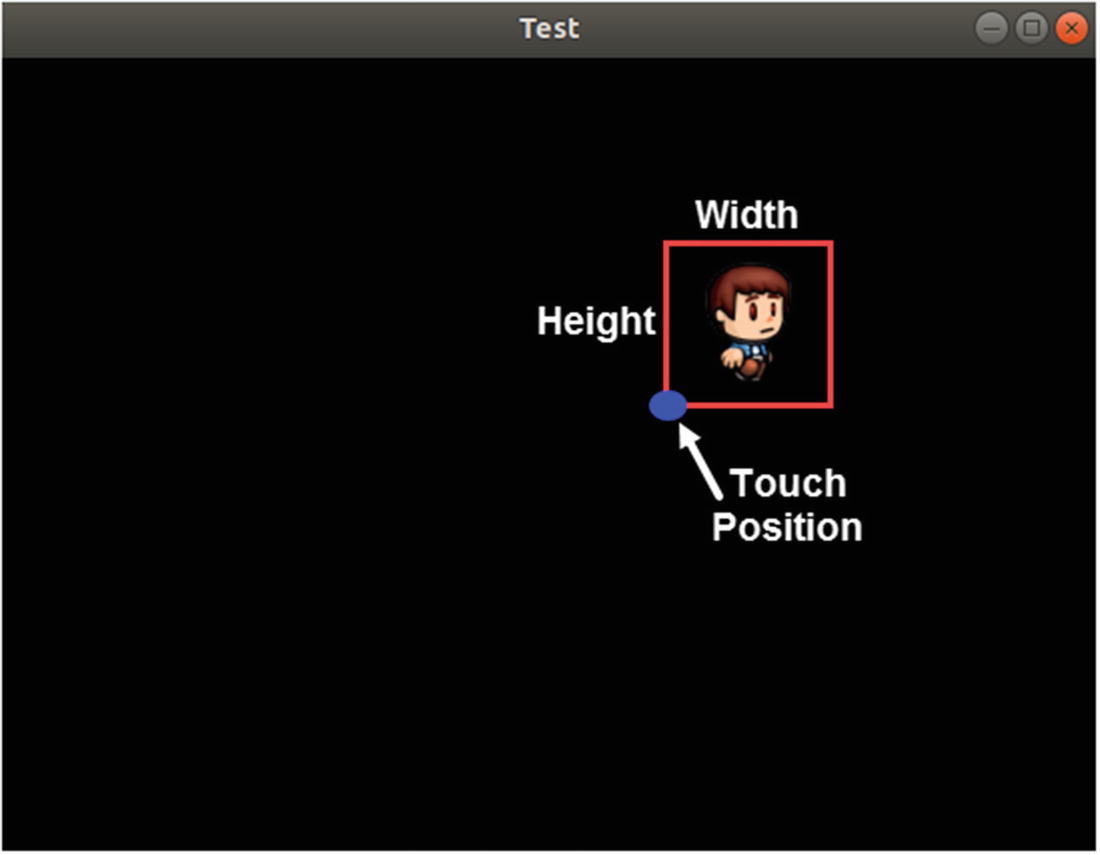
When we click the Button widget, the start_char_animation() function is executed and the animation starts. Figure 5-5 shows how the window appears, before and after pressing the button. By default, the animation takes one second to complete. This time can be changed using the duration argument.
Figure 5-5
Before and after the animation starts. The left figure shows the original image and the right figure shows the result after the animation ends
Note that we can animate multiple properties at the same animation instance. This is done by separating the different properties with commas. Listing 5-9 animates both the size and position of the image. The size is doubled by changing it from (0.15, 0.15) to (0.2, 0.2).
Animating Multiple Properties Within the Same Animation Instance
After running the application and pressing the button, the result after the animation ends is shown in Figure 5-6. Note that the duration changes to 1.5 seconds.
Figure 5-6
Result after animating the pos_hint and size_hint properties of the image
Clicking the button more does not move or change the size of the image even though the animation still works. In fact, the start_char_animation() function is executed after each button press. For each press, an Animation instance is created and started according to the attached widget. Talking about the pos_hint property for the first time the animation starts, the old value of the pos_hint property, specified in the KV file, and the new value, specified inside the Animation class constructor, are different. This is why the image moved from x=0.2 to x=0.8. After animating the image, its pos_hint property will be {'x': 0.8, 'y': 0.6}.
When animating the image again, the start value and the end value will be equal to {'x': 0.8, 'y': 0.6}. This is why there is no change in the position of the image widget. Kivy supports looping animations but looping the previous animation makes no sense. There must be at least one other value in the property so that the widget goes from one value to another. Before looping animations, we need to add another value to the pos_hint property.
The single animation accepts a single value to a given property, but we can add another value inside another animation and join the animations together.
Joining Animations
There are two ways to join animations—sequential and parallel. In sequential animations, when one animation ends, the next animation starts, and that continues until you reach the last animation. In this case, they are joined using the + operator. In parallel animations, all animations start at the same time. They are joined using the & operator.
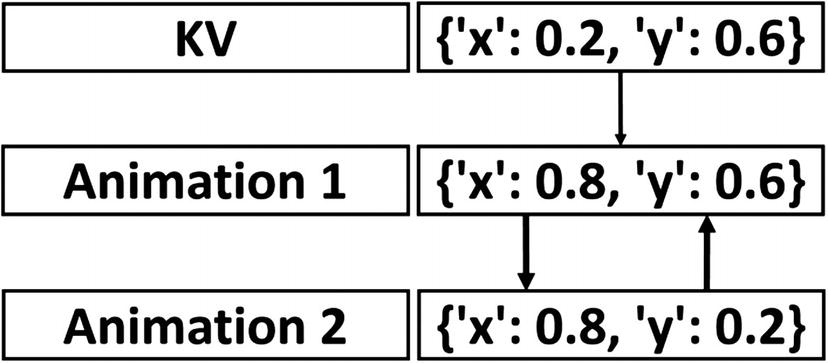
Listing 5-10 shows an example in which two animations are joined sequentially. The first animation instance, called char_anim1, moves the image horizontally to the right by changing the pos_hint property to {'x': 0.8, 'y': 0.6}, as was done previously. The second animation instance, called char_anim2, moves the widget vertically to the bottom to the new position, {'x': 0.8, 'y': 0.2}. Both animations are joined using the + operator and the result is stored in the all_anim1 variable. The joined animations start by calling the start() method.
After pressing the button, the result after running all the animations is shown in Figure 5-7.
Figure 5-7
Joining multiple animations to be applied to the Image widget sequentially
The summary of the path in which the pos_hint property gets changed is illustrated in Figure 5-8. The image starts at {'x': 0.2, 'y': 0.6} specified in the KV file. After running the first animation, it moves to the new position {'x': 0.8, 'y': 0.6}. Finally, it moves to {'x': 0.8, 'y': 0.2} after running the second animation. That position remains the current position of the image.
Figure 5-8
The path of the Image widget according to the two animations defined in Listing 5-10
After the animation completes, what happens if the button is pressed again? The joined animations will get started again. At the first animation, it changes the position of the image from its current position to the new position specified in its pos_hint argument, which is {'x': 0.8, 'y': 0.6}. Because the current position {'x': 0.8, 'y': 0.2} is different from the new position {'x': 0.8, 'y': 0.6}, the image will move. The current position of the image will be {'x': 0.8, 'y': 0.6}.
After running the first animation, the second animation starts and it moves the image from its current position {'x': 0.8, 'y': 0.6} to the new position specified in its pos_hint argument, which is {'x': 0.8, 'y': 0.2}. Because the positions are different, the image gets moved. This process repeats for each button press. Note that the initial value of the property inside the KV file is lost after the animation, if it’s not backed up.
Each animation takes one second to be completed and thus the total time for the joined animation is two seconds. You can control the duration of each animation using the duration argument.
Because there is more than one value by which the pos_hint property changes, we can loop the previous animations. We do this by setting the repeat property of the animation instance to True, according to Listing 5-11. This creates an infinite loop between the two animations.
Repeating Animations by Setting the repeat Property to True
The animation transition can be changed using the t argument inside the Animation class constructor. The default is linear. There are different types of transitions, such as in_back, in_quad, out_cubic, and many others. You can also return it using the transition property. Listing 5-12 shows an example in which the transition of the first animation is set to out_cubic.
In order to stop all animations assigned to all properties in a given widget, we call the cancel_all() function. It stops the all animations once called.
We can add another button to the widget tree that stops all animations when we click it. The new KV file is shown in Listing 5-13. When such a button is pressed, the stop_animation() function is executed. Note that the position of this button has changed, to avoid placing it over the previous button.
FloatLayout:
Image:
id: character_image
size_hint: (0.15, 0.15)
pos_hint: {'x': 0.2, 'y': 0.6}
allow_stretch: True
source: "character.png"
Button:
size_hint: (0.3, 0.3)
text: "Start Animation"
on_press: app.start_char_animation()
Button:
size_hint: (0.3, 0.3)
text: "Stop Animation"
pos_hint: {'x': 0.3}
on_press: app.stop_animation()
Listing 5-13
Adding a Button Widget to Stop Running Animations
The Python file is shown in Listing 5-14. Inside the stop_animation() function, the cancel_all() function is called to stop all animations associated with the widget with the character_image ID. When the animations are cancelled, the current values of the animated properties are saved. These values are used as the start values when the animations start again.
Stopping Running Animations Upon Press of the Button Widget
This way, we are able to start and stop the animations to all properties associated with a given widget. We can also specify selected properties to stop its animation while keeping the others using the cancel_all(). Rather than just feeding the widget reference, we add a list of the desired properties to get stopped, separated by commas.
Animating Source Property of the Image Widget
In the previous applications, the same static image is displayed when its position changes. If we want to make the character walk, it is better to change the image as its position changes to give an impression of a walking character. We do this by changing the position of its legs and hands for example. Figure 5-9 shows some images of the character at different positions. While the character is moving, we can also change the image that’s displayed. This makes the game more realistic. Because the image is specified using the source property inside the Image widget, we need to animate this property in order to change the image displayed. The question is how do we animate the source property?
Figure 5-9
Different images to reflect the movement of the character
In the previous examples, the pos_hint and size_hint properties are animated and they accept numeric values. But the source property accepts a string that specifies the image name. Is it possible to animate a string property? Unfortunately, animations change numeric values only. We can ask the Animation class to change a property from a numeric value such as 1.3 to another numeric value such as 5.8. But we cannot ask it to change a property from a string value such as character1.png to another string value, such as character2.png. So, how do we do this animation?
One lazy solution consists of four steps. We add a new property to the Image widget, say it is named im_num, and it will be assigned numbers referring to the index of the image. Then we animate this property to generate the current image number. The third step is to return each value generated by the animation. The last step is to use the generated number to create the image name, by creating a string consisting of the number prepended to the image extension, and set the source property of the Image widget to the returned image name. A summary of this process is illustrated in Figure 5-10. Let’s apply these steps.
Figure 5-10
The steps to animate the source property of the Image widget
For the first step, Listing 5-15 shows the KV file after adding the im_num property. Note that Python allows us to add new properties to already existing classes. The new property is given a value of 0 to refer to the first image of the character.
FloatLayout:
Image:
id: character_image
size_hint: (0.15, 0.15)
pos_hint: {'x': 0.2, 'y': 0.6}
source: "0.png"
im_num: 0
allow_stretch: True
Button:
size_hint: (0.3, 0.3)
text: "Start Animation"
on_press: app.start_char_animation()
Listing 5-15
Adding the im_num Property to Change the Image Using Animation
The second step is simple. We just add an argument named im_num to the constructor of the Animation class. This argument is assigned to the last index to be used. If there are eight images with indices from 0 to 7, this argument is assigned 7. Listing 5-16 shows the Python code.
In the third step, we have to answer the question, “how do we return the current value generated by the animation?” The answer is simple. To get notified when there is a change to the value of a property named X of a given widget, we add an event in that widget named on_X. This event is assigned to a Python function that will be called each time the value of the property changes. Because our target field is named im_num, the event will be called on_im_num.
Listing 5-17 shows the modified KV file after adding this event. Each time the value of the im_num field changes, the function change_char_im() inside the Python file will be called.
FloatLayout:
Image:
id: character_image
size_hint: (0.15, 0.15)
pos_hint: {'x': 0.2, 'y': 0.6}
source: "0.png"
im_num: 0
allow_stretch: True
on_im_num: app.change_char_im()
Button:
size_hint: (0.3, 0.3)
text: "Start Animation"
on_press: app.start_char_animation()
Listing 5-17
Adding the on_im_num Event to the Image Widget to Be Notified When the Image Changes
Listing 5-18 shows the modified Python code after adding this function. It is made to print the value of im_num each time it is changed.
Handling the on_im_num Event to Print the im_num When Changed
In the fourth step, the returned number is concatenated to the image extension to return a string representing the image name. This string is assigned to the source property of the Image module. This work is done inside the modified change_char_im() function, according to Listing 5-19.
Changing the Source Image of the Image Widget when im_num Changes
Note that the animation interpolates floating-point numbers between the starting and ending values of the animated property. So, there will be values such as 0.1, 2.6, 4.3, and so on. Because the images have integers in their names, the floating-point value in the im_num property should be changed to integer.
After converting it into an integer, it can be concatenated with the image extension to return the string representing the image name. This string is assigned to the source property of the Image module. Remember to set the images at the current directory of the Python file. Otherwise, prepend the path to the image name.
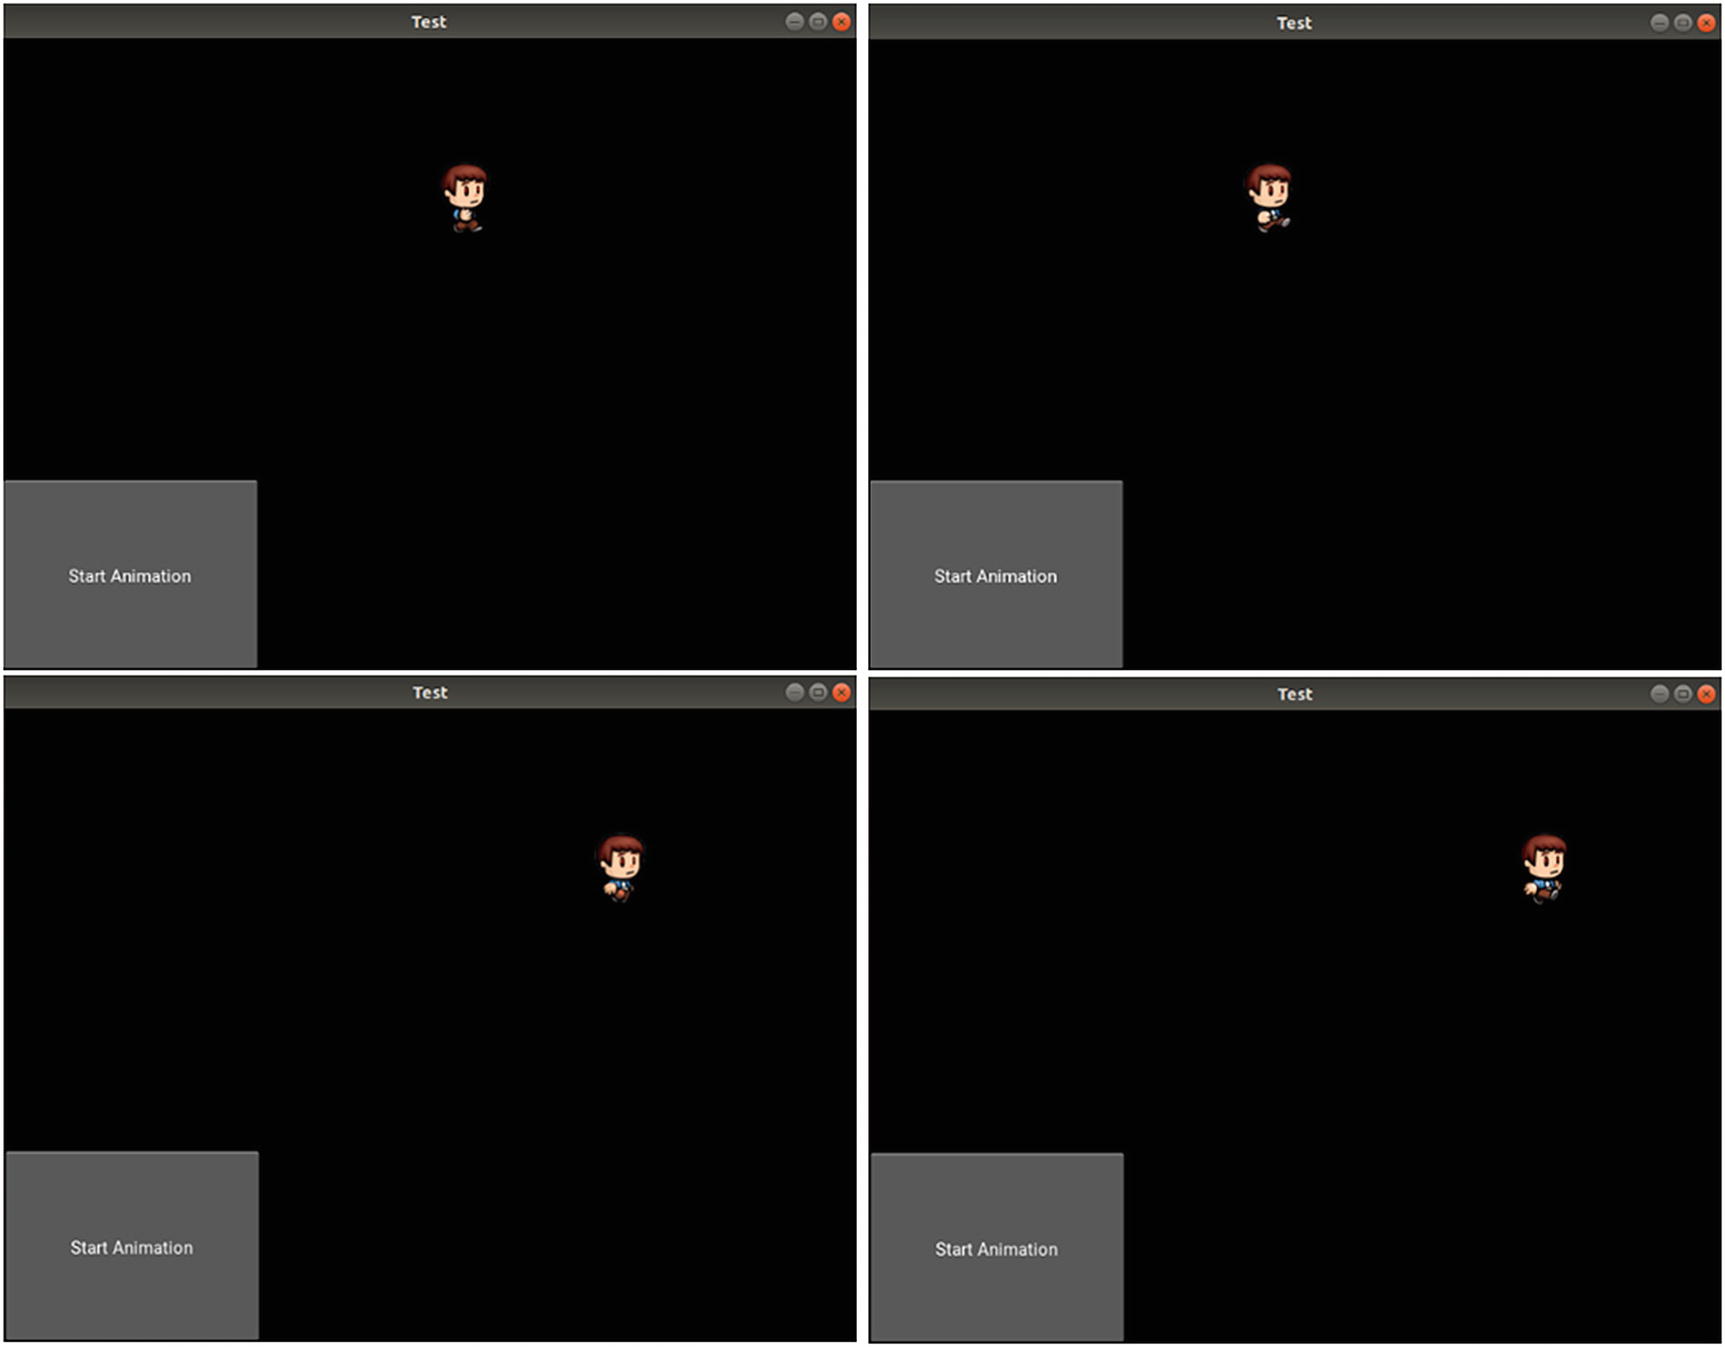
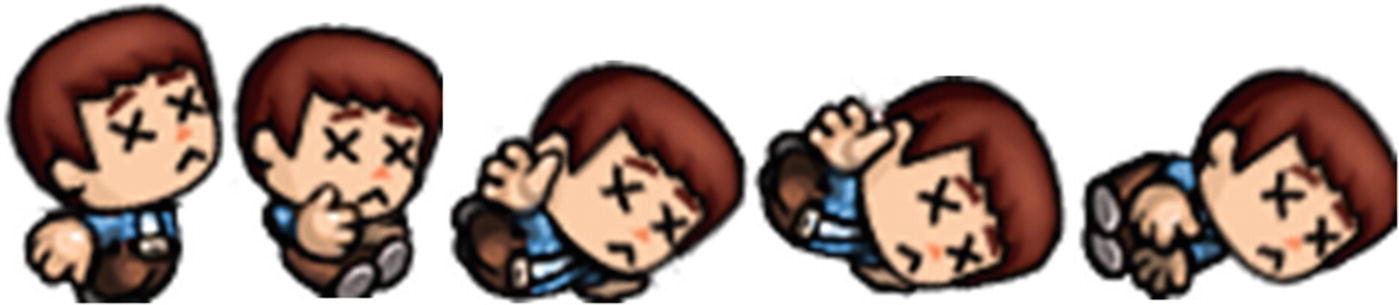
After running the application using the latest Python and KV file and pressing the button, the image should change over time. Figure 5-11 shows four screenshots of the character while changing its image using animation.
Figure 5-11
The character image changes while the character is moving
Screen Touch Events
Up to this point, the character moves when the button is clicked. The movement path is restricted to the one fed into the Animation class constructor. We need to change that in order to move the character freely according to the touch position on the entire screen. Note that touch in Kivy refers to either mouse press or touching a screen. In order to do that, we need to get the touch position on the screen and then animate the character to move to that position.
In order to return the touch position on the screen, there are three touch events to be used, which are on_touch_up, on_touch_down, and on_touch_move. We are just interested in getting the touch position when the touch is down, so the on_touch_down event is used.
This event is added to the root widget (i.e., the FloatLayout) according to the modified KV file in Listing 5-20. Note that binding the touch events with the layout itself or with one of its children does not matter, as they do not detect collisions and thus are unable to detect the boundary of the touch position. They always return the touch position on the entire window.
FloatLayout:
on_touch_down: app.touch_down_handler(*args)
Image:
id: character_image
size_hint: (0.15, 0.15)
pos_hint: {'x': 0.2, 'y': 0.6}
source: "0.png"
im_num: 0
allow_stretch: True
on_im_num: app.change_char_im()
Button:
size_hint: (0.3, 0.3)
text: "Start Animation"
on_press: app.start_char_animation()
Listing 5-20
Using the on_touch_down Event to Return the Screen Touch Position
This event accepts a function that will be executed each time the screen is touched. The touch_down_handler() function inside the Python file will be executed in response to the touch. All arguments generated by the event can be passed to the handler using the args variable. This helps to access the touch position inside the Python function.
Listing 5-21 shows the modified Python file that implements the touch_down_handler() function. The function just prints the arguments received from the event in args.
Handling the touch_down_handler() to Get the Screen Touch Position
The args passed to the function is a tuple with two elements according to the output given. The first element indicates which widget is associated with the event. The second element gives information about the touch and the device fired it. For example, the touch event is fired by a single left mouse button click.
There are different ways by which the event specifies the touch position. For example, the pos property specifies the position in pixels according to the window, while spos returns the position relative to the window size. Because all positions in our game are relative to the window size, the spos is used to specify the position to which the character moves.
Previously, the animation that moves the character was created and started in the start_char_animation() function inside the Python file. This function uses a static position to which the character moves. After using the touch event, the character will move to the position returned in the spos property of the touch event inside the touch_down_handler() function. For that reason, the header of the start_char_animation() function will change to receive the touch position. Listing 5-22 shows the modified Python file.
Note how the spos property is retuned from args. Because it resides in the second element (i.e., index 1) of the args, args[1] is used.
Moving the Character According to the Touch Position
Because the animation now starts by touching the screen, there is no need for the button inside the KV file. Listing 5-23 gives the modified KV file after removing that button.
FloatLayout:
on_touch_down: app.touch_down_handler(args)
Image:
id: character_image
size_hint: (0.15, 0.15)
pos_hint: {'x': 0.2, 'y': 0.6}
source: "0.png"
im_num: 0
allow_stretch: True
on_im_num: app.change_char_im()
Listing 5-23
Removing the Button That Starts the Animation
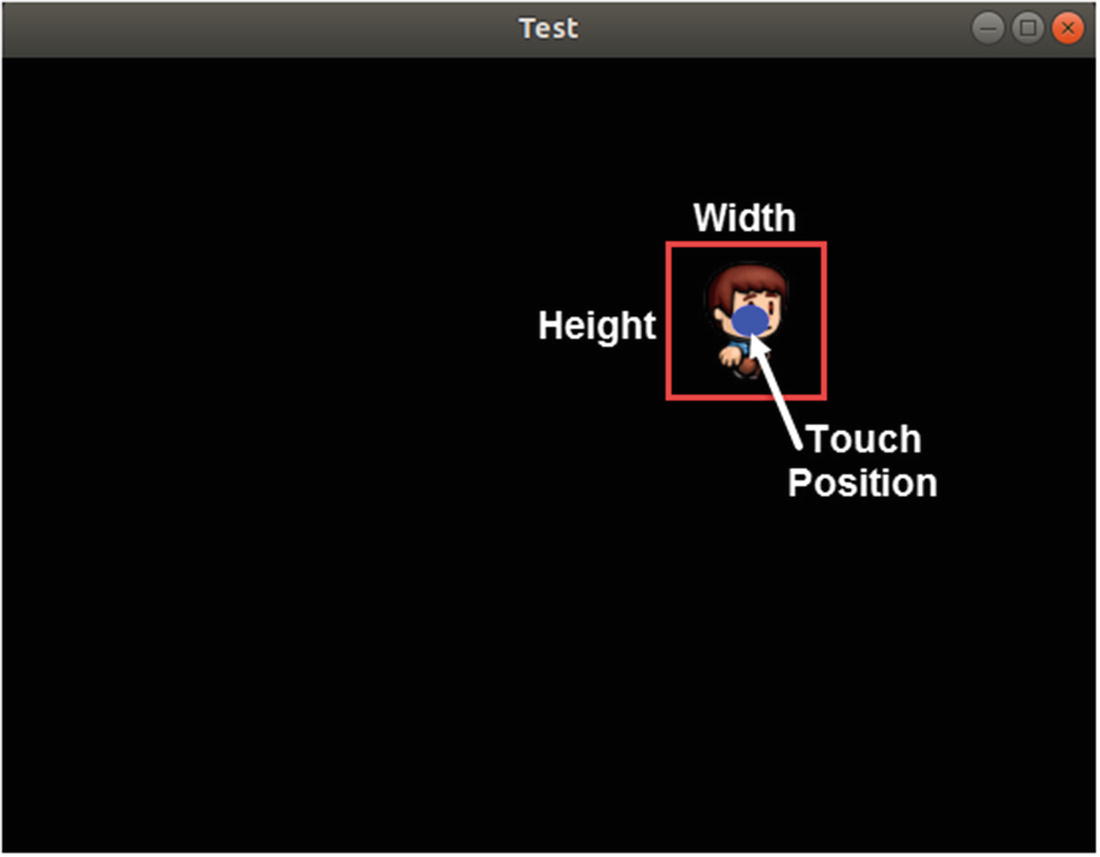
After running the application and touching the window, the character will move to the touched position. Because the position of the widget reflects the position at which the bottom-left corner will be placed, feeding that position directly to the pos_hint property of the Image widget makes its bottom-left corner start from the touch position and extends according to its size specified in the size_hint property. This is illustrated in Figure 5-12. It is more convenient to center the widget at the touch position. How do we do that?
Figure 5-12
The bottom-left corner of the Image widget is placed on the touch position
Currently, the center of the widget is larger than the touch position, horizontally by half of its width and vertically by half of its height. The center coordinates are calculated according to the following equations:
widgetCenterX = touchPosX + widgetWidth/2
widgetCenterY = touchPosY + widgetHeight/2
In order to center the widget according to the touch position, we can subtract widgetWidth/2 from touchPosX and widgetHeight/2 from touchPosY. The result will be as follows:
This way, the widget will be centered at the touch position. Listing 5-24 shows the Python code after modifying the position fed to the animation inside the start_char_animation() function. Note that widgetWidth is equal to size_hint[0] and widgetHeight is equal to size_hint[1].
Moving the Center of the Image Widget to the Touch Position
Figure 5-13 shows the result after touching the screen. The character gets its center positioned at the touch position.
Figure 5-13
The center of the Image widget is placed on the touch position
on_complete
Each time the screen is touched, an animation instance is created. It animates both the pos_hint and the im_num properties of the Image widget. For the first screen touch, both properties are animated as the character moves and the image gets changed. Touching the screen more only moves the character but, unfortunately, the im_num property does not change. Thus, there will be a static image displayed on the widget after the first screen touch. Why does this happen?
The initial value of the im_num inside the KV file is 0. When the screen is touched for the first time, the animation starts and thus the im_num animates from 0 to 7. After the animation completes, the current value stored in the im_num will be 7.
Touching the screen another time, the im_num will animate from the current value 7 to the new value, which is also 7. As a result, there is no change to the displayed image. The solution is to reset the value of im_num to 0 before starting the animation inside the start_char_animation() function.
After the animation is completed, the character is expected to be in a stable state and thus the first image with im_num=0 is to be displayed. But the value stored in im_num after completing the animation is 7, not 0. It would be better to reset im_num to 0 after the animation is complete.
Fortunately, the Animation class has an event called on_complete that is fired when the animation completes. We can bind our animation to this event so that a callback function is executed each time it is completed. The callback function is named char_animation_completed(). Inside that function, we can force im_num to return to 0. The modified Python file is listed in Listing 5-25 after binding the on_complete event to the animation of the character. This on_complete event sends arguments to the callback function, which are the animation firing the event and the widget associated with it. This is why the callback function accepts them into args.
Resetting the im_num Property to 0 After the Animation Completes
Inside the callback function, the im_num of the Image widget is changed back to 0. As a result, the image displayed on the widget will be reset each time the animation completes.
After animating the character correctly, we can start adding a monster to the game. The player/character dies when it collides with the monster.
Adding Monsters to the Game
The monster will be added to the KV file the same way the character is added. We just create an Image widget in the KV file for the monster. The new KV file is shown in Listing 5-26.
FloatLayout:
on_touch_down: app.touch_down_handler(args)
Image:
id: monster_image
size_hint: (0.15, 0.15)
pos_hint: {'x': 0.8, 'y': 0.8}
source: "10.png"
im_num: 10
allow_stretch: True
on_im_num: app.change_monst_im()
Image:
id: character_image
size_hint: (0.15, 0.15)
pos_hint: {'x': 0.2, 'y': 0.6}
source: "0.png"
im_num: 0
allow_stretch: True
on_im_num: app.change_char_im()
Listing 5-26
Adding an Image Widget for the Monster
The Image widget of the monster will have the properties defined in the character. The properties are an ID for referring to the widget inside the Python file, size_hint for setting the widget size relative to the screen size, pos_hint to place the widget relative to the screen, source for holding the image name as a string, allow_stretch to stretch the image to cover the entire area of the Image, and im_num to hold the image number displayed on the widget. To make the image numbers of the character and the monster different, the monster image numbers will start with 10. Figure 5-14 shows the images of the monster.
Figure 5-14
The image sequence of the monster
The on_im_num event will be associated with the im_num property with a callback function named change_monst_im() to gain access to its value inside the Python file each time it changed.
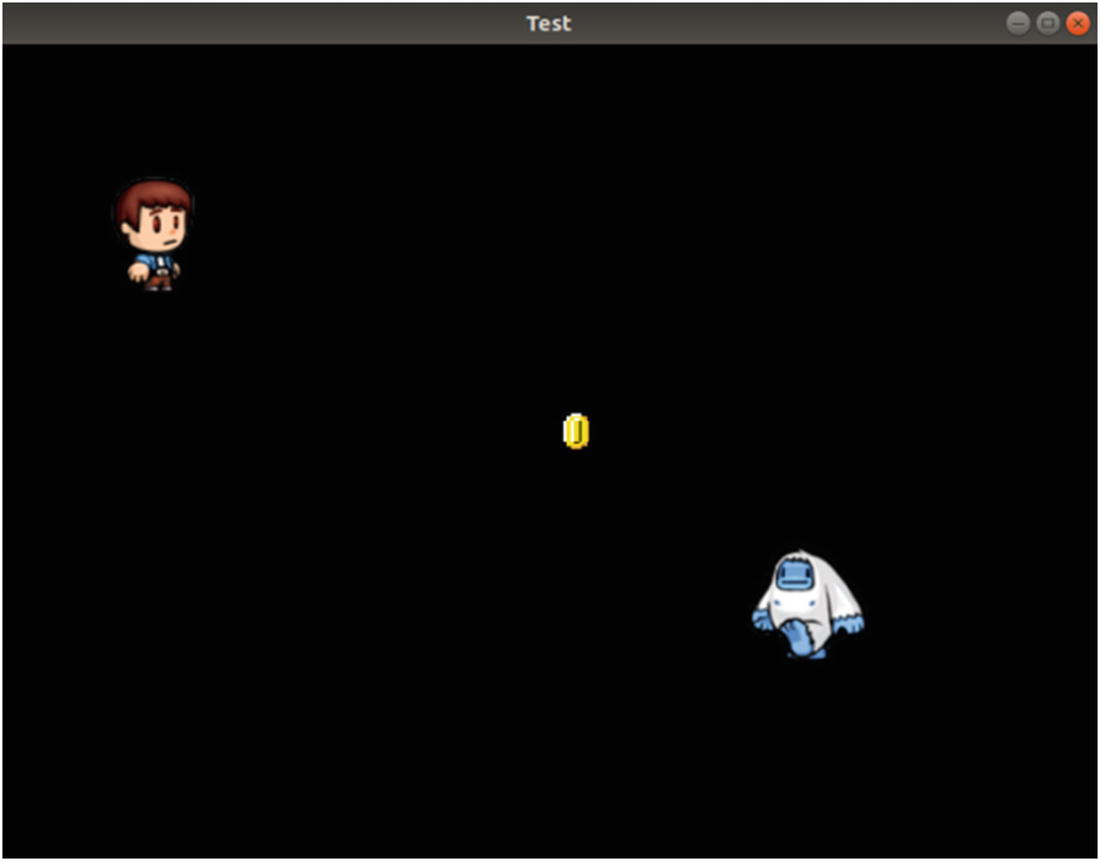
After we prepare the KV file, the application window we would see is shown in Figure 5-15.
Figure 5-15
The character and the monster Image widgets appear on the screen
Note that the monster Image widget is positioned before the character widget in the KV file (i.e., in the widget tree). This makes the character Z index lower than the Z index of the monster and thus drawn above it, as shown in Figure 5-16.
Figure 5-16
The character Image widget appears above of the monster Image widget
on_start
The animation of the character starts each time there is a screen touch but the monster animation must start once the application starts. So, where in the Python file we can start the monster? According to the Kivy application lifecycle, the method called on_start() is executed once the application starts. This is a good place to start the monster’s animation.
The Python file, after we add the change_monst_im() and on_start() functions to handle the animation of the monster, is shown in Listing 5-27. The change_monst_im() function is similar to change_char_im(), except for changing the source property of the monster Image widget.
Adding the Functions to Handle the Monster Animation
Inside the on_start() function, two sequentially joined animations are created to animate the pos_hint and im_num properties of the monster Image widget.
The initial position of the monster according to the KV file is {'x':0.8, 'y':0.8}. The first animation changes that position to {'x':0.8, 'y':0.0} and the second animation changes it back to {'x':0.8, 'y':0.8}. This animation takes place in a loop because the repeat property of the animation instance monst_anim is set to True. The monster moves in a fixed path for simplicity. In the next sections, we will change its movement to be random.
Because the initial value of the im_num property of the monster in the KV file is set to 10, the first animation has im_num set to 17. As a result, the first animation changes the image number from 10 to 17. The second animation has such a property set to 10 to change the image number from 17 back to 10. Each animation lasts two seconds.
The animation is associated with the monster Image widget, which is returned using its ID inside the monster_image variable.
Collision
Up to this point, the animations for both the pos_hint and im_num properties of the character and monster are working fine. We need to modify the game so that the character is killed when it collides with the monster.
The way collision works in Kivy is that it checks for an intersection between the bounding boxes of two widgets. The collide_widget() built-in Kivy function does that. For example, this command detects the collision between the two Image widgets:
character_image.collide_widget(monster_image)
We have to continuously check for collision between the two widgets. Thus, the above command needs to be added to something that is periodically executed.
Each time a widget changes its position using the pos_hint property, the on_pos_hint event is fired. This event will execute a callback function each time it is fired. Because the monster Image widget continuously changes its position, we can bind the event to that widget.
Note that if you are intending to kill the monster later, the monster will not change its position and thus the on_pos_hint will never be fired and thus there will be no check for collision. If there are other objects that may kill the character and you completely depend on the event associated with the killed monster for collision detection, the character will not be killed. You have to find something else to check the collision. One solution is to bind the on_pos_hint event with each object that might kill the character.
At first, the on_pos_hint event is added to the KV file, as given in Listing 5-28. It is associated with a callback function called monst_pos_hint().
FloatLayout:
on_touch_down: app.touch_down_handler(args)
Image:
id: monster_image
size_hint: (0.15, 0.15)
pos_hint: {'x': 0.8, 'y': 0.8}
source: "10.png"
im_num: 10
allow_stretch: True
on_im_num: app.change_monst_im()
on_pos_hint: app.monst_pos_hint()
Image:
id: character_image
size_hint: (0.15, 0.15)
pos_hint: {'x': 0.2, 'y': 0.6}
source: "0.png"
im_num: 0
allow_stretch: True
on_im_num: app.change_char_im()
Listing 5-28
Using the on_pos_hint Event to Return the Monster Position
The monst_pos_hint() function is implemented at the end of the Python file shown in Listing 5-29. It returns the character and monster widgets in both the character_image and monster_image properties and then calls the collide_widget() function. Just up to this time, a message is printed if a collision has occurred according to an if statement.
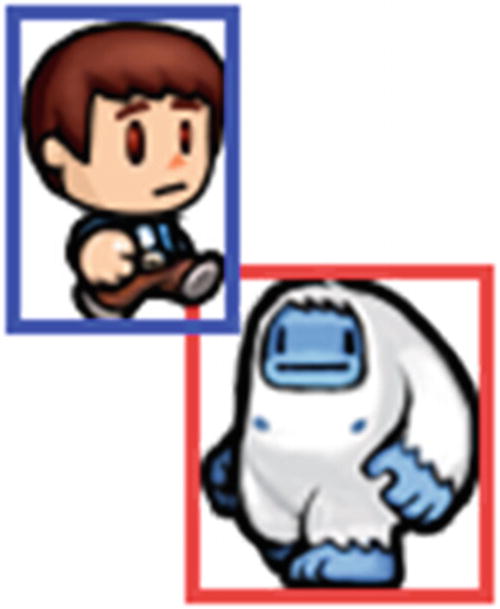
The collide_widget() function is too strict, as it returns True if there is at least an intersection in a single row or column between the two widgets. In practice, this does not happen frequently. According to Figure 5-17, such a function returns True because there is intersection between the bounding boxes of the two widgets. As a result, the character will be killed even if it hasn’t touched the monster.
Figure 5-17
The collide_widget() returns True when the outer boundary of the widget boxes collide, even if the images have not touched
We can tune the collide_widget() function by adding another condition that checks whether the collision area exceeds a predefined percentage of the character size. This makes us more confident when saying that there is collision. The monst_pos_hint() function is modified as shown in Listing 5-30.
if character_image.collide_widget(monster_image) and abs(character_center[0] - monster_center[0]) <= gab_x and abs(character_center[1] - monster_center[1]) <= gab_y:
print("Character Killed")
Listing 5-30
Tuning the collide_widget() Function to Return True Only When the Character and Monster Touch Each Other
The new condition concludes that collision occurs if the difference between the current centers of the two widgets is at least one half of the character size. This is done by making sure that the difference between the X and Y coordinates of the two centers is less than one half of the character width and height, respectively.
After tuning the collide_widget() function, the condition returned False for the cases presented in Figures 5-18 and 5-19. Thus, the results are more realistic.
Figure 5-18
No collision occurred because the maximum gab defined in Listing 5-30 between the center of the monster and character images is not exceeded. The complete Python code is shown in Listing 5-31
if character_image.collide_widget(monster_image) and abs(character_center[0]-monster_center[0])<=gab_x and abs(character_center[1]-monster_center[1])<=gab_y:
print("Character Killed")
app = TestApp()
app.run()
Listing 5-31
Complete Code for the Game in Which the Work for the Animation and Collision Is Completed Successfully
Random Monster Motion
In the previous application in Listing 5-31, we did a good job of animating the character and the monster successfully. But the monster moves in a fixed path. In this section, we will modify its motion to make it seem random. The idea is very similar to how the character Image widget is animated.
The character is animated using a function called start_char_animation(), which accepts the new position to which the character moves. Because there is just a single animation created, it can be repeated. In order to repeat the animation after being completed, the on_complete event is attached to the animation of the character. A callback function named char_animation_completed() is associated with the event. When the animation completes, this callback function is executed where it prepares the character for the new animation. We would like to make the movement of the monster similar to that. This is applied to the modified Python file shown in Listing 5-32.
Two new functions are created, which are start_char_animation() and char_animation_completed(). The start_char_animation() function accepts the new position to which the monster moves as an argument named new_pos. Then it creates an animation instance that changes the pos_hint property according to the new position. It also changes the im_num property from the initial value of 10 in the KV file to 17.
if character_image.collide_widget(monster_image) and abs(character_center[0] - monster_center[0]) <= gab_x and abs(character_center[1] - monster_center[1]) <= gab_y:
print("Character Killed")
app = TestApp()
app.run()
Listing 5-32
Repeating the Monster Animation by Handling the on_complete Event of the Animation
Inside the on_start() function, the start_monst_animation() is called with the input argument specified to a random value. Because there is just a single animation, the animation cannot repeat itself by setting the repeat property to True. For that reason, the on_complete event is attached to the animation so that the callback function monst_animation_completed() is executed after the animation is completed. This gives us the chance to start the animation again.
Inside the callback function, the im_num property of the monster is reset to 10 again. Using the uniform() function inside the random module, a random value is generated for the X and Y coordinates of the new position. The returned value is a floating-point number between 0.0 and 1.0. The new position is used as the bottom-left corner of the monster widget.
Assuming that the randomly returned position is (0.0, 1.0), this makes the character’s bottom line start at the end of the screen. As a result, the monster will be hidden. This also occurs for the positions (1.0, 0.0) and (1.0, 1.0).
In order to make sure that the monster is always visible in the screen, we have to take its width and height in regard. After positioning the bottom-left corner of the monster at the new random position, the monster there must be a space for its width and height. Thus, the maximum possible value for X is 1-monster_width and the maximum possible Y value is 1-monster_height. This makes room for the monster to be completely visible in the window for any generated position.
The modified Python code is shown in Listing 5-33. In the previous application, the duration for all monster movements is 2.0 seconds. In the new code, the duration is randomly returned using random.uniform(). As a result, the monster moves to randomly generated positions in random durations.
if character_image.collide_widget(monster_image) and abs(character_center[0] - monster_center[0]) <= gab_x and abs(character_center[1] - monster_center[1]) <= gab_y:
print("Character Killed")
app = TestApp()
app.run()
Listing 5-33
Randomly Changing the Position and Duration of the Monster Animation
Killing the Character
In the previous game in Listing 5-33, everything still works even after the monster collides with the character. We need to modify the application so that the character stops moving when it’s killed. We do this by making sure that its animation will not start again.
Inside the touch_down_handler() function, the character is always moving toward the touched position on the screen, even after collision. In the modified Python code listed in Listing 5-34, this is fixed that by using a flag variable named character_killed indicating whether the character is killed or not. Such a variable is set to False by default, meaning that the game is still running and the character is alive. An if statement inside the touch_down_handler() function makes sure that the character animation only works when that flag is set to False. Because the flag is associated with the class, it can be accessed by prepending the class name (TestApp.character_killed).
When a collision is detected inside the mons_pos_hint() function, two actions are taken, which are changing the value of the character_killed flag to True and canceling all running animations (i.e., character and monster).
if character_image.collide_widget(monster_image) and abs(character_center[0] - monster_center[0]) <= gab_x and abs(character_center[1] - monster_center[1]) <= gab_y:
Adding the character_killed Flag to Determine Whether the Character Animation Could Start Again
When the flag changes to True inside the monst_pos_hint() function, the character animation cannot be stopped. Note that after the flag value changes to True there is still a running animation in response to the previously touched position. This means that the character will continue moving until the animation completes and then will stop moving after that. In order to stop moving the animation once the collision occurs, we can cancel the animation using the cancel_all() function. As a result, cancelling the animation will stop it once collision takes place. Changing the flag value stops the animation from getting started again.
Because there is no way for the user to start the monster animation once it has been cancelled, it is enough to cancel such an animation.
Animation on Character Kill
When the character is killed in the previous application, it holds on the image whose number is specified by the im_num property, according to Figure 5-19. The image does not reflect the character’s death.
Figure 5-19
The character image stops at its latest state when collision occurs with the monster
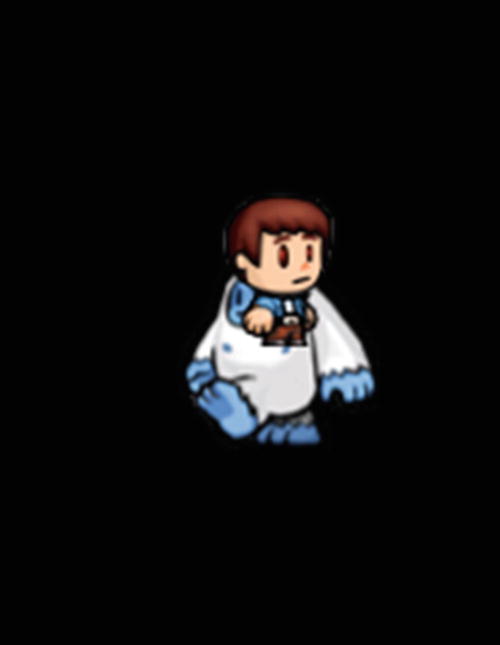
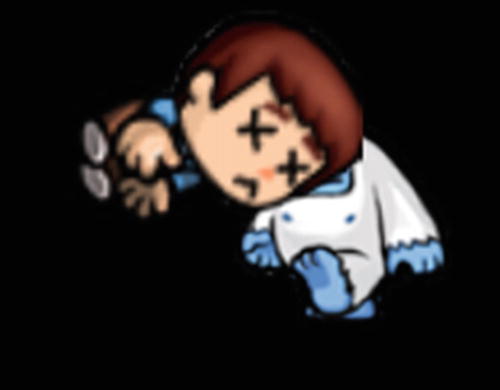
We can change the image to give a better impression. For that purpose, the images displayed in Figure 5-20 will be used.
Figure 5-20
Sequence of images to be displayed when the character is killed
Once collision occurs, it will start only after the animation is created inside the monst_pos_hint() function that animates the image according to such images. If these images are numbered from 91 to 95, the modified Python code is shown in Listing 5-35. The new animation just changes the im_num property to 95.
It is important to remember that after the character animation is cancelled, the im_num number will hold on a number between 0 and 7. If, for example, its value was 5, then running the new animation will go from 5 to 95. Because we are interested in starting at 91, the im_num property value is set to 91 before the animation starts.
if character_image.collide_widget(monster_image) and abs(character_center[0] - monster_center[0]) <= gab_x and abs(character_center[1] - monster_center[1]) <= gab_y:
According to the code in Listing 5-35, the result will be as shown in Figure 5-21 when collision occurs.
Figure 5-21
The character image changes when it collides with the monster
Adding Coins
The mission of the player is to collect a number of coins distributed across the screen. Once the right number of coins is collected, the current level of the game is completed and another level starts. Thus, the next step in the application is to add Image widgets in the widget tree representing coins. Let`s start by adding just a single Image widget representing one coin.
According to the Kivy application lifecycle, the build() method is available to prepare the widget tree. Thus, it is a good way to add new widgets to the application. The Python code shown in Listing 5-36 implements the build() method to add a single Image widget. Remember to import the kivy.uix.image module in order to access the Image class.
if character_image.collide_widget(monster_image) and abs(character_center[0] - monster_center[0]) <= gab_x and abs(character_center[1] - monster_center[1]) <= gab_y:
Adding an Image Widget to the Widget Tree Representing the Coin Before the Application Starts
The new widget uses the source, size_hint, pos_hint, and allow_stretch properties. The coin image source is shown in Figure 5-22.
Figure 5-22
Coin image
The new widget is returned to the coin variable. After that, it is added to the widget tree using the add_widget() method. Because the last widget in the widget tree appears on the top of the previous widgets, the index argument is used to alter the Z index of the coin. The default Z index for widgets is 0. The coin Z index is set to -1 to appear behind both the character and the monster.
After we run the application, we’ll see the window shown in Figure 5-23. We can add more coins to the window.
Figure 5-23
Adding the coin next to the character and monster Image widgets
One way of adding coins is to fix their positions on the screen. In this game, the positions will be random. The modified build() function is shown in Listing 5-37 in which a for loop adds five coin Image widgets to the widget tree. Note that there is a variable called num_coins defined in the class header and it holds the number of coin widgets.
The uniform() function is used to return the x and y coordinates of each coin, taking into regard the leaving place for displaying the coin on the screen. We do this is by subtracting the width and height from the returned random number. This is the same way the monster’s random position is generated.
if character_image.collide_widget(monster_image) and abs(character_center[0] - monster_center[0]) <= gab_x and abs(character_center[1] - monster_center[1]) <= gab_y:
Adding Multiple Image Widgets Representing the Coins on the Screen
Because the coin’s positioning is random, there is a chance that most or even all of them will be in a small area, as shown in Figure 5-24, after running the application with the modified build() function. We need to guarantee that each coin is a minimum distance away from the next coin. The distance could be either horizontally or vertically.
Figure 5-24
The coins may be very close to each other
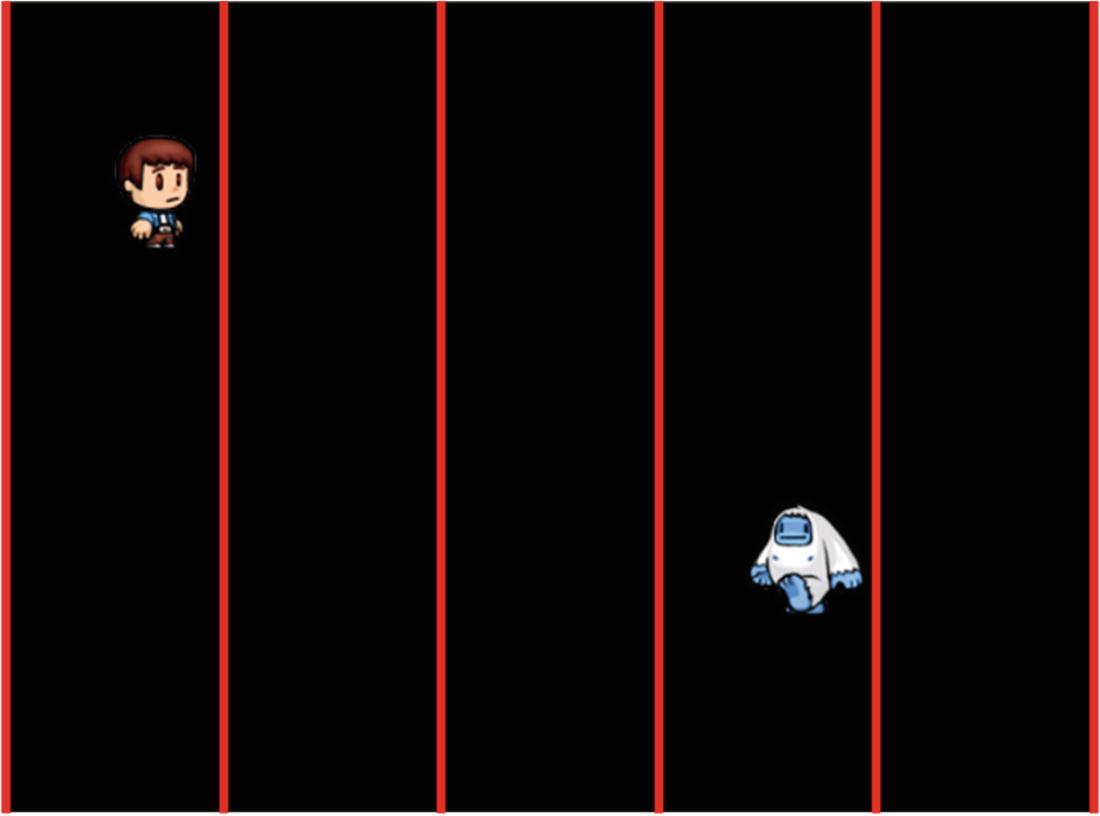
The way to position the coins is to divide the screen into a number of vertical sections equal to the number of coins to be added. This is illustrated in Figure 5-25. One coin is randomly positioned at any position in just one section.
Figure 5-25
Splitting the screen width equally for placing the coins
The modified build() function is shown in Listing 5-38. Because the screen is split vertically, each section will cover the entire height of the window but its width is limited according to the number of used coins. For that reason, the section width is calculated in the section_width variable.
if character_image.collide_widget(monster_image) and abs(character_center[0] - monster_center[0]) <= gab_x and abs(character_center[1] - monster_center[1]) <= gab_y:
Splitting the Screen Width Uniformly to Add Multiple Image Widgets Representing the Coins
Each coin can be placed within the boundary of the section. Because there is no restriction on the section height, the coin y coordinate is calculated as previously shown. In order to place the coin within the width specified by the section, the range from which the x coordinate is selected is bounded to its start and end columns. The start value is defined by section_width*k while the end is section_width*(k+1)-coin_width. Note that the coin_width is subtracted to make sure the coin is within the section boundary.
For the first coin, the loop variable k value is 0 and thus the start value is 0.0 but the end value is section_width-coin_width. Given that section_width equals 0.2 and coin_width equals 0.05, the range of the first section is 0.0:0.15. For the second coin, k will be 1 and thus the start value is section_width, while the end value is section_width*2-coin_width. Thus, the range of the second section is 0.2:0.35. The same way, the ranges for the remaining sections are 0.4:0.55, 0.6:0.75, and 0.8:0.95.
We used to use the ids dictionary of the root widget to reference a child widget inside the Python file. Unfortunately, the ids dictionary does not hold references to the dynamically added widgets inside the Python file. In order to be able to reference such widgets later, their references are saved inside the coins_ids dictionary defined in the class header. Each coin is given a string key in that dictionary consisting of the word coin appended to the coin number starting with 0. Thus, the keys are coin0, coin1, coin2, coin3, and coin4.
Figure 5-26 shows the result after running the application. The coins are better distributed. After placing the coins, the next step is to allow the player to collect them.
Figure 5-26
Uniformly distributing the coins across the screen
The coins positions are printed according to this output:
{'coin0': <kivy.uix.image.Image object at 0x7f0c56ff4388>, 'coin1': <kivy.uix.image.Image object at 0x7f0c56ff44c0>, 'coin2': <kivy.uix.image.Image object at 0x7f0c56ff4590>, 'coin3': <kivy.uix.image.Image object at 0x7f0c56ff4660>, 'coin4': <kivy.uix.image.Image object at 0x7f0c56ff4730>}
Collecting Coins
In order to collect the coins, we need to detect collisions between the character and all the coins not collected yet. In order to access the character position each time it is changed, the on_pos_hint event is bound to the character Image widget inside the KV file. Thus, the modified KV file is listed in Listing 5-39. The event is given the callback function char_pos_hint().
FloatLayout:
on_touch_down: app.touch_down_handler(args)
Image:
id: monster_image
size_hint: (0.15, 0.15)
pos_hint: {'x': 0.8, 'y': 0.8}
source: "10.png"
im_num: 10
allow_stretch: True
on_im_num: app.change_monst_im()
on_pos_hint: app.monst_pos_hint()
Image:
id: character_image
size_hint: (0.15, 0.15)
pos_hint: {'x': 0.2, 'y': 0.6}
source: "0.png"
im_num: 0
allow_stretch: True
on_im_num: app.change_char_im()
on_pos_hint: app.char_pos_hint()
Listing 5-39
Adding the on_pos_hint Event to Return the Character Position
According to the implementation of this function in the Python file listed in Listing 5-40, it loops through the items (i.e. coins) in the dictionary and returns the key and value of each item (i.e., coin) in the coin_key and curr_coin variables defined in the loop header. The collision will be detected the same way the collision was detected between the character and the monster.
The collide_widget() returns True if there is intersection between the boundaries of the two widgets even in a single row or column. In order to tune it, the centers of the two widgets are compared. If the difference between the centers exceeds a predefined thresholds, it indicates occurrence of a collision.
Once collision occurs between the character and a coin, the coin Image widget is removed from the widget tree by calling the remove_widget() method. This ensures that the widget becomes hidden after being collected. Character collision with the coins is detected similar to calculating it with the monster, except for reducing the gab_x and gab_y variables when working with the coins, because their size is smaller than the monster size.
if character_image.collide_widget(monster_image) and abs(character_center[0] - monster_center[0]) <= gab_x and abs(character_center[1] - monster_center[1]) <= gab_y:
for coin_key, curr_coin in TestApp.coins_ids.items():
curr_coin_center = curr_coin.center
if character_image.collide_widget(curr_coin) and abs(character_center[0] - curr_coin_center[0]) <= gab_x and abs(character_center[1] - curr_coin_center[1]) <= gab_y:
print("Coin Collected", coin_key)
self.root.remove_widget(curr_coin)
app = TestApp()
app.run()
Listing 5-40
Handling the char_pos_hint() Function to Detect Collision with the Coins
There is an issue in the previous application. Even after the coin is deleted from the widget tree, there is still an item for it in the dictionary. As a result, the loop goes though five iterations even if all of the items are collected and behaves as if no coins were not collected.
In order to make sure the widget is detected from the dictionary, we can keep track of the coins collected in an empty list named coins_to_delete defined inside the char_pos_hint() function, as listed in Listing 5-41. For each coin collected, its key in the coins_ids dictionary is appended to the list using the append() function.
for coin_key, curr_coin in TestApp.coins_ids.items():
curr_coin_center = curr_coin.center
if character_image.collide_widget(curr_coin) and abs(character_center[0] - curr_coin_center[0]) <= gab_x and abs(character_center[1] - curr_coin_center[1]) <= gab_y:
print("Coin Collected", coin_key)
coins_to_delete.append(coin_key)
self.root.remove_widget(curr_coin)
if len(coins_to_delete) > 0:
for coin_key in coins_to_delete:
del TestApp.coins_ids[coin_key]
Listing 5-41
Removing the Coins Once They Are Collected
After the loop ends, an if statement determines whether the list is empty or not based on its length. If its length is less than 1, there are no coins collected in the previous loop and thus no items (i.e. coins) to delete from the dictionary. If the length of the list is higher than or equal to 1 (i.e. higher than 0), this means that there are some coins from the previous loop.
In order to delete the coins from the dictionary, a for loop iterates through the elements in the list. Note that the list elements represent the keys of each coin, such as coin0. Thus, the key stored in the list will be used as an index to the dictionary to return the associated coin Image widget. Using the del command in Python, the item can be deleted from the dictionary. By doing that, we have completely deleted the coin from both the widget tree and the dictionary. After collecting all coins, the number of items in the dictionary will be zero and the loop will be useless.
Complete Level
In the previous application, there was no indication about the number of collected coins. According to the modified KV file shown in Listing 5-42, a small Label widget is added to the top-left corner of the screen to display the number of collected coins. The label is given an ID of num_coins_collected in order to change its text inside the Python code.
FloatLayout:
on_touch_down: app.touch_down_handler(args)
Label:
id: num_coins_collected
size_hint: (0.1, 0.02)
pos_hint: {'x': 0.0, 'y': 0.97}
text: "Coins 0"
font_size: 20
Image:
id: monster_image
size_hint: (0.15, 0.15)
pos_hint: {'x': 0.8, 'y': 0.8}
source: "10.png"
im_num: 10
allow_stretch: True
on_im_num: app.change_monst_im()
on_pos_hint: app.monst_pos_hint()
Image:
id: character_image
size_hint: (0.15, 0.15)
pos_hint: {'x': 0.2, 'y': 0.6}
source: "0.png"
im_num: 0
allow_stretch: True
on_im_num: app.change_char_im()
on_pos_hint: app.char_pos_hint()
Listing 5-42
Displaying the Number of Collected Coins in a Label Widget Placed at the Top of the Screen
The char_pos_hint() function inside the Python file is changed to update the added label text field according to the number of currently collected coins. The file is shown in Listing 5-43. First, a variable named num_coins_collected is defined in the class and given an initial value of 0. If a collision occurred between the character and any coin, then that variable gets incremented by 1 and then the Label widget gets updated.
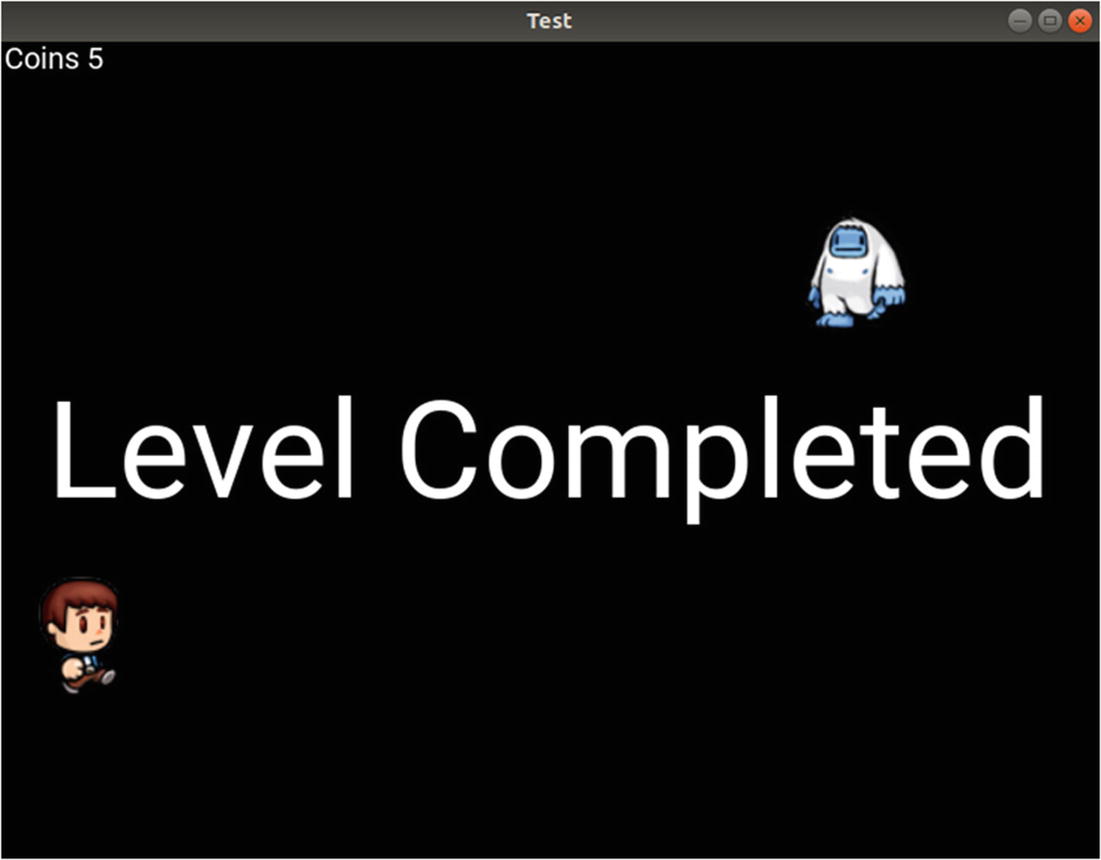
Because completing the mission of collecting all coins means the end of the current level, it is better to do something to indicate the end of the level. If the number of collected coins inside the num_coins_collected variable is equal to the number of coins in the num_coins variable, a label is dynamically added in the widget tree and it displays the "Level Completed" message. Besides creating this widget, the character and monster animations are cancelled. Note that by cancelling the monster animation, its position will not change and thus the monst_pos_hint() callback function will not be executed.
if character_image.collide_widget(monster_image) and abs(character_center[0] - monster_center[0]) <= gab_x and abs(character_center[1] - monster_center[1]) <= gab_y:
for coin_key, curr_coin in TestApp.coins_ids.items():
curr_coin_center = curr_coin.center
if character_image.collide_widget(curr_coin) and abs(character_center[0] - curr_coin_center[0]) <= gab_x and abs(character_center[1] - curr_coin_center[1]) <= gab_y:
Updating the Label Displaying the Number of Collected Coins and Displaying a Message When the Level Completes
Figure 5-27 shows the result after the level is completed.
Figure 5-27
A message is displayed when the level completes
Sound Effects
A game without sound effects is not a very good game. Sound is an important factor of the user experience. You can add sound effects to every action happening in the game. For our game, we will add sound effects to the character’s death, when completing a level, and when collecting coins. This is in addition to the background music, which helps the players engage with the game.
Kivy provides a very simple interface for playing sounds using the SoundLoader class found in the kivy.core.audio module. The modified Python file in which sounds are loaded and played is shown in Listing 5-44.
if character_image.collide_widget(monster_image) and abs(character_center[0] - monster_center[0]) <= gab_x and abs(character_center[1] - monster_center[1]) <= gab_y:
for coin_key, curr_coin in TestApp.coins_ids.items():
curr_coin_center = curr_coin.center
if character_image.collide_widget(curr_coin) and abs(character_center[0] - curr_coin_center[0]) <= gab_x and abs(character_center[1] - curr_coin_center[1]) <= gab_y:
There are two steps to playing a sound file. We must first load the sound file using the load() method of the SoundLoader class. This method accepts the sound file path that is specified in the music_dir variable. This variable uses the os module to return the current directory using the os.getcwd() function. Assuming that the sound files are stored in a folder named music inside the current directory, the complete path for the files is the concatenation between os.getcwd() and the file called music.
All the sound files are prepared in the on_start() method of the TestApp class of the application. The background sound file is loaded into the bg_music variable. The sound files for collecting coins, character death, and level completion are stored into the variables coin_sound, char_death_sound, and level_completed_sound, respectively. Note that each of these variables is associated with self, which refers to the current object. This helps to control the sound files even outside the on_start() method. Remember to use self when referencing the sound files outside that method.
The second step is to play the file using the play() method. For the background music, it is played within the on_start() method. The coin sound is played after a collision occurs with a coin inside the char_pos_hint() callback function.
The level completion sound is played after collecting all the coins. Because the level is completed, there is no need for the background music anymore and thus it is stopped by calling the stop() method.
Finally, the character death sound is played inside the monst_pos_hint() callback function after collision occurs with the monster. Playing the game after adding sound effects is more interesting than before.
Game Background
We can change the background of the game to be more attractive rather than the default black background. You can use a texture, an animated image, or a static image as the background.
A static image is used as the background of the game according to the KV file shown in Listing 5-45. It is drawn inside the FloatLayout using canvas.before. This guarantees that the image will cover the entire window.
FloatLayout:
on_touch_down: app.touch_down_handler(args)
canvas.before:
Rectangle:
size: self.size
pos: self.pos
source: 'bg.jpg'
Label:
id: num_coins_collected
size_hint: (0.1, 0.02)
pos_hint: {'x': 0.0, 'y': 0.97}
text: "Coins 0"
font_size: 20
Image:
id: monster_image
size_hint: (0.15, 0.15)
pos_hint: {'x': 0.8, 'y': 0.8}
source: "10.png"
im_num: 10
allow_stretch: True
on_im_num: app.change_monst_im()
on_pos_hint: app.monst_pos_hint()
Image:
id: character_image
size_hint: (0.15, 0.15)
pos_hint: {'x': 0.2, 'y': 0.6}
source: "0.png"
im_num: 0
allow_stretch: True
on_im_num: app.change_char_im()
on_pos_hint: app.char_pos_hint()
Listing 5-45
Adding a Background Image to the Game
Figure 5-28 shows the game after adding the background.
Figure 5-28
Adding a background image to the screen
Game Development Recap
The game currently has just one level and we need to add more levels to it. Before adding more levels, it is important to take a general overview of the progress in the game development up to this point.
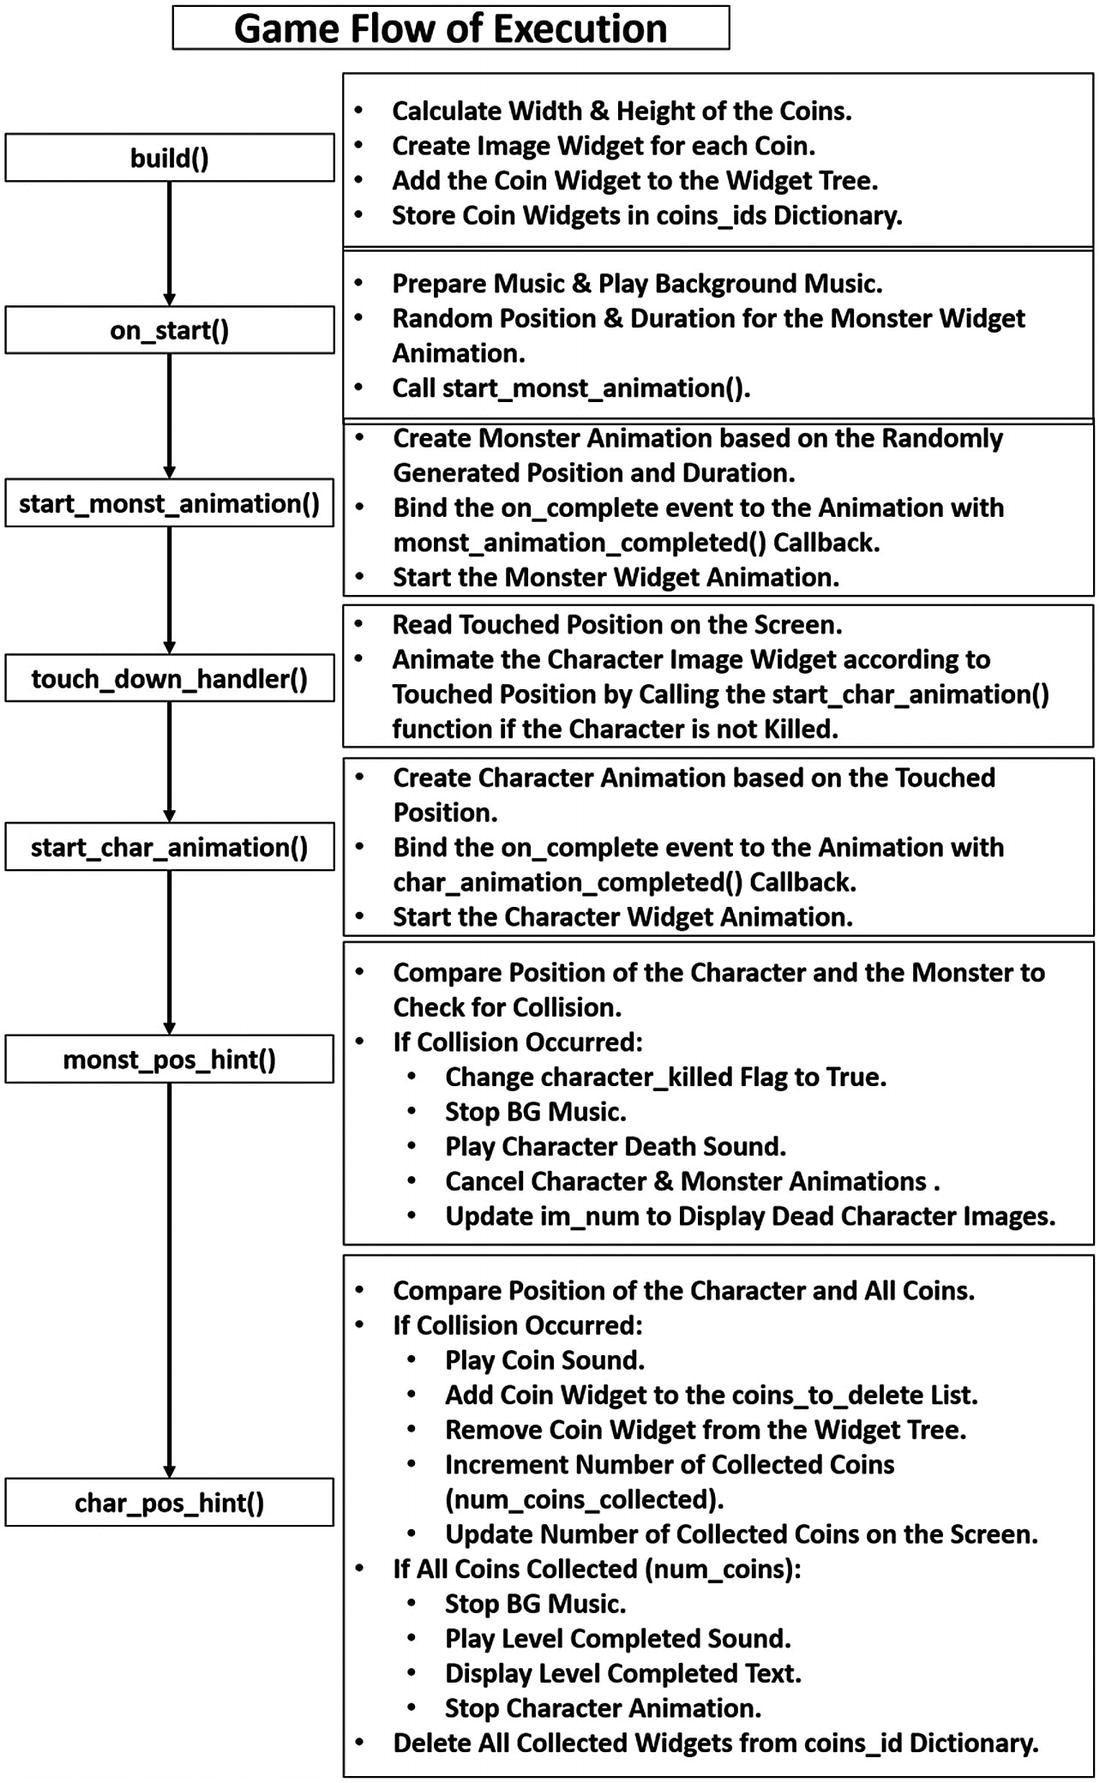
Figure 5-29 shows the flow of game execution. Because our Kivy application implements the build() and on_start() methods, according to the Kivy application lifecycle, they will be executed before any of our custom functions. This starts at the build() function until ending the game because the character was killed or all the coins were collected and the level is complete. Each function is listed in order to its execution until reaching an end for the game and its tasks are listed to its right.
Figure 5-29
The flow of game execution
Figure 5-30 lists the callback functions that handle events that serve the animation of the character and monster. It also lists the five class variables used in the previous application.
Figure 5-30
Summary of class variables and callback functions to handle the character and monster animations
From Figure 5-30, you can see that the monster requires the four functions listed as follows for its operation. Note that the character uses functions similar to these, but with a change in their names.
start_monst_animation()
change_monst_im()
monst_pos_hint()
monst_animation_completed()
Summary
The game now has a character that moves, using animation, according to the touch position. A monster moves randomly, also using animation. The character is killed when it collides with the monster. When it’s killed, a one-time animation starts that changes the image of the character to reflect death. A number of coins are uniformly distributed on the screen where the player’s mission is to collect all of them. A label at the top of the screen shows the number of collected coins. When collision occurs between the character and a coin, the coin disappears and the label is updated. When all the coins are collected, the level is complete.