
When a Python developer knows that it is possible to create Android apps using Python, one of the first questions to be asked is whether Python can develop rich Android applications like the ones developed in Android Studio using native Android languages (i.e. Java). Unfortunately, the answer is that Python is limited in its capabilities compared to Java when building Android (mobile) applications. But the good news is that there are ways to enrich the Android applications created in Python.
The Kivy team has developed some Python libraries that allow developers to access the Android features in a much easier way than was done in Android Studio. With just a few lines of Python code, we can access an Android feature. One of these libraries is Plyer, and it’s discussed in this chapter. Using just a single line, a notification can be pushed to the Android notification bar.
Because Plyer is still under development, some of its features are unimplemented. One alternate solution is to reflect Java classes within Python using a library called Pyjnius. That involves writing Java code inside the Python file. This helps us access some of the Android features, but still there are some unresolved issues. Reflecting the Java classes within Python can increase the complexity of developing the application. Moreover, some exceptions occur when reflecting some Java classes. As a result, using Plyer and Pyjnius is not enough to access all the Android features.
Remember, as mentioned in Chapter 1, an Android Studio project is created when we build the Kivy application using Buildozer. This project could be imported easily within Android Studio and then we can continue developing the application there. This enables us to build whatever features we want.
In Kivy, there is a problem packaging some Python libraries, such as OpenCV. If we cannot build an Android application from a Kivy application that uses OpenCV, we can avoid using OpenCV in Python and then use it in Android Studio. This workaround will be illustrated at the end of this chapter.
Plyer
In the applications created in the previous chapters, we used two main Android features that Kivy supports—accessing the camera and playing audio. Everything is done in Python. But there are other features in Android that might make life easier and we cannot access then in Kivy. We may use the gyroscope in the CoinTex game to move the main character. For CamShare, we might push notifications to the notification bar when the connection between the client and the server is lost. But how do we do that in Kivy (i.e., in Python)? Unfortunately, Kivy alone cannot access these features.
The Kivy team created a library called Pyjnius to access Java classes in Python. So, if you cannot access a feature from Python, you can access it from Java. Note that the Java code is written within the Python file and thus the code will not be Pythonic.
To solve that issue, the team created a library called Plyer to access the Android features inside the Python code. It is yet underdevelopment and some features are not available in the current version (1.3.3.dev0), such as the camera, audio, and Wi-Fi. The interface is very easy to learn and it accesses these features with minimal lines of Python. The Plyer documentation is available at https://plyer.readthedocs.io/en/latest .
In this section, a simple example is discussed in which Plyer is used to push notifications to the notification bar and change the orientation. In the applications created in the previous chapters, we tested them in a desktop computer before building the Android application. In this chapter, we cannot test the application in a desktop before building the Android application because the libraries used (e.g., Plyer) are running in Android devices. It is preferred to use logcat for monitoring the exceptions if any appear when running the Android application.
Changing Orientation and Pushing Notifications
Using the plyer.notification , we can push notifications to the notification bar of the Android device. This module has a function named notify that accepts a number of arguments to initialize the notification.
set_landscape(reverse=False): Sets the orientation to landscape if the reverse argument is True.
set_portrait(reverse=False): Sets the orientation to portrait if the reverse argument is True.
set_sensor(mode='any|landscape|portrait'): Sets the orientation according to the value specified in the mode argument.
Listing 7-1 shows the KV file of an application with three button widgets. The first one executes the show_notification() function , which pushes the notification to the notification bar.
KV File with Buttons for Pushing a Notification Message and Changing the Orientation of the Screen
Pushing a Notification Message to the Android Notification Bar

An Android notification message created in Python using Plyer
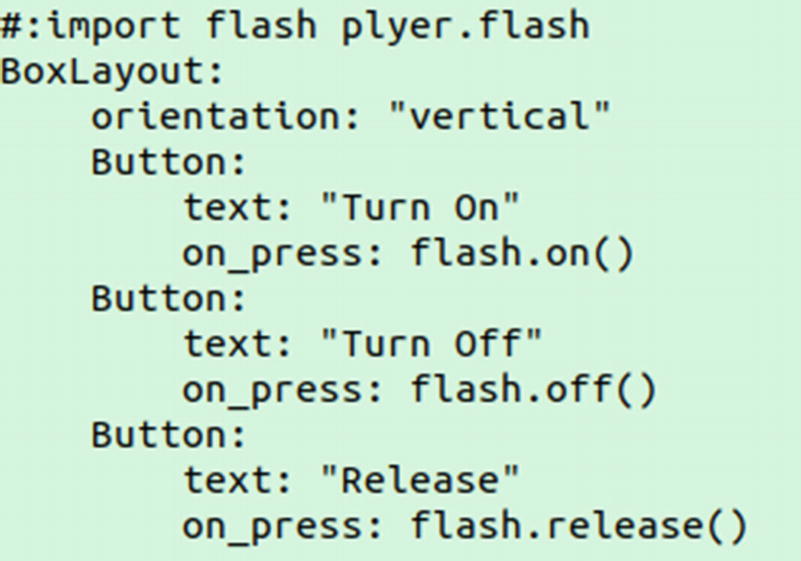
Controlling the Android Flashlight
plyer.flash.on(): Turns on the flash
plyer.flash.off(): Turns off the flash
plyer.flash.release(): Releases the flash
Controlling the Android Flashlight Using Plyer in Python
Generic Python File for Developing a Kivy Application
After running the application, we will see the window shown in Figure 7-2. Remember to list CAMERA and FLASHLIGHT as items in the android.permissions property of the buildozer.spec file.

An Android application for controlling the flashlight
The previous examples show how simple the Plyer library is for accessing Android features within Python code. Unfortunately, Plyer is restricted to some features and does not do everything an Android developer wants to do. There are some unsupported features, such as displaying a toast message, and there are some features that are not implemented for some platforms, such as accessing the camera and playing audio. We can use the Pyjnius library to access these missing features using Java code.
Pyjnius
Pyjnius is a library developed by the Kivy team to access Java classes in the Python code in order to use the currently unsupported Android features within Python Kivy projects. The library has a core function named autoclass() that accepts the Java class name and returns a variable that represents that Java class. This process is called reflection .
Printing a Message in Python Using the System Class in Java
Reading a Text File in Java
There are three classes used in the Java code in Listing 7-6. The first one is the java.io.FileReader class for reading the file. In order to read lines inside the read file, the java.io.BufferedReader class is used. Finally, we can print each line on the console using the java.lang.System class . Note that the java.lang package is already imported in any Java class and thus we don’t need to add an import statement for it within the Java code. After preparing the Java code, we need to embed it into Python using Pyjnius.
Reading a Text File Using Java Classes Reflected in Python Using Pyjnius
The result of reading a text file in Python using Java classes
After understanding the basic concept behind the Pyjnius library, we can use it to access features in Android.
Playing Audio in Android Using Pyjnius
We can start by discussing the Java code used to play audio in Android and think about how to write it in Python using Pyjnius. The code is shown in Listing 7-8, in which there is a single class used named MediaPlayer in the android.media package. After instantiating that class and returning an instance into the mediaPlayer variable, we can call the required methods to load and play the audio file.
Java Code to Play an Audio File in Android
After completing the Java code, we next need to discuss the process for reflecting this code in Python.
This class can be reflected in Python using the autoclass() function discussed before. If the object created from that reflected class is named mediaPlayer, the methods will be called exactly as was done in the Java code.
Playing an Audio File in Python by Reflecting Java Classes Using Pyjnius
Based on the code in Listing 7-9, we can create an application for playing, pausing, and stopping audio. The KV file of the application is shown in Listing 7-10. There is a BoxLayout with five widgets. The first two widgets are Labels and the last three are Buttons.
The first Label is updated according to the progress of playing the audio file. This is done by drawing a rectangle inside canvas.before using the Rectangle vertex instruction, which is colored red according to the Color instruction. The default size of this Label widget is 0.0, meaning it is hidden when the application starts. The size changes according to the playing progress.
KV File for Playing an Audio File in Android
The three buttons are responsible for starting, pausing, and stopping the audio. The callback functions start_audio(), pause_audio(), and stop_audio() are called when the on_release event is fired.

An Android application for playing an audio file
The Python file is shown in Listing 7-11. It implements the callback functions associated with the three Button widgets. The start_audio() function does the work discussed previously, from reflecting the MediaPlayer class until playing the audio file using the start() method. Notice that the instance of the MediaPlayer is set as a property inside the current object referenced using the self keyword in order to access it outside the function it is defined into. It can be accessed by self.mediaPlayer.
A class variable named prepare_audio is created to determine whether the audio file is previously loaded. It is initialized to False to mean that the file is not loaded. If its value is False, the start_audio() function loads the file and starts it. After being started, its value is set to True.
If the audio file is just paused, we do not have to reload the file again. Thus, the file will be started by calling the start() method inside the else part of the if statement. This resumes the audio file from the previous position before being paused. If the file is prepared after being paused, the file will play from the beginning.
Kivy Application for Playing an Audio File in Android Based on Reflected Java Classes Using Pyjnius
Using the schedule_interval() function inside the kivy.clock.Clock class, a callback function named update_position() is executed every 0.1 seconds. This updates the two Label widgets inside the KV file according to the current millisecond being played from the audio file.
First, the audio file duration is returned using the getDuration() method inside the audioDuration variable. The current position, in milliseconds, is returned using the getCurrentPosition() method inside the currentPosition variable. The progress percentage is calculated by dividing the audioDuration by currentPosition. Because the values inside these variables are integers and the expected result is between 0.0 and 1.0, which is float, we have to change their data type from integer to float using the float() function. The file duration, current position, and current percentage are displayed on the second Label widget inside the KV file.
Note that displaying the progress of playing the audio file is similar to updating the life percentage of the character of the CoinTex game. After discussing the function that handles the on_release event of the first button, we can discuss the functions for the remaining two buttons.
The second Button widget pauses the played audio file using the pause() method . According to its callback function, pause_audio(), an if statement ensures that the file is playing before executing this method because it must be called for an active audio file.
The last button stops the audio by calling the stop() method . Similar to the pause_audio() callback function, the stop_audio() function has an if statement that ensures that the audio file is playing before stopping it. After calling this method, the file can be played again only after preparing the file again. Thus, we must execute the code that prepares the audio file inside the if statement of the start_audio() function.
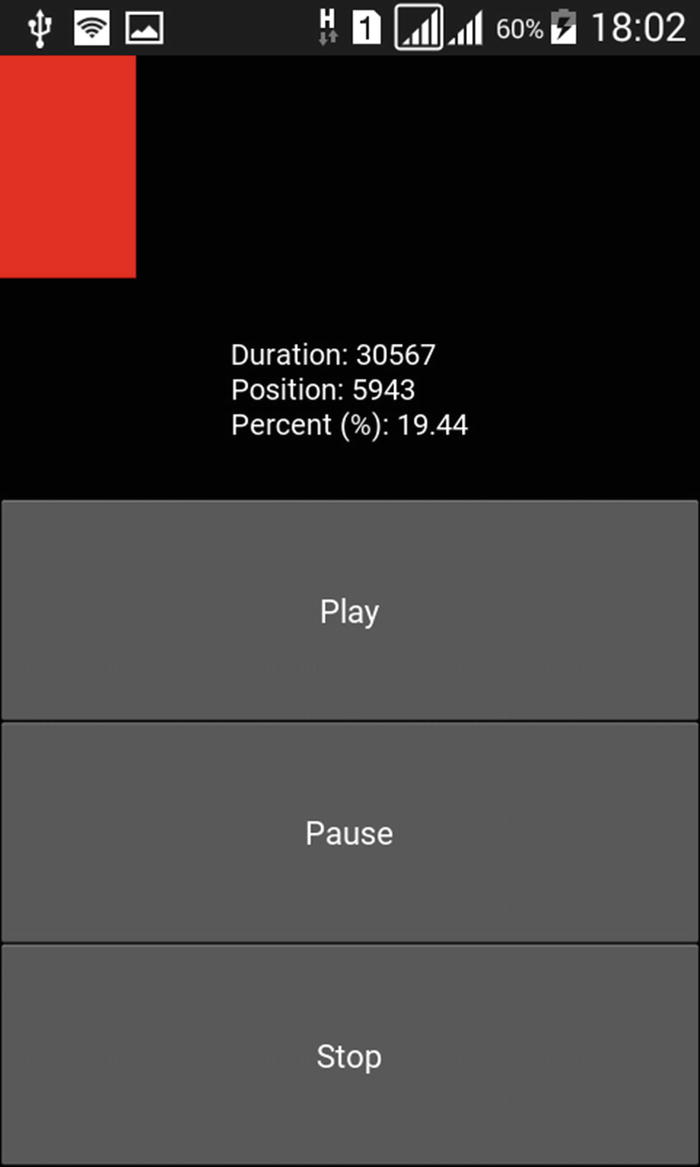
Playing an audio file in Android by reflecting Java classes in Python
The process requires more than reflecting the Toast class (android.widget.Toast) within Python. For example, we have to know that the text to be displayed is actually an instance of the CharSequence class . Thus, this class must be reflected in order to convert the text to its type to be suitable to the text argument. Moreover, toast is only created within the UI thread, not outside it. Thus, it can be displayed inside a Runnable instance. The developer has to do a lot of work than with the Java example.
Remember that the goal of using Pyjnius is to make life simpler for Kivy developers to build Android applications that use Java features in Python. If the process will get complicated, I do not recommend using it to write Java code. It can be used for simple tasks.
But if we cannot write Java code within Python, where do we write it? The answer is simply within a Java file.
Understanding the Android Project Built Using Buildozer
If you are familiar with the structure of the Android Studio projects, you can navigate through the project to find all the necessary files and directories inside a regular project.
At the root directory of the project, the build.gradle and AndroidManifest.xml files exist. We will not discuss these files in detail but just get the idea that helps us understand how to manage the Android project from Android Studio.
The AndroidManifest.xml file is shown in Listing 7-12. It starts with the <manifest> element. Inside the header of this element, the package name and the application version are specified. It starts by specifying the application package name using the package attribute, which is set to com.test.kivyandroid. This is the result of concatenation between the package.domain and package.name properties inside the buildozer.spec file.
The android:versionCode property is an integer value representing the internal version number of the application to determine whether the version is newer than another. When uploading an application to Google Play, this integer helps it to know that there is a new version of the application to notify users to update it. But this integer is not displayed to the users. The value of the android:versionName attribute is a string, which is displayed to the users.
The android:installLocation allows us to specify where to install the application. It is set to auto to install the application on the external storage if the internal storage is full.
The <supports-screens> element does not set a restriction on the target screen and sets all of its attributes to True in order to support a wide range of devices.
The <uses-sdk> element specifies the minimum and target SDK using the android:minSdkVersion and android:targetSdkVersion attributes. Try to target the highest possible SDK versions, but set the target SDK to at least 26, as Google Play is no longer accepting applications with target SDKs less than 26.
The AndroidManifest.xml File Inside the Kivy Android Studio Project
When building an Android project, there will be an application that holds multiple activities (which are the Java classes). The AndroidManifest.xml file is structured to reflect that. It has an element named <application>, which declares the entire application. Using the <activity> element, we can declare each individual activity. The <application> element holds one or more of the <activity> elements as children.
Starting with the <application> element , it has a number of attributes in its header to define the application properties. For example, the application name is specified using the android:label attribute. This is set to a string that appears to the user. You can set it as a raw string, but it is better to set it as a string resource to reference it in other parts of the application, as we will see later.
This file is shown in Listing 7-13. There is an element named app_name, which holds the name of the application (CoinTex). In order to access the value inside the string resource named app_name within the AndroidManifest.xml file, we first need to refer to the strings.xml resource file using @string and then specify the ID of the string resource using @string/app_name.
The strings.xml File Inside the Kivy Android Studio Project
If you set the fullscreen property of the buildozer.spec file to 1, the android:theme attribute will apply a style that hides the notification bar.
The <application> element has another attribute named android:hardwareAccelerated, which is set to True to smoothly render the graphics displayed on the screen.
Inside the <activity> element header, the android:label attribute is set to the value inside the string resource with ID app_name. This is the same resource used to set the application name inside the <application> element that is reused. This is why it is important to use string resources.
When some events happen, such as hiding the keyboard while an activity is running, the activity is restarted by default. The android:configChanges attribute determines the set of configuration changes to be handled by the activity without being restarted. In our project, three values are assigned to this attribute, which are keyboardHidden in addition to orientation and screenSize, for handling screen orientation changes from landscape to portrait and vice versa.
The android: screenOrientation attribute sets the orientation of the device. It reflects the value stored in the orientation property in the buildozer.spec file.
The <activity> element has a child element called <intent-filter>, which declares the intent of the activity. This is what the activity can do. Other applications can call your activity for using its capacities declared within that element. The <intent-filter> element must have at least one <action > element in order to allow it to accept intents. In our activity, its action is shown the name android.intent.action.MAIN. This means the parent activity is the entry point of the application (i.e., the activity opens after opening the application). In order to list the application in the application launcher of the device, the <category> element is added with a name equal to android.intent.category.LAUNCHER.
This is a quick overview of the AndroidManifest.xml file . Note that the values inside that file may be overridden by the build.gradle file. The interesting part inside that file is the one declaring the minimum SDK and target SDK, as shown in Listing 7-14. It is easy to understand that the minimum SDK version is 18, the target SDK is 26, the version code is integer 3, and the version name is the string 0.3. Note that these values are identical to those defined inside the AndroidiManifest.xml file.
Specifying the Minimum SDK and Target SDK Versions Inside the build.gradle File
When manipulating the Android project within Android Studio, Android Studio will search for the values of the buildToolsVersion and compileSdkVersion fields specified in the build.gradle file. If they aren’t found, the project will not be built. You can change these versions to whatever works with your system.
Project Main Activity
Because the entry point for any Android application is the onCreate() method , we can discuss it. A few lines from the top of the PythonActivity class in addition to the method are shown in Listing 7-15. The first two lines import the classes named SDLActivity and ResourceManager.
We used to find a class named R.java in the Android projects to manage the resources by maintaining their IDs for example. For Kivy projects, this class is replaced by a class called ResourceManager, which is in the org.renpy.android package. This is why an instance is created from this class at the beginning of the onCreate() method .
The onCreate() Method Inside the PythonActivity Class
A method named showLoadingScreen() inside the activity is called. This method just loads the presplash image inside an ImageView. Remember that the name of this image is specified inside the presplash.filename property of the buildozer.spec file. That method is shown in Listing 7-16.
The method works as follows. If the ImageView is not created inside the mImageView variable, it creates it by loading the presplash image resource. The resource identifier is returned in the presplashId variable using the getIdentifier() method inside the resourceManager instance. This method accepts the resource name and its kind and returns an integer representing the ID. This is why the presplashId variable type is integer. Note that in regular Android projects, the findViewById() method returns the IDs.
The presplash image is located in this path NewApp/src/main/res/drawable/presplash.jpg. Because the resource is an image, its kind is drawable and thus it’s added to the drawable directory. This directory is located under the res directory to indicate that it holds resources. The name of a resource is presplash, which is the resource filename without the extension.
After returning its ID, the raw image file is opened and returned to the is variable, which is an instance of the InputStream class. Then the raw data is decoded as an image using the decodeStream() method of the BitmapFactory class. The data is returned to a variable named bitmap.
After that, an instance of the ImageView class is returned to the mImageView variable and the image displayed on it is set using the setUmageBitmap() method . It accepts the bitmap variable we previously created.
The showLoadingScreen() Method
In order to display the presplash image view, the image view must be added to the activity layout. In order to add a view to the layout, the addView() method is used. Using the command mLayout.addView(mImageView), the presplash image view is added to the activity layout referred to it by the mLayout variable .
There is no layout XML resource file for the application. Thus, the layouts are created dynamically within the Java code.
There is just a single layout for the activity defined in the static mLayout variable of the SDLActivity class. As a result, the views added to the layout are visible until we remove them. For example, the presplash image view must be removed from the layout before the application starts (i.e., after loading ends).
After the screen finishes loading, the presplash image view is removed according to the method named removeLoadingScreen() inside the PythonActivity class. It will be discussed later in this chapter.
Note that if there is no layout created previously, the image itself is displayed on the screen as the main view using the setContentView() function.
The purpose of displaying the presplash image on the loading screen rather than starting the application directly is that files must be loaded before the application starts. Inside the project root directory, there is a folder named python-install that includes all the Python files needed to build the application.
After displaying the loading screen, the onCreate() method starts a background thread by creating an instance from the UnpackFilesTask class that extends AsyncTask. Note that a toast message is shown after running this thread while the loading screen is active.
The class header and some chunks of code from this class are shown in Listing 7-17. Note that this class is nested inside the PythonActivity class and thus no import statement is required.
The UnpackFilesTask Class
Implementation of the keepActive() Method
Implementation of the removeLoadingScreen() Method
Setting the Application Layout Inside the finishLoad() Method Within the SDLActivity Class
Note that the goal of finishing the loading screen is not just starting the application. Another purpose is to make the UI layout managed by the SDLActivity, as it is the one responsible for preparing the application UI. The finishLoad() method prepares a layout inside the mLayout instance. We will use this method later for adding views to the layout of the main activity (PythonActivity).
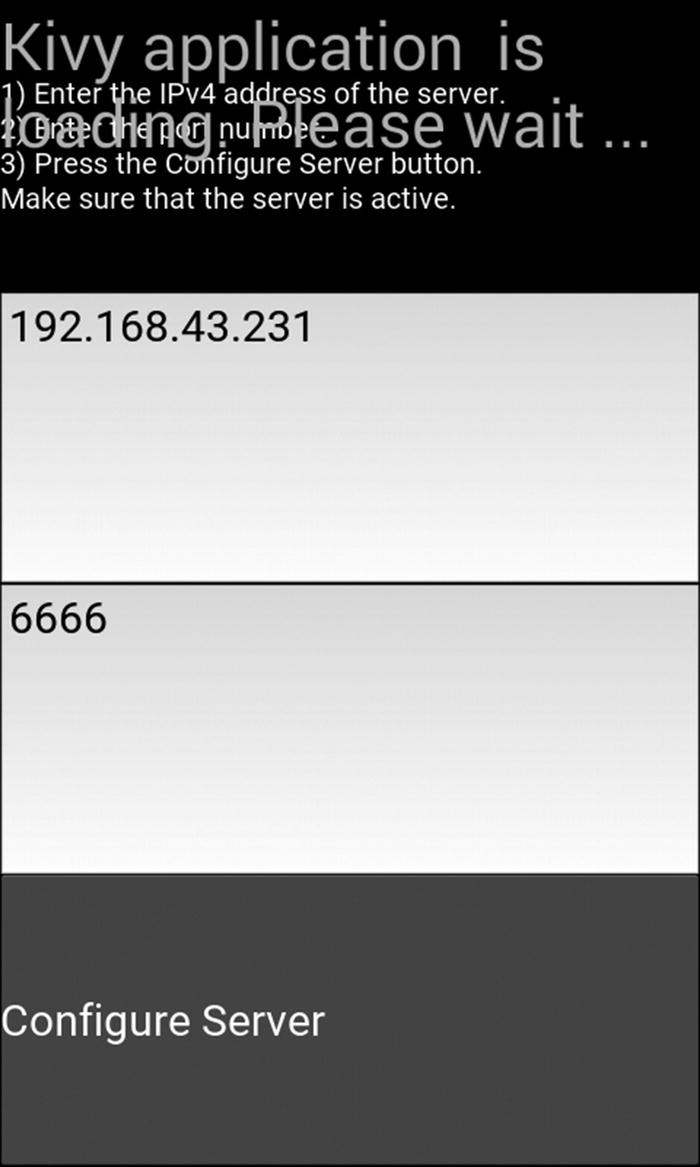
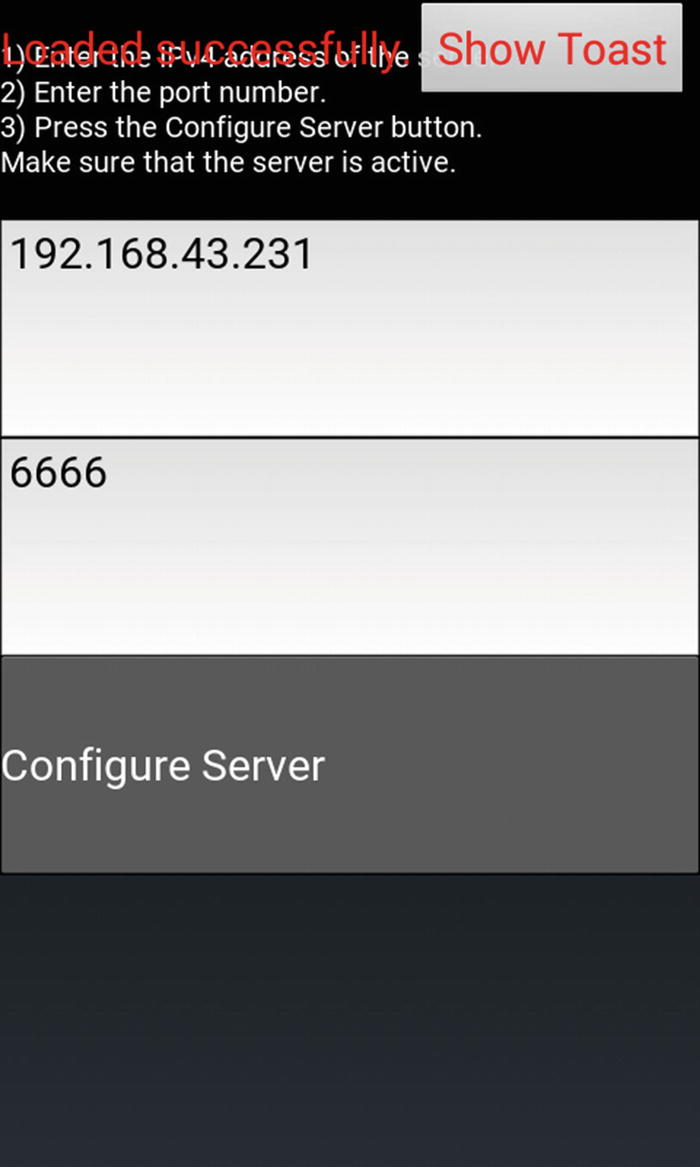
Displaying Toast Messages from Python
Implementation of the toastError() Method to Display Toast Messages
KV File for Displaying a Toast Method Using Python
Displaying a Toast Message Within Python by Reflecting the PythonActivity Class

A toast message displayed using Python
Opening Kivy Android Projects in Android Studio
From the previous discussion, we at least have a basic understanding of how the Android project created by Buildozer works. The next step is to edit this project in Android Studio.
Up to this section, Linux has been used to develop the projects. This is because Buildozer is only supported in Linux. After generating the Android project, we can use the operating system of our choice for manipulating it in Android Studio. In this section, Windows is used to import and edit the project. Before starting, make sure that Android Studio is working correctly and you have the versions of build tools and SDK listed in the gradle.build file.

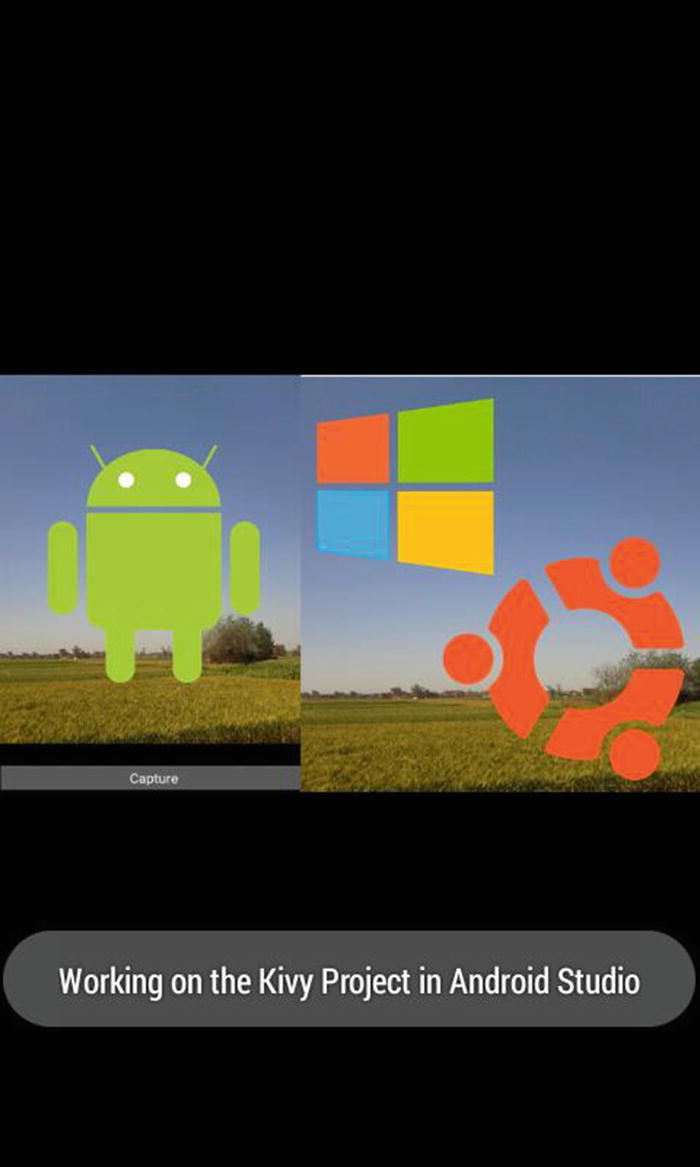
Importing the Kivy Android Studio project built using Buildozer within Android Studio

The structure of the imported project within Android Studio
Inside the manifests group, all manifests used within the project are listed. This project has a single manifest file called AndroidManifst.xml. The Java main activity class (PythonActivity) is located in the java group. We can easily deduce that this class is inside the org.kivy.android package. The build.gradle file is within a group named Gradle Scripts. The res group contains all the resources, such as the strings.xml file. You can view the project files as stored on the disk by selecting the Project view.

Selecting a USB-connected device for running the Android application
Modifying the Kivy presplash image and displaying a toast message while the application is loading
Playing Music While the Kivy Application Is Loading
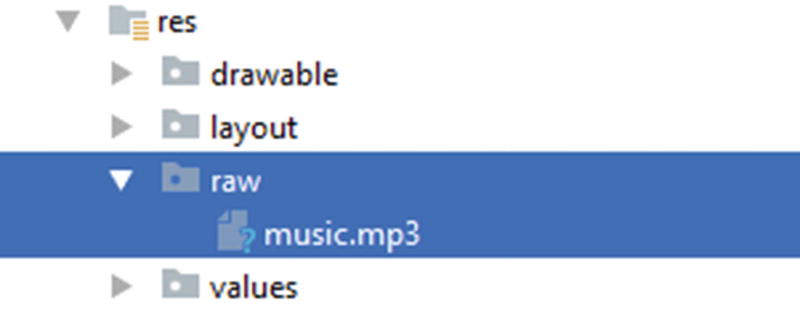
Adding the music file as a raw resource inside the Android Studio project
After adding the raw resource into the project, we must reference it within the Java code. Remember that resources in Kivy Android projects are manipulated using a class named ResourceManager inside the org.renpy.android package.
In the previous section, the ID of the drawable resource named presplash is returned using the getIdentifier() method inside that class. Similarly, the identifier of the raw resource is returned using this method. Just specify the suitable name and kind arguments.
Because the resource filename is music.mp3, the name argument is set to music. Its kind is set to raw because it exists in the raw folder. Because IDs of resources are integers, the ID is returned to the music_id variable of type integer.
After running the application, the music will be played as soon as the loading screen appears. It will automatically be stopped after the files are done loading.
Adding Views to the PythonActivity Layout
By default, the presplash image is the only view displayed on the activity layout while the screen is loading. We can alter this layout to add more views. Just remember that there is only one layout for the activity and thus we have remove the newly added views once they are not required.
The place where we can add more views while the screen is loading is the showLoadingScreen() method of the PythonActivity class. We can add a single TextView within the activity layout according to this modified method shown in Listing 7-25. The TextView is added after the presplash image view that’s defined into the mImageView variable gets added to the layout. The code omits some parts and focuses on the part where the TextView is added to the layout.
An instance from the TextView class is returned into a static variable defined in the PythonActivity class named loadingTextView. The reason for not making this variable local to the method is that we need to access it later inside the removeLoadingScreen() method to remove it.
Adding a TextView to the Loading Screen While the Kivy Application Is Loading

Adding an Android TextView to the loading screen of the Kivy application
The TextView added to the application layout while it is loading remains visible after the application starts
Removing the TextView Inside the removeLoadingScreen() Method
In summary, a view is added to the activity layout that remains as long as the screen is loading. Once the loading process is over, the view is removed. If the view is not removed from the parent, it will still visible after the application UI defined in Python is loaded.
Assume we need to add a view to the activity layout after the loading step ends. Where in the Java code do we add this view? Let’s discuss this matter in the next section.
SDLSurface
In order to determine the suitable place within the project to add views after the files are loaded but before the application layout is visible, it is important to discuss the SDLSurface class.
The SurfaceView is an Android component in which we can draw on the application UI. The UI widgets specified in the Kivy project KV file are drawn within this SurfaceView.
SurfaceView implements an interface named SurfaceHolder.Callback, which provides a number of callback methods to help receive information about the surface. For example, when the surface is created, the callback method surfaceCreated() is called. The surfaceDestroyed() and surfaceChanged() callback methods are called when the surface is destroyed and changed, respectively. An example of changes that occur is creating an instance of this class and drawing something on the surface.
To handle hardware key presses, SurfaceView implements the second interface named View.OnKeyListener. It has a single callback method named onKey() that is called when a hardware key is pressed. To handle touch events, the View.OnTouchListener is implemented. It has a single callback method named onTouch().
The final interface implemented by the SurfaceView class is SensorEventListener. It listens to the changes in the sensor data. It has two callback methods—onAccuracyChanged() and onSensorChanged(). Both are implemented in the class but the onAccuracyChanged() is empty. The onSensorChanged() is used to monitor the device orientation.
Methods Inside the SDLSurface Class
There are two lines that are worth mentioning inside the implemented surfaceChanged() callback method of the SurfaceHolder.Callback interface. These lines create and start an instance of the Thread class into the sdlThread variable, which refers to the main SDL thread. There are two arguments specified inside the Thread class constructor, which are the target Runnable object and the thread name.
Implementation of the SDLMain Class
This is not a Java method but a C function. This method is the entry point for the SDL library. This method and the other C methods are found in the source file of the SDL named libSDL2.so, located in the /NewApp/libs/rmeabi-v7a directory.
By reaching this step, the C files are ready to be executed and the application will start and get ready for user interaction. We can return to our question, which is where in the Java project do we add views that appear in the application activity after the screen loading completes. Let’s follow the chain of execution to find the suitable position.
It is now clear that the nativeInit() function inside the SDLMain class is the entry point for executing the SDL library and rendering the application UI. Thus, we have to add our views before calling this function. Back in the chain, an instance of the SDLMain class is created within the surfaceChanged() method inside the SDLSurface class. Remember that the surfaceChanged() method is a callback method inside the SurfaceHolder.Callback interface that listens to changes in the SurfaceView.
Instantiating the SDLSurface Class Within the finishLoad() Method
Remember that the finishLoad() method is called within the onPostExecute() callback method of the UnpackFilesTask class. That is after the application loads its files. We can assume that the finishLoad() method of the SDLActivity class is the starting point where the activity layout is prepared. It is a good idea to add views to the activity layout that is visible only after the application loading step ends.
Adding a TextView and a Button to the Application Layout Inside the finishLoad() Method
The button click action is handled by specifying the click listener using the setOnClickListener() method . This method accepts an instance of the OnClickListener() interface after implementing its onClick() method. The code inside this method is executed when the button is clicked. The button shows a toast message when clicked.
The two new views are added as children to a parent LinearLayout with horizontal orientation. Finally, the linear layout is added as a child to the activity layout.

Adding Android views to the Kivy application
We can modify the toast message to print all child views inside the activity layout when the button is clicked. The code in Listing 7-31 modifies the onClickListener() callback method for that purpose. The number of child views inside the layout is returned using the getChildCount() method. To retrieve a specific view, the getChildAt() method accepts an index referring to the position of the view within the parent, where index 0 refers to the first child added to the parent.
Editing the onClickListener() Callback Method of the Button View to Print All Layout Child Views Inside a Toast Message

A toast message for printing information about the child views inside the layout once the Button view is clicked
In summary, in order to add views to the layout while the screen is loading, add the code inside the showLoadingScreen() method inside the PythonActivity class. The keepAlive() method is called by SDL when the loading completes, which calls a method named removeLoadingScreen() where views can be deleted from the layout after the loading. After the project files are loaded, the onPostExecute() callback method of the UnpackFilesTask class calls a method named finishLoad() inside the SDLActivity class. It is a good place to add views to the layout after the screen is loaded.
How Does SDL Detect the UI Widgets Defined in Kivy?
You might have noticed that the button added in the previous example hides part of the word server displayed on the Label widget defined in Kivy. Why does that happen?
When the surface is created, its size is set to the entire window according to the onNativeResize() native function call inside the surfaceChanged() callback method, as shown in Listing 7-32. The width and height of the SDLActivity surface are set to the width and height of the window. This does not leave room for adding new views inside Java. The views are stacked on the top of each other. The Z order of the latest views to be added into the activity layout appear on top of the views added before them.
Setting the Surface Size to the Window Size Inside the SurfaceChanged() Method
In the previous example, the new linear layout (newLayout) is added to the activity layout (mLayout) after that SDL surface (mSurface) is added. This is why the new views appear on top of the SDL surface.
The orientation of LinearLayout is set to horizontal. For horizontal linear layout, the default width and height are set to WRAP_CONTENT, which means the linear layout will not fill the entire activity layout size. It just covers the least space for holding its child views. This is why SDLSurface is still visible.
Adding the SDL Surface to the Activity Layout Before Adding the Custom LinearLayout
One idea that comes to our mind to give each view its unique space is to change the SDL surface size to not fill the entire height of the window. The addView() method can accept another argument that specifies the layout parameters of a given view when being added to the layout. When adding the SDL surface to the layout inside the finishLoad() method, we can change its height to be 3/4 of the layout height, according to Listing 7-34.
Setting the Height of the SDL Surface to be 3/4 of the Layout Height
The SDL surface covers 3/4 of the layout height

Placing the SDL surface to the layout starting from the bottom-left corner
Handling Touch Events of Kivy Widgets in Java
The activity layout contains the SDLSurface as a child view. This view holds all the widgets defined in the KV file of the Kivy application. In this section, we discuss how events are handled for these widgets within the Android Studio project.
In the KV file of the Python application, the four widgets are added to a BoxLayout . It has four child widgets (one Button, two TextInput, and one Label). Due to its vertical orientation, the widgets span the entire width of the BoxLayout but share the height equally. The height of the screen is divided by four and thus the height of each widget is 25% of the screen height (1/4)x1.0=0.25).
Because the (0, 0) point of the SDL Surface starts at the top-left corner, the Y coordinate of the region that the Button widget covers in the layout ranges from 0.75 to 1.0. SDL associates any touch event within that range with the button widget.
The Y range of the TextInput widget above the button goes from 0.5 to 0.75. Thus, SDL associates any touch event in this region to that widget. The same process repeats for the second TextInput widget (0.25 to 0.5) and the Label (0.0 to 0.25).
After changing the height of the surface to 3/4=0.75 of the screen height, the Y range of the widgets will change. For example, the Label widget Y coordinate will start at 0.0 but ends at 1/4 of the new surface height, which is 0.75, which is 0.25x0.75=0.1875. The Y coordinate of the first TextInput will start at 0.1875 and end at 0.375. Thus, the screen Y range from 0.1875 to 0.25 is now associated with the TextInput widget.
By calculating the range of the Y coordinate for each widget in the SDL surface, SDL can easily determine the destination of the touch events and take the proper action. For example, if the position of the touch event is (x=0.1, y=0.9), it is a touch on the Button widget and thus the callback function defined in the Kivy application will be called. Touch event handling for the Kivy widgets is done inside the onTouch() callback method of the SDLSurface class, which is located inside the SDLActivity Java file. The part of this method responsible for handling the touch events is shown in Listing 7-35.
This method accepts the target view and the event. The touch event might have multiple actions to be taken including pressing, releasing, motion, and more. For that reason, a switch block filters the action to make the proper decision.
First, the action of the event is returned from the event using the getActionMasked() method in the action integer variable. For example, when the touch is pressed, the returned integer is 0. When it is released, the integer is 1.
Handling the Touch Events of Kivy Widgets Inside Android Studio
Inside an action such as ACTION_POINTER_DOWN, the x and y coordinates of the touch event are returned using the getX() and getY() methods. In order to know its relative position to the SDL surface size, they are divided by the width and height of the surface stored in the mWidth and mHeight variables. Remember that these variables are set equal to the width and height of the surface inside the surfaceChanged() callback method. Finally, the onNativeTouch() native function is called for handling the action according to the instructions written in Python. This method accepts the touch coordinates to decide which widget receives the event.
For the actions ACTION_UP, ACTION_DOWN, ACTION_POINTER_UP, and ACTION_POINTER_DOWN, the same code is executed. This is why there is no break statement for the cases associated with the actions ACTION_UP, ACTION_DOWN, and ACTION_POINTER_UP. If the action number is 1, for example, the switch block enters the case associated with ACTION_UP. Because this case does not have a break statement, the next case is executed, which is ACTION_DOWN. Also, this case does not have a break statement and thus the next case enters.
Similarly, the next case associated with ACTION_POINTER_UP does not have a break statement and thus the case associated with ACTION_POINTER_DOWN enters. Because this case includes a break statement at its end, its code is executed and the switch breaks.
Having reached this point, we have discussed the most important parts of the Java project created using Buildozer from the Kivy project. This helps us to understand how things work and modify the project to add Java components that work with the project.
Remember that one target of working on the Kivy project in Android Studio is that the complexity of implementing some actions within Python increases even with Pyjnius. In the next section, a Kivy button touch event is handled in Java.
Handling Kivy Button Click in Android Studio
Python-for-Android supports a list of libraries that can be packaged within an Android APK file. The list can be found at https://github.com/kivy/python-for-android/tree/master/pythonforandroid/recipes . Examples of these libraries are Plyer, requests, OpenCV, NumPy, and Pyjnius. Some of these libraries are well supported and work fine, but others do not. Generally, building an APK from a Kivy project that uses the image processing libraries such as NumPy and OpenCV is a bit challenging and expected to fail. Some issues in GitHub are not yet fixed, although the Kivy developers are working to solve them.
We can benefit from editing the Kivy project within Android Studio by implementing the components that are not easily implemented in Python.
In this section, a Kivy application will be created in which the user selects an image file. There is Button widget that’s unhandled within Python. Inside Android Studio, the touch event of that button is handled within the onTouch() callback method discussed previously. When the button is touched, the selected image is processed using the OpenCV library. We will start by discussing the Kivy application and then downloading and importing OpenCV in order to handle the button touch event.
Kivy Application
The KV file of the application is shown in Listing 7-36. There is a new widget named FileChooserIconView, which displays the filesystem of the device. The path property specifies the path in which the files and folders are displayed. It is set to the current directory. The dirselect determines whether the user can select directories or not. It is set to False to prevent the user from selecting directories. The multiselect property is set to False to avoid selecting multiple files. We just need to select a single image file. When the user makes a selection, the on_selection event is fired. It is handled within the Python file using a callback function named load_file().
After selecting the image file, the image is displayed on the Image widget by setting its source property to the selected file directory. A Label widget displays informational messages such as indicating whether the user selected an image or not.
KV File for a Kivy Application with a Button to be Handled Within Android Studio

Window of the application created in Listing 7-36
Python File of the Application in which an Image File Is Loaded to be Processed in Android Studio Using OpenCV
The function starts by accessing the widgets defined in the KV file. The file chooser is returned to the fileChooser variable. Even when disabling multi-selection, the selected file directory is returned into a list that can be accessed using the selection property. Index 0 returns the directory of the selected file as a string into the file_dir variable.
The selected file extension is compared to a list with the target extensions, which are .png and .jpg. If the list is equal to either, we are sure that the selected file is an image. Thus, the source property of the Image widget is set to the image directory.
If the extension is not .png or .jpg, a message is printed on the Label widget to inform the user of the incorrect selection.
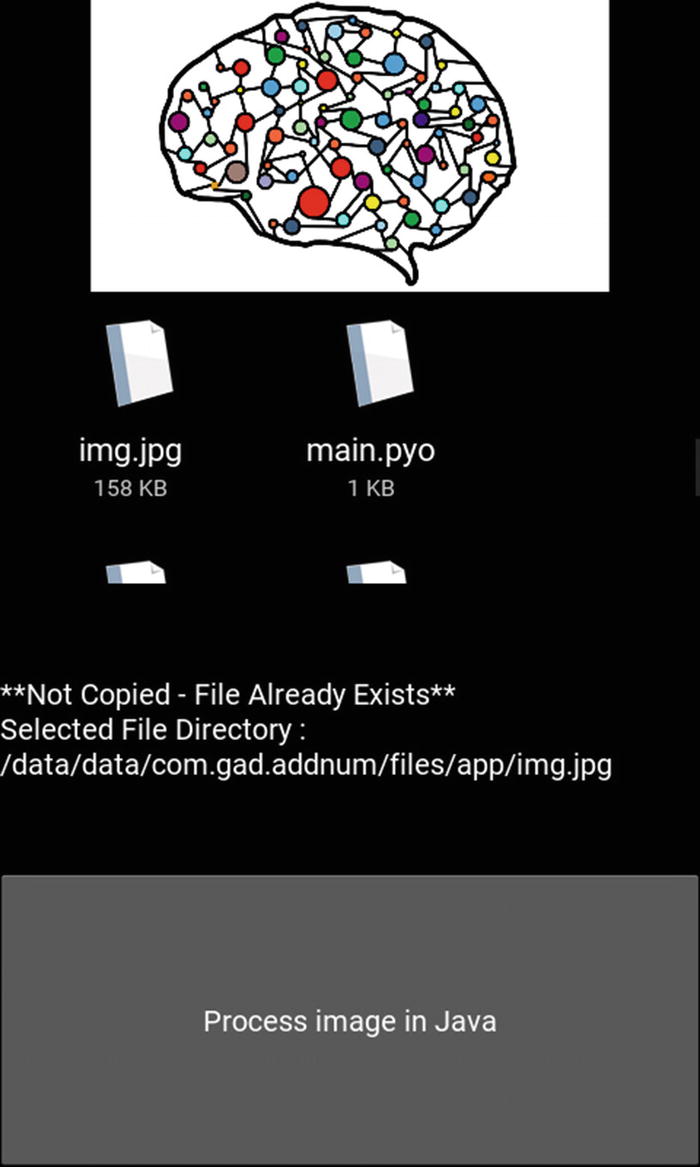
Selecting an image file that exists in the current directory
Inside the Java file, we need a way to indicate the name of the image file. We can standardize the process by setting the name of the image to be processed inside the Java file to a fixed name. The selected name is processImageJavaOpenCV. Using the os.rename() function , the old and new filenames are specified. Using the join() function, the filename and its extension are concatenated. This is done within the try and except blocks.
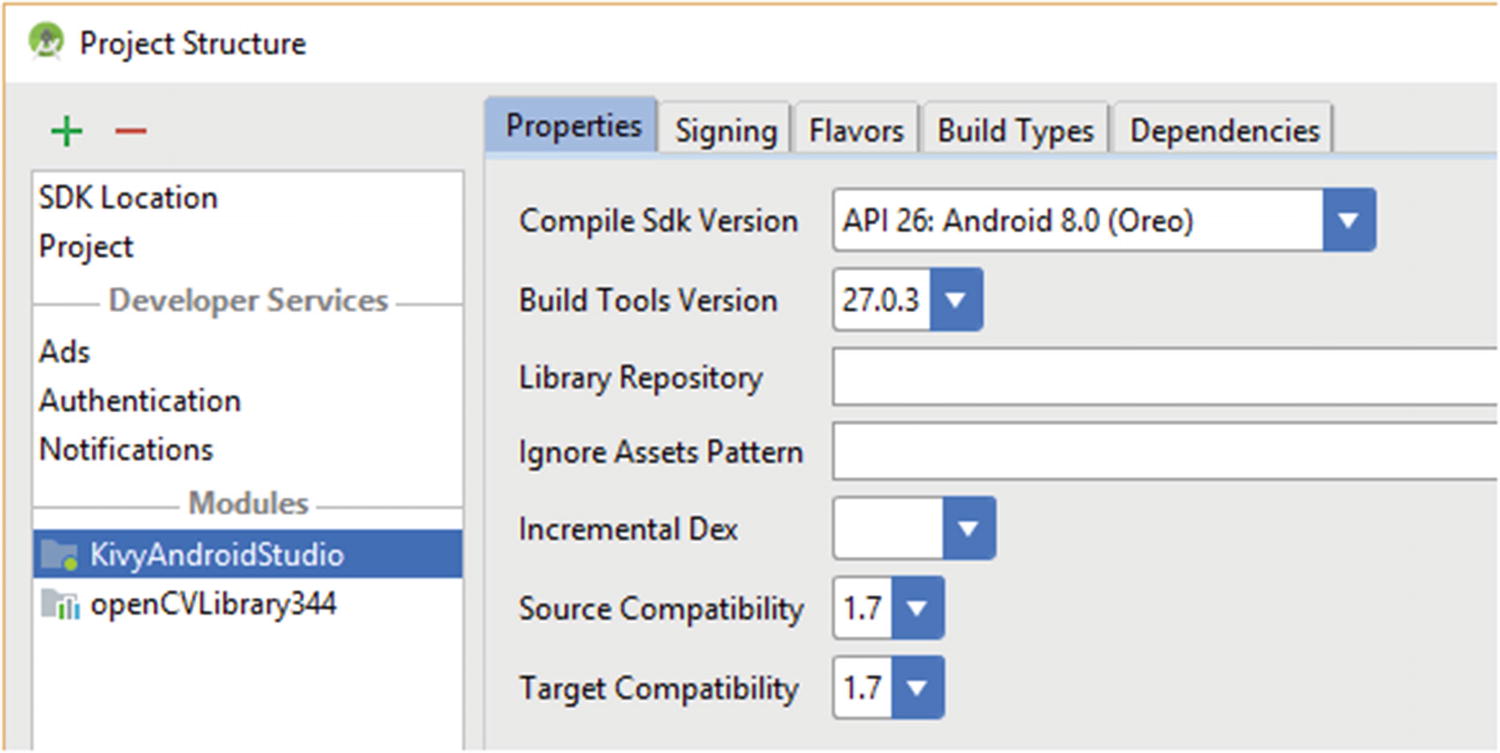
After making sure the Python application works well, we need to build the Android project using Buildozer. The produced project will be opened in Android Studio, as is done in the previous project. Remember to set the compile SDK and build tool versions to whatever your PC requires.
Detecting the Touch Event of the Button Widget Inside Java
Remember that the all Kivy widgets are drawn inside the SDL surface defined within the SDLActivity class. When the surface is touched, the touch event position is returned within the onTouch() callback method. This position is compared against the regions of each Kivy widget. The event is associated with the widget where the touch occurred in its region. In this section, we will detect the region of the Kivy button.
Similar to the previous example within the previous section titled “Handling Touch Events of Kivy Widgets in Java,” the widgets are added within the KV file inside a BoxLayout with vertical orientation. Thus, the screen height is divided equally across all child widgets. Note that the screen and the BoxLayout can be used interchangeably because the layout fills the screen.
Because the screen has four widgets, the height for each widget is 25% of the screen height. Thus, the values of the Y coordinate of the Button widget relative to the screen height start at Y=0.75 and end at Y=1.0. Any touch event that occurs in this region of the screen is associated with the Button widget.
The modified onTouch() method that handles the button touch event is shown in Listing 7-38. If we are interested in handling the event after the touch is released, the code will be written inside the case associated with ACTION_UP.
Using an if statement, the Y coordinate of the touch position is compared against the range of Y values of the button. If the touch falls within this range, the required operations for handling the touch event are added within the if block. Currently, there is just a toast message shown. Later, after linking OpenCV with the project, some operations will be applied over the selected image.
Because there is no action associated with the widgets inside the Kivy project, we do not need to call the onNativeTouch() . It is enough to return the X and Y coordinates of the touch event to determine the target widget.
Handling the Touch Event of the Kivy Button Widget Within the onTouch() Method of the Android Studio Project

Handling the touch event of the Kivy Button widget within Android Studio
Importing OpenCV in Android Studio
OpenCV supports a release that can work in Android devices. The latest release for Android at this time is 3.4.4. It can be downloaded at https://sourceforge.net/projects/opencvlibrary/files/3.4.4/opencv-3.4.4-android-sdk.zip .
OpenCV will be imported in Android Studio as a module in order to access it within the Java code. In the File menu of Android Studio, go to New and then choose Import Module. This opens a window asking for the module source directory. You can either copy and paste the directory or navigate within your file system to locate it. If the compressed file is extracted in a folder named opencv-3.4.4-android-sdk, the directory to be copied and pasted is opencv-3.4.4-android-sdkOpenCV-android-sdksdkjava. When you enter the directory, the module name will be automatically detected as openCVLibrary344.
There might be an error after importing the module due to the inconsistency in the versions of the SDK and the build tools. There is a build.gradle file within the imported module. You can change the compile, minimum, and target SDK version to match the ones you have on your machine. This is in addition to the build tools version. This is similar to what we did previously within the build.gradle file of the project itself.
Structure of the Android Studio project

Adding OpenCV as a dependency library in the Android Studio project
The final step is to copy a folder named libs in this path under OpenCV OpenCVopencv-3.4.4-android-sdkOpenCV-android-sdksdk ative. After changing the folder name to jniLibs, paste it into the KivyAndroidStudiosrcmain directory under the Android Studio project. After this step, OpenCV is ready to use.
Applying Canny Filter Over the Selected Image
An if Statement to Ensure Loading OpenCV
Loading OpenCV Within the onCreate() Method
After OpenCV is loaded, we can use it. The code in Listing 7-41 reads the selected image into a variable named inputImage. It assumes that the image extension is .jpg. You can add a little modification to support.png and .jpg.
The Canny edge detector is applied over that image. The resultant image of Canny is saved into another variable named outputImage. That image is saved as a .jpg file.
An ImageView is added to the SDL activity layout, which displays the saved image. The ImageView is added to the region associated with the file chooser widget that’s defined in the KV file.
Using OpenCV to Apply the Canny Edge Detector to the Loaded Image
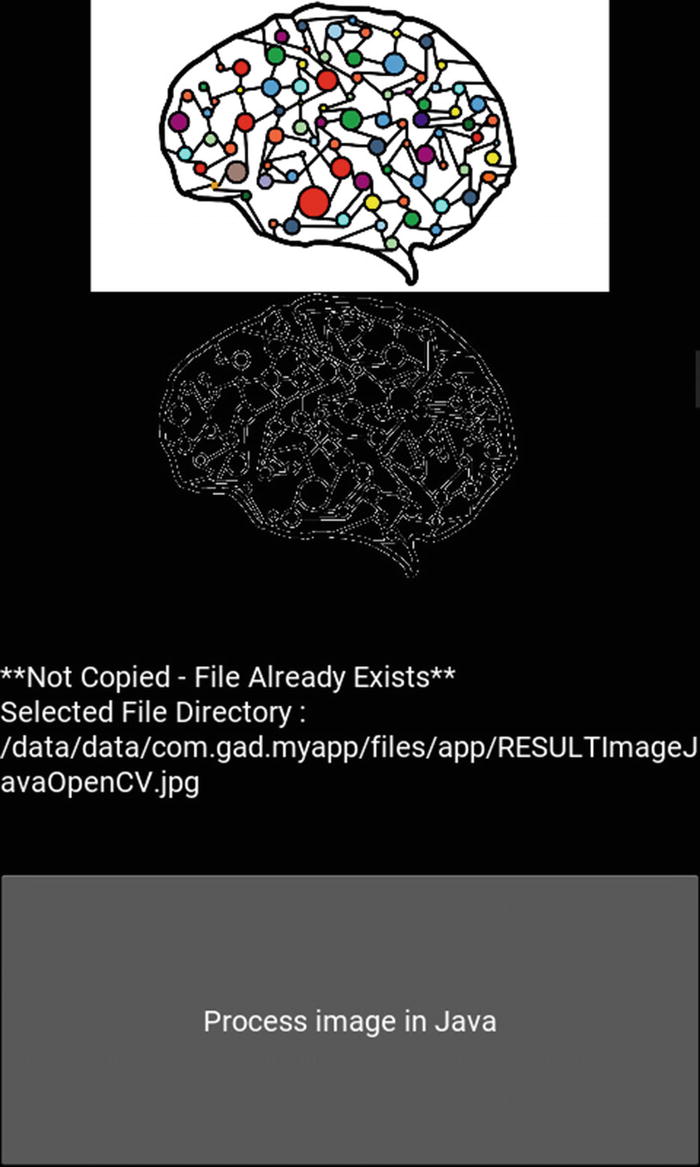
OpenCV is used to apply the Canny edge detector to the loaded image
Summary
Python alone is not able to build rich Android apps and this is why this chapter discussed enriching the Android apps created in Python using Kivy in different ways. The first library we discussed was Plyer, which allows us to access Android features using native Python code. Because many features are not implemented yet in Plyer, another library called Pyjnius was discussed, which reflects the Java classes within Python to access Java features. Unfortunately, Pyjnius adds complexity to building Java features and it is not the recommended way to enrich the Android apps. The most desirable way is to edit the Android Studio project exported using Buildozer. This way, there is no limit in what can be done in the Android apps. Anything not available in Python could be added within Java after importing the exported Android Studio project.
This chapter started discussing the project by highlighting the important files within it before making any edits. These files include the main Java activity, the manifest file, the strings resource file, and more. After that, these files were edited to add more functionality to the Android app. This included editing the loading screen layout, adding Android views to the main activity, handling click actions to both widgets, displaying toast messages, and more. This chapter also imported OpenCV within the Android Studio project in order to apply a simple filter over an image.
At the end, this chapter proved that it is possible to create rich Android apps in Python even if Python is limited in building Android apps. This is accomplished by editing the exported Android Studio project and making the necessary changes to add more functionality.