In Chapter 12, we built and tested a minimally coded ExecuteCatalogPackageTask sporting a new “SSIS-y” editor named ExecuteCatalogPackageTaskComplexUI. In this chapter, we will implement the IDTSTaskUIView editor interfaces for GeneralView and SettingsView, add editor properties, and conduct even more tests.
Implementing the GeneralView IDTSTaskUIView Interface
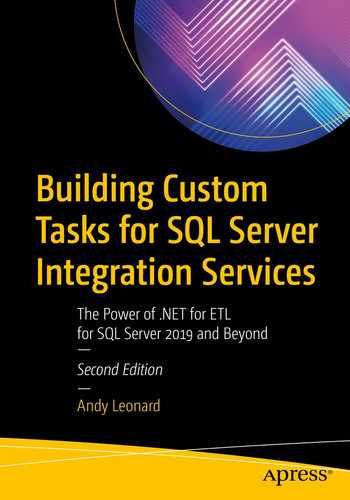
Implementing required IDTSTaskUIView interface methods for GeneralView
IDTSTaskUIView interface methods for GeneralView, commented out
The code above has also been rearranged to more closely resemble an order I prefer (see the earlier note on “CDO”).
The next step is to implement the GeneralView OnInitialize method.
Implementing GeneralView OnInitialize
Implementing OnInitialize for GeneralView

The GeneralView OnInitialize method

Adding “using Microsoft.SqlServer.Dts.Runtime;”

The using directive clears most design-time issues
Visual Studio line numbers are included in Figure 13-4 to aid in code functionality discussion. Lines 59–63 are the GeneralView OnInitialize method’s declaration and arguments.
Lines 64–67 check to see if the taskHost member is null and, if taskHost is null, throw an ArgumentNullException that includes the message: “Attempting to initialize the ExecuteCatalogPackageTask UI with a null TaskHost.”
Lines 69–72 test whether the GeneralView taskHost member’s InnerObject may not be cast to an instance of the ExecuteCatalogPackageTask type. If the GeneralView taskHost member’s InnerObject cannot be cast to an ExecuteCatalogPackageTask, the code throws an ArgumentException that includes the message: “Attempting to initialize the ExecuteCatalogPackageTask UI with a task that is not an ExecuteCatalogPackageTask.”
If the previous “type test” succeeds, the GeneralView theTask member’s InnerObject is assigned to the ExecuteCatalogPackageTask object on line 74.
On line 76, the GeneralView generalNode member is initialized (the code here is currently broken, but we will fix it soon).
On line 78, the GeneralView generalPropertyGrid member is initialized as the generalNode.
Finally, the generalNode.Name is initialized as the value of the taskHost.Name property value on line 80. The taskHost may be thought of as the “task on the SSIS package Control Flow.” This line of code helps keep the name of the ExecuteCatalogPackageTask in sync with the taskHost.Name property value displayed one the SSIS package Control Flow when the Execute Catalog Package Task editor is closed.
There are a lot of moving parts in the GeneralView OnInitialize method. A lot of what is occurring in the OnInitialize method is a knitting together of the SSIS task editor View ➤ Node ➤ Property Category ➤ Property hierarchy we originally discussed in Chapter 10.
An SSIS task editor surfaces properties in a hierarchy: View ➤ Node ➤ Property Category ➤ Property. Views are “pages” on an SSIS task editor. The following section appeared in Chapter 10. We present it here as a review.

Visualizing View ➤ Node ➤ Property Category ➤ Property
Applied to the View ➤ Node ➤ Property Category ➤ Property hierarchy, the names of the entities for the Execute SQL Task Editor – shown in Figure 13-5 – are the following: General (View) ➤ General (Node) ➤ General (Property Category) ➤ Name (Property). That’s a lot of General’s, and one – the General node – is hiding beneath the propertygrid control.
The new GeneralView OnInitialize method is coupling the ExecuteCatalogPackageTaskComplexUI to the ExecuteCatalogPackageTask using the GeneralView taskHost member. Once that succeeds – and the code will throw an exception if the coupling is not possible – the GeneralView’s generalNode member is initialized (to a new GeneralNode object) and the GeneralView’s generalPropertyGrid is, in turn, initialized to the (new) generalNode.
Again, there are a lot of moving parts in the GeneralView OnInitialize method.
Implementing GeneralView OnCommit
Implementing OnCommit for GeneralView

The GeneralView OnCommit method
Adding the TaskName and TaskDescription properties to the ExecuteCatalogPackageTask

Adding the TaskName and TaskDescription properties
Coding the GeneralNode
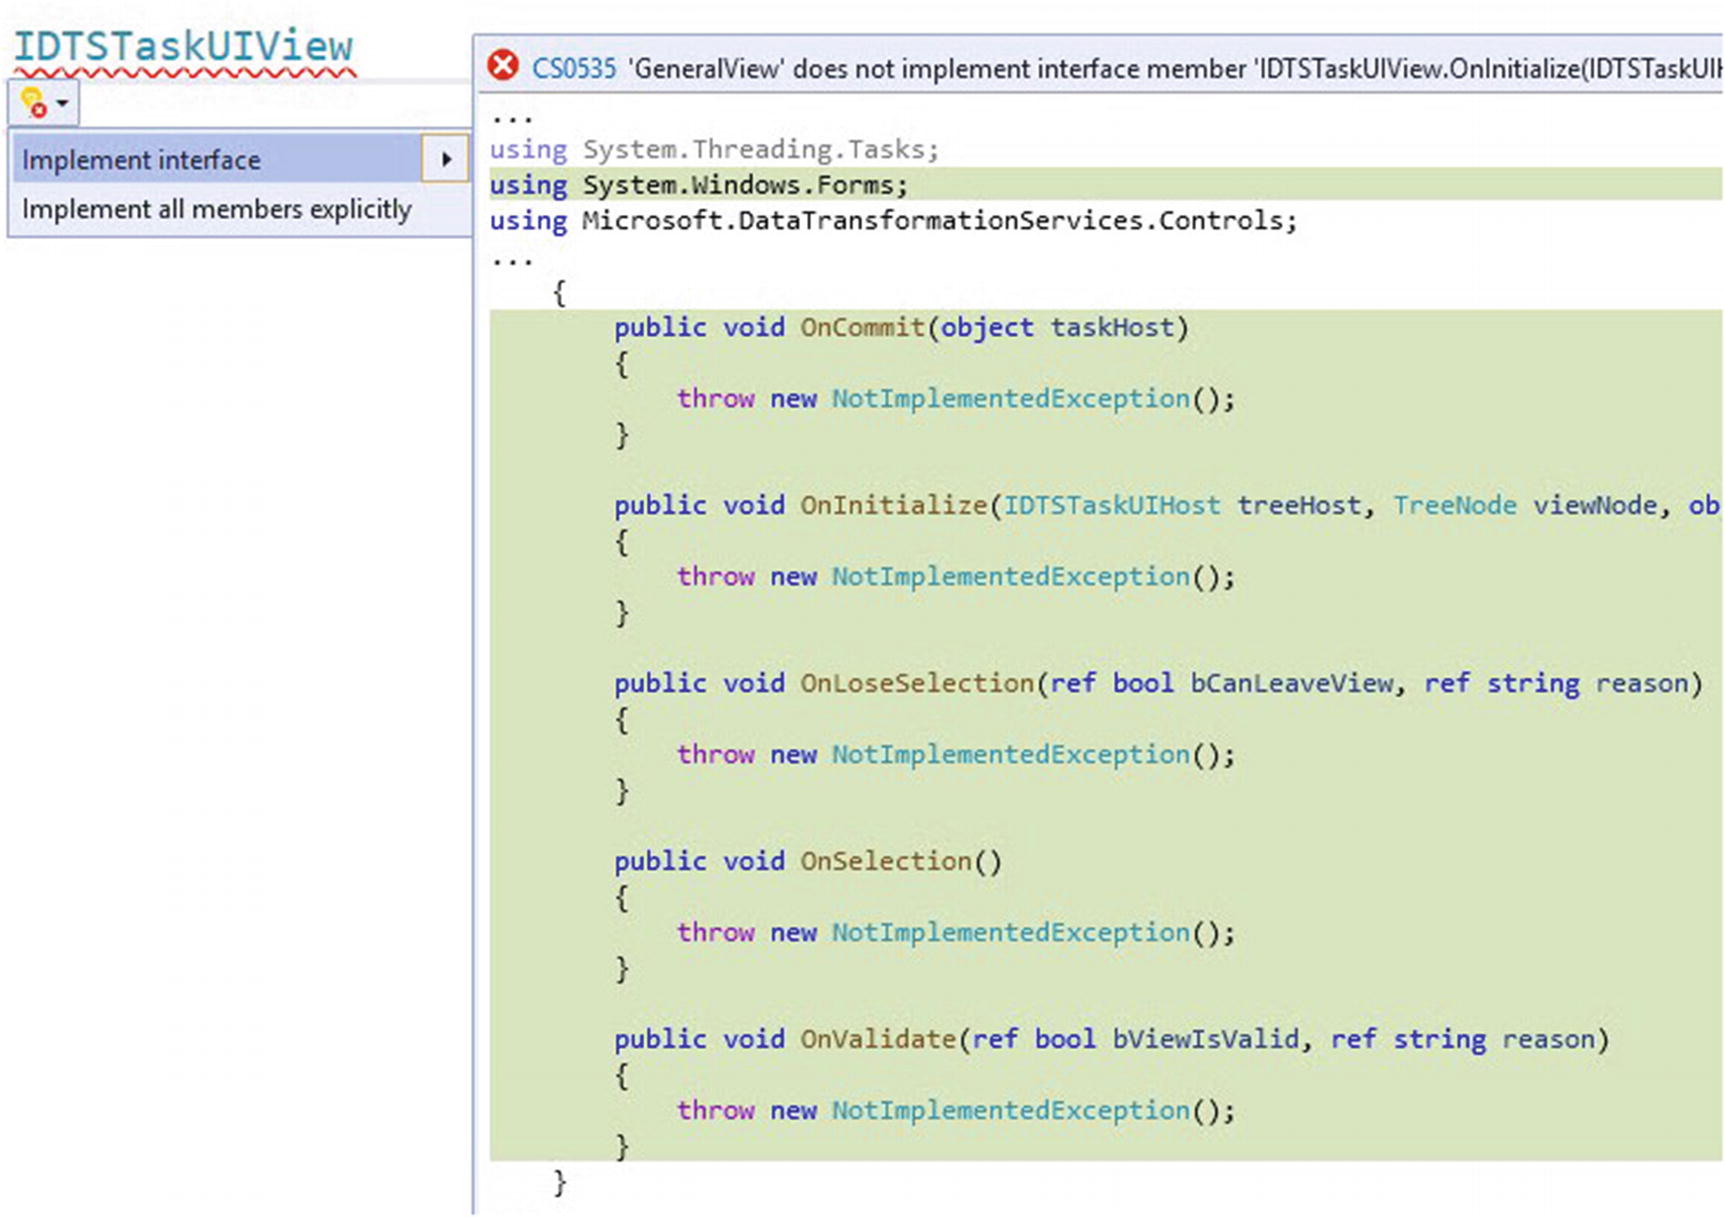
Add taskHost and task members to GeneralNode

Adding a GeneralNode class constructor
GeneralNode class constructor

No more error
The next step is to code the GeneralNode properties.
Coding the GeneralNode Properties

The value of the key-value pair
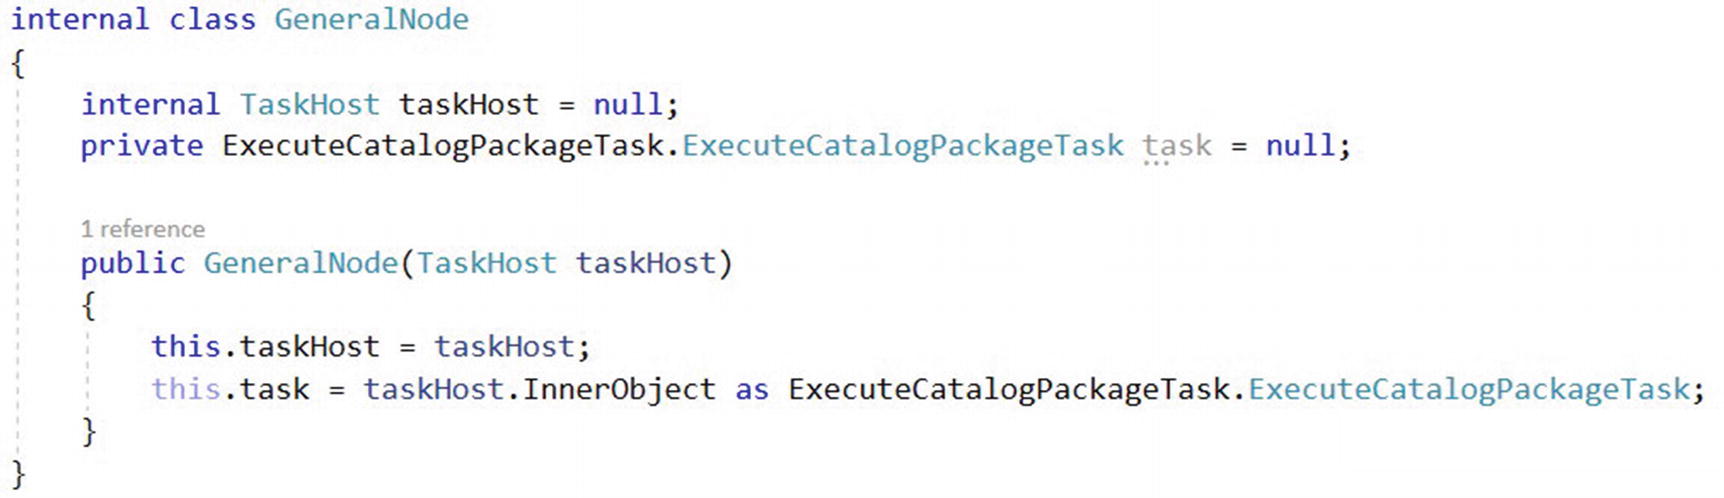
XML for an SSIS Execute SQL Task
In our sample Execute SQL Task, the Name property value is “Execute SQL Task.” The property value is stored in an attribute named DTS:ObjectName. At runtime, SSIS XML is loaded, interpreted, and executed, but it all starts with the SSIS developer opening the task editor and then configuring the value portion of key-value pairs, in which the keys are visually surfaced in editor views that make up the View ➤ Node ➤ Property Category ➤ Property hierarchy.
Adding the Name property to the GeneralNode
Adding the Name property
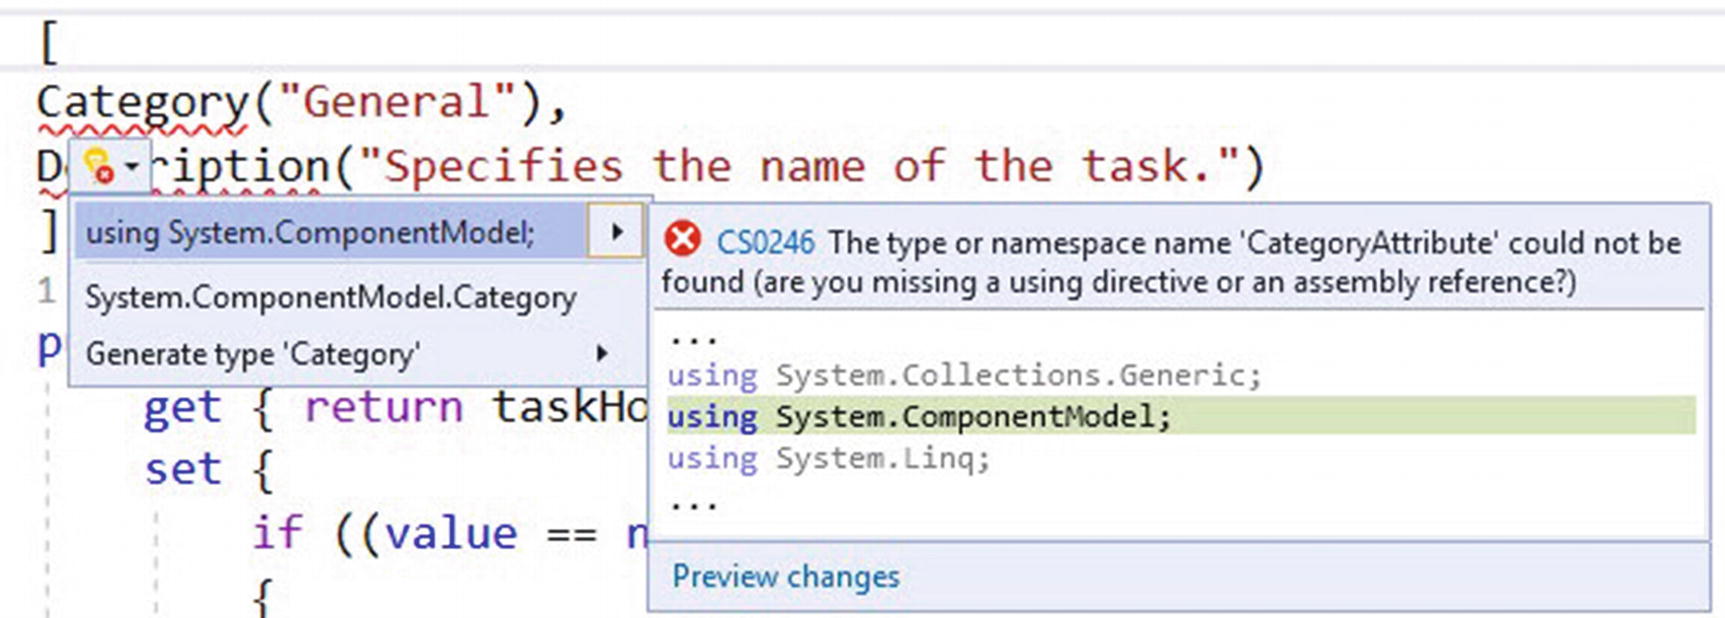
Addressing the decoration issue
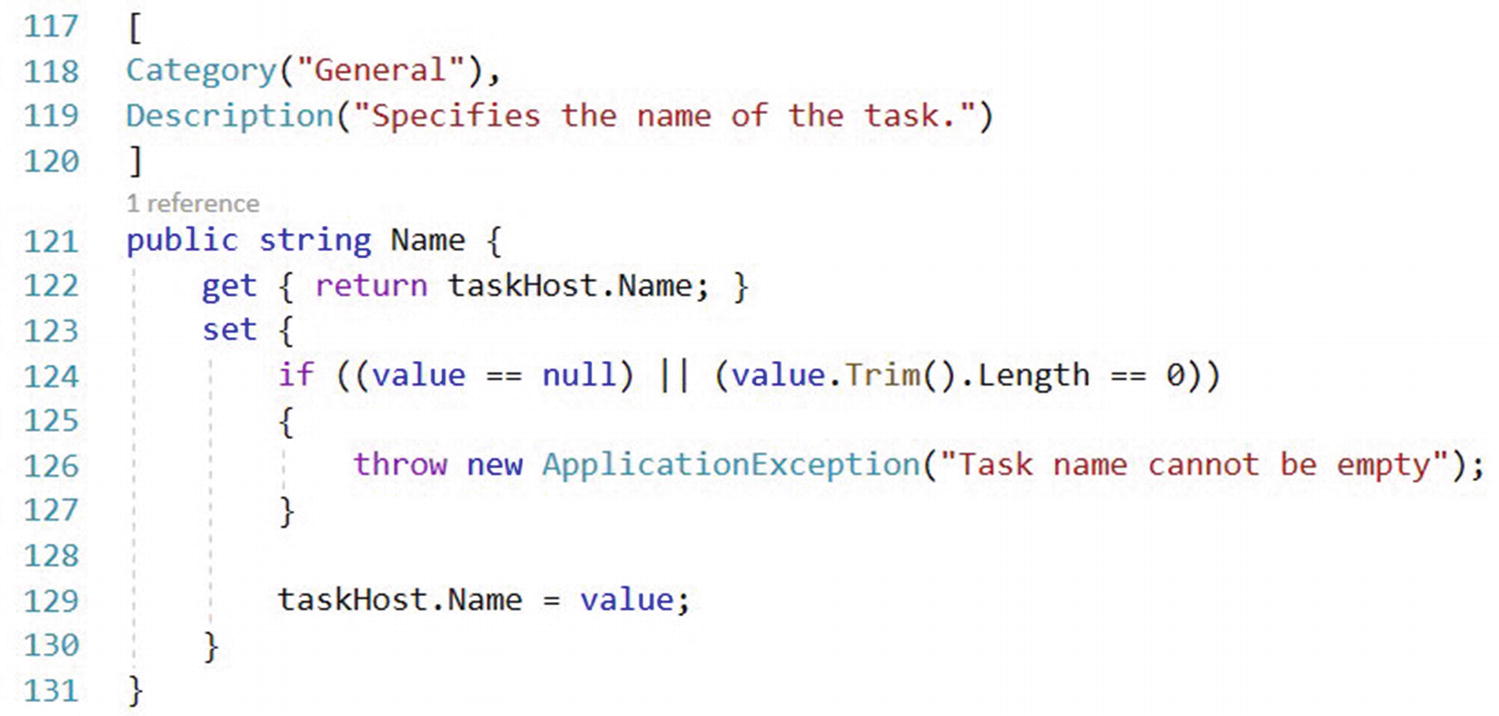
The Name property with issues resolved
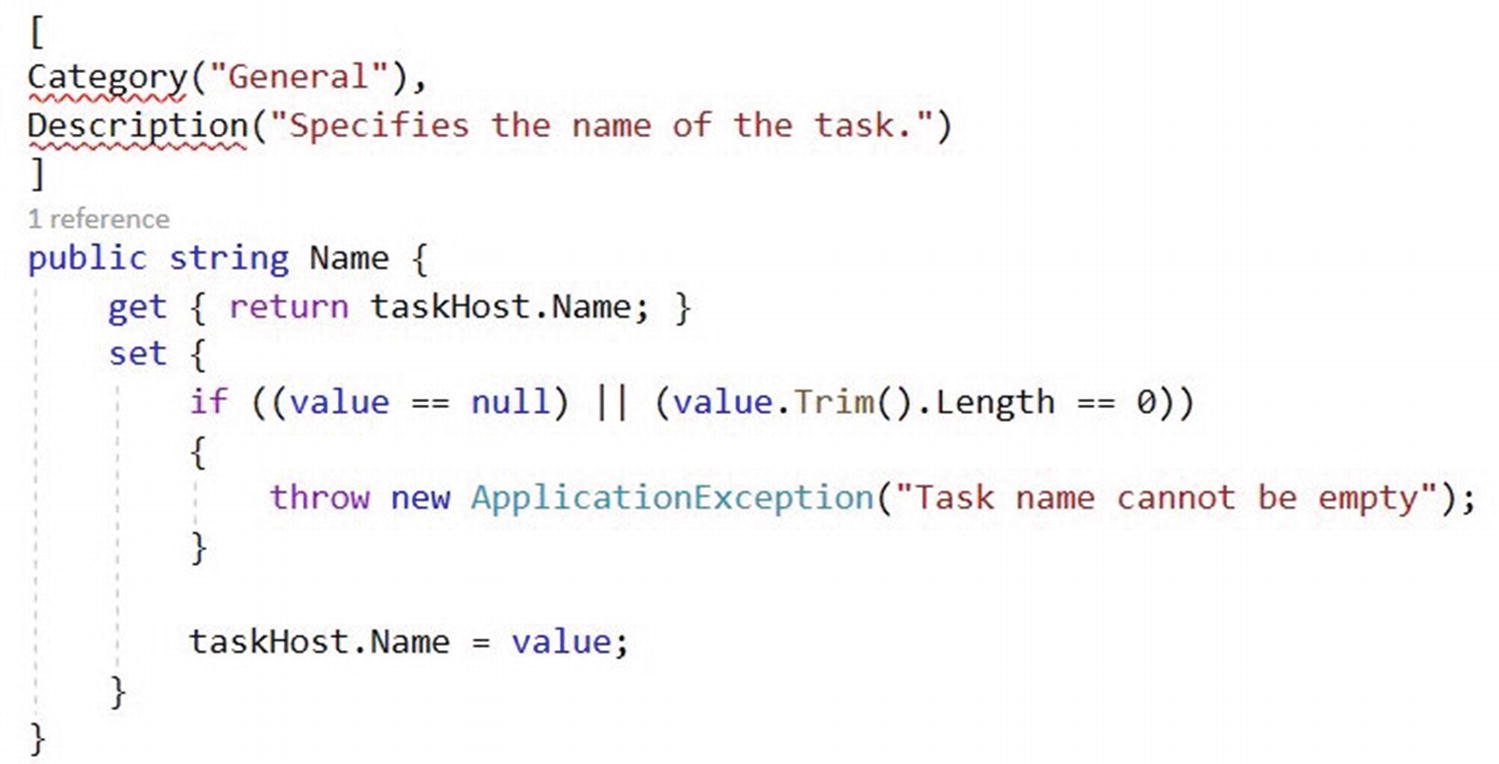
The Category and Description decorations shown on lines 117-120 are used by the propertygrid control for Property Category – which may hold one or more properties – and the Property Description displayed at the bottom of the editor when the property is selected during edit. The Property Category is set to General in this case; the Property Description is set to Specifies the name of the task. The Property Name is derived from the name of the view member – Name in this case.
Line 122 contains a get statement that returns the value of the Name property from the taskHost.Name property, or the Name property of the taskHost. While the statement is relatively short, there are a few moving parts. The GeneralNode taskHost member points back to the ExecuteCatalogPackageTask class. The taskHost.Name property value that the GeneralNode Name property is getting here is the ExecuteCatalogPackageTask.Name property value. Where is the ExecuteCatalogPackageTask.Name property value stored? In the SSIS package XML.
Lines 123–130 contain the set functionality for the property. Lines 124–127 check to see if the property value is null or empty and, if so, throws an ApplicationException that returns the message “Task name cannot be empty”.
If there is no exception, the value of the taskHost.Name is set on Line 129.
Adding the GeneralNode Description property
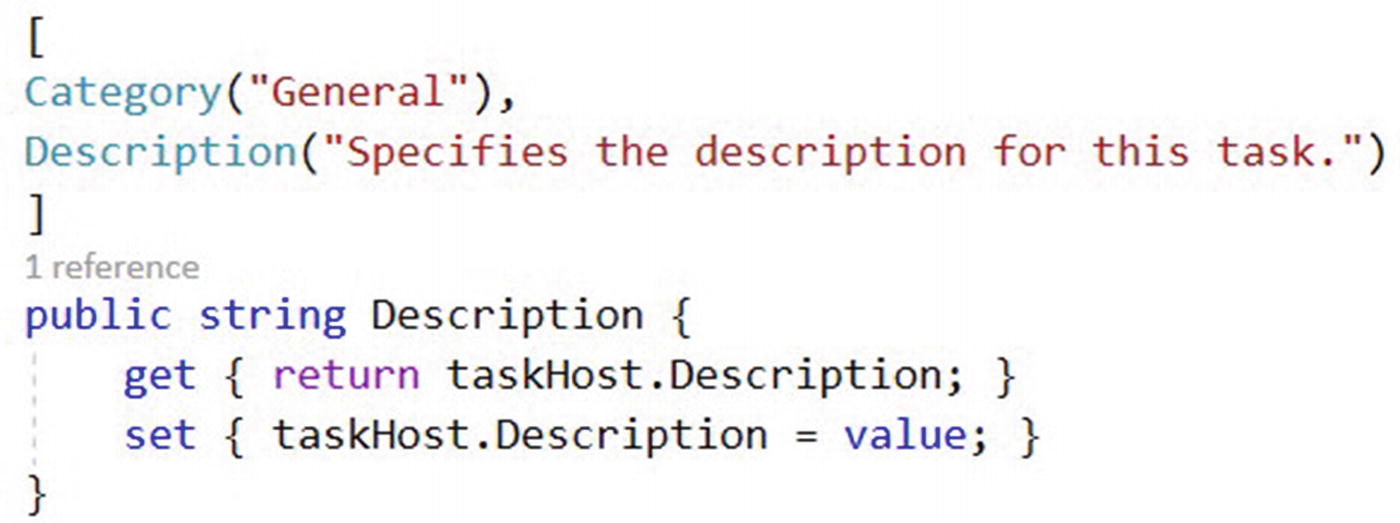
The Description property

Testing GeneralView

The GeneralView in action
The next step is to code the SettingsView.
Implementing the SettingsView IDTSTaskUIView Interface
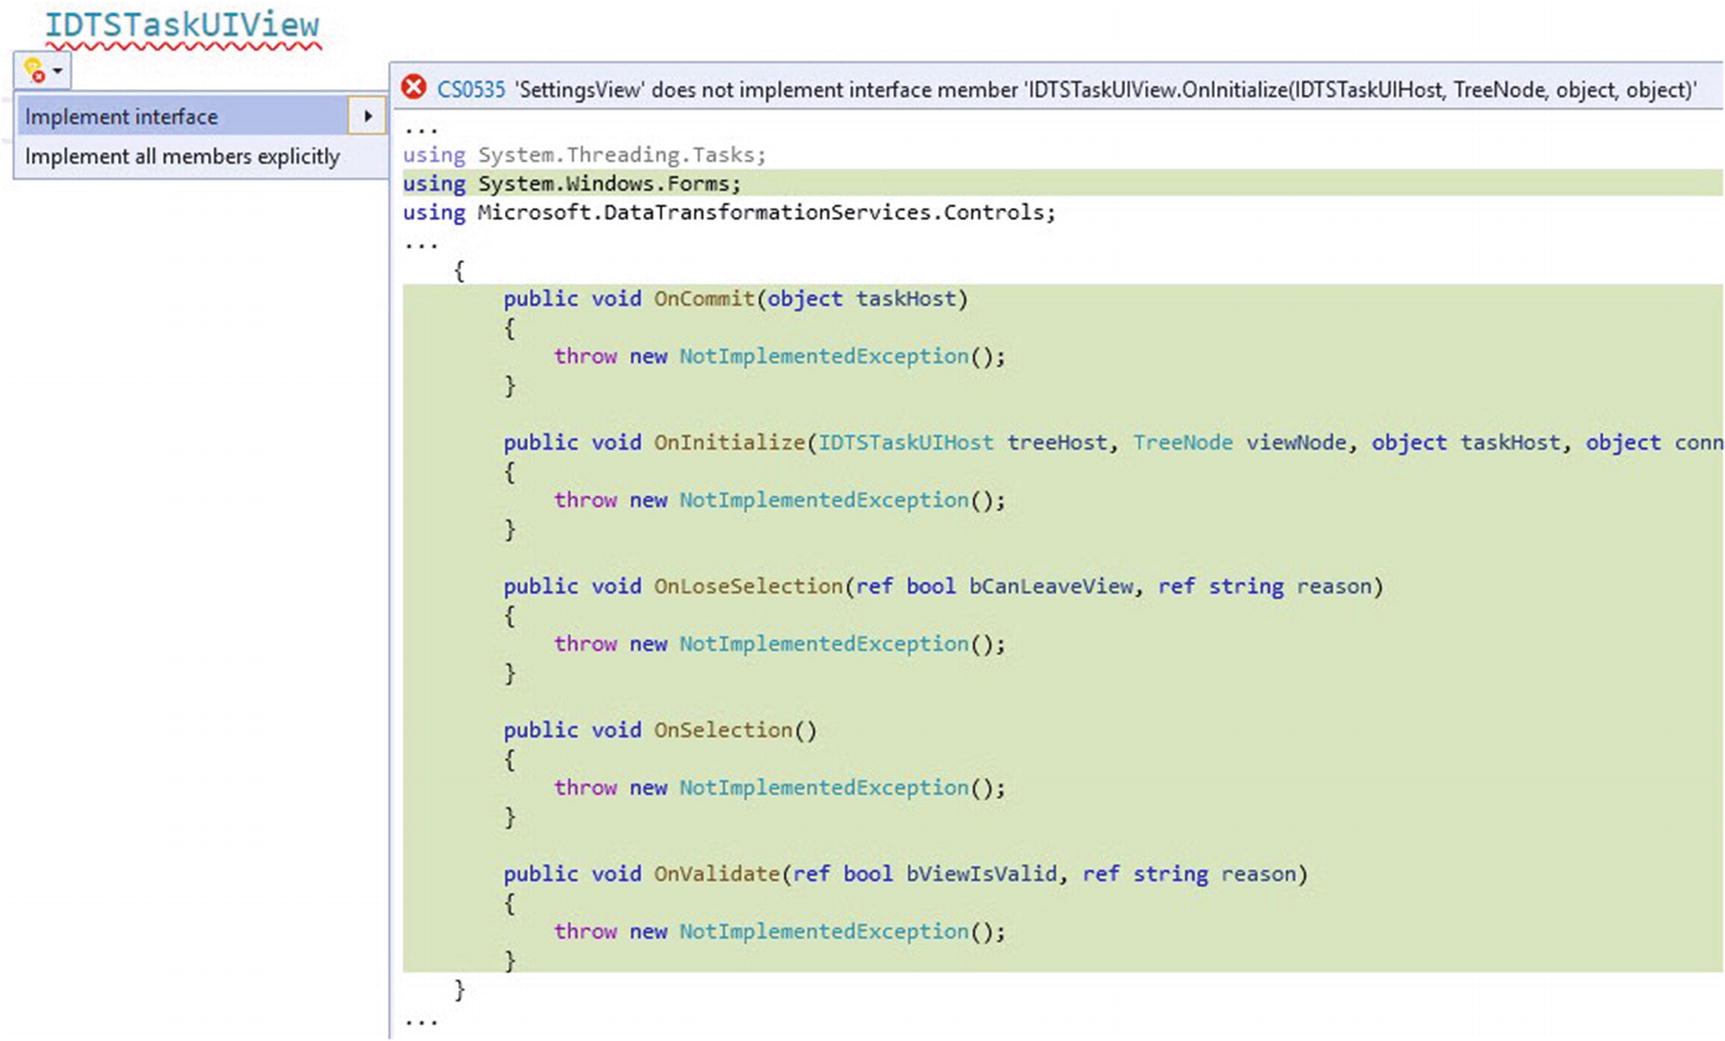
Implementing required IDTSTaskUIView interface methods for SettingsView
IDTSTaskUIView interface methods for SettingsView, commented out
The next step is to implement the SettingsView OnInitialize method.
Implementing SettingsView OnInitialize
Implementing OnInitialize for SettingsView
As when coding the GeneralView, repair the missing using directive to clear the TaskHost design-time warning (see Figure 13-3). We will clear the SettingsNode design-time warning – the red squiggly line – later.

The SettingsView OnInitialize method
Visual Studio line numbers are included in Figure 13-20 to aid in code functionality discussion. Lines 59–63 are the SettingsView OnInitialize method’s declaration and arguments.
Lines 64–67 check to see if the taskHost member is null and, if taskHost is null, throw an ArgumentNullException that includes the message: “Attempting to initialize the ExecuteCatalogPackageTask UI with a null TaskHost.”
Lines 69–72 test whether the SettingsView taskHost member’s InnerObject may not be cast to an instance of the ExecuteCatalogPackageTask type. If the SettingsView taskHost member’s InnerObject cannot be cast to an ExecuteCatalogPackageTask, the code throws an ArgumentException that includes the message: “Attempting to initialize the ExecuteCatalogPackageTask UI with a task that is not an ExecuteCatalogPackageTask.”
If the previous “type test” succeeds, the SettingsView theTask member’s InnerObject is assigned to the ExecuteCatalogPackageTask object on line 74.
On line 76, the SettingsView generalNode member is initialized (the code here is currently broken, but we will fix it soon).
Finally, the SettingsView settingsPropertyGrid member is initialized as the settingsNode.
As with the GeneralView, there are a lot of moving parts in the SettingsView OnInitialize method. The new SettingsView OnInitialize method is coupling the ExecuteCatalogPackageTaskComplexUI to the ExecuteCatalogPackageTask using the SettingsView taskHost member. Once that succeeds – and the code will throw an exception if the coupling is not possible – the SettingsView’s settingsNode member is initialized (to a new SettingsNode object), and the SettingsView’s settingsPropertyGrid is, in turn, initialized to the (new) settingsNode.
Adding ExecuteCatalogPackageTask Properties
Adding ExecuteCatalogPackageTask members

New ExecuteCatalogPackageTask members
SettingsView surfaces the ExecuteCatalogPackageTask properties configured on the Settings page of the Execute Catalog Package Task (complex) editor. In this section, we introduce complexity into the complex editor, so we will take an incremental approach to coding, building, and testing. We begin by adding the FolderName, ProjectName, and PackageName properties.
Implementing SettingsView OnCommit for FolderName, ProjectName, and PackageName Properties
Implementing OnCommit for SettingsView
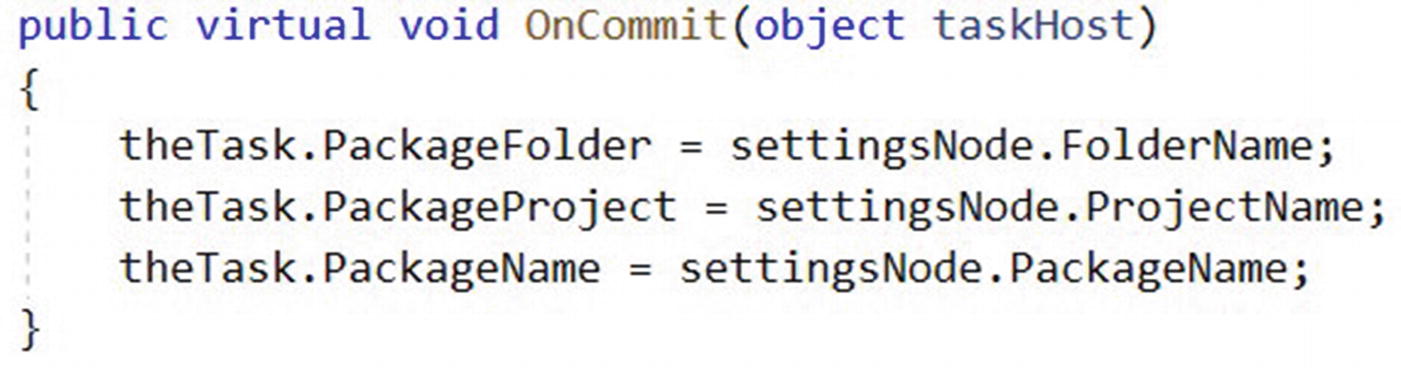
The SettingsView OnCommit method for FolderName, ProjectName, and PackageName Properties
The next step is to code SettingsNode for the FolderName, ProjectName, and PackageName properties.
Coding SettingsNode for FolderName, ProjectName, and PackageName Properties
Add members to SettingsNode

Adding a SettingsNode class constructor

SettingsNode class constructor

No more error
The next step is to code the SettingsNode FolderName, ProjectName, and PackageName properties.
Coding the SettingsNode FolderName, ProjectName, and PackageName Properties
Folder name
Project name
Package name
Adding FolderName, ProjectName, and PackageName properties to the SettingsNode

Adding FolderName, ProjectName, and PackageName properties
Note the value is checked for null, but not checked for 0 length. The reason for the omission of a 0-length string check is the code will eventually set the value of the FolderName, ProjectName, and PackageName properties to an empty string when “parent” properties are updated in the editor. For example, if the SSIS developer selects a new ProjectName property value, the code needs to set the current PackageName property value to an empty string. This functionality will be coded a few chapters hence.
As with adding initial properties to the GeneralNode, adding decorations requires adding the using System.ComponentModel; directive to the SettingsView.cs file.
FolderName, ProjectName, and PackageName SettingsNode members are validated by design time much the same way GeneralNode members were validated.
Testing SettingsView FolderName, ProjectName, and PackageName Properties

The SettingsView FolderName, ProjectName, and PackageName properties in action
The next step is to add connection-related properties to SettingsNode.
Coding SettingsNode for Connection-Related Members
Adding the _connections object to SettingsNode

Adding _connections
Initializing the _connections member

The next step is isolating ADO.Net connections contained within the SSIS package.
Regarding SSIS Package Connections
SSIS packages and containers are containers.
SSIS packages, containers, and tasks are executables.
An SSIS package will always contain a collection of containers – and the containers collection will always have at least one member because the package itself is a container.
An SSIS package will always contain a collection of executables – and the executables collection will always have at least one member because the package itself is an executable.
An SSIS package will always contain a collection of connection managers – and the connections collection may contain 0, 1, or several connection managers.
The SSIS package connections collection is available to executables in case any given executable needs to consume an SSIS package connection manager. SSIS project connection managers are also members of SSIS package connections collections.
When the ExecuteCatalogPackageTaskComplexUIForm is instantiated, the ExecuteCatalogPackageTaskComplexUI’s GetView method is called, and a member named connectionService (of the IDtsConnectionService type) is passed to the SettingsView OnInitialize method. The connections collection is passed to the SettingsNode constructor, where it may be used to populate lists of certain connection types.
Isolating SSIS Package ADO.Net Connections
Adding a Connections object to SettingsNode
Connections is an object type.
The member decoration is Browsable(false), which means the Connections member is a property, but the Connections property is not surfaced in the SettingsNode propertygrid.

The Connections property
Acquiring a list of ADO.Net connection managers

Adding the list of ADO.Net connection managers to _connections
We now have a list of ADO.Net connection managers stored in the _connections object, which are hidden (not Browsable), internal SettingsNode property (member) named Connections.
The next step is to build a TypeConverter that builds a list of ADO.Net connection manager names.
Building the ADONetConnections TypeConverter
A TypeConverter “provides a unified way of converting types of values to other types, as well as for accessing standard values and subproperties,” according to Microsoft’s TypeConverter Class documentation (docs.microsoft.com/en-us/dotnet/api/system.componentmodel.typeconverter?view=netframework-4.7.2). A TypeConverter is used to create an enumeration, or list, of objects from a collection. Applied to the list of ADO.Net connection managers in the ExecuteCatalogPackageTaskComplexUI, we will build an ArrayList of string values containing the names of ADO.Net connection managers stored in the collection of Connections (of the object type).
Adding the ADONetConnections class

The new ADONetConnections StringConverter class
StringConverter is one interface for TypeConverter.
Adding NEW_CONNECTION to ADONetConnections

Declaring ADONetConnections.NEW_CONNECTION
GetSpecializedObject (object)
GetStandardValues (StandardValuesCollection)
GetStandardValuesExclusive (bool)
GetStandardValuesSupported (bool)
Adding TypeConverter methods to ADONetConnections

Adding ADONetConnections methods
A discussion of TypeConverter methods is an in-depth topic that the author chooses not to include in this example. The outcome of the TypeConverter implemented in the ADONetConnections StringConverter will be an ArrayList containing the names of ADO.Net connection managers configured in the SSIS package, plus the option to create a new ADO.Net connection manager.
getADONetConnections
Clear the ArrayList type errors by adding the directive using System.Collections; to the SettingsView.cs file.

getADONetConnections added
A brief description of the code in getADONetConnections follows. An instance of settingsNode is passed to the getADONetConnections method in the retrievalObject (object) argument. A new internal SettingsNode variable named node and two ArrayList variables – list and listConnections – are declared and initialized on lines 244–246. listConnections is assigned the Connections object of the SettingsNode variable (node) on line 248. NEW_CONNECTION is added to the list (ArrayList) on line 251.
On lines 254–257, a foreach loop enumerates each connection in listConnections and adds the name of each connection manager to the list ArrayList. Remember, per the SettingsNode constructor, Connections contains only ADO.Net connection managers.
If the list ArrayList contains values, the code on lines 260–263 sorts the values contained in the list ArrayList.
On line 265, the list ArrayList is returned to the caller.
Surface the SourceConnection Property
The work in this section titled “Coding SettingsNode for Connection-Related Members” has all led to this point where we are (finally) able to add the SourceConnection property to SettingsView.
Adding the SourceConnection property

SourceConnection member added to SettingsNode
Testing the SourceConnection Property

The SourceConnection property is visible and populated
SourceConnection surfaces a dropdown list because the SettingsNode SourceConnection property decoration includes the TypeConverter attribute, informing the SettingsView PropertyGrid that the values in the SourceConnection property are of the ADONetConnections type. The ADONetConnections type is a StringConverter that contains an ArrayList of strings, and the list of strings the ArrayList contains is the names of all ADO.Net connection managers in the connections collection of the SSIS package.
Reaching this point in development is awesome: We’ve surfaced the SourceConnection property! That’s the good news. The bad news is the SourceConnection property doesn’t do anything – yet. We are almost there, though.
The next step is to add code so the Execute Catalog Package Task uses the SourceConnection property.
Now would be an excellent time to check in your code.
Using the SourceConnection Property
Assigning the ExecuteCatalogPackageTask’s ConnectionManagerName property

ConnectionManagerName property, assigned
The OnCommit method fires when the view commits. In the case of the SettingsView – at this point during development – the SourceConnection, FolderName, ProjectName, and PackageName properties managed by the settingsNode will set the values of the ExecuteCatalogPackageTask’s ConnectionManagerName, PackageFolder, PackageProject, and PackageName properties, respectively.
Extracting the ServerName from the SourceConnection
The returnSelectedConnectionManagerDataSourceValue function
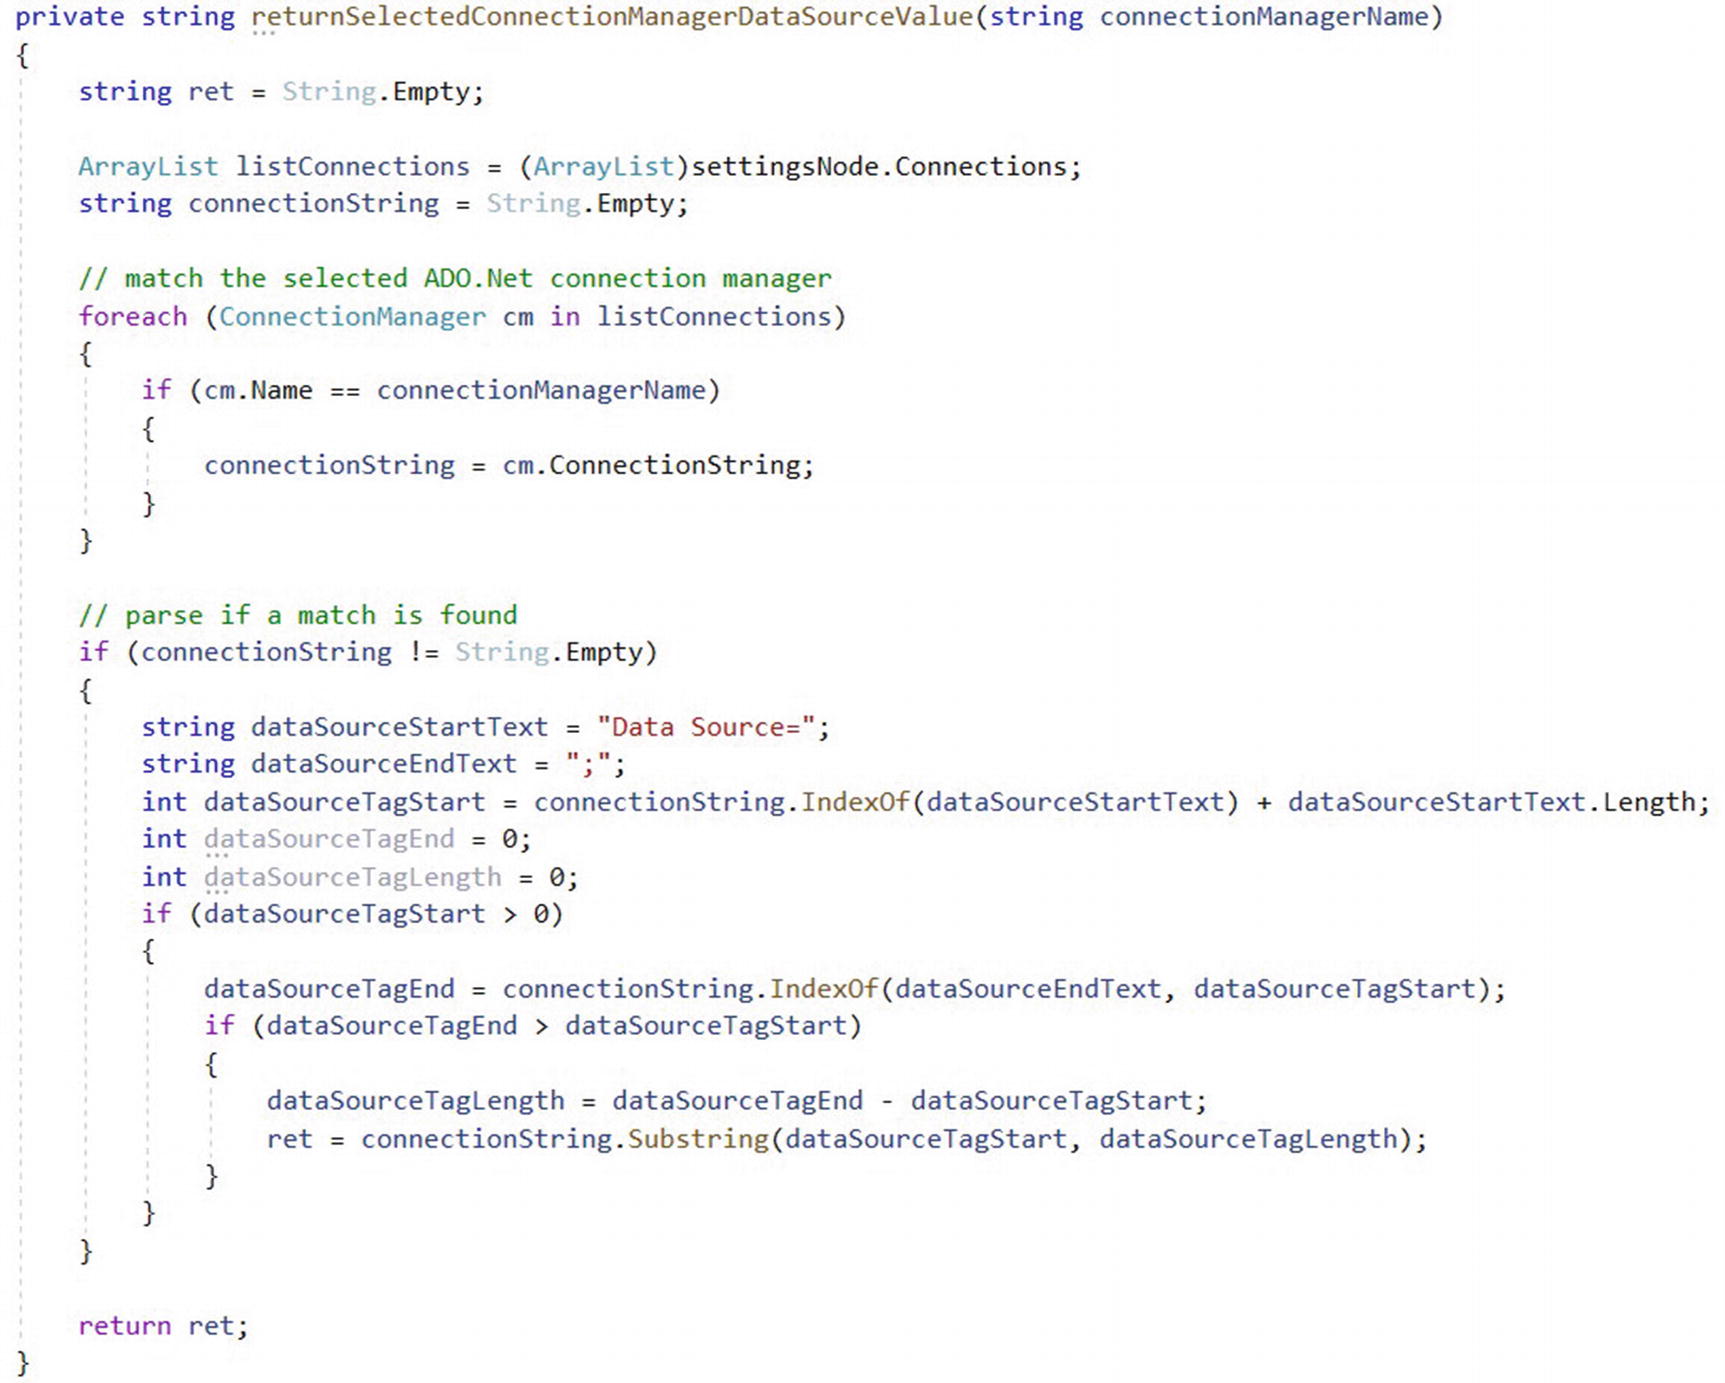
The returnSelectedConnectionManagerDataSourceValue function
There are other ways to extract the Data Source attribute value from a connection string. Feel free to implement a better way in your code.
Assigning the ExecuteCatalogPackageTask’s ServerName property

ServerName property, assigned
Edit the response to SourceConnection property value changes

Updated response to SourceConnection property value changes
Let’s Test It!
Build the solution. If all goes well, the solution should build successfully. Open a test SSIS project and add an ADO.Net connection manager aimed at an SSIS Catalog. Add the Execute Catalog Package Task to the control flow of a test SSIS package. Open the editor and click on the Settings page. Select the SSIS Catalog Ado.Net connection manager from the SourceConnection property dropdown.

Configuring the Execute Catalog Package Task

Successful execution
We’re not done coding SourceConnection functionality, but we have reached parity with the previous editor’s functionality.
Conclusion
In this chapter, we implemented the IDTSTaskUIView editor interfaces for GeneralView and SettingsView, added properties (members) to each view, and conducted tests – where possible – each step along the way.
The next steps are completing the SourceConnection property functionality and adding more SettingsView members.
Now would be an excellent time to check in your code.