The goal of this chapter is to refactor ExecuteCatalogPackageTask methods related to the SourceConnection property. The goals are
Downgrade from SSIS 2019 to SSIS 2017 so as to run on the Azure platform.
Refactor connection identification to support the Server ➤ Integration Services ➤ SSIS Catalog ➤ Folder ➤ Project ➤ Package hierarchy.
Refactor the SettingsView.SourceConnection property.
Identify catalog, folder, project, and package objects in the Server ➤ Integration Services ➤ SSIS Catalog ➤ Folder ➤ Project ➤ Package hierarchy.
We also refactor the Execute Catalog Package Task for two additional goals:
1.
Using Expressions – which is one of the main goals for this edition of the book.
2.
Executing the Execute Catalog Package Task in Azure-SSIS integration runtimes.
Thinking Azure-SSIS
At the time of this writing (October 2020), Azure-SSIS does not support SSIS 2019. SSIS 2017 is supported, so we must downgrade the task and Visual Studio solution to run as an SSIS 2017 custom task. Azure-SSIS will likely support SSIS 2019 in the future (I don’t know and I have no control over internal Microsoft decisions and priorities).
I advise you move your development effort to a machine configured with Microsoft SQL Server 2017 and not configured with Microsoft SQL Server 2019 to avoid collisions with assemblies in the Microsoft .Net Framework.
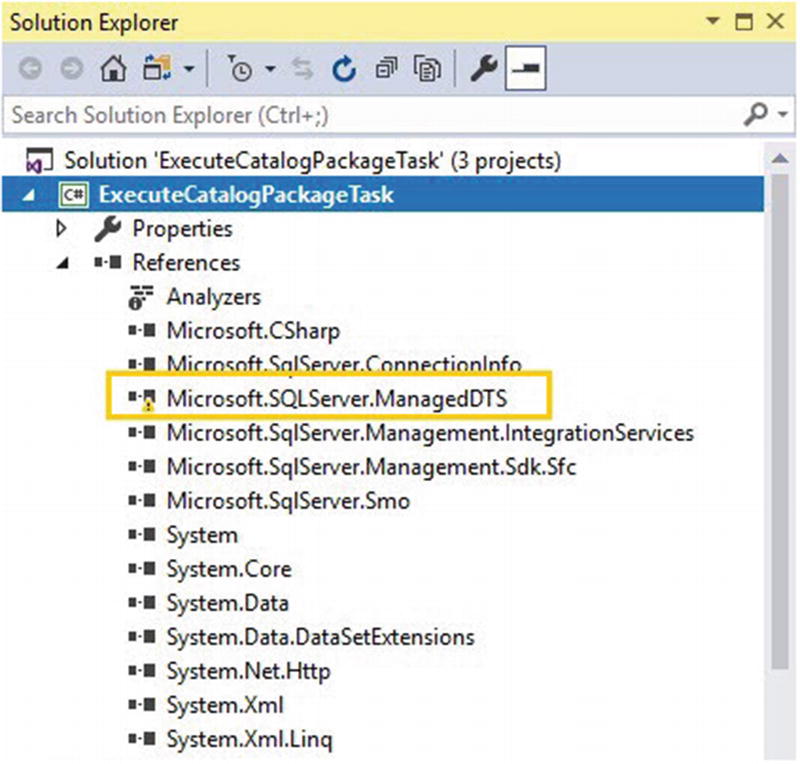
Begin by updating the ExecuteCatalogPackageTask project References by expanding the References virtual folder in Solution Explorer, as shown in Figure 16-1:
Figure 16-1
ExecuteCatalogPackageTask References
References to certain assemblies – such as the Micrsoft.SQLServer.ManagedDTS assembly outlined in Figure 16-1 – may display warning icons. The warning icon indicates an issue with the assembly. In this case, the issue is the SSIS 2019 of the Micrsoft.SQLServer.ManagedDTS assembly is not registered on the development server that has SQL Server 2017 (only) installed.
It is very important to note that your development server may be configured differently than the development server I am using. Your mileage may vary.
Click the reference to the Micrsoft.SQLServer.ManagedDTS assembly, and then press the F4 key to display its properties, as shown in Figure 16-2:
Figure 16-2
Micrsoft.SQLServer.ManagedDTS assembly properties
Note the Version property of the Micrsoft.SQLServer.ManagedDTS assembly displays the value “0.0.0.0” because the later version of the Micrsoft.SQLServer.ManagedDTS assembly cannot be located on this development server.
Delete the Micrsoft.SQLServer.ManagedDTS assembly from the ExecuteCatalogPackageTask References collection by right-clicking the assembly and then clicking Remove, as shown in Figure 16-3:
Figure 16-3
Deleting the current version of the Micrsoft.SQLServer.ManagedDTS assembly
As before, right-click the References virtual folder and click Add Reference to add a new reference (or, in this case, a new version of a reference), as shown in Figure 16-4:
Figure 16-4
Adding – replacing, really – a new reference
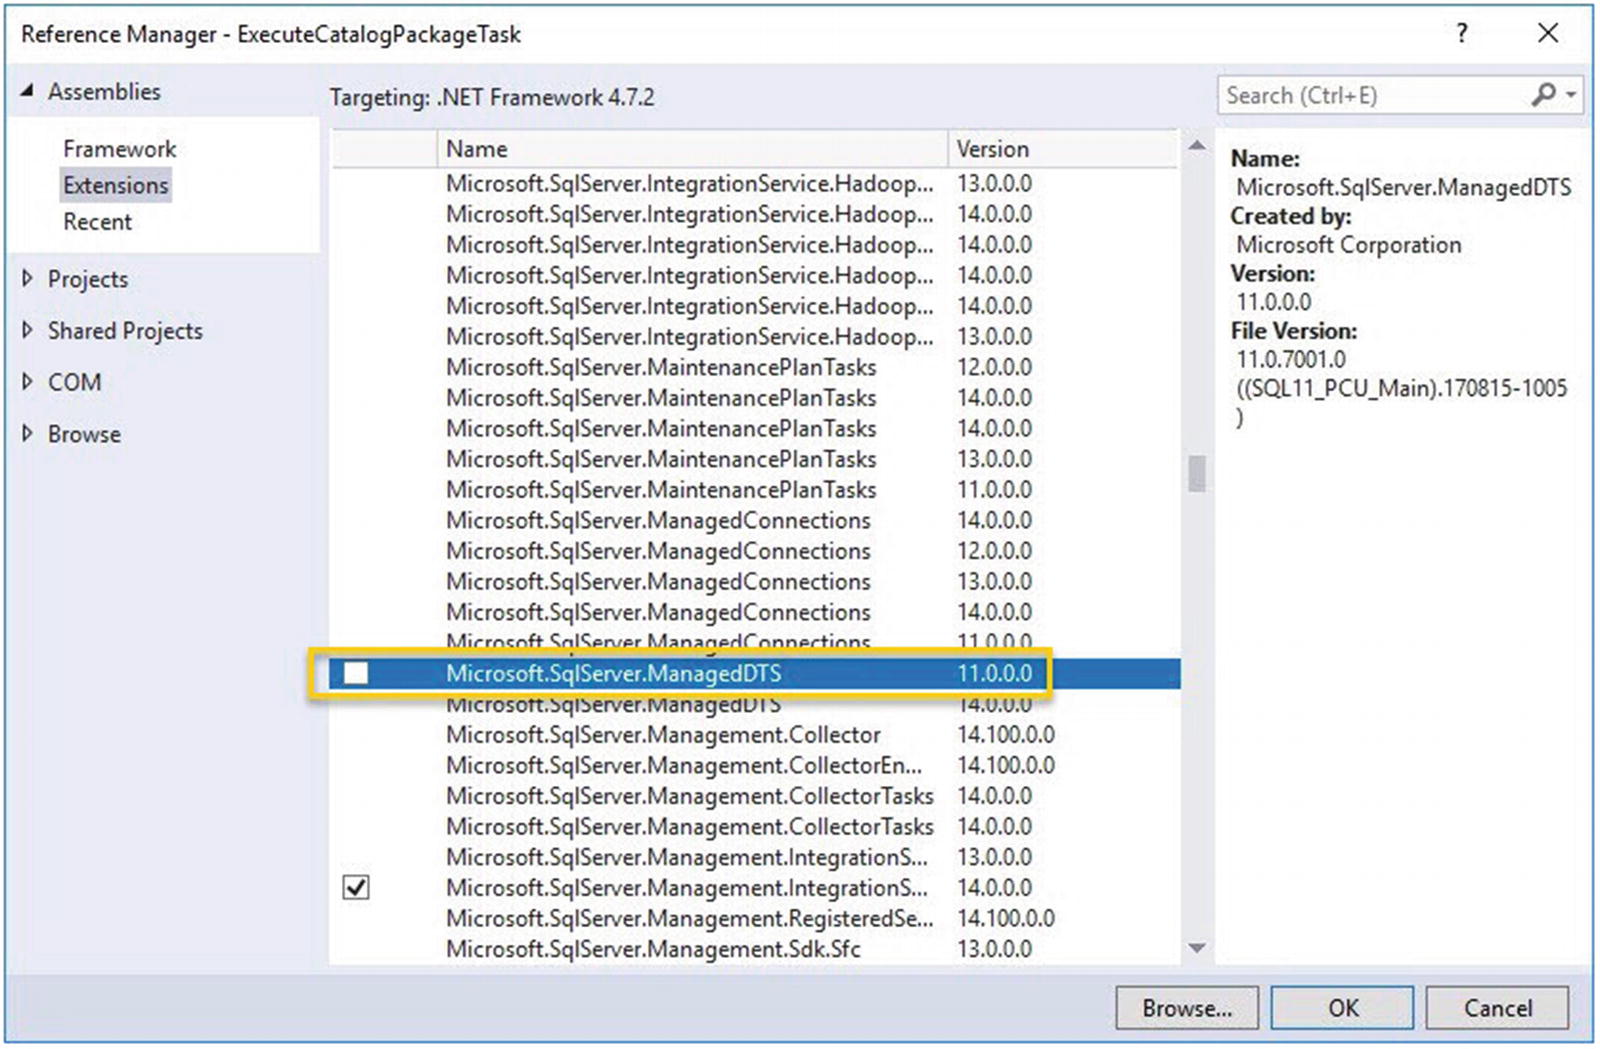
Expand Assemblies and select Extensions. Navigate to the Micrsoft.SQLServer.ManagedDTS assembly in the assemblies list, and select the Micrsoft.SQLServer.ManagedDTS assembly, as shown in Figure 16-5:
Figure 16-5
Selecting Micrsoft.SQLServer.ManagedDTS
Pay very close attention to the Version column and details in the Reference Manager’s right pane. SSIS 2017 is version 14. The selected version of Micrsoft.SQLServer.ManagedDTS is version 11.0.0.0 – or version 11. Version 11 is SSIS 2012.
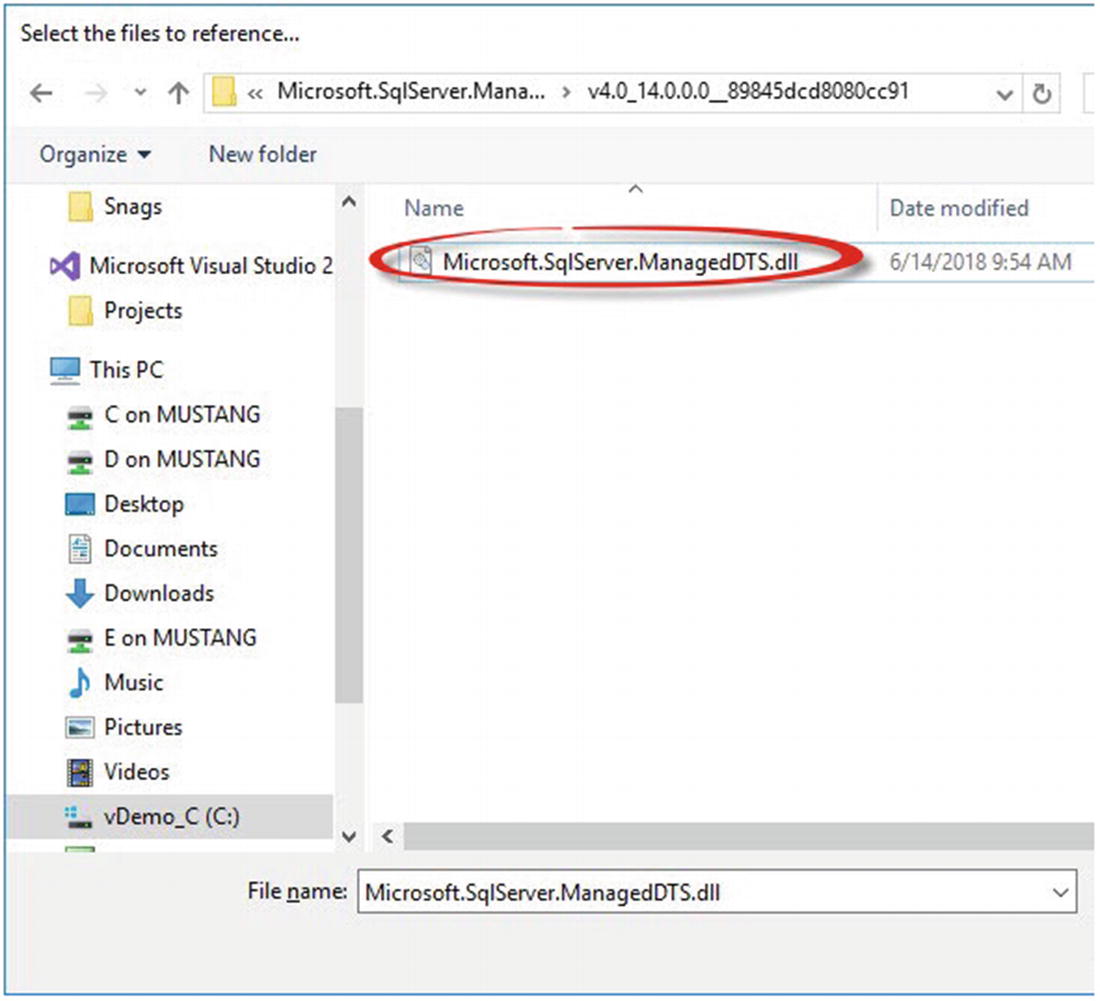
Click the Browse button and navigate to the location of the assembly file. On my server, the location is C:WindowsMicrosoft.NETassemblyGAC_MSILMicrosoft.SqlServer.ManagedDTSv4.0_14.0.0.0__89845dcd8080cc91. Note the version of the Micrsoft.SQLServer.ManagedDTS assembly is v4.0_14.0.0.0__89845dcd8080cc91. We know the version because the folder which contains the Micrsoft.SQLServer.ManagedDTS assembly is named v4.0_14.0.0.0__89845dcd8080cc91, as shown in Figure 16-6:
Figure 16-6
Selecting the SSIS 2017 version of the Micrsoft.SQLServer.ManagedDTS assembly
Add the reference to the Micrsoft.SQLServer.ManagedDTS assembly, and view the properties to verify SSIS 2017 (version 14), as shown in Figure 16-7:
Figure 16-7
The SSIS 2017 version of the Micrsoft.SQLServer.ManagedDTS assembly
Repeat this process, verifying each version of each referenced assembly in both the ExecuteCatalogPackageTask and the ExecuteCatalogPackageTaskComplexUI projects, as shown in Figure 16-8:
Figure 16-8
Rinse and repeat
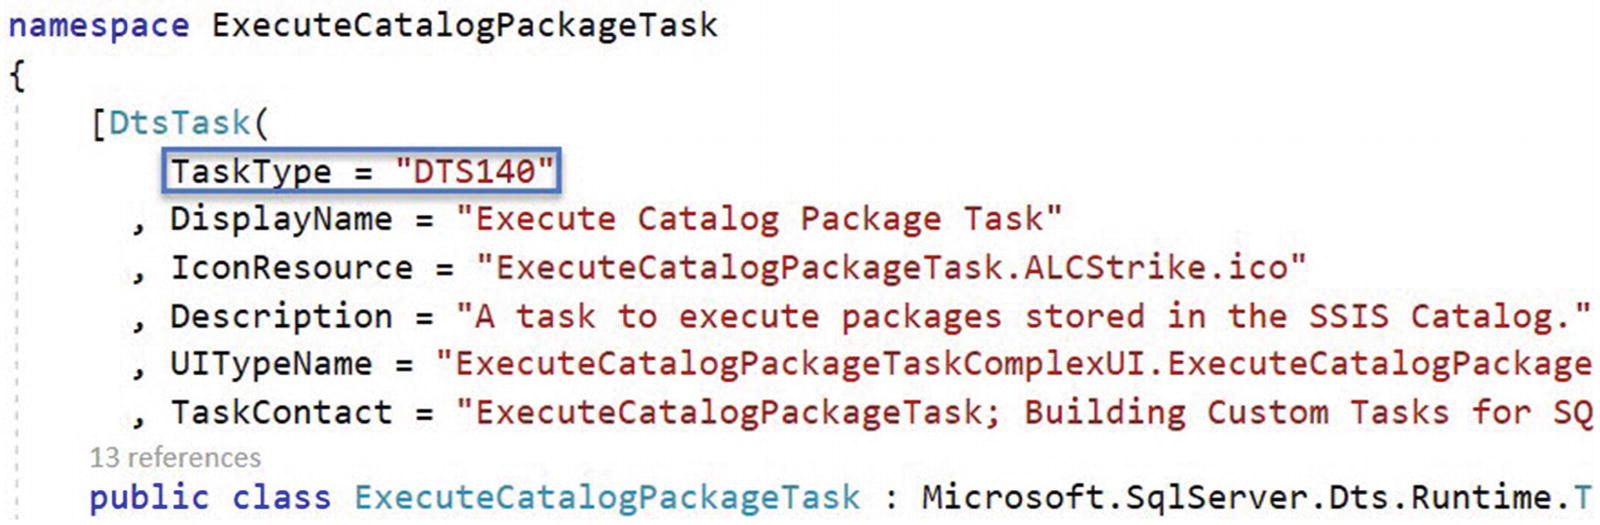
Once the References are downgraded, open the ExecuteCatalogPackageTask project’s ExecuteCatalogPackageTask.cs file. Update the TaskType attribute in the DtsTask decoration for the ExecuteCatalogPackageTask class, setting the TaskType from DTS150 to DTS140, as shown in Figure 16-9:
Figure 16-9
Updating the TaskType attribute
The ExecuteCatalogPackageTask solution has been downgraded, and the ExecuteCatalogPackageTask is now ready for Azure-SSIS.
Refactor Connection Identification
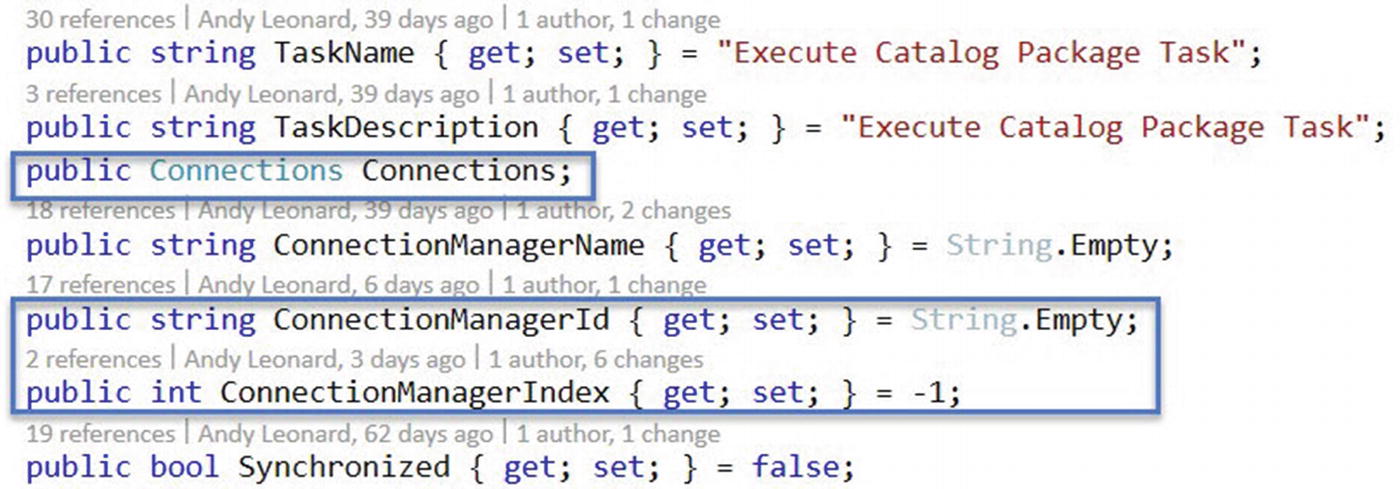
Connection manager identification is vital – especially when the connection string property is managed dynamically or overridden at execution time. The first step in refactoring connection identification is to add connection-related properties to the ExecuteCatalogPackageTask code using the code in Listing 16-1:
public Connections Connections;
public string ConnectionManagerId { get; set; } = String.Empty;
public int ConnectionManagerIndex { get; set; } = -1;
Listing 16-1
Adding Connections, ConnectionManagerIndex, and ConnectionManagerId to the ExecuteCatalogPackageTask class
Once added, the code appears as shown in Figure 16-10:
Figure 16-10
Connections, ConnectionManagerId, and ConnectionManagerIndex added to the ExecuteCatalogPackageTask class
Initialize the Connections variable by adding the code in Listing 16-2 to the ExecuteCatalogPackageTask.InitializeTask method:
// init Connections
Connections = connections;
Listing 16-2
Initializing Connections
Once added, the ExecuteCatalogPackageTask.InitializeTask method appears as shown in Figure 16-11:
Figure 16-11
The ExecuteCatalogPackageTask.InitializeTask method, updated
Initialize the ConnectionManagerIndex property value by creating the returnConnectionManagerIndex method using the code in Listing 16-3:
private int returnConnectionManagerIndex(Connections connections
Once added, the returnConnectionManagerIndex method appears as shown in Figure 16-12:
Figure 16-12
The returnConnectionManagerIndex method
Examining the code shown in Figure 16-12, a return variable named ret of the int type is declared and initialized to -1 on line 97. A try-catch block spans lines 99–121, after which – on line 123 – the value of the ret variable is returned from the returnConnectionManagerIndex method. On line 101, the code attempts to set the value of the ExecuteCatalogPackageTask.ConnectionManagerId string type property by calling the GetConnectionID method included in the Microsoft.SqlServer.Dts.Runtime.Task object methods. On line 102, a variable named connectionManager, of the Microsoft.SqlServer.Dts.Runtime.ConnectionManager type, is declared and initialized using the value of the ConnectionManagerId property to identify a member of the connections collection. On line 103, the value of the ConnectionManagerName property is set (or reset) to the name of the connectionManager object using connectionManager.Name. An if condition starts on line 105 and verifies the connectionManager object is not null. If the connectionManager object is not null, a for loop starts on line 107. The for loop iterates the number of connections. On line 109, an if condition uses the iterator i to compare the value of the Name property of the currently iterating connection – connection(i).Name – to the value of the connectionManager.Name property. If the value of the connection(i).Name equals the value of the connectionManager.Name property, the value of the ret variable is set to the current value of the iterator, i.
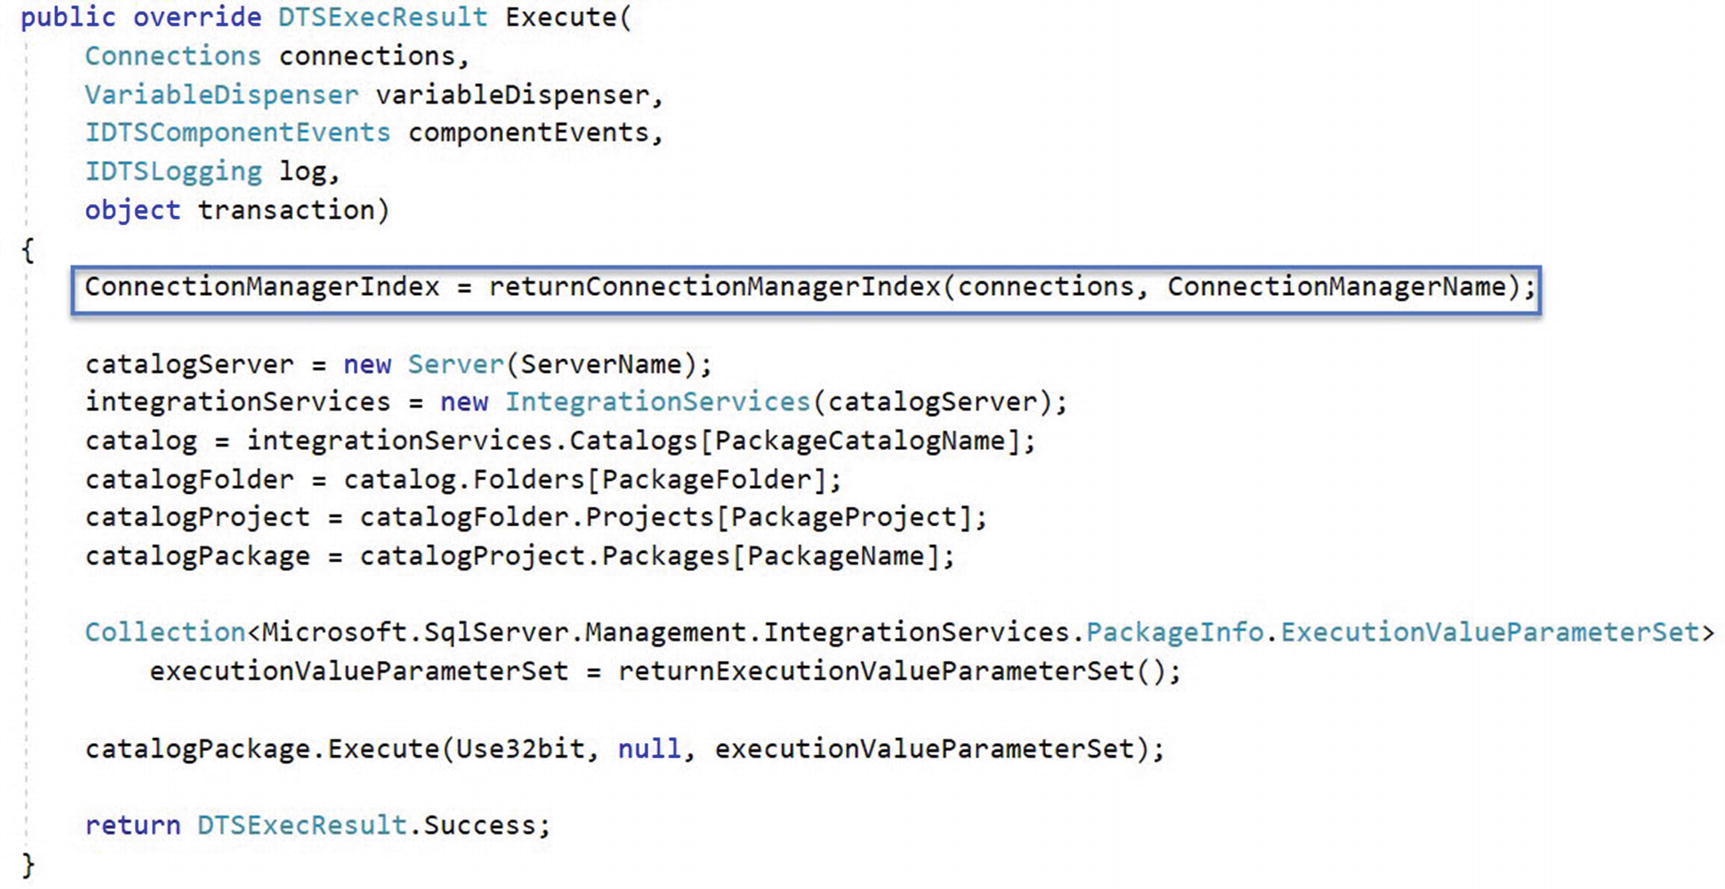
To set the value of the ConnectionManagerIndex property, add a call to the returnConnectionManagerIndex method in the ExecuteCatalogPackageTask.Execute method using the code in Listing 16-4:
Once added, the code appears as shown in Figure 16-13:
Figure 16-13
Calling returnConnectionManagerIndex in the ExecuteCatalogPackageTask.Execute method
Setting the ConnectionManagerIndex property value in this manner supports property management by expressions, which we will cover later.
Refactor the SettingsView.SourceConnection Property
Since connection manager properties may be overridden at execution time, connection manager identification is crucial. Begin refactoring the SettingsView.SourceConnection property by replacing the declaration of the IDtsConnectionService type SettingsView variable named connectionService with the code in Listing 16-5:
Replacing the connectionService variable with the ConnectionService property
Once the connectionService variable is replaced, the code appears as shown in Figure 16-14:
Figure 16-14
Updating to the ConnectionService property
Changing the connectionService variable to the ConnectionService property causes errors in the SettingsView class. Fix the first error in the SettingsView.OnInitialize method by updating the line connectionService = (IDtsConnectionService)connections; with the code in Listing 16-6:
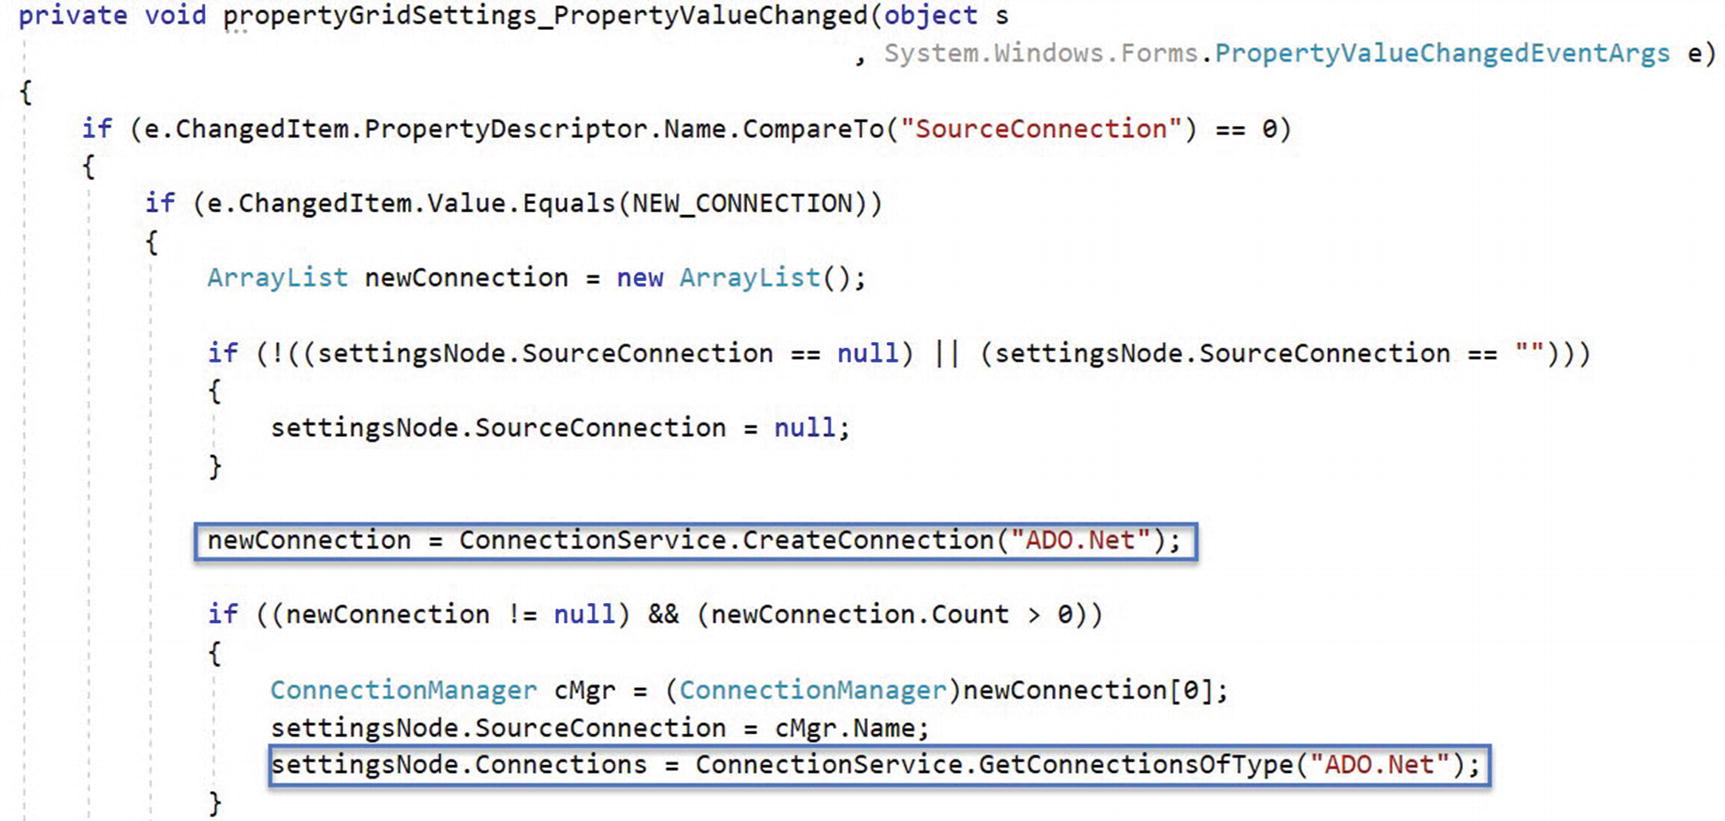
Continue updating the SettingsView.propertyGridSettings_PropertyValueChanged method by adding the code in Listing 16-8 to the if conditional if ((newConnection != null) && (newConnection.Count > 0)):
Updating the SettingsView.propertyGridSettings_PropertyValueChanged method’s new connection code
Once added, the code appears as shown in Figure 16-17:
Figure 16-17
SettingsView.propertyGridSettings_PropertyValueChanged method’s new connection code, updated
Refactor the SettingsView.propertyGridSettings_PropertyValueChanged method by adding the code in Listing 16-9 by adding an else statement to the if conditional if (e.ChangedItem.Value.Equals(NEW_CONNECTION)):
The next step is to refactor the way we identify the catalog, folder, project, and package in the ExecuteCatalogPackageTask.
Identifying Catalog, Folder, Project, and Package
“What is the problem we are trying to solve?” This is a question I learned from a mentor. It is a good question. The problem we are trying to solve is better connection management. Until now, connection management has been…adequate. Connection management in the current design ignores two valid use cases (at least):
1.
Connecting to an Azure-SSIS Catalog hosted by an Azure SQL DB that requires a SQL login (username and password) for authentication
2.
Using property expressions to override the ConnectionManagerName property value
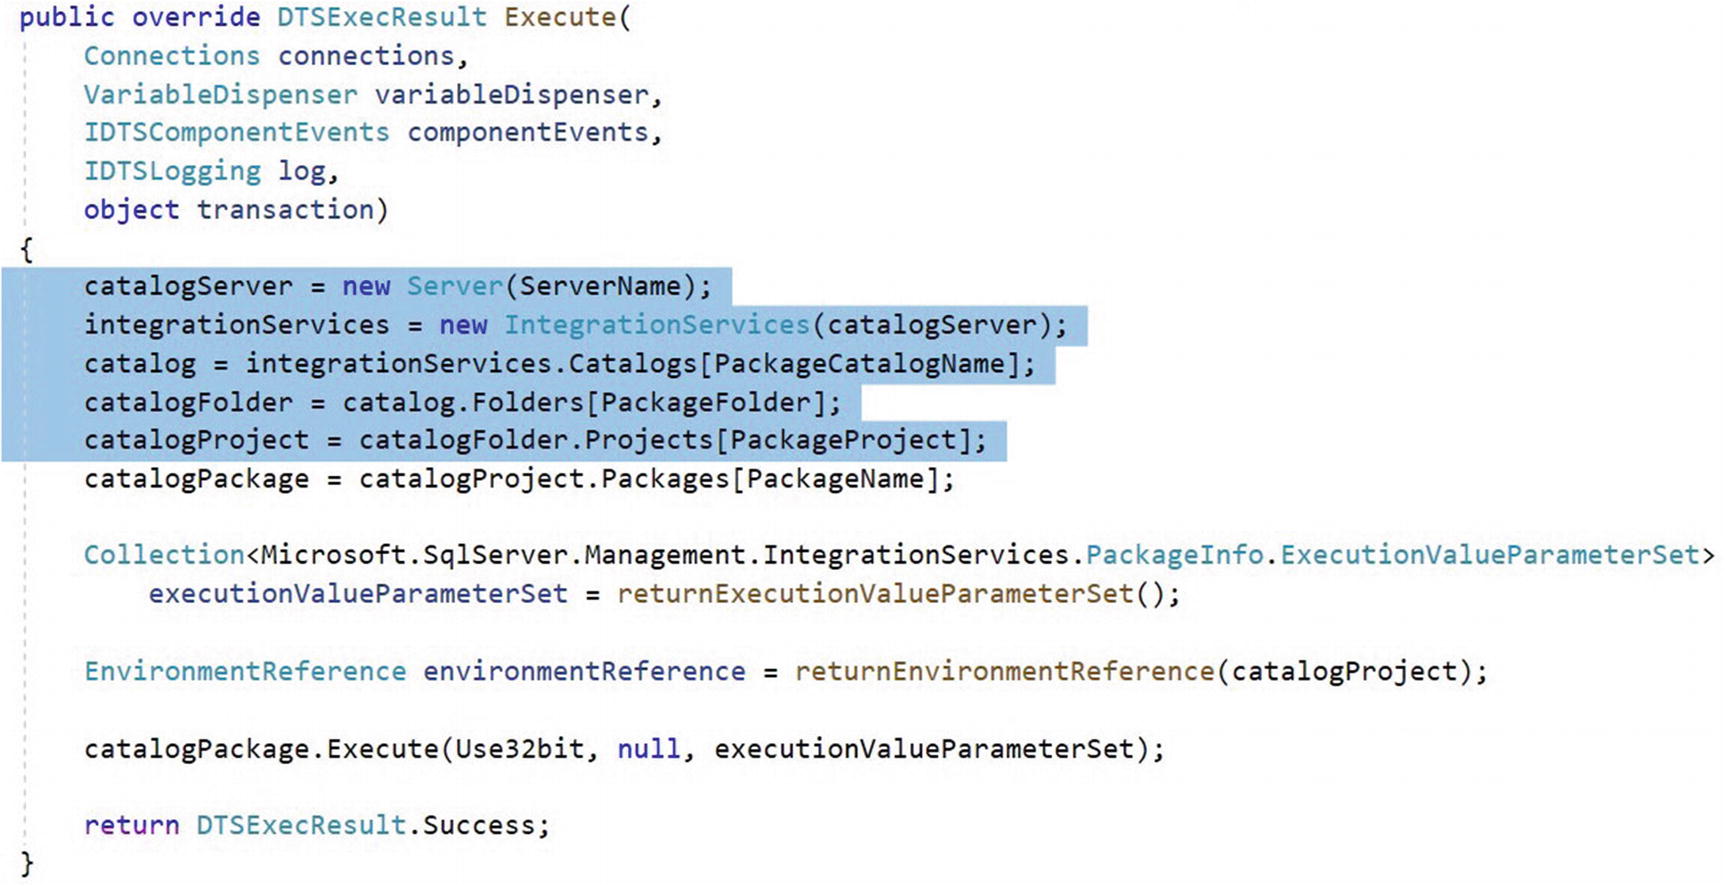
We begin with a second look at how the task code assigns the catalogProject property value, found in the ExecuteCatalogPackageTask’s Execute() method. In the ExecuteCatalogPackageTask’s Execute() method, the task currently populates the Server ➤ Integration Services ➤ SSIS Catalog ➤ Folder ➤ Project ➤ Package hierarchy using the code shown in Listing 16-10 and shown in Figure 16-19:
Figure 16-19
The Execute() method
catalogServer = new Server(ServerName);
integrationServices = new IntegrationServices(catalogServer);
Populating the Server ➤ Integration Services ➤ SSIS Catalog ➤ Folder ➤ Project ➤ Package hierarchy, currently
The code in Listing 16-10 – shown in Figure 16-19 – identifies one SSIS project based on property values configured from the SettingsNode in SettingsView. At execution time, this code is prone to errors if one or more of the SettingsNode properties are improperly configured. Identifying key artifacts – such as catalog, folder, project, and package objects – is important in the Server ➤ Integration Services ➤ SSIS Catalog ➤ Folder ➤ Project ➤ Package hierarchy. In this section, the code to identify catalog, folder, project, and package is collected and refactored into more robust and independent methods.
Let’s refactor this code by moving it to a new function named returnCatalogProject in the ExecuteCatalogPackageTask class.
Adding the returnCatalogProject Method
Continue refactoring the Execute() method by adding the returnCatalogProject method to the ExecuteCatalogPackageTask using the code in Listing 16-11:
public ProjectInfo returnCatalogProject(string ServerName
Once added, the new function appears as shown in Figure 16-20:
Figure 16-20
The returnCatalogProject function
If “SqlConnection” has a red squiggly line beneath it, right-click SqlConnection, expand Quick Actions, and then click using System.Data.SqlClient; to add the using System.Data.SqlClient; directive near the top of the ExecuteCatalogPackageTask.cs file.
Once the using System.Data.SqlClient; directive is added, the code appears as shown in Figure 16-21:
Figure 16-21
The returnCatalogProject function
Declaring the returnCatalogProject function as public allows access to the ExecuteCatalogPackageTask.returnCatalogProject function from the ExecuteCatalogPackageTaskComplexUI project.
Additional “returnCatalog*” methods are similar and demonstrate a very helpful pattern for interacting with SSIS connection managers: The Connections.AcquireConnection method returns a SqlConnection type object. Acquiring a SqlConnection by calling the Connections.AcquireConnection method is one way – perhaps the only way – to obtain a connection that requires a username and password from a connection manager.
Later in this book, we demonstrate connecting an ExecuteCatalogPackageTask to an Azure-SSIS Catalog deployed on an Azure SQL DB instance. One way to connect to Azure SQL DB instances uses a SQL Login with username and password.
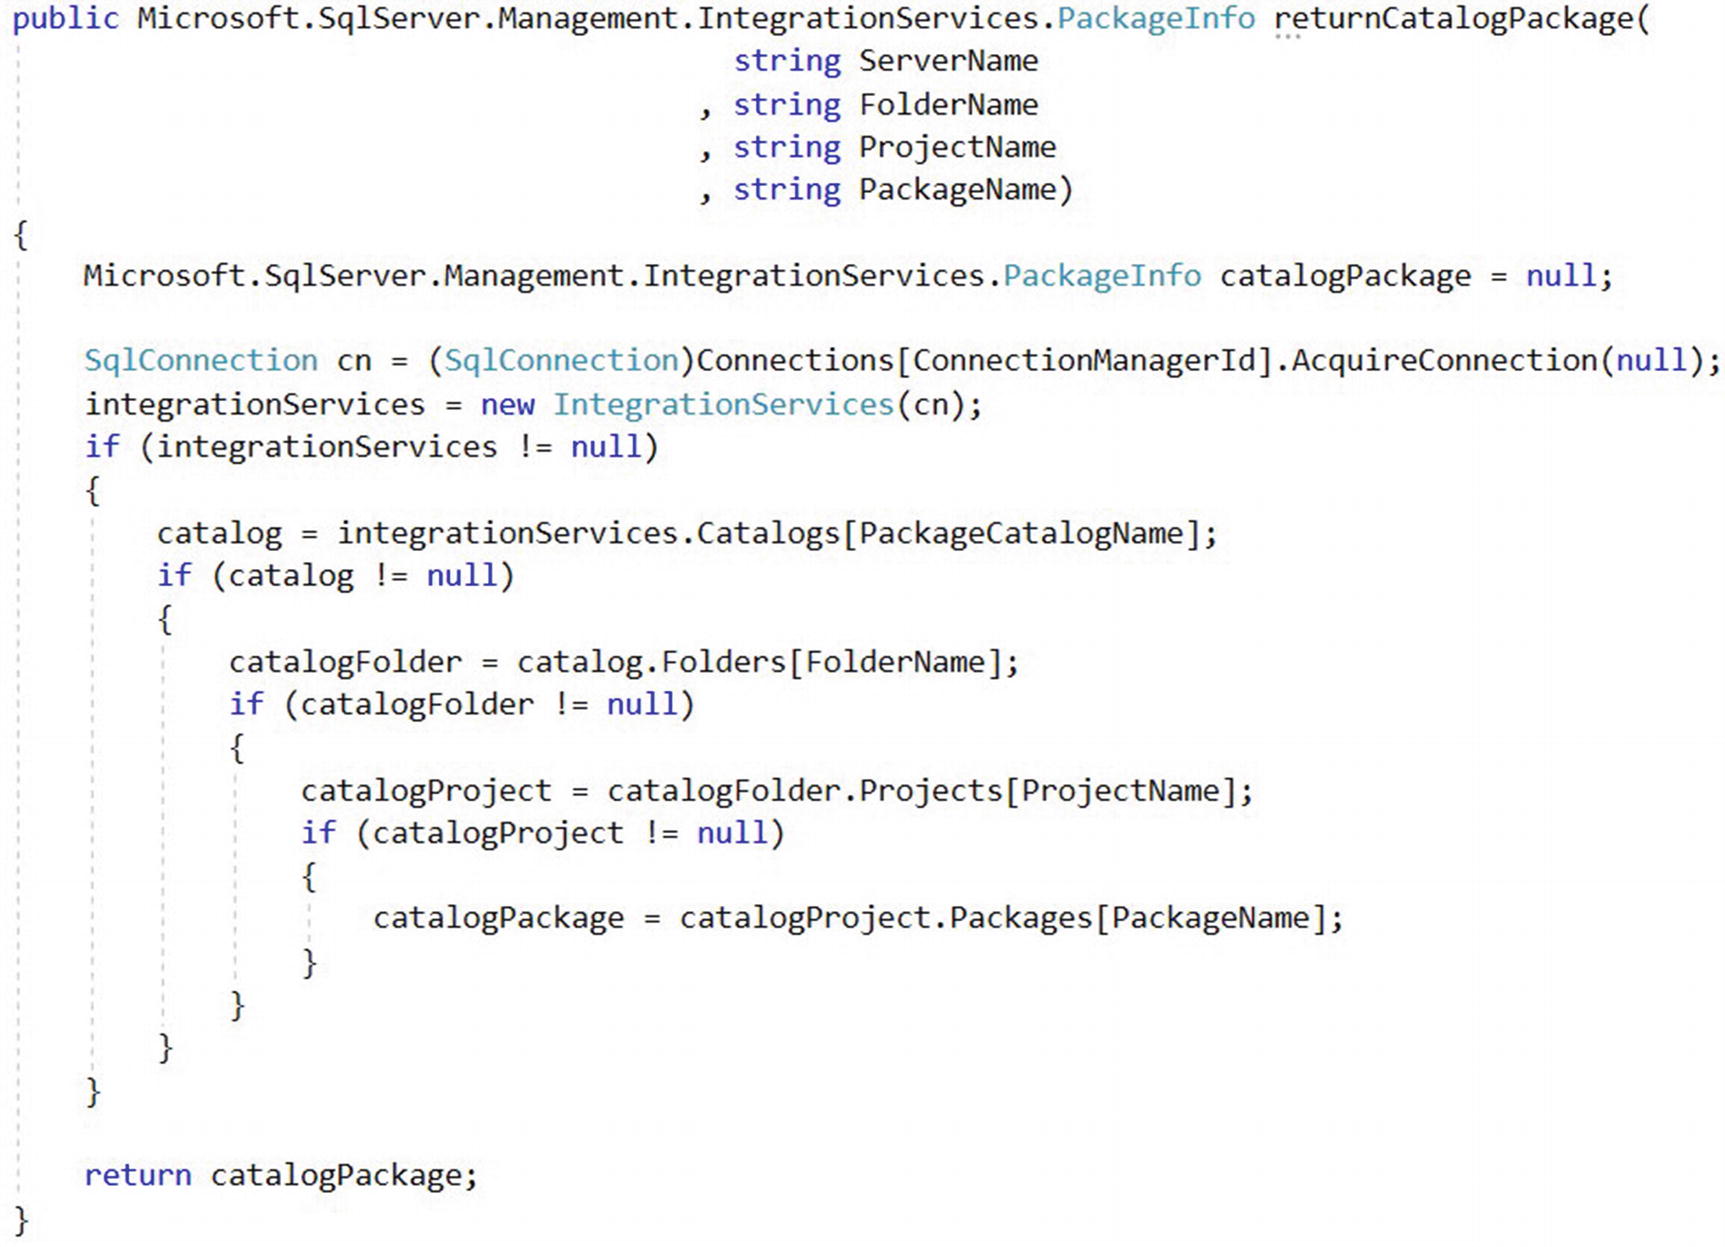
Edit the code in the Execute() method, replacing the code that populates the Server ➤ Integration Services ➤ SSIS Catalog ➤ Folder ➤ Project hierarchy using the code shown in Listing 16-12:
Once added, the code appears as shown in Figure 16-23:
Figure 16-23
The returnCatalogPackage function
Edit the code in the Execute() method, replacing the code that populates the Server ➤ Integration Services ➤ SSIS Catalog ➤ Folder ➤ Project ➤ Package hierarchy using the code shown in Listing 16-14:
Once updated, the new Execute() method appears as shown in Figure 16-24:
Figure 16-24
A portion of the updated Execute() method
The returnCatalogProject and returnCatalogPackage methods are all we need at this point in the development of the ExecuteCatalogPackageTask. While we are here, though, we might as well build the additional methods we will require in the future: returnCatalog and returnCatalogFolder.
Adding the returnCatalog Method
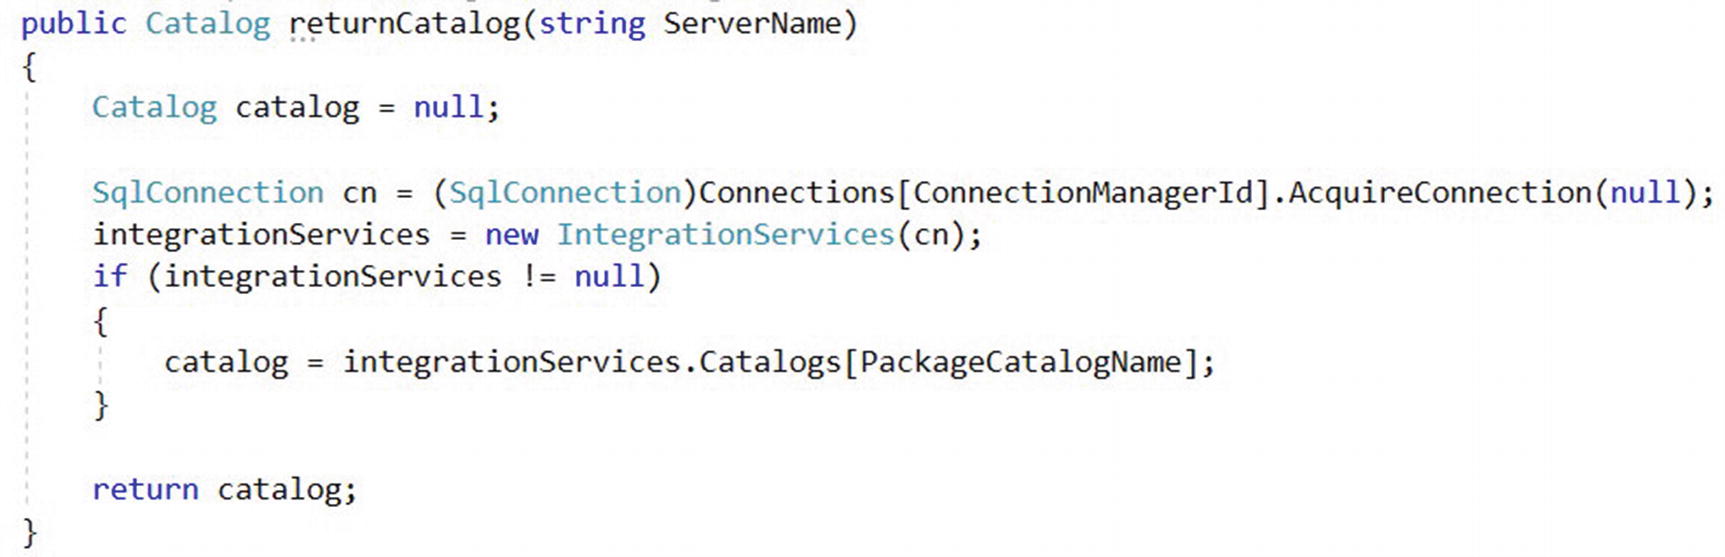
Continue by adding the returnCatalog function to the ExecuteCatalogPackageTask code using the code in Listing 16-15:
Adding the returnCatalog function to ExecuteCatalogPackageTask
The returnCatalog function is modeled from the returnCatalogProject function. The difference is a Catalog type object is returned instead of a ProjectInfo type object. Once added, the code appears as shown in Figure 16-25:
Figure 16-25
The returnCatalog function added to ExecuteCatalogPackageTask
Adding the returnCatalogFolder Method
The next step is adding the returnCatalogFolder function to the ExecuteCatalogPackageTask code using the code in Listing 16-16:
public CatalogFolder returnCatalogFolder(string ServerName
Adding the returnCatalogFolder function to ExecuteCatalogPackageTask
The returnCatalog function is utterly and completely modeled from the returnCatalogProject function. The difference is the Catalog is returned instead of a ProjectInfo object. Once added, the code appears as shown in Figure 16-26:
Figure 16-26
The returnCatalogFolder function added to ExecuteCatalogPackageTask
The “returnCatalog*” methods are helpful for the next step in our design, which is initializing the SettingsNode References collection.
Let’s Test It!
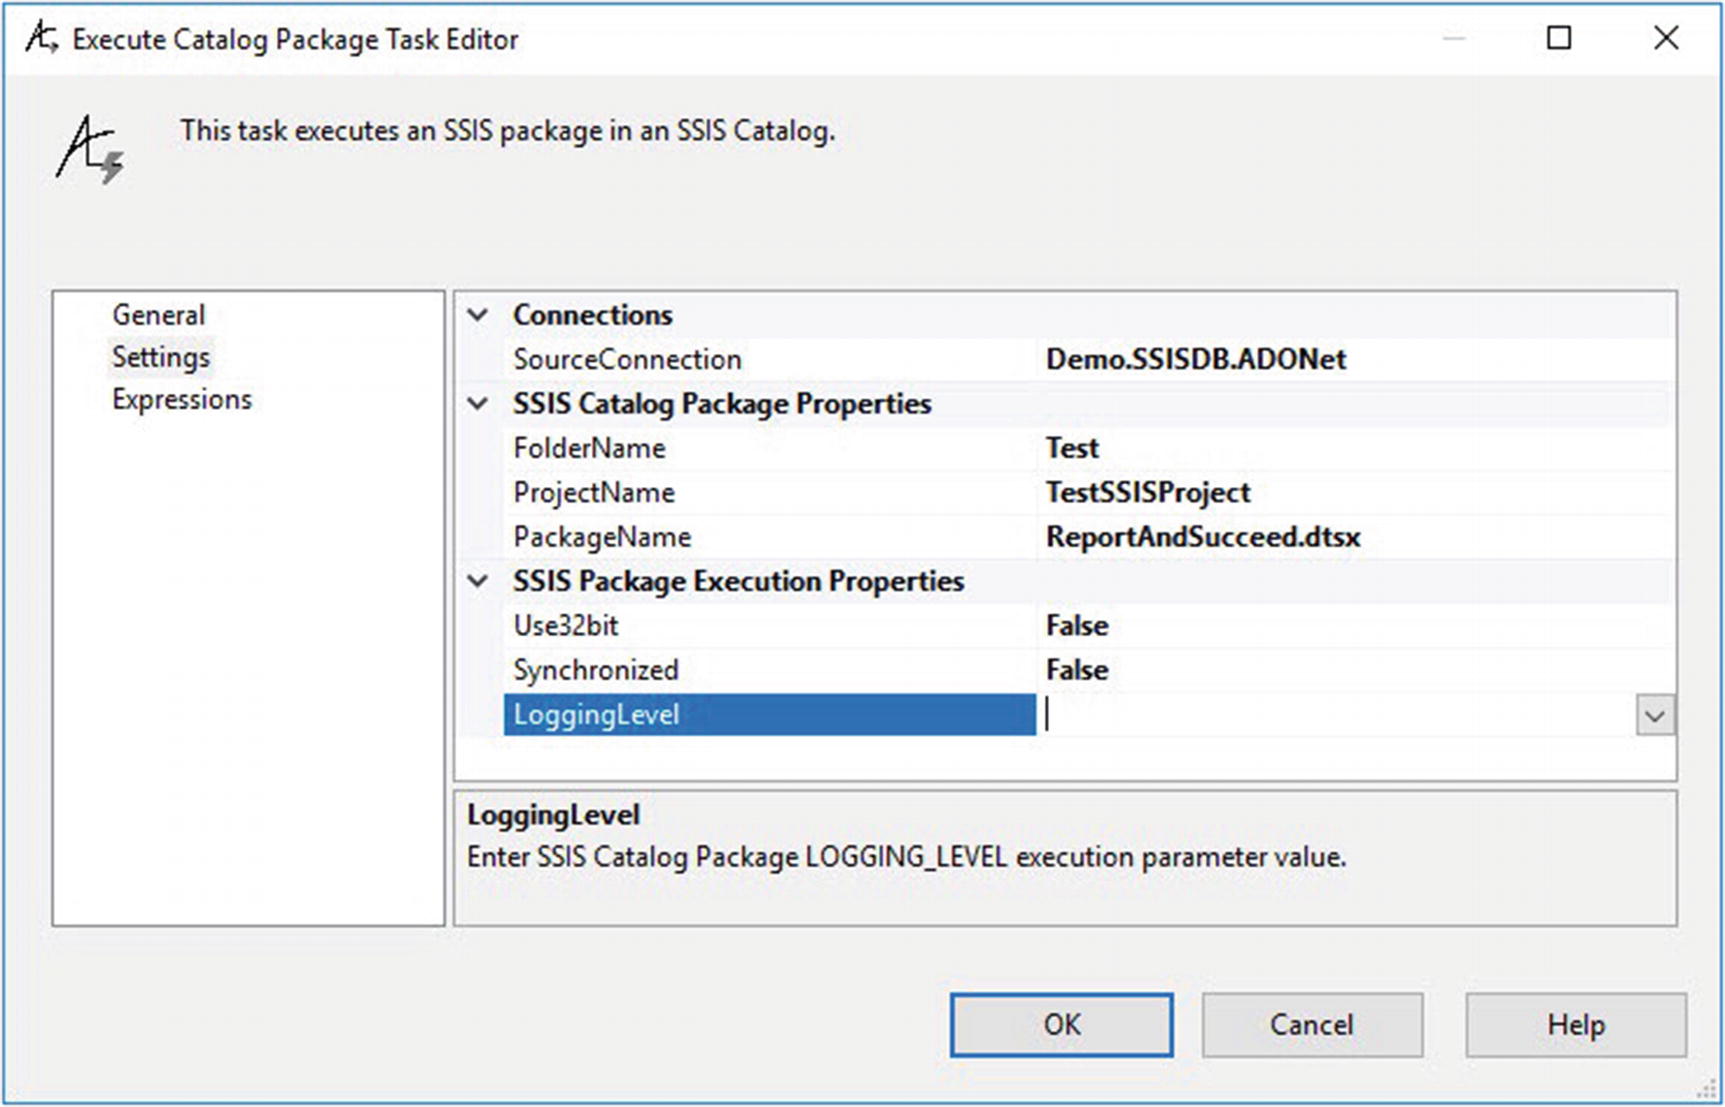
Build the ExecuteCatalogPackageTask solution, and then open a test SSIS project. Add an Execute Catalog Package Task to the control flow, open the editor, and configure the task to execute an SSIS package stored in an SSIS Catalog, as shown in Figure 16-27:
Figure 16-27
Configuring the Execute Catalog Package Task for a test execution
Click the OK button to close the editor and then execute the package in the SSIS debugger. If all goes as planned, the test debug execution succeeds, as shown in Figure 16-28:
Figure 16-28
Success!
Open SQL Server Management Studio’s Object Explorer. Navigate to the Integration Services Catalogs node and expand to the SSISDB node. Right-click the SSISDB node, hover over Reports, and click All Executions to view the results of the test SSIS package execution, as shown in Figure 16-29:
Figure 16-29
Successful test execution, verified
The new SSIS Catalog identification methods are cleaner and more robust. The code is in much better shape for additional functionality.
Conclusion
In this chapter, we made connection management more robust and refactored ExecuteCatalogPackageTask methods that assist with identifying object in the Server ➤ Integration Services ➤ SSIS Catalog ➤ Folder ➤ Project ➤ Package hierarchy. Two of these methods – returnCatalogProject and returnCatalogPackage – are used in the ExecuteCatalogPackageTask’s Execute method.
Now would be an excellent time to check in your code.