
Chapter 10
Menus and User Interface
In this chapter, first up is a full breakdown of the main menu used for all of the example games. The main menu structure should provide a perfect starting place for any main menu system.
The second part of this chapter will look at in-game UI and how the example games derive from a class that helps to store useful data.
10.1 The Main Menu
![]()
First impressions last. When you walk by a store, its appearance may influence your decision whether to go in and browse or to keep walking. If the outside of the store looks rundown or badly kept, it may also affect how you feel about the goods inside. A quick visit to an Apple Store can demonstrate the extreme of this idea, where everything is arranged to exacting, some may say extreme, levels of detail. It was no coincidence that many of Apple’s initial retail team came from the clothing store Gap, a company well known for its cool image and stylish branding.* Owing to the nature of electronics (hardly stylish to go cable shopping, for example), the appearance of electronics stores had taken a back seat to function before Apple came along and changed things. Apple brought emotion, humanity, function, and style to electronics. Steve Jobs said in a video tour of the first Apple store that “[p]eople don’t just want to buy personal computers anymore, they want to know what they can do with them.” With this approach in mind, Apple stores attempted to convey the lifestyle just as much as the product, using clever layout and styling to reinforce the key themes of the experience, such as using natural materials to bring a more earthy, organic feel to their casual and clutter-free open plan designs.
Just like the exterior and layout of a high-end store, your menus and interface can dramatically affect how people feel about the game “inside.” Thematically unsuitable graphics, a broken menu, or a difficult menu flow can frustrate players even before the game starts, leading to a heightened sense of frustration during initial gameplay. An unpolished interface may lower expectations or change the perception of quality of work that has gone into the game. We want to avoid these situations and set the user up to feel as good as possible. To encourage a positive start, we should try to make sure that menu systems are tidy and functional, and that they attempt to reinforce the main themes of the game world in every aspect.
Building quality user interface and menu screens can be a time-consuming process. If you look at most modern videogames, the menus are filled with little touches that only developers would ever notice, like particle effects, slide-on transitions, and animations. Most games have dedicated teams for building the menus and interface systems. Artists (sometimes both 2D and 3D) work hand in hand with developers to build exciting new experiences. All this comes at a cost, and it may take months of work just for the single main menu screen of a commercial title.
Some studios reuse their menu and interface code from game to game, changing the layout and graphics but keeping the underlying code and/or menu structure. Reuse of menu code makes a lot of sense in an industry where we need to pack in as much gameplay as possible and where customers demand a lot more bang for their buck.
The menu system we will be building in this chapter will not be winning any awards or enticing players in to play. But it will serve perhaps as a structural beginning and as a functional method for configuring the example games and getting them started. The great thing about this menu is that it’s completely open to interpretation. It could be built out to work for just about any kind of game with the addition of some graphics and sounds. As you develop your games and develop your style, having an operational menu will help during testing.
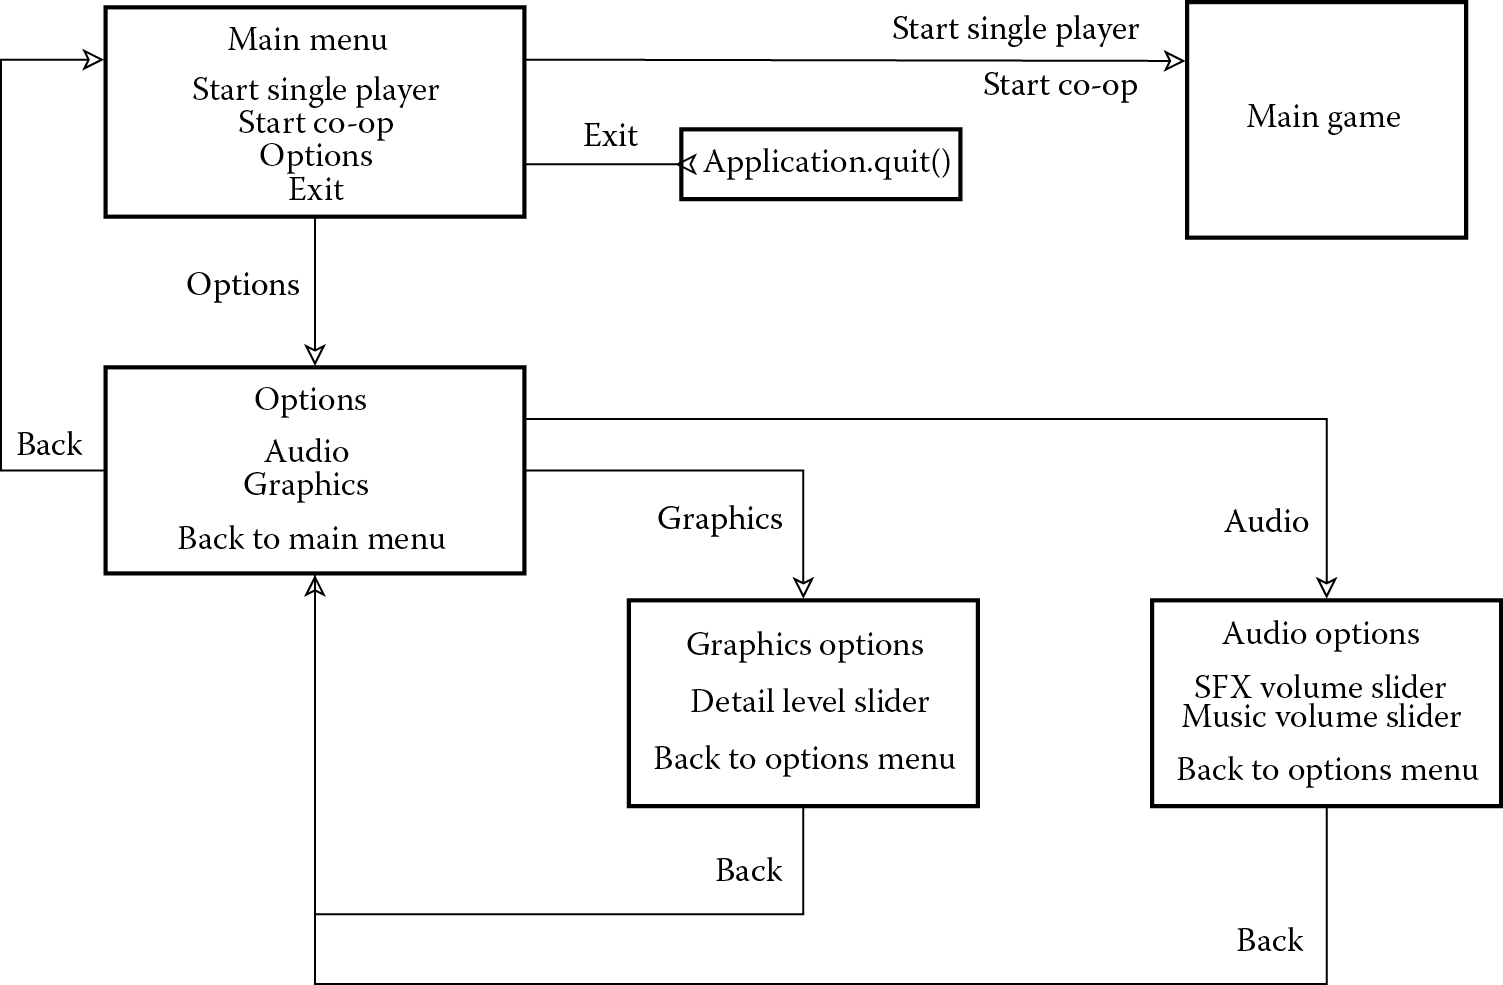
The main menu system is used by all of the example games in this book. It is easy to port between games and have submenus for audio and graphics options. The full screen flow for the entire main menu and its submenus is shown in Figure 10.1.
The flow requirements are almost identical for each game, although there are a few things that need to be variable. These are
- Game name.
- Which scene to load when we press the start game button.
- The filename of the prefs we save out to store options (volume and graphics levels).
- In the case of Interstellar Paranoids, the menu needs to have a Start Co-Op Game button, too.
Options menu uses PlayerPrefs to save and load any information we need to store or retrieve related to audio and graphics settings. The menu code should check to see that these saved values exist and, in cases where the data have not yet been saved, create new PlayerPrefs saved data as required.
We can use the same exit button and exit confirmation (a simple “Are you sure you want to quit?” yes/no menu), and the options will be exactly the same. It may be beneficial to add the option to display an image instead of just text for the name of the game and it would be easy to implement, so we should take care of that, too.
The menus will be built with Unity GUI, for the sake of simplicity, although the basic reusable menu principles could easily be applied to a GUI using a custom or third-party solution such as NGUI. Menus should also have the option to play some music in the background as well as play a sound effect whenever buttons are clicked, and the background music should continue to play between menus without restarting or breaking.
The menu is a single class to keep it simple and to allow for easy expansion or porting between projects. It is capable of displaying all different screens that make up the main menu by using a variable to state which menu should be displayed, which is checked by a case statement, and the correct screen composed within the OnGUI function.
To help make customization and stylization easier, the menu system uses a Unity GUI skin named MenuGUIskin, which defines the font to use and any custom layout requirements.
The options menu uses QualitySettings.names to find out how many different graphics preferences are available and present them as a slider bar for easy modification by players. Getting all of the available settings from QualitySettings.names (rather than hard coding them) allows for a greater level of flexibility when porting between games, as there may not always be the same number of graphics detail levels available (they are configurable in the Unity editor by going to the menus Edit → Project Settings → Quality and editing each quality setting as a list in the Inspector window).
The main menu class is in a script called MainMenuController.cs. It is derived from MonoBehavior and looks like this:
using UnityEngine;
using System.Collections;
public class MainMenuController : MonoBehavior
{
public int whichMenu= 0;
public GUISkin menuSkin;
public string gameDisplayName= "- DEFAULT GAME NAME -";
public string gamePrefsName= "DefaultGame";
public string singleGameStartScene;
public string coopGameStartScene;
public float default_width= 720;
public float default_height= 480;
public float audioSFXSliderValue;
public float audioMusicSliderValue;
public float graphicsSliderValue;
private int detailLevels= 6;
void Start()
{
// set up default options, if they have been saved out to // prefs already
if(PlayerPrefs.HasKey(gamePrefsName+"_SFXVol"))
{
audioSFXSliderValue= PlayerPrefs.GetFloat(gamePrefsName+"_SFXVol");
} else {
audioSFXSliderValue= 1;
}
if(PlayerPrefs.HasKey(gamePrefsName+"_MusicVol"))
{
audioMusicSliderValue= PlayerPrefs.GetFloat(gamePrefsName+"_MusicVol");
} else {
audioMusicSliderValue= 1;
}
if(PlayerPrefs.HasKey(gamePrefsName+"_GraphicsDetail"))
{
graphicsSliderValue= PlayerPrefs.GetFloat(gamePrefsName+"_GraphicsDetail");
} else {
string[] names = QualitySettings.names;
detailLevels= names.Length;
graphicsSliderValue= detailLevels;
}
// set the quality setting
QualitySettings.SetQualityLevel((int)graphicsSliderValue, true);
}
void OnGUI()
{
float resX = Screen.width / default_width;
float resY = Screen.height / default_height;
GUI.matrix = Matrix4x4.TRS (new Vector3(0, 0, 0), Quaternion.identity, new Vector3 (resX, resY, 1));
// set the GUI skin to use our custom menu skin
GUI.skin= menuSkin;
switch(whichMenu)
{
case 0:
GUI.BeginGroup (new Rect (default _width / 2 - 150, default _height / 2 - 250, 500, 500));
// All rectangles are now adjusted to the group. // (0,0) is the topleft corner of the group.
GUI.Label(new Rect(0, 50, 300, 50), gameDisplayName, "textarea");
if(GUI.Button(new Rect(0, 200, 300, 40),"START SINGLE", "button"))
{
PlayerPrefs.SetInt("totalPlayers", 1);
LoadLevel(singleGameStartScene);
}
if(coopGameStartScene!="")
{
if(GUI.Button(new Rect(0, 250, 300, 40),"START CO-OP"))
{
PlayerPrefs.SetInt("totalPlayers", 2);
Load Level(coopGameStartScene);
}
if(GUI.Button(new Rect(0, 300, 300, 40),"OPTIONS"))
{
ShowOptionsMenu();
}
} else {
if(GUI.Button(new Rect(0, 250, 300, 40),"OPTIONS"))
{
ShowOptionsMenu();
}
}
if(GUI.Button(new Rect(0, 400, 300, 40),"EXIT"))
{
ConfirmExitGame();
}
// End the group we started above. This is very // important to remember!
GUI.EndGroup ();
break;
case 1:
// Options menu
GUI.BeginGroup (new Rect (native_width / 2 - 150, native_height / 2 - 250, 500, 500));
// Are you sure you want to exit?
GUI.Label(new Rect(0, 50, 300, 50), "OPTIONS", "textarea");
if(GUI.Button(new Rect(0, 250, 300, 40),"AUDIO OPTIONS"))
{
ShowAudioOptionsMenu();
}
if(GUI.Button(new Rect(0, 300, 300, 40),"GRAPHICS OPTIONS"))
{
ShowGraphicsOptionsMenu();
}
if(GUI.Button(new Rect(0, 400, 300, 40),"BACK TO MAIN MENU"))
{
GoMainMenu();
}
GUI.EndGroup ();
break;
case 2:
GUI.BeginGroup (new Rect (default_width / 2 - 150, default_height / 2 - 250, 500, 500));
// Are you sure you want to exit?
GUI.Label(new Rect(0, 50, 300, 50), "Are you sure you want to exit?", "textarea");
if(GUI.Button(new Rect(0, 250, 300, 40),"YES, QUIT PLEASE!"))
{
ExitGame();
}
if(GUI.Button(new Rect(0, 300, 300, 40),"NO, DON’T QUIT"))
{
GoMainMenu();
}
GUI.EndGroup ();
break;
case 3:
// AUDIO OPTIONS
GUI.BeginGroup (new Rect (default_width / 2 - 150, default_height / 2 - 250, 500, 500));
GUI.Label(new Rect(0, 50, 300, 50), "AUDIO OPTIONS", "textarea");
GUI.Label(new Rect(0, 170, 300, 20), "SFX volume:");
audioSFXSliderValue = GUI.HorizontalSlider (new Rect(0, 200, 300, 50), audioSFXSliderValue, 0.0f, 1f);
GUI.Label(new Rect(0, 270, 300, 20), "Music volume:");
audioMusicSliderValue = GUI.HorizontalSlider (new Rect(0, 300, 300, 50), audioMusicSliderValue, 0.0f, 1f);
if(GUI.Button(new Rect(0, 400, 300, 40),"BACK TO OPTIONS MENU"))
{
SaveOptionsPrefs();
ShowOptionsMenu();
}
GUI.EndGroup ();
break;
case 4:
// GRAPHICS OPTIONS
GUI.BeginGroup (new Rect (default_width / 2 - 150, default_height / 2 - 250, 500, 500));
GUI.Label(new Rect(0, 50, 300, 50), "GRAPHICS OPTIONS", "textarea");
GUI.Label(new Rect(0, 170, 300, 20), "Graphics quality:");
graphicsSliderValue = Mathf.RoundToInt(GUI.HorizontalSlider (new Rect(0, 200, 300, 50), graphicsSliderValue, 0, detailLevels));
if(GUI.Button(new Rect(0, 400, 300, 40),"BACK TO OPTIONS MENU"))
{
SaveOptionsPrefs();
ShowOptionsMenu();
}
GUI.EndGroup ();
break;
} // <- end switch
}
void LoadLevel(string whichLevel)
{
Application.LoadLevel(whichLevel);
}
void GoMainMenu()
{
whichMenu=0;
}
void ShowOptionsMenu()
{
whichMenu=1;
}
void ShowAudioOptionsMenu()
{
whichMenu=3;
}
void ShowGraphicsOptionsMenu()
{
whichMenu=4;
}
void SaveOptionsPrefs()
{
PlayerPrefs.SetFloat(gamePrefsName+"_SFXVol", audioSFXSliderValue);
PlayerPrefs.SetFloat(gamePrefsName+"_MusicVol", audioMusicSliderValue);
PlayerPrefs.SetFloat(gamePrefsName+"_GraphicsDetail", graphicsSliderValue);
// set the quality setting
QualitySettings.SetQualityLevel((int)graphicsSliderValue, true);
}
void ConfirmExitGame()
{
whichMenu=2;
}
void ExitGame()
{
// tell level loader to shut down the game for us
Application.Quit();
}
}
10.1.1 Script Breakdown
After all of the variable declarations, the first part of this script does the initial setup within a Start() function. Remember that, in Unity, the Start function is automatically called by the engine after a script is initialized and before the first update. Here, the script checks to see whether or not PlayerPrefs data have already been saved to disk. If it finds PlayerPrefs keys that exist, it loads them in and applies the saved values to our local variables. To store slider values from the options menu, there are three variables used. These are:
- audioSFXSliderValue, a float, with a value between 0 and 1, for the sound effects volume level.
- audioMusicSliderValue, a float, with a value between 0 and 1, for the music volume level.
- graphicsSliderValue, an integer to store the level of graphics detail. The number acts as an index used to set Unity’s QualitySettings quality level with the SetQualityLevel function.
void Start()
{
// set up default options, if they have been saved out to // prefs already
if(PlayerPrefs.HasKey(gamePrefsName+"_SFXVol"))
{
audioSFXSliderValue= PlayerPrefs.GetFloat(gamePrefsName+"_SFXVol");
} else {
audioSFXSliderValue= 1;
}
if(PlayerPrefs.HasKey(gamePrefsName+"_MusicVol"))
{
audioMusicSliderValue= PlayerPrefs.GetFloat(gamePrefsName+"_MusicVol");
} else {
audioMusicSliderValue= 1;
}
if(PlayerPrefs.HasKey(gamePrefsName+"_GraphicsDetail"))
{
graphicsSliderValue= PlayerPrefs.GetFloat(gamePrefsName+"_GraphicsDetail");
} else {
string[] names = QualitySettings.names;
detailLevels= names.Length;
graphicsSliderValue= detailLevels;
}
// set the quality setting
QualitySettings.SetQualityLevel((int)graphicsSliderValue, true);
}
When you start a Unity project and the screen resolution box appears, there is a dropdown menu for the quality settings, usually something along the lines of Fastest, Fast, Simple, Good, Beautiful, and Fantastic (the default names and quality types). You can modify these in the Unity Inspector window by going through the menus Edit → Project Settings → Quality, deleting or adding new settings levels as you see fit. What this means is that there is no guarantee of there being the same number of quality settings from game to game—for example, you may choose to only have Good, Bad, and Ugly. To find out how many settings there are, QualitySettings.names is used to return an array containing all of the available quality names, and its .Length property tells us how many items are in the array. This number of available quality settings is held in the variable named detailLevels. In the Start() function, the code to do this looks like this:
string[] names = QualitySettings.names;
detailLevels= names.Length;
By default, the function also uses the highest quality level as a default setting for quality when no PlayerPrefs key is found.
graphicsSliderValue= detailLevels;
The actual graphics quality level (QualitySettings.SetQualityLevel) is set in the last line of the function:
QualitySettings.SetQualityLevel((int)graphicsSliderValue, true);
Next up, we move straight on to the OnGUI function:
void OnGUI()
{
float resX = Screen.width / default_width;
float resY = Screen.height / default _height;
GUI.matrix = Matrix4x4.TRS (new Vector3(0, 0, 0), Quaternion.identity, new Vector3 (resX, resY, 1));
The Matrix 4 × 4 function is complicated, and I am not about to try to explain it here (trust me, I am no mathematician!), but the simplest explanation I have is as follows.
The default width and height are the resolution at which you designed the UI for (so, if you intend the default screen resolution to be 1024 × 768, you would make the default_width and default_height variables equal to 1024 and 768, respectively).
The multipliers to use with the GUI.matrix function are established by taking the width and height of the screen and dividing it by your default width and height values. The line that does all the hard work is where Unity sets the GUI.matrix. It takes your values and stretches the UI to fill the screen. This, of course, means that there will be some stretching at different aspect ratios, but the UI will at least scale to suit every resolution. It is probably the easiest way to deal with multiple screen resolutions without having to design multiple user interfaces.
Once the GUI.matrix is set, everything we draw in the OnGUI function will be scaled accordingly so we can go on and start drawing the menus.
To set a GUI skin, we need to tell Unity about it in the OnGUI function. You can use as many different skins as you like, and changing/setting the skin is as easy as
// set the GUI skin to use our custom menu skin
GUI.skin= menuSkin;
In our UI function, menuSkin is a public variable so that we can set the GUI skin value in the Inspector window of the editor.
The next step is to check the variable whichMenu to see “which menu” we need to render. There are four different screens we may display here, the first one being the main menu (case 0):
switch(whichMenu)
{
case 0:
To help us to position the menu and for the most flexibility, we will render it within a group. Using a group is similar to drawing the UI inside a window, which may be moved around with its contents keeping the same layout. The coordinate system for the GUI contents within the group starts at 0,0 in the top left of the group and remains to be unaffected by screen positioning (which continues to be determined by the group rather than by its content).
GUI.BeginGroup (new Rect (default _width / 2 - 150, default _height / 2 - 250, 500, 500));
Putting content into a group is simple. Use GUI.BeginGroup() within an OnGUI function to start the content and GUI.EndGroup() once the content is complete.
GUI.Label(new Rect(0, 50, 300, 50), gameDisplayName, "textarea");
One way to get text onto the screen is to use GUI.Label. In the line above, we define a rectangle where we are going to render (keep in mind that this is happening within a group, so the coordinate system starts at 0,0 top left of the group). As this is the name of the game, we are using a string to hold the game name called gameDisplayName. Using a public string in this way means that we can change the game name in the Unity editor’s Inspector window without having to edit the script.
The final part of the GUI.Label line is a GUIStyle. This is just a string that refers to a style defined in a GUISkin. In this case, it’s the style called “textarea,” and it just makes sure that when this text is rendered that it uses the correct font, size, and text alignment.
The next part of the script renders and acts on a button. The code to draw and check for a button press is all in just a single line:
if(GUI.Button(new Rect(0, 200, 300, 40),"START SINGLE", "button"))
GUI.Button uses the defined rectangle to draw a button with the specified text “START SINGLE” in it. Again, you can see here that, to encourage predictability, we specify the GUIStyle of “button.” Notice that this line acts like a Boolean in this conditional statement, and if the button is pressed, everything within the curly brackets occurs:
PlayerPrefs.SetInt("totalPlayers", 1);
LoadLevel(singleGameStartScene);
The PlayerPrefs call saves out the total number of players for the game, which is there only as a formality (it doesn’t actually do anything or get called) in all but the example game Interstellar Paranoids. As the game has a cooperative game mode, we use the totalPlayers pref to decide which mode to start in. None of the other example games uses this key, although you could utilize it if you add multiplayer modes later on.
The next line calls on a function called LoadLevel and passes in the name of the scene to load. The variable singleGameStartScene is used, again a public string for easy editing in the Unity editor Inspector window, to determine which scene to load for a single player game. In this menu system, we also have a variable named coopGameStartScene that, when used, will branch off and display a different layout (with the addition of a “Start Co-op game” button) and will be used to launch a co-op game. It may well be that, in future games, you launch both types of games via the same scene and opt to use the totalPlayers pref key or another system like that, but the additional string is provided as a “just in case” as well as a simple way to determine whether or not to show that co-op start button with a slightly different menu layout:
if(coopGameStartScene!="")
{
if(GUI.Button(new Rect(0, 250, 300, 40),"START CO-OP"))
{
PlayerPrefs.SetInt("totalPlayers", 2);
LoadLevel(coopGameStartScene);
}
if(GUI.Button(new Rect(0, 300, 300, 40),"OPTIONS"))
{
ShowOptionsMenu();
}
} else {
if(GUI.Button(new Rect(0, 250, 300, 40),"OPTIONS"))
{
ShowOptionsMenu();
}
}
In the code above, we also added an options button to the menu group. If the options button is pressed, a function named ShowOptionsMenu() is called. This function has a single purpose, which is to set whichMenu to 1 (to display the options menu). This may make you wonder why it even exists as a function when we could just as easily set whichMenu in the button codes; the reason is simply to keep things neat and easy to extend later on. Perhaps in future menu code, you may want to play a sound, start a screen transition, or play an animation. Putting all those codes into the button detect can get messy and confusing, making the script harder to debug, hence why the ShowOptionsMenu function exists.
Now that we have dealt with starting the game and changing to the options menu, all that is left to do is show an exit button, end the group, and finish the case statement:
if(GUI.Button(new Rect(0, 400, 300, 40),"EXIT"))
{
ConfirmExitGame();
}
// End the group we started above. This is very // important to remember!
GUI.EndGroup ();
break;
To make sure that our players don’t accidentally exit the game, this script provides a separate menu screen to show a simple exit confirmation with “yes” and “no” buttons. The ConfirmExitGame() function sets whichMenu to 2, used by the switch statement to show the confirm screen.
GUI.EndGroup() ends the UI group—important to remember to include this call; otherwise, any additional UI rendered after this line will be within this group’s coordinate system and part of this group.
When the variable whichMenu is set to 1, our OnGUI function contains a code to render a simple options menu. The base menu system allows players to change audio and graphics. The menu also uses a back button to go back to the main menu:
case 1:
// Options menu
GUI.BeginGroup (new Rect (native_width / 2 - 150, native_height / 2 - 250, 500, 500));
// Are you sure you want to exit?
GUI.Label(new Rect(0, 50, 300, 50), "OPTIONS", "textarea");
if(GUI.Button(new Rect(0, 250, 300, 40),"AUDIO OPTIONS"))
{
ShowAudioOptionsMenu();
}
if(GUI.Button(new Rect(0, 300, 300, 40),"GRAPHICS OPTIONS"))
{
ShowGraphicsOptionsMenu();
}
if(GUI.Button(new Rect(0, 400, 300, 40),"BACK TO MAIN MENU"))
{
GoMainMenu();
}
GUI.EndGroup ();
ShowAudioOptionsMenu(), ShowGraphicsOptionsMenu() and GoMainMenu() are functions that simply set the variable whichMenu for the different menu screens.
The next menu case is a simple confirm-exit screen, a text label with two buttons that call either the ExitGame() function or the GoMainMenu() function:
case 2:
GUI.BeginGroup (new Rect (default_width / 2 - 150, default_height / 2 - 250, 500, 500));
// Are you sure you want to exit?
GUI.Label(new Rect(0, 50, 300, 50), "Are you sure you want to exit?", "textarea");
if(GUI.Button(new Rect(0, 250, 300, 40),"YES, QUIT PLEASE!"))
{
ExitGame();
}
if(GUI.Button(new Rect(0, 300, 300, 40),"NO, DON’T QUIT"))
{
GoMainMenu();
}
GUI.EndGroup ();
break;
The audio options menu is a little different from the ones we’ve seen so far in this chapter, as it calls for two horizontal sliders to set the sound effect and music volume levels:
case 3:
// AUDIO OPTIONS
GUI.BeginGroup (new Rect (default_width / 2 - 150, default_height / 2 - 250, 500, 500));
GUI.Label(new Rect(0, 50, 300, 50), "AUDIO OPTIONS", "textarea");
GUI.Label(new Rect(0, 170, 300, 20), "SFX volume:");
After setting up the group and rendering two labels, we move on to the code to render the horizontal slider, which looks like this:
audioSFXSliderValue = GUI.HorizontalSlider (new Rect(0, 200, 300, 50), audioSFXSliderValue, 0.0f, 1f);
Here, we set the audioSFXSliderValue variable (a float) to the return value that the GUI.HorizontalSlider gives back. A slider may take up to five parameters as follows:
- A rectangle defining the size of the area the slider will take up.
- The current value at which to render the slider handle. The audioSFXSliderValue variable is used here, and it’s OK for the GUI.HorizontalSlider to send feedback to itself, as we set audioSFXSliderValue to the return value of the slider and at the same time set the value of the handle to the same variable.
- The value at the left end of the slider. Your slider can start anywhere, but in this case, we need it to start at 0.
- The value at the right end of the slider. The maximum volume we would need to set our audio to would be 1. That’s why we set the right end of the slider to 1(f).
- If you wanted to set a GUIStyle, a fifth optional parameter (a string containing the name of the GUIStyle) may be used here, too.
A little further down in the script, we draw another label and the second horizontal slider, using the variable audioMusicSliderValue to store its value. Notice that the slider starts at 0 and ends with a maximum value of 1, the highest amount we would ever need to which to set the volume property of an AudioSource object:
GUI.Label(new Rect(0, 270, 300, 20), "Music volume:");
audioMusicSliderValue = GUI.HorizontalSlider (new Rect(0, 300, 300, 50), audioMusicSliderValue, 0.0f, 1f);
Now all that’s left to do is provide a method to get back to the options menu and to end the group. When the button is pressed, we call on two functions: SaveOptionsPrefs() and ShowOptionsMenu().
if(GUI.Button(new Rect(0, 400, 300, 40),"BACK TO OPTIONS MENU"))
{
SaveOptionsPrefs();
ShowOptionsMenu();
}
GUI.EndGroup ();
break;
Getting back to the OnGUI menu switch statement, the next menu case is the graphics options menu:
case 4:
First, a group is set up for the UI to be rendered in:
// GRAPHICS OPTIONS
GUI.BeginGroup (new Rect (default_width / 2 - 150, default_height / 2 - 250, 500, 500));
The labels for the screen are drawn next, with GUI.Label:
GUI.Label(new Rect(0, 50, 300, 50), "GRAPHICS OPTIONS", "textarea");
GUI.Label(new Rect(0, 170, 300, 20), "Graphics quality:");
For the graphics detail, the GUI.HorizontalSlider function is used with the variable graphicsSliderValue:
graphicsSliderValue = Mathf.RoundToInt(GUI.HorizontalSlider (new Rect(0, 200, 300, 50), graphicsSliderValue, 0, detailLevels));
The back button (which leads out of this menu and back to the options menu) also makes a call to SaveOptionsPrefs() to store any data updated by the user as this screen was active:
if(GUI.Button(new Rect(0, 400, 300, 40),"BACK TO OPTIONS MENU"))
{
SaveOptionsPrefs();
ShowOptionsMenu();
}
Finally, the GUI group is ended as the case breaks out:
GUI.EndGroup ();
break;
A LoadLevel() function uses Application.LoadLevel to load in a new scene:
void LoadLevel(string whichLevel)
{
Application.LoadLevel(whichLevel);
}
The functions GoMainMenu(), ShowOptionsMenu(), ShowAudioOptionsMenu(), and ShowGraphicsOptionsMenu() set the value of the variable whichMenu so that the case statement from the main OnGUI function will render the required menu:
void GoMainMenu()
{
whichMenu=0;
}
void ShowOptionsMenu()
{
whichMenu=1;
}
void ShowAudioOptionsMenu()
{
whichMenu=3;
}
void ShowGraphicsOptionsMenu()
{
whichMenu=4;
}
PlayerPrefs is used for saving out data we will need later on. In SaveOptionsPrefs(), the values for sound volume, music volume, and graphics detail level are saved to disk. You may have noticed some of these PlayerPrefs names from earlier chapters of this book, where they were used to set volume levels and graphics settings:
void SaveOptionsPrefs()
{
PlayerPrefs.SetFloat(gamePrefsName+"_SFXVol", audioSFXSliderValue);
PlayerPrefs.SetFloat(gamePrefsName+"_MusicVol", audioMusicSliderValue);
PlayerPrefs.SetFloat(gamePrefsName+"_GraphicsDetail", graphicsSliderValue);
// set the quality setting
QualitySettings.SetQualityLevel((int)graphicsSliderValue, true);
}
PlayerPrefs is used to save our settings to disk. The example games in this book use an optional string variable called gamePrefsName to attach a prefix to the PlayerPrefs key names so that our preferences will be saved individually for each game. This is completely optional—Unity saves preferences on a per-game basis, so your preferences will never be shared across projects. In this case, as all of the game examples in this book are saved into a single Unity project, the prefix ensures that each game will save its settings individually despite them all being lumped into the same project preferences file.
QualitySettings.SetQualityLevel is used to set Unity’s quality level. SetQualityLevel takes an integer index number with its second parameter being a Boolean value to set whether or not expensive changes should be applied. These are settings that may cause the game to stall. It may not always be a good idea to cause stalling (e.g., where SetQualityLevel is used for real-time dynamic quality switching based on frame rate), but in this case, it will have no noticeable impact for the player, so we can go ahead and apply all settings here.
10.2 In-Game User Interface
![]()
The user interface used for the games in this book is extremely basic but entirely functional. Each script derives from a class called BaseUIDataManager, which declares several common variables and provides some basic functions to deal with them. Those are
|
player_score |
The player’s score |
|
player_lives |
The amount of health or lives that the player has |
|
player_highscore |
The highest score achieved in the game so far |
|
gamePrefsName |
A string to prefix all PlayerPrefs references (see the earlier section in this chapter for a more in-depth discussion on how PlayerPrefs is used) |
The BaseUIDataManager.cs script looks like this:
using UnityEngine;
using System.Collections;
public class BaseUIDataManager : MonoBehavior
{
// the actual UI drawing is done by a script deriving from this one
public int player_score;
public int player_lives;
public int player_highscore;
public string gamePrefsName= "DefaultGame"; // DO NOT FORGET TO SET // THIS IN THE EDITOR!!
public void UpdateScoreP1(int aScore)
{
player_score=aScore;
if(player_score>player_highscore)
player_highscore = player_score;
}
public void UpdateLivesP1(int alifeNum)
{
player_lives = alifeNum;
}
public void UpdateScore(int aScore)
{
player_score = aScore;
}
public void UpdateLives(int alifeNum)
{
player_lives = alifeNum;
}
public void LoadHighScore()
{
// grab high score from prefs
if(PlayerPrefs.HasKey(gamePrefsName+"_highScore"))
{
player_highscore = PlayerPrefs.GetInt (gamePrefsName+"_highScore");
}
}
public void SaveHighScore()
{
// as we know that the game is over, let’s save out the high // score too
PlayerPrefs.SetInt (gamePrefsName+"_highScore", player_highscore);
}
}
For an example of an in-game user interface script using this system, look at the next chapter or any of the other example games for a full breakdown.