
Chapter 4
Recipes: Common Components
4.1 Introduction
![]()
Many of the scripts in this book are in some way linked to the base framework or parts of larger systems, but there are some that we will use that could fit into a whole number of positions in a whole number of different game types. Utility scripts or commonly used systems are also going to come in really handy for the game projects. This chapter is all about those, an eclectic bunch of reusable scripts such as timers or utilities.
In the example source files, the COMMON folder can be found within the Scripts folder. This is where we store all of the scripts that may crop up now and again that are not part of the base framework. Within the COMMON folder, there are a number of subfolders. Those are
BOTS OR PLAYER CONTROL
Contains scripts related to player or automatic control, such as a script to talk to the BaseAIController.cs script and act as a simple, functional bot moving around in a game environment.
CAMERA
Scripts related to the camera should go in here, such as third-person or top-down camera code.
GAME CONTROL
The scripts in this folder are about overall game state control. In the example files, you will find
BattleController and GlobalBattleManager—This script is used for deathmatch-style scoring and game state logic.
RaceController and GlobalRaceManager—This script contains the base logic for racing games, such as lap counting and position tracking.
SceneManager—This script deals with the loading of scenes as well as with incremental game scene management (as used in the Interstellar Paranoids example game of this book).
INPUT
Different player and game types require different control systems or input methods. Any common scripts dealing with input go in this folder.
SPAWNING
Scripts related to spawning may be found here, which includes code to spawn objects when triggers are fired or to spawn paths for dynamic waypoint following objects.
UTILITY
The Utility folder is home to small helper scripts, such as the timer class or a script to automatically spin a gameObject.
WEAPONS
Any weapons-related scripts outside of the base framework may be found here.
The scripts in this chapter will be used in various places later on in the example games parts of this book.
This chapter will look in detail at the following:
- 4.2 The timer class
- 4.3 Scripts used for spawning
- 4.4 A script to set gravity
- 4.5 A script that simulates friction
- 4.6 Cameras
- 4.7 Input scripts
- 4.8 Automatic gameObject self-destructor
- 4.9 Object spinner
- 4.10 Scene manager
4.2 The Timer Class
![]()
Our timer system will be named TimerClass.cs and the full script looks like this:
public class TimerClass
{
public bool isTimerRunning= false;
private float timeElapsed= 0.0f;
private float currentTime= 0.0f;
private float lastTime= 0.0f;
private float timeScaleFactor= 1.1f; // <-- If you need to scale // time, change this!
private string timeString;
private string hour;
private string minutes;
private string seconds;
private string mills;
private int aHour;
private int aMinute;
private int aSecond;
private int aMillis;
private int tmp;
private int aTime;
private GameObject callback;
public void UpdateTimer ()
{
// calculate the time elapsed since the last Update()
timeElapsed=Mathf.Abs(Time.realtimeSinceStartup-lastTime);
// if the timer is running, we add the time elapsed to the // current time (advancing the timer)
if(isTimerRunning)
{
currentTime+=timeElapsed*timeScaleFactor;
}
// store the current time so that we can use it on the next // update
lastTime=Time.realtimeSinceStartup;
}
public void StartTimer ()
{
// set up initial variables to start the timer
isTimerRunning=true;
lastTime=Time.realtimeSinceStartup;
}
public void StopTimer ()
{
// stop the timer
isTimerRunning=false;
}
public void ResetTimer ()
{
// resetTimer will set the timer back to zero
timeElapsed=0.0f;
currentTime=0.0f;
lastTime=Time.realtimeSinceStartup;
}
public string GetFormattedTime ()
{
// carry out an update to the timer so it is 'up to date'
UpdateTimer();
// grab minutes
aMinute=(int)currentTime/60;
aMinute=aMinute%60;
// grab seconds
aSecond=(int)currentTime%60;
// grab milliseconds
aMillis=(int)(currentTime*100)%100;
// format strings for individual mm/ss/mills
tmp=(int)aSecond;
seconds=tmp.ToString();
if(seconds.Length<2)
seconds="0"+seconds;
tmp=(int)aMinute;
minutes=tmp.ToString();
if(minutes.Length<2)
minutes="0"+minutes;
tmp=(int)aMillis;
mills=tmp.ToString();
if(mills.Length<2)
mills="0"+mills;
// pull together a formatted string to return
timeString=minutes+":"+seconds+":"+mills;
return timeString;
}
public int GetTime ()
{
// remember to call UpdateTimer() before trying to use this
// function, otherwise the time value will not be up to date
return (int)(currentTime);
}
}
4.2.1 Script Breakdown
In this script, we will only update time whenever the time is requested. Although there may be cases where the timer would need to be updated constantly, in the projects for this book we only need to do it on demand. So, after the variable declarations, the TimerClass.cs script begins with an update function called UpdateTimer(). Note that if you wanted the timer to update constantly, you would derive the class from MonoBehavior (instead of from ScriptableObject as it currently does) and add a call to UpdateTimer in your main Update function.
The timer works by having a variable called currentTime that stores the amount of time elapsed since the timer started. currentTime starts at zero, then UpdateTimer() calculates how much time goes by between updates and adds it to currentTime. The value of currentTime is then parsed into minutes, seconds, and milliseconds, and returned as a nice, tidy formatted string in the GetFormattedTime() function of the same class.
UpdateTimer() will be the only function that updates the timer’s time system:
public void UpdateTimer ()
{
// calculate the time elapsed since the last Update()
timeElapsed=Mathf.Abs(Time.realtimeSinceStartup-lastTime);
A variable called timeElapsed tracks how much time has gone by between updates. Time.realtimeSinceStartup is used for good reason. By using realtimeSinceStartup, the game can do whatever it likes to the Time.timeScale value (speeding up or slowing down Unity physics updates), and realtimeSinceStartup will still provide usable values. If Time.time were used, it would be affected by the timeScale and would fail to provide real-time values if its value were set to anything other than 1.
// if the timer is running, we add the time elapsed to the // current time (advancing the timer)
if(isTimerRunning)
{
currentTime+=timeElapsed*timeScaleFactor;
}
// store the current time so that we can use it on the next // update
lastTime=Time.realtimeSinceStartup;
}
The rest of the function checks to see whether isTimerRunning is true before updating currentTime. isTimerRunning is a Boolean that we can use to start or stop the timer without affecting anything else.
Note that one commonly used method of pausing Unity games is to set Time.timeScale to 0, which would stop a timer that didn’t use Time.realtimeSinceStartup. In this case, we will be unaffected by timescale, so this alternative system will need to be used to start and stop the timer during a game pause.
The final part of the UpdateTimer() function grabs the current Time.realtimeSinceStartup and stores it in the variable lastTime, so that we can use its value to calculate the time elapsed between this and the next call to UpdateTimer.
A StartTimer() function is used to start the timer:
public void StartTimer ()
{
// set up initial variables to start the timer
isTimerRunning=true;
lastTime=Time.realtimeSinceStartup;
}
isTimerRunning tells us whether or not to update currentTime in the UpdateTimer() function shown earlier. When the timer starts, we need to ensure that its value is true.
lastTime needs to be reset when we start the timer so that time will not be counted that occurred ‘in between’ the timer being stopped and the timer starting up again.
public void StopTimer ()
{
// stop the timer
isTimerRunning=false;
}
isTimerRunning is set to false, which stops UpdateTimer() from adding any extra time to the currentTime variable.
If there is ever a need to reset the timer, we need to refresh some of the main variables to their default states. In the ResetTimer() function, timeElapsed, lastTime, and currentTime are reset:
public void ResetTimer ()
{
// resetTimer will set the timer back to zero
timeElapsed=0.0f;
currentTime=0.0f;
lastTime=Time.realtimeSinceStartup;
}
We reset lastTime to the current time taken from Time.realtimeSinceStartup, which effectively removes the time counted between now and the last update and starts counting from now instead. Finally, we make a quick call to UpdateTimer() to start the timer process again.
Whenever we need to display the time on the screen, it is most likely that we will need it to be formatted in an established format such as minutes:seconds:milliseconds. To do this, a little work is required to calculate the required units from our currentTime variable, as currentTime is simply a float value containing a number that bears no resemblance to what we need. Time.realtimeSinceStartup returns time as reported by a system timer in seconds. The GetFormattedTime function takes this value and breaks it up into the units we need, then puts together a nicely formatted string and returns it.
public string GetFormattedTime ()
{
// carry out an update to the timer so it is 'up to date'
UpdateTimer();
Note that when GetFormattedTime() is called, we first make an UpdateTimer call to update the currentTime value. As mentioned earlier, the timer does not update itself—it is a lazy updater in that it only updates when we ask it to do something. In this case, we ask it for a formatted time string.
From there on, we are simply doing the math to get the minutes, seconds and milliseconds values from currentTime:
// grab minutes
aMinute=(int)currentTime/60;
aMinute=aMinute%60;
// grab seconds
aSecond=(int)currentTime%60;
// grab milliseconds
aMillis=(int)(currentTime*100)%100;
After minutes, seconds, and milliseconds values have been calculated and stored into the integer variables aMinute, aSecond, and aMillis, three new strings called seconds, minutes, and mills are built from them:
// format strings for individual mm/ss/mills
tmp=(int)aSecond;
seconds=tmp.ToString();
if(seconds.Length<2)
seconds="0"+seconds;
tmp=(int)aMinute;
minutes=tmp.ToString();
if(minutes.Length<2)
minutes="0"+minutes;
tmp=(int)aHour;
hour=tmp.ToString();
if(hour.Length<2)
hour="0"+hour;
tmp=(int)aMillis;
mills=tmp.ToString();
if(mills.Length<2)
mills="0"+mills;
The function uses the .Length of each string to discover whether or not an extra ‘0’ should be prefixed to the time value. This is purely for aesthetics, making the time strings consistently have two numbers even when its value is less than 10.
The final string is composed of a colon separator between each time value and then returned like this:
// pull together a formatted string to return
timeString=minutes+":"+seconds+":"+mills;
return timeString;
}
At the very end of TimerClass.cs, a GetTime() function provides a way for other scripts to process the value of currentTime:
public int GetTime ()
{
// remember to call UpdateTimer() before trying to use this // function, otherwise the time value will not be up to date
return (int)(currentTime);
}
An example of how GetTime() may be used can be found in the Tank Battle game source code provided with this book (http://www.crcpress.com/product/isbn/9781466581401), where a game controller script takes the return value from a timer’s GetTime() function and checks it to see whether the game has been running long enough to end.
4.3 Spawn Scripts
![]()
In many cases, using Unity’s built-in Instantiate function would be enough for creating objects for a desktop computer-based game, but instantiating gameObjects in Unity can be an expensive process, particularly noticeable on mobile devices. One common method of getting around the processor hit is to use pooling. Pooling is where you have a group of objects that you use and reuse without destroying them. Instead, pooled objects are hidden rather than entirely removed from memory. With this method, the memory is already allocated and the objects already exist but you are enabling and disabling them rather than having the performance hit of creating new ones and deleting unused ones.
Building a pool management system is beyond the scope of this book, although centralizing the spawning system will make it easy to switch out spawning for a better solution in the future. There are a couple of pool managers available to buy from the Unity Asset Store, or you may want to take a look at some free code to handle pooling from an awesome website called Unity Patterns (http://unitypatterns.com/new-tool-objectpool/).
4.3.1 A Simple Spawn Controller
The reason we use a spawn controller is so that we can track what has been added to the game world, if required, or switch out the spawning system for something more robust (such as a third-party library from the Unity Asset Store like PoolManager).
The spawn controller we will build in this chapter will have a few extra functions that may be useful to game development such as SetUpPlayers, which is a function that takes a list of prefabs to instantiate, a list of start positions, start rotations, and the total number of players. The function will instantiate all of the players at the correct positions and rotations:
public void SetUpPlayers (GameObject[] playerPrefabs, Vector3[] playerStartPositions, Quaternion[] playerStartRotations, Transform theParentObj, int totalPlayers)
An array of player prefabs can easily be set up and passed into the spawn controller to instantiate, letting the spawn controller take care of building them rather than having to write instantiation functions for each game. For example, the racing game example Motor Vehicle Doom will have an array of vehicles that may be set up in the Inspector window of the Unity editor. This array gets passed to the spawn controller and instantiated. By dealing with players in this way, we can easily switch out player types between levels or even build the list dynamically if required.
Below is the SpawnController.cs script:
using UnityEngine;
using System.Collections;
public class SpawnController : ScriptableObject
{
private ArrayList playerTransforms;
private ArrayList playerGameObjects;
private Transform tempTrans;
private GameObject tempGO;
private GameObject[] playerPrefabList;
private Vector3[] startPositions;
private Quaternion[] startRotations;
// singleton structure based on AngryAnt’s fantastic wiki entry // over at http://wiki.unity3d.com/index.php/Singleton
private static SpawnController instance;
public SpawnController ()
{
// this function will be called whenever an instance of the // SpawnController class is made
// first, we check that an instance does not already exist // (this is a singleton, after all!)
if (instance != null)
{
// drop out if instance exists, to avoid generating // duplicates
Debug.LogWarning("Tried to generate more than one instance of singleton SpawnController.");
return;
}
// as no instance already exists, we can safely set instance // to this one
instance = this;
}
public static SpawnController Instance
{
// to every other script, this getter setter is the way they // get access to the singleton instance of this script
get
{
// the other script is trying to access an instance // of this script, so we need to see if an instance // already exists
if (instance == null)
{
// no instance exists yet, so we go ahead and // create one
ScriptableObject.CreateInstance<SpawnController>(); // new SpawnController ();
}
// now we pass the reference to this instance back // to the other script so it can communicate with it
return instance;
}
}
public void Restart ()
{
playerTransforms=new ArrayList();
playerGameObjects=new ArrayList();
}
public void SetUpPlayers (GameObject[] playerPrefabs, Vector3[] playerStartPositions, Quaternion[] playerStartRotations, Transform theParentObj, int totalPlayers)
{
// we pass in everything needed to spawn players and take // care of spawning players in this class so that we don't
// have to replicate this code in every game controller
playerPrefabList= playerPrefabs;
startPositions= playerStartPositions;
startRotations= playerStartRotations;
// call the function to take care of spawning all the // players and putting them in the right places
CreatePlayers(theParentObj, totalPlayers);
}
public void CreatePlayers (Transform theParent, int totalPlayers)
{
playerTransforms=new ArrayList();
playerGameObjects=new ArrayList();
for(int i=0; i<totalPlayers;i++)
{
// spawn a player
tempTrans= Spawn (playerPrefabList[i], startPositions[i], startRotations[i]);
// if we have passed in an object to parent the // players to, set the parent
if(theParent!=null)
{
tempTrans.parent= theParent;
// as we are parented, let's set the local // position
tempTrans.localPosition= startPositions[i];
}
// add this transform into our list of player // transforms
playerTransforms.Add(tempTrans);
// add its gameobject into our list of player // gameobjects (we cache them separately)
playerGameObjects.Add (tempTrans.gameObject);
}
}
public GameObject GetPlayerGO (int indexNum)
{
return (GameObject)playerGameObjects[indexNum];
}
public Transform GetPlayerTransform (int indexNum)
{
return (Transform)playerTransforms[indexNum];
}
public Transform Spawn(GameObject anObject, Vector3 aPosition, Quaternion aRotation)
{
// instantiate the object
tempGO=(GameObject)Instantiate(anObject, aPosition, aRotation);
tempTrans= tempGO.transform;
// return the object to whatever was calling
return tempTrans;
}
// here we just provide a convenient function to return the spawned // objects gameobject rather than its transform
public GameObject SpawnGO(GameObject anObject, Vector3 aPosition, Quaternion aRotation)
{
// instantiate the object
tempGO=(GameObject)Instantiate(anObject, aPosition, aRotation);
tempTrans= tempGO.transform;
// return the object to whatever was calling
return tempGO;
}
public ArrayList GetAllSpawnedPlayers()
{
return playerTransforms;
}
}
4.3.1.1 Script Breakdown
The SpawnController class derives from ScriptableObject:
public class SpawnController : ScriptableObject
{
After the variable declarations, SpawnController.cs sets up as a singleton. As it says in the comments, this code is based on the work of AngryAnt (published on the Unity wiki site http://wiki.unity3d.com/index.php?title=Singleton). Recall that the singleton pattern was discussed earlier in Chapter 2. If you missed it, this just takes care of only ever having one instance of the script in existence at any time so that we always use the same instance regardless of where or how it is accessed by other scripts.
private static SpawnController instance;
public SpawnController ()
{
// this function will be called whenever an instance of the // SpawnController class is made
// first, we check that an instance does not already exist // (this is a singleton, after all!)
if (instance != null)
{
// drop out if instance exists, to avoid generating // duplicates
Debug.LogWarning("Tried to generate more than one instance of singleton SpawnController.");
return;
}
// as no instance already exists, we can safely set instance // to this one
instance = this;
}
public static SpawnController Instance
{
// to every other script, this getter setter is the way they // get access to the singleton instance of this script
get
{
// the other script is trying to access an instance // of this script, so we need to see if an instance // already exists
if (instance == null)
{
// no instance exists yet, so we go ahead and // create one
ScriptableObject.CreateInstance<SpawnController>(); // new SpawnController ();
}
// now we pass the reference to this instance back // to the other script so it can communicate with it
return instance;
}
}
}
After the setup functions, the script moves on to a simple Restart() function that clears out all of the ArrayLists used later on by the script.
public void Restart ()
{
playerTransforms=new ArrayList();
playerGameObjects=new ArrayList();
objectList=new ArrayList();
}
The SetUpPlayers function is a very specific function designed for a specific purpose. That is, it functions to pass in information about the players in the game represented by a series of arrays and an integer to say how many players are in the game in total. This information is not used immediately and will be used later on in the script by the CreatePlayers() function.
public void SetUpPlayers (GameObject[] playerPrefabs, Vector3[] playerStartPositions, Quaternion[] playerStartRotations, Transform theParentObj, int totalPlayers)
{
// we pass in everything needed to spawn players and take // care of spawning players in this class so that we don't
// have to replicate this code in every game controller
playerPrefabList= playerPrefabs;
startPositions= playerStartPositions;
startRotations= playerStartRotations;
// call the function to take care of spawning all the // players and putting them in the right places
CreatePlayers(theParentObj, totalPlayers);
}
CreatePlayers() takes all of the information passed into the SetUpPlayers() function and deals with the actual instantiation of the player objects into the game scene:
public void CreatePlayers (Transform theParent, int totalPlayers)
{
playerTransforms=new ArrayList();
playerGameObjects=new ArrayList();
for(int i=0; i<totalPlayers;i++)
{
// spawn a player
tempTrans= Spawn (playerPrefabList[i], startPositions[i], startRotations[i]);
// if we have passed in an object to parent the // players to, set the parent
if(theParent!=null)
{
tempTrans.parent= theParent;
// as we are parented, let's set the local // position
tempTrans.localPosition= startPositions[i];
}
// add this transform into our list of player // transforms
playerTransforms.Add(tempTrans);
// add its gameobject into our list of player // gameobjects (we cache them separately)
playerGameObjects.Add (tempTrans.gameObject);
}
}
The GetPlayerGO(indexNum) function allows us to get back some information about the players spawned by the CreatePlayers() function. It simply grabs an entry from the playerGameObjects array and returns it, so that we can always get access to players via a simple integer index number.
public GameObject GetPlayerGO (int indexNum)
{
return (GameObject)playerGameObjects[indexNum];
}
As with GetPlayerGO(), the GetPlayerTransform() function allows us to quickly access the transform of a particular player indexed via an integer.
public Transform GetPlayerTransform (int indexNum)
{
return (Transform)playerTransforms[indexNum];
}
For incidental spawning, such as particle effects, the SpawnController.cs script provides a Spawn() method.
At this stage, you need to understand what prefabs are, and in turn, how they can be dynamically added to the scene. To quote the Unity documentation:
[Prefabs are] … a collection of predefined GameObjects & Components that are re-usable throughout your game.
They are saved into the project, available in the same way regular assets are, and may be dragged into a scene or added dynamically through code with the Instantiate keyword. Instantiate makes a clone of an object you pass in as a parameter and returns a reference to the clone.
Instantiate takes three parameters:
object An existing object (such as a prefab or gameObject) to make a copy of
position A Vector3 position for the new object
rotation A Quaternion rotation for the new object
One important consideration to keep in mind is that there is a CPU hit for object instantiation as memory is freed and allocated for it. This is much more noticeable on mobile platforms, particularly those lower performing systems such as older (3–4-year-old) devices. In situations where performance is an issue, it is advisable to use an object pooling system. Test early, test often, and keep an eye out for performance hits like this.
By passing in a prefab (gameObject), a 3D position vector, and a Quaternion rotation value, the Spawn function will instantiate (make an instance of) an object in the correct place with the correct rotation and return the transform of the newly instantiated object:
public Transform Spawn(GameObject anObject, Vector3 aPosition, Quaternion aRotation)
{
if(objectList==null)
objectList=new ArrayList();
// instantiate the object
tempGO=(GameObject)Instantiate(anObject, aPosition, aRotation);
tempTrans= tempGO.transform;
// store this object in our list of objects
objectList.Add(tempTrans);
// return the object to whatever was calling
return tempTrans;
}
For occasions where it is preferable to return a newly instantiated object’s gameObject rather than the transform, the SpawnGO (GO being short for GameObject) function is available. It works exactly the same as the Spawn function, but instead of returning the newly instantiated object’s transform, it returns its gameObject.
// here we just provide a convenient function to return the spawned // objects gameobject rather than its transform
public GameObject SpawnGO(GameObject anObject, Vector3 aPosition, Quaternion aRotation)
{
if(objectList==null)
objectList=new ArrayList();
// instantiate the object
tempGO=(GameObject)Instantiate(anObject, aPosition, aRotation);
tempTrans= tempGO.transform;
// store this object in our list of objects
objectList.Add(tempTrans);
// return the object to whatever was calling
return tempGO;
}
The SpawnController.cs script track every object that it has created. Each one is stored in the array (an ArrayList type variable) named objectList. To have SpawnController.cs return the whole list, the function GetAllSpawnedTransforms() is provided.
public ArrayList GetAllSpawnedTransforms()
{
return objectList;
}
}
4.3.2 Trigger Spawner
The TriggerSpawner.cs script instantiates an object when another object enters the trigger to which the script is attached. One such use for this script would be to spawn an enemy when the player reaches a particular area in a level:
public class TriggerSpawner : MonoBehavior
{
public GameObject ObjectToSpawnOnTrigger;
public Vector3 offsetPosition;
public bool onlySpawnOnce;
public int layerToCauseTriggerHit= 13; // this should be set to the // number of the camera layer
private Transform myTransform;
void Start ()
{
Vector3 tempPos=transform.position;
tempPos.y=Camera.main.transform.position.y;
transform.position=tempPos;
// cache transform
myTransform=transform;
}
void OnTriggerEnter(Collider other)
{
// make sure that the layer of the object entering our // trigger is the one to cause the boss to spawn
if(other.gameObject.layer!=layerToCauseTriggerHit)
return;
// instantiate the object to spawn on trigger enter
Instantiate(ObjectToSpawnOnTrigger,myTransform.position+offsetPosition,Quaternion.identity);
// if we are to only spawn once, destroy this gameobject // after spawn occurs
if(onlySpawnOnce)
Destroy (gameObject);
}
}
4.3.3 Path Spawner
This script fulfills quite a specific need, albeit one that may crop up frequently in game development. The path spawner makes a new object appear in the game and tells its waypoint-following code which path to follow (which waypoint controller script to use for finding waypoints).
In the example game Interstellar Paranoids from Chapter 14, it is used for the path-following enemies in each level. Waypoint paths are stored in prefabs, which may be dragged into each scene to build levels with. The Path_Spawner.cs script component is attached to the parent gameObject in the path prefabs, identifying which enemies to spawn, and then as they are spawned, telling them to use the waypoint path from the prefab.
With a path spawner system, the enemies never need to have any path names or waypoint objects hard-coded to them—it can create and guide any enemy capable of following a path.
The prefabs/objects to spawn are stored in an array called spawnObjectPrefabs. This array can be as small or large as you like—if there is more than one, use timeBetweenSpawns to schedule each object one after the other.
There are two ways this script will begin to spawn objects from the spawnObjectPrefabs list. One is to set the shouldAutoStartSpawningOnLoad variable to true, and the other is to use a trigger system based on the position of the camera. In the example game Interstellar Paranoids, the trigger system is used so that enemies do not appear until the camera (and along with it the player) are within range.
Below is the Path_Spawner.cs script in full:
public class Path_Spawner : MonoBehavior
{
public Waypoints_Controller waypointControl;
// should we start spawning based on distance from the camera?
// if distanceBased is false, we will need to call this class from // elsewhere, to spawn
public bool distanceBasedSpawnStart;
// if we're using distance based spawning, at what distance should // we start?
public float distanceFromCameraToSpawnAt = 35f;
// if the distanceBasedSpawnStart is false, we can have the path // spawner just start spawning automatically
public bool shouldAutoStartSpawningOnLoad;
public float timeBetweenSpawns=1;
public int totalAmountToSpawn=10;
public bool shouldReversePath;
public GameObject[] spawnObjectPrefabs;
private int totalSpawnObjects;
private Transform myTransform;
private GameObject tempObj;
private int spawnCounter=0;
private int currentObjectNum;
private Transform cameraTransform;
private bool spawning;
public bool shouldSetSpeed;
public float speedToSet;
public bool shouldSetSmoothing;
public float smoothingToSet;
public bool shouldSetRotateSpeed;
public float rotateToSet;
private bool didInit;
void Start ()
{
Init();
}
void Init ()
{
// cache ref to our transform
myTransform = transform;
// cache ref to the camera
Camera mainCam = Camera.main;
if(mainCam==null)
return;
cameraTransform = mainCam.transform;
// tell waypoint controller if we want to reverse the path // or not
waypointControl.SetReverseMode(shouldReversePath);
totalSpawnObjects= spawnObjectPrefabs.Length;
if(shouldAutoStartSpawningOnLoad)
StartWave(totalAmountToSpawn,timeBetweenSpawns);
}
public void OnDrawGizmosSelected()
{
Gizmos.color = new Color(0,0,1,0.5f);
Gizmos.DrawCube(transform.position,new Vector3(200,0,distanceFromCameraToSpawnAt));
}
public void Update()
{
float aDist=Mathf.Abs(myTransform.position.z-cameraTransform.position.z);
if(distanceBasedSpawnStart && !spawning && aDist<distanceFromCameraToSpawnAt)
{
StartWave(totalAmountToSpawn,timeBetweenSpawns);
spawning=true;
}
}
public void StartWave(int HowMany, float timeBetweenSpawns)
{
spawnCounter=0;
totalAmountToSpawn=HowMany;
// reset
currentObjectNum=0;
CancelInvoke("doSpawn");
InvokeRepeating("doSpawn",timeBetweenSpawns,timeBetweenSpawns);
}
void doSpawn()
{
SpawnObject();
}
public void SpawnObject()
{
if(spawnCounter>=totalAmountToSpawn)
{
// tell your script that the wave is finished here
CancelInvoke("doSpawn");
this.enabled=false;
return;
}
// create an object
tempObj=SpawnController.Instance.SpawnGO(spawnObjectPrefabs[currentObjectNum],myTransform.position,Quaternion.identity);
// tell object to reverse its pathfinding, if required
tempObj.SendMessage("SetReversePath", shouldReversePath, SendMessageOptions.DontRequireReceiver);
// tell spawned object to use this waypoint controller
tempObj.SendMessage("SetWayController",waypointControl,SendMessageOptions.DontRequireReceiver);
// tell object to use this speed (again with no required // receiver just in case)
if(shouldSetSpeed)
tempObj.SendMessage("SetSpeed",speedToSet,SendMessageOptions.DontRequireReceiver);
// tell object to use this speed (again with no required // receiver just in case)
if(shouldSetSmoothing)
tempObj.SendMessage("SetPathSmoothingRate",smoothingToSet,SendMessageOptions.DontRequireReceiver);
// tell object to use this speed (again with no required // receiver just in case)
if(shouldSetRotateSpeed)
tempObj.SendMessage("SetRotateSpeed",rotateToSet,SendMessageOptions.DontRequireReceiver);
// increase the 'how many objects we have spawned' counter
spawnCounter++;
// increase the 'which object to spawn' counter
currentObjectNum++;
// check to see if we’ve reached the end of the spawn // objects array
if(currentObjectNum> totalSpawnObjects-1)
currentObjectNum=0;
}
}
4.3.3.1 Script Breakdown
This script derives from MonoBehavior:
public class Path_Spawner : MonoBehavior
{
The Path_Spawner class assumes that you will be able to set a reference to a waypoint controller in the Unity editor Inspector window (there is currently no interface to do this through code). If no waypoint controller is referenced, the script will do nothing:
public Waypoints_Controller waypointControl;
After the rest of the variable declarations, the Start() function kicks things off with a call to Init():
void Start ()
{
Init();
}
Init() is responsible for setting up the references required to make the core of this class work. Those are the transform of the gameObject this script is attached to and the transform belonging to the main camera in the scene (found by using Unity’s Camera.main):
void Init ()
{
// cache ref to our transform
myTransform = transform;
// cache ref to the camera
Camera mainCam = Camera.main;
Camera.main finds the first camera tagged with the MainCamera tag (see the tag dropdown in the Unity editor Inspector window). If there are no cameras in the scene tagged with this, the main part of this function will not work. For that reason, when mainCam is null, it drops out of Init() early:
if(mainCam==null)
return;
The camera transform is stored in cameraTransform, which will be used to trigger spawning when distanceBasedSpawnStart is true:
cameraTransform = mainCam.transform;
This script has its own shouldReversePath Boolean variable, as well as the waypoint controller having one. This line takes the value of the Boolean variable shouldReversePath and uses it to override the existing reverse mode value held by the waypoint controller any spawned objects will use. It does this by calling waypointControl.SetReverseMode():
// tell waypoint controller if we want to reverse the path // or not
waypointControl.SetReverseMode(shouldReversePath);
To keep a total on how many objects are in the spawnObjectPrefabs array:
totalSpawnObjects= spawnObjectPrefabs.Length;
If shouldAutoStartSpawningOnLoad is set to true, the first spawning kicks off right away. The StartWave() function takes two parameters: how many enemies it should spawn and what the time between spawns should be from here on. StartWave() will schedule future enemy spawning:
if(shouldAutoStartSpawningOnLoad)
StartWave(totalAmountToSpawn,timeBetweenSpawns);
}
The OnDrawGizmosSelected() function draws helper graphics in the Unity editor whenever this gameObject is selected:
public void OnDrawGizmosSelected()
{
Once the color has been set by Gizmos.color, everything drawn after this point will adopt the set color:
Gizmos.color = new Color(0,0,1,0.5f);
Gizmos.DrawCube() is used here to display a cube to show how close the camera will need to be in order to trigger the spawning. This is based on the value of distanceFromCameraToSpawnAt:
Gizmos.DrawCube(transform.position,new Vector3(200,0,distanceFromCameraToSpawnAt));
}
The main reason that this script derives from MonoBehavior is so that it can use the system functions such as Update(). The Update() function is called every frame:
public void Update()
{
aDist is a temporary float variable used to figure out the difference between this transform’s z position and the position of the camera. It uses the z position (and not the other axis) because of the way that the camera moves through the level. The camera progresses through the level along the world z-axis, so for the type of game this system is designed for it makes sense to use only the z-axis:
float aDist= Mathf.Abs(myTransform.position.z-cameraTransform.position.z);
If the component is set to use distanceBasedSpawnStart, there is no spawning currently happening and the distance is less than distanceFromCameraToSpawnAt, the next wave can be spawned:
if(distanceBasedSpawnStart && !spawning && aDist<distanceFromCameraToSpawnAt)
{
StartWave(totalAmountToSpawn,timeBetweenSpawns);
spawning=true;
}
}
StartWave() begins by resetting a few variables that will be used during the spawn cycle. A counter is used to track of the number of enemies spawned (spawnCounter), and the parameter named HowMany is copied into another variable, totalAmountToSpawn, to track how many this wave should contain:
public void StartWave(int HowMany, float timeBetweenSpawns)
{
spawnCounter=0;
totalAmountToSpawn=HowMany;
// reset
currentObjectNum=0;
A repeating call to the function doSpawn() will be made with Unity’s InvokeRepeating() function. InvokeRepeating will keep on calling doSpawn() until a CancelInvoke() tells it to stop or the scene is removed from memory. Before scheduling a new repeat call, this code uses CancelInvoke() to make sure that any previous call is well and truly stopped:
CancelInvoke("doSpawn");
InvokeRepeating("doSpawn",timeBetweenSpawns,timeBetweenSpawns);
}
doSpawn() is the function that is repeatedly called automatically by InvokeRepeating() calls. It calls SpawnObject() to add the enemy to the scene:
void doSpawn()
{
SpawnObject();
}
SpawnObject() checks the spawn counter first to see whether the wave has finished or not. When the variable spawnCounter is greater than totalAmountToSpawn, the repeating Invoke call needs to be cancelled by a CancelInvoke():
public void SpawnObject()
{
if(spawnCounter>=totalAmountToSpawn)
{
// tell your script that the wave is finished here
CancelInvoke("doSpawn");
When this wave has finished, this script disables itself and drops out to avoid using any unnecessary CPU cycles:
this.enabled=false;
return;
}
The object (enemy) is created by the singleton-type instance of the SpawnController. Its SpawnGO() creates the object and returns a reference to the new object’s gameObject:
// create an object
tempObj=SpawnController.Instance.SpawnGO(spawnObjectPrefabs[currentObjectNum],myTransform.position,Quaternion.identity);
// tell object to reverse its pathfinding, if required
tempObj.SendMessage('SetReversePath', shouldReversePath, SendMessageOptions.DontRequireReceiver);
The newly spawned object needs to know which waypoint controller to use. Rather than go through and try to find its control script, we use gameObject.SendMessage() to send a message and a single parameter to the object. Any script component attached to the gameObject that has a function named SetWayController() will be able to receive it. Just in case there are no scripts with this function name in, a final (optional) parameter in the SendMessage() call is SendMessageOptions.DontRequireReceiver, which stops any warnings if the message is not received:
// tell spawned object to use this waypoint controller
tempObj.SendMessage("SetWayController",waypointControl,SendMessageOptions.DontRequireReceiver);
If shouldSetSpeed is set to true, this function will attempt to set the speed of the new object based on the value of speedToSet. As with setting the waypoint controller, gameObject.SendMessage() is used to tell the object about the speed rather than having to find a specific script and call a function on it:
// tell object to use this speed (again with no required // receiver just in case)
if(shouldSetSpeed)
tempObj.SendMessage("SetSpeed",speedToSet,SendMessageOptions.DontRequireReceiver);
When shouldSetSmoothing is true, gameObject.SendMessage() is used to send a smoothing rate to a function named SetPathSmoothingRate. This will affect how quickly the objects/enemies turn on the path:
// tell object to use this speed (again with no required // receiver just in case)
if(shouldSetSmoothing)
tempObj.SendMessage("SetPathSmoothingRate",smoothingToSet,SendMessageOptions.DontRequireReceiver);
If shouldSetRotateSpeed is true, gameObject.SendMessage() attempts to send the rotate speed value (from the variable rotateToSet) to a function called SetRotateSpeed():
// tell object to use this speed (again with no required // receiver just in case)
if(shouldSetRotateSpeed)
tempObj.SendMessage("SetRotateSpeed",rotateToSet,SendMessageOptions.DontRequireReceiver);
Now that spawning and setup have finished, we increase the spawnCounter and currentObjectNum counters:
// increase the 'how many objects we have spawned' counter
spawnCounter++;
// increase the 'which object to spawn' counter
currentObjectNum++;
The variable currentObjectNum is used to point which object to spawn next in the array of objects to be spawned. When it reaches the value of totalSpawnObjects−1, that’s the top end of the array and it needs to be reset back to zero:
// check to see if we’ve reached the end of the spawn // objects array
if(currentObjectNum> totalSpawnObjects-1)
currentObjectNum=0;
}
}
4.4 Set Gravity
![]()
Changing gravity is often frowned upon by developers because doing so changes the way objects behave in the physics simulation. It is highly recommended that your game physics values, game world scale, and speeds are as close to real-life numbers as possible. Making a game with an environment scaled too high or too low can cause problems with the collisions system as well as make your coordinate system difficult to manage. Altering gravity to extremely high values may cause objects to behave strangely or even push down through collision meshes. Dealing with strange physics values needs to be handled with a little care and awareness of “entering the twilight zone” in physics behavior terms.
The reality is that having realistic gravity with realistically scaled 3D models and realistic physics behavior may not always be either possible or, in fact, necessary. Perhaps the effect you are going for is something outside of realistic, in which case it may become necessary to modify physics values such as gravity. Games based on another planet would likely be the most obvious use for changing these values. In the example games in this book, when gravity is altered it is purely on a personal preference of how I like game physics to feel.
The SetGravity.cs script sets gravity once in the Start() function and disables itself to save any unnecessary overhead. Its logic is extremely simple, being a single call to set Physics.gravity to a 3D vector and then disabling itself by setting this.enabled to false. The variable this is simply a reference to itself, a way of telling the script to refer to itself:
public class SetGravity : MonoBehavior {
public Vector3 gravityValue = new Vector3(0,-12.81f,0);
void Start () {
Physics.gravity=gravityValue;
this.enabled=false;
}
}
4.5 Pretend Friction—Friction Simulation to Prevent Slipping Around
![]()
The easiest way to move objects around in Unity is to simply apply forces to your rigidbodies. By using Rigidbody.AddForce and perhaps a multiplier based on Input.GetAxis or something similar, it is quite easy to get objects moving around, but the only way to have them come to a stop is either to have them make friction against something else in the game world or to change drag values on the rigidbody. This may not always be an ideal solution and can present challenges when trying to control the turning behavior of objects floating in space or perhaps even character controllers.
To help out with controlling sideways slip, this simple PretendFriction.cs script can help:
using UnityEngine;
using System.Collections;
public class PretendFriction : MonoBehavior
{
private Rigidbody myBody;
private Transform myTransform;
private float myMass;
private float slideSpeed;
private Vector3 velo;
private Vector3 flatVelo;
private Vector3 myRight;
private Vector3 TEMPvec3;
public float theGrip=100f;
void Start ()
{
// cache some references to our rigidbody, mass and // transform
myBody=rigidbody;
myMass=myBody.mass;
myTransform=transform;
}
void FixedUpdate ()
{
// grab the values we need to calculate grip
myRight=myTransform.right;
// calculate flat velocity
velo=myBody.velocity;
flatVelo.x=velo.x;
flatVelo.y=0;
flatVelo.z=velo.z;
// calculate how much we are sliding
slideSpeed=Vector3.Dot(myRight,flatVelo);
// build a new vector to compensate for the sliding
TEMPvec3= myRight * (-slideSpeed * myMass * theGrip);
// apply the correctional force to the rigidbody
myBody.AddForce(TEMPvec3 * Time.deltaTime);
}
}
4.5.1 Script Breakdown
The script derives from MonoBehavior to tap into the Start() and FixedUpdate() system calls:
public class PretendFriction : MonoBehavior
{
The Start() function caches the rigidbody, the amount of mass on the rigidbody and the transform:
void Start ()
{
// cache some references to our rigidbody, mass and // transform
myBody=rigidbody;
myMass=myBody.mass;
myTransform=transform;
}
The FixedUpdate() function will calculate how much an object is sliding—to do this, it finds how much sideways movement the object is making (to the right relative to the transform’s rotation)—to find out how much slip is happening:
void FixedUpdate ()
{
// grab the values we need to calculate grip
myRight=myTransform.right;
// calculate flat velocity
velo=myBody.velocity;
flatVelo.x=velo.x;
flatVelo.y=0;
flatVelo.z=velo.z;
// calculate how much we are sliding
slideSpeed=Vector3.Dot(myRight,flatVelo);
// build a new vector to compensate for the sliding
TEMPvec3= myRight * (-slideSpeed * myMass * theGrip);
// apply the correctional force to the rigidbody
myBody.AddForce(TEMPvec3 * Time.deltaTime);
}
}
4.6 Cameras
![]()
There are just two camera scripts for the example games in this book. Those are a third-person camera (a camera that sits behind and orbits around the player) and a top-down camera (a camera that sits up above the player, looking down). They use a similar interface for other scripts to be able to communicate with them, and both cameras should provide a good starting point for camera systems in your own games.
4.6.1 Third-Person Camera
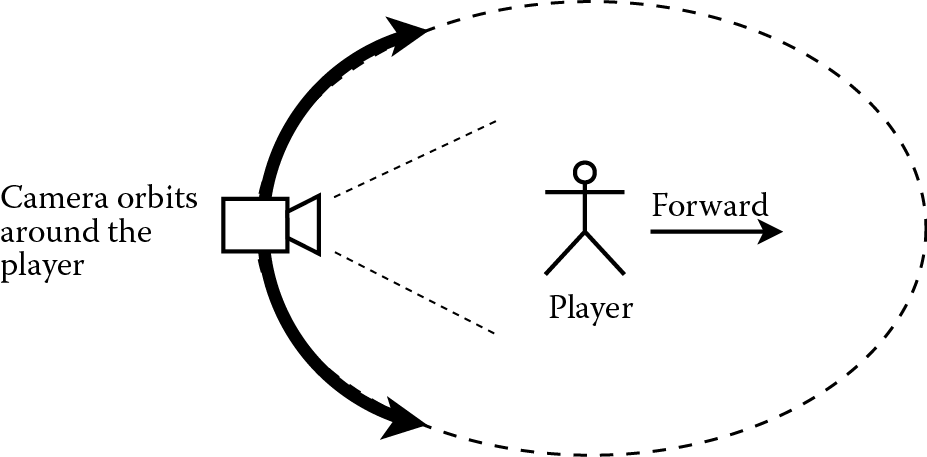
A third-person camera sits behind the player. It is not quite the same as a follow camera; a third-person camera usually orbits around the player rather than simply following it around. To visualize this, imagine that the camera is tied to a pole attached to the target player. As the player moves around, the camera remains to be the length of the pole away from it but the camera is free to move around the player in a circle (see Figure 4.1).
The position of the camera is usually somewhere behind the player, with a little damping on its horizontal movement applied to it, to allow for a good sense of movement when the player turns. In some third-person camera setups, the camera may be allowed to move in or out from the target player some. In some setups, the camera may also be offset from the player a little (e.g., in the Microsoft Studios game Gears of War, the camera is positioned over the right shoulder of the player rather than directly behind).
Below is the Camera_Third_Person.cs script:
public class Camera_Third_Person : BaseCameraController
{
public Transform myTransform;
public Transform target;
public float distance = 20.0f;
public float height = 5.0f;
public float heightDamping = 2.0f;
public float lookAtHeight = 0.0f;
public float rotationSnapTime = 0.3F;
public float distanceSnapTime;
public Vector3 lookAtAdjustVector;
private float usedDistance;
float wantedRotationAngle;
float wantedHeight;
float currentRotationAngle;
float currentHeight;
Quaternion currentRotation;
Vector3 wantedPosition;
private float yVelocity = 0.0F;
private float zVelocity = 0.0F;
public override void SetTarget(Transform aTarget)
{
target= aTarget;
}
void LateUpdate ()
{
if (target == null)
return;
if (myTransform==null)
{
myTransform=Transform;
}
wantedHeight = target.position.y + height;
currentHeight = myTransform.position.y;
wantedRotationAngle = target.eulerAngles.y;
currentRotationAngle = myTransform.eulerAngles.y;
currentRotationAngle = Mathf.SmoothDampAngle(currentRotationAngle, wantedRotationAngle, ref yVelocity, rotationSnapTime);
currentHeight = Mathf.Lerp(currentHeight, wantedHeight, heightDamping * Time.deltaTime);
wantedPosition = target.position;
wantedPosition.y = currentHeight;
usedDistance = Mathf.SmoothDampAngle(usedDistance, distance, ref zVelocity, distanceSnapTime);
wantedPosition += Quaternion.Euler(0, currentRotationAngle, 0) * new Vector3(0, 0, -usedDistance);
myTransform.position = wantedPosition;
myTransform.LookAt(target.position + lookAtAdjustVector);
}
}
4.6.1.1 Script Breakdown
All camera scripts used with the framework should implement a SetTarget function. SetTarget takes a single parameter of type Transform to put into the variable named target:
public override void SetTarget(Transform aTarget)
{
target= aTarget;
}
It may come as a surprise that the main update to the camera happens within LateUpdate() and not within the Update or FixedUpdate function. The reason for this is that we prefer everything physics-wise to have been updated before moving the camera—which should have happened by LateUpdate()—and in doing so, there should be no discrepancies between the positions of our target objects between the end of the camera update and the drawing of the next frame. Drawing at the wrong time could cause a jittering effect as the objects we are following are updated after the camera positioning.
At the start of LateUpdate(), there are the usual null checks to make sure that we have both a target and a cached version of the camera’s transform:
void LateUpdate ()
{
if (target == null)
return;
if (myTransform==null)
{
myTransform=Transform;
}
The script interpolates heights and rotation values. Before the interpolation can happen, we need to find out what the target height and rotations are as well as what the current height and rotations are. The wantedHeight variable is a float. We add the value of the public variable height to it, allowing target height adjustment to happen by setting it in the editor:
wantedHeight = target.position.y + height;
currentHeight = myTransform.position.y;
wantedRotationAngle = target.eulerAngles.y;
currentRotationAngle = myTransform.eulerAngles.y;
currentRotationAngle is a float representing the angle, in degrees, that we need to turn the camera at to try to reach the target rotation in wantedRotationAngle. It’s an interpolation carried out by Mathf.SmoothDampAngle.
Mathf.SmoothDampAngle is an interpolation function designed specifically for easing between two angles. It will automatically cap the return value between 0 and 360 as well as choose the correct way around (if your value is at 181°, it would interpolate up rather than down so that the rotation has a natural flow and doesn’t go back on itself).
The Unity documentation tells us that SmoothDampAngle takes the following parameters (in order of how they should be passed in):
current The current position.
target The position we are trying to reach.
currentVelocity The current velocity; this value is modified by the function every time you call it.
smoothTime Approximately the time it will take to reach the target. A smaller value will reach the target faster.
maxSpeed Optionally allows you to clamp the maximum speed.
deltaTime The time since the last call to this function. By default Time.deltaTime.
In this part of the code, the yVelocity variable holds the current velocity of the interpolated move, but it is not actually used anywhere else in the script. It’s a required field for SmoothDampAngle, so we just provide it for the function to work right and forget about it. Note that one possible use for getting the velocity may be speed limiting the move, but SmoothDampAngle can actually take care of this with no extra code by providing a maxSpeed parameter. This is useful for limiting interpolation speeds without having to do it yourself with velocity.
The currentRotationAngle is, in effect, the rotation amount required around the y-axis (hence using the name yVelocity to describe its speed). The variable rotationSnapTime decides how much time it should take for the rotation to happen, which is public and designed to be set in the Unity editor Inspector window on whichever gameObject the script is attached to:
currentRotationAngle = Mathf.SmoothDampAngle(currentRotationAngle, wantedRotationAngle, ref yVelocity, rotationSnapTime);
The height movement is interpolated using Mathf.Lerp, which takes three parameters: the start amount, the target amount, and a time value clamped between 0 and 1.
We use the float heightDamping, multiplied by Time.deltaTime, to make the transition time based. Are you wondering why do we need to make the time parameter time based? Good question! How the time parameter of Mathf.Lerp works has been a very popular question on various forums and help pages. The time value represents how much of a portion, of the difference between two values, that should be applied each time this line of code is executed. If the time value is 0, the return value will be the start amount. If time is 1, the return value will be the target amount.
By calculating the portion with Time.deltaTime, the transition from start value to target value is smoothed out over a repeatable, fixed amount of time rather than it being frame-rate dependent and based on how many times the Mathf.Lerp calculation line is called:
currentHeight = Mathf.Lerp(currentHeight, wantedHeight, heightDamping * Time.deltaTime);
Now that the script has calculated how much to rotate the camera and how high it should be on the y-axis, the script goes on to calculate where the camera is going to go position-wise.
wantedPosition is a Vector3 variable that will hold the target position. The first target position is the target transform’s position and an adjustment for height using the currentHeight variable calculated above:
wantedPosition = target.position;
wantedPosition.y = currentHeight;
The next part of the code calculates how far behind the player we need to move the camera. For this, the script uses Mathf.SmoothDampAngle. zVelocity represents the speed of movement of the camera along its z-axis, but again it is purely a formality to use with SmoothDampAngle and does not get used anywhere else in the script:
usedDistance = Mathf.SmoothDampAngle(usedDistance, distance, ref zVelocity, distanceSnapTime);
To place the camera at the correct position around the target using only a rotation angle, the solution lies within Quaternion.Euler. This rather frightening sounding function converts Euler angle Vector3-based rotations into a vector. That is, you pass in rotation values and you get back a direction vector instead. Multiply this by how far back we want the camera from the player, then add that to the player’s current position, and we have the correct rotation, position, and offset for the camera:
wantedPosition += Quaternion.Euler(0, currentRotationAngle, 0) * new Vector3(0, 0, -usedDistance);
myTransform.position = wantedPosition;
The final part of the function causes the camera to look at the target (player). It does this by using Unity’s built-in transform.LookAt() function. We pass in the position of the target object (as a Vector3) and add an extra offset to where the camera is going to look, via the lookAtAdjustVector variable. Note that you can also add an up vector to the LookAt() function, but in this case we don’t need to.
Aiming the camera directly at the player from behind the player may obscure the path ahead and could make the game difficult to navigate. Instead, we add a small height adjustment to the target position, so that the camera aims above the player as if it were looking ahead, rather than right at it. With a simple target height adjustment, we can help the camera to stay parallel to the ground level and keep good visibility, making the game easier to play:
myTransform.LookAt(target.position + lookAtAdjustVector);
4.6.2 Top-Down Camera
The TopDown_Camera.cs script is a basic target-following system from a top-down perspective:
public class TopDown_Camera : MonoBehavior
{
public Transform followTarget;
public Vector3 targetOffset;
public float moveSpeed= 2f;
private Transform myTransform;
void Start ()
{
myTransform= transform;
}
public void SetTarget(Transform aTransform)
{
followTarget= aTransform;
}
void LateUpdate ()
{
if(followTarget!=null)
myTransform.position= Vector3.Lerp(myTransform.position, followTarget.position + targetOffset, moveSpeed * Time.deltaTime);
}
}
4.6.2.1 Script Breakdown
After the variable declarations, the Start() function takes care of caching a reference to the object’s transform. The next function is extremely important:
public void SetTarget(Transform aTransform)
{
followTarget= aTransform;
}
The SetTarget() function is used by all of the example games to tell the camera which object to follow during the game. The LateUpdate() function checks to make sure that we have a target before it tries to position the camera:
myTransform.position= Vector3.Lerp(myTransform.position, followTarget.position + targetOffset, moveSpeed * Time.deltaTime);
The single line controlling our camera uses the Vector3.Lerp function to interpolate the camera’s transform’s position to that of the target stored in followTarget. We add an offset to the position (so that we end up above the target rather than inside it) and use the moveSpeed multiplied by Time.deltaTime to interpolate independent of frame rate.
It is a very simple camera but one that works really well for basic top-down games.
Note that in the Lazer Blast Survival example game for this book, an empty gameObject named CamTarget is used as the camera target. It is positioned in front of the player, parented to the player, so that it inherits the player’s rotation. By positioning a target object in front of the player for use with a top-down camera like this, it can help gameplay by providing a better view ahead of the player rather than centering it on the screen.
4.7 Input Scripts
![]()
In Chapter 3, we saw that the main player structure contained a single input script designed to take keyboard input. Adding input systems is a case of building custom input scripts that follow a similar format, so that the existing player code need not be changed to accommodate different controls.
It may be required to take input from other methods than the keyboard, such as a mouse or a joystick. You can easily set up alternate controls in the Unity editor via the Edit –> Project Settings –> Input menu.
4.7.1 Mouse Input
The Mouse_Input.cs script calculates the movement of the mouse between each frame and uses it for input.
Below is the script:
public class Mouse_Input : BaseInputController
{
private Vector2 prevMousePos;
private Vector2 mouseDelta;
private float speedX = 0.05f;
private float speedY = 0.1f;
public void Start ()
{
prevMousePos= Input.mousePosition;
}
public override void CheckInput ()
{
// get input data from vertical and horizontal axis and // store them internally in vert and horz so we don't
// have to access them every time we need to relay input // data out
// calculate a percentage amount to use per pixel
float scalerX = 100f / Screen.width;
float scalerY = 100f / Screen.height;
// calculate and use deltas
float mouseDeltaY = Input.mousePosition.y - prevMousePos.y;
float mouseDeltaX = Input.mousePosition.x - prevMousePos.x;
// scale based on screen size
vert += (mouseDeltaY * speedY) * scalerY;
horz += (mouseDeltaX * speedX) * scalerX;
// store this mouse position for the next time we’re here
prevMousePos= Input.mousePosition;
// set up some Boolean values for up, down, left and right
Up = (vert>0);
Down = (vert<0);
Left = (horz<0);
Right = (horz>0);
// get fire / action buttons
Fire1= Input.GetButton("Fire1");
}
public void LateUpdate()
{
// check inputs each LateUpdate() ready for the next tick
CheckInput();
}
}
4.7.1.1 Script Breakdown
The Start() function adds a default value to prevMousePos, which will be used to calculate the movement between each update. If prevMousePos was left at zero (its default), then the first time CheckInput() happens, the script will incorrectly assume that the mouse has moved from 0,0 to the current mouse position.
Input provides an interface to Unity’s input systems. It is used for everything from gyrometer input on mobile devices to keyboard presses. Input.mousePosition delivers the current position of the mouse in pixel coordinates as a 2D vector, with the bottom left of the screen at 0,0 and the top right at Screen.width, Screen.height.
public void Start ()
{
prevMousePos= Input.mousePosition;
}
The input scripts use CheckInput() as their default main update function, which is intended to be called from the player class.
The mouse input system uses mouse delta movement (the amount of movement since the last update) instead of mouse position. The delta amount is converted into a percentage value (a percentage of the screen width or height), and the resulting percentage value is used as input.
CheckInput() starts by calculating a scale to work at. The floats scalerX and scalerY hold the equivalent of 1% of the screen’s width and height, respectively:
public override void CheckInput ()
{
// get input data from vertical and horizontal axis and // store them internally in vert and horz so we don't
// have to access them every time we need to relay input // data out
// calculate a percentage amount to use per pixel
float scalerX = 100f / Screen.width;
float scalerY = 100f / Screen.height;
The delta amount of mouse movement is calculated in the code by taking the current mouse position and subtracting it from the position that the mouse was at at the end of the last update.
// calculate and use deltas
float mouseDeltaY = Input.mousePosition.y - prevMousePos.y;
float mouseDeltaX = Input.mousePosition.x - prevMousePos.x;
When the mouse position is multiplied by the scale variables (scalerX and scalerY), we end up with a percentage amount. We say that the mouse is at a percentage amount across the screen and use that percentage amount as input:
// scale based on screen size
vert += (mouseDeltaY * speedY) * scalerY;
horz += (mouseDeltaX * speedX) * scalerX;
// store this mouse position for the next time we’re here
prevMousePos= Input.mousePosition;
The mouse-based input scripts also populate Boolean variables for directional movement, if required:
// set up some Boolean values for up, down, left and right
Up = (vert>0);
Down = (vert<0);
Left = (horz<0);
Right = (horz>0);
To make the fire button work properly, mouse button input must be set up correctly in the input settings of the Unity editor, under the Fire1 entry:
// get fire / action buttons
Fire1= Input.GetButton("Fire1");
}
The script calls its own update function from LateUpdate(), which is where Unity recommends all input checking happen:
public void LateUpdate()
{
// check inputs each LateUpdate() ready for the next tick
CheckInput();
}
}
Note that if firing does not work after applying this script, check that Unity is set up correctly to receive mouse button input as Fire1. To do this, open up Unity’s Input menu (Edit → Project Settings → Input) and check that the Axes entry for Fire1 contains an entry for mouse 0 either in the negative, positive, or alt buttons.
4.7.2 Single Axis Keyboard Input
The single axis keyboard input script takes away the vertical axis and only takes input from horizontal and fire inputs. It follows the same format as the other input scripts and the input script from Chapter 3 (Player Structure), except the vertical axis is excluded:
public class Single_Axis_Keyboard_Input: BaseInputController
{
public override void CheckInput ()
{
// get input data from vertical and horizontal axis and // store them internally in vert and horz so we don't
// have to access them every time we need to relay input // data out
horz=Input.GetAxis("Horizontal");
// set up some Boolean values for up, down, left and right
Left =(horz<0);
Right =(horz>0);
// get fire / action buttons
Fire1=Input.GetButton("Fire1");
}
public void LateUpdate()
{
// check inputs each LateUpdate() ready for the next tick
CheckInput();
}
}
4.8 Automatic Self-Destruction Script
![]()
The main use for a script that automatically destroys its gameObject will be for special effects. Particle effects such as explosions will be instantiated, their effect will play out, and then they need to be destroyed.
In the example games, a short and simple class called AutomaticDestroyObject is attached to a gameObject. After a set amount of time, set in the Unity editor Inspector window, the gameObject is destroyed along with any associated child objects attached to it.
Below is the full script:
public class AutomaticDestroyObject : MonoBehavior
{
public float timeBeforeObjectDestroys;
void Start () {
// the function destroyGO() will be called in // timeBeforeObjectDestroys seconds
Invoke("DestroyGO",timeBeforeObjectDestroys);
}
void DestroyGO () {
// destroy this gameObject
Destroy(gameObject);
}
}
4.8.1 Script Breakdown
The class, which derives from MonoBehavior, is very simple. It uses Invoke to schedule a call to the DestroyGO() function at a time set by the public variable timeBeforeObjectDestroys. It probably goes without saying that DestroyGO() takes care of destroying itself, with Destroy(gameObject).
4.9 Automatic Object Spinner
![]()
One common action you may need to do is spin an object. This may be for a number of reasons, the most obvious (in this book, at least) being to draw attention to power-ups in the Interstellar Paranoids game. By spinning the power-ups, they are more obvious to the player as something that may be interacted with, whereas static power-ups may be easily missed or ignored.
Making an object spin in Unity may be very simple, but having a script to take care of this is a useful little tool to keep in the toolkit.
Below is the script in full:
using UnityEngine;
using System.Collections;
public class AutoSpinObject : MonoBehavior
{
public Vector3 spinVector = new Vector3(1,0,0);
private Transform myTransform;
void Start ()
{
myTransform=transform;
}
void Update () {
myTransform.Rotate (spinVector*Time.deltaTime);
}
}
4.9.1 Script Breakdown
AutoSpinObject.cs derives from MonoBehavior so that it can use Unity’s automatic calls to the Start() and Update() functions:
public class AutoSpinObject : MonoBehavior
{
The function is derived from MonoBehavior so that we can update the object rotation in an Update() function.
public Vector3 spinVector = new Vector3(1,0,0);
private Transform myTransform;
The spinVector variable is a 3D vector that we will use to spin the object with. By using a vector, we can spin the object in any direction in the 3D space simply by changing the values this script component uses in the Inspector window of the Unity editor. Select the gameObject that has this script attached and change the value in the Inspector to change its behavior.
void Start ()
{
myTransform=transform;
}
As per every other script, we cache a reference to this object’s transform in the Start() function. Caching this reference will save a lot of valuable processor time throughout the game.
The Update() function simply rotates the transform, multiplying the spinVector variable by Time.deltaTime to ensure that the rotation is frame rate independent and time based:
void Update () {
myTransform.Rotate (spinVector*Time.deltaTime);
}
}
4.10 Scene Manager
![]()
The scene manager deals with loading and saving different scenes. It is intended to be used for loading different levels in a game, but also it may easily be used for loading the menu if required.
The example game Interstellar Paranoids uses it to load game levels. It is attached to an empty gameObject in the menu scene, and thanks to its call to DontDestroyOnLoad() in the Start() function, it will persist across scenes so that it is always available.
Additionally, this class provides some very basic functionality for game level management in linearly progressive games; that is, games that progress through the same levels each time.
The script is designed to use an array of scenes set in the Unity editor Inspector window. The script retrieves a scene reference from the array as required. It has an integer variable named gameLevelNum, which is used as an index for the array. To advance to the next level, gameLevelNum is incremented.
Below are the level management functions:
- GoNextLevel()—Increments gameLevelNum and loads the next scene in the array. If gameLevelNum is higher than the array length, it loops back to zero.
- ResetGame()—Resets gameLevelNum back to zero, as though the game were restarting.
Below is the script in full:
using UnityEngine;
using System.Collections;
public class SceneManager : MonoBehavior
{
public string[] levelNames;
public int gameLevelNum;
public void Start ()
{
// keep this object alive
DontDestroyOnLoad (this.gameObject);
}
public void LoadLevel(string sceneName)
{
Application.LoadLevel(sceneName);
}
public void ResetGame()
{
// reset the level index counter
gameLevelNum = 0;
}
public void GoNextLevel()
{
// if our index goes over the total number of levels in the // array, we reset it
if(gameLevelNum >= levelNames.Length)
gameLevelNum = 0;
// load the level (the array index starts at 0, but we start // counting game levels at 1 for clarity’s sake)
LoadLevel(gameLevelNum);
// increase our game level index counter
gameLevelNum++;
}
private void LoadLevel(int indexNum)
{
// load the game level
LoadLevel(levelNames[indexNum]);
}
}
4.10.1 Script Breakdown
The script derives from MonoBehavior and should be attached to an empty gameObject:
using UnityEngine;
using System.Collections;
public class SceneManager : MonoBehavior
{
The Start() function calls DontDestroyOnLoad() and passes in a reference to this instance’s gameObject. What this does is tell the game engine not to remove the gameObject from the game when a new one is loaded. The new scene will load as expected and this gameObject will still exist in the new scene:
public void Start ()
{
// keep this object alive
DontDestroyOnLoad (this.gameObject);
}
LoadLevel() may be used to load a new scene directly, passing in the name of the scene as a string. Application.LoadLevel loads the specified scene:
public void LoadLevel(string sceneName)
{
Application.LoadLevel(sceneName);
}
gameLevelNum is used to tell the scene manager which scene to load when using the automated loading in GoNextLevel() or when LoadLevel() is called without a string parameter. When a new game starts, gameLevelNum needs to be reset for the scene loading to start at the beginning again:
public void ResetGame()
{
// reset the level index counter
gameLevelNum = 0;
}
At the end of a game level, calling GoNextLevel() will load the next scene automatically and increment gameLevelNum:
public void GoNextLevel()
{
// if our index goes over the total number of levels in the // array, we reset it
if(gameLevelNum >= levelNames.Length)
gameLevelNum = 0;
// load the level (the array index starts at 0, but we start // counting game levels at 1 for clarity’s sake)
LoadLevel(gameLevelNum);
// increase our game level index counter
gameLevelNum++;
}
LoadLevel() is used by the GoNextLevel() function to load a scene from the levelNames array based on the index pass in as a parameter via indexNum:
private void LoadLevel(int indexNum)
{
// load the game level
LoadLevel(levelNames[indexNum]);
}
}