
Chapter 2
Building the Core Game Framework
In this chapter, we look at the structure of the base project, to which we will be adding all of the game script components, and the thinking behind it. This chapter will give context to the design decisions made in the core framework as well as provide a good base for understanding how the individual code recipes work together and why they may sometimes have dependencies on other components.
The framework for this book (as seen in Figure 2.1) features six main areas:
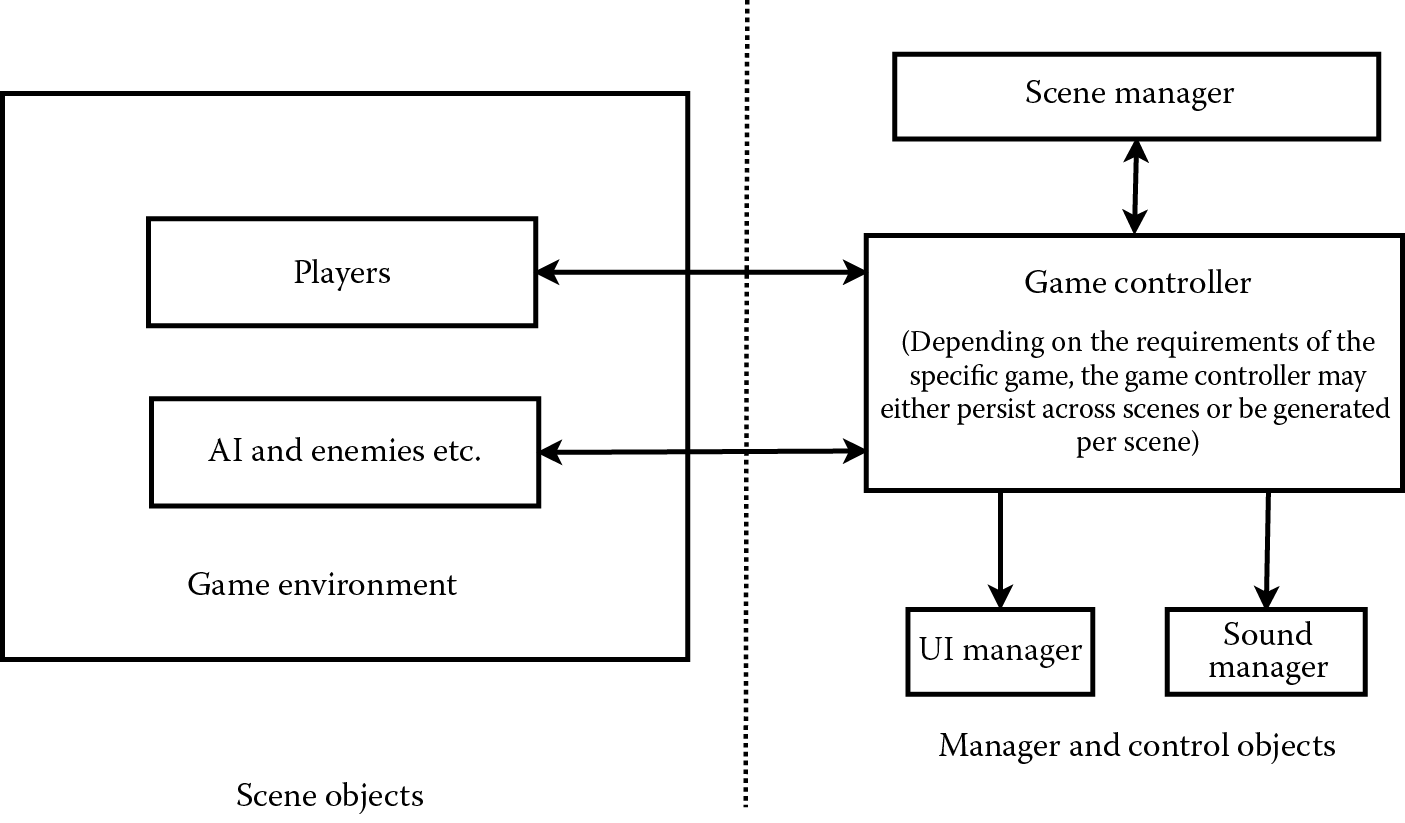
- Game Controller
The game controller acts like a central communication script for all of the different parts of the game. In a way, it is the main glue that holds together the various components that make up the game.
- Scene Manager
This script deals with the loading and saving of scenes. Scenes are what Unity calls its level files.
- UI Manager
The UI manager draws all of the main in-game user interface elements, such as score display and lives.
- Sound Manager
The sound manager handles sound playback. The manager holds an array containing the AudioClips of possible sounds to play. When the game first begins, the sound manager creates one individual AudioSource per sound in the array. When we need to play a sound, the index number referring to a sound’s place in the array is passed to the manager. It uses the sound’s individual AudioSource to play the source, which helps to alleviate problems that may be caused by playing too many sound files from a single source.
- Players
Players may already be present in the game scene or may be instantiated by the game controller. The players have a relatively complex structure that will be explored later in Chapter 3.
- AI and Enemies
As with players, AI-controlled characters or enemies may already be present in the scene at load time or they may be created at runtime by the game controller or other script.
Although you may choose to work with your own framework, understanding the one used in this book will help in seeing how the components work alongside each other and how they work together. To maximize flexibility, the base classes need to be able to accommodate a host of different configurations. For example, a player control script should allow for input to be passed in from another script so that control systems may easily be switched out. The main player script does not need to know where the input is coming from, but it needs to provide a common interface for an input script to communicate with. The input script may take its input from the keyboard, mouse, artificial intelligence, networked input, etc., and just as long as a common interface is used to communicate with the player controller; it doesn’t matter to the player controller as to where the input actually comes from.
2.1 Controllers and Managers
![]()
By specializing tasks to particular managers, it is possible to swap out other components without affecting core functions, which, in turn, makes it easy to carry the same code from game to game without having to rewrite it; from a first-person shooter to a racing game, the same code may be used to store user session data, load levels, or control weapons. In this book, I use two terms to specify the type of class: controllers and managers.
2.1.1 Controllers
Controllers specialize in specific tasks such as helping scripts communicate with each other, holding game-specific player information, or dealing with session data. For example, at the center of all of the example games in this book is a game controller script that acts as a central location for game scripts to communicate. Each game has its own game controller script acting like glue between the different components that otherwise have no built-in method for communicating.
2.1.2 Managers
Managers are used in this book as a term to represent a script that manages objects or data specifically (dealing with players, audio, or other game elements in a similar way to how a manager might manage staff in a company). For example, the GlobalBattleManager.cs script is used to manage RaceController.cs instances to keep track of a deathmatch battle in the example game Tank Battle. The manager script takes care of calculating the position of the players on the scoreboard as well as informing players as to the game’s current running state.
2.2 Building the Core Framework Scripts
![]()
There are several scripts in the Scripts/BASE folder that are intended to act as templates for your own versions, or as classes to derive from, in your own games. In this section, we will be looking at the scripts that make up the main framework.
Those core framework scripts in the BASE folder that will be covered in this chapter are as follows:
- 2.2.1. BaseGameController.cs
- 2.2.2. SceneManager.cs
- 2.2.3. ExtendedCustomMonoBehavior.cs
- 2.2.4. BaseUserManager.cs
- 2.2.5. BasePlayerManager.cs
- 2.2.6. BaseInputController.cs
There are several more scripts in the BASE folder of the example games than those above; those scripts falling outside of the basic core framework will be dealt with on a case-by-case basis throughout this book, such as the AI scripts being dealt with in Chapter 9, where our AI system is covered in full, or in Chapter 8, where audio is explored.
2.2.1 BaseGameController.cs
The game controller acts as a hub for active game activity and a place where scripts that may not be directly connected can send messages to each other. By routing scripts through the game controller, they remain independent, and changing their behavior is a straightforward process of changing how messages are dealt with here rather than across multiple scripts.
The core functions of the game controller are as follows:
- Tracking game state
- Storing the game state
- Providing functions for changing the game state
- Changing the game state based on calls to functions such as EndGame(), StartGame(), or PauseGame()
- Creating any player object(s)
- Setting up the camera (any specifics such as telling the camera which player to follow, etc.)
- Communicating between session manager, user manager, and game actions (such as score, etc.)
- Handling any communications between scripts that we would like to keep as standalone and not have to recode to talk directly to each other
Game controller is the core of gameplay, where overall game functions are defined and dealt with and where the current game state is held. Keeping track of the game state is important, as some elements will need to change their behavior based on this. If the game is paused, for example, we may want to suspend all input, freeze game time, and show a pop-up. When the game ends, we will need to disable player input and so on. Tracking game states is the job of the game controller script.
A typical game may have several different core states, such as
- Game running
- Game paused
- Loading
- Game ended
There may also be several custom states that are applicable to particular types of games, such as a state for showing a cutscene or perhaps a state for playing a special audio clip. I recommend creating a new state for any game action that affects how one or more of your scripts work. That way, you can always have the scripts rely on the game controller to know how to behave.
The base game controller script, found in Scripts/BASE, looks like this:
public class BaseGameController : MonoBehavior
{
bool paused;
public GameObject explosionPrefab;
public virtual void PlayerLostLife ()
{
// deal with player life lost (update U.I. etc.)
}
public virtual void SpawnPlayer ()
{
// the player needs to be spawned
}
public virtual void Respawn ()
{
// the player is respawning
}
public virtual void StartGame()
{
// do start game functions
}
public void Explode (Vector3 aPosition)
{
// instantiate an explosion at the position passed into this function
Instantiate(explosionPrefab,aPosition, Quaternion.identity);
}
public virtual void EnemyDestroyed(Vector3 aPosition, int pointsValue,
int hitByID)
{
// deal with enemy destroyed
}
public virtual void BossDestroyed()
{
// deal with the end of a boss battle
}
public virtual void RestartGameButtonPressed()
{
// deal with restart button (default behavior re-loads the
// currently loaded scene)
Application.LoadLevel(Application.loadedLevelName);
}
public bool Paused
{
get
{
// get paused
return paused;
}
set
{
// set paused
paused = value;
if (paused)
{
// pause time
Time.timeScale= 0f;
} else {
// unpause Unity
Time.timeScale = 1f;
}
}
}
}
2.2.1.1 Script Breakdown
Many of the key functions in BaseGameController.cs are virtual, included to serve as an established protocol for dealing with different types of game activity. That is, they contain no code in this particular file, but the intention is that you override them in your own derived versions of a game controller later on.
The BaseGameController class derives from MonoBehavior so that it can tap into automatically called system functions such as Awake(), Start(), Update(), and FixedUpdate():
public class BaseGameController : MonoBehavior
{
The functions are here as placeholders. The intention is that game controller scripts for use in actual game projects will derive from this class and populate these interface functions with functionality:
bool paused;
public GameObject explosionPrefab;
public virtual void PlayerLostLife ()
{
// deal with player life lost (update U.I. etc.)
}
public virtual void SpawnPlayer ()
{
// the player needs to be spawned
}
public virtual void Respawn ()
{
// the player is respawning
}
public virtual void StartGame()
{
// do start game functions
}
Other functions in BaseGameController are there to help turn games around quickly. If there are things that you use in many different games, it may save time to include them all in a script like this from which you can derive all other game controllers. It saves having to rewrite the same code over and over again across multiple projects. One such example is the Explode() function, which does just that:
public void Explode (Vector3 aPosition)
{
// instantiate an explosion at the position passed into this
// function
Instantiate(explosionPrefab,aPosition, Quaternion.identity);
}
All Explode() does is instantiate a gameObject at a position passed in by the function caller. Later versions of game controller scripts will use a separate spawn manager to deal with instantiation, although at this stage, it is there simply to be as generic as possible by not being reliant on any other scripts.
After Explode, we see two more of those empty functions, used to tell the game controller when regular enemies are destroyed and when a boss is destroyed:
public virtual void EnemyDestroyed(Vector3 aPosition, int pointsValue, int hitByID)
{
// deal with enemy destroyed
}
public virtual void BossDestroyed()
{
// deal with the end of a boss battle
}
All games will need some functions, such as a restart button and pause functions. In their simplest form:
public virtual void RestartGameButtonPressed()
{
// deal with restart button (default behavior re-loads the
// currently loaded scene)
Application.LoadLevel(Application.loadedLevelName);
}
RestartGameButtonPressed() uses Unity’s Application.LoadLevel function to reload the current scene. Application.loadedLevelName returns a string referring to the name of the scene the game currently has loaded in memory. You can also get an index number referring to the scene with Application.levelName. This index number ties up to how scenes are organized in the Build Settings (File → Build Settings), meaning that moving things around in build settings can affect how your game works if you choose to use index numbers to refer to specific scenes later on. To avoid any confusion, I prefer to stick to names whenever I deal with level loading.
The final part of the BaseGameController deals with the mechanics of pausing and unpausing a game:
public bool Paused
{
get
{
// get paused
return paused;
}
set
{
// set paused
paused = value;
if (paused)
{
// pause time
Time.timeScale= 0f;
} else {
// unpause Unity
Time.timeScale = 1f;
}
}
}
A Boolean variable named paused holds the game pause state internally. Rather than provide direct access to this, a getter–setter function is used so that we can act whenever the state of paused changes without having to monitor it.
The Get part simply returns the Boolean variable paused.
The Set part sets the Boolean variable paused and goes on to set Time.timeScale to either 0 (paused) or 1 (unpaused). Setting Time.timeScale affects how time passes. For example, setting timescale to 0.5 would mean that time passes 2× slower than real time. The Unity documentation states:
Except for realtimeSinceStartup, timeScale affects all the time and delta time measuring variables of the Time class.
If you lower timeScale it is recommended to also lower Time.fixedDeltaTime by the same amount.
FixedUpdate functions will not be called when timeScale is set to zero.
A regular videogame would display some sort of message to tell players whenever the game is paused, but at this stage, the script is purely providing the mechanics of pausing, and we will save concerning ourselves too much with user interface until Chapter 14.
2.2.2 Scene Manager
A manager script controls the game flow between physical scenes. Buttons from the menu interface do not load scenes directly; it falls upon the scene manager script below to load them:
public class SceneManager : MonoBehavior
{
public string[] levelNames;
public int gameLevelNum;
public void Start ()
{
// keep this object alive
DontDestroyOnLoad (this.gameObject);
}
public void LoadLevel(string sceneName)
{
Application.LoadLevel(sceneName);
}
public void GoNextLevel()
{
// if our index goes over the total number of levels in the
// array, we reset it
if(gameLevelNum >= levelNames.Length)
gameLevelNum = 0;
// load the level (the array index starts at 0, but we start
// counting game levels at 1 for clarity’s sake)
LoadLevel(gameLevelNum);
// increase our game level index counter
gameLevelNum++;
}
private void LoadLevel(int indexNum)
{
// load the game level
LoadLevel(levelNames[indexNum]);
}
public void ResetGame()
{
// reset the level index counter
gameLevelNum = 0;
}
}
2.2.2.1 Script Breakdown
Any script may call for a scene change, and menus, game controllers, or tutorial controllers may easily move between sections of the game without having to have filenames hard-coded into them.
The level manager may also be a good place to call to show loading screens, implement scene transitions (such as fade ins/outs or animations), or start downloading scenes from a remote location.
Note that in the Start() function of the class (shown below), we use DontDestroyOnLoad to keep this script and its gameObject alive even when new scenes are loaded. This means we need to prevent duplicate scene managers being instanced, but we can easily use GameObject.Find to have a look for a scene manager gameObject before instantiating a new one.
public class SceneManager : MonoBehavior
{
public string[] levelNames;
public int gameLevelNum;
public void Start ()
{
// keep this object alive
DontDestroyOnLoad (this.gameObject);
}
The SceneManager.cs script provides a scene-loading function in its simplest form. Here Application.LoadLevel is used to load a scene:
public void LoadLevel(string sceneName)
{
Application.LoadLevel(sceneName);
}
On top of simple scene loading, the class has support for a basic progressive level loading game format. An array named levelNames holds strings referring to the names of each of the levels in a game. We use an integer variable named gameLevelNum to refer to which level the player is in. When GoNextLevel() is called, we do a quick check to make sure that gameLevelNum is within range:
public void GoNextLevel()
{
// if our index goes over the total number of levels in the
// array, we reset it
if(gameLevelNum >= levelNames.Length)
gameLevelNum = 0;
Then, another version of the LoadLevel function (declared after this part) is called to start loading the next scene based on the index number. Finally, gameLevelNum is incremented, ready for next time. Note that the increment happens after the load and not before. We could have done this either way, but this way, we have the minor inconvenience of gameLevelNum always being one step ahead, which we need to be aware of if we ever try to access its value from other classes. On the other hand, by incrementing it after the load, we use GoNextLevel right from the start of the game to load the first level in the array, keeping the code consistent in level loading:
// load the level (the array index starts at 0, but we start // counting game levels at 1 for clarity’s sake)
LoadLevel(gameLevelNum);
// increase our game level index counter
gameLevelNum++;
}
This alternative version of the LoadLevel function shown below uses an index to get a level name from the levelNames array. It then uses the original LoadLevel function declared earlier to handle loading. Again, keeping the focus on using a single function for all loadings rather than duplicating the code or having loading happen in more than one place:
private void LoadLevel(int indexNum)
{
// load the game level
LoadLevel(levelNames[indexNum]);
}
The final function in the scene manager class is used to reset gameLevelNum whenever we start a new game. It is assumed that the script restarting the game will call this function before calling GoNextLevel() again.
public void ResetGame()
{
// reset the level index counter
gameLevelNum = 0;
}
}
2.2.3 ExtendedCustomMonoBehavior.cs
Extending MonoBehavior is a useful way to avoid repeating common functions or variable declarations. Many classes share functions and/or variables. For example, most of the scripts in this book use a variable named myTransform to refer to a cached version of their transforms to save having to look up the transform every time we need to access it. As MonoBehavior provides a host of system functions and calls, making a new class that extends, it can be a useful tool to have in the kit. Whereas a new class would use MonoBehavior, we just derive from the new ExtendedCustomMonoBehavior script instead.
For the scripts in this book, the ExtendedCustomMonoBehavior.cs script extends MonoBehavior to include
- a myTransform variable to hold a cached reference to a transform
- a myGO variable to hold a cached reference to a gameObject
- a myBody variable for a cached reference to a rigidBody
- a didInit Boolean variable to determine whether or not the script has been initialized
- an integer variable called id to hold an id number
- a Vector3 type variable called tempVEC to use for temporary vector actions
- a Transform variable called tempTR used for any temporary references to transforms
- a function called SetID(integer) so that other classes can set the variable id
The scripting for this class is straightforward and contains mostly variable declarations:
public class ExtendedCustomMonoBehavior : MonoBehavior
{
// This class is used to add some common variables to
// MonoBehavior, rather than constantly repeating
// the same declarations in every class.
public Transform myTransform;
public GameObject myGO;
public Rigidbody myBody;
public bool didInit;
public bool canControl;
public int id;
[System.NonSerialized]
public Vector3 tempVEC;
[System.NonSerialized]
public Transform tempTR;
public virtual void SetID(int anID)
{
id= anID;
}
}
2.2.4 BaseUserManager.cs
The user manager is a script object made by the player manager to store player properties such as
- Player name
- Current score
- Highest score
- Level
- Health
- Whether or not this player has finished the game
The user manager also contains functions to manipulate its data
Below is the BaseUserManager.cs script in full:
public class BaseUserManager : MonoBehavior
{
// gameplay specific data
// we keep these private and provide methods to modify them
// instead, just to prevent any accidental corruption
// or invalid data coming in
private int score;
private int highScore;
private int level;
private int health;
private bool isFinished;
// this is the display name of the player
public string playerName ="Anon";
public virtual void GetDefaultData()
{
playerName="Anon";
score=0;
level=1;
health=3;
highScore=0;
isFinished=false;
}
public string GetName()
{
return playerName;
}
public void SetName(string aName)
{
playerName=aName;
}
public int GetLevel()
{
return level;
}
public void SetLevel(int num)
{
level=num;
}
public int GetHighScore()
{
return highScore;
}
public int GetScore()
{
return score;
}
public virtual void AddScore(int anAmount)
{
score+=anAmount;
}
public void LostScore(int num)
{
score-=num;
}
public void SetScore(int num)
{
score=num;
}
public int GetHealth()
{
return health;
}
public void AddHealth(int num)
{
health+=num;
}
public void ReduceHealth(int num)
{
health-=num;
}
public void SetHealth(int num)
{
health=num;
}
public bool GetIsFinished()
{
return isFinished;
}
public void SetIsFinished(bool aVal)
{
isFinished=aVal;
}
}
2.2.4.1 Script Breakdown
BaseUserManager.cs contains just variable declarations and functions to get or set those variables.
2.2.5 BasePlayerManager.cs
The player manager acts like glue among the input manager, the user manager, and the game-specific player controllers. It is intended to be a central point where managers are tied to game-specific player scripts.
Below is the BasePlayerManager.cs in full:
public class BasePlayerManager : MonoBehavior
{
public bool didInit;
// the user manager and AI controllers are publically accessible so that
// our individual control scripts can access them easily
public BaseUserManager DataManager;
// note that we initialize on Awake in this class so that it is
// ready for other classes to access our details when
// they initialize on Start
public virtual void Awake ()
{
didInit=false;
// rather than clutter up the start() func, we call Init to
// do any startup specifics
Init();
}
public virtual void Init ()
{
// cache ref to our user manager
DataManager= gameObject.GetComponent<BaseUserManager>();
if(DataManager==null)
DataManager= gameObject.AddComponent<BaseUserManager>();
// do play init things in this function
didInit= true;
}
public virtual void GameFinished()
{
DataManager.SetIsFinished(true);
}
public virtual void GameStart()
{
DataManager.SetIsFinished(false);
}
}
2.2.5.1 Script Breakdown
BasePlayerManager.cs derives from MonoBehavior so that it can use the system function Awake() to call its Init() initialization:
public class BasePlayerManager : MonoBehavior
{
The Awake() function is based on the assumption that it may be reused, so it starts out by setting the Boolean variable didInit to false. This variable can then be used to tell whether or not the Init() function has been called and completed execution:
public virtual void Awake ()
{
didInit=false;
// rather than clutter up the start() func, we call Init to do any
// startup specifics
Init();
}
Init() starts out by looking to find a reference to a DataManager script component (BaseUserManager as explained earlier in this chapter). gameObject.GetComponent() will return a reference to BaseUserManager if it has been added to the gameObject that this script is attached to:
public virtual void Init ()
{
// cache ref to our user manager
DataManager= gameObject.GetComponent<BaseUserManager>();
At this point, if the DataManager variable is null, we know that the component has not been added to this gameObject, and this code goes on to use gameObject.AddComponent() to add a BaseUserManager component through the code
if(DataManager==null)
DataManager= gameObject.AddComponent<BaseUserManager>();
Now that the Init() function is done, didInit can be set to true:
// do play init things in this function
didInit= true;
}
GameFinished() will be called from an outside script (possibly the game controller script or similar game-state management script) to tell this player when the game is over:
public virtual void GameFinished()
{
DataManager.SetIsFinished(true);
}
Just like GameFinished(), GameStart() will be called from an outside script when it is time to start the game. DataManager.SetIsFinished() is called to set the isFinished variable of this player’s data manager to false:
public virtual void GameStart()
{
DataManager.SetIsFinished(false);
}
}
2.2.6 BaseInputController.cs
The input controllers provide input for use by the player controller. The BaseInputController.cs looks like this:
public class BaseInputController : MonoBehavior
{
// directional buttons
public bool Up;
public bool Down;
public bool Left;
public bool Right;
// fire / action buttons
public bool Fire1;
// weapon slots
public bool Slot1;
public bool Slot2;
public bool Slot3;
public bool Slot4;
public bool Slot5;
public bool Slot6;
public bool Slot7;
public bool Slot8;
public bool Slot9;
public float vert;
public float horz;
public bool shouldRespawn;
public Vector3 TEMPVec3;
private Vector3 zeroVector = new Vector3(0,0,0);
public virtual void CheckInput ()
{
// override with your own code to deal with input
horz=Input.GetAxis ("Horizontal");
vert=Input.GetAxis ("Vertical");
}
public virtual float GetHorizontal()
{
// returns our cached horizontal input axis value
return horz;
}
public virtual float GetVertical()
{
// returns our cached vertical input axis value
return vert;
}
public virtual bool GetFire()
{
return Fire1;
}
public bool GetRespawn()
{
return shouldRespawn;
}
public virtual Vector3 GetMovementDirectionVector()
{
// temp vector for movement dir gets set to the value of an
// otherwise unused vector that always has the value of 0,0,0
TEMPVec3=zeroVector;
// if we’re going left or right, set the velocity vector’s X
// to our horizontal input value
if(Left || Right)
{
TEMPVec3.x=horz;
}
// if we’re going up or down, set the velocity vector’s X to
// our vertical input value
if(Up || Down)
{
TEMPVec3.y=vert;
}
// return the movement vector
return TEMPVec3;
}
}
2.2.6.1 Script Breakdown
BaseInputController.cs derives from MonoBehavior:
public class BaseInputController : MonoBehavior
{
The input scripts use CheckInput() as their default main update function, which is intended to be called from the player class. This CheckInput() only contains the very least amount required for input. It just takes the axis input from the Input class:
public virtual void CheckInput ()
{
The Input class provides an interface to Unity’s input systems. It may be used for everything from gyrometer input on mobile devices to keyboard presses. Unity’s input system has a virtual axis setup, where developers can name an axis in the Input Manager section of the Unity editor. The Input Manager is available in Unity via the menus Edit –> Project Settings –> Input.
By default, Unity has inputs already set up for horizontal and vertical virtual axis. Their names are Horizontal and Vertical, and they are accessible via Input.GetAxis(), passing in the name of the virtual axis as a parameter and receiving the return value of a float between −1 and 1. The float variable horz and vert hold the return values:
// override with your own code to deal with input
horz=Input.GetAxis ("Horizontal");
vert=Input.GetAxis ("Vertical");
}
A function is provided to return the value of horz, the horizontal axis provided by the virtual axis named Horizontal:
public virtual float GetHorizontal()
{
// returns our cached horizontal input axis value
return horz;
}
A function is provided to return the value of vert, the vertical axis provided by the virtual axis named Vertical:
public virtual float GetVertical()
{
// returns our cached vertical input axis value
return vert;
}
GetFire() returns the value of the Boolean variable Fire1. GetRespawn() returns the value of the Boolean variable shouldRespawn. At this stage, you may notice that there is no actual code to set either Fire1 or shouldRespawn in this default input script. They are both provided as a guide and with the intention of being built upon on a case-by-case basis depending on what the game requires:
public virtual bool GetFire()
{
return Fire1;
}
public bool GetRespawn()
{
return shouldRespawn;
}
It may be useful in some circumstances to have a movement vector rather than having to process the numbers from horz and vert. GetMovementDirectionVector() will return a Vector3 type vector based on the current state of input. Here, TEMPVec3 receives input values and gets returned by the function
public virtual Vector3 GetMovementDirectionVector()
{
// temp vector for movement dir gets set to the value of an
// otherwise unused vector that always has the value of 0,0,0
TEMPVec3=zeroVector;
The vector starts out at 0,0,0, but its x and y values will be set to the values of horz and vert, respectively. Finally, the vector in TEMPVec3 is returned:
TEMPVec3.x=horz;
TEMPVec3.y=vert;
// return the movement vector
return TEMPVec3;
}
}