
Chapter 14
Dish: Making the Game Interstellar Paranoids
In 1978, a game came along from a company named Taito that would change the face of video gaming forever. Designer Tomohiro Nishikado said that his inspiration came from Atari’s arcade game, Breakout, and his concept was so advanced that Nishikado, a solo developer, had to develop the necessary hardware himself. He named it Space Monsters, but a superior of his changed the name before it was released, to Space Invaders.
By the end of 1978, Taito had installed over 100,000 arcade machines and grossed over $600 million in Japan alone.* The game was soon a hit right across the world, and now, 35 years on, players still get to enjoy numerous remakes, clones, and arcade-style games that pay homage to it.
A year on, in 1979, a new video game named Galaxian was launched by Namco. It was designed by Kazunori Sawano; unlike Nishikado, Sawano had a small team to work with, and they were able to accomplish much more technically that would help them to build on the original Space Invaders concepts. This time around, the enemy sprites had bright colored graphics, animations, and a scrolling starfield. Audio was much improved now, too, with the addition of background music and a theme. Galaxian saw the alien invaders swooping down at the player, attacking much more aggressively than Space Invaders, making for a faster-paced, more visceral experience.
The overall style of Galaxian should not be underestimated. Its look and feel became iconic throughout the 1980s and something that may have influenced the design style of other popular games around the time and for a while after.
Besides the advancement in technology, another feature of Galaxian was the addition of a two-player mode. Players could alternate, playing until a life was lost, to see who could get the highest score. Although not a feature unique to this game, introducing competitive play to Galaxian no doubt went a long way in helping its success in arcades across the world.
In 1980, Taito distributed another shooter in a similar style to Galaxian, called Phoenix and developed by a company named Amstar Electronics. Featuring color graphics and distinctive shooting sounds, the game’s main enemies were birds that would swoop down at the player’s spaceship. Most notably, Phoenix featured a limited implementation of power-up, as the projectile firing rate was varied based on the difficulty of the level. At the end of a level, the player had to battle a huge mothership—one of the earliest implementations of the end-of-level boss in video gaming.
In video gaming, the rules were just starting to be written; some of the most prominent features from today’s games began to evolve. Somewhere between Galaxian in 1981 and Xevious in 1983, someone got the idea to take the scrolling starfield backdrops (sometimes plain black backdrops) and turn them into actual maps and game environments. A missing link may be the 1982 game Zaxxon, which was an isometric view shooter game featuring a rich, scrolling environment filled with both ground targets and flying targets such as missiles and alien ships.
Perhaps the next revolution in arcade gaming came in the form of Xevious, Atari’s first vertical scrolling shooter launched in 1983 and published by Namco. Instead of simple starfield backdrops set in an abstract universe, Xevious brought with it a detailed view of the Earth’s surface. Alien forces both in the air and, for the first time, on the ground act as enemies as the game world makes its way down the screen toward the player. Although not the first game to feature them, Xevious was certainly one of the most popular games to feature early boss battles. At the end of levels, tougher, stronger enemies were required to be destroyed before advancing to the next stage.
The game Interstellar Paranoids (shown in Figure 14.1) pays homage to these classic games. It features a spaceship that moves left, right, up, and down around the screen, and it can fire to destroy enemies. The enemies swoop in from the top and left and right sides of the screen, flying around along paths as they shoot projectiles at the player. At the end of each stage will be a boss enemy that requires a lot more hits to take down.
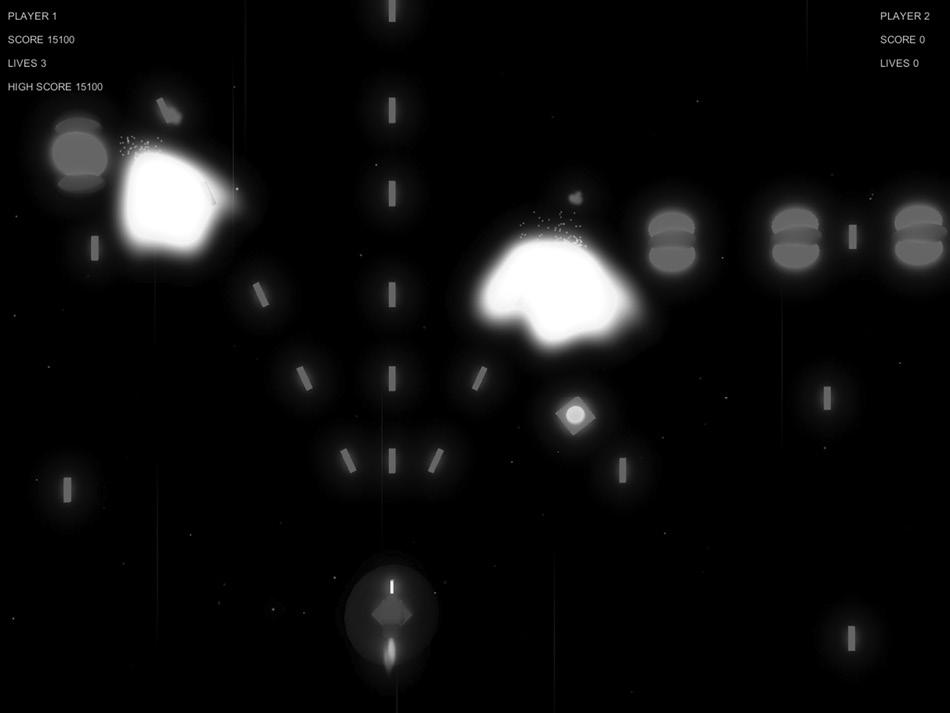
The sound effects are old fashioned, arcade style, and there is a scrolling starfield in the background with explosions lighting up the screen as collisions happen. Its overall structure differs a little from other games in this book, as seen in Figure 14.2.
This game may be found in the example games project, its scenes in the Scenes/Interstellar Paranoids folder named level_1, level_2, and menu_IP.
Its prefabs are located in the Prefabs/Games/Interstellar Paranoids folder.
14.1 Main Menu
![]()
Interstellar Paranoids has a main menu scene and two game levels. The main menu is contained in a single scene that uses the scene manager component (as discussed in Chapter 4, Section 4.10) to load the first game scene. From there, the scene manager is used to manage level count and level loading.
The main menu scene has a single camera named Main Camera. The main menu script is attached to it as a component, rendering the menu and dealing with its interaction. This is the same script that is used in all of the example games menu screens, but it is the only one that adds a two-player mode and displays an extra button on the menu to start it.
On the script component MainMenuController, when the string variable coopGameStartScene has something in it (entered in through the Unity editor Inspector window), an extra button is displayed on the menu with the label START CO-OP.
The MainMenuController.cs script is outlined in full in Chapter 10 of this book, but to add some context, here is the code that adds the extra button to the menu:
if(coopGameStartScene!="")
{
if(GUI.Button(new Rect(0, 250, 300, 40),"START CO-OP"))
{
PlayerPrefs.SetInt("totalPlayers", 2);
LoadLevel(coopGameStartScene);
}
When the button is clicked, the totalPlayers prefs key is set to 2. The game will pick up on this and add the extra player when it is required to. The game is loaded in the same way as the single-player game, through the LoadLevel() function of the menu script.
14.2 Game Scenes
![]()
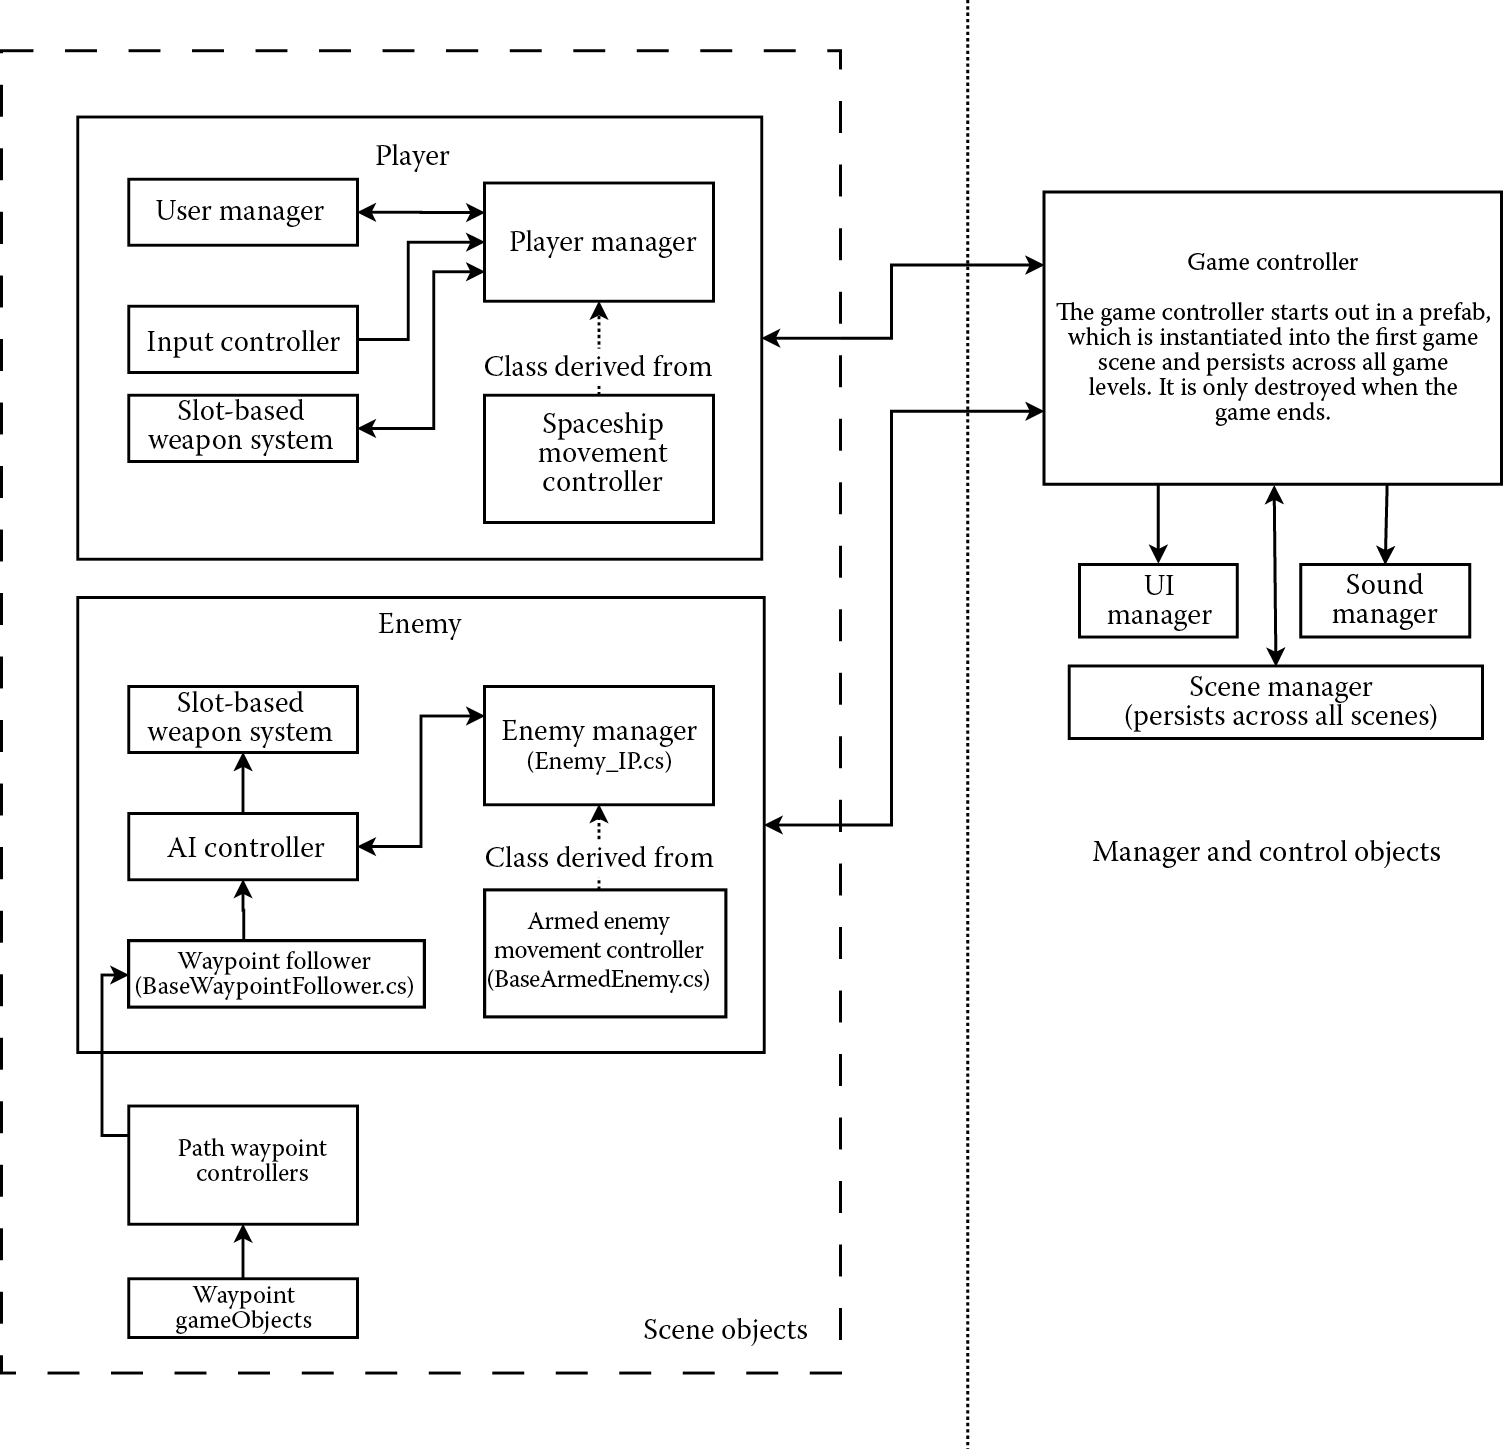
Each game level’s environment and enemy objects are contained in single scenes, although some core game elements persist throughout the game such as the game controller, player, and camera. This means that the game only needs to run its main setup functions once to create the player and arrange the core elements. They persist until the game ends, when they are destroyed before the main menu scene reloads.
There are two levels in the example game, but they have the exact same Hierarchy structure in both scenes. The Hierarchy contains
- Directional light
- Level
- Models that make up the environment—in this game, this is mostly instances of attack pattern prefabs (containing waypoints and spawners for enemies)
- LevelSetup
- ScrollStopper
- SoundController
The game controller for this game is created dynamically by the LevelSetup script component attached to the empty gameObject named LevelSetup. The actual script will be broken down later in this chapter, but the basic function of the script is to check to see whether a game controller exists in the scene and, if not, to instantiate one. It references two prefabs, one called GameController and one SceneManager.
By creating the game controller and scene manager objects dynamically, these objects can exist across different game levels. The level setup script first checks to see whether they exist, and if the game scene is a level other than the first one, the objects will not be duplicated accidentally.
When the game controller prefab is instantiated, its gameObject looks like this, in the Hierarchy window of the Unity editor:
- GameController
- GameCamera
- BulletDestroyer
- BulletDestroyer
- Player_Parent_Object
- StarsLayer1
- StarsLayer2
- UI
- GAMEOVER_GRAPHIC
- GETREADY_GRAPHIC
- GameCamera
It can be seen that the GameController prefab contains everything required for the game controller to function, create a player, and have a camera and UI available to use during the game. The prefab contains the minimum amount required to run the game, the most important elements. With the exception of the LevelSetup gameObject in each game scene, everything else in the level scenes is specific to the level.
14.3 Prefabs
![]()
The prefabs used for this game are
- ENEMIES
- EnemyShip_1
- EnemyShip_2
- EnemyShip_3
- Gameboss
- LEVEL CONTROL
- GameController
- PLAYERS
- PlayerShip_1
- PlayerShip_2
- POWERUPS
- Powerup
- PROJECTILES
- Double_Projectile
- Projectile_1
- SPAWNERS
- AttackPattern_1
- AttackPattern_2
- AttackPattern_3
- AttackPattern_4
- AttackPattern_5
- WEAPONS
- 3WayBlaster_Boss
14.3.1 Ingredients
The game uses these ingredients:
- Game Controller—The game controller script for this game derives from BaseGameController.cs
- Player:
- PlayerSpaceShip_IP
- Standard slot weapon controller
- Base player manager
- Keyboard input and mouse input
- Enemies:
- BaseWaypointFollower
- BaseAIController
- Scene Manager
- User Interface—The user interface for in-game will derive from the BaseUIDataManager script from Chapter 4, which adds data management. The main menu uses the main menu system outlined in Chapter 10.
- Sound Controller—The sound controller script from Chapter 8.
- Music Controller
14.3.2 Game Controller
The GameController_IP script:
using UnityEngine;
using System.Collections;
public class GameController_IP : BaseGameController
{
public string mainMenuSceneName = "menu_IP";
public bool didInit;
public Transform playerParent;
public GameObject[] playerPrefabList;
public GameObject powerUpPrefab;
public float levelForwardSpeed =1f;
public Transform CameraTransform;
[System.NonSerialized]
public GameObject playerGO1;
public GameObject playerGO2;
private Player_SpaceShip_IP playerScript1;
private Player_SpaceShip_IP playerScript2;
public BaseUserManager mainPlayerDataManager1;
public BaseUserManager mainPlayerDataManager2;
private int powerupExplosionCounter =0;
public int numberOfExplosionsToMakePowerup =10;
public UI_IP UIControl;
public UI_GameOver gameOverUIScript;
public BaseCameraController cameraControl;
private int tempINT;
private Vector3 tempVec3;
private Quaternion tempQuat;
private bool isStopped;
[System.NonSerialized]
public static GameController_IP Instance;
public float gameSpeed=8;
public bool BossWinToNextLevel= true;
// there should always be one player
public int totalPlayers= 1;
public SceneManager;
public float CameraStartPositionZ= -11;
public GameController_IP()
{
Instance=this;
}
public void Start()
{
// we want to keep the game controller alive right through // the game, so we use DontDestroyOnLoad to keep it alive
DontDestroyOnLoad (this.gameObject);
}
public void LevelLoadingComplete()
{
Init();
UIControl.Init();
}
public void Init()
{
// tell the player that it can move, in 4 seconds
Invoke ("StartPlayer",4);
// in case we need to change the time scale, it gets set here
Time.timeScale=gameSpeed;
// we store the current game's number of players in a pref // so it may be set elsewhere (the main menu for example) and
// carried into every level of the game.
if(PlayerPrefs.HasKey("totalPlayers")) // does this pref exist?
{
totalPlayers= PlayerPrefs.GetInt("totalPlayers"); // then use the value it holds
} else {
totalPlayers= 1; // default to single player
}
// find player parent transform
playerParent= GameObject.Find("Player_Parent_Object").transform;
Vector3[] playerStarts= new Vector3[totalPlayers];
Quaternion[] playerRotations= new Quaternion[totalPlayers];
// this may be a little over-the-top, but hard coding it // just wouldn't fit in with the overall theme of re-use
for(int i=0; i<totalPlayers; i++)
{
tempQuat= Quaternion.identity;
if(i==0)
{
// place player 1 at the default start // position of -5,0,0
tempVec3= new Vector3(-5, 0, 0);
} else {
// we'll make player 2 a start position 5 // units to the right of the start position // of player 1
tempVec3= new Vector3(-5 + (i*5), 0, 0);
}
playerStarts[i]=tempVec3;
playerRotations[i]=tempQuat;
}
// if we haven't already got players set up, didInit will // still be false... otherwise we skip creating the players
if(!didInit)
SpawnController.Instance.SetUpPlayers(playerPrefabList, playerStarts, playerRotations, playerParent, totalPlayers);
// grab a ref to the player's gameobject for later use
playerGO1= SpawnController.Instance.GetPlayerGO(0);
// if we have a two-player game, let's grab that second // player's gameobject too
if(totalPlayers>1)
playerGO2= SpawnController.Instance.GetPlayerGO(1);
// find the game camera
CameraTransform = GameObject.Find("GameCamera").transform;
// position the camera at the specified start position // (set in the Unity editor Inspector window on this // component)
tempVec3 = CameraTransform.localPosition;
tempVec3.z = CameraStartPositionZ;
CameraTransform.localPosition = tempVec3;
// if we don't have a camera control script object set by // the editor, try to find one
cameraControl= CameraTransform.GetComponent<BaseCameraController>();
isStopped=false;
// make sure we have a scene manager to talk to
GetSceneManager ();
didInit=true;
}
public void LateUpdate ()
{
if(!isStopped)
{
// do fly movement through the level
CameraTransform.Translate(Vector3.up * Time. deltaTime * levelForwardSpeed);
}
}
public void StartPlayer ()
{
Debug.Log ("StartPlayer!!!");
// find the player's control script and hold it in // playerScript
playerScript1= playerGO1.GetComponent<Player_SpaceShip_IP>();
mainPlayerDataManager1=
playerGO1.GetComponent<BasePlayerManager>().DataManager;
// all ready to play, let's go!
playerGO1.SendMessage("GameStart");
// now, if there *is* a player 2, let's tell it to get going
if(totalPlayers>1)
{
// find the player's control script and hold it in // playerScript
playerScript2= playerGO2.GetComponent<Player_SpaceShip_IP>();
mainPlayerDataManager2=
playerGO2.GetComponent<BasePlayerManager>().DataManager;
playerGO2.SendMessage("GameStart");
}
}
public void StopMovingForward ()
{
isStopped=true;
}
public void ContinueForward()
{
isStopped=false;
}
public void BossDestroyed()
{
ContinueForward();
if(BossWinToNextLevel)
{
// go to next level
Invoke("FinishedLevel", 3f);
}
}
public void FinishedLevel ()
{
// make sure we have a scene manager to talk to
GetSceneManager ();
// tell scene manager to load the next level
if(sceneManager != null)
{
sceneManager.GoNextLevel();
} else {
Debug.LogError("SCENE MANAGER DOES NOT EXIST. CAN'T MOVE TO NEXT LEVEL!");
}
}
void GetSceneManager ()
{
// find level loader object
GameObject sceneManagerGO = GameObject.Find ("SceneManager");
// check to see if we managed to find a manager object // before trying to get at its script
if(sceneManagerGO!=null)
sceneManager= sceneManagerGO.GetComponent<SceneManager>();
}
public override void EnemyDestroyed (Vector3 aPosition, int pointsValue, int hitByID)
{
// tell our sound controller to play an explosion sound
BaseSoundController.Instance.PlaySoundByIndex(1, aPosition);
// play an explosion effect at the enemy position
Explode (aPosition);
if(hitByID==1)
{
// tell main data manager to add score
mainPlayerDataManager1.AddScore(pointsValue);
// update the score on the UI
UpdateScoreP1(mainPlayerDataManager1.GetScore());
} else {
// tell main data manager to add score
mainPlayerDataManager2.AddScore(pointsValue);
// update the score on the UI
UpdateScoreP2(mainPlayerDataManager2.GetScore());
}
// count how many have been destroyed and if necessary spawn // a powerup here instead
powerupExplosionCounter++;
if(powerupExplosionCounter>numberOfExplosionsToMakePowerup)
{
Instantiate(powerUpPrefab,aPosition,Quaternion.identity);
powerupExplosionCounter=0;
}
}
public void Explode (Vector3 aPosition)
{
// instantiate an explosion at the position passed into this // function
Instantiate(explosionPrefab,aPosition, Quaternion.identity);
}
public void PlayerHit(Transform whichPlayer)
{
// tell our sound controller to play an explosion sound
BaseSoundController.Instance.PlaySoundByIndex(2, whichPlayer.position);
// call the explosion function!
Explode(whichPlayer.position);
}
// UI update calls
public void UpdateScoreP1(int aScore)
{
if(UIControl != null)
UIControl.UpdateScoreP1(aScore);
}
public void UpdateLivesP1(int aScore)
{
if(UIControl != null)
UIControl.UpdateLivesP1(aScore);
}
public void UpdateScoreP2(int aScore)
{
if(UIControl != null)
UIControl.UpdateScoreP2(aScore);
}
public void UpdateLivesP2(int aScore)
{
if(UIControl != null)
UIControl.UpdateLivesP2(aScore);
}
private void StopPlayers()
{
playerScript.GameFinished();
}
private bool player1Dead;
private bool player2Dead;
public void PlayerDied(int whichID)
{
if(whichID==1)
player1Dead=true;
if(whichID==2)
player2Dead=true;
if(player1Dead && player2Dead && totalPlayers>1)
{
// both players are dead, so end the game
UIControl.ShowGameOver();
Invoke ("Exit",5);
} else if(totalPlayers==1)
{
// this is a single-player game, so just end the
// game now both players are dead, so end the game
UIControl.ShowGameOver();
Invoke ("Exit",5);
}
}
void Exit()
{
SpawnController.Instance.Restart();
Destroy(this.gameObject);
// make sure we have a scene manager to talk to
GetSceneManager ();
sceneManager.LoadLevel(mainMenuSceneName);
}
}
14.3.2.1 Script Breakdown
The GameController_IP script is based on BaseGameController:
using UnityEngine;
using System.Collections;
public class GameController_IP : BaseGameController
{
When GameController_IP is instantiated, the static variable Instance is populated with a reference to this script, so that it can be accessed from other scripts in the scene:
public GameController_IP()
{
Instance=this;
}
To keep the game controller alive between scenes, the Start() function makes a call to DontDestroyOnLoad():
public void Start()
{
// we want to keep the game controller alive right through // the game, so we use DontDestroyOnLoad to keep it alive
DontDestroyOnLoad (this.gameObject);
}
When a new scene is loaded, the LevelLoadingComplete() function gets called by an instance of the LevelSetup.cs script. The script here can then reinitialize itself and the user interface so that the game can continue in the new scene:
public void LevelLoadingComplete()
{
Init();
UIControl.Init();
}
The Init() function is composed in such a way as to be reusable and will be called at the start of each level:
public void Init()
{
The player starts out held in place. An Invoke call to StartPlayer schedules the player to be released 4 s after this function is called:
// tell the player that it can move, in 4 seconds
Invoke ("StartPlayer",4);
The Time.timeScale value can affect the whole feel of the game. Some shooters demand more enemies and slower movement, and some have faster movement and fewer enemies; the movement and update speeds of the game are determined by the type of game you are building (including artistic style, world type, and any other game elements that may affect the overall pace). The gameSpeed variable can be set to change time scale, and the code here changes the physics engine time setting to suit:
// in case we need to change the time scale, it gets set here
Time.timeScale=gameSpeed;
This game allows for one or two players. The main menu scene displays an extra button for cooperative play. By starting the game through this additional button, a preferences key is written called totalPlayers. The first main game scene is then loaded in the same way.
At this stage in the Init() function, the PlayerPrefs value is retrieved, stored in the integer type variable totalPlayers, and used to setup the game differently:
// we store the current game's number of players in a pref so it // may be set elsewhere (the main menu for example) and
// carried into every level of the game.
if(PlayerPrefs.HasKey("totalPlayers")) // does this pref exist?
{
totalPlayers= PlayerPrefs.GetInt("totalPlayers"); // then use the value it holds
} else {
totalPlayers= 1; // default to single player
}
Spawning works the same here as with the other games, although instead of using an array full of start positions, it only uses a single transform for the spawn position. Unity’s GameObject.Find() function is used to look for a gameObject named Player_Parent_Object. Its transform information will be used on all game levels as the starting point for the players:
// find player parent transform
playerParent= GameObject.Find("Player_Parent_Object").transform;
Vector3[] playerStarts= new Vector3[totalPlayers];
Quaternion[] playerRotations= new Quaternion[totalPlayers];
As with the other example games, the SpawnController SetUpPlayers() function is used to instantiate players into the game. It requires an array of positions and an array of rotations, which are made here. This game only has a single start point and not an array of start points as other games might have, but it uses the same system purely for the sake of consistency throughout the book. Of course, if you are the reader who is going to take this game and add 50 players to it, then this is, no doubt, going to be useful to have:
for(int i=0; i<totalPlayers; i++)
{
tempQuat= Quaternion.identity;
if(i==0)
{
// place player 1 at the default start position of // -5,0,0
tempVec3= new Vector3(-5, 0, 0);
} else {
// we'll make player 2 a start position 5 units to // the right of the start position of player 1
tempVec3= new Vector3(-5 + (i*5), 0, 0);
}
playerStarts[i]=tempVec3;
playerRotations[i]=tempQuat;
}
The players are only spawned when didInit is still false. In this game, the players persist throughout the whole game, so we need to make sure that players only spawn once to avoid chaos in the scene:
// if we haven't already got players set up, didInit will // still be false... otherwise we skip creating the players
if(!didInit)
SpawnController.Instance.SetUpPlayers(playerPrefabList, playerStarts, playerRotations, playerParent, totalPlayers);
The reference held by the variable playerGO1 will be used later. SpawnController will return a gameObject from its GetPlayerGO() function based on the index passed in as a parameter to it:
// grab a ref to the player's gameobject for later
playerGO1= SpawnController.Instance.GetPlayerGO(0);
playerGO2 will hold a reference to the second player when a cooperative game is selected from the main menu and totalPlayers is greater than 1:
// if we have a two-player game, let's grab that second // player's gameobject too
if(totalPlayers>1)
playerGO2= SpawnController.Instance.GetPlayerGO(1);
When a level begins, a game controller prefab is instantiated. Within the child objects of the game controller prefab are several objects central to the game, one of which is a camera named GameCamera. Until the game controller prefab is added to the scene, the in-game levels have no camera. As the Init() function runs on the game controller script, it grabs a reference to the camera here and repositions it at the correct point for starting the level. CameraTransform is used to hold the main reference:
// find the game camera
CameraTransform = GameObject.Find("GameCamera").transform;
// position the camera at the specified start position // (set in the Unity editor Inspector window on this // component)
tempVec3 = CameraTransform.localPosition;
tempVec3.z = CameraStartPositionZ;
CameraTransform.localPosition = tempVec3;
The variable cameraControl holds a reference to the camera controller script:
// if we don't have a camera control script object set by // the editor, try to find one
cameraControl= CameraTransform.GetComponent<BaseCameraController>();
As a top-down scrolling shoot ’em up game, the scrolling of the level is continuous until isStopped is true. The isStopped Boolean variable will be used to stop scrolling when the player reaches the boss battle:
isStopped=false;
To be able to change game scenes, this script needs to have a reference to the scene manager. It looks for the scene manager in the GetSceneManager() function:
// make sure we have a scene manager to talk to
GetSceneManager ();
didInit=true;
}
After all of the main updates are done, the camera is moved forward through the level a little more in LateUpdate(). During the game, there are several really important objects parented to the camera that will be moved along with it. These are
|
BulletDestroyer |
A large invisible object with a box collider on. There are two of these objects, located just off camera, blocking the path across the width of the play area for projectiles. One is at the top of the play area, one at the bottom. When a projectile hits the collider, it is destroyed. This stops projectiles from firing off into infinity. |
|
Player_Parent_Object |
When the player is spawned by the game controller, it will be parented to this object. In turn, as this object is parented to the camera, the player will always move along with the camera. |
|
StarsLayer1 |
Particle effects used to simulate stars in the background. This effect moves along with the camera, and the particles move down to look as though it is a constant movement through space. |
If the Boolean variable isStopped is set to true, the camera will not be moved further through the level. This is used at the end of the level during the boss battle. The Translate function only requires a movement vector, which is multiplied by Time.deltaTime, in this case, to make sure that the movement is time based:
public void LateUpdate ()
{
if(!isStopped)
{
// do fly movement through the level
CameraTransform.Translate(Vector3.up * Time.deltaTime * levelForwardSpeed);
}
}
StartPlayer() is scheduled by the Init() function to be called several seconds after the level first loads. Until this point, the player (or players) will be held in place. This function starts out by grabbing references to the Player_SpaceShip_IP component with Unity’s GameObject.GetComponent(), followed by another GetComponent() call to find the DataManager component (the BasePlayerManager and DataManager scripts were discussed back in Chapter 3):
public void StartPlayer ()
{
Debug.Log ("StartPlayer!!!");
// find the player's control script and hold it in // playerScript
playerScript1= playerGO1.GetComponent<Player_SpaceShip_IP>();
mainPlayerDataManager1= playerGO1.GetComponent<BasePlayerManager>().DataManager;
Now that references have been stored for playerScript1 and mainPlayerDataManager1, a message is sent to the player’s control script component to call its GameStart() function. GameObject.SendMessage() is used to send it:
// all ready to play, let's go!
playerGO1.SendMessage("GameStart");
If there is more than one player, the game controller is going to need to know how and where to talk to the second player. This part of the script grabs the same component references as it just did for the first player but this time for the second player and placed into variables suffixed with a 2 instead of a 1:
// now, if there *is* a player 2, let's tell it to get going
if(totalPlayers>1)
{
// find the player's control script and hold it in // playerScript
playerScript2= playerGO2.GetComponent<Player_SpaceShip_IP>();
mainPlayerDataManager2=
playerGO2.GetComponent<BasePlayerManager>().DataManager;
Just as with the first player, a message is sent to the player’s Player_SpaceShip_IP component to prepare the player by calling upon its GameStart() function:
playerGO2.SendMessage("GameStart");
}
}
StopMovingForward() and ContinueForward() will be called from another script component when movement through the level is required to stop.
public void StopMovingForward ()
{
isStopped=true;
}
public void ContinueForward()
{
isStopped=false;
}
In this game, when the player reaches the boss at the end of the level, StopMovingForward() is called, then ContinueForward() will be called once the boss has been defeated just before the next level loading is started by FinishedLevel() 3 s later:
public void BossDestroyed()
{
ContinueForward();
if(BossWinToNextLevel)
{
// go to next level
Invoke("FinishedLevel", 3f);
}
}
After the big boss battle at the end of the game levels, when the boss is defeated, FinishedLevel() is called upon to move on to the next level:
public void FinishedLevel ()
{
The SceneManager variable contains a reference to the SceneManager component that will be responsible for figuring out which level to load in next. First, GetSceneManager() is called to make sure we have a working reference to it:
// make sure we have a scene manager to talk to
GetSceneManager ();
As long as SceneManager exists (and is not null), the call to GoNextLevel() will have the scene manager load the next game scene and increment its current level counter:
// tell scene manager to load the next level
if(sceneManager != null)
{
sceneManager.GoNextLevel();
} else {
Debug.LogError("SCENE MANAGER DOES NOT EXIST. CAN'T MOVE TO NEXT LEVEL!");
}
}
To find the SceneManager.cs script component, the GetSceneManager() function first needs to find its gameObject. The gameObject has been named SceneManager in the Unity editor, so a call to GameObject.Find() should return it without any trouble:
void GetSceneManager ()
{
// find level loader object
GameObject sceneManagerGO = GameObject.Find ("SceneManager");
Assuming that the gameObject has been found and a reference stored in sceneManagerGO, which we do a quick null check on here, we can go ahead and grab another reference, this time to the SceneManager component itself. GameObject.GetComponent() finds the SceneManager:
// check to see if we managed to find a manager object // before trying to get at its script
if(sceneManagerGO!=null)
sceneManager= sceneManagerGO.GetComponent<SceneManager>();
}
EnemyDestroyed() is an overridden version of the function, which can be found in the original base class (BaseGameController.cs). We need to add some extra functionality to it:
public override void EnemyDestroyed (Vector3 aPosition, int pointsValue, int hitByID)
{
When an enemy is destroyed, the scene would not be complete without a sound effect. BaseSoundController provides a nice explosion sound:
// tell our sound controller to play an explosion sound
BaseSoundController.Instance.PlaySoundByIndex(1, aPosition);
Along with the audio, this exploded enemy needs a nice explosion particle effect. Rather than duplicate code whenever we need an explosion, the function Explode() provides exactly that:
// play an explosion effect at the enemy position
Explode (aPosition);
The hitByID variable (integer) tells where the projectile came from. In this game, when there is more than one player, it is used to tell which player to award the score to.
If hitByID is 1, this is the main user. The score for this hit goes to mainPlayerDataManager1, player 1’s data manager:
if(hitByID==1)
{
// tell main data manager to add score
mainPlayerDataManager1.AddScore(pointsValue);
The user interface code will display info for one player by default, or for two players when totalPlayers is more than 1. Here the UpdateScoreP1() function is passed player 1’s score:
// update the score on the UI
UpdateScoreP1(mainPlayerDataManager1.GetScore());
} else {
As there are only two potential players in this game, the check to see whether player 2 caused this hit does not check against a specific ID. If the ID of this hit is not 1 (as per the hitByID variable), we assume that this is the second player. The score will be added to the data manager of player 2, and the user interface update goes out to the UpdateScoreP2() function:
// tell main data manager to add score
mainPlayerDataManager2.AddScore(pointsValue);
// update the score on the UI
UpdateScoreP2(mainPlayerDataManager2.GetScore());
}
The power-ups will appear after a certain number of hits by the player(s). In this line, a counter variable named powerupExplosionCounter, to track explosions, is incremented:
// count how many have been destroyed and if necessary spawn a // powerup here instead
powerupExplosionCounter++;
When powerupExplosionCounter passes the value of the variable numberOfExplosionsToMakePowerup, a power-up is instantiated into the game scene. It is assumed that numberOfExplosionsToMakePowerup is set or modified in the Unity editor Inspector window. The Instantiate call uses a prefab referenced in the variable powerUpPrefab, and it is spawned wherever the enemy hit happened. powerupExplosionCounter is reset to 0 after the Instantiate call:
if(powerupExplosionCounter>numberOfExplosionsToMakePowerup)
{
Instantiate(powerUpPrefab,aPosition,Quaternion.identity);
powerupExplosionCounter=0;
}
}
Explode() is a simple function to instantiate an explosion special effect as required. Its only parameter is a position for the explosion to happen at:
public void Explode (Vector3 aPosition)
{
// instantiate an explosion at the position passed into this // function
Instantiate(explosionPrefab,aPosition, Quaternion.identity);
}
When a player is hit by a projectile, its Player_SpaceShip_IP script component has its LostLife() function called. It takes care of most of the logic behind the respawning and UI update, but the instantiation of an explosion effect is dealt with by this PlayerHit() function, which will also be called by the player controller script:
public void PlayerHit(Transform whichPlayer)
{
BaseSoundController is called to play an explosion sound effect:
// tell our sound controller to play an explosion sound
BaseSoundController.Instance.PlaySoundByIndex(2, whichPlayer.position);
The Explode() function takes care of the particle effect:
// call the explosion function!
Explode(whichPlayer.position);
}
In contrast to the other example games in this book, Interstellar Paranoids has its own UI control script that uses Unity’s OnGUI() system to render text to the screen. This script holds a reference to the UI script in the variable UIControl. Rather than affecting GUIText components directly, as the other example games do, the update calls to the UI simply pass on the details to UIControl:
// UI update calls
public void UpdateScoreP1(int aScore)
{
if(UIControl != null)
UIControl.UpdateScoreP1(aScore);
}
public void UpdateLivesP1(int aScore)
{
if(UIControl != null)
UIControl.UpdateLivesP1(aScore);
}
public void UpdateScoreP2(int aScore)
{
if(UIControl != null)
UIControl.UpdateScoreP2(aScore);
}
public void UpdateLivesP2(int aScore)
{
if(UIControl != null)
UIControl.UpdateLivesP2(aScore);
}
Player_SpaceShip_IP.cs will deal with the player’s health/lives management, but when a player runs out of lives, it calls the PlayerDied() function here so that the game controller can decide whether or not the game is actually over. If this is a single-player game, the game can end right after this function call, but if it is a two-player game, we need to make sure that both players have lost all their lives before ending the game completely:
public void PlayerDied(int whichID)
{
The ID of the player with no lives left is passed in as a parameter named whichID. This is used to set player1Dead or player2Dead to true, depending on the ID number:
if(whichID==1)
player1Dead=true;
if(whichID==2)
player2Dead=true;
This part of the code checks to see whether this is a two-player game and, if so, tells the UIControl script to show the game-over message. A call to Exit() is scheduled by an Invoke call 5 s later:
if(player1Dead && player2Dead && totalPlayers>1)
{
// both players are dead, so end the game
UIControl.ShowGameOver();
Invoke ("Exit",5);
When totalPlayers is 1, this must be a single-player game, so there is only a need for one call to happen to this function for it to show the game-over message and end the game:
} else if(totalPlayers==1)
{
// this is a single-player game, so just end the game now
// both players are dead, so end the game
UIControl.ShowGameOver();
Invoke ("Exit",5);
}
}
Once the PlayerDied() function has established that the game is over for all players, the Exit() function is called to shut things down and leave the game, loading the menu scene:
void Exit()
{
Any references held by the spawn controller are wiped out at the end of the game, with SpawnController.Restart(), and this game control script is destroyed:
SpawnController.Instance.Restart();
Destroy(this.gameObject);
SceneManager will be used to load the menu scene. GetSceneManager() makes sure that we have a reference to it, then a call to its LoadLevel() function passes the name of the menu scene to be loaded:
// make sure we have a scene manager to talk to
GetSceneManager ();
sceneManager.LoadLevel(mainMenuSceneName);
}
}
14.3.3 Player Spaceship
BaseTopDownSpaceShip is a movement control class discussed in Chapter 5 of this book.
using UnityEngine;
using System.Collections;
public class Player_SpaceShip_IP : BaseTopDownSpaceShip
{
private Standard_SlotWeaponController weaponControl;
private bool isInvulnerable;
private bool isRespawning;
public bool isMouseControlled;
private bool fire_input;
// alternative control method
private Mouse_Input mouse_input;
public GameObject theMeshGO;
public GameObject shieldMesh;
public BasePlayerManager myPlayerManager;
public BaseUserManager myDataManager;
public bool godMode =true;
public int ownerID =-1;
public override void Start()
{
// we want to keep the player object alive right through the // game, so we use DontDestroyOnLoad to keep it alive
DontDestroyOnLoad (this.transform);
didInit=false;
// tell our base class to initialize
base.Init ();
// now do our own init
this.Init();
}
public override void Init ()
{
// hide the invulnerability shield(!)
if(!godMode)
{
MakeVulnerable();
} else {
MakeInvulnerable();
}
// get a ref to the weapon controller
weaponControl= myGO.GetComponent<Standard_SlotWeaponController>();
// tell weapon control who we are (so all weapon control can // tell projectiles who sent them)
weaponControl.SetOwner(ownerID);
// if a player manager is not set in the editor, let's try // to find one
if(myPlayerManager==null)
myPlayerManager= myGO.GetComponent<BasePlayerManager>();
myDataManager= myPlayerManager.DataManager;
myDataManager.SetName("Player");
myDataManager.SetHealth(3);
// update UI lives
if(ownerID==1)
{
// if our owner ID is 1, we must be player 1
GameController_IP.Instance.UpdateLivesP1(myDataManager.GetHealth());
} else {
// we are player 2, so set that UI instead
GameController_IP.Instance.UpdateLivesP2(myDataManager.GetHealth());
}
if(isMouseControlled)
{
// if we are going to use mouse controls, add a // mouse input controller
mouse_input= gameObject.AddComponent<Mouse_Input>();
}
didInit=true;
}
public override void Update ()
{
// don't do anything until Init() has been run
if(!didInit)
return;
// do the update in our base
UpdateShip ();
// check to see if we're supposed to be controlling the // player before checking for firing
if(!canControl)
return;
// fire if we need to
if(fire_input)
{
// tell weapon controller to deal with firing
weaponControl.Fire();
}
}
public override void GetInput ()
{
if(isMouseControlled)
{
// we're overriding the default input function to // add in the ability to fire
horizontal_input= mouse_input.GetHorizontal();
vertical_input= mouse_input.GetVertical();
// firing isn't in the default spaceship // (BaseTopDownSpaceShip.cs) behavior, so we // add it here
fire_input= mouse_input.GetFire();
} else {
// we're overriding the default input function to // add in the ability to fire
horizontal_input= default_input.GetHorizontal();
vertical_input= default_input.GetVertical();
// firing isn't in the default spaceship // (BaseTopDownSpaceShip.cs) behavior, so we // add it here
fire_input= default_input.GetFire();
}
}
void OnCollisionEnter(Collision collider)
{
if(collider.gameObject.layer==17 && !isRespawning && !isInvulnerable)
{
LostLife();
}
}
void OnTriggerEnter(Collider other)
{
if(other.gameObject.layer==12)
{
// tell our sound controller to play a powerup sound
BaseSoundController.Instance.PlaySoundByIndex(3, myTransform.position);
// hit a powerup trigger
Destroy (other.gameObject);
// advance to the next weapon
weaponControl.NextWeaponSlot(false);
}
}
void LostLife()
{
isRespawning=true;
// blow us up!
GameController_IP.Instance.PlayerHit(myTransform);
// reduce lives by one
myDataManager.ReduceHealth(1);
// update UI lives
if(ownerID==1)
{
// as our ID is 1, we must be player 1
GameController_IP.Instance.UpdateLivesP1(myDataManager.GetHealth());
} else {
// as our ID is 2, we must be player 2
GameController_IP.Instance.UpdateLivesP2(myDataManager.GetHealth());
}
if(myDataManager.GetHealth()<1) // <- game over
{
// hide ship body
theMeshGO.SetActive(false);
// disable and hide weapon
weaponControl.DisableCurrentWeapon();
// do anything we need to do at game finished
PlayerFinished();
} else {
// hide ship body
theMeshGO.SetActive(false);
// disable and hide weapon
weaponControl.DisableCurrentWeapon();
// respawn
Invoke("Respawn",2f);
}
}
void Respawn()
{
// reset the 'we are respawning' variable
isRespawning= false;
// we need to be invulnerable for a little while
MakeInvulnerable();
Invoke ("MakeVulnerable",3);
// show ship body again
theMeshGO.SetActive(true);
// revert to the first weapon
weaponControl.SetWeaponSlot(0);
// show the current weapon (since it was hidden when the // ship explosion was shown)
weaponControl.EnableCurrentWeapon();
}
void MakeInvulnerable()
{
isInvulnerable=true;
shieldMesh.SetActive(true);
}
void MakeVulnerable()
{
isInvulnerable=false;
shieldMesh.SetActive(false);
}
public void PlayerFinished()
{
// tell the player controller that we have finished
GameController_IP.Instance.PlayerDied(ownerID);
}
}
14.3.3.1 Script Breakdown
Player_SpaceShip_IP derives from its movement controller, as do all of the player scripts:
using UnityEngine;
using System.Collections;
public class Player_SpaceShip_IP : BaseTopDownSpaceShip
{
The player spaceships persist across levels, keeping the same gameObjects and components from the start of the game right through to the end. In the Start() function, DontDestroyOnLoad tells Unity to keep this gameObject’s transform alive throughout:
public override void Start()
{
// we want to keep the player object alive right through the // game, so we use DontDestroyOnLoad to keep it alive
DontDestroyOnLoad (this.transform);
There are some variables that need to be set up by the base class (BaseTopDownSpaceShip), and rather than duplicating the code in this derived class, we call base.Init() to run the original script’s Init() function before calling Init() on this class:
didInit=false;
// tell our base class to initialize
base.Init ();
// now do our own init
this.Init();
}
The Boolean variable godMode is used to make the player invulnerable. The intention is that godMode will be set in the Unity editor Inspector window and only used during testing to get through a level easily. When Init() starts up, the first thing that happens is that the default state for vulnerability/invulnerability is set. The functions MakeVulnerable() and MakeInvulnerable() will deal, respectively, with showing or hiding a shield mesh around the player, as well as with setting the right variable to make it work:
public override void Init ()
{
// hide the invulnerability shield(!)
if(!godMode)
{
MakeVulnerable();
} else {
MakeInvulnerable();
}
The weapon control system needs to know what this player’s ID is, so that it can tell all of the projectiles it spawns which ID to carry with them (making the projectiles traceable back to either player 1 or player 2). The Standard_SlotWeaponController reference gets found and stored into the variable weaponControl, then its SetOwner() function is called to set the owner ID to the ID of the player:
// get a ref to the weapon controller
weaponControl= myGO.GetComponent<Standard_SlotWeaponController>();
// tell weapon control who we are (so all weapon control can tell // projectiles who sent them)
weaponControl.SetOwner(ownerID);
The default values for the player manager’s data manager are set up here:
// if a player manager is not set in the editor, let's try to find one
if(myPlayerManager==null)
myPlayerManager= myGO.GetComponent<BasePlayerManager>();
myDataManager= myPlayerManager.DataManager;
myDataManager.SetName("Player");
myDataManager.SetHealth(3);
The health system of the data manager is used, but instead of health points, it is used as a store for the number of lives. ownerID is used again here to tell the game controller which part of the UI (either player 1 or player 2) to update with this player’s default number of lives:
// update UI lives
if(ownerID==1)
{
// if our owner ID is 1, we must be player 1
GameController_IP.Instance.UpdateLivesP1(myDataManager.GetHealth());
} else {
// we are player 2, so set that UI instead
GameController_IP.Instance.UpdateLivesP2(myDataManager.GetHealth());
}
Setting the isMouseControlled variable to true will add a new script component from the script Mouse_Input.cs to be used as input for this player:
if(isMouseControlled)
{
// if we are going to use mouse controls, add a mouse input // controller
mouse_input= gameObject.AddComponent<Mouse_Input>();
}
With Init() all done, the didInit Boolean variable is set to true. Other functions will refer to this to check that the player has been set up successfully before trying to manipulate it in ways that might otherwise cause errors or problems:
didInit=true;
}
The Update() function is used for all of the main player updates. It overrides the Update() function from the base class (BaseTopDownSpaceShip.cs):
public override void Update ()
{
Before doing anything to the player, such as updating its position or talking to the weapon controller, the Init() function needs to have been called and completed. If it has, didInit will be true. If not, didInit will be false, and this part of the code will drop out of the function before anything untoward happens:
// don't do anything until Init() has been run
if(!didInit)
return;
The base class provides a function called UpdateShip(). It deals with moving the ship around, so all we need to do for the spaceship to behave as expected is to call UpdateShip() and the BaseTopDownSpaceShip class will do the rest:
// do the update in our base
UpdateShip ();
When canControl is false, the function will drop out before it gets to check the input from the fire button:
// check to see if we're supposed to be controlling the // player before checking for firing
if(!canControl)
return;
fire_input is a Boolean set by the GetInput() function. When the fire button is down, fire_input will be true, and the call is made to weaponControl.Fire() to launch a projectile:
// fire if we need to
if(fire_input)
{
// tell weapon controller to deal with firing
weaponControl.Fire();
}
}
To keep the script flexible, the GetInput() function talks to the input controller. If we were to use a different input system, the GetInput() function in the base class may be overridden to include whatever is needed. That is exactly what happens here, as the GetInput() function is overridden:
public override void GetInput ()
{
Mouse input is used for the second player during a two-player cooperative game. The default system is either a game controller or the keyboard (as used by the Keyboard_Input.cs script), but when isMouseControlled is true, it will use mouse_input object for input, instead. The variables:
if(isMouseControlled)
{
// we're overriding the default input function to add in the // ability to fire
horizontal_input= mouse_input.GetHorizontal();
vertical_input= mouse_input.GetVertical();
// firing isn't in the default spaceship // (BaseTopDownSpaceShip.cs) behavior, so we add it here
fire_input= mouse_input.GetFire();
} else {
// we're overriding the default input function to add in the // ability to fire
horizontal_input= default_input.GetHorizontal();
vertical_input= default_input.GetVertical();
The BaseTopDownSpaceShip controller script only includes code to move the spaceship around and not to fire, so we need to add some code here to detect the fire button from the default_input input controller and to set the variable fire_input:
fire_input= default_input.GetFire();
}
}
The enemy projectiles are on layer 17—named enemy_projectile—which is set by the enemy weapon’s mounting point. Whichever layer the mounting point is set at will be used for its projectiles. Here OnCollisionEnter() looks for collisions between the player and the enemy projectiles to see whether or not the player should lose a life:
void OnCollisionEnter(Collision collider)
{
The collider belonging to the other object involved in a collision is passed in by the engine, as a parameter, to this function. The collider’s gameObject layer is checked to see whether it matches the enemy projectile layer 17. If the player is not respawning and is not set to be invulnerable, we can go ahead and call the LostLife() function:
if(collider.gameObject.layer==17 && !isRespawning && !isInvulnerable)
{
LostLife();
}
}
Power-ups, which upgrade the weapon, are gameObjects with box colliders on that are set to be triggers (the IsTrigger property of the collider set to true via the Unity editor Inspector window). When the player hits the trigger, a sound is played and the power-up is destroyed. To upgrade the weapon, the weapon controller is told to advance on to the next weapon slot.
What this means is that the weapon system should be set up so that the lowest-powered weapon is in the first slot and, progressively, more powerful weapons set in each slot up from there. Adding and setting up weapons are simply a case of using the Unity editor Inspector window (with the player gameObject selected) and dragging in the prefabs for each weapon into the Weapons array of the Standard_Slot Weapon Controller component (see Figure 14.3).

weaponControl.NextWeaponSlot() tells the weapon controller to move on to the next slot:
void OnTriggerEnter(Collider other)
{
if(other.gameObject.layer==12)
{
// tell our sound controller to play a powerup sound
BaseSoundController.Instance.PlaySoundByIndex(3, myTransform.position);
// hit a powerup trigger
Destroy (other.gameObject);
// advance to the next weapon
weaponControl.NextWeaponSlot(false);
}
}
LostLife() is called when the player is hit by an enemy projectile:
void LostLife()
{
The respawning process takes a little time, so isRespawning is a Boolean set to ensure that it does not try to respawn more than once at the same time:
isRespawning=true;
The game controller’s PlayerHit() function will make a nice explosion effect at the position of the transform passed into it:
// blow us up!
GameController_IP.Instance.PlayerHit(myTransform);
This player’s data manager tracks health levels. myDataManager.ReduceHealth() takes a single integer parameter of how much health should be reduced. In this game, the health level is treated as lives, so it is called to take away one life here:
// reduce lives by one
myDataManager.ReduceHealth(1);
The game controller is called on to update the UI, either UpdateLivesP1() or UpdateLivesP2(), depending on the ownerID for this player:
// update UI lives
if(ownerID==1)
{
// as our ID is 1, we must be player 1
GameController_IP.Instance.UpdateLivesP1(myDataManager.GetHealth());
} else {
// as our ID is 2, we must be player 2
GameController_IP.Instance.UpdateLivesP2(myDataManager.GetHealth());
}
When this player’s health level is less than 1, it is game over for this player:
if(myDataManager.GetHealth()<1) // <- game over
{
The player spaceship model is hidden by GameObject.SetActive():
// hide ship body
theMeshGO.SetActive(false);
The weapon needs to be disabled when the player is not active, which is the job of the DisableCurrentWeapon() function on the weapon controller script (a reference to Standard_SlotWeapon_Controller held in the variable weaponControl):
// disable and hide weapon
weaponControl.DisableCurrentWeapon();
The PlayerFinished() function is called now to close down this player:
// do anything we need to do at game finished
PlayerFinished();
} else {
Reaching the else of this condition means that the player just needs to be respawned and that it has more than 1 life remaining. The player model is hidden with GameObject.SetActive():
// hide ship body
theMeshGO.SetActive(false);
The weapon is disabled (it will be re-enabled when the player is respawned):
// disable and hide weapon
weaponControl.DisableCurrentWeapon();
Finally, a call to the Respawn() function of this class is scheduled to happen 2 s from now via Unity’s Invoke() function:
// respawn
Invoke("Respawn",2f);
}
}
After the player has been destroyed by an enemy projectile, it is hidden from view and its collisions ignored. The Respawn() function resets the player state back to operational:
void Respawn()
{
By the end of this function call, the player will have respawned, which means isRespawning is now to be set to false:
// reset the 'we are respawning' variable
isRespawning= false;
To prevent respawning the player into a dangerous place on screen (such as right into the path of a projectile) and causing instant death upon respawn, the player is made invulnerable for a few seconds:
// we need to be invulnerable for a little while
MakeInvulnerable();
The player regains its susceptibility to explode upon projectile impact in 3 s time, which is done with an Invoke call to MakeVulnerable():
Invoke ("MakeVulnerable",3);
The player’s spaceship model is set active, effectively displaying it again, here:
// show ship body again
theMeshGO.SetActive(true);
Any power-ups are lost on respawn by setting the weapon slot back to the beginning. If you wanted to keep power-ups even after a life is lost, you could comment this line out or perhaps replace it with weaponControl.PrevWeaponSlot() to downgrade the weapon to the previous slot rather than reset it all the way back to the beginning:
// revert to the first weapon
weaponControl.SetWeaponSlot(0);
The EnableCurrentWeapon() function on weaponControl will make sure that the weapon is displayed correctly after it is re-enabled:
// show the current weapon (since it was hidden when the ship // explosion was shown)
weaponControl.EnableCurrentWeapon();
}
MakeInvulnerable() and MakeVulnerable() set the isInvulnerable Boolean variable accordingly and show or hide the shield mesh referenced in shieldMesh, using GameObject.SetActive:
void MakeInvulnerable()
{
isInvulnerable=true;
shieldMesh.SetActive(true);
}
void MakeVulnerable()
{
isInvulnerable=false;
shieldMesh.SetActive(false);
}
The only thing left to do when this player has run out of lives (health) is to tell the game controller script about it. That way, the game controller can decide whether or not to end the game completely:
public void PlayerFinished()
{
// tell the player controller that we have finished
GameController_IP.Instance.PlayerDied(ownerID);
}
}
14.3.4 Enemies
The Enemy_IP.cs script:
using UnityEngine;
using System.Collections;
public class Enemy_IP : BaseArmedEnemy
{
private bool isRespawning;
// here we add collision and respawning to the base armed enemy // behavior
public void OnCollisionEnter(Collision collider)
{
// when something collides with us, we check its layer to // see if it is on 9 which is our projectiles
// (Note: remember when you add projectiles, set the layer // of the weapon parent correctly!)
if(collider.gameObject.layer==9 && !isRespawning)
{
myDataManager.ReduceHealth(1);
if(myDataManager.GetHealth()==0)
{
tempINT= int.Parse(collider.gameObject.name);
// tell game controller to make an explosion at our // position and to award the player points for // hitting us
TellGCEnemyDestroyed();
// if this is a boss enemy, tell the game controller // when we get destroyed so it can end the level
if(isBoss)
TellGCBossDestroyed();
// destroy this
Destroy(gameObject);
}
}
}
// game controller specifics (which will be overridden for // different game controller scripts)
// ----------------------------------------------------------------
public virtual void TellGCEnemyDestroyed()
{
GameController_IP.Instance.EnemyDestroyed(myTransform.position, pointsValue, tempINT);
}
public virtual void TellGCBossDestroyed()
{
GameController_IP.Instance.BossDestroyed();
}
// ----------------------------------------------------------------
}
14.3.4.1 Script Breakdown
The enemy behavior is based on path following provided by the BaseAIController.cs script. It derives from the BaseArmedEnemy class, discussed in Chapter 9:
public class Enemy_IP : BaseArmedEnemy
{
The BaseArmedEnemy class adds a data manager and support for the weapon system to our enemy script, but it does not deal with anything more than that. This script starts out by adding collision checking and will deduct health from the data manager when hit:
public void OnCollisionEnter(Collision collider)
{
In this game, the player projectiles are set to use layer 9 (named player_projectile). When a collision occurs with this enemy, the colliding collider is passed in as a parameter and its layer compared. If it matches with the player projectile and this enemy is not respawning, a call to the data manager stored in myDataManager is made to reduce health by 1:
if(collider.gameObject.layer==9 && !isRespawning)
{
myDataManager.ReduceHealth(1);
When this enemy’s health is at 0, it is time to explode:
if(myDataManager.GetHealth()==0)
{
Now, as I write this, I can almost hear the collective mutter of hundreds of programmers tutting at how the ID is retrieved from the projectile. It is not the most efficient or the tidiest way of doing it, but it works. Each projectile is named by its owner ID, meaning that the quickest way to find out where the projectile came from is to get its name via collider.gameObject.name. In this line of code, the ID is retrieved from the name of the projectile hitting the enemy, converted into an integer by int.Parse() and stored in the variable tempINT for use later in the script.
Perhaps a cleaner method would have been to store a reference to the collider’s gameObject and use gameObject.GetComponent to find its ProjectileController.cs script component. From there, we could have gotten the ID from ProjectileController; however, without doing some extensive tests, it is hard to say which method would end up more or less efficient. In this code, the gameObject’s name is converted to an integer, and I would expect the difference in CPU hit to be negligible between converting the string to an integer and having to look up the ProjectileController component with GetComponent():
tempINT= int.Parse(collider.gameObject.name);
The way that this script tells the game controller about the destruction of this enemy may seem a little odd, as it is contained in another function named TellGCEnemyDestroyed(). By splitting it out into its own function, any script that were to derive from this one could easily override the TellGCEnemyDestroyed() function to easily swap out the game controller for one of another type or name:
// tell game controller to make an explosion at our position // and to award the player points for hitting us
TellGCEnemyDestroyed();
Boss enemy types will use this script, too, so we have the Boolean variable isBoss to tell whether or not this is a regular enemy or an end-of-level boss. If it is a boss, TellGCBossDestroyed() is called, which tells the game controller about the hit so that it can act differently to this enemy’s destruction. In this game, the game controller will start to end the level when the boss has been destroyed, and this function is called:
// if this is a boss enemy, tell the game controller when we // get destroyed so it can end the level
if(isBoss)
TellGCBossDestroyed();
Regardless of the type of enemy, it was a hit, and its health is at 0, so it needs destroying. The Destroy command removes this enemy’s gameObject from memory:
// destroy this
Destroy(gameObject);
}
}
}
As mentioned early in this section, the TellGCEnemyDestroyed() function (and also the TellGCBossDestroyed() function) is designed to be overridden if a new type of game controller is used. These functions call EnemyDestroyed() or BossDestroyed() on it.
GameController_IP.EnemyDestroyed() takes three parameters: the position of the enemy destroyed, how much score the player should be awarded for blasting it, and, finally, the owner ID of the projectile so that the player may be identified. Without the ID, the game controller would not know which player to award the score to:
public virtual void TellGCEnemyDestroyed()
{
GameController_IP.Instance.EnemyDestroyed(myTransform.position, pointsValue, tempINT);
}
public virtual void TellGCBossDestroyed()
{
GameController_IP.Instance.BossDestroyed();
}
14.3.5 Waypoint Follower
Enemy spaceships move along waypoint paths as they fire at the player at the bottom of the screen. The BaseArmedEnemy script controls weapon firing, and the AI controller deals with path following (through its translate_along_waypoint_path state). For the AI controller to do this, it needs to know which waypoint controller to use and needs to have its AIState set (its default state is to patrol, not follow, waypoints) and the BaseWaypointFollower.cs script serves this purpose.
The BaseWaypointFollower.cs script:
// uses the translate_along_waypoint_path function of the AIController to // follow along a path
public class BaseWaypointFollower : ExtendedCustomMonoBehavior
{
public BaseAIController AIController;
public virtual void Start ()
{
if(!didInit)
Init ();
}
public virtual void Init ()
{
// cache our transform
myTransform= transform;
// cache our gameObject
myGO= gameObject;
// cache a reference to the AI controller
AIController= myGO.GetComponent<BaseAIController>();
if(AIController==null)
AIController= myGO.AddComponent<BaseAIController>();
// run the Init function from our base class // (BaseAIController.cs)
AIController.Init();
// tell AI controller that we want it to control this object
AIController.SetAIControl(true);
// tell our AI to follow waypoints
AIController.SetAIState(AIStates.AIState.translate_along_waypoint_path);
// set a flag to tell us that init has happened
didInit= true;
}
public virtual void SetWayController(Waypoints_Controller aWaypointControl)
{
if(AIController==null)
Init ();
// pass this on to our waypoint controller, so that it can // follow the waypoints
AIController.SetWayController(aWaypointControl);
}
}
14.3.5.1 Script Breakdown
The BaseWaypointFollower class derives from ExtendedCustomMonoBehavior, which adds some extra functionality and common variables:
public class BaseWaypointFollower : ExtendedCustomMonoBehavior
{
As per most of the scripts in this book, Start() calls Init():
public virtual void Start ()
{
if(!didInit)
Init();
}
Init() creates references to the transform and gameObjects, and the variable AIController is set (GameObject.GetComponent() looks for BaseAIController):
public virtual void Init ()
{
// cache our transform
myTransform= transform;
// cache our gameObject
myGO= gameObject;
// cache a reference to the AI controller
AIController= myGO.GetComponent<BaseAIController>();
In this game, as there are properties we need to set through the Unity editor Inspector window, there will always be a BaseAIController component attached to the enemy prefabs, but in the event that no BaseAIController component has been attached to this object, this script uses GameObject.AddComponent() to make a new one. This is mainly so that the script can be reused in other games:
if(AIController==null)
AIController= myGO.AddComponent<BaseAIController>();
The AIController needs to be initialized:
// run the Init function from our base class // (BaseAIController.cs)
AIController.Init();
AIController.SetAIControl() tells the AI controller that it can control this enemy. Its SetAIState() function is called next, setting the state to translate_along_waypoint_path (see Chapter 9 of this book for a full breakdown of AIStates and the BaseAIController.cs script):
// tell AI controller that we want it to control this object
AIController.SetAIControl(true);
// tell our AI to follow waypoints
AIController.SetAIState(AIStates.AIState.translate_along_waypoint_path);
// set a flag to tell us that init has happened
didInit= true;
}
SetWayController() will be called by the game controller to tell this script which Waypoints_Controller instance to use. Once this function has it, a call to AIController.SetWayController() passes on the reference:
public virtual void SetWayController(Waypoints_Controller aWaypointControl)
{
if(AIController==null)
Init ();
// pass this on to our waypoint controller, so that it can // follow the waypoints
AIController.SetWayController(aWaypointControl);
}
}
* “Can Asteroids Conquer Space Invaders?” Electronic Games, Winter 1981, 30–33 (http://www.digitpress.com/library/magazines/electronic_games/electronic_games_winter81.pdf).