
Chapter 11
Dish: Lazer Blast Survival
In the late 1970s came a turn-based game called Robots from Berkeley Software Distribution (BSD). In Robots, the player must escape from a swarm of enemies that move in closer toward the player at each turn. In the original version of the game, the player moves around the arena in an attempt to avoid contact between enemies and player, which would end the game.
Robots is often referred to as the beginning of the arena shooter—a term used to describe a top-down shoot ’em up game with the action locked into a limited area similar to an arena. There were derivatives of the Robots concept, but the overall idea of escaping from hoards of enemies in an enclosed area remained the same and the game was perfect for the low-spec computers of the time. Before long, it was inevitable that it would evolve into something faster—and in real time. In 1980, Stern Electronics introduced the world to Berserk.
Berserk started out as an arcade game but quickly moved to home consoles such as the Atari 2600, 5200, and Vectrex systems. It was, in essence, the evolution of Robots into a real-time arcade shooter. In this version, the player makes his way through a randomly generated maze, zapping enemies. Each screen contained a number of enemies, which could be either destroyed or left behind as the player made his way to the edge of the screen to move on to the next part of the maze. There was no scrolling; movement between each section was by a screen swap. One of Berserk’s most outstanding and well-remembered features was a speech synthesis system in the arcade machines that allowed the robots to talk. Arcades everywhere rumbled to random robot phrases and kids like me put on their best robot voices to say “Get the humanoid”, “The intruder must not escape”, and “Flight like a robot!”.
The video game Robotron 2048 arrived in 1982 and was made by a company called Williams Electronics. Robotron featured the same basic structure as Berserk and Robots, with screens full of robots moving toward the player. Designed by Eugene Jarvis and Larry DeMar, the game introduced dual-stick controls to the genre, which have become a common component in today’s arena shooters.
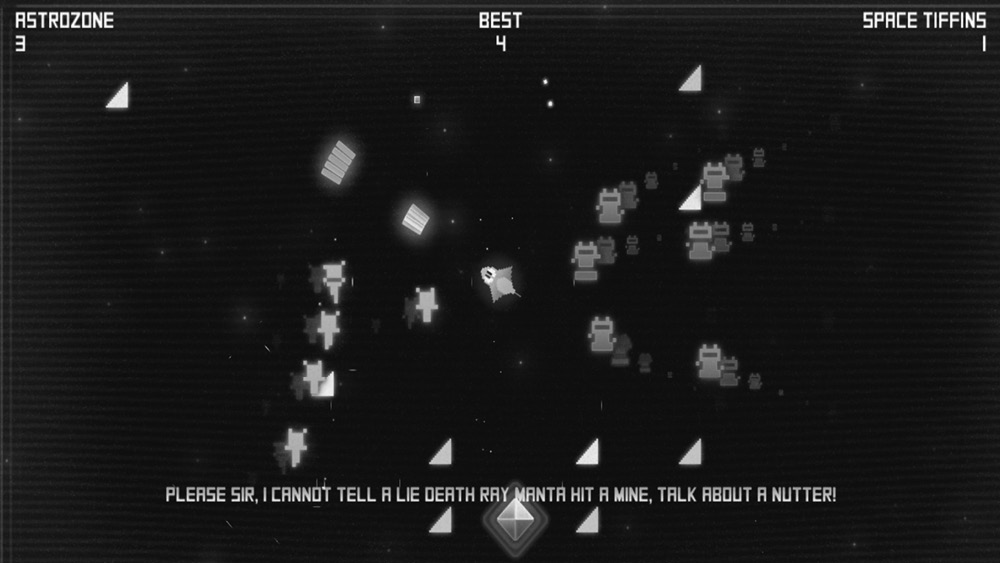
Today, the arena shooter genre is alive and well. Over the last few years, there has been quite the renaissance in the arena shooter, mostly in zombie survival shooters. Games such as Geometry Wars on Xbox360 and a Robotron remake have spun off into a new genre known as the psychedelic arena shooter. I was lucky enough to get to work with Robert Fearon, a true leader in the genre, on bringing his masterpiece Death Ray Manta to iOS and Android devices (as shown in Figure 11.1).
Lazer Blast Survival (see Figure 11.2) is a basic template for a top-down shooter, which borrows heavily from its predecessors; the action has a single player moving around an arena fighting off hoards of killer robots.
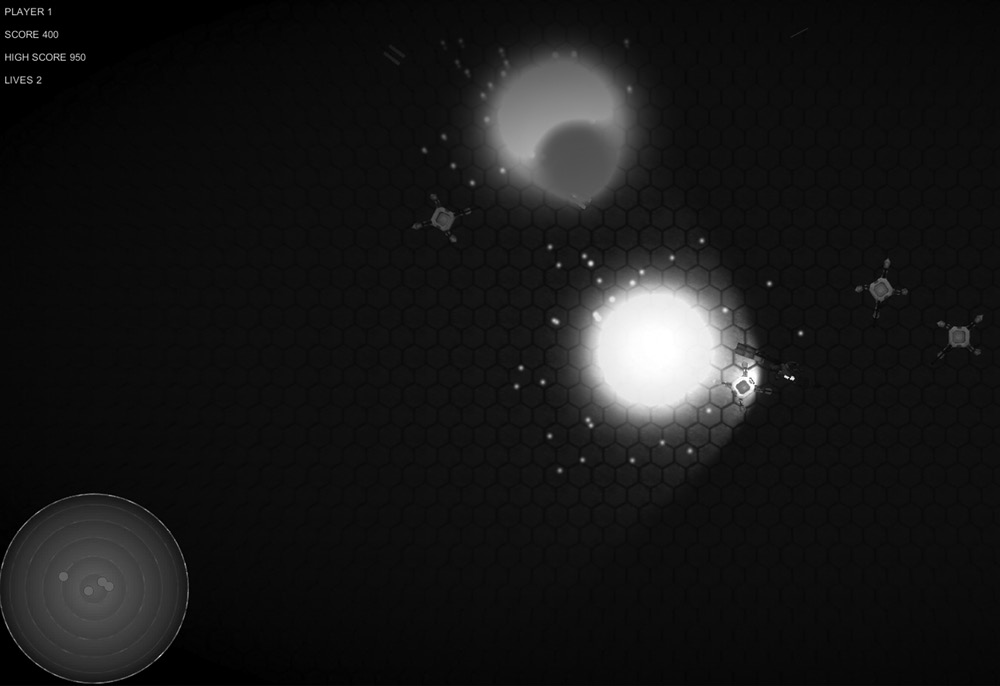
This game may be found in the example games project, its game scenes in the Scenes/Lazer Blast Survival folder named level_1, level_2 and menu_IP.
Its prefabs are located in the Prefabs/Games/Lazer Blast Survival folder.
A genre-familiar directional control system drives the action—that is, when you press the left or right key, the player moves toward the left or right of the play area and when you press the up or down key the player moves toward the top or bottom of the play area. There is a teleportation particle effect to pre-warn the player as to where the next attack wave will be appearing, which makes the spawning system fair—without the pre-warning effects it would be too easy for the player to be standing right where a new enemy spawns and for it to be killed instantly.
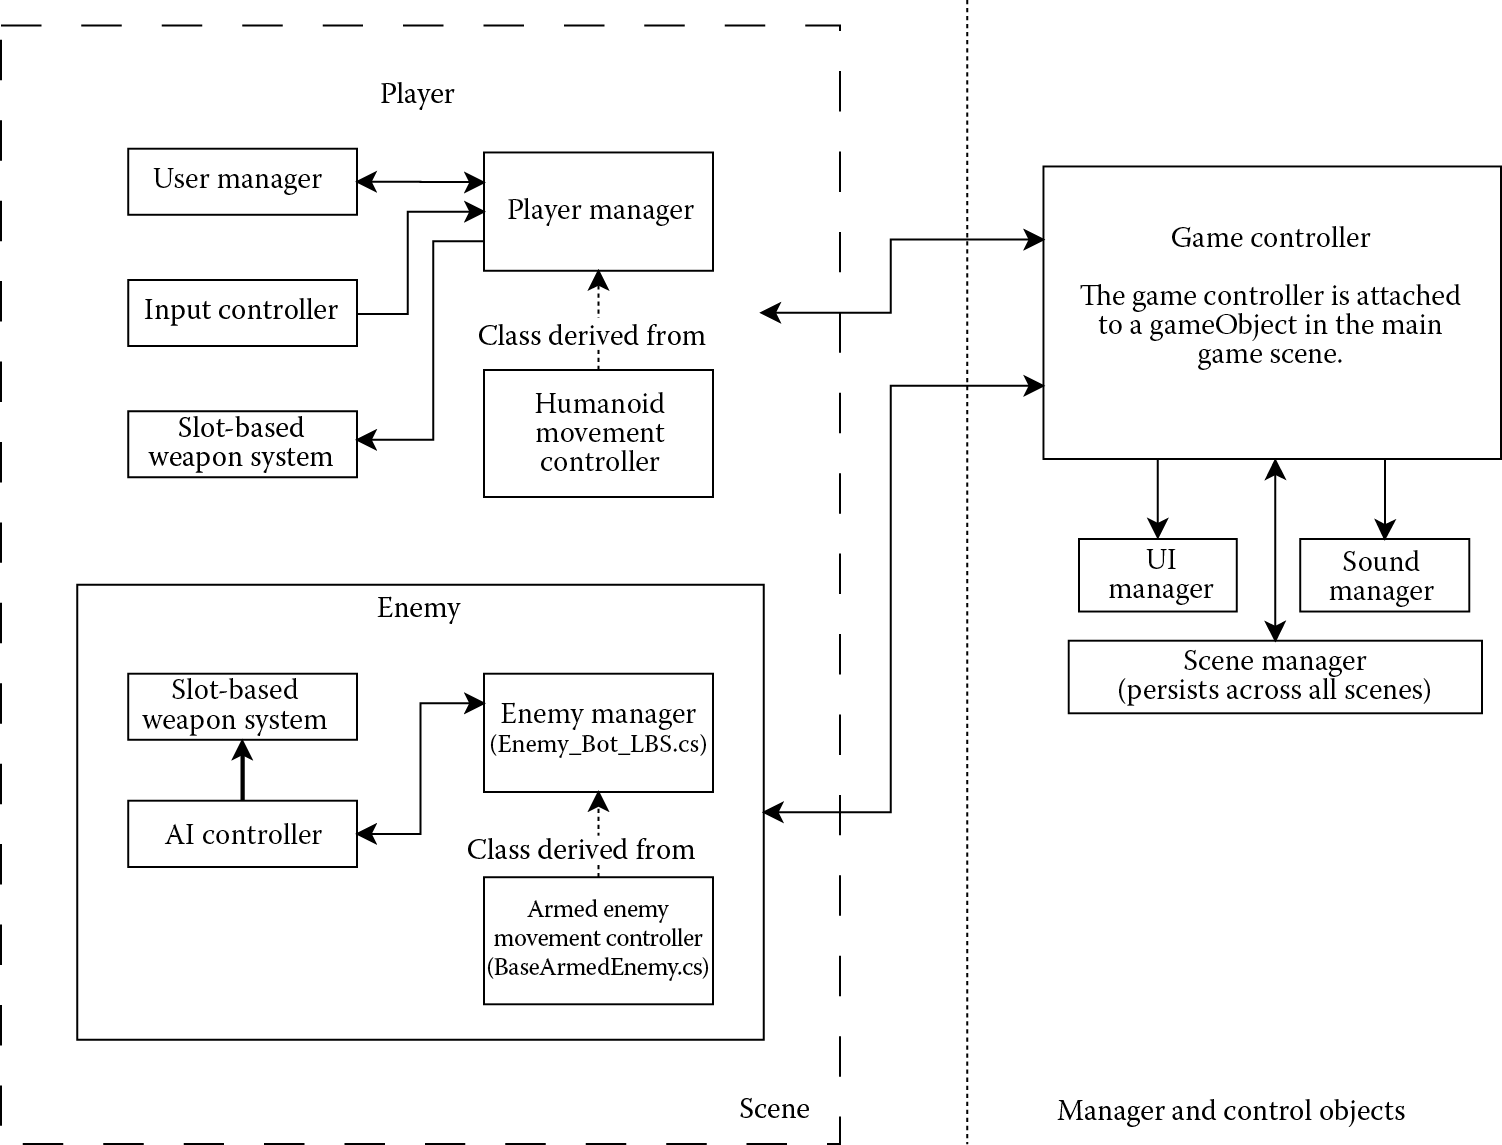
Additions to the core framework are minimal, and you can see the structure of the game in Figure 11.3.
11.1 Main Menu Scene
![]()
Lazer Blast Survival works across just two scenes. The main menu scene loads a game scene containing an arena 3D environment and everything to make the game work how it should.
11.2 Main Game Scene
![]()
Rather than loading different scenes for each attach wave, the game works by instantiating prefabs full of enemies into the same scene over and over until the player has no lives remaining.
The main menu consists of a single gameObject, and the main menu script is shown in Chapter 10.
The main game scene Hierarchy structure looks like this:
- ARENA
- (Models that make up the environment)
- Arena_Colliders
- (Colliders for the level)
- Directional light
- GameController
- Main Camera
- MusicController
- Player_Startpoint
- SoundController
- SpawnController
- UI
- Game Over Graphic
- Get Ready Graphic
Note that the game controller dynamically creates players and enemies when the game starts. References to several prefabs and gameObjects are set in the Unity Inspector window:
- Game controller prefabs
- Explosion prefab (a particle effect for explosions)
- Player Prefab List array containing a reference to the Top_Down_Player prefab
- StartPoints array containing a reference to the Player_Startpoint gameObject in the scene
- The Radar Control Script contains a reference to the Main Camera (which, in turn, has an instance of the RadarGUI.cs component attached to it)
- The BaseSoundController.cs script attached to the Sound Controller gameObject has an array called Game Sounds, containing references to:
- shoot1
- explode2
- player_explode
- powerup
- spawner 1
- The Spawn Controller gameObject has an instance of WaveSpawner.cs attached to it, with the following references in its Spawn Object Prefabs array:
- Spawn_Structure1
- Spawn_Structure2
- Spawn_Structure3
- The UI gameObject has a script named UI_LBS.cs attached to it. It refers to
- GAMEOVER_GRAPHIC gameObject
- GETREADY_GRAPHIC gameObject
11.3 Prefabs
![]()
The prefabs that make up the game are
ENEMIES
EnemyBot
ENEMY WAVES
Spawn_Structure 1
Spawn_Structure 2
Spawn_Structure 3
PLAYERS
Top_down_player
Top_down_player_ALT
PROJECTILES
Blast
Blast2
WEAPONS
Blaster
Blaster_1
EXPLOSION PREFAB (not specific to this game; the explosion prefab is in the PARTICLE_EFFECTS folder)
The rest of this chapter will look at the scripts and the programming behind the script components within the prefabs and gameObjects looked at so far.
11.4 Ingredients
![]()
Lazer Blast Survival uses the following ingredients:
- Game Controller. The game controller script for this game derives from BaseGameController.cs
- The Main Player. The player rig is based on a Unity character controller and the scripts used to control the main player are as follows:
- A main player script derived from BaseTopDown.cs (found in Chapter 5, Section 5.2.)
- The player data manager BasePlayerManager.cs (found in Chapter 3, Section 3.3.)
- The weapon controller Standard_Slot_Weapon_Controller.cs
- The enemy bots. The enemies are made of the following scripts:
- Enemy bot controller derived from BaseArmedEnemy.cs
- BaseAIController.cs for patrolling and target chasing logic.
- SimpleBotMover.cs to make the bot move around.
- A rigidbody component.
- The weapon controller Standard_Slot_Weapon_Controller.cs
- A box collider component.
- Wave spawning. Attack waves are made from prefabs containing groups of enemies. A wave spawner script named Wave_Spawner.cs instantiates the prefabs in a random order and keeps track of how many enemies there are in the level so that it knows when to spawn the next wave. Another small script called WaveProperties.cs is attached to the enemy wave prefabs to tell the spawner how many enemies it contains.
- Projectiles. The projectiles are made up of the following:
- Automatic Destroy Object script AutomaticDestroyObject.cs
- ProjectileController.cs
- Rigidbody component.
- A sphere collider component.
- User Interface. The user interface for in-game will derive from the BaseUIDataManager script from Chapter 10, Section 10.2, which adds data management. The main menu uses the main menu system outlined in Chapter 10.
- Top Down Camera. One of the camera scripts from Chapter 4.
- Sound Controller. The sound controller script from Chapter 8.
- Music Controller. The music controller script from Chapter 8.
There are other pieces to the puzzle, such as an empty gameObject to act as a starting position for the player named SpawnPosition (its transform position will be used as the location to spawn the player at). As the scripts are broken down later in this chapter, the other components should become apparent.
Note that those components already described in detail elsewhere in this book will not be covered in this section (the full list of ingredients, from early in this section, states which scripts are from elsewhere).
11.5 Game Controller
![]()
The Game Controller is a central communications hub for the game. It derives from BaseGameController, overriding some of the base functions as well as adding some of its own.
The full GameController_LBS.cs script looks like this:
using UnityEngine;
using System.Collections;
public class GameController_LBS : BaseGameController
{
public string mainMenuSceneName = "menu_LBS";
public GameObject[] playerPrefabList;
public Wave_Spawner WaveSpawnController;
public Transform playerParent;
public Transform [] startPoints;
[System.NonSerialized]
public GameObject playerGO1;
private Vector3[] playerStarts;
private Quaternion[] playerRotations;
private ArrayList playerList;
private ArrayList playerTransforms;
private Player_LBS thePlayerScript;
private Player_LBS focusPlayerScript;
[System.NonSerialized]
public BaseUserManager mainPlayerDataManager1;
private int numberOfPlayers;
public UI_LBS UIControl;
[System.NonSerialized]
public static GameController_LBS Instance;
public float gameSpeed=1;
public RadarGUI theRadarControlScript;
public GameController_LBS()
{
Instance=this;
}
public void Start()
{
Init();
Time.timeScale=gameSpeed;
}
public void Init()
{
Invoke ("StartPlayer",1);
SpawnController.Instance.Restart();
numberOfPlayers= playerPrefabList.Length;
// initialize some temporary arrays we can use to set up the // players
Vector3 [] playerStarts = new Vector3 [numberOfPlayers];
Quaternion [] playerRotations = new Quaternion [numberOfPlayers];
// we are going to use the array full of start positions that must // be set in the editor, which means we always need to
// make sure that there are enough start positions for the number // of players
for (int i = 0; i < numberOfPlayers; i++)
{
// grab position and rotation values from start position // transforms set in the inspector
playerStarts [i] = (Vector3) startPoints [i].position;
playerRotations [i] = (Quaternion) startPoints [i].rotation;
}
SpawnController.Instance.SetUpPlayers(playerPrefabList, playerStarts, playerRotations, playerParent, numberOfPlayers);
playerTransforms=new ArrayList();
// now let's grab references to each player's controller // script
playerTransforms =
SpawnController.Instance.GetAllSpawnedTransforms();
playerList=new ArrayList();
for (int i = 0; i < numberOfPlayers; i++)
{
Transform tempT= (Transform)playerTransforms[i];
Player_LBS tempController=
tempT.GetComponent<Player_LBS>();
playerList.Add(tempController);
tempController.Init ();
}
// grab a ref to the player's gameobject for later
playerGO1 = SpawnController.Instance.GetPlayerGO(0);
// grab a reference to the focussed player's controller script, so // that we can do things like access its speed variable
thePlayerScript = (Player_LBS)
playerGO1.GetComponent<Player_LBS>();
// assign this player the id of 0
thePlayerScript.SetID(0);
// set player control
thePlayerScript.SetUserInput(true);
// as this is the user, we want to focus on this for UI etc.
focusPlayerScript = thePlayerScript;
// see if we have a camera target object to look at
Transform aTarget=
playerGO1.transform.FindChild("CamTarget");
if(aTarget!=null)
{
// if we have a camera target to aim for, instead of // the main player, we use that instead
Camera.main.SendMessage("SetTarget", aTarget);
} else {
// tell the camera script to target the player
Camera.main.SendMessage("SetTarget",
playerGO1.transform);
}
// finally, tell the radar about the new player
theRadarControlScript.SetCenterObject(playerGO1.transform);
}
void StartPlayer()
{
// grab a reference to the main player's data manager so we // can update its values later on (scoring, lives etc.)
mainPlayerDataManager1=
playerGO1.GetComponent<BasePlayerManager>().DataManager;
// all ready to play, let's go!
thePlayerScript.GameStart();
}
public override void EnemyDestroyed (Vector3 aPosition,
int pointsValue, int hitByID)
{
// tell our sound controller to play an explosion sound
BaseSoundController.Instance.PlaySoundByIndex(1, aPosition);
// tell main data manager to add score
mainPlayerDataManager1.AddScore(pointsValue);
// update the score on the UI
UpdateScoreP1(mainPlayerDataManager1.GetScore());
// play an explosion effect at the enemy position
Explode (aPosition);
// tell spawn controller that we're one enemy closer to the // next wave
WaveSpawnController.Fragged();
}
public void PlayerHit(Transform whichPlayer)
{
// tell our sound controller to play an explosion sound
BaseSoundController.Instance.PlaySoundByIndex(2, whichPlayer.position);
// call the explosion function!
Explode(whichPlayer.position);
}
public void AddEnemyToRadar(Transform aTransform)
{
theRadarControlScript.AddEnemyBlipToList(aTransform);
}
public void RemoveEnemyFromRadar(Transform aTransform)
{
theRadarControlScript.RemoveEnemyBlip(aTransform);
}
public Player_LBS GetMainPlayerScript ()
{
return focusPlayerScript;
}
public Transform GetMainPlayerTransform ()
{
return playerGO1.transform;
}
public GameObject GetMainPlayerGO ()
{
return playerGO1;
}
public void PlayerDied(int whichID)
{
// this is a single player game, so just end the game now
// both players are dead, so end the game
UIControl.ShowGameOver();
Invoke ("Exit",5);
}
void Exit()
{
Application.LoadLevel(mainMenuSceneName);
}
// UI update calls
//
public void UpdateScoreP1(int aScore)
{
UIControl.UpdateScoreP1(aScore);
}
public void UpdateLivesP1(int aScore)
{
UIControl.UpdateLivesP1(aScore);
}
}
11.5.1 Script Breakdown
GameController_LBS.cs derives from BaseGameController, which, in turn, derives from MonoBehavior so that it can tap into some of Unity’s built-in calls to functions like Update(), Awake() and Start(), etc.:
using UnityEngine;
using System.Collections;
public class GameController_LBS : BaseGameController
{
When the game has finished, the string type variable mainMenuSceneName is used to load the main menu. The main menu scene of this game is named “menu_LBS”:
public string mainMenuSceneName = "menu_LBS";
Skipping past the variable declarations (as their functions should become obvious as the script is analyzed later in this section), there is a constructor for GameController_LBS. When this script is attached to a GameObject, the constructor will be called when the game first starts (as constructors are called when an instance of a script is made).
The constructor sets the static variable named Instance to the instance of the script that this function is being called on. From here on, when another script needs to talk to the game controller it can do so through GameController_LBS.Instance():
public GameController_LBS()
{
Instance=this;
}
Time.timeScale need not always be set to 1. gameSpeed is a public variable which may be used to set the game timing to one that makes for a specific type of game play experience. When Start() is called by the Unity engine, the time scale is set just after Init() is called:
public void Start()
{
Init();
Time.timeScale=gameSpeed;
}
The player will not be allowed to move straight away, and the Init() function schedules a call, with the Invoke method, to start player movement 1 second later.
This Init() function will be called when the game restarts. When the game restarts, SpawnController may still hold references to the old objects it has spawned. By calling Restart() on its instance, everything gets cleared out ready for a new round:
public void Init()
{
Invoke ("StartPlayer",1);
SpawnController.Instance.Restart();
Rather than hard-coding a player prefab or specific player objects, to keep things flexible the game controller uses an array named playerPrefabList. Player prefab references are added via the Inspector window in the Unity editor, and the game controller uses the array to spawn them when the game starts. numberOfPlayers holds a count of the players in the playerPrefabList array:
numberOfPlayers= playerPrefabList.Length;
As with players, gameObjects used to define player start positions are also stored in an array called startPoints (again, its references are set in the Inspector window of the Unity editor). Note that there needs to be at least the same amount of start positions as players for this function to work (as each player will need one).
The function iterates through the start position objects to get at positions and rotations from them and store each one into the arrays playerStarts and playerRotations:
// initialize some temporary arrays we can use to set up the // players
Vector3 [] playerStarts = new Vector3 [numberOfPlayers];
Quaternion [] playerRotations = new Quaternion [numberOfPlayers];
// we are going to use the array full of start positions that must // be set in the editor, which means we always need to make sure
// that there are enough start positions for the number of players
for (int i = 0; i < numberOfPlayers; i++)
{
// grab position and rotation values from start position // transforms set in the inspector
playerStarts [i] = (Vector3) startPoints [i].position;
playerRotations [i] = (Quaternion) startPoints [i].rotation;
}
Now that the function has arrays for players, start positions and start rotations, it can call upon the SpawnController instance’s SetUpPlayers() function to bring them into the game scene:
SpawnController.Instance.SetUpPlayers(playerPrefabList, playerStarts, playerRotations, playerParent, numberOfPlayers);
At some point, it is inevitable that this script will need to communicate with the players. The player transforms get stored in an ArrayList called playerTransforms and references to their control scripts (instances of Player_LBS.cs) held in an array named playerList.
The SpawnController instance returns an ArrayList() back from GetAllSpawnedTransforms() that we use to iterate through to get to each Player_LBS instance with GetComponent():
playerTransforms=new ArrayList();
// now let's grab references to each player's controller script
playerTransforms =
SpawnController.Instance.GetAllSpawnedTransforms();
playerList=new ArrayList();
for (int i = 0; i < numberOfPlayers; i++)
{
Transform tempT= (Transform)playerTransforms[i];
Player_LBS tempController=
tempT.GetComponent<Player_LBS>();
playerList.Add(tempController);
tempController.Init ();
}
The first player object added to the list of players in the Unity editor Inspector window needs to be the main player, in gaming terms we might call this “player one”. When players are generated, the SpawnController stores their objects in an array so they can be accessed later on, from other scripts. Access to the array is provided by the function GetPlayerGO(index number). Here, we call upon the SpawnController to return the main player object to be stored in playerGO1:
// grab a ref to the player's gameobject for later
playerGO1 = SpawnController.Instance.GetPlayerGO(0);
GetComponent() is used to grab a reference to the main player’s control script, which is stored in the variable named thePlayerScript:
// grab a reference to the focussed player's controller script, so // that we can do things like access its speed variable
// thePlayerScript = (Player_LBS) playerGO1.GetComponent<Player_LBS>();
The next line assigns an ID number to the player, used later to identify the origin of projectiles:
// assign this player the id of 0
thePlayerScript.SetID(0);
To allow control of the main player by the user, SetUserInput is called. We also keep a reference to this player script in the variable named focusPlayerScript, since it is the player that the game controller will be focused on when providing data to the UI and the player that the camera needs to focus on, too:
// set player control
thePlayerScript.SetUserInput(true);
// as this is the user, we want to focus on this for UI etc.
focusPlayerScript = thePlayerScript;
The script looks for a reference to a gameObject named CamTarget attached to the main player. If it exists, it will be used as a target for the camera. If not, the player is set to be the camera target instead:
// see if we have a camera target object to look at
Transform aTarget= playerGO1.transform.FindChild("CamTarget");
if(aTarget!=null)
{
// if we have a camera target to aim for, instead of // the main player, we use that instead
Camera.main.SendMessage("SetTarget", aTarget);
} else {
// tell the camera script to target the player
Camera.main.SendMessage("SetTarget",
playerGO1.transform);
}
The radar system needs to know which object to center on. A quick call to its SetCenterObject() function is made, with the parameter being the player’s transform:
// finally, tell the radar about the new player
theRadarControlScript.SetCenterObject(playerGO1.transform);
}
Invoked by the Start() function, the StartPlayer() function will tell the player when it should begin the game. This function also grabs a reference to the player’s data manager and keeps it in a variable named mainPlayerDataManager1. This will be used by the game controller later on for things like displaying the player’s score in the UI:
void StartPlayer()
{
// grab a reference to the main player's data manager so we // can update its values later on (scoring, lives etc.)
mainPlayerDataManager1=
playerGO1.GetComponent<BasePlayerManager>().DataManager;
Each player script incorporates a function called GameStart(), used to finalize whatever it needs to start the game:
// all ready to play, let's go!
thePlayerScript.GameStart();
}
The EnemyDestroyed() function is overridden from its original form in the BaseGameController.cs script. It will be called whenever an enemy gets destroyed and will be used to make an explosion effect, to update scoring, and to tell the wave spawner that the player is one less enemy closer to completing the wave. Its parameters are the position of the enemy when it was impacted, the enemy points value, and the ID of the projectile it was hit by:
public override void EnemyDestroyed (Vector3 aPosition,
int pointsValue, int hitByID)
{
The enemy explosion sound is the second item set in array via the Unity editor, making its index number 1:
// tell our sound controller to play an explosion sound
BaseSoundController.Instance.PlaySoundByIndex(1, aPosition);
Add the score to the main player’s data manager:
// tell main data manager to add score
mainPlayerDataManager1.AddScore(pointsValue);
A call to update the UI is made via the function later in this script called UpdateScoreP1(). To get at the player’s score, the data manager provides the GetScore() function:
// update the score on the UI
UpdateScoreP1(mainPlayerDataManager1.GetScore());
// play an explosion effect at the enemy position
Explode (aPosition);
The wave spawn controller (in the variable WaveSpawnController) keeps track of how many enemies there are, so that it knows when to spawn new ones. Each time an enemy is destroyed, the game controller needs to call its Fragged() function once:
// tell spawn controller that we're one enemy closer to the // next wave
WaveSpawnController.Fragged();
}
The PlayerHit() function makes an explosion sound via the BaseSoundController instance, then spawns an explosion wherever the player is. The player control script will call this function when it collides with an enemy projectile:
public void PlayerHit(Transform whichPlayer)
{
// tell our sound controller to play an explosion sound
BaseSoundController.Instance.PlaySoundByIndex(2, whichPlayer.position);
// call the explosion function!
Explode(whichPlayer.position);
}
Each time a new enemy is added to the world, it needs to tell the radar to track it. The game controller acts as a go-between in its AddEnemyToRadar() function, which takes the transform of the new object to be added and passes it on to the radar via its AddEnemyBlipToList() function:
public void AddEnemyToRadar(Transform aTransform)
{
theRadarControlScript.AddEnemyBlipToList(aTransform);
}
When an enemy is destroyed, the radar has no way to tell whether or not to keep trying to track it. The game controller uses this RemoveEnemyFromRadar function to tell the radar to stop tracking the transform passed in as a parameter:
public void RemoveEnemyFromRadar(Transform aTransform)
{
theRadarControlScript.RemoveEnemyBlip(aTransform);
}
There may be occasions when the main player script, its gameObject, or its transform needs to be accessed through other scripts, so game controller provides the GetMainPlayerScript(), GetMainPlayerTransform(), and GetMainPlayerGO() functions:
public Player_LBS GetMainPlayerScript ()
{
return focusPlayerScript;
}
public Transform GetMainPlayerTransform ()
{
return playerGO1.transform;
}
public GameObject GetMainPlayerGO ()
{
return playerGO1;
}
When the main player is destroyed, the PlayerDied() function is called. It tells the UI controller to display a message (a game-over message) and schedules the exiting of the game 5 seconds from the time that the call is made.
The ID of the player is passed into this function, though it remains unused in its current form. This is purely to maintain a standardized system, where under other circumstances (such as local multiplayer games) the ID might be checked to see which player died and react accordingly. In this case, as we know that there is only one player (it is a single-player game example, after all!), it is assumed that the game is over without having to check IDs:
public void PlayerDied(int whichID)
{
// this is a single player game, so just end the game now
// both players are dead, so end the game
UIControl.ShowGameOver();
Invoke ("Exit",5);
}
When the Exit() function is called (as scheduled by the PlayerDied() function earlier), Application.LoadLevel will switch scenes away from the game and in to the main menu. The mainMenuSceneName string should be set by the Inspector window in the Unity editor to the name of the main menu scene, although its default declaration early in this script will, by default, be set to the name of the main menu in the example game:
void Exit()
{
Application.LoadLevel(mainMenuSceneName);
}
The UIControl.cs script will be analyzed in full later in this chapter. Game controller needs to tell it about lives and score changes, which it does so through the functions UpdateScoreP1() and UpdateLivesP1():
// UI update calls
//
public void UpdateScoreP1(int aScore)
{
UIControl.UpdateScoreP1(aScore);
}
public void UpdateLivesP1(int aScore)
{
UIControl.UpdateLivesP1(aScore);
}
}
11.6 Player Controller
![]()
Lazer Blast Survival uses an animated human player model from the Unity3d Angry Bots tutorial, included with Unity. It uses a class that derives from the top-down controller script shown in Chapter 5, adding custom game-specific scripting to it and a separate class to take care of animating the character model.
The player class Player_LBS derives from the controller script BaseTopDown.cs, a modified version of the third-person controller script included with Unity that uses Unity’s built-in character controller for physics. BaseTopDown.cs is detailed in full in Chapter 5 (Building Player Movement Controllers).
Player_LBS.cs looks like this:
using UnityEngine;
using System.Collections;
public class Player_LBS : BaseTopDown
{
private bool isInvulnerable;
private bool isRespawning;
public BasePlayerManager myPlayerManager;
public BaseUserManager myDataManager;
public bool godMode =false;
public GameObject theMeshGO;
public Standard_SlotWeaponController weaponControl;
public bool canFire;
public bool isFinished;
public override void Init ()
{
base.Init();
// do god mode, if needed)
if(!godMode)
{
MakeVulnerable();
} else {
MakeInvulnerable();
}
// start out with no control from the player
canControl=false;
// get a ref to the weapon controller
weaponControl=
myGO.GetComponent<Standard_SlotWeaponController>();
// if a player manager is not set in the editor, let's try // to find one
if(myPlayerManager==null)
myPlayerManager=
myGO.GetComponent<BasePlayerManager>();
// set up the data for our player
myDataManager= myPlayerManager.DataManager;
myDataManager.SetName("Player");
myDataManager.SetHealth(3);
isFinished= false;
// tell game control to update the lives UI
GameController_LBS.Instance.UpdateLivesP1(myDataManager.GetHealth());
}
public override void GetInput()
{
if(isFinished || isRespawning)
{
horz=0;
vert=0;
return;
}
// drop out if we're not supposed to be controlling this player
if(!canControl)
return;
// grab inputs from the default input provider
horz= Mathf.Clamp(default_input.GetHorizontal() , -1, 1);
vert= Mathf.Clamp(default_input.GetVertical() , -1, 1);
// fire if we need to
if(default_input.GetFire() && canFire)
{
// tell weapon controller to deal with firing
weaponControl.Fire();
}
}
public void GameStart()
{
// this function is called by the game controller to tell us // when we can start moving
canControl=true;
}
void LostLife()
{
isRespawning=true;
// blow us up!
GameController_LBS.Instance.PlayerHit(myTransform);
// reduce lives by one
myDataManager.ReduceHealth(1);
GameController_LBS.Instance.UpdateLivesP1(myDataManager.GetHealth());
if(myDataManager.GetHealth()<1) // <- game over
{
// stop movement, as long as rigidbody is not // kinematic (otherwise it will have no velocity and we
// will generate an error message trying to set it)
if(!myPlayerController.rigidbody.isKinematic)
myPlayerController.rigidbody.velocity=Vector3.zero;
// hide ship body
theMeshGO.SetActive(false);
// disable and hide weapon
weaponControl.DisableCurrentWeapon();
// do anything we need to do at game finished
PlayerFinished();
} else {
// hide ship body
theMeshGO.SetActive(false);
// disable and hide weapon
weaponControl.DisableCurrentWeapon();
// respawn
Invoke("Respawn",2f);
}
}
void Respawn()
{
// reset the 'we are respawning' variable
isRespawning= false;
// we need to be invulnerable for a little while
MakeInvulnerable();
Invoke ("MakeVulnerable",3);
// show ship body again
theMeshGO.SetActive(true);
// revert to the first weapon
weaponControl.SetWeaponSlot(0);
// show the current weapon (since it was hidden when the // ship explosion was shown)
weaponControl.EnableCurrentWeapon();
}
void OnCollisionEnter(Collision collider)
{
// MAKE SURE that weapons don't have colliders
// if you are using primitives, only use a single collider // on the same gameobject which has this script on
// when something collides with our ship, we check its layer // to see if it is on 11 which is our projectiles
// (Note: remember when you add projectiles set the layer correctly!)
if(collider.gameObject.layer==11 && !isRespawning && !isInvulnerable)
{
LostLife();
}
}
void MakeInvulnerable()
{
isInvulnerable=true;
}
void MakeVulnerable()
{
isInvulnerable=false;
}
public void PlayerFinished()
{
// tell the player controller that we have finished
GameController_LBS.Instance.PlayerDied(id);
isFinished=true;
}
}
11.6.1 Script Breakdown
The player derives from BaseTopDown.cs, which was described back in Chapter 5. The game-specific Player_LBS script adds weapon control, respawning, invulnerability, and a data manager:
public class Player_LBS : BaseTopDown
{
Skipping down past the variable declarations, we can see that the Init() function comes first. Notice that there is no Start() function attached to this script; expected behavior might be to call the Init() function from Start(), but in this case the player’s Init() function will be called from the game controller so there is no need for a Start() function in this class:
public override void Init ()
{
Calling base.Init() means that the Init() function in the base class (the one that this script is derived from) will be called. It’s a good way to keep all of the setup code from the original function without having to duplicate or override it:
base.Init();
The game’s god mode gives unlimited invulnerability to the player. It is provided purely to make the game easier to test, as there is currently no way to activate this in-game and it is assumed that the godMode checkbox should be set in the Inspector window of the Unity editor on the component:
// do god mode, if needed)
if(!godMode)
{
MakeVulnerable();
} else {
MakeInvulnerable();
}
canControl will be used to determine whether or not the user can move this player around via whichever input is attached:
// start out with no control from the player
canControl=false;
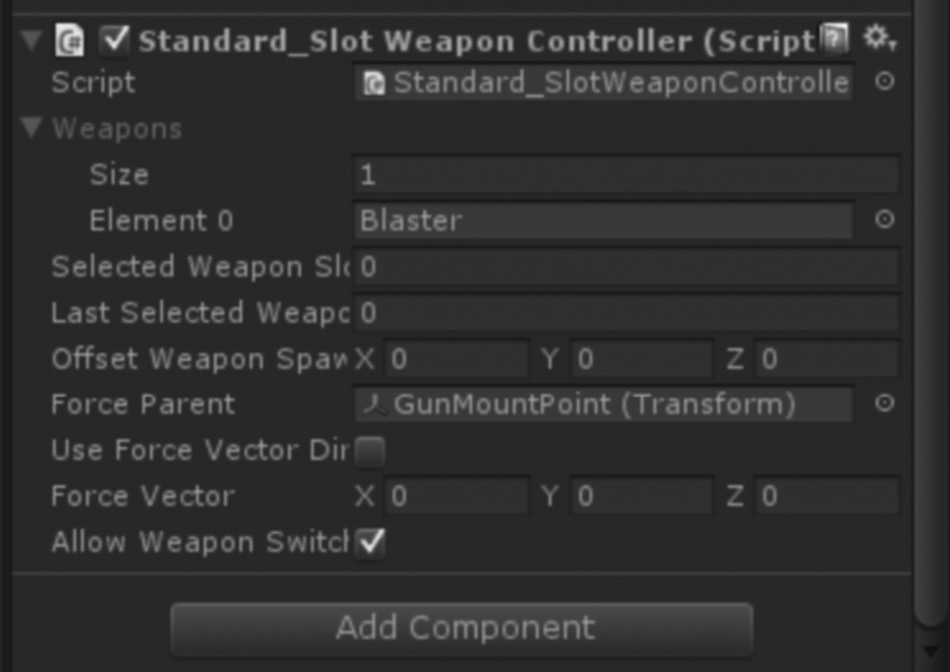
The standard slot weapon controller (as described in Chapter 6) is used by this player. For this weapon controller to work correctly, its forceParent variable needs to be set to an empty gameObject named GunMountPoint and the layer of that gameObject set to layer number 9, the layer named “enemy projectile.” This will ensure that weapons are parented to the right part of the player character and that the projectiles they fire may be identified correctly.
Expand out the player’s gameObject in the Hierarchy window of the Unity editor and you will see quite a lot of objects in it. As you get deeper into the hierarchy of gameObjects, you will start to expand the bones of the skeleton used to animate the player. Deep down under the object Bip 001 Right Hand is an empty gameObject named GunMountPoint. The GunMountPoint is where weapons will be attached and it will move around with the right hand, moving the weapon around as though the player character was holding it.
GunMountPoint gameObject is stored in the forceParent variable of the Standard_SlotWeaponController component attached to the player (see Figure 11.4) and the gameObject that will act as parent to all weapons in the game. By changing its layer, all projectiles belong to that layer, too. This is how the game identifies which projectiles are the player’s and which are fired by the enemy.
The variable weaponControl will provide the reference we need to communicate with it, as required:
// get a ref to the weapon controller
weaponControl= myGO.GetComponent<Standard_SlotWeaponController>();
As discussed in Chapter 3, the player manager script deals with all of the data associated with a player. Next in the script, if it does not already have a reference set up, myPlayerManager is set up with a reference to an instance of BasePlayerManager for health/damage and scoring. We then set its name with SetName() and its health with SetHealth(). The health value is used a little differently than you may think in that it is treated more as a lives system than as health points. It is set to 3, and each time the player hits a projectile it will be respawned and a single health unit taken away; when there is no health left the game will end:
// if a player manager is not set in the editor, let's try // to find one
if(myPlayerManager==null)
myPlayerManager= myGO.GetComponent<BasePlayerManager>();
// set up the data for our player
myDataManager= myPlayerManager.DataManager;
myDataManager.SetName("Player");
myDataManager.SetHealth(3);
isFinished is used to tell this player whether or not to act like it is playing the game. When the game ends, isFinished is set to true and the user will no longer have control:
isFinished= false;
The last part of this function tells the game controller to update the lives display to the health set within the data manager. This needs to happen for the lives display to be populated with the right amount when the game first starts:
// tell game control to update the lives UI
GameController_LBS.Instance.UpdateLivesP1(myDataManager.GetHealth());
}
The GetInput() function overrides the one from the base class (BaseTopDown.cs) to provide support for respawning and firing.
When the game has finished and isFinished is true, or when the player is respawning, all of the inputs are set to zero so that the user cannot move the player around:
public override void GetInput()
{
if(isFinished || isRespawning)
{
horz=0;
vert=0;
return;
}
Before going through to check for input, the function will drop out if canControl is false. canControl means that the user is not supposed to control this player:
// drop out if we're not supposed to be controlling this // player
if(!canControl)
return;
The actual input values come in from the default input controller held in the default_input variable. The variable default_input is declared as type Keyboard_Input.
The values returned from a call to default_input.GetHorizontal() and default_input.GetVertical() are clamped with Mathf.Clamp as a precaution, even though the keyboard controller this example game uses should never return anything other than a number between −1 and 1:
// grab inputs from the default input provider
horz= Mathf.Clamp(default_input.GetHorizontal() , -1, 1);
vert= Mathf.Clamp(default_input.GetVertical() , -1, 1);
default_input checks for the fire button, too. Next, the code checks to see whether the fire button is pressed and whether or not firing is actually possible. The Boolean variable canFire is standardized across the example games as a method to be set in the Unity editor Inspector window to state whether or not this player should be allowed to fire or not.
If the fire button is pressed and canFire is set to true, the function Fire() is called on the weaponControl object. This should tell the weapon system to fire the currently selected weapon:
// fire if we need to
if(default_input.GetFire() && canFire)
{
// tell weapon controller to deal with firing
weaponControl.Fire();
}
}
The game controller has an Invoke statement in its Start() function, which calls StartPlayer() and, in turn, calls this GameStart() function:
public void GameStart()
{
canControl is set to true, meaning that the player now has control:
// this function is called by the game controller to tell us // when we can start moving
canControl=true;
}
Respawning the player starts when LostLife() is called by this script’s collision function. We will look at OnCollisionEnter further in this section.
When LostLife() is called, the first thing that happens is the Boolean variable isRespawning is set to true. You may recall this from the input function earlier when input was locked out if the player is respawning.
Earlier in this chapter when we looked at the game controller, PlayerHit() was one of the functions used to display an explosion effect. Here, we access the static game controller variable GameController_LBS.Instance and call PlayerHit(), passing in this player’s transform:
void LostLife()
{
isRespawning=true;
// blow us up!
GameController_LBS.Instance.PlayerHit(myTransform);
The data manager gets a call next, to reduce the lives count by 1:
// reduce lives by one
myDataManager.ReduceHealth(1);
As the health has changed, we now need to update the UI and tell the user about it:
GameController_LBS.Instance.UpdateLivesP1(myDataManager.GetHealth());
In this code, the data manager function GetHealth() returns an integer health value. When health is less than 1, it’s time to stop the player from moving (setting its velocity to zero) and end the game. The player mesh is hidden too (via SetActive):
if(myDataManager.GetHealth()<1) // <- game over
{
// stop movement, as long as rigidbody is not // kinematic (otherwise it will have no velocity and we
// will generate an error message trying to set it)
if(!myPlayerController.rigidbody.isKinematic)
myPlayerController.rigidbody.velocity=Vector3.zero;
// hide ship body
theMeshGO.SetActive(false);
The weapon system is shut down so that firing doesn’t happen anymore, followed by a call to the PlayerFinished() function to take care of finalizing the game for this player:
// disable and hide weapon
weaponControl.DisableCurrentWeapon();
// do anything we need to do at game finished
PlayerFinished();
If the player’s health amount is more than 0, the player’s model is hidden, the weapon system is disabled and a respawn is scheduled 2 seconds from here (via an Invoke statement to call the Respawn() function):
} else {
// hide ship body
theMeshGO.SetActive(false);
// disable and hide weapon
weaponControl.DisableCurrentWeapon();
// respawn
Invoke("Respawn",2f);
}
}
Respawn() will reposition the player at its starting position and reset all of the variables required to put the player back to the state it was at the beginning of the level:
void Respawn()
{
// reset the 'we are respawning' variable
isRespawning= false;
When a player respawns, it may often be placed in a position where there is already an enemy or some laser fire. It could be unfair to respawn the player and have it destroyed immediately, so when respawning happens the opportunity for a spawn problem is alleviated by making the player invulnerable for a short period of time. A call to MakeInvulnerable() starts this, with an Invoke call to activate the MakeVulnerable function to counter its effect 3 seconds later:
// we need to be invulnerable for a little while
MakeInvulnerable();
Invoke ("MakeVulnerable",3);
The player mesh was hidden when the player was destroyed, so as it respawns the SetActive() function is used to show it again:
// show ship body again
theMeshGO.SetActive(true);
As well as the player model being hidden on its destruction, the weapon controller was disabled. To re-enable it, the weapon slot is set to the first one (zero) to reset it, and a call to weaponControl.EnableCurrentWeapon() is made to get it going again:
// revert to the first weapon
weaponControl.SetWeaponSlot(0);
// show the current weapon (since it was hidden when the // ship explosion was shown)
weaponControl.EnableCurrentWeapon();
}
The OnCollisionEnter function will detect when an object first collides with the player. The layer of the object colliding with it is checked to see whether it is a projectile (on layer 11) and we make sure that the player is not respawning.
The simple invulnerability system comes into play in this function; the state of isInvulnerable decides whether or not it should react to the collision.
If all conditions are met, the LostLife() function is called:
void OnCollisionEnter(Collision collider)
{
// MAKE SURE that weapons don't have colliders
// if you are using primitives, only use a single collider // on the same gameobject which has this script on
// when something collides with our ship, we check its layer // to see if it is on 11 which is our projectiles
// (Note: remember when you add projectiles set the layer // correctly!)
if(collider.gameObject.layer==11 && !isRespawning && !isInvulnerable)
{
LostLife();
}
}
MakeInvulnerable() and MakeVulnerable() simply set the Boolean isInvulnerable variable to true or false, respectively:
void MakeInvulnerable()
{
isInvulnerable=true;
}
void MakeVulnerable()
{
isInvulnerable=false;
}
The final part of the script informs the game controller when this player is completely finished with. This player will be inactive until its isFinished Boolean variable is reset to false:
public void PlayerFinished()
{
// tell the player controller that we have finished
GameController_LBS.Instance.PlayerDied(id);
isFinished=true;
}
}
11.7 Enemies
![]()
EnemyBot_LBS.cs is a surprisingly straightforward script, thanks to the BaseAIController.cs and the BaseArmedEnemy.cs scripts it uses at its core:
public class EnemyBot_LBS : BaseArmedEnemy
{
public void Start ()
{
base.Start ();
// let's find our AI controller
BaseAIController aControl= (BaseAIController)
gameObject.GetComponent<BaseAIController>();
// and tell it to chase our player around the screen (we get // the player transform from game controller)
aControl.SetChaseTarget(GameController_LBS.Instance.GetMainPlayerTransform());
// now get on and chase it!
aControl.SetAIState(AIStates.AIState.chasing_target);
// we also need to add this enemy to the radar, so we will // tell game controller about it and some code in game // controller will do this for us
GameController_LBS.Instance.AddEnemyToRadar(myTransform);
}
// game controller specifics (overridden for our laser blast survival game controller)
// ----------------------------------------------------------------
public override void TellGCEnemyDestroyed()
{
// tell the game controller we have been destroyed
GameController_LBS.Instance.EnemyDestroyed(myTransform.position, pointsValue, tempINT);
// remove this enemy from the radar
GameController_LBS.Instance.RemoveEnemyFromRadar(myTransform);
}
public override void TellGCBossDestroyed()
{
// tell the game controller we have been destroyed (and that // we are a boss!)
GameController_LBS.Instance.BossDestroyed();
// remove this enemy from the radar
GameController_LBS.Instance.RemoveEnemyFromRadar(myTransform);
}
}
11.7.1 Script Breakdown
The EnemyBot_LBS class derives from BaseArmedEnemy, as described in Chapter 4 of this book:
public class EnemyBot_LBS : BaseArmedEnemy
{
public void Start ()
{
base.Start ();
// let's find our AI controller
BaseAIController aControl= (BaseAIController) gameObject.GetComponent<BaseAIController>();
// and tell it to chase our player around the screen (we get // the player transform from game controller)
aControl.SetChaseTarget(GameController_LBS.Instance.GetMainPlayerTransform());
// now get on and chase it!
aControl.SetAIState(AIStates.AIState.chasing_target);
// we also need to add this enemy to the radar, so we will // tell game controller about it and
// some code in game controller will do this for us
GameController_LBS.Instance.AddEnemyToRadar(myTransform);
}
As all of the games have different custom game controller scripts, it is not possible for all of the player scripts to try to call their game controllers in the same way. Instead, some functions need to be designed to talk to a specific game controller. The enemy needs to tell the game controller when it is destroyed by calling its EnemyDestroyed() or BossDestroyed() function when the enemy is set to a boss. When an enemy is destroyed, it also needs to tell the game controller to remove its transform from the list of transforms that are being tracked by the radar:
// game controller specifics (overridden for our laser blast // survival game controller)
// ----------------------------------------------------------------
public override void TellGCEnemyDestroyed()
{
// tell the game controller we have been destroyed
GameController_LBS.Instance.EnemyDestroyed(myTransform.position, pointsValue, tempINT);
// remove this enemy from the radar
GameController_LBS.Instance.RemoveEnemyFromRadar(myTransform);
}
public override void TellGCBossDestroyed()
{
// tell the game controller we have been destroyed (and that // we are a boss!)
GameController_LBS.Instance.BossDestroyed();
// remove this enemy from the radar
GameController_LBS.Instance.RemoveEnemyFromRadar(myTransform);
}
}
11.8 Wave Spawning and Control
![]()
Here is the Wave_Spawner.cs script in full:
using UnityEngine;
using System.Collections;
public class Wave_Spawner : MonoBehavior
{
public bool randomSpawning;
public float timeBeforeFirstSpawn=1f;
public GameObject[] spawnObjectPrefabs;
private int totalSpawnObjects;
private int currentObjectNum;
public int currentWave;
void Start ()
{
// count how many objects we have lined up in the spawn // object list
foreach(GameObject go in spawnObjectPrefabs)
{
totalSpawnObjects++;
}
Debug.Log("Wave_Spawner.cs found "+totalSpawnObjects+" spawn objects to choose from.");
// schedule first attack wave
Invoke("LaunchWave",timeBeforeFirstSpawn);
}
public void LaunchWave()
{
CancelInvoke("LaunchWave");
if(randomSpawning)
{
currentObjectNum= Random.Range (0, totalSpawnObjects-1);
} else {
currentObjectNum++;
// loop back to 0 when we reach the end of the current 'run' of things to spawn
if(currentObjectNum > totalSpawnObjects-1)
{
currentObjectNum=0;
// you could also implement something to tell // game control that all waves have finished if
// you were making a game that only lasted until // that happens
}
}
// create an object
GameObject tempObj=
SpawnController.Instance.SpawnGO(spawnObjectPrefabs[currentObjectNum],
Vector3.zero, Quaternion.identity);
WaveProperties tempProps= tempObj.GetComponent<WaveProperties>();
currentWave= tempProps.enemiesInWave;
}
public void Fragged()
{
// one enemy down
currentWave--;
if(currentWave<=0)
{
// this wave is done, let's start the next one!
LaunchWave ();
}
}
}
11.8.1 Script Breakdown
The way attack waves are made in Lazer Blast Survival is by having a preset layout of enemies made previously in the Unity editor, parented to a single gameObject and saved out as a single prefab. When it comes time to add a new wave of enemies to the scene, the prefab is instantiated and the wave spawner script keeps track of how many enemies there are until it is time to spawn new ones.
This is an arena-based shooter and the action is intended to go on and on until the player runs out of lives. In this example game, there are just a few enemy wave prefabs (meaning that there are only just a few different types of attack waves), but there could just as easily be tens or hundreds of different layouts as required. The array spawnObjectPrefabs contains references to all of the attack wave prefabs.
Wave_Spawner.cs derives from MonoBehavior to take advantage of some of Unity’s built-in function calls:
using UnityEngine;
using System.Collections;
public class Wave_Spawner : MonoBehavior
{
When the Start() function is called, the first thing that happens is that all of the attack wave prefabs are counted and the result stored in the integer variable totalSpawnObjects:
void Start ()
{
// count how many objects we have lined up in the spawn // object list
foreach(GameObject go in spawnObjectPrefabs)
{
totalSpawnObjects++;
}
Debug.Log("Wave_Spawner.cs found "+totalSpawnObjects+" spawn objects to choose from.");
Once counting has finished, the first attack wave is scheduled using timeBeforeFirstSpawn to tell the Invoke statement how long to wait:
// schedule first attack wave
Invoke("LaunchWave",timeBeforeFirstSpawn);
}
OK, so there’s no actual launching of anything here, just prefab instantiating. It may not be as exciting as its name sounds, but the LaunchWave() function is at the core of the game:
public void LaunchWave()
{
We make a quick call to CancelInvoke just in case there have been any duplicate calls to LaunchWave(). If more than one attack wave was spawned into the same level, our spawner would have trouble tracking how many enemies are left before the next wave and the system wouldn’t work. If there are any previous Invoke calls to LaunchWave() queued up, they will be cancelled out by CancelInvoke:
CancelInvoke("LaunchWave");
The spawner may work in two different ways. One is to pick random items from the spawnPrefabObjects array and spawn them; the other is to progressively go through the array starting at zero and loop back to zero once the list is exhausted.
If the Boolean variable randomSpawning is true, the variable currentObjectNum is set to a random number between 0 and the total number of objects in the spawnPrefabObjects array (using Random.Range). If randomSpawning is set to false, the currentObjectNum is incremented and a check is made to ensure that it loops back to zero when it is incremented higher than the total number of objects in the array:
if(randomSpawning)
{
currentObjectNum= Random.Range (0, totalSpawnObjects-1);
} else {
currentObjectNum++;
// loop back to 0 when we reach the end of the // current 'run' of things to spawn
if(currentObjectNum > totalSpawnObjects-1)
{
// currentObjectNum=0;
// you could also implement something to tell // game control that all waves have finished if
// you were making a game that only lasted until // that happens
}
}
The next step is to instantiate the attack wave prefab. For this, an instance of the spawn controller (outlined in full back in Chapter 4, Section 4.3.1) is used and its SpawnGO (spawn game object) function. The parameters for SpawnGO are the prefab object to be spawned, a position and a Quaternion rotation:
// create an object
GameObject tempObj=
SpawnController.Instance.SpawnGO(spawnObjectPrefabs[currentObjectNum],
Vector3.zero, Quaternion.identity);
Once the attack wave is in the scene, we use GameObject.GetComponent to find the WaveProperties script that needs to be attached to the parent gameObject of the attack wave prefab. This script has a single variable that we need to get at: enemiesInWave. As long as enemiesInWave is set correctly on the prefab, the wave spawner can use the variable currentWave to store how many enemies the player needs to destroy to progress to the next wave:
WaveProperties tempProps=
tempObj.GetComponent<WaveProperties>();
currentWave= tempProps.enemiesInWave;
}
Whenever an enemy is destroyed, the game-specific game controller makes a call to the following Fragged() function (see earlier in this chapter GameController_LBS.cs):
public void Fragged()
{
We decrease the value of currentWave, which holds how many enemies are in the current wave:
// one enemy down
currentWave--;
Then the value of currentWave is checked to see whether it is less than or equal to 0. If this is true, it must be time to spawn the next attack wave so a call goes out to the LaunchWave() function:
if(currentWave<=0)
{
// this wave is done, let's start the next one!
LaunchWave ();
}
}
}
11.9 Wave Properties
![]()
The Wave_Spawner.cs script outlined in the last section showed that we need to know how many enemies there are in each attack wave. To take care of this, a simple WaveProperties script is attached to the attack wave prefab. It contains just a single integer named enemies-InWave that we set in the Unity editor Inspector window. The game controller script will access this value whenever a new wave is spawned, and it will use the value of enemiesInWave to keep track of enemies in each wave.
WaveProperties.cs looks like this:
public class WaveProperties : MonoBehavior
{
public int enemiesInWave;
}
11.10 Weapons and Projectiles
![]()
The main weapon (a prefab named Blaster) has a gun mesh with a single script attached to it—BaseWeaponScript.cs—and it contains a reference to a projectile named Blast that will be instantiated whenever it fires.
The projectile is made from a cube, colored red to look more like laser fire. Attached to the projectile are several scripts:
- Automatic Destroy Object
Destroys the gameObject after a set amount of time (to stop any projectiles that never hit anything from travelling off into infinite space!).
- Projectile Controller
As discussed in full in Chapter 6.
- Rigidbody
The rigidbody has only 0.1 mass and no drag at all. The rigidbody is set to interpolate its movement (in an attempt to help improve collisions). One other point of note is that its collision method is set to Continuous. When projectiles are moving as quickly as they do in this game, it is very probable that they will sometimes go through other meshes with no registered collision. The Continuous collision setting will mean increased accuracy but at a small processing cost. In a game like this, the difference in performance is negligible but you should use continuous collisions sparingly and as little as possible.
- Sphere Collider
The collider is a standard sphere collider.
11.11 User Interface
![]()
The main script looks like this:
using UnityEngine;
using System.Collections;
[AddComponentMenu("Sample Game Glue Code/Laser Blast Survival/In-Game UI")]
public class UI_LBS : BaseUIDataManager
{
public GameObject gameOverMessage;
public GameObject getReadyMessage;
void Awake()
{
Init();
}
void Init()
{
LoadHighScore();
HideMessages ();
Invoke("ShowGetReady",1);
Invoke("HideMessages",2);
}
public void HideMessages()
{
gameOverMessage.SetActive(false);
getReadyMessage.SetActive(false);
}
public void ShowGetReady()
{
getReadyMessage.SetActive(true);
}
public void ShowGameOver()
{
SaveHighScore();
// show the game over message
gameOverMessage.SetActive(true);
}
void OnGUI()
{
GUI.Label(new Rect (10,10,100,50),"PLAYER 1");
GUI.Label(new Rect (10,40,100,50),"SCORE "+player_score);
GUI.Label(new Rect (10,70,200,50),"HIGH SCORE "+player_highscore);
GUI.Label(new Rect (10,100,100,50),"LIVES "+player_lives);
}
}
11.11.1 Script Breakdown
The script derives from BaseUIDataManager, the standard UI script shown in Chapter 10. The BaseUIDataManager declares several common variables and provides some basic functions to deal with them:
using UnityEngine;
using System.Collections;
public class UI_LBS : BaseUIDataManager
{
In the example games, the game-over message and get-ready messages are GUITexture objects. In the Unity editor Inspector window, the gameOverMessage and getReadyMessage variables are set to their objects in the scene:
public GameObject gameOverMessage;
public GameObject getReadyMessage;
void Awake()
{
Init();
}
Before showing the main UI, the player_highscore variable needs to be populated with the high score saved in a PlayerPrefs file. The function LoadHighScore() is called to set that up:
void Init()
{
LoadHighScore();
Both messages (gameOverMessage and getReadyMessage) are hidden at the start of the game by calling the HideMessages() function:
HideMessages ();
The message to get ready (the reference to which is in the getReadyMessage) will be on screen in 1 second after this function call, as set up by the Invoke command:
Invoke("ShowGetReady",1);
The get-ready message stays on the screen for another second before the following Invoke call is activated and the message hidden from view:
Invoke("HideMessages",2);
}
In HideMessages(), both messages are hidden using the GameObject.SetActive() function:
public void HideMessages()
{
gameOverMessage.SetActive(false);
getReadyMessage.SetActive(false);
}
The function dedicated to showing the get-ready message is called from the Init() function via Invoke:
public void ShowGetReady()
{
getReadyMessage.SetActive(true);
}
When the game has ended, ShowGameOver() gets called. The high score is saved out into the PlayerPrefs file and the message set to active (shown) via GameObject.SetActive():
public void ShowGameOver()
{
SaveHighScore();
// show the game over message
gameOverMessage.SetActive(true);
}
The UI code uses OnGUI() to render, which is a function called automatically by the Unity engine. The problem with OnGUI() is that it may be called several times every frame, which causes a huge performance hit on mobile devices. If you are intending on converting the game over to run on a mobile system, you may want to look at other GUI solutions instead.
GUI.Label is a simple method for drawing text onto the screen. For this example game, it is used for all of the UI:
void OnGUI()
{
GUI.Label(new Rect (10,10,100,50),"PLAYER 1");
GUI.Label(new Rect (10,40,100,50),"SCORE "+player_score);
GUI.Label(new Rect (10,70,200,50),"HIGH SCORE "+player_highscore);
GUI.Label(new Rect (10,100,100,50),"LIVES "+player_lives);
}
}