
CHAPTER 16
Chapter Objectives
By the end of the chapter, readers will be able to:
![]() Understand and discuss the use of the auto, register, static, and extern storage classes.
Understand and discuss the use of the auto, register, static, and extern storage classes.
![]() Explain the value of command-line arguments and demonstrate their usage.
Explain the value of command-line arguments and demonstrate their usage.
![]() Understand the usefulness of conditional compilation and apply the more commonly used preprocessor directives.
Understand the usefulness of conditional compilation and apply the more commonly used preprocessor directives.
![]() Develop macros and explain their advantages and disadvantages.
Develop macros and explain their advantages and disadvantages.
![]() Explain the value and characteristics of various bitwise operators.
Explain the value and characteristics of various bitwise operators.
![]() Define the basic idea of big-endian and little-endian formats.
Define the basic idea of big-endian and little-endian formats.
![]() Apply masking techniques and bitwise operators to manipulate data.
Apply masking techniques and bitwise operators to manipulate data.
![]() Discuss the characteristics associated with recursion.
Discuss the characteristics associated with recursion.
![]() Apply recursive algorithms to solve a specific problem.
Apply recursive algorithms to solve a specific problem.
![]() Explain the value of examining the call stack when using recursion.
Explain the value of examining the call stack when using recursion.
This chapter presents many unrelated short topics that, while very important, do not individually warrant their own chapter. Although the tools discussed may not be used very often, they are important concepts to learn. The topics presented include storage classes, command-line arguments, conditional compilation, macros, bitwise operations, and recursion.
16.1 Storage Classes
Storage classes regulate the lifetime, visibility, or memory placement of a variable. Only one explicitly specified storage class can be used on a single variable. There are four storage classes in C++: auto, register, static, and extern.
The auto storage class specifies that a variable will only exist in the block in which it is declared. When the block has finished executing, the variable will no longer be available. Sound familiar? The behavior of the auto storage class is the default functionality of all local variables.
The register storage class requests that the variable be placed into a machine register, if possible. Registers are unique, high-speed sections of memory within the CPU, whose purpose is to hold or store the data that is being operated on. Visual Studio automatically tries to do this when certain optimizations are specified within the compiler. All developer environments allow the programmer to specify how the program is to be optimized. Optimization allows the compiler to decide on a course of action depending on the environment settings. For example, in some applications execution speed may be more important than memory usage. Therefore, the optimization may be set up to make things run faster at execution time. Registers can be used to increase the execution speed.
The other storage class specifiers, static and extern, are more commonly used and will be discussed in more detail in the following sections.
16.1.1 Static
We have all become accustomed to the fact that when a method or function ends, all local variables cease to exist. If the function is called again, the variables are recreated. One exception to this rule involves the static storage class. The static storage class specifies that while the variable has local scope, it exists for the lifetime of the program. If a static variable is not explicitly initialized, it is automatically initialized to zero. Example 16.1.1 shows the declaration of a static variable.
While Example 16.1.1 shows a static integer, static can be used with any data type. Even arrays can be declared as static. Like other variables, arrays are automatically initialized.
![]()
Remember: A static variable follows scoping rules. A static variable can only be accessed by the function in which it is declared, but it exists after the function ends.
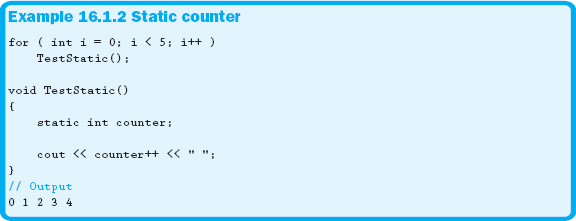
There are many uses of the static storage class. One of the more common is to keep track of the number of times a specific function is called. Example 16.1.2 demonstrates this technique.
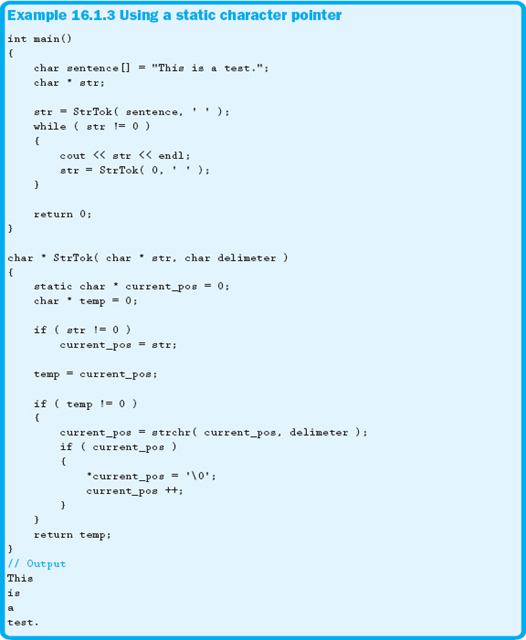
A more complicated situation using static variables is shown in Example 16.1.3. This example uses a static pointer to create our own version of the strtok function. This function only differs from the predefined function in that the second parameter is a single character instead of a cString.
Note that the static keyword can be used within classes in relation to both individual data members and methods. However, its functionality is much different than what is discussed in this section and is beyond the scope of this chapter.
16.1.2 Extern
When global variables are declared, they are not truly global. They are only visible to functions within the same source code file and therefore have file scope. Functions that need to access variables with file scope that are declared in another file need to specify that the variable is declared outside of, or external to, the current file. To do this, the keyword extern is used, as shown in Example 16.1.4.

In Example 16.1.4, the variable file_scope_var is brought into the scope of the function OtherFunc. However, because the variable is specified as extern inside of a function, only OtherFunc has access to the variable in external_file.cpp. If it is necessary for other functions to access the variable, either each function that uses the variable has to specify that file_scope_var is declared external to the current scope, or the external specification has to be done at the file level of external_file.cpp.
Section 16.1 Exercises
1. How would you declare a variable so that it would retain its value even after a function is finished?
a. auto
b. dynamic
c. static
c. const
2. What storage class is assigned by default to local variables?
3. True or false: Global variables can automatically be accessed from any source file included in the solution.
4. True or false: A static variable can be accessed by any function in the source file in which the variable was declared.
5. Which of the following are not storage classes?
a. auto
b. dynamic
c. static
d. register
e. const
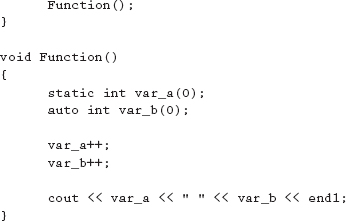
6. What is the output for the following code fragment?
![]()
Section 16.1 Learn by Doing Exercises
1. Create a project that has three source code files (.cpp). In the source code file that will contain main, create a global (file scope) two-dimensional array of integers. In main, call two functions: FillArray and DisplayArray. The definition of FillArray is located in fill.cpp, and the definition of DisplayArray is located in display.cpp. Use extern to ensure that the array is visible in each of the other two files.
2. Modify the previous exercise so that an additional function called DisplayArrayReversed is added to the display.cpp source file. First bring the array into the file scope by using the extern specification above the two functions. Once this is working, relocate the extern specification so that it is inside the DisplayArray function. Notice how this makes the array visible only to the DisplayArray function.
16.2 Command-Line Arguments
When a file is double-clicked from within Windows Explorer, that file is opened by an associated program. The operating system has associated files with specific extensions to be opened by certain programs. But how does the program know which file to open? Because the operating system passes the name and path of the file to the program. The program must catch the value in an optional parameter specified in main's function header. Extending this example, if multiple files are selected to be opened by a program, each filename is passed as one row in a ragged array. The number of strings passed to the program is stored in another parameter. These parameters can have any name, but by convention they are usually called argc and argv. The argc parameter contains the number of strings stored in argv.
![]()
Remember: The argc parameter refers to the argument count, and the argv parameter refers to the argument vector.
One thing to be aware of is that the first string stored in argv is always the path and name of the program being executed. Example 16.2.1 shows how to use argc and argv. The example will display all of the strings in argv.

The term command line refers to a textual interface into an operating system. All commands that manipulate the operating system are entered at the command prompt. To see the Windows command-line interface, go to the Start menu, select Run, and then type “cmd”. This will start the command-line interface.
Besides opening files when double-clicked, command-line arguments can be used in many situations, such as for allowing program settings to be passed to the program. For example, running the Windows command-line interface and typing “ipconfig /all” will execute the network configuration program. The program ipconfig accepts the “/all” setting and then displays the appropriate information. The operating system uses a space to separate each string and passes that information to the program along with the number of strings.
Example 16.2.2 demonstrates how command-line arguments could be used to pass a series of numbers to a program, which then calculates and displays the sum and average of those numbers.

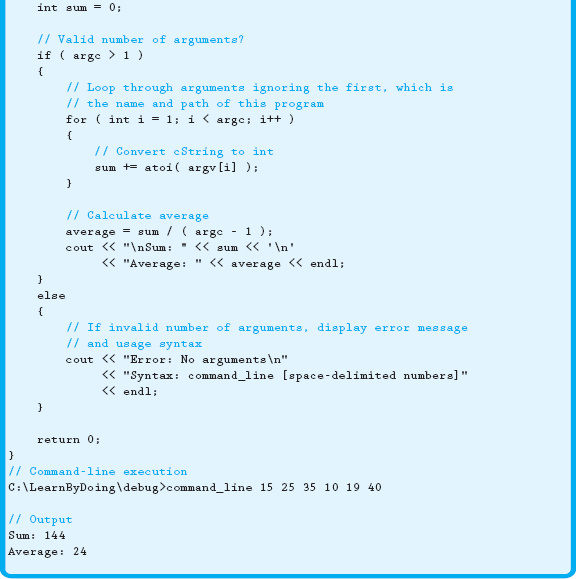
In Example 16.2.2, the number of arguments is checked to make sure the user has supplied some data to the program. If he or she has not, an error message is displayed along with the syntax that should be used. This is a common practice for programs that require command-line arguments.
You can also specify command-line arguments to be used in the debugging process. In Visual Studio, right-click on the project in the Solution Explorer. Click on the Properties item at the bottom of the pop-up menu. When the dialog box is displayed, expand the Configuration Properties item and select the Debugging option. Notice that there is an area called Command Arguments. Enter any data necessary to test your program.
Section 16.2 Exercises
1. Write the main function header that allows the use of command-line arguments.
2. What does argc contain?
3. What is always stored in argv[0]?
Section 16.2 Learn by Doing Exercise
1. Using the code presented in Example 16.2.2, create the appropriate project. Debug your solution using your environment's settings to specify the command-line arguments. Once it is working from within your IDE, execute your program from the command-line interface. Be sure to test the program appropriately using a variety of command-line arguments.
16.3 Conditional Compilation
In Chapter 15 we saw two ways of conditionally deciding what pieces of code need to be included when a project is compiled. These two methods are shown in Example 16.3.1.
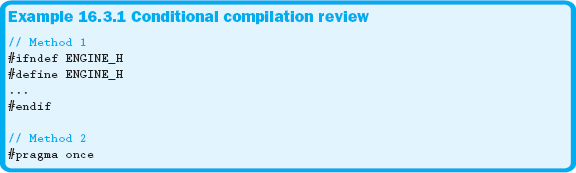
It makes sense that both of these methods involve preprocessor directives because the preprocessor executes just before the language translator (compiler). Therefore, it is the only application in the compilation process that has a chance to affect what source code gets compiled.
In addition to these methods, there are other preprocessor directives that can be used. Similarly, there are many other situations in which conditional compilation can be used. Example 16.3.2 demonstrates how conditional compilation can be used to set up various program settings based on a #define constant.


The program shown in Example 16.3.2 determines the version of a program to build depending on a single #define constant. Table 16.3.1 shows most of the preprocessor directives available for conditional compilation.
Another use of conditional compilation is shown in Example 16.3.3. This program will only compile if a C compiler is available.

Example 16.3.3 tests for the existence of an identifier, __cplusplus, present in all C++ compilers. (Note: There are two underscores in the identifier __cplusplus.) If it is defined, compilation stops and the error message is displayed in the Error List, as shown in Figure 16.3.1.
| Directive | Description |
| #if | Preprocessor if statement. |
| #elif | Preprocessor else if statement. |
| #else | Preprocessor else statement. |
| #endif | Ending statement for all preprocessor conditional statements. |
| #ifdef | Checks to see if an identifier is defined. Evaluates to true if defined. |
| #ifndef | Checks to see if an identifier is not defined. Evaluates to true if not defined. |
| #define | Used to create preprocessor constants and identifiers. |
| #error | Stops compilation and displays an error message. |
Table 16.3.1 Preprocessor directives for conditional compilation
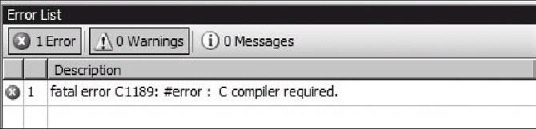
Figure 16.3.1 The #error directive message
Section 16.3 Exercises
1. True or false: Preprocessor directives cannot be used inside of functions.
2. Indicate which of the following are not valid preprocessor directives.
a. #elseif
b. #endif
c. #while
d. #if
e. #error
f. #const
g. #define
Section 16.3 Learn by Doing Exercise
1. Write a program that prints the following text using either C or C++, dependent on a preprocessor setting.
C: C rocks!
C++: C++ rocks the world!
In other words, if the preprocessor identifier is defined, the text will be displayed using printf instead of cout. For ease of testing, use your own identifier rather than the predefined __cplusplus. Be sure to test the program appropriately.
Macros are sections of code that physically replace the macro identifier during the compilation process. You have already seen some simplistic macros in use. In C++, macros are created using #define. Therefore, using #define to create a constant in essence creates a macro. The identifier associated with #define is physically replaced by the preprocessor with the supplied value.
Macros are in no way limited to the simple replacement of an identifier with a constant. Very complicated code fragments can be written, including those passing parameters to the macro. Example 16.4.1 shows the creation and use of a more robust macro.
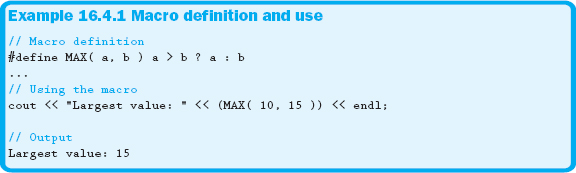
Be sure not to place a space between the macro identifier and the opening parenthesis of the parameter list in the macro definition. Your compiler will recognize that situation as an error. Example 16.4.2 shows how the preprocessor would expand the reference to the macro defined and used in Example 16.4.1.
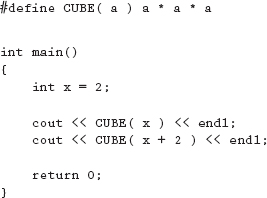
When writing macros, always keep in mind how the macro will be expanded. Example 16.4.3 shows a macro that will display unexpected results when executed.
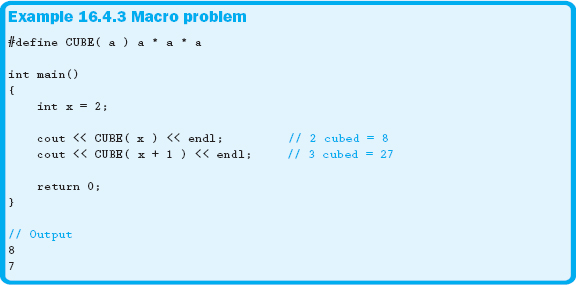
Notice that the output in Example 16.4.3 is not what was expected. The problem is more evident if you examine the expansion in Example 16.4.4.
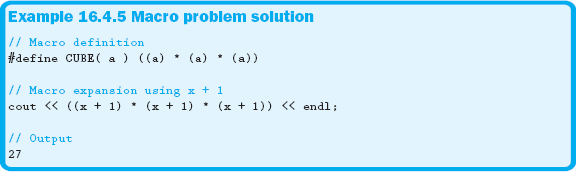
As you can see in Example 16.4.4, the order of operations is the cause of the unexpected output. To correct this problem, always make liberal use of parentheses, as shown in Example 16.4.5.
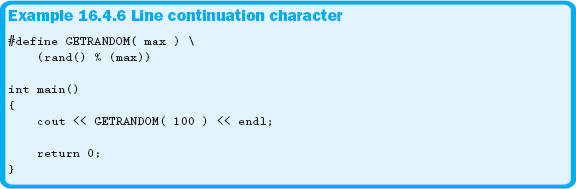
Sometimes macros may need to span multiple lines to help with the readability and maintainability of your code. However, because of expansion, doing so might cause some problems. The backslash ( ) can be used to continue a line of code to the next line. Although generally only used with macros, the line continuation character can be used at any time. Example 16.4.6 shows the appropriate use of the line continuation character.
16.4.1 Advantages and Disadvantages
So what are the advantages of using macros over functions? As we learned in Chapter 9, every time a function is called, there are quite a few settings—such as the return pointer and the states of all local variables—that are saved on the stack. Because this is done during runtime, the execution speed of your program becomes negligibly slower. Since a macro is expanded during the compilation process, using macros doesn't push anything on the stack resulting in faster execution. However, macros still participate in the modularity of your program.
One disadvantage is that because macros are expanded, if you have a large macro that is used many times, the size of your executable will be expanded accordingly, resulting in a larger executable size. Therefore, macros are usually kept relatively small.
Another disadvantage is that debugging a macro can be a real challenge because you can't use the debugger to step into a macro. Also, syntax errors are more than a little difficult to find because the error appears on the line where the macro is used, not where it is defined.
A final disadvantage is that there isn't any type checking done on the parameters of a macro. This undesirable situation can cost a programmer many hours of debugging.
Section 16.4 Exercises
1. What is the output of the following code fragment?
2. What makes debugging a macro so difficult?
3. When is a macro expanded?
Section 16.4 Learn by Doing Exercise
1. Write a macro to swap two numbers and another macro to swap two cStrings. Test your program, making multiple calls to the macros.
16.5 Bitwise Operations
There are many times when it is useful to manipulate the individual bits of a piece of data. Although it may not be intuitive when it is necessary to use bitwise manipulations, their use can increase the efficiency of memory resources as well as CPU usage. The following sections discuss the mechanics of bitwise manipulations and demonstrate some of their applications.
| Operator | Description | ||
| ~ | Bitwise NOT. Reverse the bit. A 1 results in a 0 and a 0 results in a 1. | ||
| >> | Bitwise shift right. Shift all bits to the right by the specified number of bits. | ||
| << | Bitwise shift left. Shift all bits to the left by the specified number of bits. | ||
| & | Bitwise AND. The two bits must be 1s to result in a 1. | ||
| ^ | Bitwise XOR. The two bits must be different to result in a 1. | ||
| | | Bitwise OR. The two bits must be 0s to result in a 0. |
Table 16.5.1 Bitwise operators
16.5.1 Bitwise Operators
The logical operators that were discussed in Chapter 7 also have bitwise counterparts. In addition, there are a few other bitwise operators, some of which have familiar uses. Table 16.5.1 shows the available bitwise operators and their descriptions.
With the exception of the NOT (~) operator, all of the operators in Table 16.5.1 are binary operators and are listed in order of precedence from highest to lowest. Example 16.5.1 demonstrates the use of these operators.
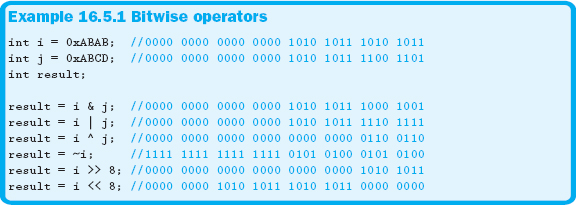
In Example 16.5.1, the bitwise operator is applied to each bit within the operands. The shift left and shift right symbols are also used with cout and cin; therefore, if you are embedding any bitwise operations in an input or output statement, you will need to use parentheses to avoid incorrect data or syntax errors.
16.5.2 Bit Fields
A bit field, or bit structure, allows a programmer to specify that a member of a structure is to occupy only a certain number of bits in an integral type. The syntax for this type of structure follows:
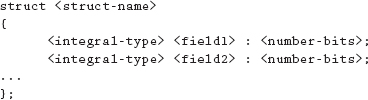
The syntax shows that each member is allocated a certain number of bits. Example 16.5.2 shows the declaration of a bit structure.
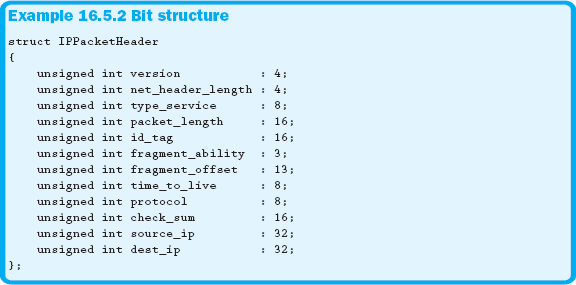
The bit structure shown in Example 16.5.2 is used to hold the header information for a network packet. The way that Microsoft Visual Studio, running on Intel's architecture, places the individual bits is shown in Figure 16.5.1. Each compiler and architecture may store the information a little differently.
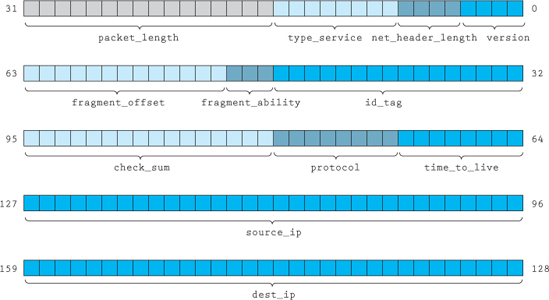
Figure 16.5.1 Memory layout of a network packet
A couple of interesting aspects of bit structures is that the field can be anonymous and the number of bits can be specified as zero. Zero length fields force the compiler to align the next field at the beginning of a new section of memory of the declared type. Example 16.5.3 shows a bit structure using an anonymous field.
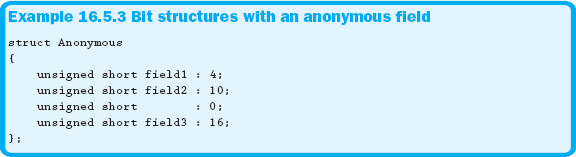
The third data member in Example 16.5.3 is allocated zero bits and is anonymous. The zero size forces field3 to be aligned with the beginning of the next chunk of memory. Figure 16.5.2 shows the memory layout of the Anonymous bit structure shown in Example 16.5.3.
![]()
Figure 16.5.2 Memory layout of a bit structure with an anonymous field
Remember that the size of each portion of memory is determined from the size of the members in the bit structure. Since Figure 16.5.2 shows the layout of a bit structure whose data members are all unsigned short, which is two bytes in size, each chunk of memory will be 16 bits.
16.5.3 Masking
Masking is the process of extracting information from a larger set of data using an operator and another piece of data. To set a bit to a 1, use the bitwise OR ( | ) operator and a mask that has that single bit set as well. Example 16.5.4 demonstrates setting a bit.

Example 16.5.4 sets the second bit from the right to a 1, while all other bits remain the same as the original data. Turning on multiple bits can be accomplished by simply applying the correct mask, as shown in Example 16.5.5.

Example 16.5.5 sets the first and third bits from the right. Turning bits off is accomplished in much the same manner except that the bitwise AND ( & ) operator is used with a zero mask, as demonstrated in Example 16.5.6.

In Example 16.5.6, the third bit is turned off, and all other bits remain in their previous state. Toggling bits is accomplished using the bitwise XOR ( ^ ) operator. Example 16.5.7 demonstrates how to toggle the state of specific bits.

Example 16.5.7 turns the third bit on if it was originally 0 and turns it off if it was originally a 1.
![]()
Remember: Setting a bit or turning it on means that the bit is assigned a 1. Turning a bit off means changing its state to a zero.
There are many situations in which we can use the concept of masking, one of which is shown in Example 16.5.8.

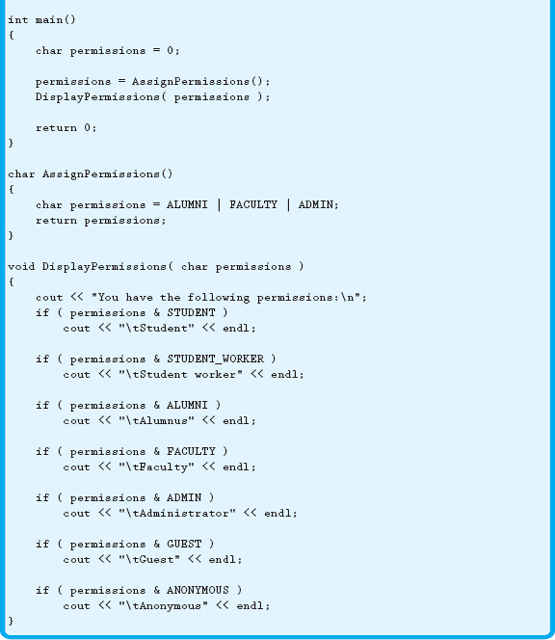
Example 16.5.8 allows you to set up a user with multiple permissions. By using bitwise operators and masking, you can assign multiple access levels while using very little memory. As you can see from the example, you can specify up to 8 different permission levels in a single character. If you were to use a short, you could have as many as 16 permissions.
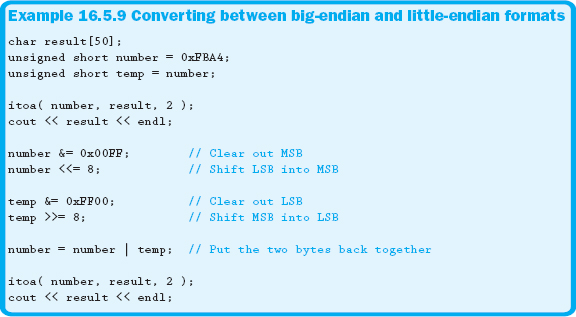
Another situation arises when converting between big-endian format to little-endian format—terms originating from Gulliver's Travels, in which some people open their soft-boiled eggs from the big end, while others open their eggs from the little end. In computer terms, a little-endian computer writes information to memory least-significant-byte (little-end) first, whereas a bigendian computer writes information to memory most-significant-byte (big end) first. Intel-based computers use the little-endian methodology, whereas Motorola typically uses the big-endian format. Converting between formats could be accomplished by reversing the bytes, as shown in Example 16.5.9.
Using bit manipulations are in no way limited to the few examples shown in this section. There are many situations in which bit manipulations can save a significant amount of memory and processing time.
Section 16.5 Exercises
1. What bitwise operation is represented by the ~ operator, and what is its main masking purpose?
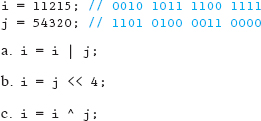
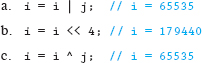
2. What value is stored in i after each of the following statements? Reset i to the original value after each statement.
3. Write the statement to perform a bitwise XOR on variables binary1 and binary2, which is then assigned to result. Explain what the result (in general) will be for the operation.
Section 16.5 Learn by Doing Exercises
1. Write a function that determines if the integer passed into it is a power of 2. Use bitwise operations to accomplish this task. Be sure to test the program appropriately. Hint: A number that is a power of 2 will only have one bit set. What would happen if 1 is subtracted from the number? What bitwise operator could be used with those two values to return a 0? As a programming aid, convert the numbers to binary to help visualize the process.
2. Modify the Swap macro in 16.4 Learn by Doing Exercise to perform number swapping using bitwise operations. Hint: Think about how XOR works. Test your macro by nesting it in a simple if statement.
16.6 Recursion
In simple terms, a recursive function is a function that calls itself. It can also refer to a function that calls another function that already exists on the call stack. Figure 16.6.1 shows the call stack from within Visual Studio for a recursive algorithm.
As you can see in Figure 16.6.1, the function RecursiveFunction calls AnotherFunction, which in turn calls RecursiveFunction. This figure also illustrates another aspect of recursive functions: that the call stack will continue to grow unless something exists to cause the recursion to stop and thus allow the call stack to unwind. Therefore, all recursive functions must have a terminating condition. If a terminating condition is not present, the call stack will continue to grow until it runs out of memory. In essence, the lack of a terminating condition creates a very memory-intensive infinite loop.
So recursive functions include a call to themselves or, as we saw in Figure 16.6.1, a call to other functions who will in turn call the recursive function. This recursive call usually has some way of reducing or altering a parameter so that it continues to approach the terminating condition. This is sometimes called the reducing clause. Example 16.6.1 shows a classic recursive function that calculates the factorial of a number.
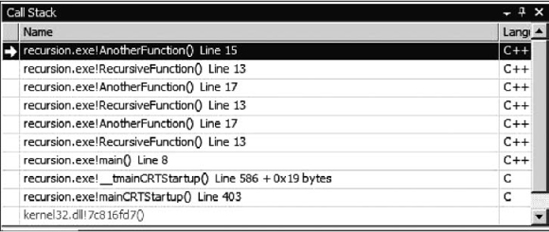
Figure 16.6.1 Recursive call stack
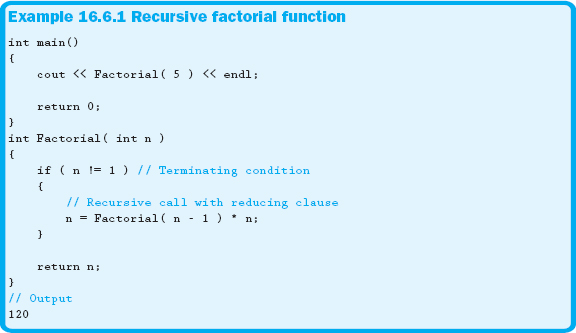
Figure 16.6.2 shows the call stack for the execution of the program shown in Example 16.6.1 when the recursion reaches its terminating clause.
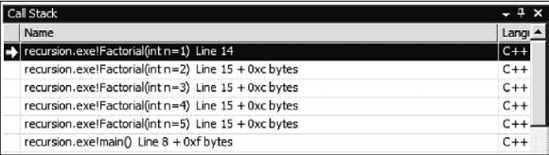
Figure 16.6.2 Factorial call stack
Notice that Example 16.6.1 shows a recursive function that could have just as easily been written using a loop instead. Recursion can always be replaced with iteration, however, some algorithms are more easily written using recursion. When the reducing clause produces something that is essentially the same before as well as after the reducing clause, a solution involving a recursive algorithm will work well.
For example, opening Windows Explorer shows the directory and file structure of your hard drive. Traversing into one of the subdirectories shows an identical structure although with different information. Writing a program that displays all of the directories and files can be accomplished using a recursive algorithm. Just for fun, let's look at one possible solution for accomplishing this task.
There are two predefined C functions that work on a Windows operating system that are helpful in developing this algorithm. The _findfirst function finds the first instance of either a directory or a file in the directory specified in the function call. The _findnext function takes what is returned from the _findfirst function and finds the next directory or file. Example 16.6.2 shows one possible solution to this problem.
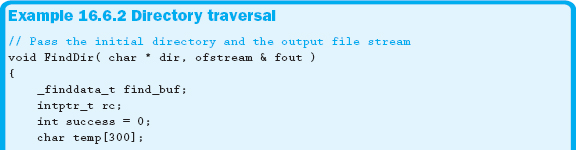
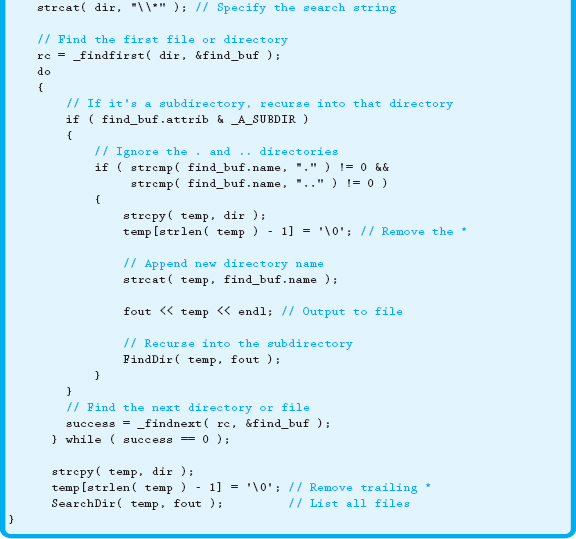
The function shown in Example 16.6.2 recursively traverses into each subdirectory. The function then writes each directory to the file. The SearchDir function is not shown here, but it is a nonrecursive function that displays the files within the current directory.
Developing recursive algorithms can be very challenging, although with practice, they can be useful. However, because of the overhead resulting from the ever-growing call stack as well as the possibility of catastrophic errors, use recursion only when necessary.
Section 16.6 Exercises
1. What makes recursive functions so costly?
2. True or false: Though not always as efficient, iteration can replace recursion in all circumstances.
3. What are the two things required by every recursive function?
Section 16.6 Learn by Doing Exercises
1. Write a recursive function that simulates the predefined pow function.
2. Write the recursive equivalent of the binary search algorithm discussed in Chapter 11.
3. Write a recursive function that displays any cString character by character, in reverse order.
16.7 SUMMARY
This chapter contained six relatively unrelated topics. The first topic introduced storage classes. As noted, storage classes are simply used to regulate or control the lifetime of a variable. We began our discussion by examining the default storage class called auto, which just implies that the variable will cease to exist when the function ends. Next we introduced the register storage class, which is a request to the compiler to put the variable into a machine register, with the goal of improving program performance. The third storage class introduced was static. The static storage class allows the variable to exist for the lifetime of the program. Unlike all other local variables, it does not cease to exist because it has gone out of scope. These variables are automatically initialized to zero if not explicitly initialized by the programmer, and adhere to the normal scoping rules. The final storage class discussed was extern. Adding the extern keyword allows functions to access a variable physically declared in another file that has file scope.
After discussing the various storage classes, we presented the concept of command-line arguments. Command-line arguments are used to pass information into the main function of our programs. While these arguments can technically have any name, they are usually referred to as argc and argv. The first parameter, argc, contains the number of strings stored in argv.
The third unique topic presented within this chapter dealt with conditional compilation. While this concept was introduced earlier in the text, some additional preprocessor directives were discussed and demonstrated in various code examples. These directives included #else, #ifdef, #ifndef, and #error.
The next concept examined was macros. A macro is a function-like section of code that is expanded and physically replaces the macro call. This is accomplished by the preprocessor. While macros can be relatively easy to write, it is imperative that the programmer carefully weigh the impact of using macros in place of functions. Such issues as macro expansion, execution speed, file size, and debugging should be considered when determining whether to use macros within your code.
Next we discussed bitwise operations, which provide the programmer with the ability to manipulate the individual bits of a piece of data. In addition to this, bitwise operations are faster in performing various arithmetic functions. To support this, both C and C++ include a number of different bitwise operators. Within this section, we also introduced the concepts of a bit structure, or bit field, and masking. By using a bit field, it becomes possible to specify the number of bits that will be reserved for a member of the structure. Masking allows the programmer to use bitwise operators to extract pieces of information from a larger portion of data.
The final issue discussed in this section was recursion. A recursive function is a function that calls itself. To help visualize the impact of recursion, the call stack was examined. Like so many other actions within C and C++, the programmer must carefully weigh both the costs and the benefits of recursion.
While the topics presented within this chapter are rather unrelated to each other, it is imperative that you be aware of their existence and fundamental use. Even though in some ways they are specialized functions or concepts, they have the potential to become important tools, which you should have in your programming toolbox.
16.8 Programming Exercises
1. Create a program that processes a number of data items passed in via the command line. When your program executes, it will check the command-line arguments for information on how the program is to manipulate the data. If the user passes a -s as the first parameter, assume that the data is cStrings; a -n specifies that the data will be numbers. If the data is numeric, convert the data to floats and then display the sum as well as the average. Regardless of the data, display all of the arguments except the name of the program.
2. Modify Programming Exercise 1 to add another character sequence to indicate the order in which to display the data. A -a will specify ascending order, while a -d will specify descending order. You will have only two sort functions—one that sorts cStrings and the other, floats. A function pointer will be passed to the sorting function, which will be used to compare two elements in the array. When the sorting function is called, pass the address of the function that will specify the appropriate order. An example of the sorting function signature follows:
![]()
16.9 Answers to Chapter Exercises
Section 16.1
1. c. static
2. auto
3. False
4. False
5. b. dynamic
e. const
6. 1 1
2 1
3 1
Section 16.2
1. int main( int argc, char * argv[] )
2. argc contains the number of strings in argv.
3. The path and name of the program being executed are always stored in argv[0].
Section 16.3
1. False
2. Indicate which of the following are not valid preprocessor directives.
a. #elseif
c. #while
f. #const
Section 16.4
1. 8
12
2. You are not able to use the debugger to step into a macro.
3. A macro is expanded during the compilation process by the preprocessor.
Section 16.5
1. Bitwise NOT is represented by the ~. Its main purpose is to reverse the bit.
2. What value is stored in i after the following code fragment has executed?
3. int result;
result = binary1 ^ binary2;
If the bits are different, the result is 1. If the bits are the same, the result is 0.
Section 16.6
1. Recursive functions are often considered costly because of the additional overhead required from the growing call stack.
2. True
3. In recursive functions, it is important that you have both a terminating condition and a way for altering or reducing a parameter so that you eventually reach the terminating condition.