6. Complex Data Types
To this point in the book, all of the data you have worked with is what we’re classifying as “simple.” One aspect of this label is that integers, floats, characters, and the like each store scalar—i.e., single—values. In this chapter we’re going to blow the lid off data types by introducing complex ones that can often, among other features, represent multiple pieces of information. The information in this chapter will lead nicely into Chapter 7, “Introducing Objects,” where you learn about the most important of the complex C++ data types.
Three new types are discussed in this chapter, starting with arrays. From there we move into pointers, which is one of the more important—and abstract—data types. The third type introduced is structures, whose usage will give you a preview of what it’s like to do object-oriented programming. Finally, the chapter revisits the topic of user-defined functions, specifically with regard to using these data types as arguments for your functions.
Working with Arrays
The array is a mainstay of many programming languages and is frequently used in many C programs. As mentioned in the introduction to this chapter, variables of type integer, float, and the like can each store only a single value at a time. The benefit that an array provides is the ability to store multiple values, all under the heading of one variable name.
Arrays are still declared as a specific type, though; you can have an array of floats or chars or integers, but you can never intermix the types. To create an array, you would code
type name[x];
where type represents the variable type, name is the name of the variable (using the same naming rules and conventions as any other variable), and x is the number of available items in that array (each item in an array is known as an element). This next line creates an array of ten floats:
float myArray[10];
Because an array variable contains multiple values, assigning and accessing any single value is a little more complicated. To do so, you use the array’s index to refer to a specific element in that array. The index is always a set of integers, which by default starts at 0 (not 1) and goes to the number of items in the array minus 1. This “start at 0” thing can be tricky for beginning programmers, so try to remember that the first item in an array is at 0, the second is at 1, and the last is at x-1, where x is again the number of items in the array (also known as the size of the array). Here is how you would assign a value to an individual array element and print it:
myArray[0] = 42.9;
std::cout << myArray[0];
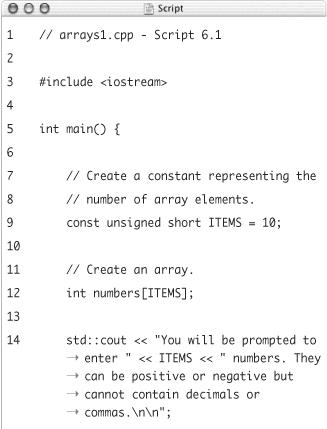
Script 6.1. The numbers array can store ten integers, which are taken as user input. These values are then totaled, averaged, and reprinted.
Normally you will not work with individual array elements like this in your programs. Instead, a loop is used to access every array element. The code for doing so is
for (int i = 0; i < x; ++i) {
// Do whatever with myArray[i];
}
This loop will iterate through each array element from 0 to x-1. The only trick is that you must know the number of elements in the array (i.e., x). The easiest way to represent this value is by using a constant, both when declaring the array and when accessing it using a loop.
All of this information will be applied in the following application. It will take a series of numbers as user input and then reprint, sum, and average them.
To use arrays
- Create a new, blank text document in your text editor or IDE (Script 6.1).
// arrays1.cpp - Script 6.1
#include <iostream> - Begin the
main()function and create an array of integers.int main() {
const unsigned short ITEMS = 10;
int numbers[ITEMS];The last line here contains the newest information, where an array of ten integers called
numbersis created. Instead of hard-coding the number of array elements, a constant is used for this purpose. - Indicate to the user what the program needs.
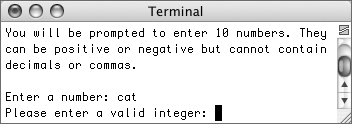
std::cout << "You will be prompted to enter " << ITEMS << " numbers. They can be positive or negative but cannot contain decimals or commas. ";
The user is provided with some information indicating what they will be expected to do. By using the constant
ITEMShere, we ensure that the program will always reflect the number of items being used (Figure 6.1).Figure 6.1. The initial message informs the program’s user as to what is about to happen.

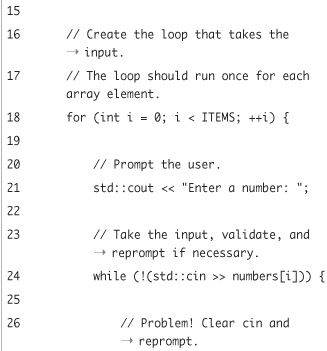
- Create a
forloop and prompt the user.for (int i = 0; i < ITEMS; ++i) {
std::cout << "Enter a number: ";The loop is defined as it was in the introduction to this section, with
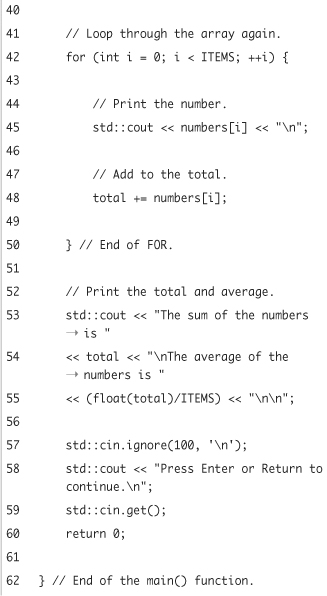
ITEMSbeing used in place of x. The loop will count from 0 toITEMS- 1, which exactly corresponds to the array’s indexes. - Read in the user’s input.
while (!(std::cin >> numbers[i])) {
std::cin.clear();
std::cin.ignore(100, ' '),
std::cout << "Please enter a valid integer: ";
}All of the user input will be read in using a
whileloop. This code was introduced in Chapter 4, “Input, Output, and Files,” as a method of handling potentially invalid input. The program will attempt to read in an integer and store it innumbers[i], which is a single slot in the array. If it could not read in a valid integer,cinis cleared out and the user is re-prompted (Figure 6.2).Figure 6.2. If the program cannot read in a valid integer, the user will be re-prompted.
- Complete the
forloop and print another message.}
std::cout << "The following numbers have been recorded: ";The application will display the inputted numbers prior to showing their sum and average.
- Create a new variable that will store the sum of the numbers.
int total = 0;
You could also define
totaltoward the top of the function, after the array variable, but it’s better to define the variable closer to where it will actually be used. - Loop through the entire array.
for (int i = 0; i < ITEMS; ++i) {
std::cout << numbers[i] << " ";
total += numbers[i];
}This loop is exactly like the example
forloop, only its body is different. Note that you have to redeclare theivariable. Variables in C++ exist only within the code block in which they were defined. So the previousivariable ceased to exist when that loop terminated.Within the loop, two things happen. First, the number stored in that array element is printed. Second, the number is added to the
totalvariable. - Print the sum and average of the numbers.
std::cout << "The sum of the numbers is "
<< total << " The average of the numbers is "
<< (float(total)/ITEMS) << " ";The sum can be printed by just sending the
totalvariable to the standard output. To calculate and return the average of them, the sum is divided by the number of items. Because dividing one integer by another will drop any remainder, one of the integers is cast to a float prior to the division. - Complete the
main()function.std::cin.ignore(100, ' '),
std::cout << "Press Enter or Return to continue. ";
std::cin.get();
return 0;
} - Save the file as
arrays1.cpp, compile, and run the application (Figure 6.3).Figure 6.3. The application reads in, totals, averages, and reprints ten numbers.
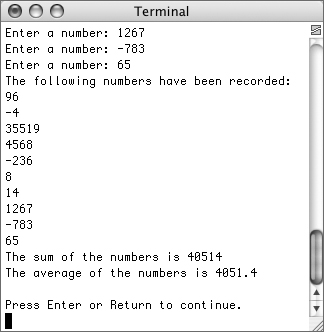
- If you want, change the value of
ITEMS, save the file, recompile, and rerun the program (Figure 6.4).Figure 6.4. Because the constant
ITEMSdictates how many array elements exist (Script 6.1), changing that one value changes the array, both loops, and the resulting calculation.
 Tips
Tips
• You can assign values to an array’s element when you create the array using this syntax:
int numbers[3] = {345, 56, 89};
This only works when you declare the variable. You cannot populate an existing array in this manner. Alternatively, you can just use
int numbers[] = {345, 56, 89};
in which case the compiler will automatically create an array whose size matches the number of provided values.
• In C, a string is actually stored as an array of characters. You can still use arrays this way in C++, but the std::string type is so much better that there’s really no need to use the old C method.
• You can print array values only one element at a time. The following will not work (not as you would expect, that is):
int numbers[] = {345, 56, 89};
std::cout << numbers;
• Because array indexes begin at 0, a common error is called an “off-by-one” error, where you refer to an array index that doesn’t exist. Watch out for code like this:
const int I = 100;
float nums[I];
nums[I] = 2340.534; // Error!
Working with Pointers
The next “complex” data type to be discussed in this chapter is one of the most important in both C and C++: pointers. They are very different from all of the other variables used thus far but do help you understand a lot more about what goes on behind the scenes. More important, pointers let you do things with data that would not otherwise be possible.
To get into pointers, you first need to understand addresses. What addresses are and why they are important will be discussed next. Then we’ll talk about how pointers relate to addresses. The third section is where the important application of pointers comes in: using pointers to change a variable’s value. Finally, some information is provided with respect to pointers and arrays.
Pointers will be implicitly or explicitly used in most advanced programming and much of the rest of this book, so being thoroughly comfortable with the information in this section is critical. For this reason, most of the examples are rather menial, focusing on how each piece of information fits in, not on how you would use it in a real-world application. That payoff will come toward the end of the chapter and in subsequent ones.
Understanding memory
We haven’t really discussed this much in the book, but everything there is to running a program involves your computer’s memory (you may already be aware of this on some level). Although a program exists as a file on your hard drive, it runs within the computer’s memory. When you execute a program, it creates variables, each of which requires memory. When your program includes a user-defined function, that also has to be stored in memory.
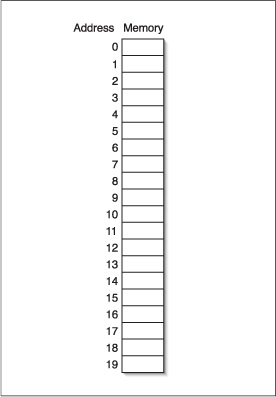
For demonstration purposes, let’s think of memory as a long row of blocks, each block being one byte in size. Each block has a unique address, so that the computer knows how to refer to that block. Figure 6.5 shows a theoretical model of some memory, with simple addresses.
Figure 6.5. A visual representation of a segment of computer memory. Memory addresses are actually hexadecimal numbers, but we’ve simplified the representation.
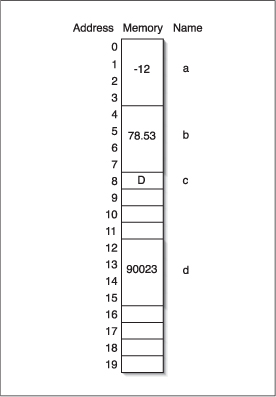
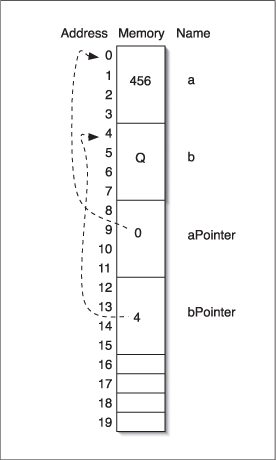
When you create a variable, the program reserves the appropriate amount of memory for it. Thus a char requires one byte, an integer four bytes (depending upon the computer), a float four bytes, and so on. Figure 6.6 shows how the following variable declarations might be associated with blocks of memory:
int a = -12;
float b = 78.53;
char c = 'D';
int d = 90023;
Figure 6.6. A sample as to how four variables might be stored in memory. (Technically the char D would be stored as an numeric ASCII representation of D, which is 68; see Table B.3.)
The important point to glean from the figure is that each piece of data actually has two associations. The data can be accessed by using a variable’s name, which is what you’ve been doing thus far. You can also access each piece of data by referring to the address in memory where that data is stored. This is the premise behind pointers.
Tip
• A computer doesn’t literally store, for example, 90023 in a block of memory. Instead it stores the right combinations of ones and zeros that represent that number.
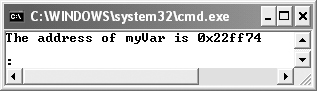
Finding addresses
Now that you know what’s going on in your computer’s memory, let’s bring some of this behind-the-scenes stuff to the forefront. To find the address where a variable’s data is being stored, precede the variable’s name with the address-of operator (&):
int myVar = 23409;
std::cout << "The address of myVar is "
<< &myVar << "
";
By default, the address will be a hexadecimal value (Figure 6.7). To print the address as a more legible integer, type cast it as an unsigned long integer:
std::cout << "The address of myVar is "
<< (unsigned long) &myVar << "
";
Figure 6.7. Addresses are hexadecimal numbers.
(In the next section of this chapter, you’ll learn the preferred, C++ way to cast the address to an unsigned integer. For the time being, let’s use this simpler syntax to perform the conversion.)
Just to play around with addresses a little bit, a simple program will create some variables and then reveal their memory locations.
To find addresses
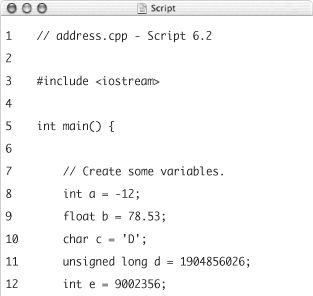
- Create a new, blank text document in your text editor or IDE (Script 6.2).
// address.cpp - Script 6.2
#include <iostream> - Begin the
main()function and create some variables.int main() {
int a = -12;
float b = 78.53;
char c = 'D';
unsigned long d = 1904856026;
int e = 90023;We’ll use some of the same variables shown in Figure 6.6, just for comparison. We’re also using different types to see how this affects the addressing.
- Print the address of each variable.
std::cout << "The address of a is "
<< (unsigned long) &a << " ";
std::cout << "The address of b is "
<< (unsigned long) &b << " ";
std::cout << "The address of c is "
<< (unsigned long) &c << " ";
std::cout << "The address of d is "
<< (unsigned long) &d << " ";
std::cout << "The address of e is "
<< (unsigned long) &e << " ";Script 6.2. This program creates five dummy variables whose addresses are then printed.
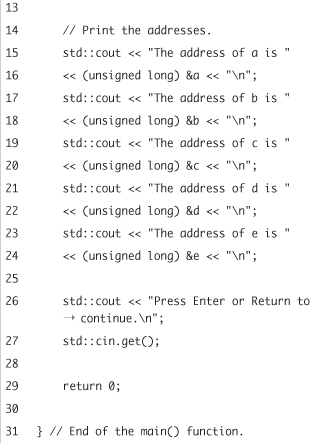
Using the syntax already described, each address is cast to an unsigned long integer and then displayed.
- Complete the
main()function.std::cout << "Press Enter or Return to continue. ";
std::cin.get();
return 0;
} - Save the file as
address.cpp, compile, and run the application (Figure 6.8).Figure 6.8. Running the program on Mac OS X shows each variable’s address (as an integer).
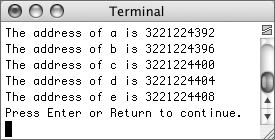
- If possible, compile and run the program on another computer (Figure 6.9).
Figure 6.9. Different computers will assign different addresses to the variables. On Windows here, the addresses are assigned in descending order.
Tips
• Even though you can type cast an address as an integer, you wouldn’t want to store it in another integer variable. To store an address in a variable, use pointers, as you’re about to learn.
• A variable’s address will not change for the duration of a program’s execution. This is a requirement, naturally, or else it would be impossible to use that variable. The same variable in the same program may not have the same address each time the program is run, though.
• Functions are also stored in memory. This means that you can even retrieve the address where that function is stored. To do so, refer to &functionName.
Understanding pointers
Being comfortable with the idea behind addresses is critical for understanding and using pointers. Whereas an address refers to a location in the computer’s memory, a pointer is a special type of variable used to store an address.
To declare a pointer, use this syntax:
type *pointerName;
Pointers need to be of the same type as the variable whose address they are storing. To store the address of an integer variable, create a pointer of type int:
int *myPointer;
To assign a value to a pointer (the value being an address in memory), use the address-of operator:
int myInt = 904;
int *myPointer;
myPointer = &myInt;
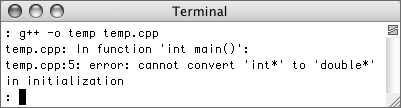
Again, the pointer’s type should match the variable’s type. If it doesn’t, you’ll see an error (Figure 6.10). To ensure that all of this information is sinking in, we’ll rewrite the previous example with pointers. At this time, let’s also incorporate the appropriate C++ casting operator. These were mentioned in Chapter 2, “Simple Variables and Data Types,” are given sufficient treatment in the sidebar, and are more formally covered in Chapter 11, “Dynamic Memory Management.”
Figure 6.10. The pointer’s type must match the type of the variable whose address it will store.
To use pointers
- Open
address.cpp(Script 6.2) in your text editor or IDE, if it is not already open. - Create a pointer to an integer that stores the address of the
ainteger variable (Script 6.3).int *aPointer = &a;
Combining the syntax outlined earlier, a pointer is both declared and assigned a value in one step. The pointer
aPointercan store an integer variable’s address. It is immediately assigned an address by referring to&a, where&is the address-of operator andais a variable of type integer. - Repeat Step 2 for the other variables.
float *bPointer = &b;
char *cPointer = &c;
unsigned long *dPointer = &d;
int *ePointer = &e;Each pointer’s type matches the corresponding variable whose address it stores.
- Change the
coutlines to print the address using the pointers.std::cout << "The address of a is "
<< reinterpret_cast<unsigned long>(aPointer) << " ";
std::cout << "The address of b is "
<< reinterpret_cast<unsigned long>(bPointer) << " ";
std::cout << "The address of c is "
<< reinterpret_cast<unsigned long>(cPointer) << " ";
std::cout << "The address of d is "
<< reinterpret_cast<unsigned long>(dPointer) << " ";
std::cout << "The address of e is "
<< reinterpret_cast<unsigned long>(ePointer) << " ";Script 6.3. The address of each variable is stored in a pointer and then printed.
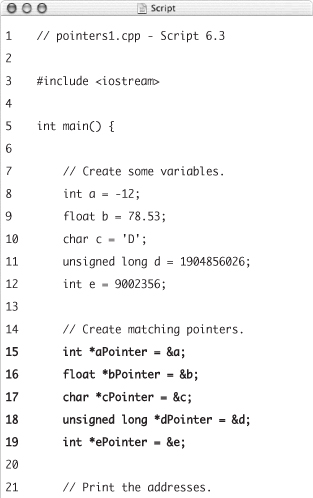

Each pointer stores an address, so the value of
aPointeris the same as&a. Thus, it can be printed just the same. The addresses are still type cast to integers so that they are not printed in hexadecimal form. The formal C++ casting operatorreinterpret_castis used here. This operator is described in the sidebar. The syntax has the name of the cast, followed by the desired (cast-to) type within angle brackets, followed by the pointer that is being cast in parentheses. - Save the file as
pointers1.cpp, compile, and run the application (Figure 6.11).Figure 6.11. The result of running the program is the same (see Figure 6.10), but pointers are now being used to store the addresses of the variables.
Tips
• Although the purpose of pointers may not be obvious at first, they actually allow for many sophisticated programming techniques. A common example of the need for pointers will be demonstrated in the final section of the chapter.
• You cannot define multiple pointers in one line like this:
int *myVar1, myVar2, myVar3; // No!
That code creates only one pointer—myVar1. The other two variables are standard integers. The proper solution is either
int *myVar1, *myVar2, *myVar3;
or to just create each pointer on its own line.
• When creating pointers, where you put the space doesn’t matter. All of these are acceptable:
int *myPointer;
int* myPointer;
int * myPointer;
Using pointers to change values
Here’s a recap on what you’ve learned regarding memory, addresses, and pointers thus far:
• When you create variables, blocks of memory are set aside to store their values.
• Each memory block has a unique address.
• You can retrieve the address of a variable using &variableName (the address-of operator).
• Addresses can be assigned to special variables called pointers.
• A pointer must be of the same type as the variable whose address it will store.
Now we can get into the really good stuff. If you have the code
int a = 456;
char b = 'Q';
int *aPointer = &a;
char *bPointer = &b;
then the program has actually reserved four blocks of memory. Two blocks are required for the two variables and two blocks for the pointers. In the blocks of memory for the variables you’ll find the values of those variables. In the blocks of memory reserved for the pointers you’ll find the values of those pointers, the values being the addresses of the other variables (Figure 6.12).
Figure 6.12. Pointers also take up memory, but this memory stores the address of other blocks. (Again, the literal character Q is not stored, but a numeric representation of that letter.)
Because you have the address of a variable stored in memory (in the pointer), you can use the pointer to access the value originally stored in the corresponding memory block. To do so, you dereference the pointer by preceding the pointer name with an asterisk (*):
std::cout << *aPointer;
This is to say that once you’ve established that aPointer stores the address of the integer a, then *aPointer and a both refer to the same value. Furthermore, assigning a value to *aPointer has the same effect as assigning a value to a (Figure 6.13):
*aPointer = 123;
Figure 6.13. Pointers can be used to change a value stored in a block of memory. Doing so does not change the value of the pointer, which is the address of that memory block.

Just to hammer the notion of pointers home, let’s do one last trivial example. Toward the end of the chapter, you’ll learn about one situation where the use of pointers to change a variable’s value is mandatory.
To use pointers to change values
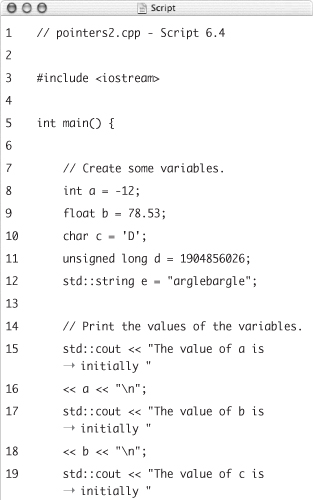
- Create a new, blank text document in your text editor or IDE (Script 6.4).
// pointers2.cpp - Script 6.4
#include <iostream> - Begin the
main()function and create some variables.int main() {
int a = -12;
float b = 78.53;
char c = 'D';
unsigned long d = 1904856026;
std::string e = "arglebargle";You can use the same variables you used before or use different ones. To mix things up a bit, a variable of type
stringis used in this example. - Print the initial value of each variable.
std::cout << "The value of a is initially "
<< a << " ";
std::cout << "The value of b is initially "
<< b << " ";
std::cout << "The value of c is initially "
<< c << " ";
std::cout << "The value of d is initially "
<< d << " ";
std::cout << "The value of e is initially "
<< e << " ";Script 6.4. To demonstrate how pointers can be used to access a stored value, this program first creates variables and then changes their values using pointers.
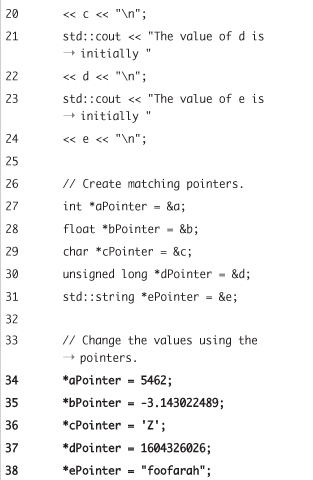
- Create pointers for each variable.
int *aPointer = &a;
float *bPointer = &b;
char *cPointer = &c;
unsigned long *dPointer = &d;
std::string *ePointer = &e;You’ve seen this already, except for the string pointer, which works exactly like the others. Each pointer now stores the address of the matching variable.
- Using the pointers, change each variable’s value.
*aPointer = 5462;
*bPointer = -3.143022489;
*cPointer = 'Z';
*dPointer = 1604326026;
*ePointer = "foofarah";To change a variable’s value using a pointer, preface the pointer’s name with an asterisk.
- Reprint each variable’s value.
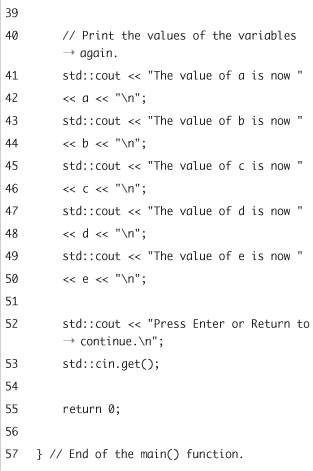
std::cout << "The value of a is now "
<< a << " ";
std::cout << "The value of b is now "
<< b << " ";
std::cout << "The value of c is now "
<< c << " ";
std::cout << "The value of d is now "
<< d << " ";
std::cout << "The value of e is now "
<< e << " ";The repeated
coutlines will reflect the changes made by the code in Step 5. - Complete the
main()function.std::cout << "Press Enter or Return to continue. ";
std::cin.get();
return 0;
} - Save the file as
pointers2.cpp, compile, and run the application (Figure 6.14).Figure 6.14. The values of the different variables are changed by dereferencing their pointers.
Tips
• You should pay particular attention to the fact that a pointer stores, in memory, an address. It does not store the value itself, nor does it allocate the memory for a value to be stored. You should always, therefore, make sure your pointers correspond to existing variables or reserved blocks of memory.
• The fact that there are two uses for the asterisk can be confusing. It is first used to create a pointer:
int *myPointer = &myInt;
It can also be used to dereference a pointer:
*myPointer = 230949;
// *myPointer == myInt
• Multiple pointers can store the same value:
int *p1 = &myInt;
int *p2 = &myInt;
Now p1 is equal to p2 and they are both equal to &myInt (the address of the myInt variable). Further, *p1 equals *p2, and they both equal myInt.
• C++ supports a void pointer, which is a pointer declared without a specific type. It’s defined like so:
void *pointerName;
Before dereferencing a void pointer, it must be type cast to the appropriate type. We’re mentioning the concept of a void pointer in case you might encounter one elsewhere, but they are not for the beginner programmer or the faint of heart.
Pointers and arrays
In the address and pointer examples we’ve used scalar types: integers, real numbers, and characters. For each of these you can create a pointer of the same type wherein you’ll store that variable’s address. But how do arrays fit into this picture?
Behind the scenes, the computer will store an array not in one single block of memory—as it does these other variables—but in sequential blocks. For example, an array defined as
int myArray[] = {25, 209, -12};
might be stored in memory as you see in Figure 6.15. Thus an array has multiple addresses, one for each element in the array. You might think that accessing an array’s address is difficult then, but it’s really just the opposite. In C++ (and in C), an array’s name is also a pointer to its base (first element’s) address. Looking at myArray, this means that these two lines accomplish the same thing:
int *ptr1 = &myArray[0];
int *ptr2 = myArray;
Figure 6.15. When an array is created, consecutive blocks of memory are reserved, with one block for each item in the array (so an array of ten integers may require ten four-byte blocks).
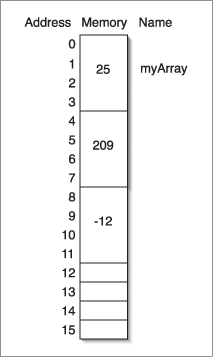
Both lines store the base address in the pointer, which is also the address of the first element in the array (see Figure 6.15). Using the dereferencing operator (*), you can now access the first value in the array:
std::cout << *ptr1; // Print
*ptr2 = 98744; // Change the value
If you use a pointer to access an array element, the question then becomes, how do you access the other array elements? The solution is to use a trick known as pointer arithmetic to change the address stored in the pointer.
Looking at ptr1 (or ptr2), it currently stores the address of the first element in the array. To change the pointer’s value to the address of the second element in the array, increment the pointer by one:
ptr1++;
By incrementing the pointer to the array, the pointer will reflect the address of the next element. Now if you refer to *ptr1 again, you’ll get the value stored in the second element.
The fascinating thing about pointer arithmetic is that the address is not necessarily being incremented by one. It’s actually being incremented by the number of bytes required for that array type for that computer. Thus if you have an array of three integers, each element might take up four bytes (as in Figure 6.15). Incrementing a pointer to that array would increment the address by four bytes! A pointer to an array of characters, which are by nature one byte each in size, would be incremented one byte at a time. This next example will play this out.
Script 6.5. This application demonstrates many things about the relationship between pointers and arrays. In particular, observe how a pointer can be used to access every element in an array and how magically pointer arithmetic works regardless of the data type.
To use an array pointer
- Create a new, blank text document in your text editor or IDE (Script 6.5).
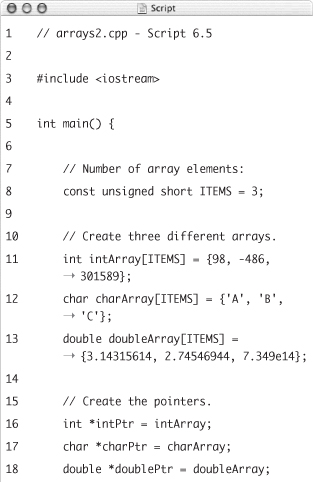
// arrays2.cpp - Script 6.5
#include <iostream> - Begin the
main()function and create some arrays.int main() {
const unsigned short ITEMS = 3;
int intArray[ITEMS] = {98, -486, 301589};
char charArray[ITEMS] = {'A', 'B', 'C'};
double doubleArray[ITEMS] = {3.14315614, 2.74546944, 7.349e14};Three arrays of different types are created. Each array contains three elements, as defined in the
ITEMSconstant. - Create the accompanying pointers.
int *intPtr = intArray;
char *charPtr = charArray;
double *doublePtr = doubleArray;Each pointer is of the same type as the array. They are all assigned values by referring to the array name (just
intArray, not&intArray). Remember that this means each pointer stores the base address of the array, not the contents of the array. - Use a pointer within a loop to print out information about the first array.
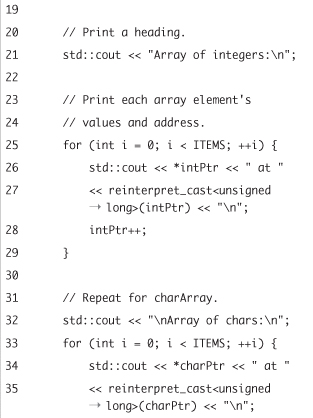
std::cout << "Array of integers: ";
for (int i = 0; i < ITEMS; ++i) {
std::cout << *intPtr << " at "
<< reinterpret_cast<unsigned long>(intPtr) << " ";
intPtr++;
}Each array is accessed using a
forloop, as you learned how to do earlier in the chapter. Within the loop, the pointer itself, along with pointer arithmetic, is used instead of the actual array.Since
intPtrinitially stores the base address of the array,*intPtrreflects the value stored at that address, which is the value of the first item in the array. The address itself is also printed as a cast unsigned long integer. Finally, the pointer is incremented so that it points to the next element in the array. - Repeat Step 4 for the two other arrays.
std::cout << " Array of chars: ";
for (int i = 0; i < ITEMS; ++i) {
std::cout << *charPtr << " at "
<< reinterpret_cast<unsigned long>(charPtr) << " ";
charPtr++;
}
std::cout << " Array of doubles: ";
for (int i = 0; i < ITEMS; ++i) {
std::cout << *doublePtr << " at "
<< reinterpret_cast<unsigned long>(doublePtr) << " ";
doublePtr++;
}The code is pretty much the same, with only the pointer name different from one example to the next. Although in all three loops the pointer is incremented by one, running the program will reveal that each pointer is incremented by a different number of bytes, in accordance with the type to which it points.
- Complete the
main()function.std::cout << "Press Enter or Return to continue. ";
std::cin.get();
return 0;
} - Save the file as
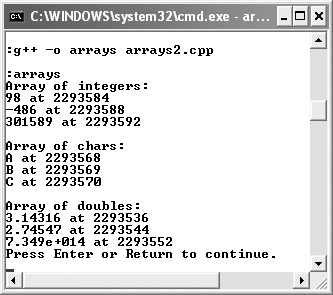
arrays2.cpp, compile, and run the application (Figure 6.16).Figure 6.16. Pointer arithmetic increases the address of an integer type by four, a character type by one, and a double type by eight (on this particular computer).
Tips
• Pointer arithmetic is more important when it comes to advanced and abstract programming. If you’re a bit thrown off by it, let the idea settle in the back of your mind and just remember for now that an array’s name is also a pointer to its first element.
• Arrays can be of any data type, meaning that you can also create an array of pointers, should that need arise. You’ll see this in Chapter 14, “Extended Topics,” where a program receives command-line arguments as an array of pointers.
• Pointer arithmetic can be more than just incrementation. You could do this:
int *ptr1 = myArray;
ptr1 += 2;
Now the pointer stores the address for the third element in the array.
Structures
One of the beautiful things about both C and C++ is that you aren’t confined to only using the data types defined in the language. You can actually define your own types and then create variables of those types. In fact, this concept leads right into the heart of C++: objects. But first, an easier example is the structure. A structure is user-defined data type made up of other variable types. The basic syntax is
struct structurename {
type varName;
type varName;
// And so on.
};
Notice that a structure’s definition ends with both the curly bracket and the semicolon.
You’ll want to use structures when dealing with items that have multiple properties. For example, say that you are writing an application that manages employees in some way. Each employee has several relevant characteristics: a name, an employee ID perhaps, an hourly wage, etc. As a structure, this might be
struct employee {
unsigned short id;
std::string name;
float wage;
};
A structure can have an unlimited number of variables, called members, and they can be of any type.
Once you’ve defined a structure, you can create variables of that type:
structureName myVar;
employee e1;
After you’ve established a variable of a structure type, use the dot syntax to refer to its individual members:
myVar.membername = value;
Assuming you have created a variable e1 of type employee, you could then assign values to the structure’s variables like so:
e1.id = 40;
e1.name = "Charles";
e1.wage = 12.34;
If you know the values of the structure’s members when you create a new variable of the structure type, you can assign those values at that time:
employee e1 = {40, "Charles", 12.34};
Where you define a structure has an impact on its availability. If you define it outside of, and before, every function, then every function can have a variable of the structure’s type. If you instead define a structure within a function, then only that function can have a variable of that type.
In this next example, a structure will be created for representing a book. The information it will store will be the book’s title, author, and year of publication.
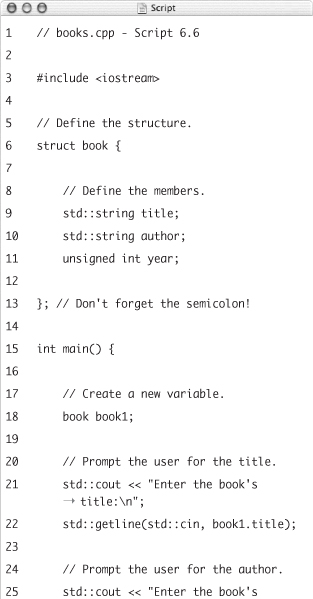
Script 6.6. A structure is used to create a user-defined variable type called book, which will encapsulate a book’s title, author, and publication year, all under one variable.
To define and use structures
- Create a new, blank text document in your text editor or IDE (Script 6.6).
// books.cpp - Script 6.6
#include <iostream> - Define the structure.
struct book {
std::string title;
std::string author;
unsigned int year;
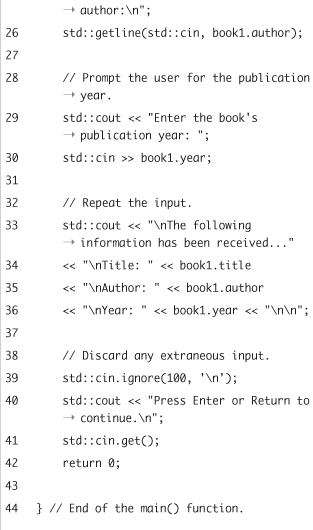
};This structure is called book. It contains three members: a string called title, another called author, and an unsigned integer for storing the year of publication. Make sure that you do not forget the semicolon after the closing curly brace, or you’ll see errors when compiling this program (Figure 6.17).
Figure 6.17. Failing to conclude a structure’s definition with a semicolon creates errors like those here.
We have defined the structure outside of, and before, any function (instead of within a single function) so that it could be used within every function.
- Begin the
main()function and create a variable of typebook.int main() {
book book1;Once your structure is defined, you can create a variable of its type, just as you would any other variable.
- Request the book title from the user and store it in the structure.
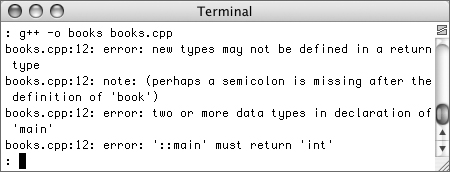
std::cout << "Enter the book's title: ";
std::getline(std::cin, book1.title);For the most part, structures can be used like any other variables. Here, a book’s title will be read in (Figure 6.18) and stored in the
bookstructure’stitlemember.Figure 6.18. The user is prompted for a book’s title, which will then be stored in the structure.
- Repeat Step 4 for the author and publication year.
std::cout << "Enter the book's author: ";
std::getline(std::cin, book1.author);
std::cout << "Enter the book's publication year: ";
std::cin >> book1.year;One prompt is made for each input to be requested (Figure 6.19). Because
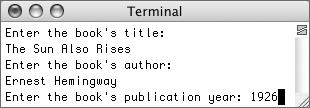
yearis an integer, not a string, you can usestd::cinto read it. See Chapter 4, “Input, Output, and Files,” for the details on taking user input.Figure 6.19. The rest of the structure’s data will also come from user input.
- Repeat the submitted information back to the user.
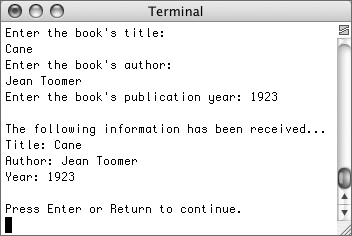
std::cout << " The following information has been received..."
<< " Title: " << book1.title
<< " Author: " << book1.author
<< " Year: " << book1.year << " ";After all of the input is stored in the structure, it will be repeated back for confirmation. Again, the
structureVariableName.structureMemberNamesyntax is used to access an individual member of the structure. - Complete the
main()function.std::cin.ignore(100, ' '),
std::cout << "Press Enter or Return to continue. ";
std::cin.get();
return 0;
} - Save the file as
books.cpp, compile, and run the application (Figure 6.20).Figure 6.20. After taking all of the input, the program repeats the book’s information back to the user.
Tips
• By understanding the idea behind structures and how to use them in your applications, you will go a long way toward understanding the basics of objects. A structure is a variable definition that contains multiple subvariables. A class is a variable definition that contains both subvariables and functions (called methods).
• Some compilers will object if you use a string type within a structure.
• In C, you had to use the more formal-struct structureName myVar;
when creating a variable of type structureName. This is not required in C++.
• You can create variables of a structure type immediately after defining the structure:
struct person {
unsigned short age;
char gender;
} me, you;
• Similarly, you can declare and initialize a structure variable at the same time:
struct person {
unsigned short age;
char gender;
} me = { 40, 'M'};
• You can create an array of structures:
person family[5];
To refer to specific members of individual elements, use the array name, with its index, followed by the dot and the member name:
family[3].age = 4;
family[2].gender = 'F';
Revisiting User-Defined Functions
Now that you have a basic understanding of some of the more complex data types available in C++, let’s revisit the topic of user-defined functions. This capability was covered in detail in Chapter 5, “Defining Your Own Functions,” where you learned how to prototype, define, send arguments to, and return values from these functions. If you read that chapter, you should already have most of the information you need to write your own functions, but there is still one significant missing piece.
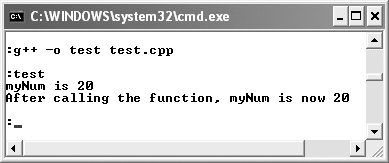
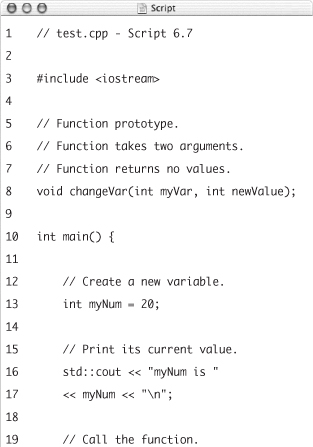
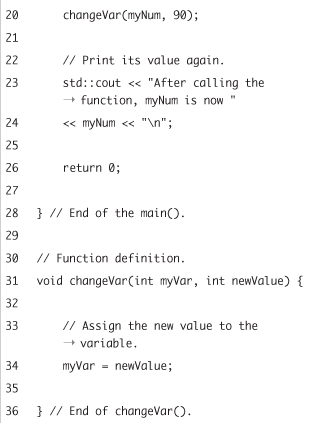
The primary restriction you’ll come across is that by default a variable is passed to a function by value. This means that a value gets sent to a function, never the variable itself. If you run test.cpp (Script 6.7), the result may not be what you expect (Figure 6.21).
Figure 6.21. The application’s changeVar() function does not actually change the value of the variable (see Script 6.7).
The reason for this is that when the changeVar() function is called, the value of myNum in main() is assigned to myVar in changeVar(), but these are still two distinct variables. As a matter of fact, the changeVar() function is completely ignorant of the existence of myNum, not even knowing that variable’s name. So the question is: how would you change the value of a variable without using its name? By using addresses and pointers, of course!
Script 6.7. Because of the way arguments are sent to functions, the changeVar() function does not have the effect you might imagine (Figure 6.21).
Passing addresses to functions
The first way to work around the “by value” problem is to pass to a function not a variable’s value but its address. As you know by now, to access a variable’s address, you preface the variable’s name with the address-of operator (&). Thus, to send an address to a function, the function call would look like this:
int main() {
int myNum = 20;
changeVar(&myNum, 90);
// Rest of main().
Now the address of the variable will be sent to the function and assigned to the first argument there. As only one data type can store an address, the first argument must be a pointer. Since pointers must be of the same type as the variable whose address they’ll store, the prototype for the changeVar() function would be
void changeVar (int *myVar, int newValue);
To change the variable’s value within the function, dereference the pointer:
void changeVar (int *myVar, int newValue) {
*myVar = newValue;
}
If you modify the test application using this code, you’ll see the desired end result (Figure 6.22).
Figure 6.22. By passing an address instead of a value to the changeVar() function, the variable’s value can be changed.
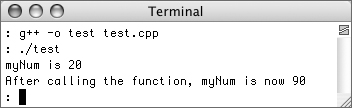
Going with another use of this same idea, this next program will define a function that swaps the values of two variables. This is something you might need with a sorting algorithm, and it can only be done using pointers and addresses.
To pass values by address
- Create a new, blank text document in your text editor or IDE (Script 6.8).
// swap1.cpp - Script 6.8
#include <iostream>Script 6.8. This program defines a function that accepts addresses of variables, enabling the function to swap the values of the variables.
- Add the function prototype.
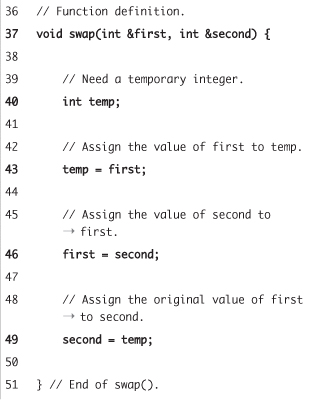
void swap(int *first, int *second);
This function is called swap, and it takes two arguments, both of which are pointers to integers.
- Begin the
main()function and create two integers.int main() {
int myNum1 = 23900;
int myNum2 = -149; - Print the initial values of the numbers.
std::cout << "At first, myNum1 is "
<< myNum1 << " and myNum2 is "
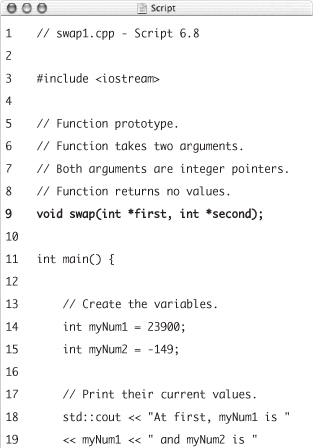
<< myNum2 << " "; - Call the
swap()function.swap(&myNum1, &myNum2);
Because the function has pointers as its arguments, it must be passed addresses. To do so, preface each variable with the address-of operator.
- Reprint the values of the variables.
std::cout << "After calling the function, myNum1 is "
<< myNum1 << " and myNum2 is "
<< myNum2 << " ";As you’ll see when you run this program, after calling the function, the values of the two variables will have been switched (Figure 6.23).
Figure 6.23. Using pointers and addresses, the
swap()function can change the values of variables.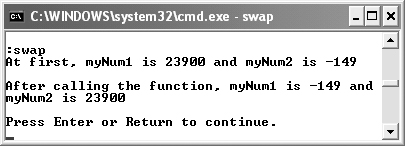
- Complete the
main()function.std::cout << "Press Enter or Return to continue. ";
std::cin.get();
return 0;
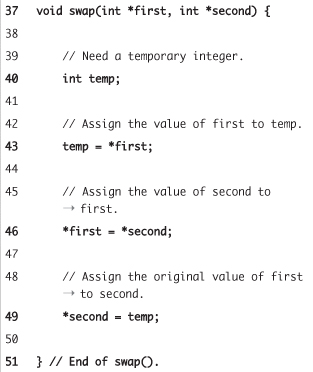
} - Begin defining the
swap()function.void swap(int *first, int *second) {
The function’s definition begins exactly like its prototype. Review Chapter 5 if any of this is unclear.
- Establish a temporary integer.
int temp;
An extra variable is necessary in order to swap the values. It can be an integer, not a pointer, as it will store a value, not an address.
- Swap the values.
temp = *first;
*first = *second;
*second = temp;Swapping is a three-step process. First, one value is stored in
temp. To refer tofirst’s value, dereference it using*first. Then the value ofsecondis assigned tofirst. Both pointers are dereferenced to accomplish this. Finally, the original value offirst, temporarily stored intemp, is assigned tosecond. - Complete the
swap()function.}
- Save the file as
swap1.cpp, compile, and run the application (Figure 6.23).
Tips
• Chapter 5 also covers the topic of overloaded functions, where multiple functions may have the same name but take a different type or number of arguments. Allowing for pointers of different types is another case where you might need to use this concept.
• Passing addresses to a function is often the only way the function can receive a complex data type.
Passing to functions by reference
Passing values to a function by addresses is necessary under some circumstances, as you’ve just seen. This feature is available in both C and C++ for such occasions. But as the wise people behind C++ thought, since this is such a good use of addresses, why not improve upon the concept? If you know that a function has to accept an address, then why not just write the function that way, so that no special syntax is needed when the function is called? Thus, passing arguments by reference was born.
The premise is the same—pass an address to a function—but the syntax is very different. Going back to the changeVar() example, the function itself is prototyped like this:
void changeVar (int &myVar, int newValue);
Script 6.9. Creating functions that accept arguments by reference is new to C++ and makes for a cleaner interface.
The first argument in the function, myVar, will not be a pointer, but actually an alias to the original variable. Anything that happens to the variable within the function affects the same variable outside of the function. This means that the changeVar() function can do its job by just coding
void changeVar (int &myVar, int newValue) {
myVar = newValue;
}
This makes calling the function even easier, where only a variable’s name has to be provided:
int main() {
int myNum = 20;
changeVar(myNum, 90);
// Rest of main().
As you can see, the function has the same capability it did before (it can change the value of a variable), but the function call is less complex. Let’s rewrite the swap application using this new idea.
To pass values by reference
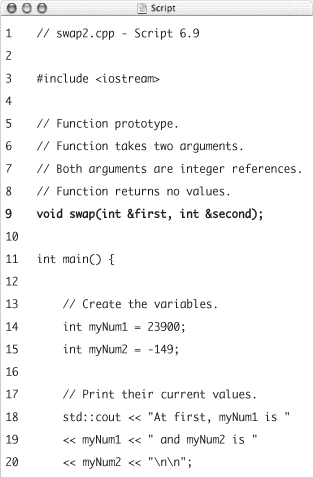
- Open
swap1.cpp(Script 6.8) in your text editor or IDE, if it is not already open. - Change the function prototype to this (Script 6.9):
void swap(int &first, int &second);
Instead of having two pointers as its arguments, the function now has two references.
- Within the
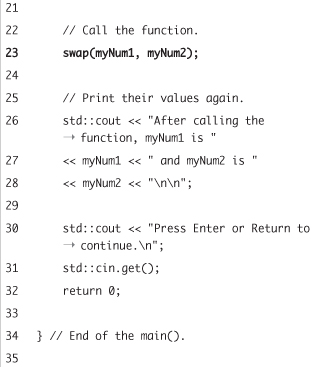
main()function, change theswap()function call to:swap(myNum1, myNum2);
Since the
swap()function is set to take its arguments by reference, it no longer needs to be called with variable addresses. - Change the
swap()function definition so that it matches the prototype.void swap(int &first, int &second) {
- Remove all references to pointers within the
swap()function.temp = first;
first = second;
second = temp;Another benefit of this method is that you no longer need to dereference pointers within the function in order to access the values.
- Save the file as
swap2.cpp, recompile, and rerun the application (Figure 6.24).Figure 6.24. The program works the same as it did before, but the
swap()function now takes its arguments by reference instead of by address.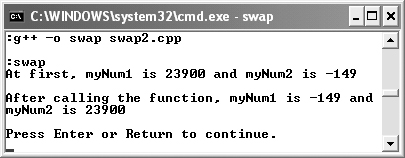
Tips
• If you have a function defined so that it accepts arguments by reference, you cannot pass literal values to it. This will not work:
changeVar(20, 90);
• You can create a reference variable at any point in time, not just as a function argument. For example:
int n1 = 10;
int &n2 = n1;
Now n1 and n2 refer to the same memory block, and changes made to the one variable affect the other.
• Functions can also be defined so that they return by reference instead of by value:
int &myFunction();
• Another benefit of passing by reference, besides the ability to change a variable’s value, is that it has less overhead. No extra memory is required for separate variables within the function.
• If you want the performance benefit of passing by reference but do not want a function to be able to change a variable’s value, you can define the parameter as a constant:
void myFunc (const int &myNum);
Such a function could be passed literal values:
myFunc(7);