4. Input, Output, and Files
If you aren’t tired by now of having to edit, resave, recompile, and rerun your applications every time you change the value of a variable, then you have more patience than we do. Any program or programming language is of limited use if it could only work with predefined values. This is why there are always ways in which you can work with data from external sources.
For starters, the most important concept to learn is how to take input from the keyboard. This will allow your programs to interact with a user. We begin this chapter by demonstrating how to take single-character, numeric, whole-word, and whole-line input. In the process of picking up these techniques, you also see how to ignore unnecessary input and take multiple types of input at once. Following these examples is a discussion as to how you can validate inputted data, a consideration that should not be ignored.
At the end of the chapter, the focus shifts slightly to discuss files. You’ll first learn how to store data in a text file, and then you’ll write another program that retrieves and displays that data. As with the first three chapters, the information covered here will be used in the vast majority of the programs you’ll write throughout the rest of the book.
Taking Character Input
In a way, your applications have already been requiring input from the keyboard. Toward the end of Chapter 1, “Creating a Basic Program,” you learned how to pause the execution of an application using std::cin.get(). By calling this function, the application waited for the user to press Return or Enter before continuing. But you can use cin to do much more than that.
The cin object is the opposite of cout, so just as you can use cout << myVar to send a variable’s value to the output, you can use cin >> myVar to assign input to a variable. For example:
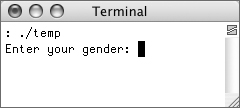
std::cout << "Enter your gender: ";
char gender;
std::cin >> gender;
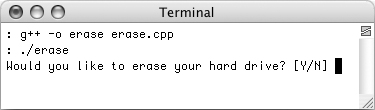
As you can see in Figure 4.1, the cin line makes the program wait for the user input. Using cin really is that simple in theory, but there’s more going on behind the scenes, as you’ll learn over the next several pages. In the meantime, let’s make a simple application that asks a Yes/No question and responds differently, depending upon the answer.
Figure 4.1. A user is prompted for input by invoking cin.
To read a single character
- Create a new, blank text document in your text editor or IDE (Script 4.1).
// erase.cpp - Script 4.1
#include <iostream>
int main() {Script 4.1. This application asks a simple Yes/No question and assigns the inputted value to the
answervariable. Aswitchconditional is used to print specific responses based upon the keyed input.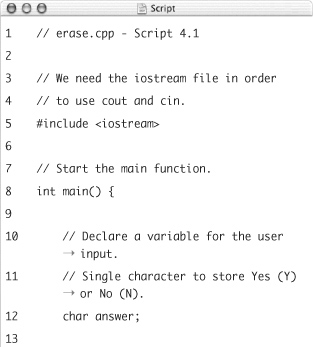

- Declare a variable of the
chartype.char answer;
The
chardata type was briefly introduced in Chapter 2, “Simple Variables and Data Types.” Declared here, the variableanswerwill be able to hold a single character. Comments are added (see the corresponding script) to indicate what type and format of data is expected to be stored in this variable. - Prompt the user and read in the reply.
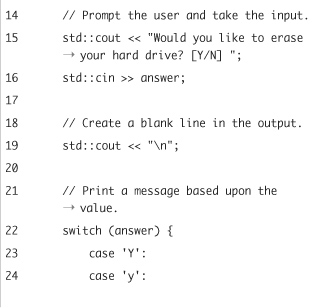
std::cout << "Would you like to erase your hard drive? [Y/N] ";
std::cin >> answer;This line prints the question being asked and indicates within square brackets the type and format the answer is expected to be in. Using square brackets like this is a common technique, giving a visual cue to the user as to how the application should be used.
Notice that, unlike in previous examples, no newline character (
Figure 4.2. The user types their answer to the question on the same line as the question itself.
- Create a blank line in the output.
std::cout << " ";
To further separate out the input from the output (Step 5), a newline character is printed. This is just for aesthetics.
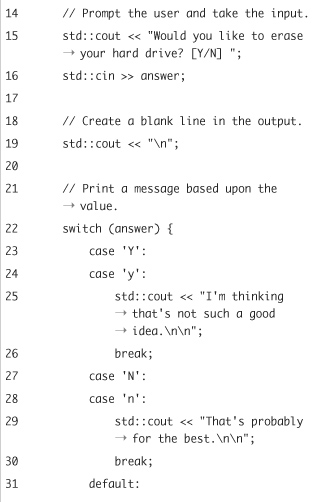
- Begin a
switchconditional that prints different messages depending on what the user enters.switch (answer) {
Since
answeris a single-character variable, aswitchconditional can be used here (switchworks only oncharand integer values, see Chapter 3, “Operators and Control Structures”). You could also use anif-else if-elseconditional here, but aswitchwill work best. - Define the first two cases.
case 'Y':
case 'y':
std::cout << "I'm thinking that's not such a good idea. ";
break;Since the
switchwill perform a case-sensitive comparison, two cases are added to see if the answer was Yes (in the form of Y or y). If either of these cases is true, then thecoutstatement is executed and theswitchis exited, thanks to thebreak. Having two cases together like this without abreakcreates a fall-through situation, where both cases have the same executed result. - Add two more cases to handles No’s.
case 'N':
case 'n':
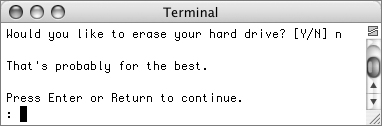
std::cout << "That's probably for the best. ";
break;This is a repeat of Step 6, using different values for the cases and a different message to be printed.
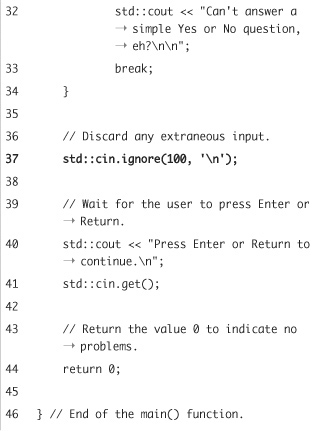
- Add a default case and complete the switch.
default:
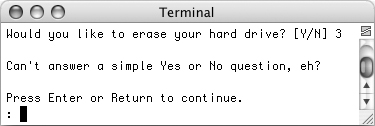
std::cout << "Can't answer a simple Yes or No question, eh? ";
break;
}The default case will be called if the typed answer is not one of the accepted values (Y, y, N, or n). The
breakisn’t required at the end of this case, but it’s a good idea to include it. - Complete the application.
std::cout << "Press Enter or Return to continue. ";
std::cin.get();
return 0;
} - Save the file as
erase.cpp, compile, and then run the application (Figure 4.3).Figure 4.3. The application prints different messages according to how the user answers the question.
If you are compiling this from a command-line environment on Windows, you’ll want to use a different name for the compiled application, as
eraseis already the name of a program on that platform.If you find that the application seems to go through its entire run cycle without waiting for you to press Enter or Return at the end, don’t be surprised. You’ll learn why, and how to fix this, in the next section of this chapter.
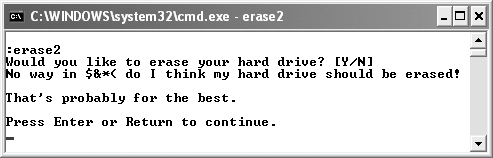
- Rerun the application, using different inputted values (Figure 4.4).
Figure 4.4. In this program, if the user doesn’t type Y, y, N, or n, they’ll see this response.
 Tips
Tips
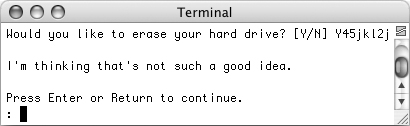
• Because cin as used here reads in only a single character, if the user types Y45jkl2j in response to the erase application, that will be treated the same as just Y (Figure 4.5). You’ll learn more about how cin reads input—and why this is important—over the course of this chapter.
Figure 4.5. Only the first non–white space character is assigned to answer, so in this case, everything after the initial Y is unused.
• The cin object, with the syntax demonstrated in this example, will ignore spaces when reading in a character. So typing <space>Y<Return> is treated the same as just Y<Return>. If you want to read in any character, including white space, use cin’s get() function:
char myChar;std::cin.get(myChar);
• As a reminder, cin stands for console input, where the console is normally a Terminal or DOS window. It is defined within the iostream file, which stands for input/output stream.
• The std:: is necessary before cin and cout because they are defined within the std namespace (namespaces are discussed in Chapter 12, “Namespaces and Modularization.”) Some IDEs will automatically have the line
using namespace std;
when creating a new document, nullifying the need for std::. We will continue to use this code in the book, though.
Discarding Input
As the preceding example should show, taking keyboard input can be quite simple, thanks to the magic of cin. That example is serviceable and demonstrates the process, but you should know a little more about how cin works behind the scenes. As we mentioned at the end of the previous steps, the erase application may now seem to ignore the request for the user to press Enter or Return before continuing. Why?
The cin object reads input from the console, which is normally the keyboard. Whatever the user types is sent to the C++ program when the user presses Return or Enter (the application does not read in each character as it is typed). Once the application receives the input, cin assigns the input to the variable, assuming that the input can match the variable’s type. In the preceding example, you might type Y and press Return. The program then assigns Y to answer, but the Return is actually still left sitting in the input stream. When the cin.get() line is executed, it immediately reads the Return that you’ve already entered instead of waiting for you to press Return or Enter again. (The input technically goes into a buffer from which the program retrieves it, but you really don’t need to worry about this intermediary area.)
How input is handled can be even more of a problem if an application requests multiple inputs. For example, if an application asks one Y/N question, then another, and if the user types Yes for the first question, then the second question will be assigned the value e. One solution to this problem is to erase the remaining (buffered) input whenever appropriate. To discard input (remove it from the buffer without doing anything with it), use the ignore() function.
std::cin.ignore();
That line has the effect of discarding a single character. This function can take a numeric argument, indicating how many characters should be ignored:
std::cin.ignore(3);
Another option is to provide a second argument, which represents a stop character. Such a character is used to specifically name what character, when read in, stops the execution of the function. This next line will ignore up to ten characters or until it hits a newline.
std::cin.ignore(10, '
'),
Let’s quickly add similar code to the erase example so that the pausing of the execution will work properly again.
To discard input
- Open
erase.cpp(Script 4.1) in your text editor or IDE, if it is not already. - After the
switchconditional, call theignore()function (Script 4.2).std::cin.ignore(100, ' '),
This line will read in and discard up to 100 characters or until it encounters a newline (when the user press Return or Enter). The number is somewhat arbitrary but should fix the existing problem.
Script 4.2. By calling the
ignore()function, extraneous input will be discarded by the application.
- Save the file as
erase2.cpp, compile, and run the application (Figure 4.6).Figure 4.6. Now the
eraseapplication will properly wait for the user to press Return or Enter again before completing its execution.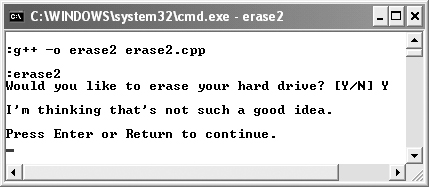
- If you want, type in your answer followed by a whole bunch of junk to see what happens (Figure 4.7).
Figure 4.7. Up to 100 extra characters will be ignored in this version of the program.
Tips
• You could also call the ignore() function immediately after the assignment of the cin to answer. That way, the extra typed data is not sitting around in the buffer while the program continues on.
• To delete the entire buffer, without specifying a number of characters, use the gcount() function, which returns the number of characters in the buffer. The syntax is:
std::cin.ignore(std::cin.gcount()+1);
In the book we stick with the habit of deleting 100 characters, but you can use this format instead.
Taking Numeric Input
Now that you know how to handle single characters, the next thing to learn is how to take numeric input, which is just as simple. Instead of declaring and assigning the input to a variable of type char, just declare a variable of a numeric type and use cin in the same manner.
std::cout << "Enter your age: ";
unsigned short age;
std::cin >> age;
The cin object will assign the next inputted unsigned integer to age, which can then be used like any other variable.
To put this knowledge to use, let’s make a conversion script that takes a temperature in degrees Fahrenheit and converts it into degrees Celsius.
To read numeric input
- Create a new, blank text document in your text editor or IDE (Script 4.3).
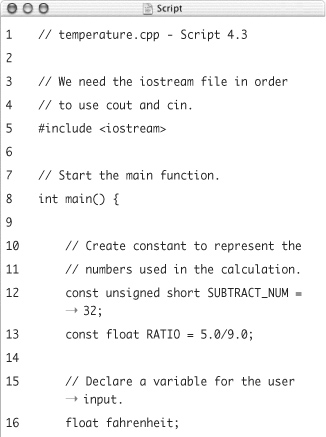
// temperature.cpp - Script 4.3
#include <iostream>
int main() { - Define the necessary constants and variables.
const unsigned short SUBTRACT_NUM = 32;
const float RATIO = 5.0/9.0;
float fahrenheit;The first two lines define constants that will represent the magic numbers used in the calculation (degrees Celsius is equal to degrees Fahrenheit minus 32 times five ninths). Because you always want to use floats when performing division (unless you don’t mind losing the remainder),
RATIOis defined as5.0/9.0instead of just5/9.The last variable will store the inputted value. It’s a float, allowing for a real number of either sign (positive or negative).
Script 4.3. This application accepts a numeric input from the keyboard and converts that value into degrees Celsius.
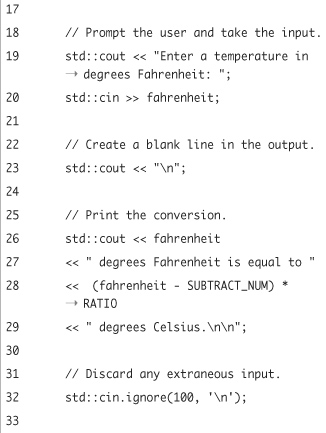
- Prompt the user and read in the input.
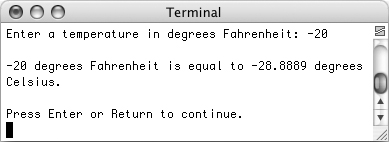
std::cout << "Enter a temperature in degrees Fahrenheit: ";
std::cin >> fahrenheit;The first line is just a simple printed message. The second line here actually reads in the keyed input and assigns it to the
fahrenheitvariable. - Create a blank line in the output.
std::cout << " ";
To create some space between the input and the next line of output, a newline is printed.
- Print the results.
std::cout << fahrenheit
<< " degrees Fahrenheit is equal to "
<< (fahrenheit - SUBTRACT_NUM) * RATIO
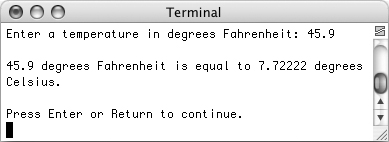
<< " degrees Celsius. ";The printed message begins by repeating the entered Fahrenheit temperature. Then the calculation is made and sent to the output (see Step 2 for the formula) and the message is concluded. You can see how this will look in Figure 4.8.
Figure 4.8. The user’s input is reprinted, along with the result of a calculation.
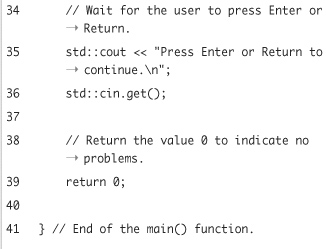
- Complete the application.
std::cin.ignore(100, ' '),
std::cout << "Press Enter or Return to continue. ";
std::cin.get();
return 0;
} - Save the file as
temperature.cpp, compile, and then run the application (Figure 4.8). - Rerun the application, using different inputted values (Figure 4.9).
Figure 4.9. You can now perform different calculations without recompiling the C++ code.
Tips
• Because cin reads in data that matches the type to which it will be assigned, if you defined Fahrenheit as an integer and entered 46.5 as the value, the variable would only be assigned 46.
• Remember that if you don’t like all of the extra decimal places in the printed temperature (see Figures 4.8 and 4.9), you can use the formatting techniques discussed in Chapter 2 to adjust the output.
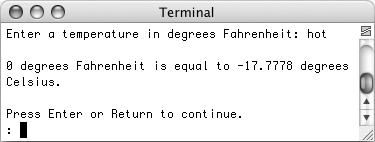
• If a user attempts to enter a non-numeric value for the temperature, the program could respond in a couple of different ways. For example, it could turn a string into some sort of number equivalent (Figure 4.10) or outright fail. Later in this chapter you’ll see how to validate user input to mitigate these situations.
Figure 4.10. Invalid input will lead to erratic and inappropriate results in your programs.
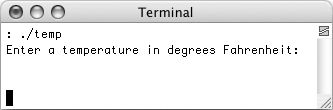
• If you don’t want the user to begin typing on the same line as the prompt, use a newline character:
std::cout << "Enter a temperature in degrees Fahrenheit:
";
Taking String Input
One of the excellent improvements of C++ over C is how easy it is to take user input. In particular you’ll see this benefit when it comes to taking whole-word input. To do so, just define a string variable as you normally would:
#include <string>
int main () {
std::string input;
Next, use cin as you do with numeric or character input:
std::cout << "Enter a word: ";
std::cin >> input;
This will assign to the input variable any string of text (including characters, numbers, and punctuation) up until the first white space. So a simple space, a tab, a newline, or a carriage return delineates the string.
To use this information, the following example will be a variation on the string example from Chapter 2. The user will be prompted to enter their first name, then their last name. Then they’ll be greeted by their full name, and the number of letters in their name will be counted and printed.
To take string input
- Create a new, blank text document in your text editor or IDE (Script 4.4).
// hello.cpp - Script 4.4
#include <iostream>
#include <string>
int main() {As this application uses strings, it must also include the
stringheader file. See Chapter 2 for more on the basics of strings.Script 4.4. A user is personally greeted by this program, which also prints the number of letters in their name.


- Define the variables used to store the input.
std::string firstName, lastName;
Two variables are declared, both of type
string. - Prompt the user for their first name, read in the value, and then discard any extra input.
std::cout << "Enter your first name: ";
std::cin >> firstName;
std::cin.ignore(100, ' '),The second line will read in the first word typed by the user and assign this value to the
firstNamevariable. Then up to 100 characters of extraneous input are ignored (or until a newline is found). - Repeat Step 3 for the last name.
std::cout << "Enter your last name: ";
std::cin >> lastName;
std::cin.ignore(100, ' '), - Create a blank line in the output.
std::cout << " ";
- Print the results.
std::cout << "Hello, "
<< firstName << " " << lastName
<< ". Did you know that there are "
<< (firstName.size() + lastName.size())
<< " letters in your name? ";The printed message begins by saying Hello, followed by the submitted first and last names. To count the number of characters used, the
size()function is called (which returns the number of characters in a string). To come up with the total, the returned value offirstName.size()is added tolastName.size(). - Complete the application.
std::cout << "Press Enter or
Return to continue. ";
std::cin.get();
return 0;
}In this program,
ignore()does not need to be called again before the finalget()call, as the input was discarded immediately after reading in thelastNamevalue. - Save the file as
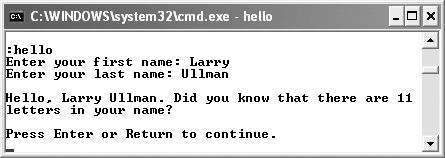
hello.cpp, compile, and then run the application (Figure 4.11).Figure 4.11. A person’s full name is taken by two prompts, so that the user is personally greeted.

- Rerun the application, using different inputted values (Figure 4.12).
Figure 4.12. Simply rerun the application to vary the input (which comes in handy if you changed your name since the last time you ran the program).
Tips
• If you know C, you’ll appreciate how easily you can take string input in C++. As a comparison, in C, you have to define a string as a character array of a fixed length, and only that much text can be read in and stored.
• In this example, you could have also created a fullName variable and defined it as
std::string fullName = firstName + " " + lastName.
Then the final cout statement could greet the person by referring to fullName and use (fullName.size() - 1) as the character count (subtracting the one added space).
Taking Multiple Inputs
Now that you understand the basics of taking input in C++ (in other words, you know how wickedly easy it is), it’s time to take things a step further by grabbing multiple pieces of input at once. Because cin uses white space as a delineator, the keyed text Larry Ullman counts as two separate inputs. To read that in using cin, you would have to assign the values to two separate variables. In practice this means that the hello example (Script 4.4) could be written using
std::string firstName, lastName;
std::cout << "Enter your first and last name: ";
std::cin >> firstName >> lastName;
The first string read in, up until a space of any kind, will be assigned to firstName. Then the second string will be read into lastName. But both inputs do not need to be of the same type; you can mix inputs just as easily. Another version of the temperature conversion application will be written that allows conversions from Celsius to Fahrenheit and vice versa.
To take multiple input
- Create a new, blank text document in your text editor or IDE (Script 4.5).
// temperature2.cpp - Script 4.5
#include <iostream>
int main() { - Define the necessary constants.
const unsigned short ADD_SUBTRACT = 32;
const float RATIO = 5.0/9.0;As before, these two constants are used in the calculations. The first constant has been renamed as
ADD_SUBTRACTbecause it could be used in either addition or subtraction, depending upon which conversion is taking place.Script 4.5. Expanding upon the notion of taking input, this program reads in two inputs (one
floatand onechar) and performs the proper temperature conversion.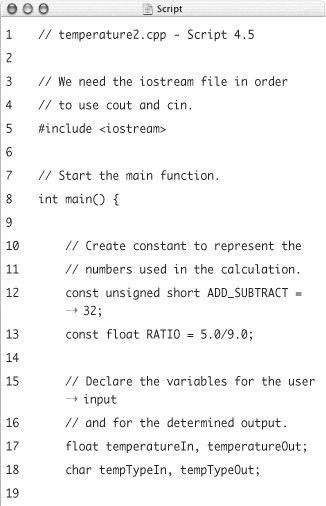

- Declare the necessary variables.
float temperatureIn, temperatureOut;
char tempTypeIn, tempTypeOut;Four variables are needed by this program. One takes the numeric temperature input, and another float will store the calculated temperature output. One character variable will store whether the input is in Fahrenheit (F) or Celsius (C), and the other stores the opposite value.
If you want to be extra careful, you could initialize each variable so that they begin with default values.
- Prompt the user and read in the input.
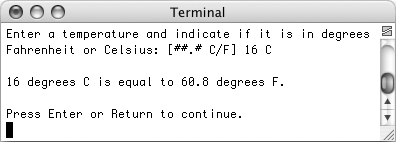
std::cout << "Enter a temperature and indicate if it is in degrees Fahrenheit or Celsius: [##.# C/F] ";
std::cin >> temperatureIn >> tempTypeIn;The prompt indicates exactly what information is expected, in what order, and in what format. The expectation is that the user will type something like -5 C or 75.2 F. The two inputs are assigned to the
temperatureInandtempTypeInvariables. - Discard any extraneous input and create a blank line in the output.
std::cin.ignore(100, ' '),
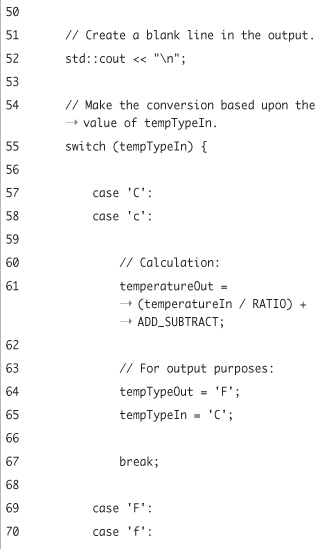
std::cout << " "; - Begin a
switchconditional that performs different calculations depending upon the inputted temperature type.switch (tempTypeIn) {
Similar to the first program in this chapter (
erase), aswitchconditional will be used on the initial temperature type (tempTypeIn). This variable should have a value of either C or F (or c or f). - Define the first two cases.
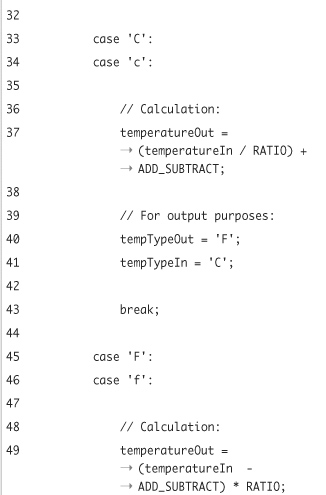
case 'C':
case 'c':
temperatureOut = (temperatureIn / RATIO) + ADD_SUBTRACT;
tempTypeOut = 'F';
tempTypeIn = 'C';
break;If the initial temperature is in degrees Celsius, then the outputted temperature should be in degrees Fahrenheit. So if
tempTypeInhas a value of either C or c, the right calculation oftemperatureOutis made. This formula is different than the one previously used, where the temperature in degrees Fahrenheit is equal to the temperature in degrees Celsius times nine-fifths (or divided by the ratio five-ninths) plus 32.At this point, the label for the outputted temperature is also defined (Figure 4.13) and the inputted value is set as a capital letter, just in case it was typed in lowercase.
Figure 4.13. Labels indicate the format of the initial temperature as well as the calculated one.
- Complete the
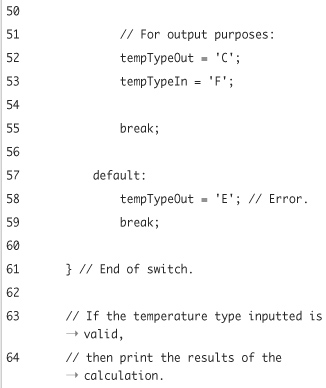
switchconditional.case 'F':
case 'f':
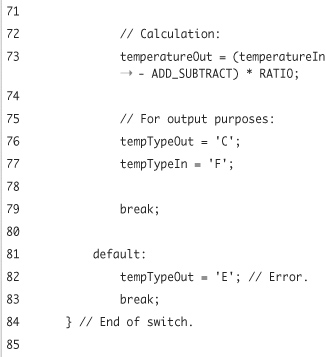
temperatureOut = (temperatureIn - ADD_SUBTRACT) * RATIO;
tempTypeOut = 'C';
tempTypeIn = 'F';
break;
default:
tempTypeOut = 'E';
break;
}The first two cases are just the opposite of the initial two. The
switchconcludes with adefaultcase, which applies iftempTypeIndoes not have a proper value. E is used to represent Error. - Print the temperature conversation if appropriate.
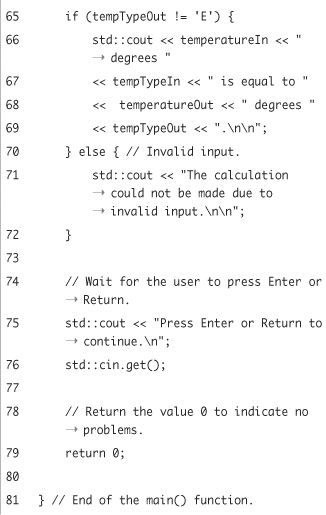
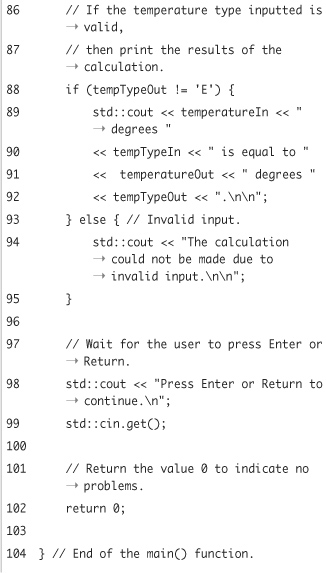
if (tempTypeOut != 'E') {
std::cout << temperatureIn << " degrees "
<< tempTypeIn << " is equal to "
<< temperatureOut << " degrees "
<< tempTypeOut << ". ";In the
switchconditional,tempTypeOutis assigned the value of E iftempTypeInis not C, c, F, or f. In other words, the user has not entered the information properly, so the conversion wasn’t made and an error message should be printed. This conditional checks iftempTypeOutis valid (if it equals E, then it’s invalid). - Complete the conditional.
} else {
std::cout << "The calculation could not be made due to invalid input. ";
}This message lets the user know why the calculation wasn’t made.
- Complete the application.
std::cout << "Press Enter or Return to continue. ";
std::cin.get();
return 0;
} - Save the file as
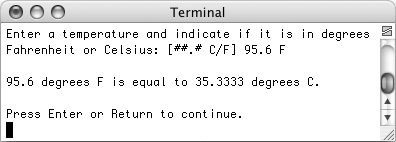
temperature2.cpp, compile, and then run the application (Figure 4.14).Figure 4.14. The temperature program now converts from Celsius to Fahrenheit or vice versa, depending upon the input (compare with Figure 4.13).
- Rerun the application, using different inputted values (Figure 4.15).
Figure 4.15. If the user does not type C, c, F, or f for the original temperature type, no conversion is made.

Reading In a Whole Line
The final kind of keyed input to be taken is an entire line of text. All of the previous examples use a space to mark the end of an input, which means that none of these allow for sentences to be entered.
To read in an entire line of text, use the getline() function. When calling it, provide the name of the input stream—cin—as the first argument and the string to which the input should be assigned as the second.
std::string input;
std::cout << "Say something clever: ";
std::getline(std::cin, input);
With this syntax, getline() will read up until it hits a newline character, which marks the end of the line. The entered text will be stored in the input string, which you can then use like any other string.
In this next example, the program will first let the user enter a quotation and then the person to whom the quotation is attributed. This program will just repeat these values back to the user (confirming the input), but a later revision of it will store the data in a text file.
To read in an entire line
- Create a new, blank text document in your text editor or IDE (Script 4.6).
// quote.cpp - Script 4.6
#include <iostream>
#include <string>
int main() {Because this program will work with strings, it should also include the
stringheader file.Script 4.6. Two lines of input, spaces and all, are read in by this application.
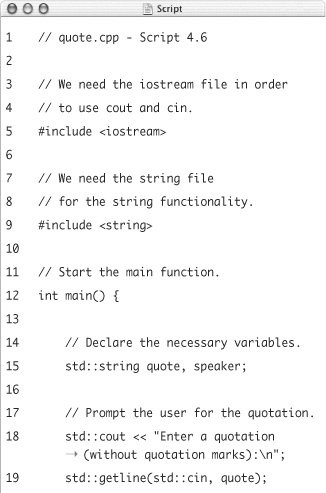
- Declare the necessary variables.
std::string quote, speaker;
The user-submitted input will be stored in these two strings. The first will store the actual quotation, and the second will store the person who said it.
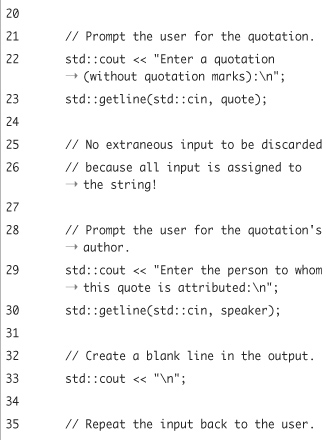
- Prompt the user for the quotation and read in the input.
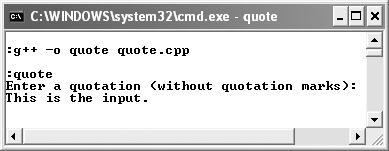
std::cout << "Enter a quotation (without quotation marks): ";
std::getline(std::cin, quote);The first line is just a prompt, although this one includes a newline so that the user’s answer will begin on the next line of the console window (Figure 4.16). The second line reads in the submitted text—spaces and all—and stores it in the
quotevariable.Figure 4.16. In some cases you’ll want the user to enter their input on a line separate from the prompt. This is particularly important with longer input.
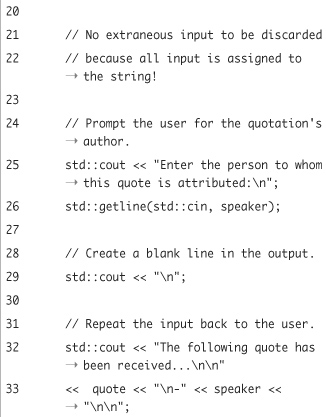
- Repeat Step 3 for the speaker’s name.
std::cout << "Enter the person to whom this quote is attributed: ";
std::getline(std::cin, speaker);Note that you do not need to worry about discarding excess input in this program as you have in previous applications. This is because all of the input up until the user presses Return or Enter will be stored in the string variable, with no extraneous input left in the buffer.
- Print the input back for the user.
std::cout << " ";
std::cout << "The following quote has been received... "
<< quote << " -" << speaker << " ";First, a newline character is printed to improve spacing in the console window. Then the inputted quotation and speaker are printed with just a touch of formatting.
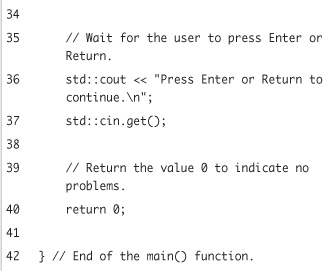
- Complete the application.
std::cout << "Press Enter or Return to continue. ";
std::cin.get();
return 0;
} - Save the file as
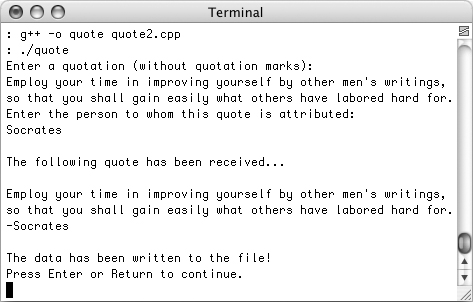
quote.cpp, compile, and then run the application (Figure 4.17).Figure 4.17. Entire sentences and names are read in by the
quoteapplication.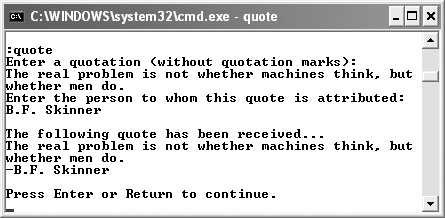
- Rerun the application, using different inputted values (Figure 4.18).
Figure 4.18. Strings of varying length, containing multiple words, can be read in by this program.

Tips
• Because using getline() as in this example terminates the input read once it hits a newline (by default), you have to make sure no extraneous input exists in the buffer prior to calling it. For example, if you read in an integer, then a whole line, the user may enter 54 followed by the Return. The 54 would be assigned to the integer variable, leaving Return in the buffer. This Return would immediately terminate the next getline() call.
• The getline() function discards the newline character that terminates the line. So this newline will not be part of the string that receives the entered value.
• The getline() function takes an optional third argument that defines the stop character. By default getline() stops reading in when it hits a newline, but you could have it terminate by a # or whatever. You’ll see this at the end of the chapter.
Validating Input
Never trusting a program’s input, particularly that typed in by a user, is a foundation of secure programming. As a best-case scenario, invalid input will render the operation of an application useless (the old “garbage in, garbage out” maxim). As a worst case, invalid input can crash a program. So understanding how to validate input is just as important as knowing how to accept it in the first place.
How exactly you go about performing validation depends upon a variable’s type and possible values. Common things you might check include if...
• A number is positive (e.g., the price or quantity of an item)
• A number is within an appropriate range (like an age less than 120 but greater than 0)
• A character has a specific value (like Y or N)
You have already been doing some of this in your programs. For example, the erase and temperature2 programs use switch conditionals to explicitly confirm the value of a character.
Another validation measure has also been in place, since cin performs a little bit of input validation. Specifically, cin will accept only a value that matches the variable to which that value will be assigned (a real number value to a float variable or a character value to a char and so on). This is great, but it leaves room for two problems.
One potential gotcha is that cin will fail if it cannot assign a value to the variable, but the program would still continue on as if cin worked. You can see this in action if you rerun some of the examples written in this chapter and enter incongruous types (Figure 4.19). Another problem is that a program will not continue until cin accepts some input. If a user keeps pressing Return instead of inputting a number, the application will just wait and wait (Figure 4.20).
Figure 4.19. The cin object will attempt to assign a valid value to a variable, but if it cannot (if, for instance, S is input as the Fahrenheit temperature), the resulting calculation will be based upon invalid input.
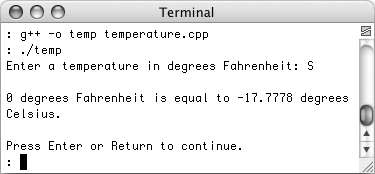
Figure 4.20. The temperature program will do nothing until it receives a valid temperature input.
One way you can handle problems is to make no assumptions about cin. The cin object has several member functions that report on the success of its operations. Each of these return a true/false value to indicate the cin status:
• eof() returns true if the end of the file (or input) has been reached.
• fail() returns true if cin didn’t work.
• bad() returns true if cin didn’t work for a more serious reason, like running out of memory.
• good() returns true if none of the above are true.
You might use these functions like so...
int age;
std::cout << "Enter your age: ";
std::cin >> age;
if (std::cin.good()) { // OK
You can also use just cin itself as a condition.
if (std::cin) {
or
if (std::cin >> age) { ...
If cin is false or if cin.fail() or cin.bad() return true, this means that a problem has occurred. To fix the problem, you can use the clear() function to restore cin and then remove all existing input in the buffer using ignore() (clear() clears the error status, not the buffer). For example:
int age;
std::cout << "Enter your age: ";
while (!(std::cin >> age)) {
std::cin.clear();
std::cin.ignore(100, '
'),
std::cout << "Enter your age: ";
}
The combination of using a loop while testing for the success of a cin call is a nice way to ensure valid input before continuing on in a program (as the loop will continue to execute until valid input is submitted). Two variations on this will be used in this next program, a rewrite of the last temperature application.
To validate input
- Open
temperature2.cpp(Script 4.5) in your text editor or IDE. - Remove the existing prompt and
cinline.The two inputs will be taken and validated separately, so the existing prompt and
cincall must be removed. The variables themselves, theswitchconditional, the calculations, and the output will all stay the same. - Add a prompt that only requests the temperature (Script 4.7).
std::cout << "Enter a temperature: [##.#] ";
First the temperature will be requested and validated. Then the temperature type will be read in and validated separately.
Script 4.7. In this program,
whileloops are used to ensure that valid input is received.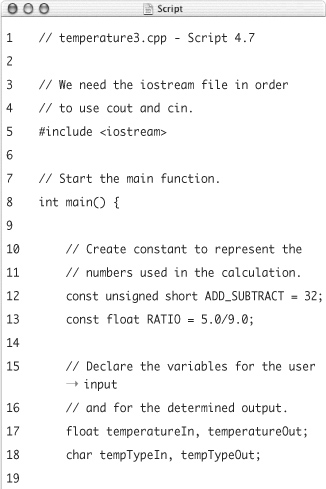
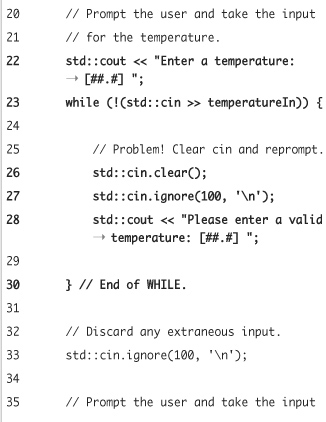
- Attempt to read in the submitted temperature as the condition of a loop.
while (!(std::cin >> temperatureIn)) {
This is exactly like the syntax demonstrated earlier. The innermost parentheses check if
cincan read a value intotemperatureIn. The exclamation mark in front of this is the logicalNOToperator. So thewhileloop basically says “as long ascincannot assign the input totemperatureIn, do the following.” Oncecinworks, thewhileloop will not be entered, as the overall condition will be false. - Complete the
whileloop.std::cin.clear();
std::cin.ignore(100, ' '),
std::cout << "Please enter a valid temperature: [##.#] ";
}As in the demonstration of this methodology, first the
clear()function is called to “fix”cin. Then the existing buffer is cleared usingignore(). Finally, the user is prompted again. After these lines are executed, the condition will be rechecked, whereincinwill attempt to read a value intotemperatureIn. If it can’t, the loop’s contents are executed again. Ifcindoes work, then the program continues on (Step 6). - After clearing the existing buffer (see the script), begin a
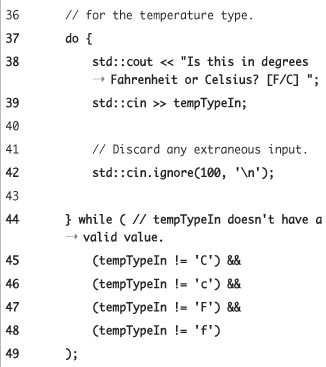
do...whileloop.do {
std::cout << "Is this in degrees Fahrenheit or Celsius? [F/C] ";
std::cin >> tempTypeIn;
std::cin.ignore(100, ' '),Instead of using a
whileloop, the type of temperature will be taken within ado...while. The syntax is different, and more importantly here, its body will be executed at least once. The logic for this loop will be: prompt the user, take the temperature type, and if the type’s value isn’t valid, repeat. The second and third lines here (the first two lines of the loop’s body) prompt and read in the single character. - Complete the
do...whileloop.} while (
(tempTypeIn != 'C') &&
(tempTypeIn != 'c') &&
(tempTypeIn != 'F') &&
(tempTypeIn != 'f')
);The syntax of a
do...whileloop isdo {
// Statements.
} while (condition);The lines in this step represent the conclusion of the loop, where the condition is the most important element. The
tempTypeInvariable is valid if it has a value of C, c, F, or f, so this condition will be true if the variable does not equal any one of those. In that case, the loop’s statements will be re-executed, retaking the input. OncetempTypeInequals any of those letters, then the whole condition is false and the loop is not entered again. - Save the file as
temperature3.cpp, compile, and run the application (Figure 4.21).Figure 4.21. The two inputs are taken and validated separately.
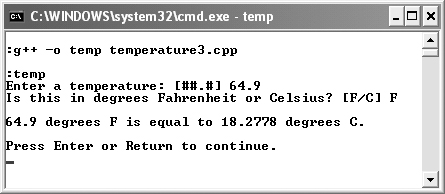
- See how secure the program is by seeing if it will accept invalid input (Figure 4.22).
Figure 4.22. The program will keep requesting an input until it is valid.

Tips
• In this version of the program, the default case is no longer necessary in the switch conditional, but it won’t hurt to leave it in.
• You can also validate single characters using the ctype library, which is part of C. Include the file using
#include <cctype>
Of the functions defined in this library, you can use isalnum() to check if the character is a letter or number, isalpha() to check just for a letter, isdigit() to see if it’s just a number, and isspace() to check for any of the space characters.
• The cctype file also defines the toupper() and tolower() functions, which change the case of a character. If you include that file, you could simplify the do...while condition as
} while (
(toupper(tempTypeIn) != 'C') &&
(toupper(tempTypeIn)!= 'F') &&
);
Creating File Output
Switching gears slightly, we’re going to shift from using the console window for all input and output to using files. To do any reading from or writing to files, you must first include the fstream library:
#include <fstream>
Like the iostream library, fstream defines some input/output functionality, but specifically for working with files.
Next you should establish a variable of the ofstream (output file stream) type. The syntax is
std::ofstream fileOutput("filename");
This line associates fileOutput with a certain file. The filename should be an absolute (C:\path\to\filename.ext or /Users/bruce/filename.ext) or relative (../filename.ext or folder\filename.ext) path. For more information, see the sidebar “One Slash Forward, Two Slashes Back” on pathnames and using slashes, later in this chapter. Note that the file does not have to exist already, as the program will attempt to create it (replacing the file if it does exist).
Next, you should use the is_open() function to confirm that the file was opened:
if (fileOutput.is_open()) { // OK!
Alternatively, you can use the aptly named good() function:
if (fileOutput.good()) { // OK!
Once you have a good, open file stream, you can write to it the way you “write” to the standard output.
fileOutput << "Please write this data.
";
You’ll normally want to append a newline character to the end of every line unless you want the file to contain just one long line of text.
When you are done with the file, you should close the stream.
fileOutput.close();
Before running through an example, another point should be made. When you open an existing file for output, by default the program will erase the file’s current contents. To change this behavior, a second parameter can be provided to the ofstream variable definition. This parameter is a flag indicating if you want other than the default treatment of the file (the default being to create a file if it doesn’t exist and replace it if it does). To add more data to an existing file, use ios::app (short for append). You’ll see this in action in the next program. It will take the existing quote application and write the submitted quotes to a text file.
To write to a file
- Open
quote.cpp(Script 4.6) in your text editor or IDE. - Before the start of the
main()function, include thefstreamfile (Script 4.8).#include <fstream>
Again, this file must be included in order to create variables of the proper type.
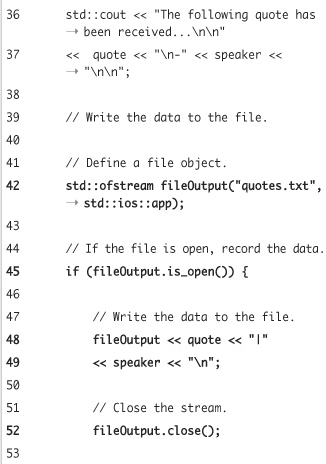
- After the information has been taken from the input and reprinted, create an
ofstreamvariable.std::ofstream fileOutput("quotes.txt", std::ios::app);
First, as when declaring strings, to declare a variable of the
ofstreamtype, use thestd::ofstreamsyntax, followed by the variable’s name. The identifier can be anything valid, butfileOuputorfout(the file equivalent ofcout) makes sense.Script 4.8. The
quoteapplication (Script 4.6) has been modified so that the submitted quote is now written to a text file.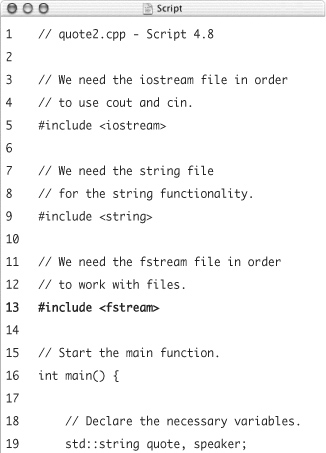
Two pieces of information are immediately provided: the name of the file to be opened and a flag indicating how it is to be opened. The former must be a valid path for your computer. If you want to make it easy, just use
quotes.txtand the file will be created in the same directory as the program. For the flag,std::ios::appis used to say that new data should be appended to the old data. - Confirm that the file was opened.
if (fileOutput.is_open()) {
You really don’t want to try to write to a file if it wasn’t successfully opened, so a conditional checks the status first.
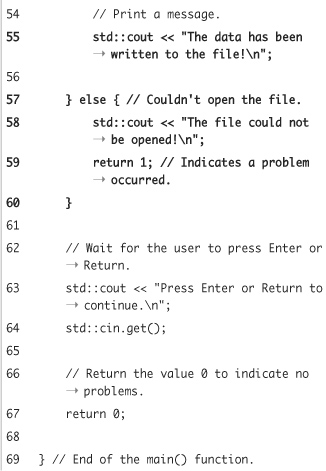
- Write the data to the file, then close it and print a message indicating success.
fileOutput << quote << "|" << speaker << " ";
fileOutput.close();
std::cout << "The data has been written to the file! ";Writing to a file is exactly like using
cout, except that you pretty much always want to conclude with a newline. To separate the quote from the speaker, the pipe symbol (|) is inserted between them. This symbol will be used when reading from the file as a way to distinguish between the two pieces of information. You can use any random character for that purpose, including a tab ( - Complete the
ifconditional.} else {
std::cout << "The file could not be opened! ";
return 1;
}The
elseclause takes effect if the file could not be opened, so a message saying exactly that is printed. Next, the number1is returned, instead of the number0, to indicate that a problem occurred. At this point, the program will terminate, as functions always end when areturnline is executed. This method of indicating a problem is simple and effective, but you’ll learn alternative ways to handle errors later in the book. - Save the file as
quote2.cpp, compile, and run the application (Figure 4.23).Figure 4.23. The submitted data is now stored in a text file on the computer.
- Run the program a few more times to add more quotes to the text file.
- If you want, you can confirm that the program worked by opening the text file in any text editor (Figure 4.24).
Figure 4.24. You can confirm the success of the program’s operation, as well as how the data is stored, by opening the
quotes.txtfile.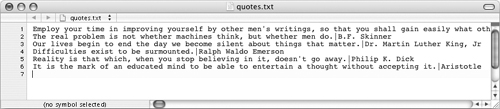
Tips
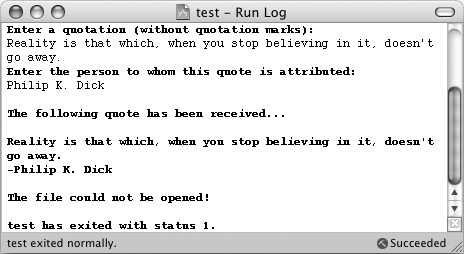
• To see what happens when the program cannot open a file, use an invalid pathname for the file (Figure 4.25).
Figure 4.25. If the program could not open the requested text file, a message is printed and the main() function returns the number 1 (which Xcode on Mac OS X reveals).
• If you are writing floating-point numbers to a file, remember to format them as needed. Doing so is the same as formatting numbers to be sent to cout.
• Technically, including fstream automatically includes iostream, but it’s best to explicitly include iostream nonetheless.
• You can create a variable of the ofstream type and then open a file separately by calling the open() function:
std::ofstream fileOutput;
fileOutput.open("/path/to/filename");
Using open() separately is particularly handy if you want to open another file, associating it with fileOutput, after you are done working with, and have closed, the previous file.
• The bad() function is the opposite of good(), which shouldn’t be a surprise. It returns a Boolean value indicating if a file could not be opened.
• Of the other instructions you can give when opening a file, two you should be aware of are ios::nocreate and ios::noreplace. The first says that the file should not be created if it doesn’t already exist. The second says that if the file already exists, it should not be opened (because that would overwrite all existing data). To use multiple flags at once, separate them using the bitwise OR operator: |. For example:
std::ofstream
fileOutput("quotes.txt",
(std::ios::app) |
(std::ios::nocreate));
Using File Input
The final topic to discuss in this chapter is how to take input from a file. The phrasing may seem strange—perhaps “reading data from a file” sounds more natural, but in C++, input is input, regardless of the source. So essentially the process of reading from a file will be like taking typed input, although some of the initial syntax differs.
As with writing to files, to do any reading from them, you must include the fstream library:
#include <fstream>
Next, declare a variable of the ifstream (input file stream) type:
std::ifstream fileInput("filename.ext");
Again, the name of the file can be an absolute or relative path, but the file must actually exist, as the program won’t create a file for reading (which wouldn’t make any sense).
Once you’ve defined the variable, you should again confirm that the file was opened using either of these lines:
if (fileInput.is_open()) { // OK!
if (fileInput.good()) { // OK!
Now that you have an open file stream, you can read all the data. The easiest way to read through an entire file is to use a loop with the getline() function, assigning each line to a string.
std::string line;
while (std::getline(fileInput, line) )
{
// Do whatever with line.
}
Since, by default, using getline() this way reads up until it encounters a newline, the while condition will read one line with each iteration. Once the getline() function fails to return a line, because the end of the file has been reached, the loop will end.
Finally, you should close the file with the (you guessed it!)...close() function.
fileInput.close();
In this last program, the stored quotations (see Script 4.8) will be read in and printed. The syntax will be very similar to that just demonstrated, barring one change. Since the text file has lines in the format
This is the quotation.|Speaker.
you’ll want to break this into its respective quotation and speaker. To do so, getline() will first be called to read up until it finds a pipe (|) and will then be called a second time to read until the newline.
To read file input
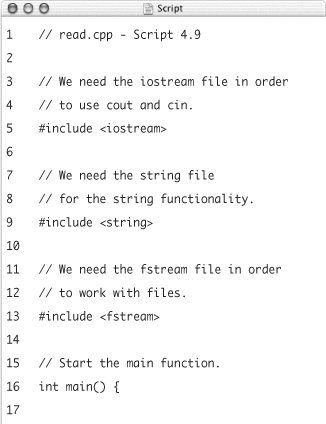
- Create a new, blank text document in your text editor or IDE (Script 4.9).
// read.cpp - Script 4.9
#include <iostream>
#include <string>
#include <fstream>You must include all three header files for this program, as it uses input, output, strings, and files.
- Begin the
main()function and declare the necessary input variable.int main() {
std::string line;The input will be read in from a file one string at a time, so only the one variable is necessary to handle the input.
Script 4.9. All of the stored user-submitted quotes (see Script 4.8) are read from the text file and printed in the console window.
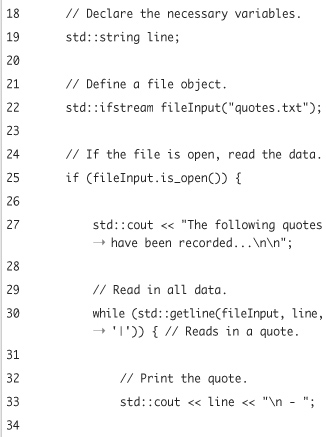
- Define the file input variable.
std::ifstream
fileInput("quotes.txt");The file’s name and path should refer to the same file that was populated by the preceding program. If this program and
quote2are not in the same directory, thenquotes.txtwill not be in this directory either, and you’ll need to change the path in this line accordingly (or copyquotes.txtto this same directory). - Check if the file has been opened and print an introductory message.
if (fileInput.is_open()) {
std::cout << "The following quotes have been recorded... "; - Define a
whileloop that reads in a quotation.while (std::getline(fileInput, line, '|')) {
The condition says that the body of the
whileloop should be executed as long asgetline()can return another string. The function will try to read the string from the file, up until it encounters the pipe, and it will store this in thelinevariable. Oncegetline()can no longer do this, the condition is false and the loop will not be entered again. - Print the quotation.
std::cout << line << " - ";
At this point the program has a string variable called
linethat’s storing a read quotation. It can be printed like any other variable. The spaces and dash after the newline are just to add a little formatting flare in the output. - Read in and print the speaker.
std::getline(fileInput, line);
std::cout << line << " ";This next call to the
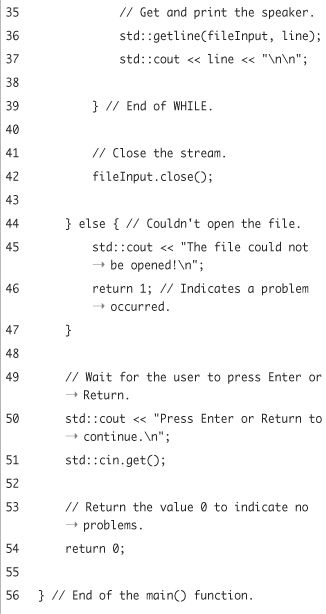
getline()function will read from the file until it hits a newline, storing the string inline. This is also printed in the console output. - Complete the
whileloop and theifconditional.} // End of WHILE.
fileInput.close();
} else {
std::cout << "The file could not be opened! ";
return 1;
} - Complete the application.
std::cout << "Press Enter or Return to continue. ";
std::cin.get();
return 0;
} - Save the file as
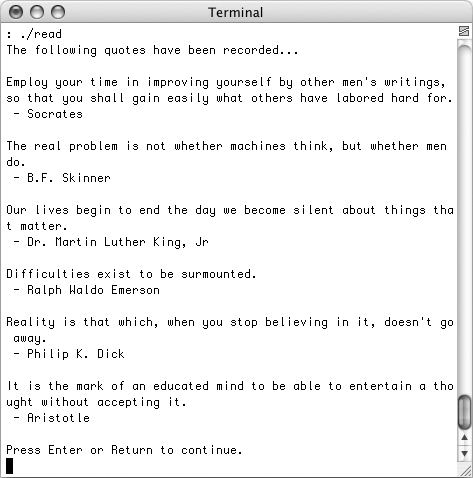
read.cpp, compile, and then run the application (Figure 4.26).Figure 4.26. All of the stored quotations are read from the text file and displayed in the console.
Tips
• The get() and ignore() functions can also be used with file input, just as they are used to read from cin.
• Using concatenation, you could read an entire file into one large string, if you need to. The code would look something like this:
std::string entireFile, line;
while (std::getline(fileInput, line) ) {
entireFile += line;
}
• If your program closes normally, it will automatically close the open file. Still, good programming form suggests that you formally close the file yourself.
• In Chapter 14, “Extended Topics,” you’ll learn how to write to and read from binary files, which is slightly different than working with plain (ASCII) text files as these last two examples do.