13. Working with Templates
By now, you have learned about two paradigms that C++ supports. You’ve been using the procedural paradigm when splitting your programs into different functions; then you worked with the object-oriented paradigm, by grouping your code and data into classes and building class hierarchies; in this chapter, you’ll be using another paradigm: generic programming.
Generic programming allows you to create blueprints (or templates) of functions and classes instead of specific functions and classes. These templates can be non-typed: written so that they aren’t restricted to working with specific kinds of data. Then, when the program needs to use one of these functions, the compiler will generate the necessary type-specific version of the code. Generic programming lets you build a single solution that can solve multiple problems.
In this chapter, we’ll first show you how to write and use your own generic code. Then we’ll introduce you to the Standard Template Library, which is a masterpiece of generic programming. It contains oodles of very useful data types and algorithms so that you don’t have to figure them out yourself.
Basic Template Syntax
In generic programming, you still write your own functions or classes, but you don’t have to specify the data types (i.e. int, double, or MyClass) that they’ll use. Instead, you just use a placeholder, typically called T, and write your function using this placeholder. Later, when the program needs this code, you provide the data type, and the compiler will generate the actual code based on your template. To do, so the compiler replaces every occurrence of T with the type you supplied.
The basic syntax for templates is very simple. All you have to do is place
template <type>
in front of the function or class.
A template for a function foo() would therefore look like this:
template <class T>
void foo(T param) {
// do something
}
There are two things to note here:
- In the first line, there’s a
class Tin angle brackets. This is used to tell the compiler that the letterTwill represent a generic type in the following function. Theclasskeyword doesn’t mean that you can only supply classes later, it’s just a convention. - After having told the compiler that
Tis a type, you can use it like a regular type.
Don’t worry if this is not absolutely clear yet. It’ll get clearer in the following parts of this chapter, where we’ll do a lot of example code using templates.
Function templates
A quite common task in every program is to exchange the values of two variables. Because that’s so common, it is a good idea to write a function for it:
void swap(int &a, int &b) {
int tmp = a;
a = b;
b = tmp;
}
Because the parameters are passed by reference (see Chapter 6, “Complex Data Types,” for a discussion of passing by reference to the swap() function), we can now call swap(i1,i2); to change the values of the int variables i1 and i2. But what happens if you’d like to swap the values of two double variables? The compiler will complain that it can’t use the swap() function, because it expects int references.
Of course, you could just add a new function swap(double &d1, double &d2). Because C++ allows overloading, you could even use the same name for the function, and the code is also the same (except the types used in the function). But then, you still can’t swap two float variables... You probably see the problem: you’d have to write the same code again and again for every data type you’d like to swap.
This is where function templates come in. Instead of writing a function for every data type there is, you just tell the compiler what it should use as a template. Whenever you use the swap() function afterward, the compiler will automatically create a function that uses the correct data types based on your templates.
Let’s try this in our next example.
To create a function template
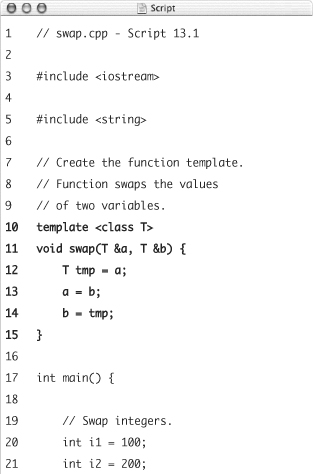
- Create a new, blank text document in your text editor or IDE (Script 13.1).
// swap.cpp - Script 13.1
#include <iostream>
#include <string> - Begin the template function
swap().template <class T>
void swap(T &a, T &b) {The first statement
template <class T>tells the compiler that we’re beginning a template definition, whereTis the placeholder for a type. On the second line, we’re using this placeholder to declare the arguments the function expects: references to two variables of the same, unspecified type. - Write the code that swaps two values and complete the function.
T tmp = a;
a = b;
b = tmp;
}Again, we’re using the type placeholder
Tto declare a temporary variable used to swap two values. The compiler does not complain, because it knows thatTis to be considered a data type in this function.Script 13.1. Once you’ve defined a function template, the compiler will generate the proper functions for each data type that uses the function.
Note that there is another small difference. In the previous examples in this book, we always wrote a function prototype before the
main()function and implemented the function after it. This time, we implement the whole function at once. When working with templates, it is a good idea not to split a function into a prototype and an implementation. Keeping just the one definition prevents you from moving only the prototype into a header file, which would be fatal. The fatality comes from how a compiler creates new functions from templates. See the sidebar “Generating Code from Templates” for a detailed explanation. - Begin the
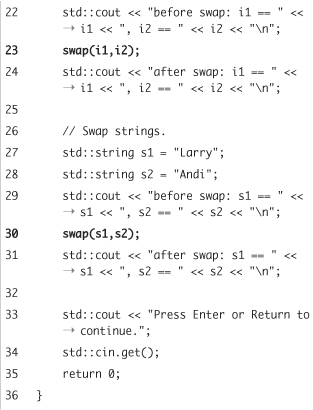
main()function that uses the template.int main() {
int i1 = 100;
int i2 = 200;
std::cout << "before swap: i1 == " << i1 << ", i2 == " << i2 << " ";This code just prepares everything for our first test. We create two local
intvariables and assign values to them. Then, we print these values to verify that everything is working. - Call the function template to swap the two
intvariables.swap(i1,i2);
Although this code looks very innocent, there’s a lot happening behind the scenes: The compiler notices that we’re calling
swap()with twointparameters. It then detects that we wrote a function template called swap that uses two parameters. Becauseswap()has not been used with integers yet, the compiler generates the source code for this function by replacingTwithint. Finally, it compiles the new functionswap(int &a, int &b)and calls it with the parametersi1andi2. - Print the new values of
i1andi2to verify that everything worked.std::cout << "after swap: i1 == " << i1 << ", i2 == " << i2 << " ";
- Test
swap()with twostrings instead of integers.std::string s1 = "Larry";
std::string s2 = "Andi";
std::cout << "before swap: s1 == " << s1 << ", s2 == " << s2 << " ";
swap(s1,s2);
std::cout << "after swap: s1 == " << s1 << ", s2 == " << s2 << " ";Again, there’s a lot happening behind the scenes. When the compiler sees the call to
swap()with two string parameters, it’ll also check if there is already an implementation that takes two string parameters. Of course, it doesn’t find one, so a new function will be generated (this time by replacingTwithstd::string). Finally, the compiler calls the newly generated function with the parameterss1ands2. - Complete the
main()function.std::cout << "Press Enter or
Return to continue.";
std::cin.get();
return 0;
} - Save the file as
swap.cpp, compile, and then run the application. (Figure 13.1).Figure 13.1. The compiler has generated two different implementations of the function
swap(), one for integers and another for strings.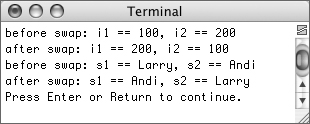
 Tips
Tips
• You can also use template <typename T> instead of template <class T> when creating a template. The meaning is the same, but the former doesn’t have the implication that T is restricted to classes, which it is not.
• Again, do not split function templates into a prototype and an implementation. If the compiler doesn’t see the whole source of a template, it won’t be able to correctly generate code for it (the sidebar contains a more detailed description how code generation works with templates). The error messages a compiler issues when it needs to instantiate a template but doesn’t know how can range from “slightly weird” to “totally incomprehensible.”
• To make it clearer that swap is a template, you can also use swap<int>(i1, i2) when calling the function. This way you tell the compiler explicitly which type to use. You’ll see more examples of this notation in the following section on class templates.
• If a function performs the same action regardless of the type of data being used, then use templates. If the function performs different actions (or requires different statements), then use function overloading.
Class templates
Class templates are very similar to function templates. Again, you just write a template of a class and then let the compiler generate the actual code when you’re using the template for the first time. Even the syntax is the same; you begin your template definition with
template <class T>
You then follow this by the class declaration that uses T:
template <class T>
class MyClass {
MyClass();
void swap(T &a, T &b);
}
The methods then are regular function templates. The implementation of the constructor would look like this:
template <class T>
MyClass<T>::MyClass() {
// Initialize the attributes here.
}
The only thing new is the class name in the constructor. Because MyClass is a template, you can’t just write MyClass::MyClass(). The compiler expects you to specify the type to use with MyClass, so you have to provide it within angle brackets. Because there is no real type to provide, we just use a function template:
template <class T>
MyClass<T>::MyClass() { ...
Note that the name of the type in the function template does not have to match the one you used in the class declaration. You could also write
template <class U>
MyClass<U>::MyClass() {
// initialize attributes here
}
and it would still be a constructor for class template MyClass. The important point is that you use a type parameter.
The following example will make this clearer. We’re going to write a template-based stack. A stack is another important data structure in real-life programming. It is a form of data storage that provides only two functions: one that pushes data onto the top of the stack, and another that removes the top element from the stack. (A stack has a “last one in, first one out” behavior.)
Although this might not sound very useful, you’ve already worked with stacks countless times. Whenever you’re calling a function or method, the compiler uses a stack to pass the parameters.
You can see a stack at work in Figures 13.2, 13.3, and 13.4. Figure 13.2 depicts an empty stack that can hold six items. To each stack belongs a so-called “stack pointer” (or SP for short), which marks the next free space in the stack. Because the stack is empty, the stack pointer points to the first slot.
Figure 13.2. An empty stack providing space for six elements, with a cursor pointing to the first position.
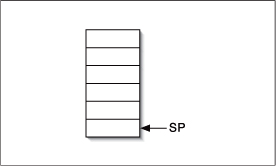
Figure 13.3. The same stack after pushing the values 14 and 42 onto it. Only the top element (42) is accessible.
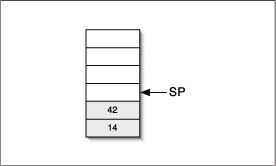
Figure 13.4. Again the same stack, this time after removing the top element.
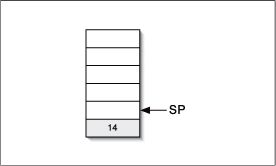
Figure 13.3 shows the result of pushing the numbers 14 and 42 onto the stack. Because two of the six slots are now in use, the stack pointer points to the third slot.
Finally, Figure 13.4 is the result of removing one element from the stack.
This next program will implement this concept.
To create a class template
- Create a new, blank text document in your text editor or IDE (Script 13.2).
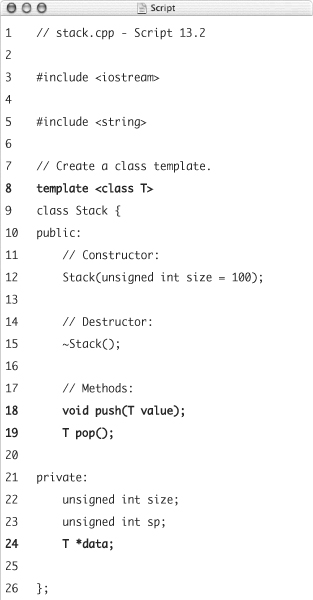
// stack.cpp - Script 13.2
#include <iostream>
#include <string>The string file is being included in case you want to create a stack of strings (which this program will not actually do).
- Begin the template class
Stack.template <class T>
class Stack {
public: - Declare all the necessary methods: a constructor and a destructor, and the methods
push()(to add elements) andpop()(to remove the top element).Stack(unsigned int size = 100);
~Stack();
void push(T value);
T pop();The constructor has a parameter that specifies the size of the stack, which is maximum number of elements that can be stored in it. The
push()andpop()methods use the type placeholderT. The former will accept an argument of typeT, and the latter will return a value of typeT. - Declare all the necessary attributes and complete the class declaration.
private:
unsigned int size;
unsigned int sp;
T *data;
};Script 13.2. You can also create templates for classes, like this one that manages a stack. The compiler will create the class implementations for different types as needed.

We’re going to store the elements in a dynamically allocated array, so we need a pointer to
Tthat stores the address of the array (data). Additionally, we need to store the index of the next free element on the stack. The name of this attribute issp, which stands for stack pointer. Finally, we’re storing the size of the stack in the attributesize. - Implement the constructor.
template <class T>
Stack<T>::Stack(unsigned int size /* = 100 */) {
this->size = size;
data = new T[size];
sp = 0;
}Remember that we need to specify a generic type that the function works with, so we must use a function template. The implementation of the constructor itself is straightforward. First it stores the size passed to the constructor in the
sizeattribute. Then it creates a new array, of typeT,in memory, containingsizenumber of elements. (See Chapter 11, “Dynamic Memory Management,” for a discussion on dynamically creating an array). Finally, the constructor initializes the stack pointer as0, so that it points to the first element in the stack. - Create the destructor as a function template.
template <class T>
Stack<T>::~Stack() {
delete[] data;
}All there is to do here is free the allocated memory. Remember to use
delete[] (as opposed to justdelete), because we allocated an array. - Now, it’s time to implement
push().template <class T>
void Stack<T>::push(T value) {
data[sp++] = value;
}The implementation is very simple: store the data at the next free slot in the array, and then increment the stack pointer. Because of operator precedence, if
spis initially0, the value will be stored atdata[0], and thenspis incremented. You could also write this more explicitly asdata[sp] = value;
sp++; - Implement
pop().template <class T>
T Stack<T>::pop() {
return data[--sp];
}The
pop()method is also almost trivial. Return the element that is on top of the stack, and then decrement the stack pointer. You could also write this out formally (and less concisely) as:T thing = data[sp];
sp--; // Or --sp;
return thing; - Begin a
main()function.int main() {
- Create a local variable that holds a stack for the type
int.Stack<int> intStack(100);
Because there is no way for the compiler to guess which type of stack to use, specify the type explicitly. You do this by adding
intwithin angle brackets. - Push some values onto the stack:
intStack.push(1);
intStack.push(2);
intStack.push(3);Since
intStackis now an object of typeStack, it can call its ownpush()member. Thepush()function takes an argument of typeT, which in this case is an integer. - Remove the values from the stack and print them.
std::cout << "intStack.pop() returned " << intStack.pop() << " ";
std::cout << "intStack.pop() returned " << intStack.pop() << " ";
std::cout << "intStack.pop() returned " << intStack.pop() << " "; - Complete the
main()function.std::cout << "Press Enter or Return to continue.";
std::cin.get();
return 0;
} - Save the file as
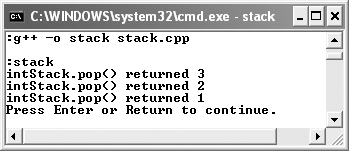
stack.cpp, compile, and then run the application. (Figure 13.5).Figure 13.5. A class template is used to create a stack. Then the program creates a stack of integers. Items on a stack are retrieved in a “last in, first out” manner.
- If you want, change
main()to create a stack of a different type, and then resave, compile, and run the application (Figure 13.6).Figure 13.6. With generic programming, like using class and function templates, the same methodology—a stack—can be used on many different types of data.
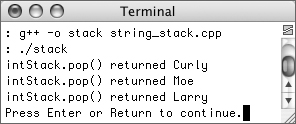
You can get the results in Figure 13.6 by merely changing the first four lines of code in
main()to:Stack<std::string> intStack(20);
intStack.push("Larry");
intStack.push("Moe");
intStack.push("Curly");
Creating Inline Templates
As you can see, the differences between creating class templates and function templates are minimal. And we didn’t mention this earlier, but the same critical rule applies to class templates: keep your code together. With any template, the compiler needs to see the whole source code to be able to create a new implementation for a given type.
A good way to avoid problems when doing this is to use the inline notation for class templates. Inline notation was first mentioned with respect to functions in Chapter 5, “Defining Your Own Functions.” An inline function looks like this:
inline void fN() {
// Function body.
}
In a class, an inline method basically means that you declare and define the method at the same time.
class Person {
public:
Person(std::string name) {
this->name = name;
}
// And so on.
Besides helping the compiler to use the class template, creating inline methods has a nice side effect: it minimizes the amount of typing you have to do and results in more readable source code, as you’ll see in this variation on the stack example.
To create a class template using inline notation
- Create a new, blank text document in your text editor or IDE (Script 13.3).
// stack2.cpp - Script 13.3
#include <iostream>
#include <string> - Begin the template class
Stack.template <class T>
class Stack {
public: - Declare and implement the constructor.
Stack(unsigned int size = 100) {
this->size = size;
data = new T[size];
sp = 0;
}Notice that, when you implement the constructor (or any method) inside of the class template, you no longer have to use
template <class T>
Stack<T>::Stack(unsigned int size /* = 100 */) {...as you do when implementing it separately. Compare this implementation with that in Script 13.2.
Because this is a method implementation (and not the closing of the class), you don’t need to add a semicolon after the closing curly brace.
- Declare and implement the destructor.
~Stack() {
delete[] data;
}The destructor is defined exactly as it was before.
Script 13.3. Using the inline notations, where the methods are implemented inside of the class, helps you keep the template code together and improves the code’s legibility.
- Declare and implement
push()andpop().void push(T value) {
data[sp++] = value;
}
T pop() {
return data[--sp];
} - Add the needed attributes and complete the class declaration.
private:
unsigned int size;
unsigned int sp;
T* data;
}; - Create the
main()function, which creates a stack of floats.int main() {
Stack<float> intStack(100);
intStack.push(3.14);
intStack.push(2.7841);
intStack.push(56.0);To really hammer this point home (as to how a generic template can be used for many different types), the
Stackclass will be used with real numbers here. - Complete the
main()function.std::cout << "intStack.pop() returned " << intStack.pop() << " ";
std::cout << "intStack.pop() returned " << intStack.pop() << " ";
std::cout << "intStack.pop() returned " << intStack.pop() << " ";
std::cout << "Press Enter or Return to continue.";
std::cin.get();
return 0;
} - Save the file as
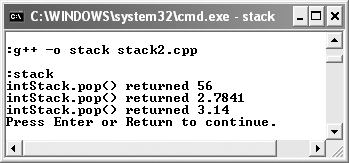
stack2.cpp, compile, and then run the application (Figure 13.7).Figure 13.7. The behavior of the program remains the same (using floats this time), although the inline notation is used (see Script 13.3).
Tips
• If you plan to use the Stack template in your programs, make sure that you add a copy constructor and an assignment operator. We’re using dynamically allocated memory in the class, so the default bitwise copy that would be generated by the compiler won’t work properly. See Chapter 11 for discussion on how to—and why you should—create these things.
• Error handling is also missing in our example. It would be a good idea to throw exceptions if push() is called and the stack is full, or if pop() is called on an empty stack. See Chapter 10, “Error Handling and Debugging.”
• To repeat ourselves, it is essential that the compiler sees the whole implementation of a template when it has to generate a version for a new type. Using the inline notation for class templates helps to ensure this.
• You’re not limited to only one type placeholder. If your class template needs more than one type, just add other placeholders:
template <class T, class U>
class MyClass {
//. . .
}
When instantiating such a class, just list the concrete types between angle brackets, separated by commas:
MyClass<int, float> myClass;
Containers and Algorithms
In almost any program you’ll write, you will need to store data. C++ provides you with the basic means to do this: you can create local or global variables to store single values, or you can use arrays to store multiple values. Data structures that are able to hold more than one value are often also called containers.
Arrays are the only container that is directly supported in C++, but arrays are not equally well suited for every problem. If you had to write a simple spell checker, you’d probably have a huge list of words. To check the spelling of a given word, you would just look it up in your word list. If the word is in the list, it is spelled correctly. Using arrays, you’d always have to iterate through every entry and compare it to the word in question. Although this solution would work, it’d be painfully slow.
Computer scientists have invested a lot of energy during the past few years to come up with data structures (or containers) that are best suited for different problems. For our spell checker, a so-called hash table or a binary tree would be a good choice. (Hash tables and binary trees are structures that store data in special way so that a check for the existence of a specific element is most expedient.)
In the previous part of this chapter, you saw one way to implement new containers. The template-based Stack you wrote is exactly that: a new container. Now that you understand how to use a template, you could grab a book covering data structures and implement other containers yourself. Programmers of the past have spent a good part of their time doing exactly that, and probably even more time debugging these containers!
Luckily, this isn’t necessary anymore with C++. The standard library (see the sidebar) contains a lot of ready-made containers that are well designed and tested. You can use these right out of the box, and we’ll show you how later in the chapter.
Having the right set of containers available is only one part of the programming story. You’ll also need functions (or algorithms) that work on the data within these containers. Again, there is some standard functionality that you’ll repeatedly use, like sorting data or finding a given element in a container. There’s also been a lot of research to solve such seemingly simple problems most efficiently, saving you from having to reinvent the wheel in every program you write.
The C++ Standard Library not only provides you with a lot of standard containers, but also with state-of-the-art and well-tested algorithms that solve common problems. And because they’ve been implemented using templates, you can use them for every data type you’d like, even for your own classes.
We won’t discuss every container in the standard library. That would be way out of the scope of this book. Instead, we’ll prepare the ground for your own explorations, demonstrating the concepts using a popular container called a vector.
Working with vectors
The big, ever-lurking problem with arrays is that they are restricted to a set size. If you define an array as int myArray[40], your program actually has two problems. First of all, you will only ever be able to store forty integers in that variable. If your program needs to store one more, you’re out of luck. Secondarily, the memory required to store forty integers will be reserved by the program, even if it never gets around to storing that many numbers. Because a lot of C++ is just better solutions to common C problems, C++ has created the vector type.
Much as you can create arrays of different types, you can create vectors of different types. To create a vector of a specific type, use this syntax:
std::vector<type> vectorName;
Hopefully you’re recognizing that this syntax—using the angle brackets to indicate type—reflects what you’ve learned about using templates. So, a vector of strings would be defined like this:
std::vector<std::string> names;
You surely have noticed that we didn’t specify the number of elements the vector should contain. There is no need to do this, because a vector can dynamically grow to store as many elements as you add to it (up to the limits of available memory, that is). You can get the current size of a vector (i.e., the number of elements it contains) anytime using its size() method.
std::cout << "There are " << names.size() << "items in the vector.";
Once you’ve defined a vector, you add things to it using the push_back() function:
vector<string> names;
names.push_back("Larry");
To retrieve items from the vector, you can use syntax like that used to refer to individual array elements:
for (int i = 0; i < names.size(); i++) {
std::cout << names[i] << "
";
}
To use vectors
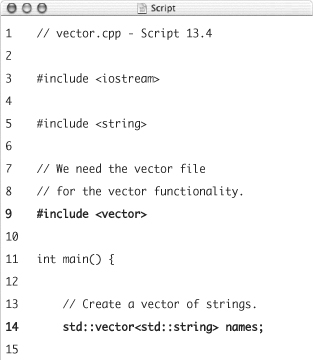
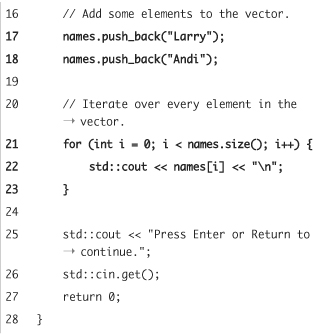
- Create a new, blank text document in your text editor or IDE (Script 13.4).
// vector.cpp - Script 13.4
#include <iostream>
#include <string>
#include <vector>Note that you also need to include the file
vector. This is the file that contains the definition ofvector, just as thestringfile defines thestringtype. - Begin the
main()function and declare a local variable that holds a vector of strings.int main() {
std::vector<std::string> names; - Now, add some elements to the vector.
names.push_back("Larry");
names.push_back("Andi");Keep adding names as you see fit.
- Begin a
forloop that iterates over every element in the vector.for(int i = 0; i < names.size(); i++) {
Although you know that there are only two elements in the vector, it’s better to use the
size()method to determine the number of elements (which has the benefit of always being accurate).Script 13.4. This program uses vectors, one of the many containers provided by the C++ Standard Library, to store strings.
- Print the current element and complete the
forloop.std::cout << names[i] << " ";
} - Complete the
main()function.std::cout << "Press Enter or Return to continue.";
std::cin.get();
return 0;
} - Save the file as
vector.cpp, compile, and then run the application (Figure 13.8).Figure 13.8. Elements in a vector can be accessed like elements in a regular array. Here a vector of strings is created, populated, and printed.
Tips
• The Standard C++ Library is one of the joys of programming in C++ today. It allows you to do very sophisticated things easily, even without a full understanding of its inner workings. Thus, even a beginner’s book like this one can discuss vectors.
• Because C++ is very good about type-checking, errors will result if you attempt to put the wrong type (say a number) into a vector (of strings).
• Once you’ve put elements into a vector, you can change individual values by using the assignment operator, as you would for an array:
names[0] = "John";
• Because vectors are limited in size only by the amount of available memory, they are good candidates for things like taking an unknown amount of user input.
Working with iterators
Although the preceding example worked fine and used a standard container, there’s still a little problem: When iterating through the elements stored in the vector, we treated it as if it were a C++ array. By using the index operator to access the elements, we assumed that this container provides random access to its elements: that you can refer to names[x]. Even if this is true for a vector, you’ll have problems if you later use a different kind of container, one that doesn’t allow this (like a stack). Because iterating through the elements in a container is a very common task, there should be a uniform way to do this, and that’s the reason the language designers added iterators to the standard library.
Iterators have a very limited (but useful) functionality. They let you access the current element, and they provide methods to move to the next (and sometimes previous) element in the container. Because their functionality is so elementary, every container in the library supports them. By using iterators, you can exchange the containers in a program without changing as much code. More important, iterators let you write algorithms that work equally well with every container.
You’ll never instantiate an iterator directly. Instead, you ask the container to hand you an iterator, because only the container knows which iterator to use for its internal representation.
Let’s rewrite the vector example to use iterators.
To use iterators
- Open the
vector.cppexample (Script 13.4) in your text editor or IDE, if it is not already. - Delete the existing
forloop completely (Script 13.5).We’ll replace the
forloop with awhileloop that uses iterators. - Ask the container to provide an iterator that points to the first element.
std::vector<std::string>::iterator iter = names.begin();
Because iterators are strongly tied to the container, they are typically defined within the container’s class. To get an iterator of a matching type, we need to use this ugly syntax:
std::vector<std::string>::iterator iteratorName
To initialize the iterator, the container’s method
begin()returns an iterator value that points to the first element in the container. - Begin a
whileloop that is executed as long as the iterator hasn’t reached the end of the container.while (iter != names.end()) {
As long as
iterdoesn’t have a value that matches the end of the container, which is represented bynames.end(), the loop should be entered. - In the
whileloop, print the element that the iterator is currently pointing to.std::cout << *iter << " ";
To use an iterator to access an individual element’s value, dereference the iterator as if it were a pointer.
Script 13.5. By using iterators instead of array-style indexes to access members of a vector, we add a little complexity, but we gain flexibility and the chance to easily exchange containers.
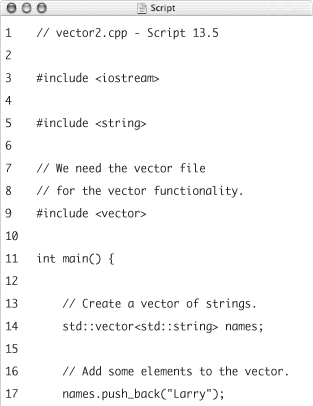
- Move the iterator to the next element and complete the
whileloop.++iter;
}Moving to the next element is done using the incremental operator.
- Complete the
main()function.std::cout << "Press Enter or Return to continue.";
std::cin.get();
return 0;
} - Save the file as
vector2.cpp, compile, and then run the application (Figure 13.9).Figure 13.9. Using iterators—instead of indexes—with the vector doesn’t change the behavior of the program (compare Scripts 13.4 and 13.5). This is a preferred method to access every vector member, though.
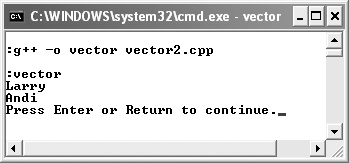
Tips
• While it may seem like more effort, you should always use iterators, if possible. This will allow you to easily change the container used in a program, should that need arise.
• The elegant while loop we used in our example
while (iter != names.end()) {...}
is only possible because names.end() returns an iterator that actually points past the last element. In the sample program, the last time the while loop is entered, iter will point to the last item in the vector. Then the iterator is incremented, so that it points past the end of the vector, which is equal to names.end(). Hence the condition becomes false, and the loop is not entered again.
Working with algorithms
It may seem that the latest change to our vector example wasn’t that great. After all, the behavior of the code is still the same, but the loop that iterates over the elements is now considerably more complex.
The true value of iterators lies in the fact that they are available for all containers. By using iterators to access container elements, every algorithm will work with any kind of container. The C++ Standard Library contains a lot of algorithms to solve common (and non-trivial) problems that you can use right out of the box.
In our next example, we’re demonstrating the power of these algorithms by further expanding the vector example. Before printing the container’s content, we’re going to sort the list in alphabetical order.
Although sorting elements seems to be a simple problem for a human being, it is actually quite tricky to do it efficiently. A fair amount of research has gone into this problem, and a lot of different algorithms have been developed over the years: bubble sort, heap sort, quick sort, and so on. Every algorithm has its strengths and weaknesses, and only the most trivial ones (and therefore the slowest ones) are easy to implement on your own. Luckily, the C++ Standard Library contains an optimized sort algorithm that is very fast. To use the sort algorithm, you only have to include the file algorithm:
#include <algorithm>
and then just call sort
std::sort(beginIterator, endIterator);
The next example will make this clearer.
To use the sort algorithm
- Open the
vector2.cppexample in your text editor or IDE. - Add
algorithmto the list of included files (Script 13.6).#include <algorithm>
- Go to the place in the program where elements are added to the vector and add some more, so that there are a few records to sort.
names.push_back("Michael");
names.push_back("Claudia");
names.push_back("Eve");
names.push_back("Bjarne");Of course this isn’t technically necessary, but sorting only two names is not very impressive.
- Add the call to
sort()just after populating the vector.std::sort(names.begin(), names.end());
Because we want to sort the whole vector, we pass to the algorithm values that mark the beginning of the vector (
names.begin()) and the end of the vector (names.end()). - Save the file as
vector3.cpp, compile, and then run the application (Figure 13.10).Script 13.6. Besides containers, the C++ Standard Library also provides algorithms that work on the elements stored in the containers. This example uses the sort algorithm to alphabetically sort the strings in the vector.
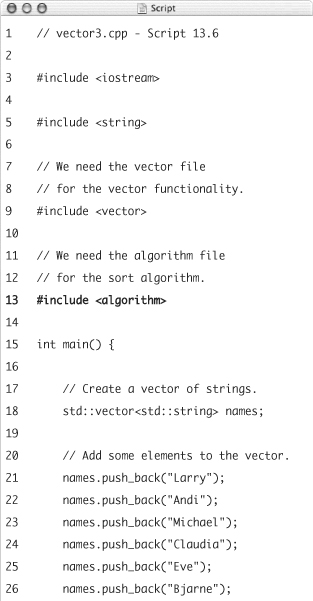
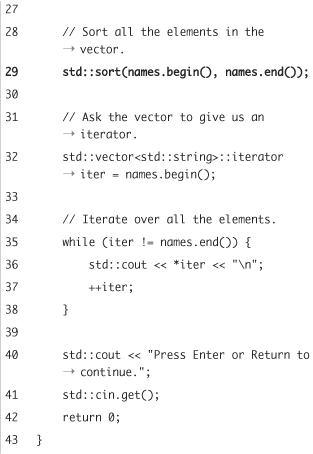
Figure 13.10. The elements in the vector are now sorted alphabetically thanks to the
sort()algorithm.
Tips
• The C++ Standard Library contains not only sorting algorithms but a lot of other useful and common ones. Search the Web for details (or pick up an advanced C++ text that could list them all).
• You can also sort only a part of the elements by passing iterators that don’t point to the beginning or end of the vector.
• When passing a range to an algorithm, the standard library assumes that you provide an end-iterator that points past the last element in the range. Again, names.end() returns that value, as passed to std::sort() in this last example.
• To use the algorithms in the Standard Library with your own classes, you have to implement the following: assignment, operator=(); less than comparison, operator<(); and, equality, operator==().
• To play with this concept some more, you could take a list of items from user input, store them in the vector, and then sort and display the list.