Chapter 10. VLAN Trunking Protocol and Inter-VLAN Communication
This chapter provides information and commands concerning the following topics:
Inter-VLAN communication using an external router: router-on-a-stick
Inter-VLAN communication on a multilayer switch through a switch virtual interface (SVI)
Removing L2 switchport capability of an interface on an L3 switch
Dynamic Trunking Protocol (DTP)
Switch(config)# interface fastethernet 0/1 |
Moves to interface configuration mode |
Switch(config-if)# switchport mode dynamic desirable |
Makes the interface actively attempt to convert the link to a trunk link Note With the switchport mode dynamic desirable command set, the interface becomes a trunk link if the neighboring interface is set to trunk, desirable, or auto |
Switch(config-if)# switchport mode dynamic auto |
Makes the interface able to convert into a trunk link Note With the switchport mode dynamic auto command set, the interface becomes a trunk link if the neighboring interface is set to trunk or desirable |
Switch(config-if)# switchport nonegotiate |
Prevents the interface from generating DTP frames Note Use the switchport mode nonegotiate command only when the interface switchport mode is access or trunk. You must manually configure the neighboring interface to establish a trunk link |
Switch(config-if)# switchport mode trunk |
Puts the interface into permanent trunking mode and negotiates to convert the link into a trunk link Note With the switchport mode trunk command set, the interface becomes a trunk link even if the neighboring interface is not a trunk link |
Tip
The default mode is dependent on the platform. For the 2960/9200 series, the default mode is dynamic auto.
Tip
On a 2960/9200 series switch, the default for all ports is to be an access port. However, with the default DTP mode being dynamic auto, an access port can be converted into a trunk port if that port receives DTP information from the other side of the link and that other side is set to trunk or desirable. It is therefore recommended that you hard-code all access ports as access ports with the switchport mode access command. This way, DTP information will not inadvertently change an access port to a trunk port. Any port set with the switchport mode access command ignores any DTP requests to convert the link.
Tip
VLAN Trunking Protocol (VTP) domain names must match for a DTP to negotiate a trunk.
Setting the VLAN Encapsulation Type
Depending on the series of switch that you are using, you may have a choice as to what type of VLAN encapsulation you want to use: the Cisco proprietary Inter-Switch Link (ISL) or the IEEE Standard 802.1Q (dot1q). The 2960 and 9200 series of switches only support dot1q trunking.
Caution
Cisco ISL has been deprecated. Depending on the age and model of your Cisco switch, you may be able to change the encapsulation type between dot1q and ISL.
Switch3650(config)# interface fastethernet 0/1 |
Moves to interface configuration mode |
Switch3650(config-if)# switchport mode trunk |
Puts the interface into permanent trunking mode and negotiates to convert the link into a trunk link |
Switch3650(config-if)# switchport trunk encapsulation isl |
Specifies ISL encapsulation on the trunk link |
Switch3650(config-if)# switchport trunk encapsulation dot1q |
Specifies 802.1q tagging on the trunk link |
Switch3650(config-if)# switchport trunk encapsulation negotiate |
Specifies that the interface negotiate with the neighboring interface to become either an ISL or dot1q trunk, depending on the capabilities or configuration of the neighboring interface |
Tip
With the switchport trunk encapsulation negotiate command set, the preferred trunking method is ISL.
Caution
The 2960, 2960-x, and 9200 series of switches support only dot1q trunking.
VLAN Trunking Protocol (VTP)
VTP is a Cisco proprietary protocol that allows for VLAN configuration (addition, deletion, or renaming of VLANs) to be consistently maintained across a common administrative domain.
Switch(config)# vtp mode client |
Changes the switch to VTP client mode |
Switch(config)# vtp mode server |
Changes the switch to VTP server mode Note By default, all Catalyst switches are in server mode |
Switch(config)# vtp mode transparent |
Changes the switch to VTP transparent mode |
Switch(config)# no vtp mode |
Returns the switch to the default VTP server mode |
Switch(config)# vtp domain domain-name |
Configures the VTP domain name. The name can be from 1 to 32 characters long Note All switches operating in VTP server or client mode must have the same domain name to ensure communication |
Switch(config)# vtp password password |
Configures a VTP password. In Cisco IOS Software Release 12.3 and later, the password is an ASCII string from 1 to 32 characters long. If you are using a Cisco IOS Software release earlier than 12.3, the password length ranges from 8 to 64 characters long Note To communicate with each other, all switches must have the same VTP password set |
Switch(config)# vtp version number |
Sets the VTP Version to Version 1, Version 2, or Version 3 Note VTP versions are not interoperable. All switches must use the same version (with V1 and V2). The biggest difference between Versions 1 and 2 is that Version 2 has support for Token Ring VLANs. Version 3 has added new features such as the creation of a VTP primary server, to prevent the accidental deletion of VLANs that occurred in V1 and V2. V3 also supports extended VLANs, private VLANs, Multiple Spanning Tree Protocol (MSTP) and the ability to be disabled per interface as well as globally VTP Version 3 is compatible with Version 2, but not Version 1 |
Switch2960# vtp primary-server |
Changes the operation state of a switch from a secondary server (the default state) to a primary server and advertises the configuration to the domain. If the switch password is configured as hidden, you are prompted to reenter the password. This happens only if configured in Version 2. This prompt occurs in privileged EXEC mode but not in global config mode |
Switch2960# vtp primary-server vlan |
(Optional) Selects the VLAN database as the takeover feature. This is the default state |
Switch2960# vtp primary-server mst |
(Optional) Selects the multiple spanning tree (MST) database as the takeover feature |
Switch2960# vtp primary-server force |
(Optional) Entering force overwrites the configuration of any conflicting servers. If you do not enter force, you are prompted for confirmation before the takeover |
Switch9200# vtp primary |
Configures the device as a VTP primary server on the 9200 series switch. The same optional parameters of vlan, mst, and force are also valid on this platform |
Switch(config)# vtp pruning |
Enables VTP pruning Note By default, VTP pruning is disabled. You need to enable VTP pruning on only one switch in VTP server mode |
Note
Only VLANs included in the pruning-eligible list can be pruned. VLANs 2 through 1001 are pruning eligible by default on trunk ports. Reserved VLANs and extended-range VLANs cannot be pruned. To change which eligible VLANs can be pruned, use the interface-specific switchport trunk pruning vlan command:
Switch(config-if)# switchport trunk pruning vlan remove 4,20-30
! Removes VLANs 4 and 20-30
Switch(config-if)# switchport trunk pruning vlan except 40-50
! All VLANs are added to the pruning list except for 40-50
Caution
Due to the inherent risk in having VTP servers overwrite each other and cause VLANs to disappear, Cisco recommends as a best practice deploying VTP in transparent mode. If you are going to use a client/server model, use Version 3 and the use of a VTPv3 primary server to prevent accidental database overwrites.
Verifying VTP
Switch# show vtp status |
Displays general information about VTP configuration |
Switch# show vtp counters |
Displays the VTP counters for the switch |
Note
If trunking has been established before VTP is set up, VTP information is propagated throughout the switch fabric almost immediately. However, because VTP information is advertised only every 300 seconds (5 minutes), unless a change has been made to force an update, it can take several minutes for VTP information to be propagated.
Inter-VLAN Communication Using an External Router: Router-on-a-Stick
Router(config)# interface fastethernet 0/0 |
Moves to interface configuration mode |
Router(config-if)# duplex full |
Sets the interface to full duplex |
Router(config-if)# no shutdown |
Enables the interface |
Router(config-if)# interface fastethernet 0/0.1 |
Creates subinterface 0/0.1 and moves to subinterface configuration mode |
Router(config-subif)# description Management VLAN 1 |
(Optional) Sets the locally significant description of the subinterface |
Router(config-subif)# encapsulation dot1q 1 native |
Assigns VLAN 1 to this subinterface. VLAN 1 will be the native VLAN. This subinterface uses the 802.1q tagging protocol |
Router(config-subif)# ip address 192.168.1.1 255.255.255.0 |
Assigns the IP address and netmask |
Router(config-subif)# interface fastethernet 0/0.10 |
Creates subinterface 0/0.10 and moves to subinterface configuration mode |
Router(config-subif)# description Accounting VLAN 10 |
(Optional) Sets the locally significant description of the subinterface |
Router(config-subif)# encapsulation dot1q 10 |
Assigns VLAN 10 to this subinterface. This subinterface uses the 802.1q tagging protocol |
Router(config-subif)# ip address 192.168.10.1 255.255.255.0 |
Assigns the IP address and netmask |
Router(config-subif)# exit |
Returns to interface configuration mode |
Router(config-if)# exit |
Returns to global configuration mode |
Router(config)# |
Note
The networks of the VLANs are directly connected to the router. Routing between these networks does not require a dynamic routing protocol. In a more complex topology, these routes need to either be advertised with whatever dynamic routing protocol is being used or be redistributed into whatever dynamic routing protocol is being used.
Note
Routes to the networks associated with these VLANs appear in the routing table as directly connected networks.
Note
In production environments, VLAN 1 should not be used as the management VLAN because it poses a potential security risk; all ports are in VLAN 1 by default, and it is an easy mistake to add a nonmanagement user to the management VLAN.
Inter-VLAN Communication on a Multilayer Switch Through a Switch Virtual Interface
Note
Rather than using an external router to provide inter-VLAN communication, a multilayer switch can perform the same task through the use of a switched virtual interface (SVI).
Removing L2 Switchport Capability of an Interface on an L3 Switch
Switch9300(config)# interface gigabitethernet 0/1 |
Moves to interface configuration mode |
Switch9300(config-if)# no switchport |
Creates a Layer 3 port on the switch Note You can use the no switchport command on physical ports only on a Layer 3-capable switch |
Configuring Inter-VLAN Communication on an L3 Switch
Switch9300(config)# interface vlan 1 |
Creates a virtual interface for VLAN 1 and enters interface configuration mode |
Switch9300(config-if)# ip address 172.16.1.1 255.255.255.0 |
Assigns IP address and netmask |
Switch9300(config-if)# no shutdown |
Enables the interface |
Switch9300(config)# interface vlan 10 |
Creates a virtual interface for VLAN 10 and enters interface configuration mode |
Switch9300(config-if)# ip address 172.16.10.1 255.255.255.0 |
Assigns an IP address and netmask |
Switch9300(config-if)# no shutdown |
Enables the interface |
Switch9300(config)# interface vlan 20 |
Creates a virtual interface for VLAN 20 and enters interface configuration mode |
Switch9300(config-if)# ip address 172.16.20.1 255.255.255.0 |
Assigns an IP address and netmask |
Switch9300(config-if)# no shutdown |
Enables the interface |
Switch9300(config-if)# exit |
Returns to global configuration mode |
Switch9300(config)# ip routing |
Enables routing on the switch |
Note
For an SVI to go to up/up and be added to the routing table, the VLAN for the SVI must be created, an IP address must be assigned, and at least one interface must support it.
Inter-VLAN Communication Tips
Although most older routers (routers running IOS 12.2 and earlier) support both ISL and dot1q, some switch models support only dot1q, such as the 2960, 2960-x, and 9200 series. Check with the version of IOS you are using to determine whether ISL or dot1q is supported.
ISL will probably not be an option, as it has been deprecated for quite some time.
If you need to use ISL as your trunking protocol, use the command encapsulation isl x, where x is the number of the VLAN to be assigned to that subinterface.
Recommended best practice is to use the same number as the VLAN number for the subinterface number. It is easier to troubleshoot VLAN 10 on subinterface fa0/0.10 than on fa0/0.2
Configuration Example: Inter-VLAN Communication
Figure 10-1 illustrates the network topology for the configuration that follows, which shows how to configure inter-VLAN communication using commands covered in this chapter. Some commands used in this configuration are from other chapters.
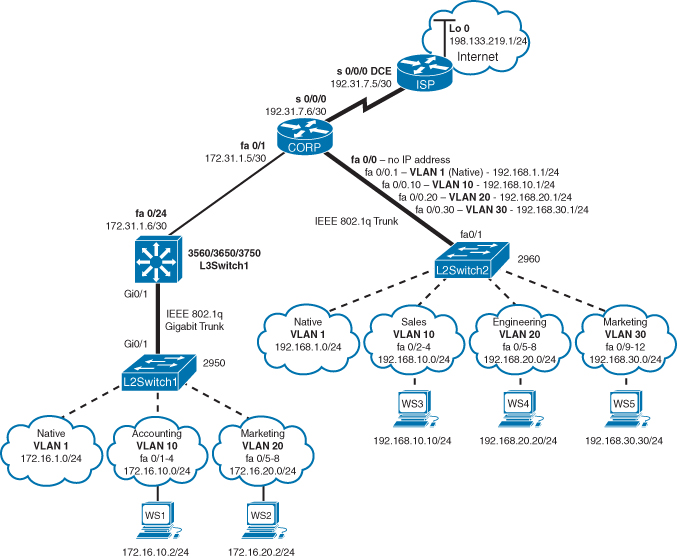
Figure 10-1 Network Topology for Inter-VLAN Communication Configuration
ISP Router
Router> enable |
Moves to privileged EXEC mode |
Router># configure terminal |
Moves to global configuration mode |
Router(config)# hostname ISP |
Sets the host name |
ISP(config)# interface loopback 0 |
Moves to interface configuration mode |
ISP(config-if)# description simulated address representing remote website |
Sets the locally significant interface description |
ISP(config-if)# ip address 198.133.219.1 255.255.255.0 |
Assigns an IP address and netmask |
ISP(config-if)# interface serial 0/0/0 |
Moves to interface configuration mode |
ISP(config-if)# description WAN link to the Corporate Router |
Sets the locally significant interface description |
ISP(config-if)# ip address 192.31.7.5 255.255.255.252 |
Assigns an IP address and netmask |
ISP(config-if)# clock rate 56000 |
Assigns a clock rate to the interface; DCE cable is plugged into this interface |
ISP(config-if)# no shutdown |
Enables the interface |
ISP(config-if)# exit |
Returns to global configuration mode |
ISP(config-if)# router eigrp 10 |
Creates Enhanced Interior Gateway Routing Protocol (EIGRP) routing process 10 |
ISP(config-router)# network 198.133.219.0 |
Advertises directly connected networks (classful address only) |
ISP(config-router)# network 192.31.7.0 |
Advertises directly connected networks (classful address only) |
ISP(config-router)# no auto-summary |
Disables automatic summarization |
ISP(config-router)# exit |
Returns to global configuration mode |
ISP(config)# exit |
Returns to privileged EXEC mode |
ISP# copy running-config startup-config |
Saves the configuration to NVRAM |
CORP Router
Router> enable |
Moves to privileged EXEC mode |
Router># configure terminal |
Moves to global configuration mode |
Router(config)# hostname CORP |
Sets the host name |
CORP(config)# no ip domain-lookup |
Turns off Domain Name System (DNS) resolution to avoid wait time due to DNS lookup of spelling errors |
CORP(config)# interface serial 0/0/0 |
Moves to interface configuration mode |
CORP(config-if)# description link to ISP |
Sets the locally significant interface description |
CORP(config-if)# ip address 192.31.7.6 255.255.255.252 |
Assigns an IP address and netmask |
CORP(config-if)# no shutdown |
Enables the interface |
CORP(config)# interface fastethernet 0/1 |
Moves to interface configuration mode |
CORP(config-if)# description link to L3Switch1 |
Sets the locally significant interface description |
CORP(config-if)# ip address 172.31.1.5 255.255.255.252 |
Assigns an IP address and netmask |
CORP(config-if)# no shutdown |
Enables the interface |
CORP(config-if)# exit |
Returns to global configuration mode |
CORP(config)# interface fastethernet 0/0 |
Enters interface configuration mode |
CORP(config-if)# duplex full |
Enables full-duplex operation to ensure trunking takes effect between here and L2Switch2 |
CORP(config-if)# no shutdown |
Enables the interface |
CORP(config-if)# interface fastethernet 0/0.1 |
Creates a virtual subinterface and moves to subinterface configuration mode |
CORP(config-subif)# description Management VLAN 1 - Native VLAN |
Sets the locally significant interface description |
CORP(config-subif)# encapsulation dot1q 1 native |
Assigns VLAN 1 to this subinterface. VLAN 1 is the native VLAN. This subinterface uses the 802.1q protocol |
CORP(config-subif)# ip address 192.168.1.1 255.255.255.0 |
Assigns an IP address and netmask |
CORP(config-subif)# interface fastethernet 0/0.10 |
Creates a virtual subinterface and moves to subinterface configuration mode |
CORP(config-subif)# description Sales VLAN 10 |
Sets the locally significant interface description |
CORP(config-subif)# encapsulation dot1q 10 |
Assigns VLAN 10 to this subinterface. This subinterface uses the 802.1q protocol |
CORP(config-subif)# ip address 192.168.10.1 255.255.255.0 |
Assigns an IP address and netmask |
CORP(config-subif)# interface fastethernet 0/0.20 |
Creates a virtual subinterface and moves to subinterface configuration mode |
CORP(config-subif)# description Engineering VLAN 20 |
Sets the locally significant interface description |
CORP(config-subif)# encapsulation dot1q 20 |
Assigns VLAN 20 to this subinterface. This subinterface uses the 802.1q protocol |
CORP(config-subif)# ip address 192.168.20.1 255.255.255.0 |
Assigns an IP address and netmask |
CORP(config-subif)# interface fastethernet 0/0.30 |
Creates a virtual subinterface and moves to subinterface configuration mode |
CORP(config-subif)# description Marketing VLAN 30 |
Sets the locally significant interface description |
CORP(config-subif)# encapsulation dot1q 30 |
Assigns VLAN 30 to this subinterface. This subinterface uses the 802.1q protocol |
CORP(config-subif)# ip add 192.168.30.1 255.255.255.0 |
Assigns an IP address and netmask |
CORP(config-subif)# exit |
Returns to interface configuration mode |
CORP(config-if)# exit |
Returns to global configuration mode |
CORP(config)# router eigrp 10 |
Creates EIGRP routing process 10 and moves to router configuration mode |
CORP(config-router)# network 192.168.1.0 |
Advertises the 192.168.1.0 network |
CORP(config-router)# network 192.168.10.0 |
Advertises the 192.168.10.0 network |
CORP(config-router)# network 192.168.20.0 |
Advertises the 192.168.20.0 network |
CORP(config-router)# network 192.168.30.0 |
Advertises the 192.168.30.0 network |
CORP(config-router)# network 172.31.0.0 |
Advertises the 172.31.0.0 network |
CORP(config-router)# network 192.31.7.0 |
Advertises the 192.31.7.0 network |
CORP(config-router)# no auto-summary |
Turns off automatic summarization at classful boundary |
CORP(config-router)# exit |
Returns to global configuration mode |
CORP(config)# exit |
Returns to privileged EXEC mode |
CORP# copy running-config startup-config |
Saves the configuration in NVRAM |
L2Switch2 (Catalyst 2960)
Switch> enable |
Moves to privileged EXEC mode |
Switch# configure terminal |
Moves to global configuration mode |
Switch(config)# hostname L2Switch2 |
Sets the host name |
L2Switch2(config)# no ip domain-lookup |
Turns off DNS resolution |
L2Switch2(config)# vlan 10 |
Creates VLAN 10 and enters VLAN configuration mode |
L2Switch2(config-vlan)# name Sales |
Assigns a name to the VLAN |
L2Switch2(config-vlan)# exit |
Returns to global configuration mode |
L2Switch2(config)# vlan 20 |
Creates VLAN 20 and enters VLAN configuration mode |
L2Switch2(config-vlan)# name Engineering |
Assigns a name to the VLAN |
L2Switch2(config-vlan)# vlan 30 |
Creates VLAN 30 and enters VLAN configuration mode. Note You do not have to exit back to global configuration mode to execute this command |
L2Switch2(config-vlan)# name Marketing |
Assigns a name to the VLAN |
L2Switch2(config-vlan)# exit |
Returns to global configuration mode |
L2Switch2(config)# interface range fastethernet 0/2 - 4 |
Enables you to set the same configuration parameters on multiple ports at the same time |
L2Switch2(config-if-range)# switchport mode access |
Sets ports 2 to 4 as access ports |
L2Switch2(config-if-range)# switchport access vlan 10 |
Assigns ports 2 to 4 to VLAN 10 |
L2Switch2(config-if-range)# interface range fastethernet 0/5 - 8 |
Enables you to set the same configuration parameters on multiple ports at the same time |
L2Switch2(config-if-range)# switchport mode access |
Sets ports 5 to 8 as access ports |
L2Switch2(config-if-range)# switchport access vlan 20 |
Assigns ports 5 to 8 to VLAN 20 |
L2Switch2(config-if-range)# interface range fastethernet 0/9 - 12 |
Enables you to set the same configuration parameters on multiple ports at the same time |
L2Switch2(config-if-range)# switchport mode access |
Sets ports 9 to 12 as access ports |
L2Switch2(config-if-range)# switchport access vlan 30 |
Assigns ports 9 to 12 to VLAN 30 |
L2Switch2(config-if-range)# exit |
Returns to global configuration mode |
L2Switch2(config)# interface fastethernet 0/1 |
Moves to interface configuration mode |
L2Switch2(config)# description Trunk Link to CORP Router |
Sets the locally significant interface description |
L2Switch2(config-if)# switchport mode trunk |
Puts the interface into trunking mode and negotiates to convert the link into a trunk link |
L2Switch2(config-if)# exit |
Returns to global configuration mode |
L2Switch2(config)# interface vlan 1 |
Creates a virtual interface for VLAN 1 and enters interface configuration mode |
L2Switch2(config-if)# ip address 192.168.1.2 255.255.255.0 |
Assigns an IP address and netmask |
L2Switch2(config-if)# no shutdown |
Enables the interface |
L2Switch2(config-if)# exit |
Returns to global configuration mode |
L2Switch2(config)# ip default-gateway 192.168.1.1 |
Assigns a default gateway address |
L2Switch2(config)# exit |
Returns to privileged EXEC mode |
L2Switch2# copy running-config startup-config |
Saves the configuration in NVRAM |
L3Switch1 (Catalyst 3560/3650/3750)
Switch> enable |
Moves to privileged EXEC mode |
Switch# configure terminal |
Moves to global configuration mode |
Switch(config)# hostname L3Switch1 |
Sets the host name |
L3Switch1(config)# no ip domain-lookup |
Turns off DNS queries so that spelling mistakes do not slow you down |
L3Switch1(config)# vtp mode server |
Changes the switch to VTP server mode |
L3Switch1(config)# vtp domain testdomain |
Configures the VTP domain name to testdomain |
L3Switch1(config)# vlan 10 |
Creates VLAN 10 and enters VLAN configuration mode |
L3Switch1(config-vlan)# name Accounting |
Assigns a name to the VLAN |
L3Switch1(config-vlan)# exit |
Returns to global configuration mode |
L3Switch1(config)# vlan 20 |
Creates VLAN 20 and enters VLAN configuration mode |
L3Switch1(config-vlan)# name Marketing |
Assigns a name to the VLAN |
L3Switch1(config-vlan)# exit |
Returns to global configuration mode |
L3Switch1(config)# interface gigabitethernet 0/1 |
Moves to interface configuration mode |
L3Switch1(config-if)# switchport trunk encapsulation dot1q |
Specifies 802.1q tagging on the trunk link |
L3Switch1(config-if)# switchport mode trunk |
Puts the interface into trunking mode and negotiates to convert the link into a trunk link |
L3Switch1(config-if)# exit |
Returns to global configuration mode |
L3Switch1(config)# ip routing |
Enables IP routing on this device |
L3Switch1(config)# interface vlan 1 |
Creates a virtual interface for VLAN 1 and enters interface configuration mode |
L3Switch1(config-if)# ip address 172.16.1.1 255.255.255.0 |
Assigns an IP address and netmask |
L3Switch1(config-if)# no shutdown |
Enables the interface |
L3Switch1(config-if)# interface vlan 10 |
Creates a virtual interface for VLAN 10 and enters interface configuration mode |
L3Switch1(config-if)# ip address 172.16.10.1 255.255.255.0 |
Assigns an IP address and mask |
L3Switch1(config-if)# no shutdown |
Enables the interface |
L3Switch1(config-if)# interface vlan 20 |
Creates a virtual interface for VLAN 20 and enters interface configuration mode |
L3Switch1(config-if)# ip address 172.16.20.1 255.255.255.0 |
Assigns an IP address and mask |
L3Switch1(config-if)# no shutdown |
Enables the interface |
L3Switch1(config-if)# exit |
Returns to global configuration mode |
L3Switch1(config)# interface fastethernet 0/24 |
Enters interface configuration mode |
L3Switch1(config-if)# no switchport |
Creates a Layer 3 port on the switch |
L3Switch1(config-if)# ip address 172.31.1.6 255.255.255.252 |
Assigns an IP address and netmask |
L3Switch1(config-if)# exit |
Returns to global configuration mode |
L3Switch1(config)# router eigrp 10 |
Creates EIGRP routing process 10 and moves to router configuration mode |
L3Switch1(config-router)# network 172.16.0.0 |
Advertises the 172.16.0.0 classful network |
L3Switch1(config-router)# network 172.31.0.0 |
Advertises the 172.31.0.0 classful network |
L3Switch1(config-router)# no auto-summary |
Turns off automatic summarization at classful boundary |
L3Switch1(config-router)# exit |
Applies changes and returns to global configuration mode |
L3Switch1(config)# exit |
Returns to privileged EXEC mode |
L3Switch1# copy running-config startup-config |
Saves configuration in NVRAM |
L2Switch1 (Catalyst 2960)
Switch> enable |
Moves to privileged EXEC mode |
Switch# configure terminal |
Moves to global configuration mode |
Switch(config)# hostname L2Switch1 |
Sets the host name |
L2Switch1(config)# no ip domain-lookup |
Turns off DNS queries so that spelling mistakes do not slow you down |
L2Switch1(config)# vtp domain testdomain |
Configures the VTP domain name to testdomain |
L2Switch1(config)# vtp mode client |
Changes the switch to VTP client mode |
L2Switch1(config)# interface range fastethernet 0/1 - 4 |
Enables you to set the same configuration parameters on multiple ports at the same time |
L2Switch1(config-if-range)# switchport mode access |
Sets ports 1 to 4 as access ports |
L2Switch1(config-if-range)# switchport access vlan 10 |
Assigns ports 1 to 4 to VLAN 10 |
L2Switch1(config-if-range)# interface range fastethernet 0/5 - 8 |
Enables you to set the same configuration parameters on multiple ports at the same time |
L2Switch1(config-if-range)# switchport mode access |
Sets ports 5 to 8 as access ports |
L2Switch1(config-if-range)# switchport access vlan 20 |
Assigns ports 5 to 8 to VLAN 20 |
L2Switch1(config-if-range)# exit |
Returns to global configuration mode |
L2Switch1(config)# interface gigabitethernet 0/1 |
Moves to interface configuration mode |
L2Switch1(config-if)# switchport mode trunk |
Puts the interface into trunking mode and negotiates to convert the link into a trunk link |
L2Switch1(config-if)# exit |
Returns to global configuration mode |
L2Switch1(config)# interface vlan 1 |
Creates a virtual interface for VLAN 1 and enters interface configuration mode |
L2Switch1(config-if)# ip address 172.16.1.2 255.255.255.0 |
Assigns an IP address and netmask |
L2Switch1(config-if)# no shutdown |
Enables the interface |
L2Switch1(config-if)# exit |
Returns to global configuration mode |
L2Switch1(config)# ip default-gateway 172.16.1.1 |
Assigns the default gateway address |
L2Switch1(config)# exit |
Returns to privileged EXEC mode |
L2Switch1# copy running-config startup-config |
Saves the configuration in NVRAM |