Chapter 15. Static Routing
This chapter provides information and commands concerning the following topics:
Configuring an IPv4 Static Route
When using the ip route command, you can identify where packets should be routed in two ways:
The next-hop address
The exit interface
Both ways are shown in the “Configuration Example: IPv4 Static Routes” and the “Configuring an IPv4 Default Route” sections.
Router(config)# ip route 172.16.20.0 255.255.255.0 172.16.10.2 |
172.16.20.0 = destination network 255.255.255.0 = subnet mask 172.16.10.2 = next-hop address Read this to say, “To get to the destination network of 172.16.20.0, with a subnet mask of 255.255.255.0, send all packets to 172.16.10.2” |
Router(config)# ip route 172.16.20.0 255.255.255.0 serial 0/0/0 |
172.16.20.0 = destination network 255.255.255.0 = subnet mask Serial 0/0/0 = exit interface Read this to say, “To get to the destination network of 172.16.20.0, with a subnet mask of 255.255.255.0, send all packets out interface serial 0/0/0” |
Static Routes and Recursive Lookups
A static route that uses a next-hop address (intermediate address) causes the router to look at the routing table twice: once when a packet first enters the router and the router looks up the entry in the table, and a second time when the router has to resolve the location of the intermediate address.
For point-to-point links, always use an exit interface in your static route statements:
Router(config)# ip route 192.168.10.0 255.255.255.0 serial 0/0/0
For broadcast links such as Ethernet, Fast Ethernet, or Gigabit Ethernet, use both an exit interface and an intermediate address:
Router(config)# ip route 192.168.10.0 255.255.255.0 fastethernet 0/0
192.138.20.2
This saves the router from having to do a recursive lookup for the intermediate address of 192.168.20.2, knowing that the exit interface is FastEthernet 0/0.
Try to avoid using static routes that reference only intermediate addresses.
The permanent Keyword
Without the permanent keyword in a static route statement, a static route is removed if an interface goes down. A downed interface causes the directly connected network and any associated static routes to be removed from the routing table. If the interface comes back up, the routes are returned.
Adding the permanent keyword to a static route statement keeps the static routes in the routing table even if the interface goes down and the directly connected networks are removed. You cannot get to these routes—the interface is down—but the routes remain in the table. The advantage to this is that when the interface comes back up, the static routes do not need to be reprocessed and placed back into the routing table, thus saving time and processing power.
When a static route is added or deleted, this route, along with all other static routes, is processed in 1 second. Before Cisco IOS Software Release 12.0, this processing time was 5 seconds.
The routing table processes static routes every minute to install or remove static routes according to the changing routing table.
To specify that the route will not be removed, even if the interface shuts down, enter the following command, for example:
Router(config)# ip route 172.16.20.0 255.255.255.0 172.16.10.2
  permanent
Floating Static Routes in IPv4 and Administrative Distance
To specify that an administrative distance (AD) of 200 has been assigned to a given route, enter the following command, for example:
Router(config)# ip route 172.16.20.0 255.255.255.0 172.16.10.2 200
By default, a static route is assigned an AD of 1. AD rates the “trustworthiness” of a route. AD is a number from 0 to 255 (or 254 for IPv6), where 0 is absolutely trusted and 255 (254 for IPv6) cannot be trusted at all. Therefore, an AD of 1 is an extremely reliable rating, with only an AD of 0 being better. An AD of 0 is assigned to a directly connected route. Table 15-1 lists the AD for each type of route.
Table 15-1 Administrative Distances
| Route Type | AD IPv4 | AD IPv6 |
| Connected | 0 | 0 |
| Static | 1 | 1 |
| Enhanced Interior Gateway Routing Protocol (EIGRP) summary route | 5 | 5 |
| External Border Gateway Protocol (eBGP) | 20 | 20 |
| EIGRP (internal) | 90 | 90 |
| Open Shortest Path First Protocol (OSPF) | 110 | 110 |
| Intermediate System-to-Intermediate System Protocol (IS-IS) | 115 | 115 |
| Routing Information Protocol (RIP) | 120 | 120 |
| External Gateway Protocol (EGP) (no longer supported by Cisco IOS) | 140 | 140 |
| On-Demand Routing | 160 | 160 |
| EIGRP (external) | 170 | 170 |
| Internal Border Gateway Protocol (iBGP) (external) | 200 | 200 |
| Unknown or unbelievable | 255 (Does not pass traffic) | 254 (Does not pass traffic) |
By default, a static route is always used rather than a routing protocol. By adding an AD number to your statement, however, you can effectively create a backup route to your routing protocol. If your network is using EIGRP and you need a backup route, add a static route with an AD greater than 90. EIGRP will be used because its AD is better (lower) than the static route. If EIGRP goes down, however, the static route is used in its place. This is known as a floating static route.
Configuring an IPv4 Default Route
Router(config)# ip route 0.0.0.0 0.0.0.0 172.16.10.2 |
Send all packets destined for networks not in my routing table to 172.16.10.2 |
Router(config)# ip route 0.0.0.0 0.0.0.0 serial 0/0/0 |
Send all packets destined for networks not in my routing table out my serial 0/0/0 interface |
Note
The combination of the 0.0.0.0 network address and the 0.0.0.0 mask is called a quad-zero route.
Verifying IPv4 Static Routes
To display the contents of the IP routing table, enter the following command:
Router# show ip route
Note
The codes to the left of the routes in the table tell you from where the router learned the routes. A static route is described by the letter S. A default route learned by a static route is described in the routing table by S*. The asterisk (*) indicates that the last path option is used when forwarding the packet.
Router# show ip route |
Displays the current IPv4 routing table |
Router# show ip route summary |
Displays a summarized form of the current IPv4 routing table |
Router# show ip static route |
Displays only static IPv4 routes installed in the routing table |
Router# show ip static route 172.16.10.0/24 |
Displays only static route information about the specific address given |
Router# show ip static route 172.16.10.0 255.255.255.0 |
Displays only static route information about the specific address given |
Router# show ip static route summary |
Displays a summarized form of IPv4 static routes |
Configuration Example: IPv4 Static Routes
Figure 15-1 illustrates the network topology for the configuration that follows, which shows how to configure static routes using the commands covered in this chapter.
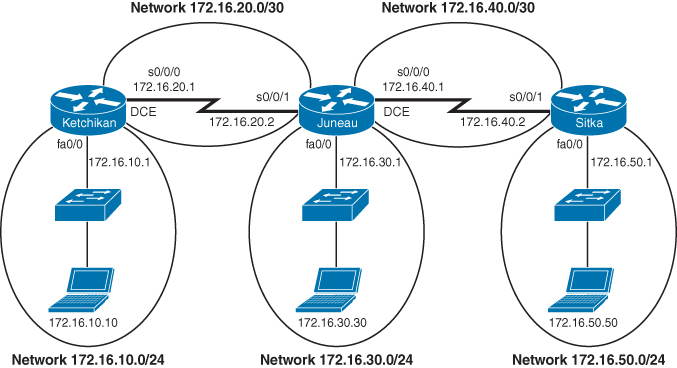
Figure 15-1 Network Topology for Static Route Configuration
Note
The host names, passwords, and interfaces have all been configured using the commands shown in the configuration example in Chapter 14, “Configuring a Cisco Router.”
Ketchikan Router
Ketchikan> enable |
Moves to privileged EXEC mode |
Ketchikan# configure terminal |
Moves to global configuration mode |
Ketchikan(config)# ip route 172.16.30.0 255.255.255.0 172.16.20.2 |
Configures a static route using the next-hop address. Since this is a point-to-point serial link, an exit interface should be used. This method works, but is inefficient |
Ketchikan(config)# ip route 172.16.40.0 255.255.255.0 172.16.20.2 |
Configures a static route using the next-hop address. Since this is a point-to-point serial link, an exit interface should be used. This method works, but is inefficient |
Ketchikan(config)# ip route 172.16.50.0 255.255.255.0 172.16.20.2 |
Configures a static route using the next-hop address. Since this is a point-to-point serial link, an exit interface should be used. This method works, but is inefficient |
Ketchikan(config)# exit |
Moves to privileged EXEC mode |
Ketchikan# copy running- config startup-config |
Saves the configuration to NVRAM |
Juneau Router
Juneau> enable |
Moves to privileged EXEC mode |
Juneau# configure terminal |
Moves to global configuration mode |
Juneau(config)# ip route 172.16.10.0 255.255.255.0 serial 0/0/1 |
Configures a static route using the exit interface |
Juneau(config)# ip route 172.16.50.0 255.255.255.0 serial 0/0/0 |
Configures a static route using the exit interface |
Juneau(config)# exit |
Moves to privileged EXEC mode |
Juneau# copy running-config startup-config |
Saves the configuration to NVRAM |
Sitka Router
Sitka> enable |
Moves to privileged EXEC mode |
Sitka# configure terminal |
Moves to global configuration mode |
Sitka(config)# ip route 0.0.0.0 0.0.0.0 serial 0/0/1 |
Configures a static route using the default route method. Note that an exit interface is used since this is a point-to-point link |
Sitka(config)# exit |
Moves to privileged EXEC mode |
Sitka# copy running-config startup-config |
Saves the configuration to NVRAM |
Configuring an IPv6 Static Route
Note
To create a static route in IPv6, you use the same format as creating a static route in IPv4.
Figure 15-2 illustrates the network topology for the configuration that follows, which shows how to configure static routes with IPv6. Note that only the static routes on the Austin router are displayed.

Figure 15-2 Network Topology for IPv6 Static Route Configuration
Austin(config)# ipv6 route 2001:db8:c18:3::/64 2001:db8:c18:2::2 |
Creates a static route configured to send all packets addressed to 2001:db8:c18:3::/64 to a next-hop address of 2001:db8:c18:2::2 |
Austin(config)# ipv6 route 2001:db8:c18:3::/64 gigabitethernet 0/0 |
Creates a directly attached static route configured to send packets out interface gigabitethernet 0/0 |
Austin(config)# ipv6 route 2001:db8:c18:3::/64 gigabitethernet 0/0 2001:db8:c18:2::2 |
Creates a fully specified static route on a broadcast interface. On a broadcast medium such as Ethernet, this is the preferred method for creating static routes |
Floating Static Routes in IPv6
To create a static route with an AD set to 200 as opposed to the default AD of 1, enter the following command, for example:
Austin(config)# ipv6 route 2001:db8:c18:3::/64 gigabitethernet 0/0 200
Note
The default ADs used in IPv4 are the same for IPv6, with one exception—the AD number for unknown or unbelievable is 254 as opposed to 255. See Table 15-1 for a list of the default ADs.
Configuring an IPv6 Default Route
Note
To create a default route in IPv6, you use the same format as creating a default route in IPv4.
Austin(config)# ipv6 route ::/0 2001:db8:c18:2::2 |
Creates a default route configured to send all packets to a next-hop address of 2001:db8:c18:2::2 |
Austin(config)# ipv6 route ::/0 serial 0/0/0 |
Creates a default route configured to send packets out interface serial 0/0/0 |
Verifying IPv6 Static Routes
Router# show ipv6 route |
Displays the current IPv6 routing table |
Router# show ipv6 route summary |
Displays a summarized form of the current IPv6 routing table |
Router# show ipv6 static |
Displays only static IPv6 routes installed in the routing table |
Router# show ipv6 static 2001:db8:5555:0/16 |
Displays only static route information about the specific address given |
Router# show ipv6 static interface serial 0/0/0 |
Displays only static route information with the specified interface as the outgoing interface |
Router# show ipv6 static detail |
Displays a more detailed entry for IPv6 static routes |