Chapter 9. VLANs
This chapter provides information and commands concerning the following topics:
Creating Static VLANs
Static VLANs occur when a switch port is manually assigned by the network administrator to belong to a VLAN. Each port is associated with a specific VLAN. By default, all ports are originally assigned to VLAN 1. You create VLANs using the VLAN configuration mode.
Creating Static VLANs Using VLAN Configuration Mode
Switch(config)# vlan 3 |
Creates VLAN 3 and enters VLAN configuration mode for further definitions |
Switch(config-vlan)# name Engineering |
Assigns a name to the VLAN. The length of the name can be from 1 to 32 characters |
Switch(config-vlan)# exit |
Applies changes, increases the revision number by 1, and returns to global configuration mode |
Switch(config)# |
Note
Use this method to add normal-range VLANs (1–1005) or extended-range VLANs (1006–4094). Configuration information for normal-range VLANs is always saved in the VLAN database, and you can display this information by entering the show vlan privileged EXEC command.
Note
The VLAN Trunking Protocol (VTP) revision number is increased by one each time a VLAN is created or changed.
VTP version 3 supports propagation of extended-range VLANs. VTP versions 1 and 2 propagate only VLANs 1–1005.
Note
Transparent mode does not increment the VTP revision number.
Assigning Ports to VLANs
Switch(config)# interface fastethernet 0/1 |
Moves to interface configuration mode |
Switch(config-if)# switchport mode access |
Sets the port to access mode |
Switch(config-if)# switchport access vlan 10 |
Assigns this port to VLAN 10 |
Note
When you use the switchport mode access command, the port operates as a nontrunking, single VLAN interface.
Tip
An access port can belong to only one data VLAN.
Tip
By default, all ports are members of VLAN 1.
Using the range Command
Switch(config)# interface range fastethernet 0/1 - 9 |
Enables you to set the same configuration parameters on multiple ports at the same time Note Depending on the model of switch, there is a space before and after the hyphen in the interface range command. Be careful with your typing |
Switch(config-if-range)# switchport mode access |
Sets ports 1 to 9 as access ports |
Switch(config-if-range)# switchport access vlan 10 |
Assigns ports 1 to 9 to VLAN 10 |
Configuring a Voice VLAN
The voice VLAN feature permits switch ports to carry voice traffic with Layer 3 precedence and Layer 2 Class of Service (CoS) values from an IP Phone.
You can configure the switch port, which is connected to an IP Phone, to use one VLAN for voice traffic and another VLAN for data traffic originating from a device that is connected to the access port of the IP Phone.
Cisco switches use Cisco Discovery Protocol (CDP) packets to communicate with the IP Phone. CDP must be enabled on any switch port that is to be connected to an IP Phone.
Note
Voice VLANs are disabled by default.
Note
By default, a switch port drops any tagged frames in hardware.
Configuring Voice and Data with Trust
Note
This configuration is used for Cisco IP Phones that trust data traffic using CoS coming from the laptop or PC connected to the IP Phone’s access port. Data traffic uses the native VLAN.
Switch# configure terminal |
Enters global configuration mode |
Switch(config)# mls qos |
Enables QoS functionality globally |
Switch(config)# interface fastethernet 0/6 |
Moves to interface configuration mode |
Switch(config-if)# mls qos trust cos |
Has the interface enter into a state of trust and classifies traffic by examining the incoming Class of Service (CoS) |
Switch(config-if)# mls qos trust dscp |
Has the interface enter into a state of trust and classifies traffic by examining the incoming Differentiated Services Code Point (DSCP) value |
Switch(config-if)# switchport voice vlan dot1p |
Configures the telephone to use the IEEE 802.1p priority tagging to forward all voice traffic with a higher priority through VLAN 0 (the native VLAN). By default the Cisco IP Phone forwards the voice traffic with an IEEE 802.1p priority of 5 |
Switch(config-if)# switchport voice vlan none |
Does not instruct the IP telephone about the voice VLAN. The telephone uses the configuration from the telephone keypad |
Switch(config-if)# switchport voice vlan untagged |
Configures the telephone to send untagged voice traffic. This is the default for the telephone |
Switch(config-if)# switchport voice vlan 10 |
Configures voice VLAN 10 |
Switch(config-if)# switchport voice vlan 10 name vlan_name |
Optional command. Specifies the VLAN name to be used for voice traffic. You can enter up to 128 characters |
Switch(config-if)# switchport priority extend trust |
Extends the trust state to the device (PC) connected to the access port of the IP Phone The switch instructs the phone on how to process data packets from the device (PC) connected to the IP Phone |
Switch(config-if)# priority-queue out |
Gives voice packets head-of-line privileges when trying to exit the port. This helps prevent jitter |
Switch(config-if)# spanning-tree portfast |
Enables PortFast on the interface, which removes the interface from the Spanning Tree Protocol (STP) |
Switch(config-if)# spanning-tree bpduguard enable |
Enables Bridge Protocol Data Unit (BPDU) Guard on the interface |
Switch(config-if)# exit |
Exits interface configuration mode and returns to global configuration mode |
Switch(config)# |
Configuring Voice and Data Without Trust
Note
This configuration is used for Cisco IP Phones without trusting the laptop or PC connected to the IP Phone’s access port. Data traffic uses the 802.1Q frame type.
Switch# configure terminal |
Enters global configuration mode |
Switch(config)# mls qos |
Enables QoS functionality globally |
Switch(config)# interface fastethernet 0/8 |
Moves to interface configuration mode |
Switch(config-if)# mls qos trust cos |
Has the interface enter into a state of trust and classifies traffic by examining the incoming Class of Service (CoS) value |
Switch(config-if)# mls qos trust dscp |
Has the interface enter into a state of trust and classifies traffic by examining the incoming Differentiated Services Code Point (DSCP) value |
Switch(config-if)# switchport voice vlan 10 |
Configures voice VLAN 10 |
Switch(config-if)# switchport access vlan 20 |
Configures data VLAN 20 |
Switch(config-if)# priority-queue out |
Gives voice packets head-of-line privileges when trying to exit the port. This helps prevent jitter |
Switch(config-if)# spanning-tree portfast |
Enables PortFast on the interface, which removes the interface from the Spanning Tree Protocol (STP) |
Switch(config-if)# spanning-tree bpduguard enable |
Enables BPDU Guard on the interface |
Switch(config-if)# exit |
Exits interface configuration mode and returns to global configuration mode |
Switch(config)# |
Verifying VLAN Information
Switch# show vlan |
Displays VLAN information |
Switch# show vlan brief |
Displays VLAN information in brief |
Switch# show vlan id 2 |
Displays information about VLAN 2 only |
Switch# show vlan name marketing |
Displays information about VLAN named marketing only |
Switch# show interfaces vlan x |
Displays interface characteristics for the specified VLAN |
Switch# show interfaces switchport |
Displays VLAN information for all interfaces |
Switch# show interfaces fastethernet 0/6 switchport |
Displays VLAN information (including voice VLAN information) for the specified interface |
Saving VLAN Configurations
The configurations of VLANs 1 to 1005 are always saved in the VLAN database. When using VLAN configuration mode, the exit command saves the changes to the VLAN database.
If the VLAN database configuration is used at startup, and the startup configuration file contains extended-range VLAN configuration, this information is lost when the system boots.
If you are using VTP transparent mode, the configurations are also saved in the running configuration and can be saved to the startup configuration using the copy running-config startup-config command.
If the VTP mode is transparent in the startup configuration, and the VLAN database and the VTP domain name from the VLAN database match those in the startup configuration file, the VLAN database is ignored (cleared), and the VTP and VLAN configurations in the startup configuration file are used. The VLAN database revision number remains unchanged in the VLAN database.
Erasing VLAN Configurations
Switch# delete flash: vlan.dat |
Removes the entire VLAN database from flash Caution Make sure there is no space between the colon (:) and the characters vlan.dat. You can potentially erase the entire contents of the flash with this command if the syntax is not correct. Make sure you read the output from the switch. If you need to cancel, press (Switch#) Switch# delete flash:vlan.dat Delete filename [vlan.dat]? Delete flash:vlan.dat? [confirm] Switch# |
Switch(config)# interface fastethernet 0/5 |
Moves to interface configuration mode |
Switch(config-if)# no switchport access vlan 5 |
Removes port from VLAN 5 and reassigns it to VLAN 1—the default VLAN |
Switch(config-if)# exit |
Moves to global configuration mode |
Switch(config)# no vlan 5 |
Removes VLAN 5 from the VLAN database |
Note
When you delete a VLAN from a switch that is in VTP server mode, the VLAN is removed from the VLAN database for all switches in the VTP domain. When you delete a VLAN from a switch that is in VTP transparent mode, the VLAN is deleted only on that specific switch.
Note
You cannot delete the default VLANs for the different media types: Ethernet VLAN 1 and FDDI or Token Ring VLANs 1002 to 1005.
Caution
When you delete a VLAN, any ports assigned to that VLAN become inactive. They remain associated with the VLAN (and thus inactive) until you assign them to a new VLAN. Therefore, it is recommended that you reassign ports to a new VLAN or the default VLAN before you delete a VLAN from the VLAN database.
Configuration Example: VLANs
Figure 9-1 illustrates the network topology for the configuration that follows, which shows how to configure VLANs using the commands covered in this chapter.
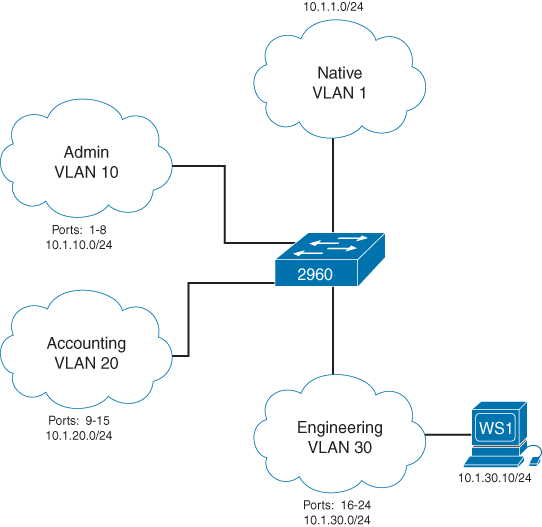
Figure 9-1 Network Topology for VLAN Configuration Example
2960 Switch
Switch> enable |
Moves to privileged mode |
Switch# configure terminal |
Moves to global configuration mode |
Switch(config)# hostname Switch2960 |
Sets the host name |
Switch2960(config)# vlan 10 |
Creates VLAN 10 and enters VLAN configuration mode |
Switch2960(config-vlan)# name Admin |
Assigns a name to the VLAN |
Switch2960(config-vlan)# exit |
Increases the revision number by 1 and returns to global configuration mode |
Switch2960(config)# vlan 20 |
Creates VLAN 20 and enters VLAN configuration mode |
Switch2960(config-vlan)# name Accounting |
Assigns a name to the VLAN |
Switch2960(config-vlan)# vlan 30 |
Creates VLAN 30 and enters VLAN configuration mode. Note that you do not have to exit back to global configuration mode to execute this command. This also increases the revision number by 1 because you moved from VLAN 20 to VLAN 30 |
Switch2960(config-vlan)# name Engineering |
Assigns a name to the VLAN |
Switch2960(config-vlan)# exit |
Increases the revision number by 1 and returns to global configuration mode |
Switch2960(config)# interface range fasthethernet 0/1 - 8 |
Enables you to set the same configuration parameters on multiple ports at the same time |
Switch2960(config-if-range)# switchport mode access |
Sets ports 1 to 8 as access ports |
Switch2960(config-if-range)# switchport access vlan 10 |
Assigns ports 1 to 8 to VLAN 10 |
Switch2960(config-if-range)# interface range fastethernet 0/9 - 15 |
Enables you to set the same configuration parameters on multiple ports at the same time |
Switch2960(config-if-range)# switchport mode access |
Sets ports 9 to 15 as access ports |
Switch2960(config-if-range)# switchport access vlan 20 |
Assigns ports 9 to 15 to VLAN 20 |
Switch2960(config-if-range)# interface range fastethernet 0/16 - 24 |
Enables you to set the same configuration parameters on multiple ports at the same time |
Switch2960(config-if-range)# switchport mode access |
Sets ports 16 to 24 as access ports |
Switch2960(config-if-range)# switchport access vlan 30 |
Assigns ports 16 to 24 to VLAN 30 |
Switch2960(config-if-range)# exit |
Returns to global configuration mode |
Switch2960(config)# exit |
Returns to privileged mode |
Switch2960# copy running-config startup-config |
Saves the configuration in NVRAM |