Chapter 8
Configuring Nexus
The following topics are covered in this chapter:
- Operating Cisco NX-OS Software
- Describing the Features of the CLI
- Identifying the Help Functions of the CLI
- Describing the Startup Characteristics of the Switch
- Describing Configuration Management
With everything you’ve learned in Chapters 1 through 7, you’re completely ready to be introduced to the Nexus Operating System (NX-OS) command line now. This operating system runs on both Nexus and MDS devices and we’ll be using it to explore and configure these exciting, new machines.
If you’re already familiar with Cisco’s Internetworking Operating System (IOS), you’ll certainly encounter lots of similarities. But there are many differences as well, and I’ll guide you through them all to successfully complete the configuration of a NX-OS device. Once you’re comfortable with the Nexus interface, you’ll be ready to configure hostnames, banners, usernames, and more, and I’ll close the chapter with the ever-vital verification process. Here’s a quick scan of the topics you’ll be learning about in this chapter:
- Understanding and configuring the Nexus Operating System (NX-OS)
- Connecting to a device
- Bringing up a device
- Understanding the device prompts
- Understanding the CLI prompts
- Performing editing and help features
- Gathering basic routing information
- Setting administrative functions
- Setting hostnames
- Setting usernames and passwords
- Setting interface descriptions
- Performing interface configurations
- Viewing, saving, and erasing configurations
As always, bear in mind that all the knowledge you gain in this chapter will become a solid foundation to build upon with the skills you’ll refine as you move on through this book.
The NX-OS User Interface
The Nexus Operating System (NX-OS) is the kernel of Cisco’s newest data center switches and it’s designed to be a highly reliable powerhouse of performance. You probably remember that a kernel is the essential part of an operating system that allocates resources and manages things like low-level hardware interfaces and security.
Coming up soon, I’m going to show you the Cisco NX-OS and how to configure a Nexus device using the command-line interface (CLI). Clearly, a good place to start is by telling you about the three ways you can connect to it initially.
Connecting to a Nexus Device
Even though there are other ways to connect to a Nexus device, most of the time, you’ll connect via the console port for configuration and verification and when checking statistics. This port is usually an RJ-45 (8-pin modular) connection located on the device itself. Make a mental note that Nexus Fabric Extenders do not have console ports because they’re managed by their parent devices. In one of those similarities I mentioned, Nexus switches are kind of like IOS devices in that they can support out-of-band management from the console port and the Aux port—but not on all platforms!
Another way to connect is called in-band, which means configuring the device through the network using a terminal emulation program like Telnet or Secure Shell (SSH.) Most people opt for SSH because it’s a more secure way to connect through a network.
The last way to connect is via a dedicated Ethernet management port called MGMT0. It’s one of the ways Nexus differs from IOS because MGMT0 traffic is separate from the main Ethernet ports. This is referred to as out-of-band management. An important point to remember is that after the initial configuration of the device has been completed, most additional configuration is usually completed through this port.
Figure 8-1 shows a Cisco Nexus 5548 switch console port and a management port, but just so you know, the L1 and L2 ports you see to the left of these ports are not currently implemented on the Nexus 5000 series. Take a look.
Figure 8-1: Nexus management port

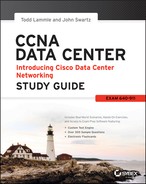
Let’s take a look at a Nexus 7000 Supervisor 1 card in Figure 8-2.
Figure 8-2: Nexus 7000 Supervisor I card
The auxiliary port was traditionally utilized for remote dial-in access so that you could connect via dial-up and manage the switch out-of-band. The auxiliary port exists on the Nexus 7000 Supervisor version 1 but was discontinued in later versions. The CMP Ethernet port is essentially a separate remote access server port that you can connect to remotely even if your management port is down and achieve an out-of-band management connection. As with the Aux port, the CMP port was discontinued after the Nexus 7000 supervisor 1.
Now, let’s take a look at a Nexus 7000 Supervisor 2 card in Figure 8-3.
Figure 8-3: Nexus 7000 Supervisor 2 card

Notice the clean look and lack of extra, useless management ports such as Aux and CMP. The Supervisor 2 card scales beyond 15 terabits per second (Tbps)! The new Sup2E (enhanced) has two quad-core Intel Xeon processors with 32GB of memory that support more VDC and fabric extenders. The Super2E has four times the CPU and memory power of the Supervisor 1 and is four times the price as well.
Bringing Up an NX-OS Device
When you bring up a Nexus device for the first time, it will look for and then load the kickstart image from flash memory. This program gets the system up and running and loads the system software. After kickstart is loaded and verified, the kernel launches and then executes a power-on self-test (POST) diagnostics session.
Here’s how the initial boot looks on my 5040 switch:
System Bootstrap, Version 12.4(13r)T, RELEASE SOFTWARE (fc1)

Booting kickstart image: bootflash:/n5000-uk9-kickstart.5.0.3.N2.2.bin....
............................................................................Image verification OK
Starting kernel...
Usage: init 0123456SsQqAaBbCcUu
INIT: version 2.85 bootingI2C - Mezz present
Starting Nexus5020 POST...
  Executing Mod 1 1 SEEPROM Test......done
  Executing Mod 1 1 GigE Port Test.......done
  Executing Mod 1 1 Inband GigE Test.....done
  Executing Mod 1 1 NVRAM Test....done
  Executing Mod 1 1 PCIE Test...............................done
  Mod 1 1 Post Completed Successfully
  Executing Mod 1 2 SEEPROM Test....done
  Mod 1 2 Post Completed Successfully
POST is completed
autoneg unmodified, ignoring
autoneg unmodified, ignoring
Checking all filesystems..... done.
And by the way, this output would also appear if I were to reboot the Nexus switch.
This initial part of the NX-OS boot process output is all information about kickstart, which first runs the POST and then verifies the file system.
The next part shows us that the system software is being decompressed into RAM and additional plug-in modules are being loaded:
Loading system software
Uncompressing system image: bootflash:/n5000-uk9.5.0.3.N2.2.bin
Loading plugin 0: core_plugin...
Loading plugin 1: eth_plugin...
Notice that the NX-OS system version showing in the filename is 5.0.3. This is important because the system software contains the majority of the processes the switch uses.
Okay, now the switch will start up initializing processes and begin mounting file systems and loading files. You can see these things happening in the following output:
ethernet switching mode
INIT: Entering runlevel: 3Exporting directories for NFS kernel daemon...done.
Starting NFS kernel daemon:rpc.nfsd.
rpc.mountddone.
Set name-type for VLAN subsystem. Should be visible in /proc/net/vlan/config
Added VLAN with VID == 4042 to IF -:muxif:-
VDC-1 %$ %USER-2-SYSTEM_MSG: CLIS: loading cmd files begin  -
clisVDC-1 %KERN-2-SYSTEM_MSG: Starting kernel... - kernel
VDC-1 %KERN-0-SYSTEM_MSG: platform_type cmdline parameter not
found. Asssuming Oregon. - kernelVDC-1 %KERN-0-SYSTEM_MSG: I2C –
Mezz present  - kernelVDC-1 %KERN-0-SYSTEM_MSG: sprom_drv_init_platform: nuova_i2c_register_get_card_index  - kernelVDC-1 %USER-2-SYSTEM_MSG:
CLIS: loading cmd files end  - clis
VDC-1 %USER-2-SYSTEM_MSG: CLIS: init begin  - clis
Finally, the device tests the application-specific integrated circuits, known as ASICs, and indicates that it’s all done:
Executing ASIC Power On Self Test..
.............Done
At this point, you’ll be prompted to log in if the device already has a configuration, but if it’s a new device and there isn’t one there yet, the System Admin Account Setup will appear.
Command-Line Interface
Initially, an NX-OS device’s command-line interface (CLI) seems a lot like IOS, but stay with me for a while and you’ll begin to see some key differences pop up as we delve deeper into the configuration!
Entering the CLI
Now again, if you’ve got a shiny, new device, System Admin Account Setup will appear. Its first request will be for a respectably strong, complex password. The rules for Nexus strong passwords are as follows:
- Must be at least eight characters long.
- Doesn’t comprise too many sequential characters, like, “efgh.”
- Doesn’t contain many of the same characters, such as, “qqqzzz.”
- Does not contain common dictionary words.
- Does not contain proper names.
- Comprises uppercase and lowercase characters.
- Contains numbers as well.
Because passwords like this are usually a wise thing to go with anyway, I’d set the administrator password, write it on a sticky note, and plunk it down on my switch for reference, right? You know I’m kidding… No stickies, anywhere, ever!
Seriously, I would normally come up with a vault-tight password, but in this learning environment, we’re going to go with something much simpler, like this (and just say no to enforcing secure passwords):
---- System Admin Account Setup ----
Do you want to enforce secure password standard (yes/no): no
  Enter the password for "admin":
  Confirm the password for "admin":
The Basic System Configuration dialog now appears; you can get out of it by typing no or pressing Ctrl+C.
---- Basic System Configuration Dialog ----
This setup utility will guide you through the basic configuration of
the system. Setup configures only enough connectivity for management
of the system.
Please register Cisco Nexus 5000 Family devices promptly with your
supplier. Failure to register may affect response times for initial
service calls. Nexus devices must be registered to receive entitled
support services.
Press Enter at anytime to skip a dialog. Use ctrl-c at anytime
to skip the remaining dialogs.
Would you like to enter the basic configuration dialog (yes/no):
Exiting the basic config setup.
You’ll only see the preceding dialogs when your device doesn’t already have a configuration on it. One that does will take you straight to a login prompt with the username admin and using the password that was set initially:
login: admin
Password:
Cisco Nexus Operating System (NX-OS) Software
TAC support: http://www.cisco.com/tac
Copyright (c) 2002-2011, Cisco Systems, Inc. All rights reserved.
The copyrights to certain works contained in this software are
owned by other third parties and used and distributed under
license. Certain components of this software are licensed under
the GNU General Public License (GPL) version 2.0 or the GNU
Lesser General Public License (LGPL) Version 2.1. A copy of each
such license is available at
http://www.opensource.org/licenses/gpl-2.0.php and
http://www.opensource.org/licenses/lgpl-2.1.php
switch#
Cisco Nexus devices have two main command modes, user exec mode and configuration mode. However, unlike with an IOS device, the pound (#) sign does not indicate privileged mode. There is no “enable” to grant you admin power with NX-OS! The username provides admin or operator powers when you log in. We’ll talk about this more later in this chapter.
But for now, I’m just going to type exit to leave the console:
switch# exit
login:Next, I’ll take you through some basic administrative configurations.
Overview of NX-OS Modes
When configuring from a CLI, you can make global changes to your device by typing configure terminal or configure, or even just con. Any of these will get you into global configuration mode and will change the running-config. Never forget that you set a global command from global config mode only once, and doing so affects the entire device.
I just typed type con from the user EXEC prompt. Here’s the resulting output:
switch# con
Enter configuration commands, one per line.  End with CNTL/Z.
switch(config)#
Here, in global configuration mode, we’ll make changes that will affect the device as a whole. To change the running-config—the current configuration running in dynamic RAM (DRAM)—use the configure command as I just did.
CLI Prompts
It’s really important for you to understand the different prompts you’ll encounter when configuring an NX-OS device because they serve as a type of compass and will help you navigate where you are at any given point within configuration mode. So next, we’ll test the prompts commonly used on a Nexus device and make sure you understand the relevant terms as well. And don’t forget to always check your prompts before making any changes to the configuration!
Just so you know, we won’t be trying out each and every different command prompt there is because that would be going way beyond the scope of this book. But rest assured that I’ll definitely explain all the prompts you’ll see throughout this chapter because they’re really the ones you’ll use most in real life anyway. That, and they also happen to be the ones you absolutely need to know for the exam.
Interfaces
I’m going to make changes to an interface now using the interface command from global configuration mode:
Enter configuration commands, one per line.  End with CNTL/Z.
switch (config)# interface ?
  ethernet      Ethernet IEEE 802.3z
  loopback      Loopback interface
  mgmt          Management interface
  port-channel  Port Channel interface
switch (config)# interface mgmt 0
switch (config-if)#
Did you notice that the prompt changed to (config-if)#? This is important because it tells you that you’re in interface configuration mode. Of course, it would be really nice if the prompt also told us which interface we’re configuring, but for now, we’ll have to live without that because sadly, it doesn’t. Take this as an omen—you must really pay attention when configuring NX-OS!
At least the NX-OS does offer the command where, and using it will make it tell you the specific interface you’re on:
switch (config-if)# where
  conf; interface mgmt0      admin@switch
switch (config-if)#
Subinterfaces
You can create virtual subinterfaces on a physical interface that are configured as a layer 3 interfaces (not layer 2 ports). Subinterfaces divide a physical interface into two or more virtual interfaces so you can assign unique IP addresses, routing protocols, and more. The IP address for each subinterface must be in a different subnet than any other subinterface, just as they would on any physical interface.
You create a subinterface with a name that consists of the parent interface name (for example, Ethernet 1/1) followed by a period and then by a number that is unique. The prompt then changes to nexus(config-subif)#:
switch (config-if)# interface ethernet 1/1.1
switch (config-subif)#
Line Commands
You can configure user-mode passwords with the line console command. The prompt will then become (config-console)#:
switch (config)# line ?
  com1     Primary terminal line
  console  Primary terminal line
  vty      Virtual terminal line
switch (config)# line console
switch (config-console)#
The line console command is a global one that we sometimes also call a major command. Any command typed from the (config-console) prompt is known as a subcommand. The console is used to configure the console port, com1 is for the Aux port, and VTY is for telnet and SSH settings.
Routing Protocol Configurations
Because routing protocols are covered in Chapter 10, “Routing Protocols”I’m just demonstrating how the prompt changes in this one. But just so you know, you can configure routing protocols like RIP, OSPF, and EIGRP using the prompt (config-router#):
switch# config t
Enter configuration commands, one per line.  End with CNTL/Z.
switch#(config)# feature eigrp
switch#(config)# router eigrp MyGroup
switch#(config-router)#
Defining Terms
As I mentioned, knowing the terms relevant to the technology you’re dealing with is vital. Table 8-1 is a good review that lists the most important terms used so far.
Table 8-1: Device terms
| Mode | Definition |
| User exec mode | Provides access to all commands |
| Global configuration mode | Commands that affect the entire system |
| Specific configuration modes | Commands that affect interfaces/processes only |
| Setup mode | Interactive configuration dialog |
Editing and Help Features
Cisco’s advanced editing features can be really helpful when configuring your device. For instance, if you type in a question mark at any prompt, you’ll be given a list of all the commands available from that prompt. Check out the output to see what I mean. I just typed a question mark (?) after the switch# prompt:
switch# ?
  attach           Connect to a specific linecard
  callhome         Callhome commands
  cd               Change current directory
  cfs              CFS parameters
  checkpoint       Create configuration rollback checkpoint
  city             Set global city params (exec level)
  clear            Reset functions
  cli              CLI commands
  clock            Manage the system clock
  configure        Enter configuration mode
  copy             Copy from one file to another
  csl              CSL
  debug            Debugging functions
  debug-filter     Enable filtering for debugging functions
  delete           Delete a file or directory
  diff-clean       Remove temp files created by '| diff' filters
  dir              List files in a directory
  dos2nxos         DOS to NXOS text file format converter
  echo             Echo argument back to screen (useful for scripts)
  event            Event Manager commands
  find             Find a file below the current directory
  format           Format disks
-- More --
Also very good to know is that at this point, you can simply press the spacebar to gain access to another entire page of information. If that sounds too overwhelming, just press Enter to go one command at a time. You can also press Q to quit and get you back to the prompt.
And if you want even more output and you want to see each and every available command, enter a ? when you’re at the More prompt. This is what doing that will get you:
Most commands optionally preceded by integer argument k.  Defaults in brackets.
Star (*) indicates argument becomes new default.
-----------------------------------------------------------------------
<space>              Display next k lines of text [current screen size]
z                    Display next k lines of text [current screen size]*
<return>             Display next k lines of text [1]*
d or ctrl-D          Scroll k lines [current scroll size, initially 11]*
q or Q or <interrupt>Exit from more
s                    Skip forward k lines of text [1]
f                    Skip forward k screenfuls of text [1]
b or ctrl-B          Skip backwards k screenfuls of text [1]
'                    Go to place where previous search started
=                    Display current line number
/<regular expression>Search for kth occurrence of regular expression [1]
n                    Search for kth occurrence of last r.e [1]
!<cmd> or :!<cmd>    Execute <cmd> in a subshell
v                    Start up /usr/bin/vi at current line
ctrl-L               Redraw screen
:n                   Go to kth next file [1]
:p                   Go to kth previous file [1]
:f                   Display current file name and line number
.                    Repeat previous command
-----------------------------------------------------------------------
--More--
Okay—we all love these—here’s a shortcut that’s going to seem completely obvious to you when you read this: To find commands that start with a certain letter, just type the desired letter plus a question mark with no space between them and voilà! Check out what I got when I typed c?:
switch# c?
  callhome    Callhome commands
  cd          Change current directory
  cfs         CFS parameters
  checkpoint  Create configuration rollback checkpoint
  city        Set global city params (exec level)
  clear       Reset functions
  cli         CLI commands
  clock       Manage the system clock
  configure   Enter configuration mode
  copy        Copy from one file to another
  csl         CSL
switch#
Nice—all I did was enter c? and I got an entire list of all the commands that start with the letter c in response. And did you happen to notice that the switch# prompt reappeared after the list of commands is displayed?This little trick is super helpful when you have really long commands but all you need is the next possible command. It would be horribly tedious if you had to retype the entire command every time you used a question mark!
So, to find the next command in a string, type the first command and then a question mark like this:
switch# clock ?
  set  HH:MM:SS Current Time
switch# clock set ?
  WORD  HH:MM:SS Current Time (Max Size 8)
switch# clock set 12:34:56 ?
  <1-31>  Day of the month
switch# clock set 12:34:56 30 june ?
  <2000-2030>  Enter the year (no abbreviation)
switch# clock set 12:34:56 30 june 2015
Tue Jun 30 12:34:56 UTC 2015
switch#
Okay, here you can see that I got a nice little list of the of the next possible parameters and what they do by just typing in the clock ? command! To get out of this, you just keep typing a command, a space, and then a question mark until <cr> (carriage return) is your only option.
Now if you’re typing commands and receive this,
switch# clock set 12:34:56
                          ^
% Incomplete command at '^' marker.
you know the command string isn’t done yet. Just press the up arrow key to redisplay the last command entered, and then continue with the command by using your question mark.
But if you receive the following error message,
switch# clock set 12:34:56 june
                           ^
% Invalid command at '^' marker.
it means that you’ve entered a command incorrectly. See that little caret—the ^? That’s a very helpful little marker that highlights the exact spot where you blew it and entered the command incorrectly.
Here’s another example of when you’ll see that caret:
switch# show ethernet 1/1
              ^
% Invalid command at '^' marker.
This command looks okay, right? Be careful—it’s not! The problem is that the full, proper command is show interface Ethernet 1/1.
Now suppose you receive this error:
switch# show v
              ^
% Ambiguous command at '^' marker.
It means there are multiple commands that begin with the string you entered and it’s not unique. Say the command you’re after begins with the letter v. Just type Show v? after the switch# prompt. That ever-helpful question mark will help you find the command you really need:
switch# show v?
  vdc      Show Virtual Device Contexts
  version  Show the software version
  vlan     Vlan commands
  vrf      Display VRF information
As you can see, there are four commands beginning with a v.
Table 8-2 displays a list of the enhanced editing commands available on a Nexus device.
Table 8-2: Enhanced editing commands
| Command | Meaning |
| Ctrl+A | Moves your cursor to the beginning of the line |
| Ctrl+E | Moves your cursor to the end of the line |
| Esc+B | Moves back one word |
| Ctrl+B | Moves back one character |
| Ctrl+F | Moves forward one character |
| Esc+F | Moves forward one word |
| Ctrl+D | Deletes a single character |
| Backspace | Deletes a single character |
| Ctrl+R | Redisplays a line |
| Ctrl+U | Erases a line |
| Ctrl+W | Erases a word |
| Ctrl+Z | Ends configuration mode and returns to exec |
| Tab | Finishes typing a command for you |
And you can review the command history with the commands shown in Table 8-3.
Table 8-3: Command history
| Command | Meaning |
| Ctrl+P or up arrow | Shows last command entered |
| Ctrl+N or down arrow | Shows previous commands entered |
| show terminal | Shows terminal configurations |
Gathering Basic Information
The show version command will provide you with a view of the basic configuration for the system hardware, plus the software version and the boot images. Here’s an example:
switch# show version
Cisco Nexus Operating System (NX-OS) Software
TAC support: http://www.cisco.com/tac
Copyright (c) 2002-2010, Cisco Systems, Inc. All rights reserved.
The copyrights to certain works contained herein are owned by
other third parties and are used and distributed under license.
Some parts of this software are covered under the GNU Public
License. A copy of the license is available at
http://www.gnu.org/licenses/gpl.html.The output above describes the Cisco NX-OS running on the device. The next bit of output describes the read-only memory (ROM) employed, which is what is used to boot the device and also holds the POST:
ROM: System Bootstrap, Version 12.4(13r)T, RELEASE SOFTWARE (fc1)This section shows us which software versions are running and what the filenames are:
Software
  loader:    version N/A
  kickstart: version 5.0(3) [gdb]
  system:    version 5.0(3) [gdb]
  kickstart image file is: bootflash:/titanium-d1-kickstart.5.0.3.gbin
  kickstart compile time:  7/12/2010 18:00:00 [07/24/2010 11:40:20]
  system image file is:    bootflash:/titanium-d1.5.0.3.gbin
  system compile time:     7/12/2010 18:00:00 [07/24/2010 13:23:40]
The next part tells us about the processor, the amount of DRAM and bootflash memory:
Hardware
  cisco Nexus5020 Chassis ("40x10GE/Supervisor")
  Intel(R) Celeron(R) M CPU    with 2073408 kB of memory.
  Processor Board ID JAB1243000W
  Device name: switch
  bootflash:    1003520 kB
The final section shows us the uptime, reset time, reason for reset, and plug-ins loaded:
Kernel uptime is 0 day(s), 1 hour(s), 17 minute(s), 54 second(s)
Last reset at 756736 usecs after  Mon Jan 28 14:21:53 2013

  Reason: Reset Requested by CLI command reload
  System version: 5.0(3)N2(2)
  Service:
plugin
  Core Plugin, Ethernet Plugin
In addition to these, the show interfaces and show ip interface brief commands are very useful in verifying and troubleshooting, but we’re not going there just yet.
Administrative Configurations
Even though the following sections aren’t vital to actually making a switch work on your network, they’re still really important. As we move through them, I’m going to reveal configuring commands that will help you administer your network.
First, understand that there are three administrative functions that you can configure on a switch:
- Hostnames
- Passwords
- Interface descriptions
While it’s true that none of these will make your switches work better or faster, life will be lot better if you take the time to set these configurations on each of your network devices. This is because they will make troubleshooting and maintaining your network exponentially easier—seriously. So this section will be devoted to demonstrating these administrative functions and their related commands on a Nexus device.
Hostnames
The identity of the devices is set with the hostname or switchname command. Bear in mind that the hostname is only locally significant, which means that it has no bearing on how the device performs name lookups or even how it works on the internetwork at all.
Here’s a sample of the output:
switch# conf t
Enter configuration commands, one per line.  End with CNTL/Z.
switch(config)# hostname John
John(config)# hostname Tampa
Tampa(config)# switchname nexus
nexus(config)#
Even though it can be kind of tempting to configure the hostname after your own name, it’s definitely a better idea to name the device something pertinent to its location. This is because giving it a hostname that’s somehow relevant to where the device actually lives will make finding it a whole lot easier later. And well, it also helps confirm that you are, indeed, configuring the right device.
Setting Usernames and Passwords
Nexus authentication requires setting a username and password, and most of the time, that’s all you’ll need to do. But within some more secure environments, you’ll also want to use roles. The two most commonly used built-in roles are network-admin, which gets complete read/write access and write access to the entire NX-OS device, and network-operator, which gets only read access. So you can see that roles come in really handy for specifying what a given user can and can’t do, and I’m pretty sure the security benefits gained by using them are crystal clear.
With that, let’s start by creating a user from global configuration mode:
nexus(config)# username ?
  WORD  User name (Max Size 28)
nexus(config)# username john ?
  <CR>
  expire       Expiry date for this user account
  keypair      Generate SSH User Keys
  password     Password for the user
  role         Role which the user is to be assigned to
  ssh-cert-dn  Update cert dn
  sshkey       Update ssh key for the user for ssh authentication
nexus(config)# username john password ?
  0     Indicates that the password that follows should be in clear text
  5     Indicates that the password that follows should be encrypted
  WORD  Password for the user (clear text) (Max Size 64)
nexus(config)# username john password mypassword ?
  <CR>
  expire  Expiry date for this user account
  role    Role which the user is to be assigned to
nexus(config)# username john password mypasswordOkay—you can see that I just created the username john, without specifying a role, with the admittedly lame password, mypassword. The default username has full administrative control as network-admin. But it doesn’t have to stay that way if I go to the next level and assign john a role to limit just what it is he can do.
If you create a user without specifying a role, by default that user will have network-admin as their role. You can change their role as shown here (it is also possible to assign the role and password on a single line):
nexus(config)# username john role ?
  network-admin     System configured role
  network-operator  System configured role
  priv-0            Privilege role
  priv-1            Privilege role
  priv-10           Privilege role
  priv-11           Privilege role
  priv-12           Privilege role
  priv-13           Privilege role
  priv-14           Privilege role
  priv-15           Privilege role
  priv-2            Privilege role
  priv-3            Privilege role
  priv-4            Privilege role
  priv-5            Privilege role
  priv-6            Privilege role
  priv-7            Privilege role
  priv-8            Privilege role
  priv-9            Privilege role
  vdc-admin         System configured role
  vdc-operator      System configured role
nexus(config)# username john role network-operator
There, at the bottom line of the output, you can now see that user john’s role has changed to network-operator, meaning he’s now prohibited from changing or even viewing the configuration—clearly a security advantage! The various default roles are very helpful when you want to create and enable users without giving them too much access.
Here is an example of providing this level of security in one command line:
nexus(config)# username john password Lame0ne role network-operatorNow I’ll log in as john and we’ll try some commands.
nexus#
nexus# sh running-config
% Permission denied for the role
nexus# copy run start
% Permission denied for the role
nexus# where
        john@nexus%default
Notice that when I logged in as john, which is a network operator, I can neither change nor view the configuration. The default roles are similar to user mode and privileged mode in IOS. Unlike with the IOS, however, you cannot look at the prompt and know where you are, but I can tell who I am logged in as using the where command.
Setting Up Secure Shell
As mentioned earlier, opting for Secure Shell creates a more secure session than the Telnet application, which uses an unencrypted data stream. Instead, Secure Shell uses encryption keys to send data so that your username and password don’t travel in clear text.
There are five steps needed to set up SSH:
nexus(config)#hostname JohnJohn(config)#ip domain-name Lammle.comJohn(config)#username John password mypassJohn(config)# feature sshJohn(config)# ssh key ?
dsa Generate DSA keys
rsa Generate RSA keys
John(config)# ssh key rsa ?
<CR>
<768-2048> Enter number of bitsJohn(config)# ssh key rsa 1024 ?
<CR>
force Force the generation of keys even if previous ones are present
John(config)# ssh key rsa 1024The process to configure SSH on a Nexus device is somewhat similar than on IOS routers and switches, but you need to start the feature in NX-OS first.
Descriptions
As with the hostname, setting descriptions on an interface is only locally significant and also really helpful for administration purposes. Here’s an example where I used the description command to keep track of interface numbers:
John(config)# switchname nexus
nexus(config)# int mgmt 0
nexus(config-if)# description connected to the 7010 port 2/1/2
And you can view the description of an interface with either the show running-config command or the show interface command:
nexus#sh run
[output cut]
interface mgmt0
  description connected to the 7010 port 2/1/2
line console
line vty
boot kickstart bootflash:/n5000-uk9-kickstart.5.0.3.N2.2.bin
boot system bootflash:/n5000-uk9.5.0.3.N2.2.bin
 [output cut]
nexus(config-if)# show int mgmt 0
mgmt0 is up
  Hardware: GigabitEthernet, address: 000d.eca4.2fc0 (bia 000d.eca4.2fc0)
  Description: the is connect to the 7010 port 2/1/2
Don’t Do the do Command
Thankfully, beginning with IOS version 12.3, Cisco finally bestowed the do command upon us, which offers a nice view of the configuration and statistics from within configuration mode. But with the Nexus operating system, you don’t need it! Just use show commands from within config mode instead:
nexus(config-if)# sh clock
16:44:47.067 UTC Mon Jan 28 2013
nexus(config-if)#
Okay, you can still use the do command if you really want to, but since you don’t have to, why type needlessly?
For those of you resistant to change, here it is:
nexus(config-if)# do show clock
16:45:14.057 UTC Mon Jan 28 2013
nexus(config-if)#
Just as in an IOS router, you can use the do command to pretty much perform any command within configuration mode. However, with NX-OS you can quickly get used to not having to include the do command. It’s a very nice feature!
Device Interfaces
Interface configuration is one of the most important device configurations you can tangle with because without interfaces, a device is a pretty useless thing. Plus, interface configurations require serious precision to enable communication with other devices. Network layer addresses, media type, bandwidth, and more are all on the menu used to configure an interface, but different devices definitely require using specific ways to choose their interfaces.
I know many of us have grown accustomed to using the interfacetype number sequence to configure an interface, but there’s an actual, physical slot in Nexus devices. And there’s also a port number on the module plugged into that slot. With that in mind, the minimum Nexus configuration would be interface type slot/port, as seen here:
nexus(config-if)# interface ethernet ?
  <1-255>  Slot/chassis number
nexus(config-if)# interface ethernet 1/?
  <1-128>  Port/slot number
nexus(config-if)# interface ethernet 1/1
nexus(config-if)#
An important note here is that some interfaces require three numbers, as when using a fabric extender. In the following example, the 48-port fabric extender has been configured as FEX 100 and the interface number starts with 100 for each port:
nexus(config)# int ethernet 100/?
  <1-128>  Port/slot number
nexus(config)# int ethernet 100/1/?
  <1-48>  Port number
nexus(config)# int ethernet 100/1/2
nexus(config-if)#
I know this may look a little dicey, but I promise it’s not that hard. It helps to remember that you should always view a running-config output first so that you know exactly which interfaces you have to deal with. Here’s my only slightly edited 5040 output as an example:
nexus# sh run
!Command: show running-config
!Time: Tue Jan 29 12:31:03 2013
 [output cut]
interface Ethernet1/1
interface Ethernet1/2
interface Ethernet1/3
interface Ethernet1/4
[output cut]
interface mgmt0
  description the is connect to the 7010 port 2/1/2
  ip address 10.10.10.82/16
interface Ethernet100/1/1
interface Ethernet100/1/2
interface Ethernet100/1/3
interface Ethernet100/1/4
[output cut]For the sake of brevity, I didn’t include my complete running-config, but I’ve displayed all you really need to see.
Bringing Up an Interface
Next, I’ll show you how to bring up the interface and set an IP address on it.
You can disable an interface with the interface command shutdown and enable it with the no shutdown command.
If an interface is shut down, it’ll display administratively down when you use the show interfacescommand—sh intfor short:
nexus# sh int e3/9
Ethernet3/9 is down (Administratively down)[output cut]
I’ve changed devices, so this output is from a Nexus 7010 using line card 3 and port 9 on that card. Another way to check an interface’s configuration is via the show running-config command. All interfaces are shut down by default. You can bring up the interface with the no shutdown command—no shut for short:
nexus(config)# int e3/9
nexus(config-if)# no shutdown
nexus(config-if)# show int e3/9
Ethernet3/9 is up
[output cut]
Configuring IP Addresses
To be able to manage your NX-OS device remotely, you really should attach an IP address to the management interface. To configure IP addresses on an interface, use the ip address command from interface configuration mode:
nexus(config)# int e3/9
nexus(config-if)# ip address 172.16.10.2 255.255.255.0
This command looks just like it does on IOS devices, but there’s another way to do the same thing on a Nexus device using CIDR notation:
nexus(config)# int e3/9
nexus(config-if)# ip address 172.16.10.2/24
Please don’t forget to enable the interface with the no shutdown command, and always remember to use the show interface int command to see if the interface is administratively shut down or not! You can also use the show running-config command to get this information.
If you want to add a second subnet address to an interface, you have to use the secondary parameter. If you type another IP address and press Enter, it will replace the existing primary IP address and mask. Most of the time, you won’t use secondary IP addresses, but doing so can solve some sticky situations.
So let’s try it anyway… To add a secondary IP address, just use the secondary parameter:
nexus# con
Enter configuration commands, one per line.  End with CNTL/Z.
nexus(config)# int e3/9
nexus(config-if)# ip add 172.16.100.100/24 secondary
nexus(config-if)# show run int e3/9
!Command: show running-config interface Ethernet3/9
!Time: Tue Feb 19 18:29:15 2013
version 5.0(2a)
interface Ethernet3/9
  no ip redirects
  ip address 172.16.10.2/24
  ip address 172.16.100.100/24 secondary
  no shutdown
So now you know how to configure IP addresses on regular interfaces, but what about the management interface? Even though this interface is key and is usually one of the first IP addresses assigned on devices, the management interface is configured just like any other interface:
nexus# conf t
Enter configuration commands, one per line.  End with CNTL/Z.
nexus(config)# interface mgmt 0
nexus(config-if)# ip address 10.10.10.82 255.255.255.0
Nexus(config-if)# show run int mgmt0
!Command: show running-config interface mgmt0
!Time: Tue Feb 19 18:32:56 2013
version 5.0(2a)
interface mgmt0
  ip address 10.10.10.82/24
Remember that this IP address is accessible only through the management interface and not via the main ports.
Creating a Switched Virtual Interface
The switched virtual interface (SVI) originated from what is actually a very simple idea. We know we can assign IP addresses to an interface, but how do we assign an IP address to a VLAN? Well, let’s say that we have a switch with four ports in VLAN 10 and we want to assign an IP address for that VLAN. To achieve this, we would just create an interface for the VLAN because an SVI elegantly provides layer 3 routing between VLANs.
Understand that an SVI or VLAN interface is not a physical interface but a logical one, and it’s accessible through any of the ports on that VLAN. On a Nexus device, the Interface-VLAN or SVI feature isn’t enabled by default, so if you try to create a VLAN interface, you’ll get an error like this one:
nexus(config)# interface vlan 300
                         ^
Invalid command (interface name) at '^' marker.
nexus(config)#
However, if we enable the feature first, everything works great:
nexus(config)# feature interface-vlan
nexus(config)# interface vlan 300
nexus(config-if)# ip address 10.22.33.44 255.255.0.0
nexus(config-if)#
Switched virtual interfaces are typically used on devices where layer 3 routing occurs. Most often, each and every single VLAN will have its own interface and layer 3 settings. I’ve already shown you how to configure a variety of NX-OS interfaces, so I’m not going to be overly repetitive by demonstrating that process again. If you really can’t wait and simply must have more information on Nexus layer 3 switching now, you can skip over to Chapter 10, but I recommend sticking with the flow and moving on with the rest of us.
Switchport Settings
Nexus switches have ports that can be configured to behave a lot like the ports on Catalyst switches. Switches with layer 3–capable ports can be either layer 3 or layer 2. The switchport command enables the layer 2 mode and allows for the configuration of various layer 2 settings. In the following example, port e3/9 is currently a layer 3 interface, but I’m going to use the switchport command to configure it as a layer 2 interface:
nexus(config)# int e3/9
nexus(config-if)# show int e3/9 switchport
Name: Ethernet3/9
  Switchport: Disabled
nexus(config-if)# switchport
nexus(config-if)# show int e3/9 switchport
Name: Ethernet3/9
  Switchport: Enabled
  Switchport Monitor: Not enabled
  Operational Mode: access
  Access Mode VLAN: 1 (default)
Once a port is configured as a switchport, the commands follow the same formula as they would on an IOS device. And even though the port will default to access mode, I’m going to configure a port as an access port and place it into VLAN 10 now using the switchport command:
nexus# conf t
Enter configuration commands, one per line.  End with CNTL/Z.
nexus(config)# int e1/20
nexus(config-if)# switchport ?
  <CR>
  access       Set access mode characteristics of the interface
  autostate    Include or exclude this port from vlan link up calculation
  block        Block specified outbound traffic for all VLANs
  description  Enter description of maximum 80 characters
  host         Set port host
  mode         Enter the port mode
  monitor      Monitor session related traffic
  monitor      Configures an interface as span-destination
  priority     CoS Priority parameter
  trunk        Configure trunking parameters on an interface
  voice        Set voice mode characterestics of the interface
nexus(config-if)# switchport mode ?
  access      Port mode access
  fex-fabric  Port mode FEX fabric
  trunk       Port mode trunk
nexus(config-if)# switchport mode access
nexus(config-if)# switchport access ?
  vlan  Set VLAN when interface is in access mode
nexus(config-if)# switchport access vlan ?
  <1-3967,4048-4093>  VLAN ID of the VLAN when this port is in access mode
nexus(config-if)# switchport access vlan 10
nexus(config-if)#
The switchportmode command is used for configuring the port to be access, trunk, or FEX-fabric. FEX-fabric is required to connect to a Fabric Extender.
To view switchport settings such as VLAN, native trunk mode, and switchport status, I’ll use the show interface command followed by the switchport option here:
nexus(config)# show int e1/1 switchport
Name: Ethernet1/1
  Switchport: Enabled
  Switchport Monitor: Not enabled
  Operational Mode: trunk
  Access Mode VLAN: 1 (default)
  Trunking Native Mode VLAN: 1 (default)
  Trunking VLANs Enabled: 1,10
  Voice VLAN: none
  Extended Trust State : not trusted [COS = 0]
  Administrative private-vlan primary host-association: none
  Administrative private-vlan secondary host-association: none
  Administrative private-vlan primary mapping: none
  Administrative private-vlan secondary mapping: none
  Administrative private-vlan trunk native VLAN: none
  Administrative private-vlan trunk encapsulation: dot1q
  Administrative private-vlan trunk normal VLANs: none
  Administrative private-vlan trunk private VLANs: none
  Operational private-vlan: none
  Unknown unicast blocked: disabled
  Unknown multicast blocked: disabled
Once a port has been configured as a switchport, only layer 2 commands will be available unless you execute the no switchport command on it to turn it into a layer 3 port:
nexus(config-if)# ip add 1.1.1.1 255.255.255.0
                      ^
% Invalid command at '^' marker.
nexus(config-if)# no switchport
nexus(config-if)# ip add 1.1.1.1 255.255.255.0
nexus(config-if)#
Notice that the IP address command does not work until the port is switched back to layer 3.
Understand that though layer 2 settings are generally simpler than layer 3 settings, both are equally as important for you to know.
Viewing, Saving, and Erasing Configurations
If you run through setup mode, you’ll be asked if you want to use the configuration you just created. If you say yes, then it will copy the configuration running in DRAM, the running-config into NVRAM, and name the file startup-config.
You can manually save the file from DRAM, usually called RAM, to NVRAM by using the copy running-config startup-config command. The cool shortcut for that, which I’m going to use now, is copy run start:
nexus# copy running-config startup-config
[########################################] 100%
nexus#
You can also copy the running configuration to other locations:
nexus# copy running-config ?
  bootflash:      Select destination filesystem
  ftp:            Select destination filesystem
  nvram:          Select destination filesystem
  scp:            Select destination filesystem
  sftp:           Select destination filesystem
  startup-config  Copy from source to startup configuration
  tftp:           Select destination filesystem
  volatile:       Select destination filesystem
And if you want to view the files, enter the show running-config or show startup-config from privileged mode. The sh run command, which is a shortcut for show running-config, tells us that we are viewing the current configuration:
nexus# show run
!Command: show running-config
!Time: Tue Jan 29 11:09:20 2013
version 5.0(3)N2(2)
feature telnet
feature lldp
[output cut]The sh start command—one of the shortcuts for the show startup-config command—shows us the configuration that will be used the next time the device is reloaded. It also tells us how much NVRAM is being used to store the startup-config file. Here’s an example:
nexus# show start
!Command: show startup-config
!Time: Tue Jan 29 11:09:43 2013
!Startup config saved at: Tue Jan 29 11:06:24 2013
version 5.0(3)N2(2)
feature telnet
feature lldp
 [output cut]
Deleting the Configuration and Reloading the Device
If you configure your Nexus device and decide you just want to start over, or you’re studying for your CCNA and want to practice setting up a Nexus, then erasing and restarting the device is important to you!You can delete the startup-config file and reset the IP configuration of MGMT0 by using the write erase boot command:
nexus# write erase boot
This command will erase the boot variables and the ip configuration
of interface mgmt 0
Do you wish to proceed anyway? (y/n)  [n] y
nexus# show startup-config
No startup configuration
nexus# reload
WARNING: This command will reboot the system
Do you want to continue? (y/n) [n]
If you reload or power-cycle the device after using the write erase boot command, you’ll be offered setup mode because there’s no configuration saved in NVRAM. You can press Ctrl+C to exit setup mode at any time.

Verifying Your Configuration
Obviously, show running-config would be the best way to verify your configuration and show startup-config would be the best way to verify the configuration that’ll be used the next time the device is reloaded—right?
Well, once you take a look at the running-config and all appears to be good, you can verify your configuration with utilities like ping and Telnet. Ping is a program that uses ICMP echo requests and replies and works by sending a packet to a remote host. If the host on the receiving end responds, you know it’s alive, but you don’t know if it’s alive and also well! Just because you can ping a Microsoft server does not mean you can log in! Still, ping is always a great starting point for troubleshooting an internetwork.
When you ping on a Nexus device, it assumes that you want to send the ping out of the main Ethernet interfaces and not the management port. The problem is that we often use the management port to ping, but to be able to do that from this port, you’ve got to first specify the correct Virtual Routing and Forward, or VRF. VRF maintains a separate routing table for the management port that’s different from the other ports. VRFs were covered in detail in Chapter 7, “Introduction to Nexus.”
Let’s try to ping from our device that has an IP address only on the management port and see what happens:
nexus# ping 10.10.1.1
PING 10.10.1.1 (10.10.1.1): 56 data bytes
ping: sendto 10.10.1.1 64 chars, No route to host
Request 0 timed out
ping: sendto 10.10.1.1 64 chars, No route to host
Request 1 timed out
ping: sendto 10.10.1.1 64 chars, No route to host
Request 2 timed out
ping: sendto 10.10.1.1 64 chars, No route to host
Request 3 timed out
ping: sendto 10.10.1.1 64 chars, No route to host
Request 4 timed out
--- 10.10.1.1 ping statistics ---
5 packets transmitted, 0 packets received, 100.00% packet loss
nexus#
Okay, by default, it tried to ping from the main Ethernet ports, which do not have an IP address, and because there is no IP address on those ports, it cannot ping. So let’s use our ever-handy question mark to explore some other ping options:
nexus# ping 10.10.1.1 ?
  <CR>
  count        Number of pings to send
  df-bit       Enable do not fragment bit in IP header
  interval     Wait interval seconds between sending each packet
  packet-size  Packet size to send
  source       Source IP address to use
  timeout      Specify timeout interval
  vrf          Display per-VRF information
Most of the options listed here are the same type of options you would have on an IOS router, such as manipulating the number of packets sent, how often to send them, and such. The new output shown here is VRF. The VRF option will allow us to choose Virtual Route Forwarding tables other than the default:
nexus# ping 10.10.1.1 vrf ?
  WORD        VRF name (Max Size 32)
  default     Known VRF name
  management  Known VRF name
The options listed after VRF will show all of the existing VRFs configured on that device. We should already know that our MGMT0 port is located in the management VRF.
Now let’s try pinging using the management VRF:
nexus# ping 10.10.1.1 vrf management
PING 10.10.1.1 (10.10.1.1): 56 data bytes
64 bytes from 10.10.1.1: icmp_seq=0 ttl=254 time=2.773 ms
64 bytes from 10.10.1.1: icmp_seq=1 ttl=254 time=3.969 ms
64 bytes from 10.10.1.1: icmp_seq=2 ttl=254 time=3.997 ms
64 bytes from 10.10.1.1: icmp_seq=3 ttl=254 time=4.058 ms
64 bytes from 10.10.1.1: icmp_seq=4 ttl=254 time=4.106 ms
--- 10.10.1.1 ping statistics ---
5 packets transmitted, 5 packets received, 0.00% packet loss
round-trip min/avg/max = 2.773/3.78/4.106 ms
nexus#
This output looks very familiar. We see that five pings were successfully sent and replied to. The icmp_seq is indicating which packet in the sequences it is, the ttl is indicating time to live, and the time is showing how long it took round-trip. At the bottom under statistics, it averages the numbers above and shows you the result.
Never forget about that VRF option unless you live for frustration. It can get ugly trying to troubleshoot when you’re sending packets out the wrong interfaces!
If you want to find a neighbor’s Network layer address, you must either go to the switch itself or enter the show cdp neighbor detail command to get the Network layer addresses you need for pinging.
And you can also use an extended ping to change the default variables, as shown here:
nexus# ping
Vrf context to use [default] :management
Target IP address or Hostname: 10.10.1.1
Repeat count [5] :
Datagram size [56] :
Timeout in seconds [2] :
Sending interval in seconds [0] :
Extended commands [no] : yes
Source address or interface :
Data pattern [0xabcd] :
Type of service [0] :
Set DF bit in IP header [no] :
Time to live [255] :
Loose, Strict, Record, Timestamp, Verbose [None] :
Sweep range of sizes [no] :
Sending 5, 56-bytes ICMP Echos to 10.10.1.1
Timeout is 2 seconds, data pattern is 0xABCD
64 bytes from 10.10.1.1: icmp_seq=0 ttl=254 time=2.495 ms
64 bytes from 10.10.1.1: icmp_seq=1 ttl=254 time=3.928 ms
64 bytes from 10.10.1.1: icmp_seq=2 ttl=254 time=4.052 ms
64 bytes from 10.10.1.1: icmp_seq=3 ttl=254 time=4.065 ms
64 bytes from 10.10.1.1: icmp_seq=4 ttl=254 time=4.098 ms
--- 10.10.1.1 ping statistics ---
5 packets transmitted, 5 packets received, 0.00% packet loss
round-trip min/avg/max = 2.495/3.727/4.098 ms
nexus#
Notice that the extended ping allows me to set the repeat count higher than the default of 5 and up the datagram size too. Doing this raises the MTU and allows a much better testing of throughput! One last, critical item I want to pull out of the output and highlight is the source address interface line there in the middle. This means you can choose which interface the ping is sourced from, which can be super helpful in certain diagnostic situations!
Traceroute uses ICMP with IP time to live (TTL) time-outs to track the path a packet takes through an internetwork. This is in contrast to ping, which just finds the host and responds. Let’s try it and see what we get:
nexus# traceroute ?
  A.B.C.D or Hostname  IP address of remote system
  WORD                 Enter Hostname
nexus# traceroute 10.28.254.254
traceroute to 10.28.254.254 (10.28.254.254), 30 hops max, 40 byte packets
 1  10.28.230.1 (10.28.230.1)  0.941 ms  0.676 ms  0.58 ms
 2  10.24.114.213 (10.24.114.213)  0.733 ms  0.7 ms  0.619 ms
 3  10.20.147.46 (10.20.147.46)  0.671 ms  0.619 ms  0.635 ms
 4  10.28.254.254 (10.28.254.254)  0.613 ms  0.628 ms  0.62 ms
In this example, we are sending a traceroute to 10.28.254.254. The first router (layer 3 device) that is encountered is 10.28.230.1. That is known at the first hop, and the time for each packet is listed at the end of the line. The second router in the path to 10.28.254.254 (or second hop) is 10.24.114.213. That is followed by the third hop, and the finally we reach 10.28.254.254.
That’s all good, but still remember that telnet, ftp, and http are your best tools because they use IP at the Network layer and TCP at the Transport layer to create a session with a remote host. This means that if you can telnet, ftp, or http into a device, your IP connectivity just has to be good:
nexus# telnet ?
  A.B.C.D  Enter a valid IPv4 address
  WORD     Enter hostname  (Max Size 64)
The syntax for SSH is a little different because you need to specify the username on the command line:
nexus# ssh ?
  WORD  Enter hostname or user@hostname (Max Size 64)
nexus# ssh [email protected]If you have the choice between Telnet and SSH, always opt for the latter because an SSH session is encrypted. Never forget that anything Telnet is sent in plaintext!
Let’s move on and discover how to verify the interface statistics.
Verifying with the show interface Command
The show interface commands are a great group to go to for verifying your configuration. The first of these is show interfaces ?, which will reveal all available interfaces to verify and configure. This sleek, highly useful command displays all configurable parameters and statistics about every interface on your device and is also great for troubleshooting an assortment of device and network issues. Let’s give it a try and check out the output from a Nexus 5040:
nexus# show interface ?
  <CR>
  >                      Redirect it to a file
  >>                     Redirect it to a file in append mode
  brief                  Show brief info of interface
  capabilities           Show interface capabilities information
  counters               Show interface counters
  debounce               Show interface debounce time information
  description            Show interface description
  ethernet               Ethernet IEEE 802.3z
  fcoe (no abbrev)       Show FCoE info for interface
  flowcontrol            Show interface flowcontrol information
  loopback               Loopback interface
  mac-address            Show interface MAC address
  mgmt                   Management interface
  port-channel           Port Channel interface
  priority-flow-control  Show interface PFC information
  snmp-ifindex           Show snmp ifindex list
  status                 Show interface line status
  switchport             Show interface switchport information
  transceiver            Show interface transceiver information
  trunk                  Show interface trunk information
  untagged-cos           Show interface untagged CoS information
  |                      Pipe command output to filter
We can see that the only “real,” physical interfaces are Ethernet and mgmt. The rest are either logical interfaces or additional commands you can use as verification tools.
The next command is show interface ethernet 1/5, which will reveal the hardware address, the encapsulation method, plus a boatload of statistics:
nexus# sh int e1/5
Ethernet1/5 is up
  Hardware: 1000/10000 Ethernet, address: 000d.eca4.2fcc (bia 000d.eca4.2fcc)
  MTU 1500 bytes, BW 10000000 Kbit, DLY 10 usec,
     reliability 255/255, txload 1/255, rxload 1/255
  Encapsulation ARPA
  Port mode is access
  full-duplex, 10 Gb/s, media type is 10G
  Beacon is turned off
  Input flow-control is off, output flow-control is off
  Rate mode is dedicated
  Switchport monitor is off
  EtherType is 0x8100
  Last link flapped 21:35:44
  Last clearing of "show interface" counters never
  30 seconds input rate 2624 bits/sec, 328 bytes/sec, 0 packets/sec
  30 seconds output rate 304 bits/sec, 38 bytes/sec, 0 packets/sec
  Load-Interval #2: 5 minute (300 seconds)
    input rate 2.14 Kbps, 0 pps; output rate 192 bps, 0 pps
  RX
    0 unicast packets  25363 multicast packets  0 broadcast packets
    25363 input packets  26732602 bytes
    0 jumbo packets  0 storm suppression packets
    0 giants  0 input error  0 short frame  0 overrun   0 underrun
    0 watchdog  0 if down drop
    0 input with dribble  0 input discard
    0 Rx pause
  TX
    0 unicast packets  42753 multicast packets  0 broadcast packets
    42753 output packets  3701470 bytes
    0 jumbo packets
    0 output errors  0 collision  0 deferred  0 late collision
    0 lost carrier  0 no carrier  0 babble
    0 Tx pause
  0 interface resets
This output tells us that the preceding interface is working and appears to be in good shape. You can use the show interfaces command to tell you if you are receiving errors on the interface. This command will also show you the following information:
- The maximum transmission unit (MTU), which is the maximum packet size allowed to transmit on the interface.
- The bandwidth (BW) for use with routing protocols.
- Level of reliability—255/255 means perfect!
- The load—1/255 means no load.
Let’s pause for a second and look at the last output again. Can you find the bandwidth of the interface? On a Nexus, Ethernet interfaces are just rather vaguely dubbed “Ethernet,” regardless of speed. But there’s hope—we can see that the bandwidth is 10000000Kbit, which is really 10,000,000,000 because Kbit means to add three zeros. Thus, the bandwidth equals 10Gbits per second, or 10 Gigabit Ethernet. Problem solved!
The most important output of the show interface command is the first line, which indicates status. If the output reveals that Ethernet 1/1 is up, then the interface is up and running:
nexus# show interface ethernet 1/1
Ethernet1/1 is up
Here’s an example that depicts the most common source of all our networking problems. Type in sh int e1/22:
nexus(config-if)# sh int e1/22
Ethernet1/22 is down (SFP not inserted)
It’s telling us that there is no SFP module inserted, meaning, there’s nothing plugged in! Happens all the time, right? Let’s look at a slightly different example:
nexus(config-if)# sh int e1/2
Ethernet1/2 is down (Link not connected)
The interface in this scenario does in fact have a cable plugged in, but it’s not receiving a signal from the other side. If one end is administratively shut down, as will be displayed next, the remote end would be show up as “administratively down”:
nexus# sh int e1/1
Ethernet1/1 is down (Administratively down)
Sure enough, it is! If you want to enable the interface and bring it up, simply use the command no shutdown from interface configuration mode.
The switch tracks a legion of statistics for the interface, one of which is the number of packets sent and received, known as counters. You can clear the counters on the interface by typing the command clear counters, which will reset all the values to zero. Let’s execute this command now:
nexus# clear counters ?
  <CR>
  interface  Clear interface counters
nexus# clear counters interface ?
  all           Clear all interface counters
  ethernet      Ethernet IEEE 802.3z
  loopback      Loopback interface
  mgmt          Management interface
  port-channel  Port Channel interface
nexus# clear counters interface ethernet 1/5
nexus#
Verifying with the show ip interface Command
The show ip interface command gives us loads of information regarding the layer 3 configurations of a device’s interfaces:
nexus# show ip interface
IP Interface Status for VRF "default"
Vlan10, Interface status: protocol-down/link-down/admin-up, iod: 48,
  IP address: 2.2.2.2, IP subnet: 2.2.2.0/24
  IP broadcast address: 255.255.255.255
  IP multicast groups locally joined: none
  IP MTU: 1500 bytes (using link MTU)
  IP primary address route-preference: 0, tag: 0
  IP proxy ARP : disabled
  IP Local Proxy ARP : disabled
  IP multicast routing: disabled
  IP icmp redirects: enabled
  IP directed-broadcast: disabled
  IP icmp unreachables (except port): disabled
  IP icmp port-unreachable: enabled
  IP unicast reverse path forwarding: none
  IP load sharing: none
  IP interface statistics last reset: never
  IP interface software stats: (sent/received/forwarded/originated/consumed)
 [output cut]
In the resulting output, we can determine the status of the interface, the IP address, and the mask as well as basic IP information.
Using the show ip interface brief Command
The show ip interface brief command is one of the most helpful commands you’ll ever use on a Nexus device. It will give you a quick overview of all the device’s layer 3 interfaces, including the logical address and status. Check it out:
nexus# sh ip int brief
IP Interface Status for VRF "default"(1)
Interface            IP Address      Interface Status
Vlan10               2.2.2.2         protocol-up/link-up/admin-up
Vlan40               4.4.4.4         protocol-down/link-down/admin-up
This looks good, but where’s the management interface? Remember, the management interface is not in the default VRF, so to view management interface information, you must get to the management VRF:
nexus# sh ip int brief ?
  <CR>
  >            Redirect it to a file
  >>           Redirect it to a file in append mode
  operational  Display only interfaces that are administratively enabled
  vrf          Display per-VRF information
  |            Pipe command output to filter
nexus# sh ip int brief vrf ?
  WORD        VRF name (Max Size 32)
  all         Display all VRFs
  default     Known VRF name
  management  Known VRF name
nexus# sh ip int brief vrf management
IP Interface Status for VRF "management"(2)
Interface            IP Address      Interface Status
mgmt0                10.10.10.82     protocol-up/link-up/admin-up
nexus#
So what’s my favorite version of this command? I love the show ip int brief vrf all because it allows me to see all of the IP addresses on the switch even if they are in other VRFs!
Summary
We really got moving in this chapter! In it, I showed you around the Cisco NX-OS and I really hope you gained a lot of insight into the Nexus device world. I began by explaining the Nexus Operating System and how you can use the NX-OS to both run and configure Nexus devices. You learned how to bring a device up and what setup mode does. And because you can now basically configure Nexus devices, you know you should never, ever use setup mode, right?
After I discussed how to connect to a device with a console and LAN connection, I covered the Cisco help features and how to use the CLI to find commands and command parameters. In addition, I discussed a bunch of basic yet powerful show commands, which help you to verify your configurations.
We then explored administrative functions available on a device, which help you manage your network and verify that you’re definitely configuring the correct device. You also discovered that setting device passwords properly is one of the most important configurations you can perform. In addition to all that ground, we covered how to use the hostname and interface description to help you administer, verify, and even troubleshoot your device.
And that concludes your introduction to the Cisco NX-OS.
Exam Essentials
enable
config t
hostname ToddWritten Lab 8.1
You can find the answers in Appendix A.
Write out the command or commands for the following questions:
Hands-on Labs
In this section, you will perform commands on a Nexus device that will help you understand what you learned in this chapter.
You’ll need at least one Nexus device—two would be better, three would be outstanding. The hands-on labs in this section are included for use with real Nexus devices.
It is assumed that the device you’re going to use has no current configuration present. If necessary, erase any existing configuration with Hands-on Lab 8.1; otherwise, proceed to Hands-on Lab 8.2:
Hands-on Lab 8.1: Erasing an Existing Configuration
The following lab may require the knowledge of a username and password to enter privileged mode. If the device has a configuration with an unknown username and password for privileged mode, this procedure will not be possible:
Hands-on Lab 8.2: Exploring User Exec and Configuration Modes
Hands-on Lab 8.3: Using the Help and Editing Features
Hands-on Lab 8.4: Saving an NX-OS Configuration
- Type copy run start and press Enter.
- Type copy running, press Tab, type start, press Tab, and press Enter.
- Type copy running-config startup-config and press Enter.
Hands-on Lab 8.5: Setting the Hostname, Descriptions, and IP Address
switch#config t
switch(config)#hostname switchA
switchA(config)#config t
int mgmt0
ip address 1.1.1.1 255.255.0.0config t
int mgmt0
description link to MiamiReview Questions
You can find the answers in Appendix B.
1. What is the minimum required command to enter global configuration mode on a Cisco Nexus switch?
A. nexus# con
B. nexus# configure
C. nexus# configure global
D. nexus# configure terminal
2. Which option would you use to exit the Cisco Nexus Operating System interface configuration mode and return to the exec prompt?
A. nexus(config-if)#Ctrl-C nexus#
B. nexus(config-if)#Ctrl-Z nexus#
C. nexus(config-if)#Ctrl-E nexus#
D. nexus(config-if)#exit nexus#
3. Which two commands would you use to erase the Cisco Nexus Operation System configuration and return the switch to factory defaults'? (Choose two.)
A. nexus# write erase boot
B. nexus# erase configuration
C. nexus# erase running-configuration
D. nexus# erase startup-configuration
E. nexus# reboot
F. nexus# reload
G. nexus# shutdown
4. On a new Cisco Nexus switch, you receive an error message when you attempt to create an SVI. What is the first command you must use to create the SVI?
A. interface vlan (vlanid)
B. vlan (vlanid)
C. feature interface-vlan
D. interface routed
5. Which command should you use to configure a Cisco Nexus switch port for layer 2 operation?
A. nexus(config)#interface vlan 10nexus{config-if)#switchport
B. nexus(config-if)#layer-2
C. nexus{config-if)#switchport
D. nexus(config-if)#routed
6. What is the Cisco Nexus Operating System command to define a port as a layer 3 port?
A. port routed
B. no switchport
C. switchport
D. port switching
7. What are the two default user roles in Cisco Nexus Operating System? (Choose two.)
A. Admin
B. Network-Operator
C. Operator
D. Storage Operator
E. Root
F. System Manager
8. What is the function of the Tab key on the Cisco Nexus Operating System command-line interface?
A. Redisplays the current command line
B. Deletes all characters from the cursor to the end of the command line
C. Clears the terminal screen
D. Completes a partially entered command if enough characters are present
E. Moves the cursor one word to the right
9. Which statement correctly describes an SVI?
A. An SVI provides layer 3 routing between VLANs.
B. An SVI is a layer 2 interface and uses a dynamic MAC address.
C. An SVI cannot have an IP address assigned to it.
D. Each switchport requires an SVI assignment.
10. Which command displays the Trunking Native Mode VLAN on port Ethernet 1/18?
A. show running-config switchport e1/18
B. show interface e1/18 native
C. show interface e1/18 switchport
D. show running-config e1/18 switchport
E. show interface e1/18
11. Which of the following is an example of a static default route on a Nexus device?
A. ip route 0.0.0.0/32 10.99.99.2
B. ip route 0.0.0.0/0 Null0
C. ip route 0.0.0.0/32 Null0
D. ip route 0.0.0.0/32 mgmt0 10.99.99.2
E. ip route 0.0.0.0/0 10.99.99.2
12. Where does Cisco Nexus Operating System store the running configuration file?
A. NVRAM
B. Bootflash
C. Volatile
D. Flash
E. RAM
13. Which command will delete the contents of NVRAM on a device?
A. delete NVRAM
B. delete startup-config
C. erase NVRAM
D. erase start
14. Given the following output, what is the most likely reason this interface is not receiving packets?
Nexus# sh ip int vlan 11
IP Interface Status for VRF "default"(1)
Vlan11, Interface status: protocol-down/link-down/admin-down, iod: 153,
  IP address: 10.20.20.3, IP subnet: 10.20.20.0/24
  IP broadcast address: 255.255.255.255
  IP multicast groups locally joined:
  224.0.0.9
  IP MTU: 1500 bytes (using link MTU)
  IP primary address route-preference: 0, tag: 0
  IP proxy ARP : disabled
  IP Local Proxy ARP : disabled
  IP multicast routing: disabled
  IP icmp redirects: enabled
  IP directed-broadcast: disabled
  IP icmp unreachables (except port): disabled
  IP icmp port-unreachable: enabled
  IP unicast reverse path forwarding: none
  IP load sharing: none
  IP interface statistics last reset: never
  IP interface software stats: (sent/received/forwarded/originated/consumed)
    Unicast packets    : 0/0/0/0/0
    Unicast bytes      : 0/0/0/0/0
    Multicast packets  : 0/0/0/0/0
    Multicast bytes    : 0/0/0/0/0
    Broadcast packets  : 0/0/0/0/0
    Broadcast bytes    : 0/0/0/0/0
    Labeled packets    : 0/0/0/0/0
    Labeled bytes      : 0/0/0/0/0
A. A default access control list is used.
B. The interface is administratively shut down.
C. The interface is in layer 3 mode.
D. This interface is fine; there is not traffic.
15. What command would set the admin password to cisco?
A. enable secret cisco
B. enable cisco
C. secret cisco
D. username admin password cisco
16. What command would create a switched virtual interface for VLAN 30?
A. interface SVI 30
B. interface SVI 1.30
C. interface VLAN 30
D. feature SVI 30
17. You type the following command into the router and receive the following output:
switch#show ethernet 1/1
            ^
% Invalid input detected at ‘^’ marker.
Why was this error message displayed?
A. You need to be in config mode.
B. You cannot have a space between ethernet and 1/1.
C. You need to be in interface mode.
D. Part of the command is missing.
18. You type switch#sh r and receive a % ambiguous command error. Why did you receive this message?
A. The command requires additional options or parameters.
B. There is more than one show command that starts with the letter r.
C. There is no show command that starts with r.
D. The command is being executed from the wrong router mode.
19. Which of the following commands will display the current IP addressing and the layer 1 and 2 status of an interface? (Choose two.)
A. show version
B. show interfaces
C. show controllers
D. show ip interface
E. show running-config
20. At which layer of the OSI model would you assume the problem is if you type show interface serial 1 and receive the following message?
Ethernet3/3 is down (Link not connected)A. Physical layer
B. Data Link layer
C. Network layer
D. None; it is a router problem