
CHAPTER 4
Sniffing and Evasion
In this chapter, you will
• Describe sniffing concepts, including active and passive sniffing and protocols susceptible to sniffing
• Describe ethical hacking techniques for Layer 2 traffic
• Describe sniffing tools and understand their output
• Describe sniffing countermeasures
• Learn about intrusion detection system (IDS), firewall, and honeypot types, use, and placement
• Describe signature analysis within Snort
• Describe IDS, firewall, and honeypot evasion techniques
I used to work in an office building just up the road from me. My office sat on the corner of two hallways, which dead ended just outside with the door to the stairwell, about 5 feet beyond. There was a large window right at the end of the hallway looking out over the giant parking lot, with two big palm trees swaying in the eternal breeze just to the left. Oftentimes, people would walk down to the end of the hallway and look out the window for a while, longing for freedom during the middle of a harsh workday. And, oftentimes, they went down there to take or place personal calls on their cell phones. I know I was educated in Alabama, but I just assumed everyone knew sound travels.
These people talked to their girlfriends, boyfriends, and, on a couple of occasions, the “other woman.” They called up banks and talked about their accounts or loans. They called businesses they’ve applied to, trying to work out interview times and other issues. And all of this they did without any knowledge that someone was listening to all their conversations. Thankfully, for all these folks, I’m not an evil little guy. If I were, I would have been drawing from several bank accounts. I could also have set up and run a very successful dating agency—or a source for divorce proceedings.
In much the same way as this example, people have conversations over a network all the time, without having any idea someone else could be listening in. In this chapter, we’re going to discuss ways for you to sit in the cramped little corner office of the network wire, listening in on what people are saying over your target subnet. We’ll also include a little discussion on efforts to stop your network intrusion and, hopefully, steps you can take around them.
Essentials
Most people consider eavesdropping to be a little on the rude side. When it comes to your career as a pen tester, though, you’re going to have to get over your societal norms and become an ace at it—well, an ace at virtual eavesdropping anyway. Sniffing (often construed as wiretapping by law enforcement types, something we’ll examine in detail later) is the art of capturing packets as they pass on a wire, or over the airwaves, to review for interesting information. This information could simply be addresses to go after or information on another target. It can also be as high value as a password or other authentication code. Believe it or not, some applications send passwords and such in the clear, making things a heck of a lot easier for you. A sniffer is the tool you’ll use to accomplish this, and a host of different ones are available. Before I get into all that, though, let’s get some basics out of the way.
Network Knowledge for Sniffing
Before getting into sniffing and sniffers per se, we’ll spend just a little more time discussing communications basics and what they mean to sniffing. No, I’m not going to revisit the networking basics stuff again, but we do need to review how network devices listen to the wire (or other media used for your network) and how all these topics tie together. See, network devices don’t just start babbling at each other like we humans do. They’re organized and civilized in their efforts to communicate with each other. Believe it or not, your understanding of this communications process is critical to your success in sniffing. If you don’t know how addressing works and what the protocols are doing at each layer, your time spent looking at sniffer output will be nothing more than time wasted.
The process of sniffing comes down to a few items of great importance: what state the network interface card (NIC) is in, what access medium you are connected to, and what tool you’re running. Because a sniffer is basically an application that looks at all frames passing on a medium for your perusal, and because you already know the full communications process, I would imagine it’s easy for you to understand why these three items are of utmost importance.

EXAM TIP You probably (should) know this already, but the IPv4 loopback address (denoting the software loopback of your own machine) is 127.0.0.1, and the MAC address of broadcast messages is FF:FF:FF:FF:FF:FF.
First, let’s consider your NIC. This little piece of electronic genius works by listening to a medium (a wire most often, or the airwaves in the case of wireless) and looking for messages that match its address (or an address it’s supposed to be looking at, such as a broadcast or multicast message). This address, known as a MAC (Media Access Control), physical, or burned-in address, is a unique identifier assigned to a network interface controller (NIC) for communications at the Data Link layer of a network segment. It’s 48 bits long and is generally displayed as 12 hex characters separated by colons. The first half of the MAC address is known as the organizationally unique identifier (assigned to the NIC manufacturer) and the second half provides a unique number to identify that particular card. This addressing ensures each NIC in each device on a subnet has a specific, unique address.

NOTE Even though it’s considered a physical address, there are special instances where MAC addresses don’t refer to a single, specific card. Broadcast and multicast messages inside a network have their own MAC addresses as well. NICs on the subnet will look at these frames as they arrive on the medium and open them just as they would frames with their own MAC address.
If the NIC is on an electric wire (and for the rest of this example, let’s assume it is working in a standard Ethernet network), it reacts when electricity charges the wire and then begins reading the bits coming in. If the bits come in the form of a frame, it looks at the ones making up the destination address. If that address matches its own MAC address, the broadcast address for the subnet, or a multicast address it is aware of, the NIC will pull the frame from the wire and let the operating system begin working on it. In short, your NIC (under the influence and control of your operating system and its associated drivers) will see anything passing by but normally won’t process any frame not addressed to it. You have to tell it to do so.
A sniffer needs your card to run in something called promiscuous mode. This simply means that, regardless of address, if the frame is passing on the wire, the NIC will grab it and pull it in for a look. Because NICs are designed to pay attention only to unicast messages addressed appropriately, multicast messages, or broadcast messages, you need something that forces it to behave for your sniffer. In other words, your NIC will “see” everything passing by on the wire, but it only pulls in and examines things it recognizes as addressed to the host. If you wish for it (more specifically, the driver for the NIC) to pull everything in for a look, you have to tell it to do so. WinPcap is an example of a driver that allows the operating system to provide low-level network access and is used by a lot of sniffers on Windows machine NICs.
EXAM TIP Regardless of OS, the NIC still has to be told to behave promiscuously. On Windows, the de facto driver/library choice is WinPcap. On Linux, it’s libpcap.
This brings up the second interesting point mentioned earlier—what wire, or medium, you have access to. Ethernet (because it’s the most common, it’s what we’ll discuss) runs with multiple systems sharing a wire and negotiating time to talk based on Carrier Sense Multiple Access/Collision Detection (CSMA/CD). In short, anyone can talk anytime they want, so long as the wire is quiet. If two decide to talk at the same time, a collision occurs, they back off, and everyone goes at it again. As long as your system is within the same collision domain, right out of the box and without you changing a thing, your NIC will see every message intended for anyone else in the domain. This doesn’t mean your NIC will act on these messages. Again, it will only act on unicast messages addressed for the host and on broadcast/multicast messages for the subnet. Your NIC usually only forwards the ones intended for you and ignores the rest. So, what constitutes a collision domain? Is the whole world in a collision domain? See Figure 4-1.
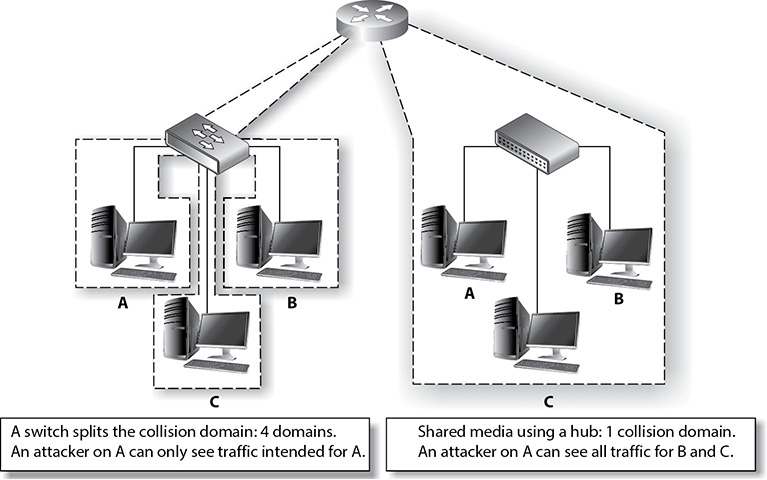
Figure 4-1 Collision domains and sniffing
Collision domains are composed of all the machines sharing any given transport medium. In other words, if we’re all connected to the same wire and we use electricity to talk to one another, every time I send a message to one person on the wire, everyone gets shocked. Therefore, only one of us can talk at a time—if two try it simultaneously, the voltage increases, and the messages will get all garbled up. Because we’re all connected to the same wire, I don’t have to guess when anyone else is sending a message; I’m getting shocked every time anyone sends anything. I don’t read them all, because they’re not addressed for me, but I know they’re being sent.
Why all this talk about collision domains and who receives what from whom? Try thinking about it this way: Suppose there are 10 people in an open room together, close enough to hear every word each one of them says. Bob, a gregarious guy who loves humor, has a great joke and decides he wants to share it with Jane. He says, “Hey Jane, want to hear a joke?” Jane says, “Sure, go ahead.” Bob says “Two corn chips are out in the yard, but not playing with each other. One chip says to the other, ‘I get the feeling you don’t like me, but I’d like to play. Can we taco about it?’ The other chip says, ‘No. I’m nacho friend.’” Jane laughs, and so does Bill from the other side of the room.
Who in the room heard Bob start a message? Everyone, of course. Who acted on it? Just Jane. Why? Because everyone heard Jane’s name up front and knew the message was not for them, so they ignored it—even though they could hear the whole thing. Jane opened up a line of communication and listened while Bob told that ridiculous joke. Bill, who decided he’d listen to everyone’s conversation, didn’t have to do a thing to enjoy the joke message, even though it wasn’t intended for him. Got it now?
Armed with this knowledge, your sniffing options can be scrutinized appropriately. Suppose, for example, you see systems connected to a hub. All systems connected to a hub share the same collision domain; therefore, every system on the hub can hear the stupid jokes every other system on the hub sends or receives. If the hub is taken out and replaced with a switch, however, things change.
Switches split collision domains so that each system connected to the switch resides in its own little collision domain—the switch will send frames down a wire for a given computer only if they’re intended for the recipient. To continue our silly example, consider the same setup, but this time everyone in the room is wearing soundproof headsets (like football coaches on the sideline) with individual frequency channels. When Bob decides to tell his joke, he first tunes his transmitter to Jane’s frequency and starts talking. Nobody else in the room hears the conversation. The only way Bill will start laughing is if he has somehow tuned in to Bob’s or Jane’s frequency, to silently sit back and listen to them.
This brings up a potential problem for the sniffing attacker. If you’re connected to a switch and you receive only those messages intended for your own NIC, what good is it to sniff? This is an excellent question and a good reminder that it’s important to know what you actually have access to, media-wise. We’ll revisit this in just a moment when we start discussing active sniffing.
Protocols Susceptible to Sniffing
Once you figure out how to start looking at all those packets you’re pulling in (and we’ll get to that in a minute), you may start asking yourself which ones are more important than others. I mean, there are tons of the things. Millions of them. Billions. Surely some of them are more important than others, right? Well, this is where knowledge of how protocols work on a network comes into play.
There are some important protocols in the upper layers for you to pay attention to as an ethical hacker—mainly because of their simplicity. When you think about an Application layer protocol, remember it normally relies on other protocols for almost everything else except its sole, primary purpose. For example, consider Simple Mail Transport Protocol (SMTP). SMTP was designed to do one thing: carry an e-mail message. It doesn’t know anything about IP addressing or encryption, or how big the network pipe is; its only concern is packaging ASCII characters together to be given to a recipient. Because it was written to carry nothing but ASCII, there is virtually no security built into the protocol at all. In other words, everything sent via SMTP, with no encryption added at another layer, is sent as clear text, meaning it can be easily read by someone sniffing the wire. Now, SMTP is on version 3 (SMTPv3), so not all SMTP packets will provide the detail you’re looking for, but I’m sure you catch the drift.
NOTE Ever heard of hardware protocol analyzers? They’re neat little boxes that do a whole lot of data sniffing and analyzing for you, automatically. Companies such as Fluke, RADCOM, and Keysight all make versions. Go check them out.
Are there other Application layer protocols to pay attention to? You bet your Manwich there are. For example, although FTP requires a user ID and password to access the server (usually), the information is passed in clear text over the wire. TFTP passes everything in clear text, and you can pull keystrokes from a sniffed Telnet session (user name and password anyone?). SNMPv1 and NNTP send their passwords and data over clear text, as does IMAP and POP3. And HTTP? Don’t get me started, what with all the data that one sends in the clear. Several Application layer protocols have information readily available to captured traffic—you just need to learn where to look for it. Sometimes data owners will use an insecure application protocol to transport information that should be kept secret. Sniffing the wire while these clear-text messages go across will display all that for you.
NOTE This should probably go without saying, but the fact that protocols like the ones just mentioned send passwords in the clear should be a big clue that, if at all possible, you should avoid using them.
Protocols at the Transport and Network layers can also provide relevant data. TCP and UDP work in the Transport layer and provide the port numbers that both sides of a data exchange are using. TCP also adds sequence numbers, which will come into play later during session hijacking. IP is the protocol working at the Network layer, and there is a load of information you can glean just from the packets themselves (see Figure 4-2). An IP packet header contains, of course, source and destination IP addresses. However, it also holds information such as the quality of service for the packet (Type of Service field) and information on fragmentation of packets along the way (Identification and Fragment Offset fields), which can prove useful in crafting your own fragmented packets later.

Figure 4-2 IP packet header
ARP
We’ve spent a little time covering some base information you’ll need regarding Application, Transport, and Network layer protocols, but the Data Link layer is going to be a huge area of focus for the sniffing portion of your exam (not to mention your success in sniffing). Frames are built in the Data Link layer, and that’s where all your local addressing happens. And how, pray tell, do systems discover the local, physical (MAC) address of other machines they wish to communicate with? By asking, of course, and they ask with a little protocol called ARP (Address Resolution Protocol).
ARP’s entire purpose in life is to resolve IP addresses to machine (MAC) addresses. As noted earlier, while each IP packet provides the network address (needed to route the packet across different networks to its final destination), the frame must have a MAC address of a system inside its own subnet to deliver the message. So as the frame is being built inside the sending machine, the system sends an ARP_REQUEST to find out what MAC address inside the subnet can process the message. Basically it asks the entire subnet, via a broadcasted message, “Does anyone have a physical address for the IP address I have here in this packet? If so, please let me know so I can build a frame and send it on.” If a machine on the local subnet has that exact IP, it will respond with an ARP_REPLY directly to the sender, saying “Why yes, I’m the holder of that IP address, and my MAC address is _macaddress_.” The frame can then be built and the message sent.
NOTE The MAC address (a.k.a. physical address) that is burned onto a NIC is actually made of two sections. The first half of the address, consisting of 3 bytes (24 bits), is known as the organizationally unique identifier and is used to identify the card manufacturer. The second half is a unique number burned in at manufacturing to ensure no two cards on any given subnet will have the same address.
Sometimes, though, the message is not intended for someone in your network segment. Maybe it’s a packet asking for a web page, or an e-mail being sent to a server somewhere up the Net, or maybe even a packet intended to start another yelling contest on Facebook. In any case, if the IP address of the packet being sent is not inside the same subnet, or is not already present in some fashion in your route table (that is, there’s no specific route previously defined for the address), the route table on your host already knows the packet should be sent to the default gateway (also known as the “route of last resort,” and is generally speaking your local router port). If it doesn’t happen to remember the default gateway’s MAC address, it’ll send out a quick ARP request to pull it. Once the packet is properly configured and delivered to the default gateway, the router will open it, look in the route table, and build a new frame for the next subnet along the route path. As that frame is being built, it will again send another ARP request: “Does anyone have a physical address for the IP address I have here in this packet? If so, please let me know so I can build a frame and send it on.” This continues on each subnet until the packet finds its true destination.
Want to know another interesting thing about ARP? The protocol retains a cache on machines as it works—at least, in many implementations it does. This really makes a lot of sense when you think about it—why continue to make ARP requests for machines you constantly talk to? To see this in action, you can use the ping, arp, and netsh commands on your Windows machine. The command arp -a will display your current ARP cache—you can see all the IP-to-MAC mappings your system knows about. Next, enter either arp -d * or netsh interface ip delete arpcache. Try arp -a again, and you’ll see your cache cleared. Refill it on the fly by pinging anything on your network. For example, I pinged a laptop over in the corner with an address of 192.168.0.3. It responded, and my ARP cache has a new entry (see Figure 4-3). Try it yourself on your network.
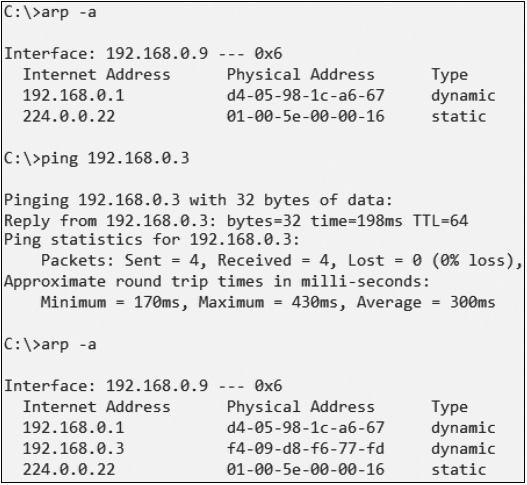
Figure 4-3 ARP cache
There are a couple of other relevant notes on ARP you should know. First, the protocol works on a broadcast basis. In other words, requests (“Does anyone have the MAC for this IP address?”) and replies (“I do. Here’s my physical address—please add it to your cache.”) are broadcast to every machine on the network. Second, the cache is dynamic—that is, the information in it doesn’t stay there forever, and when your system gets an updated ARP message, it will overwrite the cache with the new information. Suppose, for example, Machine A shuts down for a while and sends no further messages. Eventually, all system caches will delete its entry, almost as if it never existed. Suppose also that Machine B changes its NIC and now has a new MAC address. As soon as it sends its first ARP message, all systems on the network receiving it will update their caches with this new MAC address.
EXAM TIP ARP, as well as the other protocols listed in this section, can be tested heavily. Depending on your exam, you’ll be asked about it a lot. Know framing, MAC addressing, and how ARP works. Trust me.
All of this is interesting information, but just how does it help a hacker? Well, if you put on your logical thinking cap, you’ll quickly see how it could be a veritable gold mine for your hacking efforts. A system on your subnet will build frames and send them out with physical address entries based on its ARP cache. If you were to, somehow, change the ARP cache on Machine A and alter the cached MAC address of Machine B to your system’s MAC, you would receive all communication Machine A intended to send to Machine B. Suppose you went really nuts and changed the ARP entry for the default gateway on all systems in your subnet to your own machine. Now you’re getting all messages everyone was trying to send out of the local network, often the Internet. Interested now?
Attackers can do this by sending something called a gratuitous ARP. It is a special packet that updates the ARP cache of other systems before they even ask for it—in other words, before they send an ARP_REQUEST. Its original intent when created was to allow updates for outdated information, which helps with things like IP conflicts, clustering, and other legitimate issues. In our world of hacking, though, it’s easy to see where that could be taken advantage of.
NOTE It is true that ARP is cached, but it’s also true that the cache is temporary. If an attacker has persistent access, he can simply wait it out.
IPv6
Another discussion point of great importance in sniffing (and really all things hacking) is IP version 6. As you’re no doubt aware, IPv6 is the “next generation” of Internet Protocol addressing and offers a whole new world of interesting terms and knowledge to memorize for your exam (and your job). Because you’re already an IPv4 expert and know all about the 32-bit address, which is expressed in decimal and consists of four octets, we’ll focus a little attention on IPv6 and some things you may not know.
IPv6 was originally engineered to mitigate the coming disaster of IPv4 address depletion (which, of course, didn’t happen as quickly as everyone thought, thanks to network address translation and private networking). It uses a 128-bit address instead of the 32-bit IPv4 version and is represented as eight groups of four hexadecimal digits separated by colons (for example, 2002:0b58:8da3:0041:1000:4a2e:0730:7443). Methods of abbreviation, making this overly complex-looking address a little more palatable, do exist, however. Leading zeroes from any groups of hexadecimal digits can be removed, and consecutive sections of zeroes can be replaced with a double colon (::). This is usually done to either all or none of the leading zeroes. For example, the group 0054 can be converted to 54. See Figure 4-4 for an example of this address truncation in use.
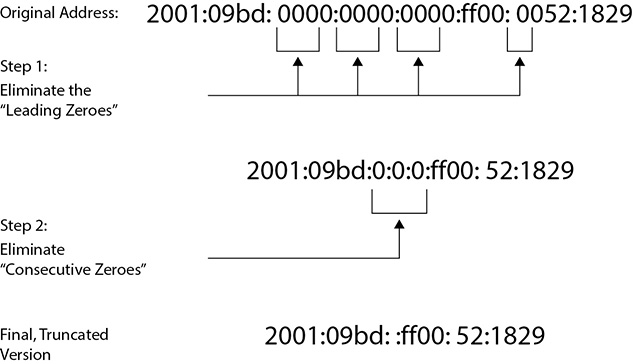
Figure 4-4 IPv6 address truncation
NOTE The double colon can be used only once in an address. Apparently using it more than once confuses routers and renders the address useless. An RFC (5952) addresses this issue.
Despite the overly complex appearance of IPv6 addressing, the design actually reduces router processing. The header takes up the first 320 bits and contains source and destination addresses, traffic classification options, hop count, and extension types. Referred to as “Next Header,” this extension field lets the recipient know how to interpret the data payload. In short, among other things, it points to the upper-layer protocol carried in the payload. Figure 4-5 shows an IPv6 packet header.

Figure 4-5 IPv6 packet
EXAM TIP The IPv6 loopback address is 0000:0000:0000:0000:0000:0000:0000:0001 and may be edited all the way down to ::1.
As with IPv4, which had unicast, multicast, and broadcast, IPv6 has its own address types and scopes. Address types include unicast, multicast, and anycast, and the scopes for multicast and unicast include link local, site local, and global. The good-old broadcast address in IPv4 (which was sent to all hosts in a network segment) is no longer used. Instead, multicast functions along with scope fulfill that necessity. Table 4-1 details address types and scopes.
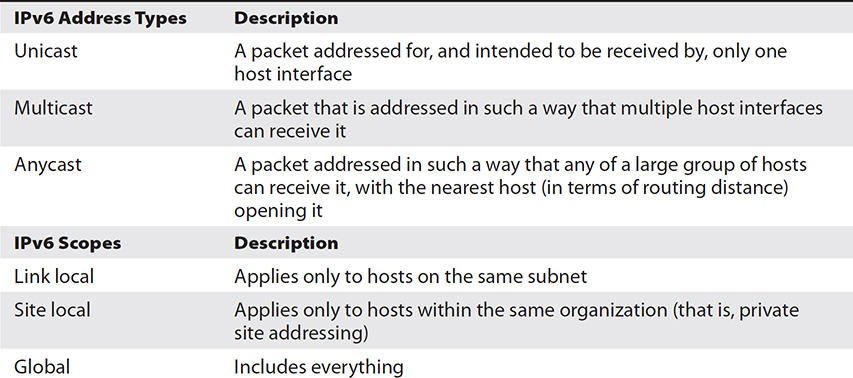
Table 4-1 IPv6 Addresses and Scopes
Addressing in IPv6 isn’t too terribly difficult to understand, but scope adds a little flair to the discussion. Unicast is just like IPv4 (addressed for one recipient) and so is multicast (addressed for many), but anycast is an interesting addition. Anycast works just like multicast; however, whereas multicast is intended to be received by a bunch of machines in a group, anycast is designed to be received and opened only by the closest member of the group. The nearest member is identified in terms of routing distance; a host two hops away is “closer” than one three hops away. Another way of saying it might be, “Whereas multicast is used for one-to-many communication, anycast is used for one-to-one-of-many communication.”
EXAM TIP In IPv6, the address block fe80::/10 has been reserved for link-local addressing. The unique local address (the counterpart of IPv4 private addressing) is in the fc00::/7 block. Prefixes for site local addresses will always be FEC0::/10.
The scope for multicast or anycast defines how far the address can go. A link-local scope defines the boundary at the local segment, with only systems on your network segment getting the message. Anything past the default gateway won’t because routers won’t forward the packets. It’s kind of like the old 169.254.1–254.0 network range: it’s intended for private addressing only. Site-local scope is much the same; however, it is defined via a site. A site in IPv6 addressing can be a fairly confusing subject because the same rules apply as the link-local scope (not forwarded by a router). But if you’re familiar with the private address ranges in IPv4 (10.0.0.0, 172.16–32.0.0, and 192.168.0.0), the site should make sense to you. Think of it this way: link local can be used for private networking and autoconfiguration of addressing like your out-of-the-box easy networking of the 169.254.0.0 network, and site local is more akin to setting up your private networks using predefined ranges.
As far as IPv6 on your exam goes, again it depends on which pool your random roll of the virtual dice pulls for you. Some exams won’t even mention it, whereas others will seem like it’s one of the only topics that matter. Most IPv6-type questions are easy—as you can see from our discussion, this is mostly rote memorization. You’re not going to be asked to divine network IDs or anything like that; you’ll just be quizzed on general knowledge. It’s helpful to note, though, that IPv6 makes traditional network scanning very, very difficult—in ECC parlance, it’s “computationally less feasible”—due to the larger address space to scan. However, should an attacker get a hold of a single machine inside a native IPv6 network, the “all hosts” link-local multicast address will prove quite handy.
Wiretapping
Finally, our last entry in fundamental sniffing concepts has to do with our friends in law enforcement and what they do in regard to sniffing. Lawful interception is the process of legally intercepting communications between two (or more) parties for surveillance on telecommunications, VoIP (Voice over IP), data, and multiservice networks. Thankfully, all of those ridiculous definitions and terms to remember regarding this seem to have been ditched by EC-Council, so the basics here are all you need.
NOTE Anyone else tired of the terms “active” and “passive”? Trust me, I’m sick of them, too. I feel like Han Solo saying to Chewy, “It’s not my fault. It’s not my fault!” However, it’s really not my fault. Wiretapping (monitoring a phone or Internet conversation) can be active or passive. Active wiretapping involves interjecting something into the communication (traffic), for whatever reason. Passive only monitors and records the data.
As an aside, but very relevant to this discussion because ECC has it in their official courseware, were you aware that the NSA wiretaps a gigantic amount of foreign Internet traffic that just happens to come through U.S. servers and routers? PRISM (Planning Tool for Resource Integration, Synchronization, and Management) is the data tool used to collect said foreign intelligence passing through Uncle Sam’s resources. I don’t know any more information on this and I don’t want to know—just passing on that EC-Council knows this, too.
Active and Passive Sniffing
EC-Council breaks sniffing down into two main categories: passive and active. Passive sniffing is exactly what it sounds like: plug in a sniffer and, without any other interaction needed on your part, start pulling data packets to view at your leisure. Passive sniffing works only if your machine’s NIC is part of the same collision domain as the targets you want to listen to—something we beat to death in the previous section, remember? Because hubs do not split a collision domain (hubs extend a collision domain), the hub is your dream network device from a sniffing perspective. Anything plugged into a port on a hub receives every message sent by anyone else plugged into it. Therefore, if you’re out and about looking to drop a sniffer onto a network segment and you see your target uses hubs, try to contain your excitement because your job just became much easier.
NOTE You’re probably as likely to see a hub in a target organization’s network as you are a unicorn or a leprechaun. But passive sniffing is testable material, so you need to know it well. Besides, if you can find Windows NT machines and LM hashing out on networks, you can certainly get lucky and come across a hub or two. Additionally, even though passive is, well, passive, there are occasions where someone has a misconfigured NIC on the subnet and you’ll grab their stuff too!
Active sniffing requires some additional work on your part, either from a packet injection or manipulation stance or from forcing network devices to play nicely with your efforts. Active sniffing usually means the collision domain you are part of is segmented from those you want to look in to, which probably means you’re attached to a switch. And if you’re connected to a switch, sniffing requires some additional work. On the outside, a switch looks much like a hub: it’s a box with a lot of blinky lights, ports for connecting machines on the front, and a power cord in the back. Inside, though, it’s a lot different. If you take the lid off a hub, it would look very much (virtually, anyway) like a single wire with attached wires running to each port. Shock one port and everyone gets shocked since they’re all wired together. The inside of a switch looks the same; however, each port’s wire is separated from the main line by a switch that gets closed only when a message is received for that port. The problem with switches in sniffing is that you’ll receive only those messages intended for your own port. One trick for active sniffing purposes is to get the switch to close the port you are connected to each and every time it closes the port you want to sniff.
Getting a switch to send a message to both the port it was addressed to and the port you’re connected to for sniffing can be accomplished by configuring something called a span port. A span port is one in which the switch configuration has been altered to send a copy of all frames from one port, or a succession of ports, to another. In other words, you tell the switch, “Every time you receive and send a frame to port 1 through 10, also send a copy to the span on port 25.” Also called port mirroring, this isn’t necessarily a simple thing to do (you must have access to the switch configuration to set it up), but it’s fairly common practice in network monitoring.
NOTE Not every switch on the planet has the capability to perform port spanning. Additionally, most modern switches (for example, Cisco’s) don’t allow a port that is configured to span as one that can transmit data. In other words, your span port can listen but cannot send anything.
Sniffing Tools and Techniques
A lot of sniffing really boils down to which tool you decide to use. Tons of sniffers are available. Some of them are passive sniffers, simply pulling in frames off the wire as they are received. Others are active sniffers, with built-in features to trick switches into sending all traffic their way. In the interest of time, page count, and your study (since this one will be on your exam), we’ll discuss Wireshark. Ettercap, EtherPeek, and even Snort (better known as an IDS, though) are also examples of sniffers.
Techniques
While it would be fun to find a network full of hubs, and an open port just sitting there waiting for you to connect, the real world isn’t like that. Equipment is in highly secured cabinets, port security is turned on, and hubs are nowhere to be seen except on someone’s USB so they have enough ports available to charge their phone and use the USB cannon geek toy. So where do we turn for help in manipulating devices and traffic to enhance our sniffing efforts? The following techniques will help.
MAC Flooding
Suppose you don’t know how to reconfigure the switch OS to set up a span port, or you just don’t have the access credentials to log in and try it. Are you out of luck? Not necessarily. Another option you have is to so befuddle and confuse the switch that it simply goes bonkers and sends all messages to all ports—and you can do this without ever touching the switch configuration. To explain how this all works, come with me on a short journey into the mind of a switch, and learn how the whole thing works with an overly simplistic, but accurate, account.
Imagine a switch comes right out of the box and gets plugged in and turned on. All these cables are connected to it, and there are computers at the end of all these cables, each with its own unique MAC address. All the switch knows is flooding or forwarding. If it receives a message that’s supposed to go to everyone (that is, a broadcast or multicast frame), the decision is easy, and it will flood that message to all ports. If the switch receives a unicast message (that is, a message with a single MAC address for delivery), and it knows which port to send it to, it will forward the frame to that single port. If it doesn’t know which port to send it to, it will flood it to all, just to be sure.
Flooding all packets to every port will certainly get them where they’re going, but it’s not very efficient, and the switch was built to split collision domains and improve efficiency. Therefore, it has to learn who is on what port so it can deliver messages appropriately. To do so, it waits patiently for messages to start coming in. The first frame arrives and it’s a doozy—a broadcast message from a computer with a MAC address of “A” attached to port 1 is sending an ARP message looking for the MAC address of another computer.
The switch opens up a little virtual book and writes “MAC A is on switchport 1—any messages I see for MAC A can be sent directly to switchport 1.” It then sends the broadcast message out to every available switchport, and patiently waits to see who replies. A computer on switchport 2 answers with an ARP reply stating, “I have the IP address you’re looking for, and my MAC address is B.” The switch smiles, and adds to its little virtual notebook, “MAC B is on switchport 2—any messages I see for B can be sent directly to switchport 2.” This continues until the little virtual book has an entry for every port, and the switch hums along, happily delivering messages.
In our story here, the little virtual notebook is called the content addressable memory (CAM) table. As you can imagine, since you know how ARP works now and you know how many packets are delivered back and forth in any given second or so, the CAM table gets updated very often. And if it’s empty, or full, everything is sent to all ports.
NOTE MAC flooding is big in the ECC CEH world, but in reality it’s not easy to do, will probably destroy the switch before you get anything useful, doesn’t last long if you could pull it off, and it will get you caught. Most modern switches protect against MAC floods but may still be susceptible to MAC spoofing. Just so you know.
You can use this to your advantage in sniffing by figuring out a way to consistently and constantly empty the CAM table, or by simply confusing the switch into thinking the address it’s looking for is not available in the table, so it should just send it out to all ports—including the one you’re sniffing on. This method, which doesn’t work on a lot of modern switches but is questioned repeatedly and often on your exam, is known as MAC flooding. The idea is simple: Send so many MAC addresses to the CAM table it can’t keep up, effectively turning it into a hub. Because the CAM is finite in size, it fills up fairly quickly, and entries begin rolling off the list. Etherflood and Macof are examples of tools you MAC flood with.
EXAM TIP In an utterly ridiculous semantic exercise, ECC defines some versions of MAC flooding as “switch port stealing.” The idea is the same—flood the CAM with unsolicited ARPs. But instead of attempting to fill the table, you’re only interested in updating the information regarding a specific port, causing something called a “race condition,” where the switch keeps flipping back and forth between the bad MAC and the real one.
ARP Poisoning
Another effective active sniffing technique is something called ARP poisoning (a.k.a. ARP spoofing or gratuitous ARP). This refers to the process of maliciously changing an ARP cache on a machine to inject faulty entries, and it’s not really that difficult to achieve. As stated earlier, ARP is a broadcast protocol. So, if Machine A is sitting there minding its own business and a broadcast comes across for Machine B that holds a different MAC address than what was already in the table, Machine A will instantly, and gladly, update its ARP cache—without even asking who sent the broadcast. To quote the characters from the movie Dude, Where’s My Car?, “Sweet!”
NOTE Tons of tools are available for ARP poisoning; however, you have some big considerations when using them. First, the ARP entries need updating frequently; to maintain your “control,” you’ll need to always have your fake entry update before any real update comes past. Second, remember ARP is a broadcast protocol, which means ARP poisoning attempts can trigger alerts pretty quickly. And lastly, speed always wins here: if a machine ARPs and the hacker gets there before the intended recipient does…
Because ARP works on a broadcast, the switch will merrily flood all ARP packets—sending any ARP packet to all recipients. Be careful, though, because most modern switches have built-in defenses for too many ARP broadcasts coming across the wire (for example, you can configure Dynamic ARP Inspection using DHCP snooping inside Cisco’s IOS). Also, administrators can put to use a wide variety of network monitoring tools, such as XArp (www.chrismc.de), to watch for this, and some network administrators are smart enough to manually add the default gateway MAC permanently (using the command arp -s) into the ARP cache on each device. A couple of tools that make ARP flooding as easy as pressing a button are Cain and Abel (www.oxid.it), WinArpAttacker, Ufasoft (ufasoft.com), and dsniff (a collection of Linux tools holding a tool called ARPspoof).
DHCP Starvation
For some reason, EC-Council includes DHCP starvation (an attack whereby the malicious agent attempts to exhaust all available addresses from the server) in the discussion with sniffing. Although it’s more of a type of denial-of-service attack, don’t be surprised to see it pop up in a sniffing question. Why does ECC include it in sniffing discussions? I don’t have a clue. All I do know is you need to know how DHCP works and what the attack does.
When a network is set up, the administrator has two options. The first is manually configuring (and keeping track of) IP addresses on each and every system in the network. While this does have several advantages, static addressing comes with a lot of problems—like keeping track of all those IPs, for example. Another solution, and one used on virtually every network on the planet, is handing out and monitoring all these IPs automatically. Dynamic Host Configuration Protocol (DHCP) is the protocol for the job.
NOTE The packets in DHCPv6 have different names from those of DHCPv4. DHCPDISCOVER, DHCPOFFER, DHCPREQUEST, and DHCPACK are known as Solicit, Advertise, Request (or Confirm/Renew), and Reply, respectively.
DHCP is actually fairly simple. A DHCP server (or more than one) on your network is configured with a pool of IP addresses. You tell it which ones it can hand out, which ones are reserved for static systems already, how long systems can keep (or lease) the address, and assign a few other settings, and then turn it loose. When a system comes on the network, it sends a broadcast message known as a DHCPDISCOVER packet, asking if anyone knows where a DHCP server is. The DHCP relay agent will respond with the server’s info and then send a DHCPOFFER packet back to the system, letting it know the server is there and available. The system then sends back a DHCPREQUEST packet, asking for an IP. In the final step, the server responds with a DHCPACK message, providing the IP and other configuration information the system needs (see Figure 4-6 for a, hopefully, clear visual of the process). An easy way to remember it all is the acronym DORA—Discover, Offer, Request, and Acknowledge.

Figure 4-6 DHCP in action
So how does DHCP starvation work? First, the attacker sends unending, forged DHCP requests to the server on the subnet. The server will attempt to fill each and every request, which results in its available IP address pool running out quickly. Any legitimate system attempting to access the subnet now cannot pull a new IP or renew its current lease. DHCP starvation attacks can be carried out by tools such as Yersinia (https://tools.kali.org/vulnerability-analysis/yersinia) and DHCPstarv (http://dhcpstarv.sourceforge.net/). Configuring DHCP snooping on your network device is considered the proper mitigation against this attack.
EXAM TIP Another fun DHCP attack is known as using a “rogue DHCP server.” An attacker sets up his own DHCP server on the network and starts handing out bad IP addresses to legitimate systems connecting to the network. Whether in conjunction with the DHCP starvation attack or not, this could allow an attacker to redirect communications sessions.
Spoofing
Finally, in our romp through traffic-misdirection efforts, we need to spend a little time on spoofing. Whether IP, MAC, DNS, or otherwise, spoofing is simply pretending to be an address you’re not. We’ve already mentioned spoofing in general before, so this concept shouldn’t be anything new to you.
MAC spoofing (a.k.a. MAC duplication) is a simple process of figuring out the MAC address of the system you wish to sniff traffic from and changing your MAC to match it. And just how do you change the MAC on your system? Well, there are multiple methods, depending on the OS you use, but they’re all fairly simple. In Windows 8, for instance, you can use the Advanced tab on the NIC properties and just type in whatever you want, or you can go to the registry HKEY_LOCAL_MACHINESYSTEMCurrentControlSetControlClass{4d36e972-e325-11ce-bfc1-08002be10318} and find the proper string to update for your NIC. If you’d rather use a tool to do it all for you, SMAC (http://www.klcconsulting.net/smac/) is a good bet.
When a MAC address is spoofed, the switch winds up with multiple entries in the CAM table for a given MAC address. Unless port security is turned on, the latest entry in the table is the one that is used. Port security refers to a security feature on switches that allows an administrator to manually assign MAC addresses to a specific port; if the machine connecting to the port does not use that particular MAC, it isn’t allowed to connect. In truth, this type of implementation turns out to be a bit of a pain for the network staff, so most people don’t use it that way. In most cases, port security simply restricts the number of MAC addresses connected to a given port. Suppose your Windows 7 machine runs six virtual machines (VMs) for testing, each with its own MAC. As long as your port security allows for at least seven MACs on the port, you’re in good shape. Anything less, the port will turn amber, SNMP messages will start firing, and you’ll be left out in the cold—or have a network admin come pay you a visit.
NOTE In modern networks, most switch admins will configure ports to a specific number of MAC addresses. If the port tries to resolve more than that number, it’ll die (or “amber out” in nerd lingo) or, even worse for the hacker, stay on but notify the admin someone is up to no good.
For example, suppose “Good Machine,” with MAC address 0A-0B-0C-AA-BB-CC, is on port 2. The switch has learned any frame addressed for that MAC should go to port 2 and no other. The attacker attaches “Bad Machine” to port 3 and wants to see all packets Good Machine is receiving. The attacker uses an application such as Packet Generator (from SourceForge) to create multiple frames with the source address of 0A-0B-0C-AA-BB-CC and sends them off (it doesn’t really matter where). The switch will notice that the MAC address of Good Machine, formerly on port 2, seems to have moved to port 3 and will update the CAM table accordingly. So long as this is kept up, the attacker will start receiving all the frames originally intended for Good Machine. Not a bad plan, huh?
Plenty of other spoofing opportunities are out there for the enterprising young ethical hacker. Ever heard of IRDP spoofing? It’s a neat attack where the hacker sends spoofed ICMP Router Discovery Protocol messages through the network, advertising whatever gateway he wants all the system to start routing messages to. Fun! Another one is DNS poisoning—something introduced way back in Chapter 2—and it can have much the same effect. And if everyone gets their DNS information from a proxy, well that’s just all sorts of naughtiness. In short, spoofing may not be the most technical attack in the world, but it sure can bring home the bacon for you.
Tools
Wireshark is probably the most popular sniffer available, mainly because it is free, it is stable, and it works really well. Previously known as Ethereal, Wireshark can capture packets from wired or wireless networks and provides a fairly easy-to-use interface. The top portion of the display is called the Packet List and shows all the captured packets. The middle portion, Packet Detail, displays the sections within the frame and packet headers. The bottom portion displays the actual hex entries in the highlighted section. Once you get used to them, you’ll be surprised what you can find in the hex entries. For example, you can scroll through and pick up ASCII characters from a Telnet login session. Wireshark also offers an almost innumerable array of filters you can apply to any given sniffing session, and you can fine-tune your results to exactly what you’re looking for. Additionally, the good folks who created it have provided a multitude of sample captures for you to practice on—simply go to their site and download what you wish to try out!
NOTE On some systems (I’m speaking specifically about Windows Vista and 8 here, but this may apply to whichever OS you’re running if you have it “locked down”), you may need to set the tool to run as administrator. Not doing so causes all kinds of headaches in trying to run in promiscuous mode.
Following a TCP stream is a great way to discover passwords in the clear. For instance, I downloaded one of the capture files from Wireshark (clicking Sample Captures in the Files section, in the center of the window, gives you plenty to download and play with) regarding a Telnet session. After opening the file, I sorted by protocol and selected the first Telnet packet I could find. A right-click, followed by selecting Follow TCP Stream, gave me the entire session, including the logon information, as shown in Figure 4-7.

Figure 4-7 Telnet session in Wireshark
Another great feature of Wireshark is its ability to filter a packet capture to your specifications. A filter can be created by typing in the correct stream in the filter window, by right-clicking a packet or protocol header and choosing Apply As Filter, or by clicking the Expression button beside the filter screen and checking off what you’d like. In any case, the filter will display only what you’ve chosen. For example, in Figure 4-8, only Telnet packets will be displayed. In Figure 4-9, all packets with the source address 192.168.0.2 will be shown.
![]()
Figure 4-8 Telnet filter in Wireshark

Figure 4-9 IP source address filter
Filters are of great use when you set up a packet capture for a long period of time, and they will show up in bunches on your exam. For example, the string ! (arp or icmp or dns) filters out all the annoying ARP, ICMP, and DNS packets from your display. The http.request string displays all the HTTP GET requests, while the tcp contains string argument displays all TCP segments that contain the word “string.” The expression ip.addr==172.17.15.12 && tcp.port==23 will display all Telnet packets containing the IP 172.17.15.12, while the expression ip.addr==172.17.15.12 or ip.addr==172.17.15.60 will show packets containing either address. The combinations are endless.
EXAM TIP There are innumerable filter combinations in Wireshark. I simply could not include them all in this book, nor could you possibly memorize them all. But make very sure you are familiar with what the equal to, and, and or conjunctions mean. Equal to (==) means exactly what it says—the packet will display if the argument appears in the packet. And (&&) means the packet will display only if both arguments appear. Or (or) means the packet will display if either argument appears.
During a capture, you can also click the Capture Filters selection from the Capture menu item and choose a variety of predefined options. For example, No Broadcast and No Multicast is a good one to use if you want to cut down on the number of packets you’ll have to comb through (only packets addressed explicitly to a system on the subnet will be shown). There are endless combinations of filters you can use. Take advantage of the sample captures provided by Wireshark and play with the Expression Builder—it’s the only real way to learn.
NOTE Wireshark also has the ability to filter based on a decimal numbering system assigned to TCP flags. The assigned flag decimal numbers are FIN = 1, SYN = 2, RST = 4, PSH = 8, ACK = 16, and URG = 32. Adding these numbers together (for example, SYN + ACK = 18) allows you to simplify a Wireshark filter. For example, tcp.flags == 0x2 looks for SYN packets, tcp.flags == 0x16 looks for ACK packets, and tcp.flags == 0x18 looks for both.
Lastly, since Wireshark is the recognized standard in sniffing applications, and EC-Council tests it heavily, it follows that you should know it very, very well. I toyed a lot with adding a bunch of Wireshark exercises here but decided against reinventing the wheel. A quick visit to the home page and a search for help and documentation reveals the good folks at Wireshark have provided a ton of help for those seeking it (www.wireshark.org/docs/). Downloads, how-to guides, and even videos detailing multiple network scenarios are all available. I highly recommend you visit this page and run through the help videos. They are, in a word, awesome.
Another “old-school” tool you’ll definitely see in use on your pen tests, and probably on your exam as well, is tcpdump. Although there is a more recent Windows version (WinDump), tcpdump has been a Unix staple from way, way back, and many people just love the tool. There are no bells and whistles—this is a command-line tool that simply prints out a description of the contents of packets on a network interface that match a given filter (Boolean expression). Just point tcpdump to an interface, tell it to grab all packets matching a Boolean expression you create, and voilà! These packets can be dumped to the screen, if you really like Matrix-y characters flying across the screen all the time, or you can dump them to a file for review later.
The syntax for this tool is fairly simple: tcpdump flag(s) interface. However, the sheer number of flags and the Boolean combinations you can create can make for some pretty elegant search strings. For a simple example, tcpdump -i eth1 puts the interface in listening mode, capturing pretty much anything that comes across eth1. If you were to add the -w flag, you could specify a file in which to save the data, for review later. If you get nuts with them, though, the Boolean expressions show tcpdump’s power. The following command shows all data packets (no SYN, FIN, or ACK-only) to and from port 80:
![]()
Take some time to review the tcpdump man page at www.tcpdump.org/tcpdump_man.html, and you can see a variety of great examples, as well as good write-ups on each of the flags available. But don’t worry too much—no one is going to expect you to write a 35,000-character Boolean expression on the exam. You should, though, know basic flags for tcpdump—particularly how to put the interface in listening mode (-i), how to write to a file (-w), and how to use the tool.
EXAM TIP Another tool you may want to check out is tcptrace (www.tcptrace.org/). It is used to analyze files produced by several packet-capture programs and can easily read from tcpdump, WindDump, Wireshark, and EtherPeek.
Of course, you have plenty of other choices available in sniffers. Ettercap is a powerful sniffer and man-in-the-middle suite of programs. It is available as a Windows tool but works much better in its native Unix platform. Ettercap can be used as a passive sniffer, an active sniffer, and an ARP poisoning tool. Other great sniffers include Capsa Network Analyzer, Snort (most often discussed as an intrusion detection application), Sniff-O-Matic (https://sniff-o-matic.soft112.com/), EtherPeek, WinDump, and WinSniffer.
NOTE tcpdump is a built-in utility for all Unix systems, so you have no worries there. But Wireshark is considered by many organizations as a hacking tool, and Ettercap is always considered a hacking tool. If you value your job, I highly suggest you don’t install these on your work desktop without first checking to see if it’s okay.
Evasion
All this talk about sniffing and listening in on network conversations makes this whole sordid business sound pretty easy. However, our adversaries (a very strong word, since we’re all on the side of bettering security)—those guys who manage and administer the network and systems we’re trying to gain access to—aren’t going to just sit by and let us take whatever we want without a fight. They are doing everything in their power to make it as difficult as possible for the aspiring ethical hacker, and that means taking advantage of a multitude of hardware and software tools. As stated before, as an ethical hacker, you certainly won’t be expected to know how to crack the latest and greatest network roadblock efforts; however, you are expected to (and should) know what they are and what, if anything, you can do about them.
Devices Aligned Against You
Intrusion detection has come a long, long way in the past 15 years or so. What used to be a fringe effort, tacked on to someone’s “real” job, now is a full-time career of its own. As the name implies, intrusion detection is all about identifying intrusion attempts on your network. Sometimes this is simply a passive effort—to notify others of what might be happening. Other times it becomes much more active in nature, letting one punch back, so to speak, at the bad guys. When it comes to ethical hacking, it’s useful to know how intrusion detection works and what, if anything, you can do to get around it.
Intrusion detection systems (IDSs) are hardware and/or software devices that examine streams of packets for unusual or malicious behavior. Sometimes this is done via a signature list, where the IDS compares packets against a list of known traffic patterns that indicate an attack. When a match is made, the alarm sounds. Other IDSs may be anomaly (or behavior) based, making decisions on alerts based on learned behavior and “normal” patterns—anything out of the ordinary for a normal day sounds the alarm.
EXAM TIP Ever heard of libwhisker (SourceForge.net)? It’s a full-featured Perl library used for HTTP-related functions, including vulnerability scanning, exploitation, and, of course, IDS evasion.
They both have benefits and drawbacks. A signature-based system is only as good as the signature list itself; if you don’t keep it up to date, newer intrusion methods may go undetected. A behavior-based system may be better at picking up the latest attacks because they would definitely be out of the norm, but such systems are also known to drive administrators crazy with false positives—that is, an alarm showing an intrusion has occurred when, in reality, the traffic is fine and no intrusion attempt has occurred. Anomaly-based IDS is, by its nature, difficult because most network administrators simply can’t know everything going on in their networks.
As an aside, although a false positive is easy enough to identify, you need to be familiar with another term in regard to IDS (and your exam). A false negative occurs when the IDS reports a particular stream of traffic is just fine, with no corresponding alarm or alert, when, in fact, an intrusion attempt did occur. False negatives are considered far worse than false positives, for obvious reasons. Unfortunately, many times these aren’t discerned until well after an attack has occurred.
IDSs are also defined not only by what they use to make a decision but also where they are located and their span of influence. A host-based IDS (also known as an HIDS) is usually a software program that resides on the host itself. More often than not an HIDS is signature based, although anomaly and heuristic engines get better and better every day, and its entire job is to watch that one host. It looks for traffic or events that would indicate a problem for the host itself. Some popular examples include Cybersafe, Tripwire, Norton Internet Security, and even firewalls and other features built into the operating system.
NOTE Ever heard of HBSS? The Department of Defense (DoD) loves it (as does our friendly tech editor). The Host Based Security System (HBSS) is a flexible commercial-off-the-shelf (COTS) application that monitors, detects, and counters against known cyber-threats to DoD Enterprise. The plan is to have HBSS on each host (server, desktop, and laptop) in the DoD—which, of course, will protect them fully against attacks from people like our tech editor during a penetration test.
On the other hand, a network-based IDS sits, oddly enough, on the network perimeter. Its job, normally, is to watch traffic coming into, and leaving, the network. Whether signature or anomaly based, an NIDS will sit outside or inside the firewall (either works so long as the NIDS is placed where it can see all traffic) and will be configured to look for everything from port and vulnerability scans to active hacking attempts and malicious traffic. A large network may even employ multiple NIDSs at various locations in the network, for added security. An exterior NIDS outside the firewall would watch the outside world, whereas one placed just inside the firewall on the DMZ could watch your important server and file access. Dozens upon dozens of intrusion detection system and software options are available for you; however, the one used more often than any other, and the one you’ll see on your exam more often than not, is Snort.
Snort
By far the most widely deployed IDS in the world, Snort is an open source IDS that, per its website, “combines the benefits of signature, protocol, and anomaly-based inspection.” It has become the commonly acknowledged standard for IDS and is in use on networks ranging from small businesses to U.S. government enterprise systems. It is a powerful sniffer, traffic-logging, and protocol-analyzing tool that can detect buffer overflows, port scans, operating system fingerprinting, and almost every conceivable external attack or probe you can imagine. Its rule sets (signature files) are updated constantly, and support is easy to find.
Snort runs in three different modes. Sniffer mode is exactly what it sounds like and lets you watch packets in real time as they come across your network tap. Packet Logger mode saves packets to disk for review at a later time. Network Intrusion Detection System mode analyzes network traffic against various rule sets you pick from, depending on your network’s situation. NIDS mode can then perform a variety of actions based on what you’ve told it to do.
NOTE A network tap is any kind of connection that allows you to see all traffic passing by. It can be as simple as a hub connected on the segment you’d like to watch or as complex as a network appliance created specifically for the task. Just keep two points in mind: First, where you place the tap determines exactly what, and how much, traffic you’ll be able to see. Second, your tap should be capable of keeping up with the data flow (an old 486 running 10 Mbps half-duplex connected to a fiber backbone running at 30 Mbps on a slow day will definitely see some packet loss).
It’s not completely intuitive to set up and use, but it isn’t the hardest tool on the planet to master either. That said, as much as I know you’d probably love to learn all the nuances and command-line steps on how to set up and configure Snort completely, this book is about the ethical hacker and not the network security manager. I’m charged with giving you the knowledge you’ll need to pass the exam, so I’ll concentrate on the rules and the output. If you’re really interested in all the configuration minutiae, I suggest grabbing the user manual as a start. It’s an easy read and goes into a lot of things I simply don’t have the time or page count to do here.
The Snort “engine,” the application that actually watches the traffic, relies on rule sets an administrator decides to turn on. For example, an administrator may want to be alerted on all FTP, Telnet, and CGI attack attempts but could care less about denial-of-service attempts against the network. The engine running on that network and the one running on the government enterprise down the street that’s watching everything are the same. The rule sets selected and put in place are what make the difference.
The Snort configuration file resides in /etc/snort on Unix/Linux and in c:snortetc on most Windows installations. The configuration file is used to launch Snort and contains a list of which rule sets to engage at startup. To start Snort, a command like the following might be used:
![]()
Basically this says, “Snort application, I’d like you to start logging to the directory c:snortlog. I’d also like you to go ahead and start monitoring traffic using the rule sets I’ve defined in your configuration file located in c:snortetc.”
The configuration file isn’t all that difficult to figure out either. It holds several variables that need to be set to define your own network situation. For example, the variable HOME_NET defines the subnet local to you. On my home network, I would define the variable in the file to read as follows:
![]()
Other variables I could set are displayed in the overly simplified snort.conf file shown next. In this instance, I want to watch out for SQL attacks, but because I’m not hosting any web servers, I don’t want to waste time watching out for HTTP attacks.
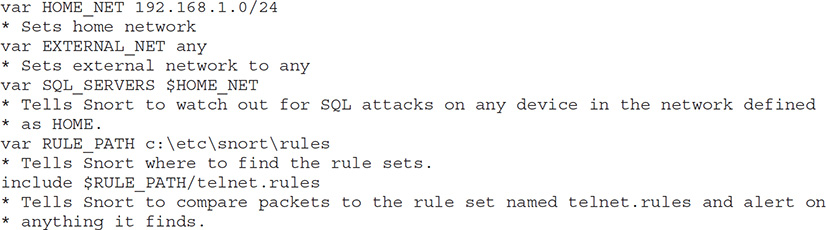
NOTE Some network security administrators aren’t very concerned with what’s going on inside their networks and don’t want to see any traffic at all from them in their Snort logs. If you change the external variable to EXTERNAL_NET !$HOME_NET, Snort will ignore packets generated by your home network that find their way back inside.
If I were hosting websites, I’d turn that function on in the config file by using the following entry:
![]()
SMTP_SERVERS, SQL_SERVERS, and DNS_SERVERS are also entries I could add, for obvious reasons. To include a particular rule set, simply add the following line:
![]()
Speaking of rule sets, there are loads of them. The rules for Snort can be downloaded from the Snort site at any time in a giant .zip (.tar) file. The rules are updated constantly, so good administrators will pull down fresh copies often. Because the rules are separate from the configuration, all you have to do to update your signature files is to drop the new copy in the directory holding the old copy. One quick overwrite (and usually a stop/start of services) is all that’s needed. If you’re looking for some help in managing signature updates and such, Oinkmaster (http://oinkmaster.sourceforge.net/about.shtml) is the standard for it.
A rule itself is fairly simple. It must be single line and is composed of a header and options. Each rule contains an action, a protocol, the rule format direction (which could be bi-directional), a source address/port, a destination address/port, and message parameters. The Snort rule action can be Alert (in a variety of configured methods, alert when the condition is met), Log (simply make a note when the condition is met), or Pass (ignore the packet). For example, consider the following rule:
![]()
This rule tells Snort, “If you happen to come across a packet from any address that is not my home network, using any source port, intended for an address within my home network on port 31337, alert me with the message ‘BACKDOOR ATTEMPT-Backorifice.’” Other options you can add to the message section include flags (indicating specific TCP flags to look for), content (indicating a specific string in the packet’s data payload), and specialized handling features. For example, consider this rule:
![]()
Here’s the meaning: “Please alert on any packet from an address not in my home network and using any source port number, intended for any address that is within my home network on port 23, including the ASCII string ‘admin.’ Please write ‘Telnet attempt..admin access’ to the log.” As you can see, although it looks complicated, it’s really not that hard to understand. And that’s good news, because you’ll definitely get asked about rules on the CEH exam.
EXAM TIP You’ll need to be intimately familiar with the basics of Snort rule syntax, as well as the raw output from the packet capture. Pay special attention in the output to port numbers; most questions can be answered just by knowing what port numbers go with which protocol and where to find them in the output. Also, always watch the directional arrows in test questions.
Lastly on Snort, you’ll also need to know how to read the output. GUI overlays are ridiculously easy, so I’m not even going to bother here—you purchased this book, so I’m relatively certain you can read already. Command-line output, though, requires a little snooping around. A typical output is listed here (bold added for emphasis):
![]()

I know, it looks scary, but don’t fret—this is simple enough. The first portion of the line indicates the date stamp at 11:23 on February 7. The next entry shows the source and destination MAC addresses of the frame (in this case, the source is 0:10:2:AC:1D:C4 and the destination is 0:2:B3:5B:57:A6). The Ethernet frame type and length are next, followed by the source and destination IPs, along with the associated port numbers. This frame, for example, was sent by 200.225.1.56, with source port 1244, destined for 129.156.22.15 on port 443 (can you say “SSL connection attempt”?). The portion reading “******S*” indicates the SYN flag was set in this packet, and the sequence and acknowledgment numbers follow. The payload is displayed in hex digits below everything.
Do you need to remember all this for your exam? Of course you do. The good news is, though, most of the time you can figure out what’s going on by knowing where to find the port numbers and source/destination portions of the output. I bolded them in the preceding code listing for emphasis. I guarantee you’ll see output like this on your exam, so be ready to answer questions about it.
Firewall
While we’re on the subject of sniffing (and other attack) roadblocks, we can’t ignore the one everyone has already heard of—the firewall. If you’ve watched a Hollywood movie having anything whatsoever to do with technology, you’ve heard mention of firewalls. And, if you’re like me, you cringe every time they bring it up. Script writers must believe that a firewall is some kind of living, breathing entity that has the capability to automatically sense what the bad guys are doing, and anything that makes it past the firewall is free and clear. A firewall isn’t the end-all of security; it’s just one tool in the arsenal. Granted, it can be a powerful tool, but it’s just one piece of the puzzle, not the whole thing.
A firewall is an appliance within a network that is designed to protect internal resources from unauthorized external access. Firewalls work with a set of rules, explicitly stating what is allowed to pass from one side of the firewall to the other. Additionally, most firewalls work with an implicit deny principle, which means if there is not a rule defined to allow the packet to pass, it is blocked—there is no need to create a rule to deny packets. For example, there may be a rule saying port 80 is allowed to pass from external to internal, but if there is not a rule saying port 443 is allowed, SSL requests to internal resources will automatically be denied.
Another interesting point on most firewalls is that the list of rules that determine traffic behavior is usually read in order, from top to bottom. As soon as a match is made, the decision on whether to pass the packet is made. For example, an access control list (ACL) that starts out with an entry of “allow ip any any” makes the firewall moot—every IP packet will be allowed to pass because the match is made on the first entry. Most firewalls are configured with rule sets to allow common traffic, such as port 80 if you’re hosting web servers and port 53 for DNS lookups, and then rely on implicit deny to protect the rest of the network.
Many firewalls (just like routers) also implement network address translation (NAT) at the border, and NAT can be implemented in many different ways. Basic NAT is a one-to-one mapping, where each internal private IP address is mapped to a unique public address. As the message leaves the network, the packet is changed to use the public IP, and when it is answered and routed back through the Internet to the firewall (or external router), NAT matches it back to the single corresponding internal address and sends it along its way. For example, a packet leaving 172.16.1.72 would be changed to 200.57.8.212 for its journey across the Internet. Although the rest of the world will see IP addresses in your public range, the true senders of the data packets are internal and use an address from any of the private network classes (192.168.0.0, 172.16–31.0.0, or 10.0.0.0).
In the real world, though, most organizations and individuals don’t implement a one-to-one mapping; it’s simply too expensive. A more common method of NAT is NAT overload, better known as port address translation. This method takes advantage of the port numbers (and other items) unique to each web conversation to allow many internal addresses to use one external address. Although we could start an entire conversation here on how this works and what to watch for, I’m simply mentioning it so you won’t be caught off guard by it should you see it on the exam.
NOTE If you didn’t already know about NAT, I’d bet dollars to doughnuts you’re a NAT “overloader” already. If you don’t believe me, check your wireless router. How many devices do you have connected to it? Each one has its own private IP address assigned (probably in the 192.168.1.1–254 range), which we all know can’t be routed to or from the Internet. And I’m absolutely certain you did not purchase a public IP address range from your provider, right? Open the configuration for your router and check the public-facing IP address. I’ll bet you’ll find you’ve been NAT-ing like a pro all along.
Much like IDSs, the placement of firewalls is important. In general, a firewall is placed on the edge of a network, with one port facing outward, at least one port facing inward, and another port facing toward a DMZ (an area of the network set aside for servers and other resources that the outside world would need access to). Some networks will apply additional firewalls throughout the enterprise to segment for various reasons.
EXAM TIP There are a few definition terms of note for you. The screened subnet (a.k.a. public zone) of your DMZ is connected to the Internet and hosts all the public-facing servers and services your organization provides. These bastion hosts sit outside your internal firewall and are designed to protect internal network resources from attack: they’re called bastions because they can withstand Internet traffic attacks. The private zone holds all the internal hosts that, other than responding to a request from inside that zone, no Internet host has any business dealing with. Lastly, because your firewall has two or more interfaces, it is referred to as multi-homed.
Originally, firewalls were all packet-filtering firewalls. They basically looked at the headers of packets coming through a port and decided whether to allow them based on the ACLs configured. Although this does provide the ability to block specific protocols, the major drawback with packet filtering alone is twofold: it is incapable of examining the packet’s payload, and it has no means to identify the state of the packet. This gave rise to stateful inspection firewalls, which gave the firewall the means to track the entire status of a connection. For instance, if a packet arrives with the ACK flag set but the firewall has no record of the original SYN packet, that would indicate a malicious attempt. ECC also calls these “stateful multilayer inspection” firewalls, with the capability from the Network layer up to the Application layer (although their focus is in Layers 3 and 4).
Two other firewall types of note include circuit-level gateway and application-level firewalls. A circuit-level gateway firewall works at the Session layer and allows or prevents data streams—it’s not necessarily concerned with each packet. An application-level firewall filters traffic much like a proxy, allowing specific applications (services) in and out of the network based on its rule set.
EXAM TIP HTTP tunneling is a firewall evasion technique you’ll probably see at least mentioned on the exam. The short of it is, lots of things can be wrapped within an HTTP shell (Microsoft Office has been doing this for years). And, because port 80 is almost never filtered by a firewall, you can craft port 80 segments to carry payload for protocols the firewall may have otherwise blocked. HTTP beacons and HTTP tunnels are the de facto standard implant technology for hackers.
Evasion Techniques
Our brief exposure to IDSs here should give you pause as an ethical hacker; if these tools work so well, how can we ever break in without being noticed? That’s a fair question, and the answer on some networks is, “You probably can’t.” Again, we’re not looking to break into Fort Knox—we’re looking for the easy target. If IDSs are set up correctly, located in the correct spot on the network, have the latest up-to-date signatures files, and have been on long enough to identify normal behavior, then, sure, your job is going to be tough. But just how many of those IDSs are perfectly located and maintained? How many are run by security staff members who are maybe a little on the complacent side? Think there may be some misconfigured ones out there or maybe installations with outdated or corrupt signature files? Now we’re talking!
So, how do you get around these things? First, learn to slow down. Snort has a great signature file for tracking port scan attempts, but you do have to set it on a timer. I interviewed a perimeter security guy a little while back on this subject and asked him how long he thought, given enough patience, it would take me to port-scan his entire network (he watches the perimeter of a huge enterprise network of more than 10,000 hosts). He sighed and told me if I kept everything under 2 minutes a pop, I could have the whole thing done in a matter of a couple of days. Slow down, scan smaller footprints, and take your time—it will eventually pay off.
NOTE Slower is not only the better choice for hiding your attacks, it’s really the preferred choice nearly every time. Only the impatient and uneducated run for nmap’s -T5 switch as their primary choice. The pros will slow things down with the -T1 switch and get better, more useful results to browse through.
Another method for trying to get past the watchful eyes of the security folks is to flood the network. The ethical hacker could set up some fake attacks, guaranteed to trigger a few alerts, along with tons and tons of traffic. The sheer volume of alerts might be more than the staff can deal with, and you may be able to slip by unnoticed.
Evasion through session splicing—a fancy term for fragmentation—is also a worthwhile tactic. The idea here is to put payload into packets the IDS usually ignores. SYN segments, for example, usually have nothing but padding in the data payload. Why not slide small fragments of your own code in there to reassemble later? You can even try purposefully sending the segments out of order or sending adjustments with the IP fragment field. The IDS might not pick up on this. Again, patience and time pay off.
NOTE Another extremely common IDS evasion technique in the web world (because it works against web and IDS filters well) is the use of Unicode characters. The idea is to use Unicode characters (U+0020 = a space, U+0036 = the number 6, and U+0041 = a capital letter A) instead of human-readable code to confuse the signature-based IDS. Sometimes this works and sometimes it doesn’t—just keep in mind that many Unicode signature files are available to look for this very thing.
Some tools you may get asked about or see along the way for IDS evasion are Nessus (also a great vulnerability scanner), ADMmutate (able to create multiple scripts that won’t be easily recognizable by signature files), NIDSbench (an older tool used for playing with fragment bits), and Inundator (a flooding tool). IDS Informer is another great tool that can use captured network traffic to craft, from start to finish, a test file to see what can make it through undetected. Additionally, many packet-generating tools—such as Packet Generator and PackETH, shown in Figures 4-10 and 4-11, respectively—can do the job nicely.
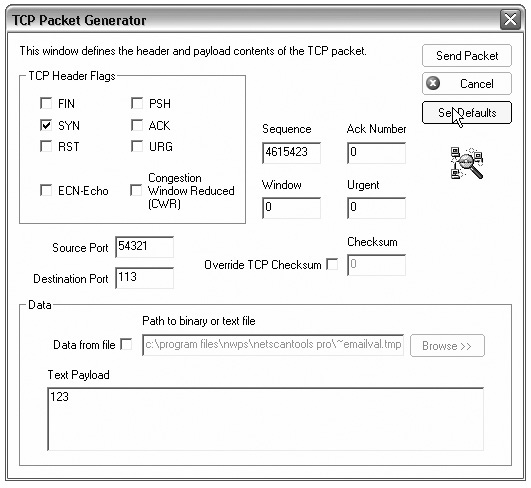
Figure 4-10 Packet Generator
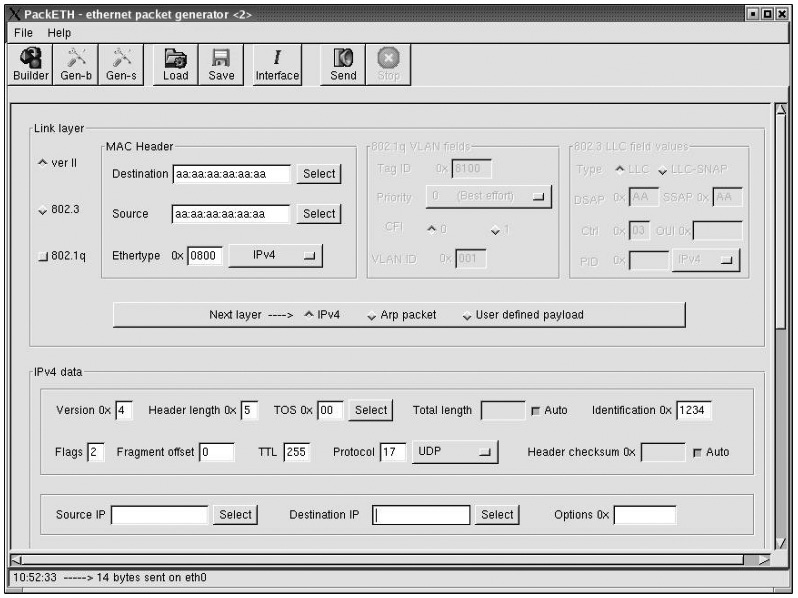
Figure 4-11 PackETH
Firewall Evasion
Knowing what a firewall is, where and how it’s most likely to be used in the network, and how it works (via ACLs and/or stateful inspection) is only part of the battle. What we really need to know now is how we identify where the firewall is from the outside (in the middle of our footprinting and attack) and how we can get around it once we find it. Identifying a firewall location doesn’t require rocket-scientist brainpower, because no one really even bothers to hide the presence of a firewall. As covered earlier, a simple traceroute can show you where the firewall is (returning splats to let you know it has timed out). If you’re using your sniffer and can look into the packets a little, an ICMP Type 3 Code 13 will show that the traffic is being stopped (filtered) by a firewall (or router). An ICMP Type 3 Code 3 will tell you the client itself has the port closed. A tool called Firewall Informer, and others like it, can help in figuring out where the firewall is. Lastly, banner grabbing—which we covered in the previous chapter—also provides an easy firewall-identification method.
Once you find the firewall (easy), it’s now time to find out ways to get through it or around it (not so easy). Your first step is to peck away at the firewall in such a manner as to identify which ports and protocols it is letting through and which ones it has blocked (filtered). This process of “walking” through every port against a firewall to determine what is open is known as firewalking. Tons of tools are available for this—from nmap and other footprinting tools, to a tool called Firewalk (from PacketStorm). Whether you set up an nmap scan and document the ports yourself or use a program that does it for you, the idea is the same: find a port the firewall will allow through, and start your attack there. Just keep in mind this is generally a noisy attack, and you will, most likely, get caught.
Of course, the best method available is to have a compromised machine on the inside initiate all communication for you. Usually firewalls—stateful or packet filtering—don’t bother looking at packets with internal source addresses leaving the network. So, for example, suppose you e-mailed some code to a user and had them install it (go ahead, they will…trust me). The system on the inside could then initiate all communications for your hacking efforts from the outside, and you’ve found your ticket to ride.
NOTE Some other firewall-hacking tools you may run across include CovertTCP, ICMP Shell, and 007 Shell. Remember, though, a compromised system inside the network is your best bet.
When it comes to the actual applications you can use for the task, packet-crafting and packet-generating tools are the ones you’ll most likely come across in your career for evading firewalls and IDSs, although a couple of tools are specifically designed for the task. PackETH is a Linux tool from SourceForge that’s designed to create Ethernet packets for “security testing.” Another SourceForge product is Packet Generator, which allows you to create test runs of various packet streams to demonstrate a particular sequence of packets. Netscan also provides a packet generator in its tool conglomeration. All of these allow you to control the fields in frame and packet headers and, in some cases, interject payload information to test the entirety of the security platform. Not bad, huh?
Honeypots
Our final network roadblock isn’t really designed to stop you at all. Quite to the contrary, this one is designed to invite you in and make you comfortable. It provides you with a feeling of peace and tranquility, consistently boosting your ego with little successes along the way—and, like a long lost relative, encourages you to stay for a while.
A honeypot is a system set up as a decoy to entice attackers. The idea is to load it up with fake goodies, with not-too-easy vulnerabilities a hacker may exploit. An attacker, desperately looking for something to report as his success, would stumble upon your honeypot and spend all his time and effort there, leaving your real network, and resources, alone. While it sounds like a great idea, a honeypot isn’t without its own dangers.
By design a honeypot will be hacked, so this brings up two very important points regarding it. First, anything and everything on a honeypot system is not to be trusted. Anything that has that many successful attacks against it could be riddled with loads of stuff you don’t even know about yet. Don’t put information or resources on the honeypot that can prove useful to an attacker, and don’t trust anything you pull off it. Granted, the information and resources have to look legitimate; just make sure they’re not.
Second, the location of the honeypot is of utmost importance. You want this to be seen by the outside world, so you could place it outside the firewall. However, is that really going to fool anyone? Do you really believe a seasoned attacker is just going to accept the fact an administrator protected everything on the network, by putting everything behind a firewall, but just forgot this really important server on the outside? A better, more realistic placement is inside the DMZ. A hacker will discover pretty quickly where the firewall is, and placing a hard-to-find port backdoor to your honeypot is just the ticket to draw them in. Wherever the honeypot winds up being located, it needs to be walled off to prevent it becoming a launching pad for further attacks.
NOTE Remember when we were discussing vulnerability scans a little while ago? Nessus does a good job, during a scan, of identifying where a honeypot is located. Another one of note is Send-Safe Honeypot Hunter.
There are two types of honeypots. A high-interaction honeypot simulates all services and applications and is designed to be completely compromised. Examples include Symantec, Decoy Server, and Honeynets. A low-interaction honeypot simulates a limited number of services and cannot be compromised completely (by design). Examples of these include Specter, Honeyd, and KFSensor. Of course, in the real world almost no one has the time, interest, or concern for installing and maintaining a honeypot. Most real hackers know they’re in one pretty quickly, and the payoff (that is, getting anything substantially useful out of it) is oftentimes nothing. But it is testable material, so learn what you must.
Chapter Review
Sniffing (also known as wiretapping by law enforcement) is the art of capturing packets as they pass on a wire, or over the airwaves, to review for interesting information. The process of sniffing comes down to a few items of great importance: what state the network interface card (NIC) is in, what access medium you are connected to, and what tool you’re running.
A sniffer needs your card to run in promiscuous mode. This simply means that, regardless of address, if the frame is passing on the wire, the NIC will grab it and pull it in for a look. Pcap is needed for your card to effectively slip into promiscuous mode. On Windows, the de facto driver/library choice is WinPcap. On Linux, it’s libpcap.
As long as your system is within the same collision domain, right out of the box and without you changing a thing, your NIC will see every message intended for anyone else in the domain. Collision domains are composed of all the machines sharing any given transport medium. All systems connected to a hub share the same collision domain. Switches split collision domains so that each system connected to the switch resides in its own little collision domain—the switch will only send frames down a wire for a given computer only if they’re intended for the recipient. If you’re connected to a switch, you receive only those messages intended for your own NIC.
There are some important protocols in the upper layers for you to pay attention to in sniffing. Simple Mail Transport Protocol (SMTPv1) was designed to carry an e-mail message. Because it was written to carry nothing but ASCII, everything sent via SMTP, with no encryption added at another layer, is sent as clear text. FTP requires a user ID and password to access the server (usually), but the information is passed in clear text over the wire. TFTP passes everything in clear text, and you can pull keystrokes from a sniffed Telnet session. SNMPv1 and NNTP send their passwords and data over clear text, as does IMAP and POP3.
ARP (Address Resolution Protocol) resolves IP addresses to machine (MAC) addresses. As a frame is being built inside the sending machine, the system sends an ARP_REQUEST to find out what MAC address inside the subnet can process the message. The machine on the local subnet with the requested IP will respond with an ARP_REPLY. The protocol retains a cache on machines as it works, and it works on a broadcast basis. The cache is dynamic—that is, the information in it doesn’t stay there forever, and when your system gets an updated ARP message, it will overwrite the cache with the new information. A gratuitous ARP is a special packet that updates the ARP cache of other systems before they even ask for it—in other words, before they send an ARP_REQUEST.
IPv6 uses a 128-bit address instead of the 32-bit IPv4 version, and it is represented as eight groups of four hexadecimal digits separated by colons (for example, 2002:0b58:8da3:0041:1000:4a2e:0730:7443). Leading zeroes from any groups of hexadecimal digits can be removed, and consecutive sections of zeroes can be replaced with a double colon (::). The IPv6 “loopback” address is 0000:0000:0000:0000:0000:0000:0000:0001 and may be edited all the way down to ::1.
IPv6 address types include unicast, multicast, and anycast, and the scope for multicast and unicast includes link local, site local, and global. There is no equivalent in IPv6 to the broadcast address of IPv4. Unicast is just like IPv4 (addressed for one recipient) and so is multicast (addressed for many). Anycast works just like multicast; however, whereas multicast is intended to be received by a bunch of machines in a group, anycast is designed to be received and opened only by the closest member of the group. In IPv6, the address block fe80::/10 has been reserved for link-local addressing. The unique local address (the counterpart of IPv4 private addressing) is in the fc00:: /7 block. Prefixes for site-local addresses will always be “FEC0::/10.”
Lawful interception is the process of legally intercepting communications between two (or more) parties for surveillance on telecommunications, VoIP (Voice over IP), data, and multiservice networks. Wiretapping (monitoring a phone or Internet conversation) can be active or passive. Active wiretapping involves interjecting something into the communication (traffic), for whatever reason. Passive only monitors and records the data. PRISM (Planning Tool for Resource Integration, Synchronization, and Management) is the data tool used to collect foreign intelligence passing through U.S. network resources.
EC-Council breaks sniffing down into two main categories: passive and active. Passive sniffing is exactly what it sounds like: plug in a sniffer and, without any other interaction needed on your part, start pulling data packets to view at your leisure. Passive sniffing works only if your machine’s NIC is part of the same collision domain as the targets you want to listen to (and it’s configured to listen). Active sniffing requires some additional work on your part, either from a packet injection or manipulation stance or from forcing network devices to play nicely with your efforts. Active sniffing usually means the collision domain you are part of is segmented from those you want to look in to (which means you’re probably attached to a switch), and you’ll have to take proactive steps in order to sniff.
One trick for active sniffing purposes is to get a switch to close the port you are connected to each and every time it closes the port you want to sniff. A span port (also called port mirroring) is one in which the switch configuration has been altered to send a copy of all frames from one port, or a succession of ports, to another.
Another option you have is to fill the content addressable memory (CAM) table, such that the switch can’t keep up and floods all packets. This process is known as MAC flooding. Etherflood and Macof are examples of tools you can MAC flood with. Switch port stealing refers to the process of flooding the CAM with unsolicited ARPs regarding specific ports, thus creating a race condition.
ARP poisoning is the process of maliciously changing an ARP cache on a machine to inject faulty entries. Most modern switches have built-in defenses for too many ARP broadcasts coming across the wire (for example, you can configure Dynamic ARP Inspection using DHCP snooping inside Cisco’s IOS). Also, administrators can put to use a wide variety of network monitoring tools, such as XArp, to watch for this, and some network administrators are smart enough to manually add the default gateway MAC permanently (using the command arp -s) into the ARP cache on each device. A couple of tools that make ARP flooding as easy as pressing a button are Cain and Abel, WinArpAttacker, Ufasoft, and dsniff (a collection of Linux tools that includes a tool called ARPspoof).
DHCP starvation is an attack whereby the malicious agent attempts to exhaust all available addresses from the server. Packets in the DHCP exchange include DHCPDISCOVER, DHCP OFFER, DHCPREQUEST, and DHCPACK. The packets in DHCPv6 have different names than those of DHCPv4. DHCPDISCOVER, DHCPOFFER, DHCPREQUEST, and DHCPACK are known as Solicit, Advertise, Request (or Confirm/Renew), and Reply, respectively. Tools such as Yersinia and DHCPstarv can carry out DHCP starvation attacks, and configuring DHCP snooping on your network device is considered the proper mitigation against this attack. Another fun DHCP attack is using a rogue DHCP server. An attacker sets up his own DHCP server on the network and starts handing out bad IP addresses to legitimate systems connecting to the network. Whether in conjunction with the DHCP starvation attack or not, this could allow an attacker to redirect communications sessions.
MAC spoofing (a.k.a. MAC duplication) is a simple process of figuring out the MAC address of the system you wish to sniff traffic from and changing your MAC to match it. IRDP spoofing is an attack where the hacker sends spoofed ICMP Router Discovery Protocol messages through the network, advertising whatever gateway he wants all the system to start routing messages to. DNS poisoning is much the same as ARP poisoning, just with DNS entries.
Wireshark is probably the most popular sniffer available, can capture packets from wired or wireless networks, and provides a fairly easy-to-use interface. Wireshark also offers an almost innumerable array of filters you can apply to any given sniffing session, and you can fine-tune your results to exactly what you’re looking for. Filters are of great use when you set up a packet capture for a long period of time, and they will show up in bunches on your exam. For example, the string ! (arp or icmp or dns) filters out all the annoying ARP, ICMP, and DNS packets from your display. The http.request string displays all the HTTP GET requests, while the tcp contains string argument displays all TCP segments that contain the word “string.” The expression ip.addr==172.17.15.12 && tcp.port==23 will display all Telnet packets containing the IP 172.17.15.12, while the expression ip.addr==172.17.15.12 or ip.addr==172.17.15.60 will show packets containing either address. Make very sure you are familiar with what the equal to, and, and or conjunctions mean. Equal to (==) means exactly what it says—the packet will display if the argument appears in the packet. And (&&) means the packet will display only if both arguments appear. Or (or) means the packet will display if either argument appears.
Intrusion detection systems (IDSs) are hardware and/or software devices that examine streams of packets for unusual or malicious behavior. Sometimes this is done via a signature list, where the IDS compares packets against a list of known traffic patterns that indicate an attack. When a match is made, the alarm sounds. Other IDSs may be anomaly (or behavior) based, making decisions on alerts based on learned behavior and “normal” patterns—anything out of the ordinary for a normal day sounds the alarm. Libwhisker is a full-featured Perl library used for HTTP-related functions, including vulnerability scanning, exploitation, and, of course, IDS evasion.
A false positive occurs when a system alerts on traffic as being malicious when it is not. A false negative occurs when the IDS reports a particular stream of traffic is just fine, with no corresponding alarm or alert when, in fact, an intrusion attempt did occur. False negatives are considered far worse than false positives, for obvious reasons. A host-based IDS (also known as HIDS) is usually a software program that resides on the host itself. A network-based IDS sits on the network perimeter.
Snort is an open source IDS that is a powerful sniffer as well as a traffic-logging, protocol-analyzing tool that can detect buffer overflows, port scans, operating system fingerprinting, and almost every conceivable external attack or probe you can imagine. Snort runs in three different modes. Sniffer mode is exactly what it sounds like and lets you watch packets in real time as they come across your network tap. Packet Logger mode saves packets to disk for review at a later time. Network Intrusion Detection System mode analyzes network traffic against various rule sets you pick from, depending on your network’s situation. NIDS mode can then perform a variety of actions based on what you’ve told it to do.
The Snort configuration file resides in /etc/snort on Unix/Linux installations and in c:snortetc on most Windows installations. The configuration file is used to launch Snort and contains a list of which rule sets to engage at startup. To start Snort, use
![]()
Snort rules are simple. They must be a single line and are composed of a header and options. Each rule contains an action, a protocol, the rule format direction (which could be bi-directional), a source address/port, a destination address/port, and message parameters. A Snort rule action can be Alert (in a variety of configured methods, alert when the condition is met), Log (simply make a note when the condition is met), or Pass (ignore the packet). Be familiar with the basics of Snort rule syntax, as well as the raw output from the packet capture. Pay special attention in the output to port numbers; most questions can be answered just by knowing what port numbers go with which protocol and where to find them in the output. Also, always watch the directional arrows in test questions.
A firewall is an appliance within a network that is designed to protect internal resources from unauthorized external access. Firewalls work with a set of rules, explicitly stating what is allowed to pass from one side of the firewall to the other. Additionally, most firewalls work with an implicit deny principle, which means if there is not a rule defined to allow the packet to pass, it is blocked—there is no need to create a rule to deny packets. The screened subnet (a.k.a. public zone) of your DMZ is connected to the Internet and hosts all the public-facing servers and services your organization provides. These bastion hosts sit outside your internal firewall and are designed to protect internal network resources from attack: they’re called bastions because they can withstand Internet traffic attacks. The private zone holds all the internal hosts that no Internet host has any business dealing with. Lastly, because your firewall has two or more interfaces, it is referred to as multi-homed.
Originally, firewalls were all packet-filtering firewalls. They basically looked at the headers of packets coming through a port and decided whether to allow them based on the ACLs configured. Stateful inspection firewalls gave the firewall the means to track the entire status of a connection. ECC also calls these stateful multilayer inspection firewalls, with the capability from the Network layer up to the Application layer (although their focus is in Layers 3 and 4). Circuit-level gateway firewalls work at the Session layer and allow or prevent data streams—they’re not necessarily concerned with each packet. An application-level firewall filters traffic much like a proxy—allowing specific applications (services) in and out of the network based on its rule set.
HTTP tunneling is a firewall-evasion technique. Evasion can also be carried out via session splicing—a fancy term for fragmentation—where you put payload into packets the IDS usually ignores.
A honeypot is a system set up as a decoy to entice attackers. There are two types of honeypots. A high-interaction honeypot simulates all services and applications and is designed to be completely compromised. Examples include Symantec, Decoy Server, and Honeynets. A low-interaction honeypot simulates a limited number of services and cannot be compromised completely (by design). Examples of these include Specter, Honeyd, and KFSensor.
Questions
1. Which of the following best describes a honeypot?
A. It is used to filter traffic from screened subnets.
B. It is used to gather information about potential network attackers.
C. It is used to analyze traffic for detection signatures.
D. Its primary function involves malware and virus protection.
2. Which of the following Wireshark filters would display all traffic sent from, or destined to, systems on the 172.17.15.0/24 subnet? (Choose all that apply.)
A. ip.addr == 172.17.15.0/24
B. ip.src == 172.17.15.0/24 and ip.dst == 172.17.15.0/24
C. ip.src == 172.17.15.0/24 or ip.dst == 172.17.15.0/24
D. ip.src == 172.17.15.0/24 and ip.dst == 172.17.15.0/24
3. Which of the following best describes active sniffing? (Choose all that apply.)
A. Active sniffing is usually required when hubs are in place.
B. Active sniffing is usually required when switches are in place.
C. Active sniffing is harder to detect than passive sniffing.
D. Active sniffing is easier to detect than passive sniffing.
4. Your client tells you they know beyond a doubt an attacker is sending messages back and forth from their network, yet the IDS doesn’t appear to be alerting on the traffic. Which of the following is most likely true?
A. The attacker is sending messages over an SSL tunnel.
B. The attacker has corrupted ACLs on every router in the network.
C. The attacker has set up port security on network switches.
D. The attacker has configured a trunk port on a switch.
5. Which display filter for Wireshark shows all TCP packets containing the word facebook?
A. content==facebook
B. tcp contains facebook
C. display==facebook
D. tcp.all contains ==facebook
6. You are configuring rules for your Snort installation and want to have an alert message of “Attempted FTP” on any FTP packet coming from an outside address intended for one of your internal hosts. Which of the following rules are correct for this situation?
A. alert tcp $EXTERNAL_NET any -> $HOME_NET 23 (msg:"Attempted FTP")
B. alert tcp $EXTERNAL_NET any -> $HOME_NET 25 (msg:"Attempted FTP")
C. alert tcp $EXTERNAL_NET any -> $HOME_NET 21 (msg:"Attempted FTP")
D. alert tcp $HOME_NET 21 -> $EXTERNAL_NET any (msg:"Attempted FTP")
7. What occurs when an IDS does not properly identify a malicious packet entering the network?
A. False negative
B. False positive
C. True negative
D. True positive
8. Machine A (with MAC address 00-01-02-AA-BB-CC) and Machine B (00-01-02-BB-CC-DD) are on the same subnet. Machine C, with address 00-01-02-CC-DD-EE, is on a different subnet. While the attacker is sniffing on the fully switched network, Machine B sends a message to Machine C. If an attacker on Machine A wanted to receive a copy of this message, which of the following circumstances would be necessary?
A. The ARP cache of the router would need to be poisoned, changing the entry for Machine A to 00-01-02-CC-DD-EE.
B. The ARP cache of Machine B would need to be poisoned, changing the entry for the default gateway to 00-01-02-AA-BB-CC.
C. The ARP cache of Machine C would need to be poisoned, changing the entry for the default gateway to 00-01-02-AA-BB-CC.
D. The ARP cache of Machine A would need to be poisoned, changing the entry for Machine C to 00-01-02-BB-CC-DD.
9. An IDS installed on the network perimeter sees a spike in traffic during off-duty hours and begins logging and alerting. Which type of IDS is in place?
A. Stateful
B. Signature based
C. Anomaly based
D. Packet filtering
10. In what situation would you employ a proxy server? (Choose the best answer.)
A. You wish to share files inside the corporate network.
B. You want to allow outside customers into a corporate website.
C. You want to filter Internet traffic for internal systems.
D. You want to provide IP addresses to internal hosts.
11. An attacker has successfully connected a laptop to a switch port and turned on a sniffer. The NIC is running in promiscuous mode, and the laptop is left alone for a few hours to capture traffic. Which of the following statements are true? (Choose all that apply.)
A. The packet capture will provide the MAC addresses of other machines connected to the switch.
B. The packet capture will provide only the MAC addresses of the laptop and the default gateway.
C. The packet capture will display all traffic intended for the laptop.
D. The packet capture will display all traffic intended for the default gateway.
12. Which of the following are appropriate active sniffing techniques against a switched network? (Choose all that apply.)
A. ARP poisoning
B. MAC flooding
C. SYN flooding
D. Birthday attack
A. Firewalking
13. A pen tester is configuring a Windows laptop for a test. In setting up Wireshark, what driver and library are required to allow the NIC to work in promiscuous mode?
B. libpcap
C. winprom
D. winpcap
A. promsw
14. Which of the following works at Layer 5 of the OSI model?
B. Stateful firewall
C. Packet-filtering firewall
D. Circuit-level firewall
A. Application-level firewall
Answers
1. B. A honeypot is designed to draw attackers in so you can watch what they do, how they do it, and where they do it from.
2. A, C. In Wireshark filter questions, always pay attention to the operators. While answer A shows any packet with the correct IP in it, anywhere, the or operator in answer C shows packets meeting both options.
3. B, D. If you’re on a hub, why bother with active sniffing techniques? You’re already seeing everything. Also, active sniffing is much more likely to get you caught than simply plugging in a wire and sitting back.
4. A. Encryption is the bane of an IDS’s existence. If traffic is encrypted, the IDS is blind as a bat.
5. B. The appropriate Wireshark display filter is the following: tcp contains search-string
6. C. Snort rules follow the same syntax: action protocol src address src port -> dest address port (options)
7. A. When traffic gets to the IDS, is examined, and is still let through even though it’s malicious, a false negative has occurred. And a false negative is really, really bad.
8. B. ARP poisoning is done on the machine creating the frame—the sender. Changing the default gateway entry on the sending machine results in all frames intended for an IP out of the subnet being delivered to the attacker. Changing the ARP cache on the other machine or the router is pointless.
9. C. IDSs can be signature or anomaly based. Anomaly-based systems build a baseline of normal traffic patterns over time, and anything that appears outside of the baseline is flagged.
10. C. There are a bunch of reasons for having a proxy. In this case, you’re using it to filter traffic between internal hosts and the rest of the world. Generally speaking, proxies don’t act as file servers, websites, or DHCP servers.
11. A, C. Switches filter or flood traffic based on the address. Broadcast traffic, such as ARP requests and answers, is flooded to all ports. Unicast traffic, such as traffic intended for the laptop itself or the default gateway, is sent only to the port on which the machine rests.
12. A, B. ARP poisoning can be used to trick a system into sending packets to your machine instead of recipients (including the default gateway). MAC flooding is an older attack used to fill a CAM table and make a switch behave like a hub.
13. C. WinPcap is the library used for Windows devices. Libpcap is used on Linux devices for the same purpose.
14. C. I admit, this one is tricky. Yes, circuit-level firewalls work at Layer 5. Stateful firewalls can be said to work at Layer 5, but they’re focused on Layers 3 and 4. Application works at Layer 7.