Chapter 9. Using other client libraries
This chapter covers
- Overview of other CMIS client libraries
- Connecting to SharePoint with CMIS
- Using C#, Python, and PHP to write CMIS applications
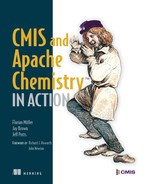
This chapter will review some of the CMIS client libraries that are available beyond OpenCMIS. These libraries are useful if your preferred language is something other than Java, or if OpenCMIS doesn’t meet the specific needs of the solution you’re building (see figure 9.1). By the end of the chapter, you’ll have a working knowledge of the capabilities of these libraries. Optionally, you can work through the “Try it” sections for each client library to add functionality to the solution you’ve developed in previous chapters—The Blend.
Figure 9.1. Other client libraries give non-Java developers access to any CMIS-compliant repository.
We realize you may not have an immediate need for all of these libraries, but we recommend that you read the entire chapter because it introduces you to what’s available and gives you an idea of when each of these libraries might be appropriate to use. But if you have zero interest in a particular language, feel free to skip that section.
9.1. Working with other client libraries
If you’re a Java developer, you might have the luxury of developing your applications using only the OpenCMIS client library, depending on the type of applications you build. But the real world is rarely that homogeneous, which is a good thing—it keeps life interesting.
Luckily, CMIS is language-independent, which means that if you prefer another language, or if Java isn’t a good match for the task at hand, it’s highly likely that another client library is available that will meet your needs.
Let’s take a look at some common CMIS client libraries other than OpenCMIS.
9.1.1. Common client libraries
The first place to start when seeking out another client library is the Apache Chemistry project (http://chemistry.apache.org). This project isn’t only home to OpenCMIS; it also hosts CMIS projects for .NET, Python, PHP, and Android. Each of these subprojects has its own page on the Apache Chemistry site, which is where you’ll find download packages and documentation.
Apache Chemistry isn’t the only place to find CMIS client libraries. When developers need to work with a CMIS repository in their preferred language and a client library doesn’t already exist, often a new client library is born. Table 9.1 lists some of the more common client libraries.
Table 9.1. At a glance: popular non-Java libraries for working with CMIS
|
Library |
Language |
Project home |
Bindings supported |
Install method |
Key dependencies |
|---|---|---|---|---|---|
| DotCMIS | .NET | Apache Chemistry | AtomPub and Web Services | Manual | Microsoft OS |
| cmislib | Python | Apache Chemistry | AtomPub only | Python setuptools or manual | Python 2.6 or 2.7 |
| PHP Client | PHP | Apache Chemistry | AtomPub only | Manual | None |
In this chapter, we’ll spend some time looking at each of these. You’ll learn a little bit about each one, including how it compares to OpenCMIS, what the requirements are for using the library, and how to install it. Once you have a feel for a given library, you can work through a hands-on example that further expands on The Blend. By the end of the chapter, you’ll have a better idea of what’s available and how to use each one.
9.2. Coding in .NET with DotCMIS
The first client library we’ll look at is DotCMIS, which is used when writing C#, PowerShell, and web parts that need to talk to a CMIS repository. By the end of this section, you’ll know how DotCMIS compares with OpenCMIS, and you’ll have a web part that can browse The Blend. Toward the end of this section, there will also be a discussion of how to use Microsoft SharePoint as a CMIS provider.
9.2.1. Comparing DotCMIS and OpenCMIS
.NET provides a formidable platform for CMIS client applications targeting Windows users. Not only do you get the opportunity to take advantage of the strongly typed, object-oriented C# programming language, which provides comforts such as garbage collection, operator overloading, optional arguments, and C-like syntax, but also the opportunity to take advantage of the powerful, flexible, command-line shell and scripting language that’s PowerShell.
Imagine you’re in the early exploratory stages of developing the next grand slam CMIS client application. You want to know how best to solve a problem with your algorithm, but on this particular implementation detail the specification is intentionally vague, and no other relevant documentation solves your problem. Coding up a whole program to test your various rival theories on the best solution could take forever, but luckily you remember that you have a PowerShell window open, with a session already connected to a test server equipped with a CMIS producer. You type in a few method calls using your session instance, and upon inspecting the results you come to a solid conclusion as to which theory holds water. Now that experimentation has yielded a solid, sanity-tested plan, you can get to work creating a high-quality compiled C# program—using the same API that you experimented with.
DotCMIS, as its name implies, is the .NET CMIS client library. It’s similar in architecture to the OpenCMIS client library, and it’s tightly based on the CMIS domain model. It’s a full-featured library, including caching of CMIS objects and bindings, but it’s limited in the area of authentication. Whereas OpenCMIS provides support for both NTLM and Basic authentication, DotCMIS includes only Basic authentication. On the bright side, it’s extensible to other authentication methods, as we’ll discuss shortly.
In the following sections, you’ll see a demonstration of the basic use of the DotCMIS library in both C# and PowerShell and how to use PowerShell to change the metadata of songs in The Blend’s repository.
9.2.2. Getting started with DotCMIS
In this section, you’ll see how to connect to the repository and perform basic CRUD functions against it using DotCMIS.
Regardless of whether you seek to take advantage of DotCMIS in PowerShell or C#, your first step is the same: you must create a reference to the DotCMIS binary. In C#, this is as simple as clicking Add a Reference for your Visual Studio project and browsing to the DotCMIS binary. In PowerShell, you’ll need to run the following command:
[Reflection.Assembly]::LoadFile("C:examplepathDotCMIS.dll")
Within the DotCMIS API, the Session object is the star of the show. You need to create a Session instance as the first step in any CMIS client program, and once you have it, you can use it for a myriad of different tasks, including creating and retrieving ACLs, documents, folders, policies, relationships, and type definitions—for a full list, see figure 9.2.
Figure 9.2. DotCMIS methods

Here’s what creating an AtomPub session looks like in C#:
Dictionary<string, string> parameters =
     new Dictionary<string, string>();

parameters[SessionParameter.BindingType] = BindingType.AtomPub;
parameters[SessionParameter.AtomPubUrl] =
     "http://exampleServer/service/cmis/rest";
parameters[SessionParameter.User] = "exampleUser";
parameters[SessionParameter.Password] = "examplePassword";

SessionFactory factory = SessionFactory.NewInstance();
ISession session = factory.GetRepositories(parameters)[0].
     CreateSession();
And here’s what it looks like in PowerShell:
#helper function
function New-GenericDictionary([type] $keyType, [type] $valueType) {
    $base = [System.Collections.Generic.Dictionary``2]
    $ct = $base.MakeGenericType(($keyType, $valueType))
    New-Object $ct
}
$sp = New-GenericDictionary string string
$sp["org.apache.chemistry.dotcmis.binding.spi.type"] = "atompub"
$sp["org.apache.chemistry.dotcmis.binding.atompub.url"] =
     "http://exampleServer/service/cmis/rest"
$sp["org.apache.chemistry.dotcmis.user"] = "exampleUser"
$sp["org.apache.chemistry.dotcmis.password"] = "examplePassword"

$factory = [DotCMIS.Client.Impl::SessionFactory]::NewInstance()
$session = $factory.GetRepositories($sp)[0].CreateSession()
Creating a SOAP Web Services session in either language is slightly different, because it requires the endpoints not only of the repository service, but of every service. To connect with Web Services instead of AtomPub, change the value of the binding type, and replace the line setting the AtomPub URL with the endpoints for each service. Here’s what that looks like in C#:
Dictionary<string, string> parameters =
     new Dictionary<string, string>();

parameters[SessionParameter.BindingType] = BindingType.WebServices;
parameters[SessionParameter.WebServicesAclService] =
     "https://exampleServer/cmis/soap/aclservice?wsdl";
parameters[SessionParameter.WebServicesDiscoveryService] =
     "https://exampleServer/cmis/soap/discoveryservice?wsdl";
parameters[SessionParameter.WebServicesMultifilingService] =
     "https://exampleServer/cmis/soap/multifilingservice?wsdl";
parameters[SessionParameter.WebServicesNavigationService] =
     "https://exampleServer/cmis/soap/navigationservice?wsdl";
parameters[SessionParameter.WebServicesObjectService] =
     "https://exampleServer/cmis/soap/objectservice?wsdl";
parameters[SessionParameter.WebServicesPolicyService] =
     "https://exampleServer/cmis/soap/policyservice?wsdl";
parameters[SessionParameter.WebServicesRelationshipService] =
     "https://exampleServer/cmis/soap/relationshipservice?wsdl";
parameters[SessionParameter.WebServicesRepositoryService] =
     "https://exampleServer/cmis/soap/repositoryservice?wsdl";
parameters[SessionParameter.WebServicesVersioningService] =
     "https://exampleServer/cmis/soap/versioningservice?wsdl";
parameters[SessionParameter.User] = "exampleUser";
parameters[SessionParameter.Password] = "examplePassword";

SessionFactory factory = SessionFactory.NewInstance();
ISession session = factory.GetRepositories(parameters)[0].
     CreateSession();
And here’s what creating a SOAP Web Services Session looks like in PowerShell:
#helper function
function New-GenericDictionary([type] $keyType, [type] $valueType) {
    $base = [System.Collections.Generic.Dictionary``2]
    $ct = $base.MakeGenericType(($keyType, $valueType))
    New-Object $ct
}
$sp = New-GenericDictionary string string
$sp["org.apache.chemistry.dotcmis.binding.spi.type"] = "webservices"
$sp["org.apache.chemistry.dotcmis.binding.webservices.ACLService"] =
     "https://exampleServer/service/cmis/soap/aclservice?wsdl"
$sp[
"org.apache.chemistry.dotcmis.binding.webservices.DiscoveryService"
] = "https://exampleServer/service/cmis/soap/discoveryservice?wsdl"
$sp[
"org.apache.chemistry.dotcmis.binding.webservices.MultiFilingService"
] = "https://exampleServer/service/cmis/soap/multifilingservice?wsdl"
$sp[
"org.apache.chemistry.dotcmis.binding.webservices.NavigationService"
] = "https://exampleServer/service/cmis/soap/navigationservice?wsdl"
$sp["org.apache.chemistry.dotcmis.binding.webservices.ObjectService"] =
     "https://exampleServer/service/cmis/soap/objectservice?wsdl"
$sp["org.apache.chemistry.dotcmis.binding.webservices.PolicyService"] =
     "https://exampleServer/service/cmis/soap/policyservice?wsdl"
$sp[
"org.apache.chemistry.dotcmis.binding.webservices.RelationshipService"
] = "https://exampleServer/service/cmis/soap/relationshipservice?wsdl"
$sp[
"org.apache.chemistry.dotcmis.binding.webservices.RepositoryService"
] = "https://exampleServer/service/cmis/soap/repositoryservice?wsdl"
$sp[
"org.apache.chemistry.dotcmis.binding.webservices.VersioningService"
] = "https://exampleServer/service/cmis/soap/versioningservice?wsdl"
$sp["org.apache.chemistry.dotcmis.user"] = "exampleUser"
$sp["org.apache.chemistry.dotcmis.password"] = "examplePassword"
$factory = [DotCMIS.Client.Impl::SessionFactory]::NewInstance()
$session = $factory.GetRepositories($sp)[0].CreateSession()
If your server requires authentication, you’ll need to provide an authentication provider class, which should implement the AbstractAuthenticationProvider interface. Out of the box, DotCMIS provides Basic authentication for the AtomPub REST binding, and Basic-over-SSL authentication for the Web Services SOAP binding, contained within the DotCMIS.Binding.StandardAuthenticationProvider class. Assuming you’ve decided on an appropriate authentication provider class, you can set it along with the rest of your preconnection Session settings. Here it is in C#:
parameters[SessionParameter.AuthenticationProviderClass] =
     "ExampleNamespace.ExampleAuthenticationProvider";
And here’s how to set the authentication provider in PowerShell:
$sp["org.apache.chemistry.dotcmis.binding.auth.classname"] =
     "ExampleNamespace.ExampleAuthenticationProvider"
Note that in the previous examples, you get the list of repositories (through the call to factory.getRepositories) and pick the first one. If you wish to choose a known repository by ID rather than choosing whichever repository happens to be first in the returned list, you can specify the repository ID as a session parameter, and change the factory method call from getRepositories to getRepositoryInfo, as shown here in C#:
Dictionary<string, string> parameters =
     new Dictionary<string, string>();

parameters[SessionParameter.BindingType] = BindingType.AtomPub;
parameters[SessionParameter.AtomPubUrl] =
     "http://exampleServer/service/cmis/rest";
parameters[SessionParameter.RepositoryId] =
     "01234567-89ab-cdef-0123-456789abcdef";
parameters[SessionParameter.User] = "exampleUser";
parameters[SessionParameter.Password] = "examplePassword";

SessionFactory factory = SessionFactory.NewInstance();
ISession session = factory.GetRepositoryInfo(parameters)[0].
     CreateSession();
And here’s the same thing shown in PowerShell:
#helper function
function New-GenericDictionary([type] $keyType, [type] $valueType) {
    $base = [System.Collections.Generic.Dictionary``2]
    $ct = $base.MakeGenericType(($keyType, $valueType))
    New-Object $ct
}
$sp = New-GenericDictionary string string
$sp["org.apache.chemistry.dotcmis.binding.spi.type"] = "atompub"
$sp["org.apache.chemistry.dotcmis.binding.atompub.url"] =
     "http://exampleServer/service/cmis/rest"
$sp["org.apache.chemistry.dotcmis. session.repository.id"] =
     "01234567-89ab-cdef-0123-456789abcdef"
$sp["org.apache.chemistry.dotcmis.user"] = "exampleUser"
$sp["org.apache.chemistry.dotcmis.password"] = "examplePassword"

$factory = [DotCMIS.Client.Impl::SessionFactory]::NewInstance()
$session = $factory.GetRepositoryInfo($sp).CreateSession()
At this point, you should be able to create a session appropriate for your situation. This enables you to, among other things, implement basic CRUD (create, read, update, and delete) operations. From your session instance, you can either retrieve the root folder or get another object by ID or path, as shown in C# in a later section (from this point on, we’ll omit the PowerShell version):

Once you have an ICmisObject instance, you may find it more useful to further define it as an IFolder, IDocument, IPolicy, or IRelationship after checking its base type, as follows:
if (objectByPath.BaseTypeId == BaseTypeId.CmisDocument)
{
     IDocument document = (IDocument)objectById;
     //do something
}
else if (objectByPath.BaseTypeId == BaseTypeId.CmisFolder)
{
     IFolder folder = (IFolder)objectById;
     //do something else
}
When creating an object, you have the choice between specifying the folder ID explicitly through the session instance, or by calling the creation method from that folder’s IFolder instance directly:

Suppose you want to delete the first file and then rename the second file so it has the first file’s name. You can do that as follows:
firstDoc.Delete(true);

Dictionary<string, object> properties = new Dictionary<string,object>()
{
     {"cmis:name", "exampleName" },
};
secondDoc.UpdateProperties(properties);
Finally, one of the most useful abilities of CMIS is its query functionality. In order to perform some action on all documents retrieved by a query, you’d do something like this:
foreach (ICmisObject cmisObject in session.Query(
     "SELECT * FROM cmis:document", false))
{
     //do something
}
Now that you know how to connect to a CMIS repository to perform basic operations using DotCMIS, it’s time to revisit The Blend to see how you can expand on that example with .NET.
9.2.3. Try it—building a web part with .NET and CMIS to browse The Blend
In prior chapters, you wrote a Java-based web application to work with music and art objects in sophisticated ways. Now suppose you have a new requirement to access The Blend from a web part running within SharePoint. In this section, you’ll learn how to do that. When you’ve finished, the CMIS Browser web part will look like figure 9.3.
Figure 9.3. CMIS Browser web part as it appears after working through this section

A .NET web part can be a simple and powerful means of displaying CMIS-powered information on a web page. We’ll use a web part to browse The Blend within the web browser. The user should see a list of the files in The Blend’s CMIS repository and be able to navigate the repository’s folder hierarchy within the page. For the purposes of this example, we’ll use Microsoft Visual Studio 2012 paired with Microsoft SharePoint Server 2013.
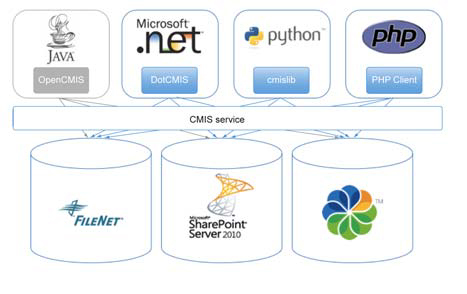
In order to create a SharePoint 2013 Web Part Project in Visual Studio, you’re required to have installed the Microsoft Office Developer Tools for Visual Studio 2012 (available from Microsoft at http://mng.bz/2qzs) and the SharePoint Server 2013 Client Components SDK (available at http://mng.bz/h2T0). After you’ve created the project in Visual Studio, you’ll need to add a reference to the DotCMIS binary as instructed earlier. There’s also an extra step when dealing with web parts: because this web part will be dependent on the third-party DotCMIS binary, you must go to the Package file, click on the Advanced tab, and add the binary as an Additional Assembly, as shown in figure 9.4. Don’t worry, you can keep the binary where it is; Visual Studio will automatically deploy it to the GAC or an alternate appropriate location.
Figure 9.4. Adding an additional assembly to your package
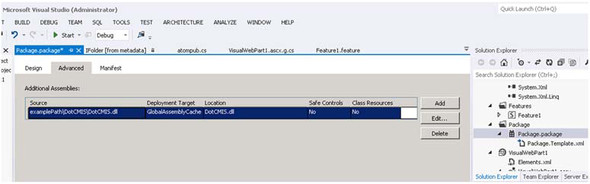
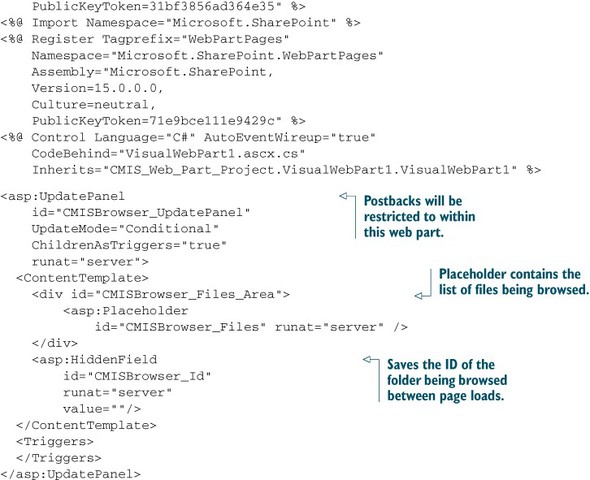
Peering into the project, you should see the first several lines of listing 9.1 already added into your .ascx file. Because this project calls for user-controlled dynamic navigation from the contents of one folder to another, it will require postbacks to the server to get that new content—but the web part would hardly be smooth if it required a full-page refresh for every click. In order to handle this issue, you can use an UpdatePanel to restrict the postback to within the bounds of that single DOM element. You’ll also need a server-side Placeholder to serve as a container for the list of files to be displayed, and a HiddenField to store the current folder ID that the user has browsed to in the ViewState of the page.
Listing 9.1. User interface for the DotCMIS-based CMIS Browser
Next, we’ll look into the code behind the web part. This web part will have an ISession member variable in order to maintain its connection to the repository for the entire ASP .NET lifecycle, initialized as shown in listing 9.2. Whenever a folder (or the Up One Level link) is clicked in the web part’s user interface, the CMISBrowser _File_Click event handler will fire, triggering a postback and refreshing the web part with that folder’s ID as the new parent folder ID.
Listing 9.2. Logic for the DotCMIS-based web part

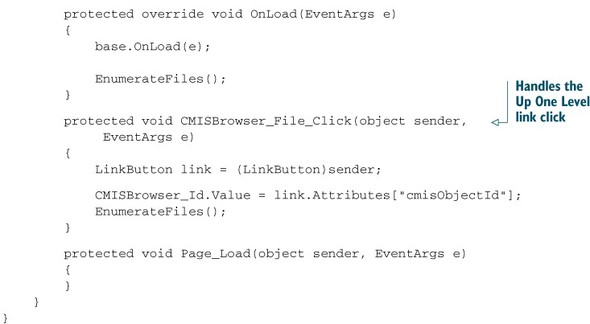
The lion’s share of the logic resides in the EnumerateFiles method (shown in listing 9.3), whose purpose is to fill the CMISBrowser_Files control with the contents of the parent folder pointed to by CMISBrowser_Id. Because the ViewState of the CMISBrowser_Id is necessary for this method to work properly (and hence for the proper folder’s contents being displayed), the EnumerateFiles method must be invoked after the ViewState has been defined during the ASP .NET lifecycle, which means no earlier than the OnPreLoad event. Even in cases where a folder has been clicked and the CMISBrowser_File_Click event has been queued to run, the call to EnumerateFiles inside of OnLoad is necessary, so that it can recreate the control that initiated the call to CMISBrowser_File_Click. This allows the event handler to fire correctly and triggers the second call to EnumerateFiles. Similarly, if the LinkButtons didn’t have DOM IDs specified, the control’s ID wouldn’t be recreated consistently, meaning the event handler would end up firing an unreliable portion of the time.
Listing 9.3. The EnumerateFiles method of the DotCMIS-based web part


This sample is obviously not production-ready, and many more improvements upon it could be made, such as adding metadata other than the names of the files and folders (artist, track time, album date, and so on) and including a visual of the album thumbnail next to the album title. We won’t discuss the styling of the CSS for the user interface here, either, as that’s likely to be implementation-specific.
Now you know how to create a web part that uses CMIS to talk to a content repository. This should serve as a solid starting point for any CMIS-powered web part, and it hopefully illustrates how the ASP lifecycle and client-server paradigm interact with DotCMIS.
9.2.4. Using SharePoint as a CMIS repository
You can use DotCMIS with any CMIS-compliant repository. But if you’re doing .NET development, the chances are high that you also have access to Microsoft SharePoint Server. In this section, you’ll learn about special considerations when using SharePoint as a CMIS server, and you’ll see an example of how to connect to Microsoft SharePoint Server 2013 using CMIS.
The first thing to consider is which authentication protocol your client application will implement—if it isn’t also supported by SharePoint 2013, you won’t be able to connect. In an effort to be flexible and allow as many different clients to work with SharePoint as possible, SharePoint 2013’s CMIS Producer supports the following authentication protocols:
- Basic
- NTLM
- Digest
- Kerberos
- Windows-Claims
- Claims-Multiprotocol
SharePoint Server 2013
Note that this section refers only to Microsoft SharePoint Server 2013, not SharePoint Foundation 2013, which doesn’t include support for CMIS.
The second thing to consider is which optional capabilities within the CMIS specification you’ll use within your client application. Table 9.2 lists some of the capabilities and limitations of the SharePoint 2013 CMIS Producer.
Table 9.2. Optional capabilities of the SharePoint 2013 CMIS Producer
|
Capability |
Value |
|---|---|
| capabilityACL | Manage |
| capabilityAllVersionsSearchable | false |
| capabilityChanges | objectidsonly |
| capabilityContentStreamUpdatability | anytime |
| capabilityGetDescendants | false |
| capabilityGetFolderTree | true |
| capabilityMultifiling | false |
| capabilityPWCSearchable | true |
| capabilityPWCUpdatable | true |
| capabilityQuery | bothseparate |
| capabilityRenditions | none |
| capabilityUnfiling | false |
| capabilityVersionSpecificFiling | false |
| capabilityJoin | none |
| cmisVersionSupported | 1.0 |
Beyond the list in table 9.2, the SharePoint 2013 CMIS Producer development team made other choices regarding optional parts of the CMIS 1.0 specification. For example, the SharePoint ACL model is more complex than the CMIS ACL model that it emits: SharePoint supports custom permission levels, which can be applied to dynamic user groups and applied to any subset of the full set of repositories on a site. Within a repository, folders and even documents can have their own unique set of permissions. But when the CMIS Producer is asked for all possible permission levels, it only returns cmis:read, cmis:write, and cmis:all, as required by the specification. Each of these CMIS permission levels is mapped to a native SharePoint permission level that has the same relevant permissions.
Another nuance to consider is SharePoint 2013’s support for CMIS Query. SharePoint supports the CONTAINS predicate as long as CONTAINS predicates are only used in queries that don’t contain comparison predicates. For example, consider the following queries:
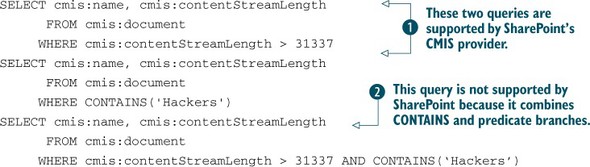
The first two queries ![]() are both supported by SharePoint 2013, yet the third query
are both supported by SharePoint 2013, yet the third query ![]() isn’t, because it combines CONTAINS and comparison predicates.
isn’t, because it combines CONTAINS and comparison predicates.
Another query-related item is the fact that SharePoint 2013 supports table aliases, as demonstrated by the t in the following query, which is functionally equivalent to the first of the three previous queries, but with aliases inserted appropriately. These aliases are meaningless due to SharePoint’s lack of support for JOINs, so they’re ignored:
SELECT t.cmis:name, t.cmis:contentStreamLength FROM cmis:document t
     WHERE t.cmis:contentStreamLength > 31337
With these capabilities and limitations in mind, let’s see how to make the connection to SharePoint.
9.2.5. Connecting to SharePoint
Now that you understand the capabilities of SharePoint 2013’s CMIS Producer, let’s move on to see how exactly you could go about setting up and connecting to it. Let’s assume you have your SharePoint server up and running, and you know which SharePoint libraries you want to use as CMIS repositories.
SharePoint 2013’s CMIS capabilities are all wrapped up in a SharePoint site feature called Content Management Interoperability Services (CMIS) Producer. This means that for every site that contains a library you want to use as a CMIS repository, you must follow these steps to make the library accessible via CMIS:
1. Navigate to any page on your site.
2. Click on the gear in the upper-right corner and select Site Settings (figure 9.5).
Figure 9.5. SharePoint site settings
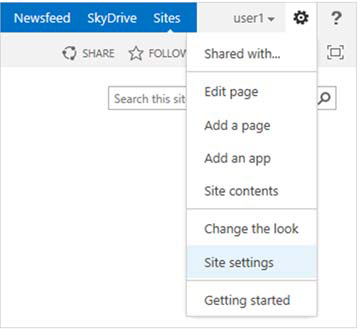
3. Click on Manage Site Features under the Site Actions header.
4. Look for the feature entitled Content Management Interoperability Services (CMIS) Producer, and click the Activate button to the right of it.
With these steps completed, the CMIS Producer is ready to go.
Let’s assume that you want to connect to a SharePoint site with a URL of www.example.com/cmis. SharePoint 2013’s CMIS Producer provides both the AtomPub binding and the Web Services binding, which means you can connect in several ways. A typical CMIS client will connect to the AtomPub binding by calling the getRepositories or getRepositoryInfo methods. The getRepositories method can be used to get a list of all CMIS-appropriate repositories on the SharePoint site, but, as you saw earlier, if you already know the GUID of your repository, you can skip right to that repository using the getRepositoryInfo method. Here are two examples:
- http://www.example.com/cmis/_vti_bin/cmis/rest?getRepositories
- http://www.example.com/cmis/_vti_bin/cmis/rest/156939c0-7a4d-48ef-9bed-82741ccd785f?getRepositoryInfo
On the other hand, if the client application needs to use the Web Services binding, it can connect using the WSDL file, which (if we continue our imaginary example) should be available at the following address: http://www.example.com/cmis/_vti_bin/cmissoapwsdl.aspx.
Note that the preceding file, unlike some WSDLs, isn’t anonymously accessible—you’ll need to authenticate in order to access it.
This WSDL file will provide a list of endpoints for the various CMIS services, which might look like these:
- http://www.example.com/cmis/_vti_bin/cmis/soap/ACLService.svc
- http://www.example.com/cmis/_vti_bin/cmis/soap/DiscoveryService.svc
- http://www.example.com/cmis/_vti_bin/cmis/soap/NavigationService.svc
- http://www.example.com/cmis/_vti_bin/cmis/soap/ObjectService.svc
- http://www.example.com/cmis/_vti_bin/cmis/soap/RepositoryService.svc
- http://www.example.com/cmis/_vti_bin/cmis/soap/VersioningService.svc
From this point on, interacting with the SharePoint 2013 CMIS Producer is like working with any other CMIS server.
Now you know how to connect to Microsoft SharePoint Server using CMIS.
9.3. Coding in Python with cmislib
Picture yourself as a digital archivist. It’s 5:30 p.m. on a Friday, and you’re about to start your weekend when you get an instant message from your boss. Against your better judgment, you accept the video chat (see figure 9.6). One look at her frantic face is enough to send chills down your spine. It seems that a major acquisition is happening and you’ve got to sift and sort through a pile of files and metadata, organizing and storing them in the corporate digital asset repository so they can be tagged and served up by the website before the press release goes out on Monday.
Figure 9.6. Handing out last-minute assignments—like a boss. Luckily, Python and cmislib can automate repetitive tasks like bulk content loading.

After making your boss squirm for a few minutes, you assure her it’s all good. You’re confident you can knock this out quickly. Why? Because you aren’t just any digital archivist. You’re a digital archivist who knows Python. And Python is one bad-ass programming language. You can use Python to productively code all kinds of things—from desktop applications to full-featured, consumer-grade web applications—but it’s particularly good at command-line scripting, which is where compiled languages like Java can’t compare.
In addition to its clear syntax, and the fact that it’s crossplatform (it’s installed by default on Mac OS X and most Linux- and Unix-based operating systems), another great thing about Python is that thousands of modules are freely available for a broad spectrum of functionality, ranging from imaging libraries to web application frameworks and everything in between. One such module is cmislib, which, as the name suggests, is a CMIS client library for Python.
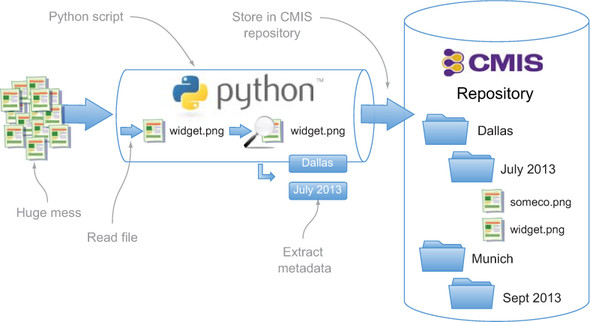
Using cmislib, anyone can make quick work of repetitive tasks. For example, suppose that the pile of digital artifacts you need to sort through needs to be organized in the CMIS repository based on some metadata the files contain rather than the current folder structure. As shown in figure 9.7, a Python script could traverse the folder structure, and, using one of several freely available modules, read the metadata on the files (maybe it’s EXIF or IPTC, for example, which are two common metadata sets for images), and then upload the files into the repository, renaming them and setting properties on the new documents along the way.
Figure 9.7. Python scripts can automate repetitive tasks, like organizing files in a CMIS repository based on metadata stored in the file itself.
Python, cmislib, and a CMIS-compliant repository are a powerful and productive combination for people who need to automate content-centric tasks.
Let’s take a look at how cmislib compares to what you already know about OpenCMIS and also at how to install cmislib. Once that’s done, you’ll see how to use it from the command line and how to write a script that can copy objects from one CMIS repository to another.
9.3.1. Comparing cmislib and OpenCMIS
The motivation for the creation of the cmislib project was to make it easy for people to learn CMIS and to explore different CMIS server implementations without having to slog through all of the XML that’s returned by the AtomPub binding. A secondary motivation was that the original developer loved Python and wanted to encourage the creation of simple web applications built on top of CMIS repositories using Python frameworks like Django and Pyramid.
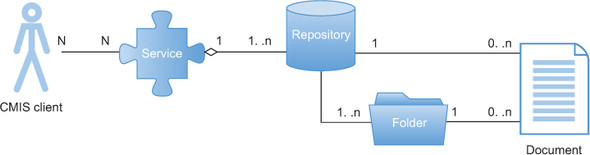
As a result, cmislib is easy for developers to pick up—its API follows the CMIS domain model as closely as possible. Remember the domain model discussed in chapter 2 and shown in figure 9.8? Well, in cmislib you’ll find CmisClient, Repository, Folder, and Document classes, as well as others named as you’d expect based on what you know about the CMIS specification.
Figure 9.8. The CMIS domain model
Additionally, the creator made a conscious decision to minimize the number of dependencies, to make it as easy to install as possible. Table 9.3 summarizes cmislib at a high level.
Table 9.3. At a glance: cmislib
|
Library |
Language |
Project home |
Bindings supported |
Install method |
Key dependencies |
|---|---|---|---|---|---|
| cmislib | Python | Apache Chemistry | AtomPub only | Python setuptools or manual | Python 2.6 or 2.7 |
This pragmatic approach means you’ll have a few limitations when compared to a more full-featured library, such as the one included in OpenCMIS. These are some of the limitations:
- cmislib supports only the AtomPub binding, although support for the new Browser binding is a work in progress.
- cmislib offers no sophisticated level of caching.
- cmislib uses Python’s built-in XML parsing library, which is slower than other available XML libraries.
- cmislib is maintained by a smaller development team.
Despite these potential limitations, cmislib is still valuable for a variety of uses.
9.3.2. Installing cmislib
We’ll assume you already have Python 2.6 or 2.7 installed. We also highly recommend you use virtualenv to create and activate a virtual environment directory to keep cmislib, its dependencies, and the code you write isolated from other libraries that may exist on your system. If you need help installing Python or virtualenv, see http://python.org.
The easiest way to install cmislib is to use a Python package installer called setuptools. Using setuptools to install cmislib is as easy as typing easy_install cmislib. The package manager does the work of finding the latest version, downloading it, installing it, and making it available on the system path. It also does the same for each of cmislib’s dependencies (and their dependencies, and so on).
If you can’t or don’t want to use setuptools, it’s still easy to download and install cmislib. Download the egg file from the Apache Chemistry website and add it to Python’s system path.
9.3.3. Connecting to a CMIS repository using the interactive shell
Let’s slowly slither into the weeds by launching the Python interactive shell and using it to connect to a CMIS repository. This will validate that cmislib is installed correctly. It has the added benefit of providing instant feedback as you explore the library.
Launch the shell
First, launch the Python interactive shell by typing python at the command line. You should see the Python version followed by three right angle brackets (>>>), as shown in figure 9.9.
Figure 9.9. The Python interactive shell patiently waiting to do your bidding

Import cmislib
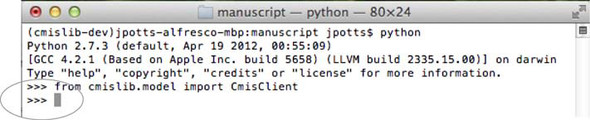
Next, import cmislib by typing from cmislib.model import CmisClient, as shown in figure 9.10. If you get another three angle brackets, it means Python has found the library and you’re ready to move on.
Figure 9.10. No news is good news: once the client successfully imports, it’s easy to connect to the repository.
If you took our earlier advice and used virtualenv and setuptools to install cmislib, it’s highly likely that when you import CmisClient on your machine, Python will import cmislib successfully. If so, you’re ready to connect to the repository.
But if Python complains, it means cmislib isn’t installed on your system path properly. If this happens to you, it might be a good idea to do an import sys followed by print sys.path to start your troubleshooting.
We’ll assume everything is looking good and you’re ready to connect to the repository.
In earlier chapters, you learned that when using OpenCMIS you might need to specify many parameters before you can get a session. With cmislib it’s much easier. Everything starts with a CmisClient object. You instantiate that by specifying the AtomPub service URL, a username, and a password:

Once you have a CmisClient object, you can get a handle to the repository:

The Repository object is like the lobby in a grand hotel. You can learn a lot about the services a hotel offers from standing in the lobby. Is there a concierge desk? Maybe a car rental counter? A four-star restaurant? A hopping lobby bar? Or is there only a scary-looking guy in a stained T-shirt staring at you from behind bulletproof glass, offering to rent you a bath towel by the hour? Different hotels offer different capabilities and qualities of service that you can often summarize with a quick glance at the lobby.
Similarly, the Repository object tells you information about that particular CMIS server and about the capabilities the server offers. For example, if you call getRepositoryInfo(), you’ll get a dictionary of metadata about the repository. The next listing shows how to iterate over the items in the dictionary to see what kind of metadata is returned.
Listing 9.4. Iterating over repository information

Similarly, the Repository object can tell you what the capabilities of this particular repository are, as shown in the following listing.
Listing 9.5. Retrieving the repository’s capabilities

Continuing with the hotel lobby analogy, just as the lobby leads to the elevators and the elevators to the rooms, the Repository object is your gateway to other objects in the system. It contains methods for things like retrieving the root folder, getting an object by ID, getting an object by path, and running queries.
For example, try printing the name of every child in the repository’s root folder:
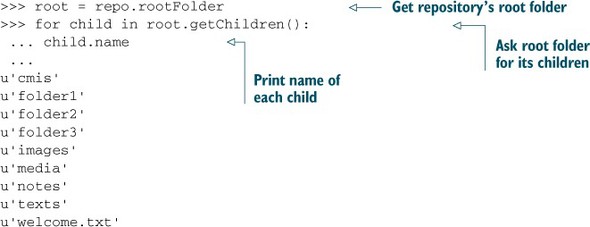
If you ever forget or don’t know what you can do with an object, Python’s built-in dir() function will help. When you call dir with any Python object, it’ll respond with a list of the properties and methods of the object, like so:

If the dir() function doesn’t tell you enough about what you can do with an object, you can try the help() function. It spits out the documentation for that object. You can also always browse the full documentation online at the Apache Chemistry website or generate the documentation yourself locally using a tool called Sphinx.
Creating objects with cmislib
Now that you know how to connect to the repository and can use cmislib to navigate the repository, you’re probably anxious to learn how to create new objects in the repository. Let’s look at how to create a new folder and then a new document within that. Then you’ll be ready to do something useful, like polling for changed objects to copy from one repository to another.
Creating objects is straightforward. If you do a dir(root), you’ll see a method called createFolder (figure 9.11).
Figure 9.11. Using dir(root) to find the createFolder method

If you do a help(root.createFolder), you’ll see that the createFolder method takes a name and, optionally, a dictionary of properties (see figure 9.12).
Figure 9.12. Using the built-in help() function to determine the syntax of createFolder
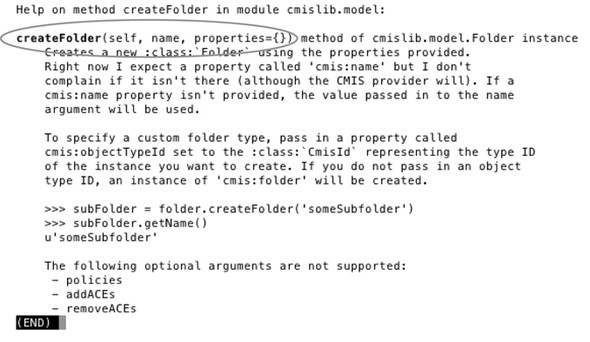
That means creating a new folder called test as an instance of cmis:folder is as easy as typing root.createFolder('test').
But what if you didn’t want to create the folder as an instance of cmis:folder, but instead wanted to use some other folder type? The object type of a folder is one of the properties you can specify when you call the createFolder method. To create a new folder as an instance of F:mm:expenseReport, a completely made-up type for this example, you’d do this:

Creating a document is similar—a name for the new document is required. The object type is also required, but cmislib will use cmis:document if one isn’t provided as part of a properties dictionary. If a name is the only thing provided, the result will be a new Document object that has a zero-byte content stream. You might hear people call these content-less objects:

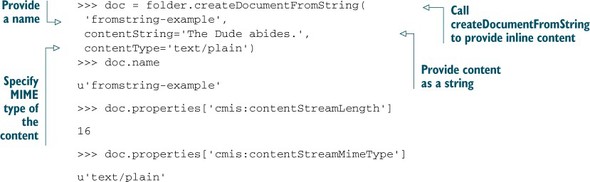
Another option is to use the createDocumentFromString method. This is useful if your code is generating plain text to store as content. The next listing shows how to use this method.
Listing 9.6. Creating a document using a string as content
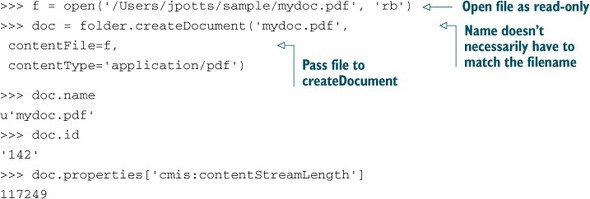
The most common case is that a file needs to be set as the content stream:
You now know how to use Python to connect to a CMIS repository, navigate among the objects stored there, and even create new objects. You can do several things with the repository that we didn’t cover. In short, if it’s in the CMIS specification and implemented in the AtomPub binding, cmislib can do it. Remember to use dir(), help(), and the documentation if you get stuck.
Now let’s look at a more useful example: using Python to synchronize objects between two CMIS repositories.
9.3.4. Using cmislib to synchronize objects between two CMIS repositories
Suppose you’ve been using The Blend with one CMIS repository and you’d like to migrate those images, songs, and videos to another CMIS repository. You might be moving objects from “test” to “production.” Or maybe you’ve decided to move to a different vendor’s CMIS implementation. Whatever the reason, Python is up to the task.
Functional overview
Given two repositories, a source repository and a target repository, the goal is to copy all new and changed objects from the source repository to the target repository. This includes the content and the metadata.
Here are some additional requirements for the synchronization example:
- The synchronization process should be incremental. You don’t want to have to copy the entire source repository to the target repository every time the script runs.
- The source and target repositories may have different content models. For example, The Blend has a type called cmisbook:image in the InMemory Repository, but in Alfresco, the same type has an ID of D:cmisbook:image. Similarly, properties writable in one repository may not be writable in another repository.
- The synchronization process should run constantly, polling for changes periodically. If the process is stopped and restarted, it should pick up where it left off.
- Two CMIS repositories from different vendors will have two different object ID implementations, so if an object in the source repository has an object ID of ABCD, there’s no way to use that object ID to find the equivalent object in the target repository without maintaining some sort of mapping. For this example, we’ll use the object’s path as the unique identifier that’s common across repositories. The implication of this is that if an object moves in the source repository, this simplified approach won’t have a way to move the equivalent object in the target repository.
- Deletes in the source repository are going to be ignored. There’s no technical reason to ignore deletes in the source—we’re just trying to keep it simple.
- The synchronization is one-way, from the source to the target. If something changes on the target, the source won’t be updated, and if a subsequent change happens in the source, the equivalent object in the target repository will be overwritten.
The high-level approach
CMIS has a built-in mechanism that will make finding the incremental changes easy. It’s called a change token. A CMIS repository that supports changes (check the repository’s Changes capability) will return the changes that have occurred since the time the change token was generated. If you persist the change token after you process a set of changes, you can provide that change token later and get all of the changes that have occurred since then.
The high-level algorithm will be as follows:
1. If this is the first sync, ask the repository for its changes. Otherwise, ask the repository for the changes for a specific change token.
2. Process each change. This might involve creating new objects in the target repository if they don’t exist, or updating existing objects in the target repository with the modified objects from the source repository.
3. After processing all of the changes, save the latest change token.
4. Go to sleep for a configurable amount of time, and then wake up and repeat.
The code
The goal is to synchronize changes in the source repository to a target repository. We’ll take advantage of CMIS change tokens to get a list of incremental changes to process since the last time the script processed changes. Let’s walk through some of the code.
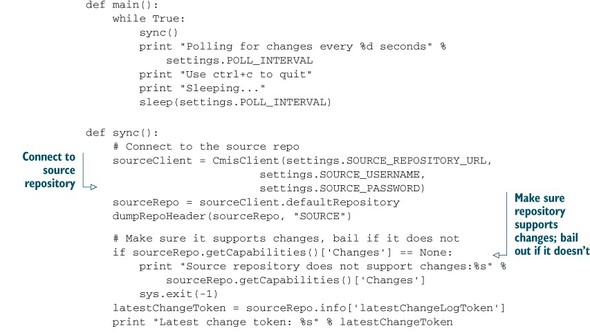
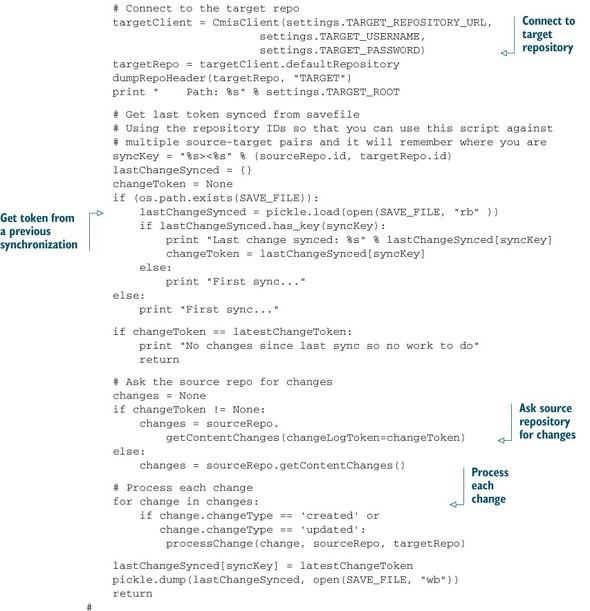
The main polling and processing loop
Listing 9.7 shows the two functions: main and sync. There isn’t much to the main function—it starts an infinite loop that calls the sync function, goes to sleep, and then repeats.
The sync function connects to the source and target repositories, asks the source repository for its changes, and persists the change token to be used the next time sync gets called. The function calls processChange for every object that has been created or updated in the source repository.
Listing 9.7. The main and sync functions
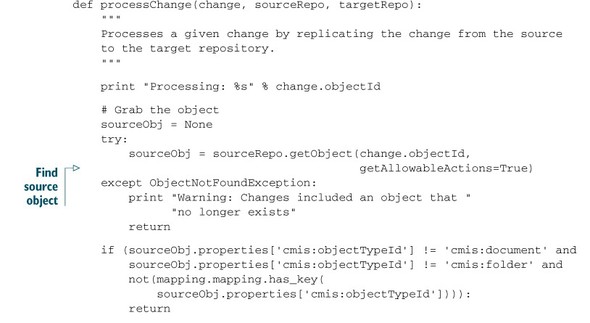
Processing each change
The processChange function in listing 9.8 gets called for every object created or updated in the source repository. It’s responsible for retrieving the source object and then attempting to retrieve the corresponding object in the target repository. If it finds the object in the target repository, it knows it needs to do an update. If it doesn’t find it, it knows the object needs to be created.
Listing 9.8. The processChange function

Determining the properties to set
Listing 9.9 shows the getProperties function. Its job is to figure out what properties need to be sent to the target repository when a given object is created or updated based on the source object’s type and the corresponding type definition in the target repository. This is the function that figures out that a given type in the source repository maps to a given type in the target repository. The function also makes sure that every property is writable in the target repository.
Listing 9.9. The getProperties function
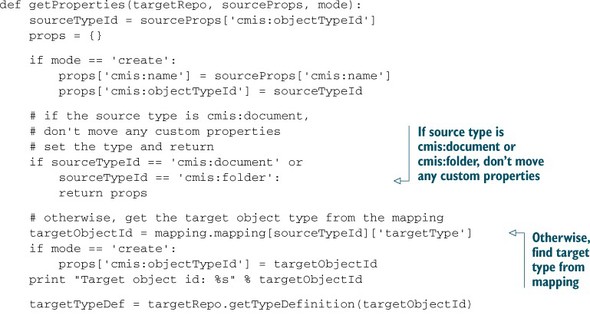
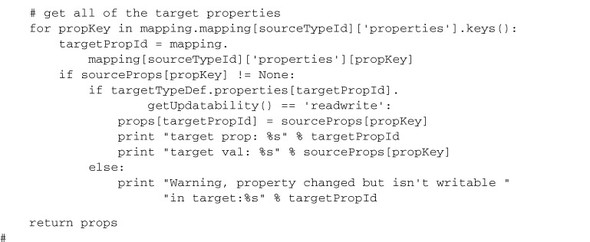
Notice how the last block uses the type definition to make sure that the property is writable in the target. If it isn’t, there’s no need to attempt to write the value, so the property isn’t added to the list of properties to sync and a warning is printed.
Running the sync
To test the script, we created an instance of The Blend that persisted its data to Alfresco. If you want to try this, see the code zip download that comes with the book for the instructions on building and deploying The Blend’s content model to Alfresco. We chose Alfresco because it’s freely available and because it supports change tokens.
Out of the box, Alfresco isn’t configured to support changes, but it’s easy to turn on. Edit your alfresco-global.properties file and add the following:
#
# Auditing
#
# Enable audit in general
audit.enabled=true

# Enable the alfresco-access audit application
audit.alfresco-access.enabled=true

# Enable CMIS change log
audit.cmischangelog.enabled=true
Now when you start the server and invoke getCapabilities(), you’ll see that Changes has a value of objectidsonly.
We created a mapping file that maps Alfresco’s content types and properties to the InMemory server’s content types and properties.
With that in place, we started the sync and watched as the script mirrored the data stored in the local Alfresco repository into the InMemory Repository. After the initial pass, the script went to sleep. The output in the next listing shows what happens when we subsequently modified a property on an image in the source Alfresco repository.
Listing 9.10. Output of cmis-sync when it sees a change that needs to be synced
==================================
SOURCE repository info:
----------------------------------
    Name: Main Repository
      Id: 068e0de6-434e-4106-99c2-a08c5ef4016d
  Vendor: Alfresco
 Version: 4.2.0 (4428)
Latest change token: 1022
==================================
TARGET repository info:
----------------------------------
    Name: Apache Chemistry OpenCMIS InMemory Repository
      Id: A1
  Vendor: Apache Chemistry
 Version: 0.8.0-SNAPSHOT
    Path: /cmis-sync
Last change synced: 1021
Processing: workspace://SpacesStore/1f9acfdf-d438-42c3-9bf4-2
69bb37d1617;1.0
Source Path: /blend/Art/Sunset.jpg
Version label:V 1.25
Target object id: cmisbook:image
Warning, target property changed but isn't writable in target:
  cmisbook:imageHeight
target prop: cmisbook:xResolution
target val: 72.0
Warning, target property changed but isn't writable in target:
  cmisbook:imageWidth
target prop: cmisbook:make
target val: Research In Motion
target prop: cmisbook:model
target val: BlackBerry 8900
target prop: cmisbook:copyright
target val: test value updated alfresco eight
target prop: cmisbook:yResolution
target val: 72.0
Updating content stream in target object version:V 1.25
Polling for changes every 10 seconds
Use ctrl+c to quit
Sleeping...
You can see that when the script woke up and asked Alfresco for its latest changes, the script saw the change to Sunset.jpg, and then determined which properties to set on the target object. Because cmisbook:imageHeight and cmisbook:imageWidth are marked as createonly in the target repository instead of readwrite, the script tosses those properties out and sets the rest. The script isn’t smart enough to know exactly which properties have changed or whether or not the content stream was modified, so a single change triggers the entire object and all of its properties to get updated in the target.
You now have what you need to run Python against any CMIS-compliant repository, and you’ve seen how Python and change tokens can help you write a CMIS synchronization daemon. Let’s now turn our attention to another one of the “P” languages: PHP.
9.4. Apache Chemistry PHP API
PHP is one of the most widely used languages for web applications. PHP is one of the Ps that can be attributed to the LAMP stack (Perl and Python are the other Ps). Many of the most widely used web development frameworks use PHP, including Drupal, Moodle, Joomla, WordPress, and CakePHP. Providing a PHP client library allows developers to take advantage of CMIS-compliant content repositories as a part of their web solutions. Currently, Drupal and WordPress have CMIS integrations that take advantage of the CMIS PHP Client. You’ll see Drupal and CMIS in action in later sections.
The next section discusses the PHP Client and how it maps CMIS objects into PHP objects. You’ll learn how to install the PHP Client, see how it compares to OpenCMIS, and then see some simple PHP examples before moving on to a Drupal example that builds on The Blend.
9.4.1. Installing the PHP Client
You can install the client in one of two ways. The preferred way is to follow these two steps:
1. Add the location of the cmis-lib to the include_path.
2. Include the following line in your code:
require_once ('cmis-lib.php'),
Alternatively, you can add the following line:
require_once('<fullpath to cmis-lib>/cmis-lib.php'), .
9.4.2. About the PHP Client library
The Apache Chemistry PHP API provides access to a CMIS-compliant repository using a structure that will make sense to PHP developers. The main access is provided by instantiating a CMISService object that accepts a CMIS endpoint, authentication information, and some optional settings.
All of the operations performed against a CMIS repository using the PHP Client are executed by calling methods on the CMISService. Not all of the methods are functional—some have yet to be implemented. The methods that aren’t yet functional will throw a CmisNotImplementedException($functionName).
You’ll want to keep a couple of things in mind with regard to arguments passed in to CMISService methods:
- The CMIS server expects a repository ID with every method call (except getRepositories). The PHP Client caches the repository ID in the CMISService object, so developers don’t need to repeat it with each call.
- All of the required input parameters for CMISService methods are included in the method signature. All of the optional parameters for those methods are passed in an associative array.
9.4.3. PHP Client architecture
The PHP Client is divided into two classes: CMISRepositoryWrapper and CMISService, as shown in figure 9.13.
Figure 9.13. PHP Client architecture
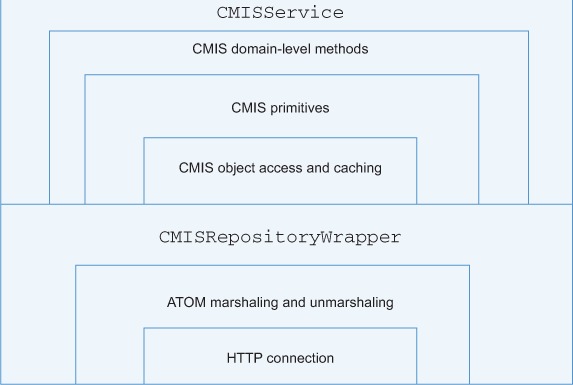
The CMISRepositoryWrapper handles the HTTP connection and has all of the logic to marshal and unmarshal AtomPub XML to PHP objects.
The CMISService provides an interface that implements the CMIS domain-level methods. Rather than separating the client into the seven individual services you learned about in part 1, the CMISService class implements all of the services you might call.
Table 9.4 highlights the supported return types.
Table 9.4. Mapping of AtomPub types and PHP types
|
Return type |
AtomPub type |
PHP structure |
Comments |
|---|---|---|---|
| Repository definition | Workspace | An object with the following five arrays:
|
|
| CMIS object | Entry | An object containing two scalars and three arrays:
The following members will be added in the future:
|
A CMIS object can refer to
|
| List of CMIS objects | Feed | PHP object with two arrays of Entry objects:
|
Objects in the feed may not be fully populated. |
| Tree of CMIS objects | Feed with CMIS hierarchy extensions | Array similar to previous. Hierarchy is achieved by adding a Children object to each Entry that has children. The Children object contains the same structure as the feed. | Objects in the feed may not be fully populated. |
| Type definition | Entry | An object with three arrays and one scalar:
|
The Type Definition data structure needs work for completion. Currently, it has enough to support the needs of the Object Services. |
| List of type definitions | Feed | PHP object with two arrays of Entry objects:
|
Objects in the feed may not be fully populated. |
| Tree of type definitions | Feed with CMIS hierarchy extensions | Array similar to previous. Hierarchy is achieved by adding a Children object to each Entry that has children. The Children object contains the same structure as the feed. | Objects in the feed may not be fully populated. |
| Content stream | Content | Content |
9.4.4. Differences between OpenCMIS and the PHP Client
OpenCMIS and the PHP Client have several differences between them. Let’s look at some functional differences and then see some simple code examples to further illustrate the differences.
Functional differences
In Java-based web applications, you can cache information from one request for future requests. In many PHP installations, PHP is run in the CGI mode, which means that server memory has no means of caching content for access by future requests. As a result, the PHP Client places less emphasis on caching. Most of the caching is centered around retaining information that will be used in a single HTTP request to the web application.
In the OpenCMIS implementation, CMIS objects have methods. In the PHP Client, only the CMISService object has methods; the CMIS objects contain only data—they have no methods.
The PHP Client only supports the AtomPub binding. Currently, work is under way that will add a SOAP binding to the PHP Client.
The current implementation doesn’t support CMIS endpoints with multiple repositories.
Code comparison
It’s helpful to see a few PHP examples of things you learned to do with OpenCMIS in earlier chapters. In this section, you’ll see how to get a session, how to run a query, and how to update the properties on an object.
Initiating a session
In PHP, initiating a session requires you to call the CMISService constructor with the CMIS endpoint and login credentials. The CMISService session will return a new object that’s connected to the repository. Currently, only Basic authentication is supported:
require_once ('cmis-lib.php'),

$client = new CMISService("http://localhost:8081/inmemory/atom",
                          "admin",
                          "admin");
Executing a query
You can execute queries by passing the CMIS SQL to the query method, which will return a list of objects, like this:
$query = "SELECT * FROM cmisbook:taggable AS t
          WHERE 'soul' = ANY t.cmisbook:tags";
$objs = $client->query($query);
foreach ($objs->objectList as $obj) {
    print $obj->properties['cmis:name'] . "
";
}
Updating a multivalued property
Updating a property is a matter of creating an array of properties, and then passing that to the updateProperties method:

You may have noticed a difference in how OpenCMIS handles multivalued properties compared to the PHP library. The PHP library doesn’t change all multivalued properties into a list/array. If you want to do that, you have to use the array helper function. The maintainers of the PHP Client library might remove the need for this at a later date, but it would involve parsing the type definition when retrieving the properties.
That gives you a rough feel for what it’s like to work with CMIS from PHP. Let’s move on to a more real-world example by returning to The Blend.
9.4.5. Using PHP to browse The Blend
We’ve created a module that allows users to tag content, mark content as favorites, and search for content. We built the module as a custom Drupal 7 module on top of the PHP CMIS library, and we used Drupal 7’s library feature to add the PHP CMIS library as a shared library. Using PHP CMIS as a shared library allows the developer to create multiple CMIS-based modules using the same library.
The custom module for The Blend doesn’t use the CMIS API module that’s part of Drupal 6. The CMIS module is still in development form for Drupal 7 and will probably need to be reworked to take advantage of the shared library.
Let’s look at some of the details of the Drupal module for The Blend.
Functional overview
The Drupal module for The Blend, shown in figure 9.14, allows a visiting user to add tags to any taggable object and to list objects that are tagged with a specific term. The module also allows users to create their own collections of taggable objects (for example, playlists and photo galleries). Finally, the module allows users to store saved searches.
Figure 9.14. The Blend as a Drupal module

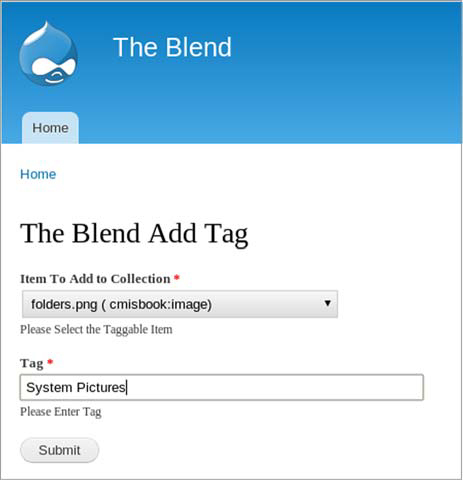
Tagging taggable items
In The Blend, tags are implemented using a multivalue property called cmisbook:tags on a type called cmisbook:taggable. Tags on a given object are added by updating the tags property with the new tag:
function theblend_add_tag_to_item($objectId,$tag_name) {
    $client = theblend_get_cmis_client();
    $item = $client->getObject($objectId);
    $tags = $client->getMultiValuedProp($item, 'cmisbook:tags'),
    $properties = array('cmisbook:tags' => $tags);
    $properties['cmisbook:tags'][] = $tag_name;
    $client->updateProperties($objectId,$properties);
}
The Drupal form for adding a tag to an item is shown in figure 9.15.
Figure 9.15. Adding a tag to a taggable object
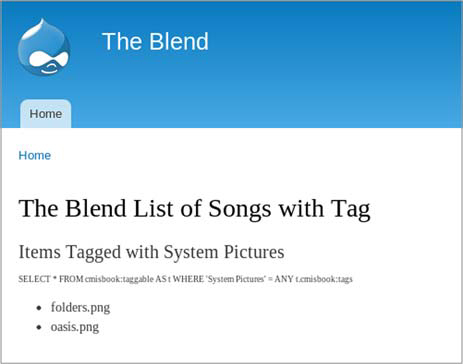
Listing items tagged with a specific tag
You’ll use a CMIS query with an ANY clause to find objects with a specific tag, as this code shows:
function theblend_list_items_with_tag($tag_name) {
    $client = theblend_get_cmis_client();
    $query = "SELECT * FROM cmisbook:taggable AS t WHERE '" .
                $tag_name . "' = ANY t.cmisbook:tags";
    $objs = $client->query($query);
    $output = "<h2>$query</h2>";
    $output .= "<ul>";
    foreach ($objs->objectList as $obj) {
        $output .= "<li>" . $obj->properties['cmis:name'] . "</li>";
    }
    $output .= "</ul>";
    return $output;
}
From Drupal, searching for a list of items with a specific tag looks like figure 9.16.
Figure 9.16. Querying for taggable objects with a specific tag
Advanced searches and saved queries
In order to store a user’s saved searches, we created a folder called /user_content. This folder will have a subfolder for each user. The queries for the saved searches are stored in the queries subfolder for the user. This means if joeschmoe is a user, his queries would be stored in /user_content/joeschmoe/queries. The next listing shows how the queries are saved, retrieved, and run.
Listing 9.11. Saving, retrieving, and executing saved searches


Creating collections of taggables (playlists, galleries)
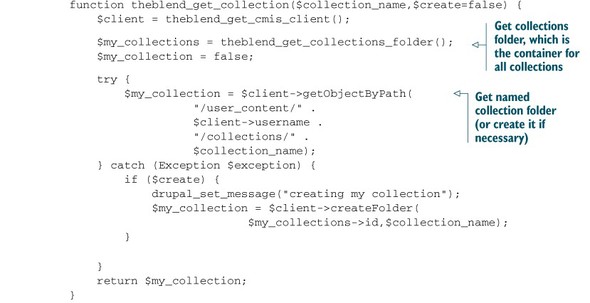
Collections of taggables are implemented by creating folders in which taggable items can be multifiled. A collection for a user is stored in a subfolder of a user-content folder called collections. For example, if our user, joeschmoe, wants to create a collection called “classics,” that folder would be located at /user_content/joeschmoe/collections/classics/. The functions that deal with creating and retrieving collections of taggables are shown in the following listing.
Listing 9.12. Creating and retrieving collections of taggables

Now you’ve seen how PHP and CMIS can be used together—in this case, to build a Drupal module—and how they can work with content in a CMIS repository.
9.5. Summary
You should now have a good feel for some of the other client libraries available to you. If you read the entire chapter and worked through all of the examples, congratulations! Your laptop is now a veritable CMIS Swiss Army knife.
Table 9.5 summarizes the client libraries we reviewed in this chapter.
Table 9.5. At a glance: popular non-Java libraries for working with CMIS
|
Library |
Language |
Project home |
Bindings supported |
Install method |
Key dependencies |
|---|---|---|---|---|---|
| DotCMIS | .NET | Apache Chemistry | AtomPub and Web Services | Manual | Microsoft OS |
| cmislib | Python | Apache Chemistry | AtomPub only | Python setuptools or manual | Python 2.6 or 2.7 |
| PHP Client | PHP | Apache Chemistry | AtomPub only | Manual | None |
All of the libraries you saw in this chapter are available as part of the Apache Chemistry project. Developers typically use these libraries to build desktop applications and web applications. But what if you’re a mobile developer? Whether your platform of choice is iOS or Android, the next chapter shows you how to build mobile applications that work with CMIS repositories.