
Chapter 10. Building mobile apps with CMIS
This chapter covers
- Setting up an OpenCMIS development environment for Android
- Tips for writing a mobile application with OpenCMIS for Android
- Setting up an ObjectiveCMIS development environment
- Using ObjectiveCMIS to enhance an iOS application
The emergence of modern mobile smartphones and tablets has fundamentally changed how people interact with their mobile devices. Every day, more and more users access and consume websites, music, email, and video directly from these devices regardless of their physical location. Now, for both personal and professional reasons, they want their documents too.
In this chapter, we’ll use projects from Apache Chemistry to create native mobile applications on both the Android and Apple iOS platforms. The applications will show how easy it is to create mobile applications that store content to and retrieve it from a CMIS repository.
10.1. Writing mobile apps with OpenCMIS for Android
This section will introduce you to developing mobile applications that need to work with CMIS repositories on Android devices. We’ll start by talking a little bit about Android and about a port of the OpenCMIS library built specifically for Android. Then we’ll show you how to set up a local development environment before taking some initial steps with a simple one-screen application. Finally, we’ll wrap up by looking at an Android application written specifically for The Blend.
10.1.1. Android and CMIS
Android is a Linux-based operating system for mobile devices such as smartphones and tablet computers, developed by Google in conjunction with the Open Handset Alliance. It is one of the world’s most popular mobile platforms. Every day more than one million Android devices are activated.
Android’s programming interface is Java-oriented. You may have already tried to import Apache Chemistry OpenCMIS libraries as dependencies into an Android project and found that it doesn’t work. That’s because OpenCMIS relies on some dependencies that aren’t available in the Android platform. Although the Android SDK is Java-based, it’s different than the JDK. They share some common packages, but they don’t share all of them, and Android lacks several packages necessary to use straight OpenCMIS in an Android application.
That’s why, starting with version 0.8.0-SNAPSHOT of Apache Chemistry, a subproject named chemistry-opencmis-android-client was added. This project allows Android developers to use OpenCMIS. It’s a merge of the opencmis-client-* and opencmis-commons-* projects into a single JAR file.
The OpenCMIS Android Client supports Android 2.3 and later. The coverage of the CMIS specification is not yet complete—for example, you can’t use OpenCMIS Android to manage ACLs or policy objects.
The OpenCMIS Android Client is a synchronous library. What does this mean to you as a developer? By default, all components of an Android application run in the same process—running code, graphical user interface, and input events are all managed from a single thread, generally called the main thread or the UI thread. This is not usually a problem if developers don’t require any time-consuming operations. When you do need to perform a long-running operation, such as retrieving information from the internet, the screen interface of the application will be blocked until the code has finished running. Android will kill the application if it doesn’t react within five seconds of the user’s input, so to provide a good user experience, all potentially long-running operations in an Android application should run asynchronously, which developers can achieve by encapsulating all operations in a background thread.
Android has a few different objects that can help:
- Service—An application component representing either an application’s desire to perform a longer-running operation while not interacting with the user or to supply functionality for other applications to use.
- AsyncTask—Helps perform asynchronous work in the user interface. The AsyncTask performs the blocking operations in a worker thread and then publishes the results on the UI thread.
- Loader—Available since Android HoneyComb, a Loader gives the developer a mechanism for loading data asynchronously for an activity or fragment. A Loader is usually easier to use than an AsyncTask.
It’s up to the developer to determine which object and overall approach is best for a given application.
Now that you know a little bit about the library and how it’s used in Android applications, it’s time to set up a development environment.
10.1.2. Setting up an Android environment
Before you can create your first Android project, you need to set up the Android SDK, configure Eclipse, and install an emulator. So let’s do that now.
Requirements
One of the nice things about Android development is that the dependencies are freely available and will run on any platform. Here’s what you need:
- Java Development Kit (JDK)
- Java Integrated Development Environment (IDE)
- Android SDK
- Android Development Tools (ADT) Eclipse Plugin (optional, but this book assumes you’re using the ADT with Eclipse)
- Android emulator (or a real Android device)
- OpenCMIS Android Client library
Installing the Android SDK
The Android SDK includes all the tools and APIs you need to write mobile applications. You can download the latest version for your platform from the Android developer website at http://developer.android.com/sdk/index.html. Follow the instructions to install the SDK from the Android developer website at http://developer.android.com/sdk/installing/index.html.
Before you begin development, you need to download at least one SDK platform release. The Android SDK Manager will do this for you. If you’re on Windows, run the SDK Manager.exe file (at the root of the Android SDK directory). If you’re on Mac OS X or Linux, run the android executable (in the /tools directory in the Android SDK). Either way, when you open the Android SDK Manager, it will automatically select a set of recommended packages. Then, when you click Install (see figure 10.1), the Android SDK Manager will launch the download and installation.
Figure 10.1. Android SDK Manager

For more information, please refer to Android’s “Adding Platforms and Packages” page: http://developer.android.com/sdk/installing/adding-packages.html.
Installing Eclipse and the Android ADT
You probably already have Eclipse installed from your work with OpenCMIS in earlier chapters. If not, Eclipse is available for download from the Eclipse foundation website: www.eclipse.org/downloads. Installing Eclipse consists of uncompressing the installation package file onto your filesystem.
Android offers a custom plugin for the Eclipse IDE called Android Development Tools (ADT). It extends the capabilities of Eclipse to let you quickly set up new Android projects, build an application UI, use an emulator, debug your app, and export signed (or unsigned) application packages (APKs) for distribution. To install this plugin from Eclipse, follow these steps:
1. Select Help > Install New Software.
2. Click Add, in the top-right corner.
3. In the next dialog box, enter “Android Plugin” for the name and the following URL for the location: https://dl-ssl.google.com/android/eclipse/. Then click OK.
4. In the Available Software dialog box, select the check box next to Developer Tools, and click Next.
5. Read and accept the license agreements, and then click Finish.
6. When installation is complete, restart Eclipse and update the ADT preferences.
7. After restart, in the “Welcome to Android Development” window that appears, select Use Existing SDKs.
8. Browse and select the location of the Android SDK directory you recently downloaded.
9. Click Next. You’re finished.
The Android SDK is now installed and running in Eclipse. If you don’t have a physical Android device (or even if you do), you may want to configure one or more virtual devices for testing and debugging. That’s covered in the next section.
Setting up an Android Emulator
The Android SDK includes an Android Virtual Device (AVD) Manager. As the name implies, the AVD can create, use, and delete a virtual mobile device that runs on your computer to emulate what end users will see when they run your application on a physical device. You can create as many AVDs as you need.
To create an AVD, follow these steps:
1. In Eclipse, select Window > AVD Manager, or click the AVD Manager icon in the Eclipse toolbar. If you don’t see the AVD Manager window, you can launch it as you did earlier.
2. In the Virtual Devices panel, you’ll see a list of existing AVDs. Click New to create a new AVD. The Create New AVD dialog box appears, as shown in figure 10.2.
Figure 10.2. The Create New AVD dialog box

3. Fill in the details for the AVD.
4. Give it a name, a platform target, an SD card size, and a skin (HVGA is the default). You can also add specific hardware features of the emulated device by clicking New and selecting the feature.
6. Your AVD is now ready, and you can either close the AVD Manager, create more AVDs, or launch an emulator with the AVD by selecting a device and clicking Start.
You now have an Android development environment set up. It’s time to start working with CMIS from an Android application.
10.1.3. Writing your first Android CMIS application
Let’s start with something simple. Let’s create a one-screen application that iterates over the children in the media folder of a CMIS repository. Then we can look at a more complex example.
Creating an Android project
To create an Android Project, follow these steps:
1. In Eclipse, select File > New > Other.
2. In the Wizard List panel, select Android > Android Application Project and click Next.
3. Fill in the details for the project. Use The Blend for the application name and project name. Use com.manning.cmis .theblend.android for the package name. Then click Next.
4. In the Configure Custom Launcher Icon panel, let your artistic side free and then click Next.
5. In the Create Activity panel, select Blank Activity and click Next.
6. In the New Blank Activity panel, change the following values:
- Activity Name: FirstOpenCMISActivity
- Layout Name: activity_opencmis
7. Click Finish.
Your Android project is now ready, and it should look like the one shown in figure 10.3.
Figure 10.3. Android project structure for The Blend

Adding libraries
The build path of your project doesn’t yet contain the OpenCMIS Android Client. To add it, you’ll need to download it from the Apache Chemistry OpenCMIS downloads page (http://chemistry.apache.org/java/download.html), unzip it, and then either drag and drop the JAR from your download folder to YourProject > libs, or you can right-click on the libs folder and select Import > File System > Browse > Path to download folder, and then select the JAR and click Finish.
You’ll also need to add slf4j-android-1.6.1-RC1. If you don’t already have it, you can download SLF4J Android from www.slf4j.org/android/.
Using Apache Maven
If you prefer to use the build tool Maven, it’s also possible to import the Android client as a Maven dependency by adding the following to your pom.xml file: <dependencies><dependency> <groupId>org .apache.chemistry.opencmis</groupId> <artifactId>chemistry-opencmis-android-client</artifactId> <version>0.8.0</version> <dependency> </dependencies>. This requires the use of the Android Maven plugin. For more information on how to use the Android Maven plugin, see the “Android Maven Plugin” page: http://code.google.com/p/maven-android-plugin/.
Creating the first screen
First of all, you need to modify the default layout of your screen. A layout in Android is a type of resource that defines what’s drawn on the screen. Layouts are implemented as XML files in the /res/layout resource directory for the application.
By default, your application already has a layout named activity_opencmis.xml. Let’s modify it:
1. In Eclipse, from an Explorer view, navigate to Blend/res/layout, then right-click the file named activity_open_cmis.xml, and then click Open With > XML Editor.
2. Edit the file as follows:

Now it’s time to change the main activity of your application to use the Android OpenCMIS Client. An Android activity is an application component that provides a screen with which users can interact in order to do something, such as dial the phone, take a photo, send an email, or view a map. Each activity is given a window in which to draw its user interface. The window typically fills the screen, but it may be smaller than the screen and can float on top of other windows.
In your current project, you already have an activity called FirstOpenCMISActivity. Let’s modify it to display the list of all documents inside the media folder. This requires two things:
- A Session object, which can be used to list the children of the media folder
- An asynchronous mechanism to respect the UI/Background Thread model
In this example, you’ll use an AsyncTask to do the job. Here’s how:
1. In Eclipse, from an Explorer view, navigate to Blend/src/com.manning .cmis.theblend.android and select the file named FirstOpenCMISActivity.java.
2. Edit the file and replace it with the contents of listing 10.1. The content of First-OpenCMISAsyncTask may look familiar—it’s exactly the same logic that you used in chapter 7 to iterate over the children in a folder with OpenCMIS.
Listing 10.1. FirstOpenCMISActivity.java
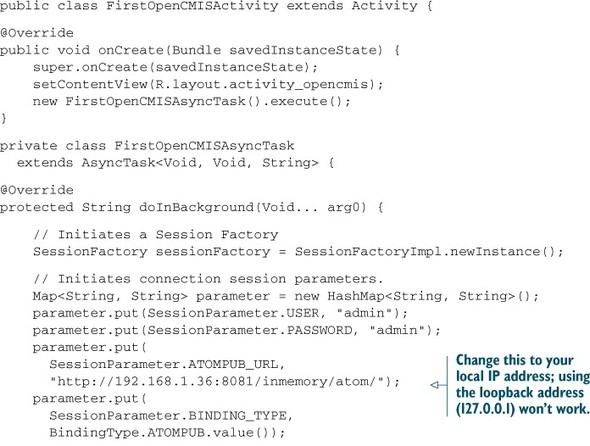

Configuring permissions
By default, an Android application has no permission to do much of anything. To make use of the protected features of the device, you must include one or more <uses-permission> tags declaring the permissions that your application needs in your AndroidManifest.xml.
The internet access permission is mandatory for the Android OpenCMIS Client. An Android application that needs to connect to a CMIS server isn’t going to get very far without it. Here’s how to give your application the permission:
1. In Eclipse, from an Explorer view, select the file named AndroidManifest.xml that resides in The Blend.
2. Add the following internet permission after the uses-sdk element and before the application element:
<uses-permission android:name="android.permission.INTERNET"/>
Running your application
Now it’s time to run the application. To do that, follow these steps:
1. In Eclipse, right-click the project folder.
2. Click Run as > Android Application.
3. If you don’t use a real device, an Android emulator will start. If you use a real device, plug in the device to your development machine with a USB cable. You might need to install the appropriate USB driver for your device. Ensure that USB debugging is enabled in the device settings.
4. After a few seconds, your device/emulator will display a screen that looks like figure 10.4.
Figure 10.4. A simple Android application that iterates over a folder’s children
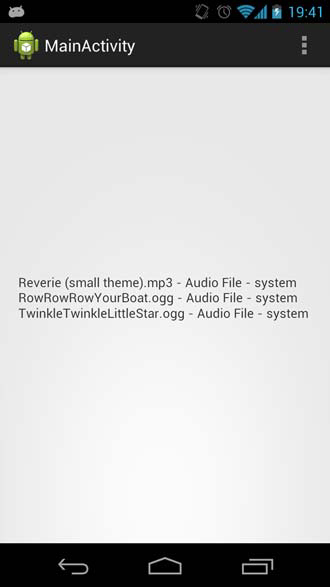
Now you’ve created a simple Android application that has successfully connected to a CMIS server and iterated over a folder’s children. The next step is to create a full-blown Android application for The Blend.
10.1.4. Try it—writing an Android application for The Blend
You know the basics of how to use and incorporate CMIS in an Android application. It’s now time to go further. Let’s build an Android application for The Blend. It will be a simple mobile application that allows users to connect to a CMIS repository, retrieve information about their favorite songs, and plays those songs. The full source code for this application accompanies this book. Figure 10.5 shows mockups of what The Blend for Android will look like.
Figure 10.5. Mockups of The Blend for Android

This application is divided into three main screens:
- The Login screen is responsible for requesting information about the CMIS repository where the music is being stored.
- The Album List screen displays a list of all albums stored in the repository.
- The Album Details screen provides information on a specific album and a list of the tracks that make up the album.
Each screen includes actions associated with the page context, such as “create album” or “download a track.”
Now that you’ve seen a high-level overview of the application, let’s look at how you can get the source code set up in Eclipse. Then we’ll walk through how the Login and Album List screens are built and complete the section by giving you some suggestions for tackling some of the functionality on your own.
Setting up the project in Eclipse
The easiest way to step through the code and to run the application is to import the source code that accompanies the book into Eclipse. To import the Android project, follow these steps:
1. In Eclipse, Select File > Import > Android > Existing Android Code Into Workspace.
2. Browse to the chapter10 folder and validate the choice by clicking Finish.
You should now have a project that looks like figure 10.6. Take a few minutes to get familiar with the project structure:
Figure 10.6. The Blend after importing the source code into Eclipse

- The components and settings are described in the AndroidManifest.xml file.
- The src folder contains Java class files. They implement the screens and behaviors of the application. Activities (application screens) and tasks (background tasks to retrieve information from the server) are inside this folder. They’re divided into a logical package structure.
- The libs folder contains all of the libraries the project depends on. This is the same set of dependencies you configured in section 10.1.3. If this folder doesn’t exist in your project after importing, create it, and import the same three JARs you used earlier.
- The res folder contains all of the resources files, including these:
- Drawable folders— Images in different sizes to support different Android device screen sizes
- Layout folder— XML file that describes files used to define the user interface
- Values folder— XML files used to define strings, colors, dimensions, styles, and static arrays of strings or integers
Now that you know your way around the project, let’s take a look at the Login page.
The Blend: Login page
The main goal of the Login screen is to create the CMIS Session object and share it with all of the other screens in the application.
The implementation of the screen is found inside com.manning.cmis.theblend.android. It’s composed of two classes:
- LoginActivity—Displays the form and manages user interactions. It allows the user to provide information about the CMIS server, retrieves information from the server, and creates the SessionTask.
- SessionTask—Creates the CMIS Session object in a background thread and displays the Album List screen when the session is created.
In an Android application, each screen or activity is totally independent of other screens/activities. Each activity has its own context and its own lifecycle. If your application is composed of more than one screen, you must exchange important information, like the Session object, between screens. The CMIS Session object is critical to The Blend. Without this object, the application can’t do anything. For this reason, it’s important to keep it safe and to share it with all of the components that need it.
In Android there’s a mechanism called an intent. An intent is an object that provides a runtime binding between separate components (such as two activities). The intent represents an app’s intent to do something. You can use intents for a wide variety of tasks, but most often they’re used to start another activity.
An example of this is the SessionTask. After successfully creating a Session object, the task creates an intent to display the Album List screen and uses it to transfer the session, like this:
public class SessionTask extends AsyncTask<Bundle, Void, Session> {
...
@Override
protected void onPostExecute(String result) {
    Bundle b = new Bundle();
    b.putSerializable(BundleConstant.KEY_SESSION, result);
    Intent i = new Intent(activity, AlbumsActivity.class);
    i.putExtra(BundleConstant.KEY_EXTRAS, b);
    activity.startActivity(i);
}}
Then, in AlbumsActivity it’s possible to retrieve the object with the getIntent().getExtras() method and use it inside your new screen, like so:
public class AlbumsActivity extends Activity{
...
@Override
public void onCreate(Bundle savedInstanceState){
...
    // Retrieves informations from Intent
    if (getIntent().getExtras() != null) {
       Bundle b = getIntent().getExtras().
                  getBundle(BundleConstant.KEY_EXTRAS);
       session = (Session) b.getSerializable(
                             BundleConstant.KEY_SESSION);
    }
...
}}
This same pattern can be repeated by any other screen in the application that needs to use the Session object.
The Blend: Album List screen
The Album List screen displays all of the CMIS album objects present in the CMIS repository. The implementation for this screen is found inside com.manning .cmis.theblend.android.albums. It consists of the following:
- AlbumsActivity—Displays the list of all of the cmisbook:album objects. The user sees a list of albums and can scroll through them and select one to display more information.
- AlbumsTask—First creates a CMIS request to retrieve all cmisbook:album objects in a background thread. Then it transforms the result object into a CMIS Document object and transfers this information to the AlbumsActivity.
- AlbumsAdapter—Used by AlbumsActivity to receive data and populate an Android listView component. It’s responsible for creating a row for each cmisbook:album object.
The Blend uses wireless networking to retrieve its information. But during this transfer, there’s a risk of latency caused by a problem with the network, user interaction, an incoming phone call, or any number of things. The application needs to catch and manage errors that prevent it from getting data. A common way to address this is to wrap information from an AsyncTask into a high-level result object. This object encapsulates information (data expected, exceptions, and other data) from the server side and allows other parts of the application to display the right information. In a normal case, the code displays the information as expected. If an exception occurs, the code can handle it gracefully and display a user notification that explains why the action hasn’t been executed.
In The Blend, the CmisResult class, which resides in the com.manning.cmis.theblend.android.utils package, is responsible for implementing this pattern.
AlbumsTask uses CmisResult to change the behavior on its onPostExecute method. If the albums list is retrieved, AlbumsTask pushes the information to the activity. If not, it displays a user notification that contains the exception message. You can see this happening in the following listing.
Listing 10.2. AlbumsTask.java


All AsyncTasks inside The Blend use this principle. Instead of returning the expected object, they return a CmisResult object that contains the information.
The Blend: things to try on your own
As you may have noticed, OpenCMIS Android mobile development is really similar to OpenCMIS Java development. Just remember to respect these three rules:
1. Always take care of your Session object by using an intent to share it across all of the screens in your application.
2. Use a background thread to execute any OpenCMIS code.
To practice what you’ve learned about OpenCMIS Android development, try to implement one or more of these features inside The Blend:
- Create an action that allows a user to create a new album
- Create an action that allows a user to add a track to an album based on a track ID
- Create a screen that displays the track list for an album
- Create a screen that displays the track object’s properties
That’s it! Now let’s turn our attention from Java and Android to Objective-C and iOS.
10.2. Writing iOS apps with ObjectiveCMIS
This section introduces you to ObjectiveCMIS, an Objective-C client library for CMIS, and to iOS application development using ObjectiveCMIS. We’ll also look at ObjectiveCMIS and how it compares to Apache Chemistry’s OpenCMIS client library. We’ll then take a look at how you can incorporate ObjectiveCMIS into your existing project and review several code snippets for a few different CMIS operations. Finally, we’ll walk you through an example that builds a very simple audio-capture application that can be used to upload audio to The Blend.
Don’t know Objective-C or are new to iOS development?
A good place to begin your adventures with Objective-C and iOS application development is by starting at Apple’s iOS Dev Center (https://developer.apple.com/ios). Apple provides excellent resources (documentation, videos, sample code projects, and so on) for anyone interested in iOS development. All you need to do is register as an Apple Developer.
10.2.1. What is ObjectiveCMIS?
ObjectiveCMIS is an open source project that provides a CMIS client API written in Objective-C for iOS. It’s part of the Apache Chemistry project. The goal behind the ObjectiveCMIS project is to provide a robust CMIS client library for iOS applications.
ObjectiveCMIS is implemented as a Cocoa Touch static library for iOS development and links against Apple’s Foundation framework. What this means to you is that there are no third-party APIs or frameworks being used by the library. It also means that the library is built for iOS usage—if you want to develop Mac OS X applications, you can’t do that with ObjectiveCMIS out of the box. The library is thread-safe, and calls to a CMIS repository are asynchronous. The asynchronous operations in ObjectiveCMIS are provided by the extensive use of Objective-C blocks.
Objective-C blocks
ObjectiveCMIS uses Objective-C blocks to provide callback handlers (completion blocks) for all asynchronous calls. Objective-C blocks are also known as closures. If you’re unfamiliar with the concept, an introduction to blocks can be found in the iOS Developer Library at http://mng.bz/6Fz6.
ObjectiveCMIS is essentially an Objective-C port of the OpenCMIS Java client library you already know so much about. Like the OpenCMIS client library, ObjectiveCMIS is implemented so that it closely follows the CMIS domain model. Just like OpenCMIS, ObjectiveCMIS provides two APIs: a high-level object-oriented API and a low-level bindings API. The high-level object-oriented API is the API that you’ll most likely want to use whenever possible—it’s much easier to use than the low-level binding API, which will be used only when you need more fine-grained control of how your application talks to the CMIS repository.
Why are all classes in ObjectiveCMIS prefixed with CMIS?
When you dive into the ObjectiveCMIS API, you’ll notice that all classes in ObjectiveCMIS are prefixed with CMIS. This is a common pattern recommended by Apple. It’s necessary because Objective-C doesn’t have namespaces.
Table 10.1 summarizes ObjectiveCMIS at a high level in its current state.
Table 10.1. ObjectiveCMIS at a high level
|
Library |
Language |
Project home |
Bindings supported |
Install method |
Key dependencies |
|---|---|---|---|---|---|
| ObjectiveCMIS | Objective-C | Apache Chemistry | AtomPub only | Manual | iOS SDK 5.1+, Xcode 4.3+ |
ObjectiveCMIS is a fairly new client library. As such, there are a few limitations you should know about up front before deciding if it’s right for your project:
- Supports CMIS 1.0 only
- Supports the RESTful AtomPub binding only
- Doesn’t yet provide support for CMIS policies, relationships, change logs, or full access control functionality
- Provides no caching features, other than a link cache
- Can’t be used to create OS X desktop applications out of the box
Over time, some of these limitations may go away. The project is always looking for more contributors, so if you’re interested, reach out to the Chemistry Dev List ([email protected]).
Although there are limitations in features and capabilities, ObjectiveCMIS is capable of performing most of the common use cases for acting upon documents and folders, search, and versioning. It’s used in multiple production applications.
10.2.2. Comparing ObjectiveCMIS with OpenCMIS
As we mentioned earlier, ObjectiveCMIS is essentially an Objective-C port of the OpenCMIS Java client library, and it’s implemented so that it closely follows the CMIS domain model. If you understand the OpenCMIS Java client library, you should be able to quickly understand how to use the ObjectiveCMIS static library—the biggest difference between the two is the programming language.
Because of the similarity between the two, it shouldn’t surprise you that the main entry point when interacting with a CMIS repository is the CMISSession. Once you get a CMISSession, you can start making calls against either the high-level client API or the low-level client binding API. However, in ObjectiveCMIS you’ll find that not all the core CMIS domain model classes are available. ObjectiveCMIS includes support for documents, folders, query results, and repository info objects. CMIS policy and relationship objects aren’t yet available. That leaves us with an object model that looks like figure 10.7.
Figure 10.7. ObjectiveCMIS object model

It’s encouraging that the API is so close to OpenCMIS. If you already know how to work with Xcode to develop mobile applications, that may be all you need to know. If that’s the case for you, you might want to skip ahead to section 10.2.4 to learn how to generate the ObjectiveCMIS documentation before you move on to the “Try it” section. Otherwise, keep reading to learn how to set up the library in your local Xcode environment.
10.2.3. Getting started with ObjectiveCMIS
Now that you have a general understanding of ObjectiveCMIS and its current capabilities and limitations, it’s time to see how to use it in your own project. This section describes the requirements for using the library, how to include ObjectiveCMIS in your project, and finally how to build the documentation for ObjectiveCMIS.
Minimum requirements
Because ObjectiveCMIS makes use of Automatic Reference Counting (ARC) and ObjectiveCMIS blocks, there are a few technical requirements that need to be met before you can use ObjectiveCMIS as part of your iOS application:
- Xcode 4.3 or newer
- iOS SDK 5.1 or newer
- iOS deployment target of iOS 5.1 or above
Where to find the source code
The ObjectiveCMIS source code and other resources you’ll need to work through the examples in this section are provided in the zip archive that accompanies this book. If you would prefer to work with the latest release of ObjectiveCMIS, the release packages can be found on the Apache Chemistry ObjectiveCMIS web page at http://chemistry.apache.org/objective-c/objectivecmis.html. The ObjectiveCMIS source code is kept in a Subversion repository located at http://svn.apache.org/repos/asf/chemistry/objectivecmis/trunk/.
In the next few sections, we’ll go through the process of building the ObjectiveCMIS library, adding it to an Xcode project using two different approaches, and, finally, generating the documentation. If you want to follow along, identify a folder where you’ll unzip the ObjectiveCMIS source code archive file, ObjectiveCMIS-src.zip. We’ll call this location $IOS_DEV_HOME. If you haven’t done so already, go ahead and extract ObjectiveCMIS-src.zip to $IOS_DEV_HOME. You should now have the ObjectiveCMIS Xcode project available at $IOS_DEV_HOME/ObjectiveCMIS.
Now let’s look at how you can incorporate the ObjectiveCMIS library into your project.
Incorporating ObjectiveCMIS into your application project
There are two options for incorporating the static library into your new or existing iOS application. The first option is to compile ObjectiveCMIS into a universal static library and then add the compiled universal static library and header files to your project. The second option is to add the ObjectiveCMIS Xcode project to an existing Xcode workspace, and allow Xcode to properly build the explicit and implicit dependencies required.
Let’s look at each of these two options.
Using the compiled universal library file and public headers directly
The simplest way to incorporate the ObjectiveCMIS library into your mobile application project is to directly add the compiled universal static library and public headers to your project. For convenience, the compiled universal library file and public headers are made available in the archive ObjectiveCMIS-UniversalLib.zip that accompanies this book. If you want to use the precompiled files from the zip, jump to step 5. Otherwise, you must manually compile the library file and headers. To do that, follow these steps:
1. Change to the root folder for the ObjectiveCMIS Xcode project located at $IOS_DEV_HOME/ObjectiveCMIS.
2. Execute the shell script build_universal_lib.sh to start the build.
3. The script will output something similar to the following:
...I will output a universal build to: /Users/dev/Code/
ObjectiveCMIS/build/Debug-universal
4. Copy the folder path the script spit out. This folder contains ObjectiveCMIS compiled as a universal library and it’s ready to be included in an Xcode project. Open the folder using the open command and the path, which will likely be different on your machine:
open /Users/dev/Code/ObjectiveCMIS/build/Debug-universal
5. Add the generated universal library file and header files to your application project by dragging and dropping the folder into your Xcode project or by using the Add Files to ProjectName action from the Navigator and selecting the folder Debug-universal. When you’re prompted for the Add options for the new files (as shown in figure 10.8), make sure that you add the files to the target of your iOS application.
Figure 10.8. Adding the library to the Xcode project

6. The ObjectiveCMIS universal library has been added, and you can verify that the static library is available. Open the Target Summary view for your mobile application and find libObjectiveCMIS.a as a linked library, as shown in figure 10.9.
Figure 10.9. Verifying that the static library is available

7. Finally, you’ll need to set the flags -ObjC -all_load in the Other Linker Flags setting available in the Target Build Settings (see figure 10.10). The -ObjC flag must be set because ObjectiveCMIS uses categories. The flag -all_load must be set to work around a linker bug in iOS applications (see Apple’s Technical Q&A QA1490 for complete details—http://developer.apple.com/library/mac/#qa/qa1490/_index.html).
Figure 10.10. Setting the Other Linker Flags in build settings

That’s it! The ObjectiveCMIS library has been incorporated into your project and you can now begin using ObjectiveCMIS!
Using ObjectiveCMIS in an Xcode workspace
You’ve seen the first option for making the ObjectiveCMIS library available to your iOS application. Now let’s take a look at the second option, which is to add the entire ObjectiveCMIS source code project to your Xcode project. Xcode then builds ObjectiveCMIS and its dependencies when it builds your project. The advantage to this approach is that it gives you full access to the ObjectiveCMIS source code and any other files and projects added to the workspace. The disadvantage is that the ObjectiveCMIS project will be built more often than you might prefer, and it requires some additional configuration that isn’t required for the first option.
For our purposes, the positives outweigh the negatives, so if you’re following along, go ahead and incorporate ObjectiveCMIS into your workspace. To do that, follow these steps:
1. Open or create a workspace with your existing project. If you don’t know about Xcode workspaces, Apple provides excellent documentation in the iOS Developer Library. Go to http://developer.apple.com/library/ios and search for workspaces.
2. Add the ObjectiveCMIS Xcode project to your workspace by adding the ObjectiveCMIS Xcode project file, ObjectiveCMIS.xcodeproj. ObjectiveCMIS should be added to the workspace as a sibling project to your other Xcode projects. Figure 10.11 shows the project navigator pane with ObjectiveCMIS and another Xcode project.
Figure 10.11. ObjectiveCMIS added to a workspace

3. Add the libObjectiveCMIS.a library from the workspace, so that it’s a linked library. After linking libObjectiveCMIS.a, the library should now be in your list of linked frameworks and libraries, as shown in figure 10.12.
Figure 10.12. Summary view showing ObjectiveCMIS as a linked library

4. Configure the settings User Header Search Paths and Other Linker Flags in the Target Build Settings for the mobile application. You must configure these settings so that the target is able to locate the ObjectiveCMIS public headers.
- Configure the User Header Search Paths setting with value $(BUILT_ PRODUCTS_DIR), and make sure to check the recursive flag, as shown in figure 10.13.
Figure 10.13. Setting User Header Search Paths
- Set Other Linker Flags by adding the following flags: -ObjC –all_load. These flags are required. Figure 10.14 shows the setting correctly configured.
Figure 10.14. Setting Other Linker Flags


Can’t get ObjectiveCMIS to build?
If you encounter a problem where ObjectiveCMIS fails to build, try updating the project scheme for the target that you’re building so that the ObjectiveCMIS build target is explicitly built before your application is built.
Well done! If you’ve made it this far, you’ve successfully incorporated ObjectiveCMIS into your workspace. Now other targets within the workspace can leverage the ObjectiveCMIS library.
Generating the ObjectiveCMIS documentation
ObjectiveCMIS provides the capability to output Apple-like source code documentation that’s fully indexed and browsable as an Xcode documentation set. That’s because the ObjectiveCMIS project has a Documentation build target. However, if you want to generate the documentation, you must have the appledoc tool installed and available on your path. You can find instructions from the appledoc home page on GitHub at https://github.com/tomaz/appledoc.
It’s probably a good idea to generate the documentation so you can use it later when you build The Blend’s mobile application. Here’s how:
1. If you don’t have appledoc installed, download and install appledoc from GitHub as mentioned previously.
2. Run the Documentation target available in the ObjectiveCMIS Xcode project.
3. Once the Documentation target build completes, open the Xcode documentation and you should see the ObjectiveCMIS documentation, as shown in figure 10.15.
Figure 10.15. Browsing ObjectiveCMIS documentation in Xcode

Great! You’ve got the library set up in your Xcode workspace, and you have some documentation to refer to. You’re now ready to begin developing a CMIS-based mobile app for iOS.
10.2.4. Using ObjectiveCMIS
Now that you’ve incorporated ObjectiveCMIS into your project, let’s see how you can use ObjectiveCMIS to do something simple, like grabbing a session and retrieving a folder. Then we’ll knock out the application.
Creating a CMISSession
As discussed earlier in the section, the CMISSession object is the main entry point to interacting with a CMIS repository, just as it is in OpenCMIS. To create a CMISSession, you must first provide session parameters for the session. The next listing shows a simple scenario of setting up a CMISSession for the AtomPub binding.
Listing 10.3. Setting up a CMISSession for the AtomPub binding

Once you’ve got a session, you’re standing in the CMIS hotel lobby (remember that analogy from chapter 9?). With what you know already, together with the documentation, you’re probably good to go, but before building the app, let’s look at the differences between the ObjectiveCMIS Object API and Binding API. Let’s see how retrieving a folder and iterating over its children differs between the two.
Retrieving a folder
Let’s use ObjectiveCMIS to grab a folder and iterate over its children using the two different client APIs available in ObjectiveCMIS: the Object API and the Binding API. For both examples, assume that the CMISSession object you instantiated in listing 10.3 has been authenticated successfully and is still valid.
Object API
Using the Object API to get a folder is straightforward. Use retrieveObject on the CMISSession object. Once you have a handle on the CMISFolder, you can use the Object API to retrieve the folder’s children, as shown in the next listing.
Listing 10.4. Getting the children of a folder

Binding API
Now let’s see how you’d retrieve the same folder object using the Binding API. The Binding API deals with each of the CMIS services you learned about in chapter 2, so to get a folder and iterate over its children, the first step is to use the getObject service available on the Object Services to retrieve the folder object. The second step is to call getChildren on the Navigation Services to retrieve the children objects for the specified folder, shown next.
Listing 10.5. Using the Binding API to retrieve the children objects of a specific folder


That example was very basic, but it gives you a feel for the two APIs available in ObjectiveCMIS. It’s time to move on to something a little more involved. You’ll add an iOS app to The Blend.
10.2.5. Try it—writing an iOS application to capture new tracks for The Blend
Alright, it’s time for a real-world example. Suppose that the artists using The Blend to create, share, and remix audio, video, and other artwork are happy, but they’d like more options to capture content and load it into the repository. Specifically, they want to be able to use their iPhones and iPads to record music or even cool sounds while they’re out and about.
Let’s take everything that you learned in this section and put it into action by creating a mobile application for The Blend’s users. As luck would have it, some kind soul has created an audio capture application called “Blend Capture” and made it available as open source. But it isn’t CMIS-aware. So we’ll take that app and enhance it so that after a user captures audio on their mobile device, they can easily upload it to the CMIS repository used by The Blend. Sound cool? We think so too.
Before we begin, you must have The Blend web application and the InMemory Repository running on Tomcat. If you followed along in chapter 6, you’re already good to go. If not, flip back to that chapter, get the base web application and repository working, and then come back.
Don’t forget to reload your test data!
Remember that the InMemory Repository loses its data every time Tomcat restarts, so before you continue you might need to reload the test data. See chapter 6 if you forget how to do that.
For the remainder of this section, we’ll assume that the InMemory CMIS Repository is running on the same ports you set up in chapter 6. As a reminder, the InMemory Repository should be available at http://localhost:8081/inmemory/ and The Blend web application is available at http://localhost:8080/the-blend/.
Getting started with the Blend Capture Xcode project
Let’s begin by opening up the Xcode workspace for the Blend Capture mobile application. To do that, follow these steps:
1. Unzip BlendCapture.zip to $IOS_DEV_HOME. After extracting the archive, you should find the folder $IOS_DEV_HOME/BlendCapture.
2. Open the Xcode workspace file found at $IOS_DEV_HOME/BlendCapture/BlendCaptureWorkspace.xcworkspace.
3. Xcode should now launch with the Blend Capture workspace and project available. The Xcode workspace will look like figure 10.16.
Figure 10.16. Blend Capture workspace and project

Now that you have the project open, you can see that the project uses Apple’s AV Foundation framework for the audio capture and playback capabilities. The audio is captured using the AAC encoding, as the MP3 encoding is not available out of the box on iOS. As you look through the project, you’ll see that the application is very simple—it’s an iPhone application with a single view, nothing more.
Go ahead and run the Blend Capture application in the iOS simulator. If everything builds successfully, your simulator should look like the one shown in figure 10.17.
Figure 10.17. Blend Capture application running in the iOS simulator

Go ahead and play with the application. You should find that it’s a very simple audio recorder that can play back the audio it most recently captured.
Using ObjectiveCMIS to extend Blend Capture
Great! Now that you’ve explored the project and tested the application in the simulator, it’s time to enhance the application so that it exposes the ability for the user to upload captured audio to The Blend’s CMIS repository. You’ll do the following:
- Incorporate ObjectiveCMIS into the project or workspace.
- Update the application so that it provides the user the ability to upload the audio that has been captured. You’ll use ObjectiveCMIS to do the upload.
Incorporating ObjectiveCMIS
ObjectiveCMIS is a dependency for your project. You can either incorporate it using the same steps you followed earlier in section 10.2.3, or you can include ObjectiveCMIS as a workspace project.
If you want to include ObjectiveCMIS as a workspace project, follow these steps:
1. Add the ObjectiveCMIS Xcode project to the workspace so that it’s a sibling project to the Blend Capture project.
2. Add the Objective CMIS static library to the Blend Capture as a linked static library.
3. Update the User Header Search Paths setting so that it searches the $(BUILT_PRODUCTS_DIR) path recursively.
4. Add the flags -ObjC –all_load to the Other Linker Flags.
Enhancing Blend Capture to upload captured audio
Let’s now go ahead and update the Blend Capture application so that it can be used to upload audio to The Blend application using ObjectiveCMIS. To provide this functionality, you’ll need to add a new button to the view. This new button, when pressed, will attempt to upload the captured audio to the path /blend/Unsorted.
The following steps will walk you through the implementation:
1. Add a new UIButtonIBOutlet named uploadButton that has an IBAction linked to –(IBAction)uploadButtonPressed.
2. Update the nib file for the view controller by adding a new UIButton with the text Upload to The Blend, and then use interface builder to wire up the new IBOutlet and IBAction defined in the previous step. Thus, when the new UIButton receives a touch event, the IBAction -uploadButtonPressed will be messaged. The updated nib should look similar to figure 10.18.
Figure 10.18. Updated view showing The Blend upload button

Now that the view and view controller are wired up, you can implement the upload logic that will allow you to upload the captured audio to the CMIS server used by The Blend. Begin by initializing a CMISSession and retrieving the cmis:objectId for the folder /blend/Unsorted. The folder /blend/Unsorted will be the default location to which you upload the captured audio. The following listing implements this requirement in the viewDidLoad method of the view controller.
Listing 10.6. Determining the objectId of the target folder for the upload


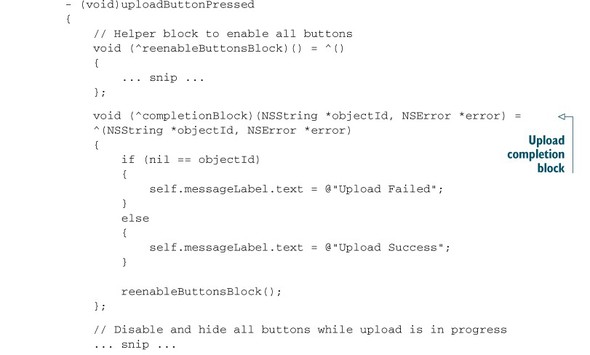
Now that you have the cmis:objectId for the Unsorted folder, you can implement the upload logic for the newly added UIButton. The upload logic should be implemented in the uploadButtonPressed IBAction method. The next listing shows an implementation of the upload logic using the ObjectiveCMIS object-oriented API.
Listing 10.7. Upload logic

Now that you’ve enhanced the Blend Capture mobile application, test it against your CMIS repository used by The Blend. (If you weren’t able to successfully enhance the Blend Capture mobile application, you can find an enhanced working version of the mobile application in the archive BlendCaptureEnhanced.zip).
To test it, follow these steps:
1. Capture some audio that you want to upload to The Blend.
2. Upload the audio to The Blend.
3. Open The Blend web application and navigate to the Unsorted directory.
4. If the upload was successful, you should find a new audio file in the Unsorted directory. Figure 10.19 shows two audio files that were captured and uploaded by the Blend Capture mobile application.
Figure 10.19. The two .aac files shown here were captured and uploaded by the Blend Capture iOS application.

In this section, you learned about ObjectiveCMIS, the new CMIS library for Objective-C and iOS. You should now have a fundamental overview of and the basic know-how for developing iOS applications using ObjectiveCMIS.
10.3. Summary
Android and iOS are the two dominant mobile platforms today. Regardless of which one is right for your solution, you saw in this chapter that applications on each platform can work with CMIS repositories. You saw that, in both cases, the libraries are fairly close ports of OpenCMIS, so a lot of what you’ve learned about OpenCMIS in earlier chapters applies to OpenCMIS for Android and for ObjectiveCMIS.
In the Android section, you saw that you can easily develop Android applications directly in Eclipse with minimal setup. These are the keys to success with OpenCMIS for Android:
- Use intents to share the CMIS session.
- Use a background thread to execute OpenCMIS code.
- Encapsulate your data in a higher-level object.
The iOS side is a little more involved in terms of setup and dependencies, and you have to use Objective-C, which is not that difficult for people who already know Java or C, but it requires a completely different toolchain. Hopefully, you saw that once you make that adjustment, writing a CMIS application for iOS is very similar to writing a Java application with OpenCMIS.
This also concludes part 2 of the book and our client-side programming examples. In part 3, we’ll turn our attention to more advanced topics like bindings, security, performance considerations, and server-side implementations.