
Chapter 7 NetWare 6 Internet Infrastructure
This chapter covers the following testing objectives for Novell Course 3004: Novell Network Management:
![]() Identify the purpose of Novell Web Services
Identify the purpose of Novell Web Services
![]() Install, configure, and manage Enterprise Web Server
Install, configure, and manage Enterprise Web Server
![]() Install and configure NetWare FTP Server
Install and configure NetWare FTP Server
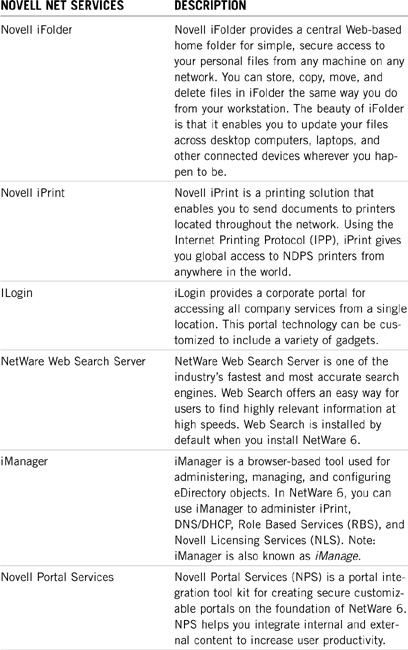
“No matter where you go, there you are!” That’s the battle cry for the new twenty-first century NetWare. NetWare 6 is Novell’s most Internet-savvy network operating system to date. In fact, NetWare 6 is the catalyst of Novell’s oneNet vision. In this capacity, it offers anytime, anywhere access to the following critical network services: filing (iFolder), printing (iPrint), network management (iManager), and directory services (eDirectory).
The mission of NetWare 6 is to extend the reach of local network services to the users who need them—to boldly serve files and printers where no one has served them before—to provide nonstop access to networked resources as the platform of oneNet. Simply stated, Novell has stripped the i from Internet and placed it on the front of seemingly every NetWare 6 utility: iFolder, iPrint, and iManager.
Welcome to Novell’s Internet!
In this chapter, we’ll extend your CNE adventure beyond the server and eDirectory, into the Web-savvy world of the Internet. Here’s a brief peek at the future:
![]() “Delivering Internet Services with Novell”—First, we’ll study the fundamentals of Internet Webmastering and learn how Novell Web service components support Novell Net Services. We’ll kick off a whole new round of buzzwords, including Apache, Enterprise Web Server, FTP, and one of my personal favorites, WebDAV.
“Delivering Internet Services with Novell”—First, we’ll study the fundamentals of Internet Webmastering and learn how Novell Web service components support Novell Net Services. We’ll kick off a whole new round of buzzwords, including Apache, Enterprise Web Server, FTP, and one of my personal favorites, WebDAV.
![]() “Building a NetWare Enterprise Web Server”—With a firm understanding of Novell’s Internet fundamentals, we’ll tackle Novell’s Web server solution: NetWare Enterprise Web Server. This world-class Internet host operates as a set of NetWare Loadable Modules (NLMs) on your NetWare 6 server. These applications work together to publish multimedia HTML files to local intranets or the global Internet. In the second lesson, we’ll study Enterprise Server configuration and learn how to manage this great Internet tool via Web Manager.
“Building a NetWare Enterprise Web Server”—With a firm understanding of Novell’s Internet fundamentals, we’ll tackle Novell’s Web server solution: NetWare Enterprise Web Server. This world-class Internet host operates as a set of NetWare Loadable Modules (NLMs) on your NetWare 6 server. These applications work together to publish multimedia HTML files to local intranets or the global Internet. In the second lesson, we’ll study Enterprise Server configuration and learn how to manage this great Internet tool via Web Manager.
![]() “Building a NetWare FTP Server”—Finally, we’ll venture beyond the simple Web server into the realm of Internet file system management. The NetWare FTP Server enables NetWare 6 clients to use File Transfer Protocol (FTP) to work with files using Web-based browsers. NetWare FTP enables you to log in to the network, list directories, and copy files from a browser.
“Building a NetWare FTP Server”—Finally, we’ll venture beyond the simple Web server into the realm of Internet file system management. The NetWare FTP Server enables NetWare 6 clients to use File Transfer Protocol (FTP) to work with files using Web-based browsers. NetWare FTP enables you to log in to the network, list directories, and copy files from a browser.
As you can see, NetWare 6 isn’t your run-of-the-mill network operating system. NetWare 6 is a full-fledged Internetwork operating system. As such, it seamlessly and securely connects geographically separated portions of your network (including users and printers) via TCP/IP and the Internet.
Let’s start with a primer in twenty-first century NetWare.
Test Objective Covered:
![]() Identify the purpose of Novell Web Services
Identify the purpose of Novell Web Services
So, you want to be a Webmaster. A noble proposition!
So far in this CNE study companion, we’ve focused on the NetWare 6 server and intra-network communications via eDirectory. Now it’s time to venture outside of this protective bubble and hang ten on the World Wide Web—also known as inter-network communications.
The Internet and the World Wide Web can be intimidating at first, but actually they’re simply electronic mechanisms for publishing multimedia documents, either internally (corporate intranets) or to the world at large (the Internet). These multimedia Web pages are published using Hypertext Markup Language (HTML) and spread around cyberspace using FTP. In addition, the Hypertext Transfer Protocol (HTTP) offers the platform for client/server communications. Welcome to acronym heaven.
Although you’ve probably used the Internet for years, you’re probably a little fuzzy on how it works and all of its underlying technologies. Before you can understand how Novell Web Services and Novell Net Services work together, you must first become a semi-expert on the behind-the-scenes magic that makes the Internet tick.
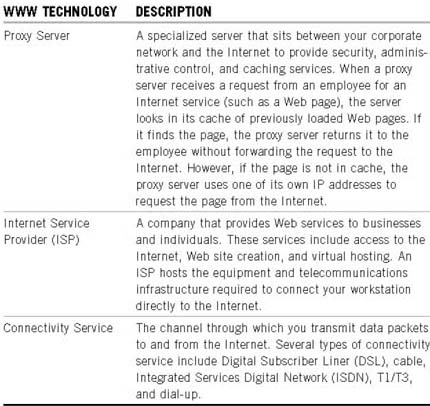
Let’s start with a primer of World Wide Web technology by following a data packet as it bounces along the information superhighway. See Table 7.1 for a brief description of my top ten favorite Internet components. After you’ve memorized this list, you will be ready to surf a data packet from your Web browser to www.Novell.com.
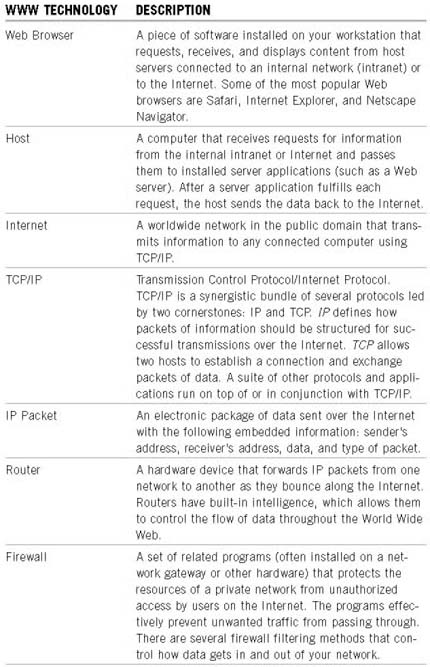
Now that you’re a pro in World Wide Web technology, let’s take a journey from your Internet browser to www.Novell.com:
1. You make an Internet request from your workstation by typing the following URL into your Web browser’s Address field: www.Novell.com.
2. The request is placed in IP packets of different types and sizes. Each packet is labeled with your address, the receiver’s address, and the packet type. Because these packets enter the Internet through a proxy server, they also receive an address for the proxy server device.
3. When the packets arrive at the proxy server, it opens them and reads the destination URL. If the URL in each packet is acceptable (according to corporate policy), the packets are sent to the firewall for further processing.
4. The firewall filters packets based on several parameters, including the source address, destination address, and port number. This helps to prevent certain types of content from being sent out over the Internet.
5. After making it through the firewall, the packets are sent to a router that forwards them to the appropriate connectivity service. This service acts as an on-ramp to the Information superhighway. An ISP often provides the router and connectivity services, although many larger corporations support their own intranet infrastructure.
6. After the packets have reached the Internet, global routers bounce them on an optimal path to the destination host. The path traveled can traverse satellite, telephone cable, or wireless waves. To view the specific route your packets take to a host, you can enter the following command at the workstation command prompt: TRACERT WWW.NOVELL.COM.
7. When your packets finally arrive at the host destination, they’re again filtered by a firewall. This firewall allows only authorized packets into the local network. When your packets arrive at this firewall, they’re screened more carefully before being allowed to continue on to the destination host.
8. On the way to the host machine, additional routers and proxy servers might process your packets. This process continues until your request reaches the destination host.
9. After arriving at the host machine, your packets are opened and the request is sent to the appropriate server application for processing. These applications include Web servers, FTP servers, and search engines. After being processed by the server application, the requested Web page is organized into multiple reply packets and sent back to the client from which the request came.
10. The reply packets bounce along the Internet on a return path to your workstation browser. When they arrive, they’re opened and the contents are displayed on your screen.
Congratulations, you made it all the way from your workstation to www.Novell.com in Provo, Utah. And just think: It only took 1–2 seconds. Clearly there’s a lot more going on behind-the-scenes than you might have realized. The goal of this section is to explore these Internet mechanisms in much more detail. After all, how are you going to save the world with NetWare 6 if you’re trapped in your local LAN?
Now let’s take a moment to explore how Novell makes use of these technologies to build Internet infrastructures for NetWare 6 CNEs using Novell’s pervasive oneNet vision. In a oneNet world, individuals must be able to access their own information, the way they want it, anytime, anywhere, from any device.
Novell’s oneNet vision is accomplished through two main suites of services:
![]() Novell Web Services—Almost all tools, utilities, and features in NetWare 6 touch Novell Web Services. As an integral part of NetWare 6, Novell Web Services provides a path for other technologies and networks to come together as one network.
Novell Web Services—Almost all tools, utilities, and features in NetWare 6 touch Novell Web Services. As an integral part of NetWare 6, Novell Web Services provides a path for other technologies and networks to come together as one network.
![]() Novell Net Services—Novell Net Services secure and power all types of networks across all leading operating systems. Novell Net Services include products such as iFolder and iPrint to unify diverse networks and technologies for the purpose of simplifying business processes and communication.
Novell Net Services—Novell Net Services secure and power all types of networks across all leading operating systems. Novell Net Services include products such as iFolder and iPrint to unify diverse networks and technologies for the purpose of simplifying business processes and communication.
Let’s learn more about how Novell Web Services and Novell Net Services combine to create a true oneNet eBusiness solution in NetWare 6.
The second half of Novell’s oneNet vision involves iPrint, iFolder, and iManager. See Table 7.3 for a description of Novell’s Net Services.
Congratulations, as a NetWare 6 CNA and CNE, you have learned how to successfully deliver Internet services via Novell’s oneNet system. In this section, we explored the fundamentals of World Wide Web technology and learned how Novell delivers Internet services with the help of two key components: Novell Web Services and Novell Net Services.
In the remainder of this chapter, we’ll explore two key components of Novell’s Internet infrastructure:
![]() NetWare Enterprise Web Server
NetWare Enterprise Web Server
![]() NetWare FTP Server
NetWare FTP Server
Without any further ado, let’s attack Novell’s first, and most sophisticated, Web service: NetWare Enterprise Web Server. Be careful—this is powerful stuff!
Test Objective Covered:
![]() Install, configure, and manage Enterprise Web Server
Install, configure, and manage Enterprise Web Server
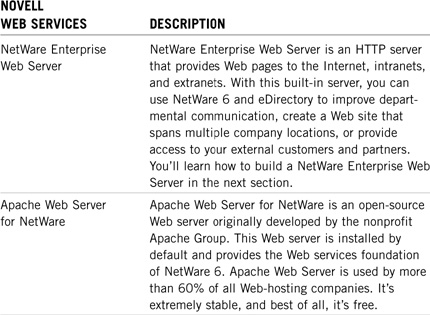
The NetWare Enterprise Web Server is a set of NetWare Loadable Modules (NLMs) that work together to publish a variety of file types, including HTML and multimedia, to local intranets or the global Internet. These files are read using graphical browsers and the HTTP protocol. This entire Internet infrastructure runs on the foundation of NetWare 6.
Following is a brief glossary of the terms we’ll use in this section:
![]() World Wide Web—A wide-area, hypermedia information-retrieval initiative that humanizes the Internet. Web servers publish information to client programs called browsers.
World Wide Web—A wide-area, hypermedia information-retrieval initiative that humanizes the Internet. Web servers publish information to client programs called browsers.
![]() Browsers—These are client applications that convert HTML (.HTM and .HTML) code into formatted text and graphics. Sample Web server files include executable (EXE), video (MOV and AVI), audio (MP3 and WAV), graphics (GIF and JPEG), and compressed (ZIP) formats.
Browsers—These are client applications that convert HTML (.HTM and .HTML) code into formatted text and graphics. Sample Web server files include executable (EXE), video (MOV and AVI), audio (MP3 and WAV), graphics (GIF and JPEG), and compressed (ZIP) formats.
![]() Hypertext Markup Language (HTML)—HTML files are text files with special tags usually enclosed in less-than (<) and greater-than (>) symbols. HTML files tell graphical browsers how to format files on your screen.
Hypertext Markup Language (HTML)—HTML files are text files with special tags usually enclosed in less-than (<) and greater-than (>) symbols. HTML files tell graphical browsers how to format files on your screen.
![]() Hypertext Transfer Protocol (HTTP)—HTTP enables Web servers and browsers to communicate with each other over the World Wide Web by using TCP/IP.
Hypertext Transfer Protocol (HTTP)—HTTP enables Web servers and browsers to communicate with each other over the World Wide Web by using TCP/IP.
The Apache Web Server foundation for Novell’s Enterprise Server is installed during NetWare 6 installation. Both servers are configured and managed using a Web-based utility called the NetWare Web Manager. If you didn’t install Enterprise Web Server during the initial NetWare 6 installation, follow these simple steps:
1. Insert the NetWare 6 Operating System CD. At the server console, enter the following command:
CDROM
2. From the NetWare Graphical Console, select Novell, Install, and then Add.
3. From the Source Path dialog box, browse to and select the NetWare6 CD volume, and then click OK.
4. Begin copying the installation files by clicking OK.
5. From the Components dialog box, select Clear All. Then, from the components list, choose the NetWare Enterprise Web Server. Click Next.
6. Log in to your network container by supplying your admin username and appropriate password.
7. From the Configure IP-Based dialog box, perform one of the following:
Leave Single IP Address selected—Use the default port numbers listed for the Enterprise Web Server or change the port numbers.
Select Multiple IP Addresses—Enter a unique secondary IP address for the Enterprise Web Server. If you use a unique IP address for Enterprise Web Server, you can use the default industry standard of port 80 for both Novell Web servers (Enterprise and Apache).
8. Select Next. When the LDAP configuration dialog box appears, select Next.
TIP
Select the Allow Clear Text Passwords option only if you want to allow unencrypted passwords and data to be accepted by the LDAP server.
9. Install the Enterprise Web Server by selecting Finish.
10. After the files have been copied and processed, complete the installation process by selecting Close. Then remove the NetWare 6 Operating System CD.
The NetWare Web Manager is a set of NLMs that are automatically loaded from AUTOEXEC.NCF when the NetWare 6 server boots. You can manually load the Web Manager at the server console by typing the following:
NSWEB
In this lesson, you’ll gain valuable Web-mastering skills with the help of the NetWare Web Manager. Here’s a quick preview:
![]() “Configuring Basic Parameters”—First, you’ll learn how to use the NetWare Web Manager to start and to stop the Enterprise Web Server and to configure basic network settings, including server name, port numbers, and IP address.
“Configuring Basic Parameters”—First, you’ll learn how to use the NetWare Web Manager to start and to stop the Enterprise Web Server and to configure basic network settings, including server name, port numbers, and IP address.
![]() “Configuring Directories in the Document Tree”—Then you’ll use the Web Manager to organize Enterprise Server content. This includes identifying and configuring document directories.
“Configuring Directories in the Document Tree”—Then you’ll use the Web Manager to organize Enterprise Server content. This includes identifying and configuring document directories.
Okay, that’s all it takes to become a NetWare Webmaster. Let’s start by exploring the fundamentals of the NetWare Web Manager tool.
NetWare Web Manager is a central point of control for Enterprise Web Server configuration management and maintenance. From this single Web-based interface, you can configure server preferences, establish access restriction security, and manage Web server documents.
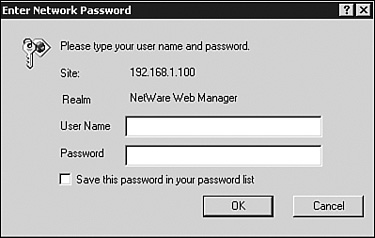
After the NetWare Web Manager has been activated, you can access it by using any standard Web browser, such as Netscape Navigator or Internet Explorer. After you’ve launched the browser at the Novell Client Workstation, enter the following Uniform Resource Locator (URL) into the Location field:
https://{hostname}:2200/
The {hostname} is the IP address (or domain name) that you assigned to the Apache Server during NetWare 6 installation. Similarly, the port number (2200, by default) is the Web Manager port number assigned during NetWare 6 installation. Make sure to document this number during installation. For purposes of security, HTTPS is used. This protocol ensures that your username and password are encrypted when you access NetWare Web Manager. When a Web browser uses HTTPS, a small graphic of a lock appears in the bottom of the browser window.
After the NetWare Web Manager has loaded, you’re presented with a variety of security certificate screens. Click Next on the Certificate home page (see Figure 7.1) to continue.
Next, Apache Web Server returns the NetWare Web Manager Authentication window. As you can see in Figure 7.2, this window includes two input fields: User Name and Password. Make sure to enter the Admin username and password that were designated during the installation of NetWare 6 and click OK.
After you’ve been authenticated, the NetWare Web Manager home page appears. This home page is a central access point for Enterprise Web Server configuration management and maintenance. As you can see in Figure 7.3, NetWare Web Manager controls a variety of NetWare 6 Web tools, including Enterprise Server, Novell eDirectory, Remote Manager, and NetWare FTP Server.
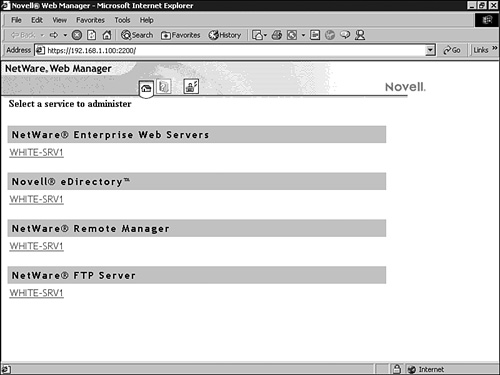
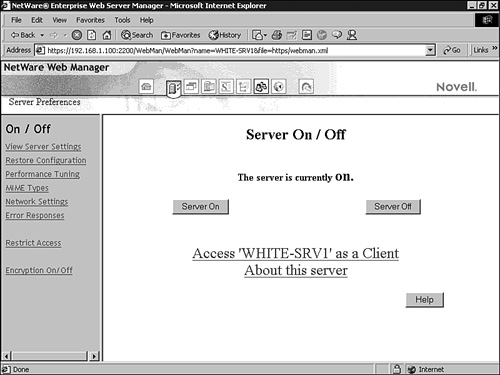
To configure the NetWare Enterprise Web Server within Web Manager, click the Enterprise Web Server link shown in Figure 7.3. (In the figure, the Enterprise Web Server is named WHITE-SRV1.) At this point, you’ll be greeted with the NetWare Enterprise Web Server Manager home page, as shown in Figure 7.4. As you can see in the figure, the home page consists of the following three frames:
![]() Server Configuration Buttons—A list of seven configuration buttons is organized horizontally across the top frame. These buttons represent the Server Preferences, Programs, Server Status, Styles, Content Management, Users and Groups, and WebDAV categories of Enterprise Server configuration. In Figure 7.4, the Server Preferences button has been activated.
Server Configuration Buttons—A list of seven configuration buttons is organized horizontally across the top frame. These buttons represent the Server Preferences, Programs, Server Status, Styles, Content Management, Users and Groups, and WebDAV categories of Enterprise Server configuration. In Figure 7.4, the Server Preferences button has been activated.
![]() Server Configuration Links—Each time you activate a configuration button, a list of configuration links appears in the left frame. These links correspond with specific subtopics under each configuration category. For example, in Figure 7.4, the Server Preferences button has been activated and the On/Off link has been chosen.
Server Configuration Links—Each time you activate a configuration button, a list of configuration links appears in the left frame. These links correspond with specific subtopics under each configuration category. For example, in Figure 7.4, the Server Preferences button has been activated and the On/Off link has been chosen.
![]() Main Frame—When you choose a server configuration link in the left frame, the corresponding Web form pops up in the main frame. This form is where you will perform all of your Web-mastering. In Figure 7.4, for example, the Server On / Off form is displayed. If you need more information about a specific form, you can always click Help for context-sensitive assistance.
Main Frame—When you choose a server configuration link in the left frame, the corresponding Web form pops up in the main frame. This form is where you will perform all of your Web-mastering. In Figure 7.4, for example, the Server On / Off form is displayed. If you need more information about a specific form, you can always click Help for context-sensitive assistance.
Most of the Enterprise Web Manager forms make changes that apply to the entire Enterprise Server. However, some forms can configure specific resources as well. Any Web Manager form that supports changes to a subset of the Enterprise Server must use the Resource Picker to specify which resources to configure.
That completes our preview of the NetWare Web Manager configuration tool. As you can see, it offers a Web-savvy look and feel with fairly straightforward navigation. Now let’s learn how to use this tool to configure basic parameters and document preferences.
The two most fundamental Enterprise Server Manager configurations are the following:
![]() On/Off
On/Off
![]() Network Settings
Network Settings
First you’ll learn how to turn the Enterprise Server on and off by using this form. Then we can explore some of the Enterprise Server’s more basic network settings, including Server Name, Server Port, and IP Address.
After it has been installed, the Enterprise Server runs constantly. It’s always listening for, accepting, and responding to user requests. When your Enterprise Web Server is running, you’ll see the Server On link in the Web Manager home page (refer to Figure 7.4).
Also, you can verify the Enterprise Server’s status within the Server Preferences category of the Enterprise Server Manager. Server Preferences include an On/Off link. Simply choose this link and you’ll see the Server On/Off form. Furthermore, you can control the status of your Web server by using the Server On/Off configuration form. Simply click Server On to activate your Web server and Server Off to deactivate it.
Now let’s move on to a little tougher configuration task: Network Settings.
Another key Web-mastering form within the Enterprise Server Manager is Network Settings. This Web-based screen can be found under the Server Preferences button by choosing the Network Settings link on the left side of the screen.
The Network Settings form includes the following two critical pieces of IP connectivity data:
![]() Server Name—This specifies the DNS host name of your Enterprise Server. This is the URL that virtual villagers use to find your city on the Information superhighway.
Server Name—This specifies the DNS host name of your Enterprise Server. This is the URL that virtual villagers use to find your city on the Information superhighway.
![]() Server Port—The Server Port number is the TCP port that the Enterprise Server listens to for HTTP requests. The standard nonsecure Web Server Port number is 80. The standard secure Web Server Port number is 443. The port number you choose can be any number from 1 to 65535. In the example in Figure 7.4, we used the default Server Port number of 2200.
Server Port—The Server Port number is the TCP port that the Enterprise Server listens to for HTTP requests. The standard nonsecure Web Server Port number is 80. The standard secure Web Server Port number is 443. The port number you choose can be any number from 1 to 65535. In the example in Figure 7.4, we used the default Server Port number of 2200.
This completes our discussion of the basic Enterprise Server Manager configuration parameters. Now let’s step up the difficulty level a little bit and learn how to Web-master Enterprise Server content, starting with directories in the document tree.
When the Enterprise Server is running, you should shift your Web-mastering energy to content management. To get started, click the Content Management configuration button at the top of the Enterprise Web Server Manager home page. As you can see in Figure 7.5, the Enterprise Server responds with a long list of configuration links in the left frame. In this section, we’ll focus on the first two links:
![]() Primary Document Directory
Primary Document Directory
![]() Additional Document Directories
Additional Document Directories
A Web server is only as good as its content. The Enterprise Server keeps its Web pages in a central location within the NetWare server directory structure. This location is known as the document root or primary document directory. By default, the primary document directory for your Enterprise Server (see Figure 7.5) is
SYS:NOVONYXSUITESPOTDOCS
By default, the Enterprise Server URL address maps to this primary document directory. Here’s an example of the correlation between the URL and the file system from the world of ACME:
![]() URL—www.acmelabs.com/pr/info.html
URL—www.acmelabs.com/pr/info.html
![]() Document directory—sys:novonyxsuitespotdocsprinfo.html
Document directory—sys:novonyxsuitespotdocsprinfo.html
Enterprise Server Manager provides the Web form that you need to change Enterprise Server’s primary document directory. As you can see in Figure 7.5, Enterprise Web Server Manager uses the NOVONYX file system by default.
The beauty of this system is that it enables you to move your Web content anywhere on the NetWare file server without having to remap all of your URLs. All you have to do is simply change the primary document directory. Of course, be sure to save and apply your changes after you’ve finished.
After you’ve established your primary document directory, you might want to configure additional URLs for content outside the default directory structure. The Enterprise Server enables you to serve documents from any directory on the NetWare 6 server as long as you establish a unique URL prefix (called a virtual directory). Here’s how it works:
![]() URL prefix—For virtual villagers to find Web content outside the default file system, you’ll have to give them an extended URL address. For example, users who want a graphical map of ACME distribution sites will have to pull up Web pages from the new Distribution URL. This Distribution prefix is appended to the standard URL. In our AMCELABS example, any user who points a browser to www.acmelabs.com/distribution/ will retrieve Web pages from the directory specified in the next bullet.
URL prefix—For virtual villagers to find Web content outside the default file system, you’ll have to give them an extended URL address. For example, users who want a graphical map of ACME distribution sites will have to pull up Web pages from the new Distribution URL. This Distribution prefix is appended to the standard URL. In our AMCELABS example, any user who points a browser to www.acmelabs.com/distribution/ will retrieve Web pages from the directory specified in the next bullet.
![]() Map to directory—Next you must provide Enterprise Server with the content directory for the new URL. In this field, be sure to type the following absolute directory path: SYS:NOVONYXACMELABSDISTRIBUTION. This is where the graphical distribution maps are stored in HTML format. When users access the Distribution URL, their browser automatically finds the HTML map files.
Map to directory—Next you must provide Enterprise Server with the content directory for the new URL. In this field, be sure to type the following absolute directory path: SYS:NOVONYXACMELABSDISTRIBUTION. This is where the graphical distribution maps are stored in HTML format. When users access the Distribution URL, their browser automatically finds the HTML map files.
This completes our discussion of Enterprise Server configuration and management. As you can see, this Internet component is at the heart of your Web-mastering skills. In review, NetWare Enterprise Web Server is a set of NLMs that work together to publish multimedia HTML files to local intranets or the global Internet—all on the foundation of NetWare 6.
That was fun. Now you’re much closer to becoming a world-class Webmaster. Next we must expand our Internet skills into the realm of Web-based file system management. Next stop, NetWare FTP Server.
Test Objective Covered:
![]() Install and configure NetWare FTP Server
Install and configure NetWare FTP Server
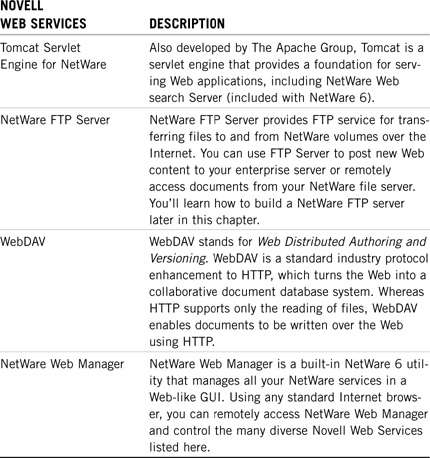
The NetWare FTP Server enables your NetWare 6 clients to use File Transfer Protocol (FTP) to work with files within their corporate intranet or on the global Internet via Web-based browsers. FTP is a fast and efficient protocol for transferring files on TCP/IP networks, such as the Internet. In addition, FTP includes functions to log in to the network, to list directories, and to copy files.
All of these Web filing features operate in a client/server relationship: Your NetWare 6 workstation and browser act as the client and the NetWare FTP Server is the server. FTP transfers can be initiated by entering the URL preceded with ftp:// rather than the standard http://. Corporations typically use FTP servers for archiving and distributing documents, computer programs, pictures, sound, and video.
In this section, you’ll learn how to activate NetWare FTP Server on top of your NetWare 6 file server. In addition, you’ll learn how to use the NetWare FTP Server Manager to configure FTP users and to establish security restrictions.
Let’s get started.
If NetWare FTP Services is installed on your NetWare 6 server, the NetWare FTP Server icon appears on the NetWare Web Manager home page (refer to Figure 7.3 earlier in this chapter). After the FTP Server has been installed and loaded, it runs constantly, listening for and responding to FTP requests. To access the NetWare FTP Server Manager (shown in Figure 7.6), click the button displaying the name of the server from the NetWare Web Manager home page.
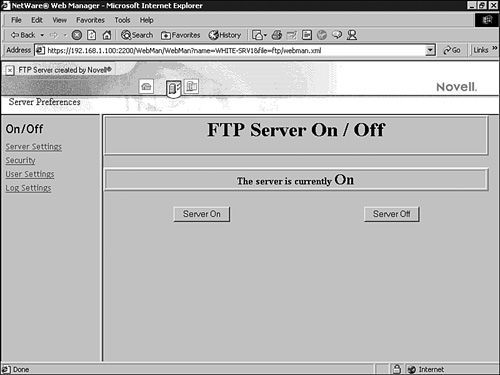
As Figure 7.6 illustrates, the FTP Server Manager home page resembles the Enterprise Web Server home page, including configuration buttons, configuration links, and a main frame. In our example, the Server Preferences configuration button has been activated along with the On/Off configuration link. From within this management console, you can start, stop, and restart NetWare FTP Server. In addition, you can respectively shut down and restart an FTP server from the NetWare server console with the following commands:
After you’ve activated NetWare FTP Server, you can use FTP Server Manager to set the default home directory and/or configure user restrictions. Let’s take a closer look.
When an authorized FTP client accesses NetWare FTP Server via Netscape Navigator or Internet Explorer, the user is placed in the SYS:PUBLIC home directory by default. You can specify a different default home directory by selecting the User Settings link from the Server Preferences configuration button of FTP Server Manager. In the Default Home Directory field, enter the directory path by using the following format:
Volume:/directory/subdirectory
After you’ve entered the new default home directory, you’ll have to click Save and OK to complete the Web-based form. Then you must restart the FTP server in order for the changes to take effect.
By default, the NetWare FTP Server allows all eDirectory users to log in and browse through SYS:PUBLIC and other public directories. For better security, you should specify access restrictions at a variety of different levels using the SYS:ETC/FTPREST.TXT restrictions file. The following levels of access restrictions are available:
![]() Container Level—Restrictions can be specified for any eDirectory container. This setting controls all users in that container and its subcontainers.
Container Level—Restrictions can be specified for any eDirectory container. This setting controls all users in that container and its subcontainers.
![]() User Level—Restrictions can be specified for a particular user.
User Level—Restrictions can be specified for a particular user.
![]() Domain Level—Restrictions can be specified at a domain level. This controls all hosts in that domain and its subdomains.
Domain Level—Restrictions can be specified at a domain level. This controls all hosts in that domain and its subdomains.
![]() Host Level—Restrictions can be specified for a particular host.
Host Level—Restrictions can be specified for a particular host.
Table 7.4 contains a description of the access rights permitted by NetWare FTP Server. When modifying these rights in the NetWare FTP Server restriction file, keep in mind that each line should have one entity name and corresponding access right, and all rights specified on that line are applied to the entity. Also, make sure to assign the rights according to the order in which they appear in the restriction. If different rights apply to the same entity, those rights that appear last in the restriction file are applied. Finally, if the restrictions file does not exist or is empty, access is given to all users without restrictions. Ouch!
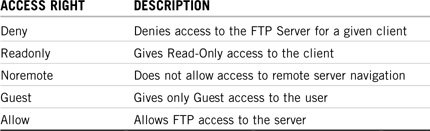
Following is an example of NetWare FTP Server restrictions at ACME:
.NORAD.ACME ACCESS=ALLOW
.LABS.NORAD.ACME ACCESS=DENY
.AEinstein.LABS.NORAD.ACME ACCESS=READONLY
In the preceding example, AEinstein at LABS is allowed the Read-Only right. Other users in the LABS.NORAD.ACME container are denied access. However, all other organizational units in the NORAD location are allowed access to the NetWare FTP Server. Remember, you read from the top to bottom when setting FTP Server restrictions, and the last entry wins!
If your NetWare FTP Server has documents or programs that the public needs access to, it’s impractical to set up a user account for every individual user on the Internet. Fortunately, NetWare FTP Server supports an anonymous user account with access to files intended for public use. To enable or disable access to anonymous users, set the following three User Settings parameters in the NetWare FTP Server Manager (see Figure 7.7):
![]() Allow Anonymous Access—YES or NO (default is NO)
Allow Anonymous Access—YES or NO (default is NO)
![]() Anonymous Users Home Directory—Volume:/directory/subdirectory (default is SYS:/PUBLIC)
Anonymous Users Home Directory—Volume:/directory/subdirectory (default is SYS:/PUBLIC)
![]() Require E-mail Address for Password—YES or NO (default is YES)
Require E-mail Address for Password—YES or NO (default is YES)
To access the FTP server, the anonymous user must be represented by a valid eDirectory User object. This object can be created in ConsoleOne with the login name Anonymous and appropriate file system rights to the anonymous user home directory.
This completes our lesson in NetWare FTP Services. With this Internet infrastructure component activated, files will appear as hyperlink documents inside client browsers. As a matter of fact, the Enterprise Server, FTP, and TCP/IP work in synergy to provide transparent data access to our World Wide Web netizens.
In this chapter, you gained first-hand experience in extending the reach of local network services to the users who need them around the world. Together, we learned how to build an anytime, anywhere network for diverse users by traversing Novell’s Internet infrastructure, building an Enterprise Web Server, and sharing files via NetWare’s FTP solution.
So, where do we go from here? Easy: server optimization. Now it’s time to move from the Internet services of NetWare 6 into a chapter full of advanced administration tasks, including memory management, server optimization, network optimization, and even a quick look at NetWare 6 multitasking, multithreading, and multiprocessing.
Ready, set, take off!