
Chapter 8 NetWare 6 Optimization
This chapter covers the following testing objectives for Novell Course 3004: Novell Network Management:
![]() Identify NetWare 6 Server Management Utilities
Identify NetWare 6 Server Management Utilities
![]() Identify Adjustable NetWare 6 Resources
Identify Adjustable NetWare 6 Resources
![]() Manage and Optimize the Memory Subsystem
Manage and Optimize the Memory Subsystem
![]() Manage and Optimize the Disk and Traditional File System
Manage and Optimize the Disk and Traditional File System
![]() Manage and Optimize LAN Communications
Manage and Optimize LAN Communications
Optimization...a whole new frontier. Welcome to NetWare 6 server and network optimization.
![]() Server memory—This has the most dramatic effect on server performance. Memory optimization involves memory allocation, virtual memory, and memory protection.
Server memory—This has the most dramatic effect on server performance. Memory optimization involves memory allocation, virtual memory, and memory protection.
![]() Server disk—Blocks and buffers affect server memory and disk utilization and, therefore, overall network performance. Check out the architecture in Figure 8.1. Disk optimization starts with NSS and leads to block suballocation and file compression. In addition, you can further optimize the server by prioritizing applications.
Server disk—Blocks and buffers affect server memory and disk utilization and, therefore, overall network performance. Check out the architecture in Figure 8.1. Disk optimization starts with NSS and leads to block suballocation and file compression. In addition, you can further optimize the server by prioritizing applications.

![]() Network packets—The fundamental building blocks of network communication. Network optimization involves MONITOR.NLM, packet receive buffers, packet bursting, and large Internet packets (LIPs).
Network packets—The fundamental building blocks of network communication. Network optimization involves MONITOR.NLM, packet receive buffers, packet bursting, and large Internet packets (LIPs).
Now that you have a handle on that picture, let’s start our journey by taking a look at the really big picture. Let’s begin our discussion with an overview of the server management utilities included in NetWare 6 and some very cool adjustable resources.
Test Objectives Covered:
![]() Identify NetWare 6 Server Management Utilities
Identify NetWare 6 Server Management Utilities
![]() Identify Adjustable NetWare 6 Resources
Identify Adjustable NetWare 6 Resources
NetWare 6 includes three server management utilities:
![]() Remote Manager—We discussed this cool utility in detail in Chapter 3, “NetWare 6 Server Management.” Almost all the optimization strategies discussed in this chapter can be accomplished using Remote Manager.
Remote Manager—We discussed this cool utility in detail in Chapter 3, “NetWare 6 Server Management.” Almost all the optimization strategies discussed in this chapter can be accomplished using Remote Manager.
![]() SET parameters—You use SET parameters to adjust values for allocating resources related to the memory subsystem, disk and file system, communications, and processor utilization. The default values for most SET parameters provide optimal performance, but a few of these parameters even self-tune themselves to make adjustments to resource allocations according to need and availability. You use the server console, the MONITOR utility, or Remote Manager to view or make adjustments yourself.
SET parameters—You use SET parameters to adjust values for allocating resources related to the memory subsystem, disk and file system, communications, and processor utilization. The default values for most SET parameters provide optimal performance, but a few of these parameters even self-tune themselves to make adjustments to resource allocations according to need and availability. You use the server console, the MONITOR utility, or Remote Manager to view or make adjustments yourself.
![]() MONITOR—This server-based utility provides a menu-based interface that you use to modify SET parameters. You can view the settings, set parameters, and observe network statistics. You use this utility by loading MONITOR.NLM from the server console. The opening menu provides general information and a list of available options, including categories of parameters such as connections, storage devices, time, and server parameters.
MONITOR—This server-based utility provides a menu-based interface that you use to modify SET parameters. You can view the settings, set parameters, and observe network statistics. You use this utility by loading MONITOR.NLM from the server console. The opening menu provides general information and a list of available options, including categories of parameters such as connections, storage devices, time, and server parameters.
But what about that self-tuning thing? I’m glad you asked.
NetWare 6 uses SET parameters to establish minimum and maximum values as well as wait times for adjustable parameters related to server resources. The number of resources allocated by the server at startup represents the minimum value. The upper limit that NetWare 6 can use as it self-tunes represents the maximum value. The amount of time the operating system must wait before allocating a new resource is the wait time.
When the server receives a request for services, new resources typically aren’t immediately allocated. NetWare 6 waits for an existing resource to become available to service the request. No new resources are allocated if the requested resource becomes available. However, if the resources don’t become available during the wait time, new resources are then allocated. This ensures that peaks in server activity do not result in permanently allocating more resources than are typically needed.
Self-tuning means that the operating system makes adjustments to resource allocation that will return to the minimum SET parameter value when the server is restarted. Self-tuning does not mean permanent changes to SET parameters; unfortunately, that can only be done manually.
TIP
If your network consistently demands more than the default minimum, you should adjust your SET parameters so that the server can handle the normal level of resource demands now and forever.
Among the resources that NetWare 6 self-tunes are the following:
![]() Directory cache buffers
Directory cache buffers
![]() Load balancing for multiple processors
Load balancing for multiple processors
![]() Memory for NLM programs
Memory for NLM programs
![]() Router/server advertising
Router/server advertising
![]() Routing buffers
Routing buffers
![]() Service processes
Service processes
TIP
You can view a complete list of resources that NetWare 6 self-tunes by visiting www.novell.com/documentation/lg/nw6p/index.html or www.novell.com/documentation/lg/nw6p/index.html?page=/documentation/lg/nw6p/smem_enu/data/h9kdb57n.html.
Adjustable resources for NetWare 6 can be categorized as follows:
![]() Memory subsystem—By adjusting these values, you control the way server memory is used. You can optimize the memory subsystem by implementing and setting values for the caching, virtual memory, and the protected address space.
Memory subsystem—By adjusting these values, you control the way server memory is used. You can optimize the memory subsystem by implementing and setting values for the caching, virtual memory, and the protected address space.
![]() Disk and file system—By adjusting these values, you control the way disk space is used and the way files are stored on a NetWare 6 server. You can optimize the disk and file system by implementing and setting values for the volume block size, suballocation, and file compression.
Disk and file system—By adjusting these values, you control the way disk space is used and the way files are stored on a NetWare 6 server. You can optimize the disk and file system by implementing and setting values for the volume block size, suballocation, and file compression.
![]() LAN communications and service processes—By adjusting these values, you control the way memory buffers are used to handle data packets and service requests to and from the network. You can optimize LAN communications for packet receive buffers and service processes.
LAN communications and service processes—By adjusting these values, you control the way memory buffers are used to handle data packets and service requests to and from the network. You can optimize LAN communications for packet receive buffers and service processes.
Throughout the remainder of this chapter, we’ll delve more deeply into these adjustable resource categories.
Now that you understand the big picture, let’s take some time to study memory management. You do remember how to study, don’t you?
Test Objective Covered:
![]() Manage and Optimize the Memory Subsystem
Manage and Optimize the Memory Subsystem
Server memory obviously has a dramatic effect on NetWare 6 server performance. Thus, NetWare 6 memory management architecture is designed to achieve the following goals:
![]() Allocate memory to the processes that need it
Allocate memory to the processes that need it
![]() Utilize memory deallocation
Utilize memory deallocation
![]() Achieve efficient performance
Achieve efficient performance
![]() Create a secure server environment
Create a secure server environment
![]() Provide a simple, straightforward environment for NLM developers
Provide a simple, straightforward environment for NLM developers
Believe it or not, NetWare 6 requires a minimum of 256MB of RAM and can access up to 64GB of RAM. After SERVER.EXE has been loaded, the remaining memory on the system is assigned to cache memory and virtual memory. This is then made available to NLMs and other processes.
The memory allocator in NetWare 6 can only handle so much. It can allocate only up to 4GB of memory to cache memory. If you have more than that on your system, the remaining memory is allocated to the virtual memory system. We’ll look into virtual memory in detail later in this chapter.
When data is stored in cache memory, it’s stored in 4KB blocks called cache buffers. These buffers contain recently used data just in case it’s needed again. Because data can be written to or read from cache memory hundreds of times faster than it can be written to or read from a disk, caching significantly speeds up processing.
Cache memory is allocated for all server processing needs, including the following:
![]() Storing volume file allocation tables (FATs) and suballocation tables
Storing volume file allocation tables (FATs) and suballocation tables
![]() Storing volume directory entry tables
Storing volume directory entry tables
![]() Storing data files for users
Storing data files for users
![]() Storing NLMs (such as LAN drivers, disk drivers, and management utilities)
Storing NLMs (such as LAN drivers, disk drivers, and management utilities)
![]() Building hash tables for directory names
Building hash tables for directory names
![]() Creating protected address spaces
Creating protected address spaces
![]() Allocating memory used by NLMs
Allocating memory used by NLMs
In this first section on optimization, we’ll explore three important aspects of NetWare 6 memory management: memory allocation, virtual memory, and memory protection.
NetWare 6 includes a highly efficient memory allocation strategy called paging. Each memory page consists of a 4KB block of RAM. With paging, the server can assign physically noncontiguous pages of memory in a logically contiguous (adjacent) range, resulting in efficient memory allocation and utilization.
As a network administrator, you must be aware of how memory allocation affects server performance. Specifically, the paging memory allocation scheme reserves a special memory location in RAM for processes, instructions, and data. NetWare then assigns each process to its own allocation pool. A process requests memory from its own allocation pool and returns memory to the same pool. This minimizes fragmentation and maximizes efficiency. It also enables third-party developers to easily create and optimize applications.
In addition, NetWare 6 includes the following server processes for recovering unused segments of memory and returning them to a common memory pool:
![]() Memory deallocation—NLM programmers can tell NetWare that a particular buffer of memory is no longer needed by using an application program interface (API) called Free, which labels the memory as deallocated.
Memory deallocation—NLM programmers can tell NetWare that a particular buffer of memory is no longer needed by using an application program interface (API) called Free, which labels the memory as deallocated.
![]() Logical memory addressing—When contiguous blocks of memory pages are allocated and then freed, small segments of memory might be left over. After a while, many such isolated pieces of memory are left over, but are too small to be used. This is known as memory fragmentation, and can prevent the server from satisfying memory requests. The memory management subsystem provides a logical space manager that lists logical memory addresses from 0 to 4GB. When an NLM needs a contiguous block of memory, NetWare 6 finds a set of logical, contiguous addresses in the logical space, and then allocates physical memory that might or might not be contiguous. NetWare 6 then binds the logical addresses to the physical addresses.
Logical memory addressing—When contiguous blocks of memory pages are allocated and then freed, small segments of memory might be left over. After a while, many such isolated pieces of memory are left over, but are too small to be used. This is known as memory fragmentation, and can prevent the server from satisfying memory requests. The memory management subsystem provides a logical space manager that lists logical memory addresses from 0 to 4GB. When an NLM needs a contiguous block of memory, NetWare 6 finds a set of logical, contiguous addresses in the logical space, and then allocates physical memory that might or might not be contiguous. NetWare 6 then binds the logical addresses to the physical addresses.
![]() Garbage collection—After they’ve been freed, these deallocated memory buffers are ready for collection. This is accomplished using a sophisticated internal garbage collection process, which automatically occurs every five minutes (by default). If virtual memory is heavily used, garbage collection is activated immediately. You can optimize garbage collection by using the SET GARBAGE COLLECTION INTERVAL command (the range is from 1 to 60 minutes; the default is 5). You can also use Remote Manager (select Manage Server, and then SET Parameters, and finally Memory) or MONITOR (select Server Parameters and then Memory).
Garbage collection—After they’ve been freed, these deallocated memory buffers are ready for collection. This is accomplished using a sophisticated internal garbage collection process, which automatically occurs every five minutes (by default). If virtual memory is heavily used, garbage collection is activated immediately. You can optimize garbage collection by using the SET GARBAGE COLLECTION INTERVAL command (the range is from 1 to 60 minutes; the default is 5). You can also use Remote Manager (select Manage Server, and then SET Parameters, and finally Memory) or MONITOR (select Server Parameters and then Memory).
Periodic garbage collection is necessary to ensure that deallocated memory is recovered by NetWare. Furthermore, garbage collection can be accelerated by other memory management features, such as virtual memory. By default, NetWare checks virtual memory usage every 10 seconds. If virtual memory is being used heavily, garbage collection is immediately activated.
If virtual memory usage is low, garbage collection occurs according to a variety of server-based parameters. For example, you can use the SET GARBAGE COLLECTION INTERVAL command to optimize the garbage collection process. This parameter sets the interval for collection. The range is from 1 to 60 minutes; the default is 5 minutes. You can set this parameter using Remote Manager or MONITOR.
We’ll explore SET commands later in the chapter. But here’s a quick preview. SET is a NetWare 6 console command. The great news about SET is that when you select a category, the current values for each parameter display onscreen. In addition, the range of parameters is also displayed so that you know how high or low you can go. It sure beats looking it up in a manual.
In addition to the values you can see with SET, MONITOR.NLM provides numerous memory utilization statistics. Most of them are found under the System Resources option. Figure 8.2 illustrates the NetWare 6 memory utilization statistics. Later in this chapter, we’ll use this screen to determine how our server resources utilize available RAM.

Memory deallocation and garbage collection go a long way in helping you optimize physical server RAM. However, they can’t solve one critical problem: running out of memory! Fortunately, NetWare 6 offers virtual memory to solve this problem. Let’s take a closer look.
NetWare 6 virtual memory increases server-based application performance by supporting as much memory as applications require, whenever they require it. This is accomplished by temporarily storing memory files on the hard drive when there isn’t enough RAM to complete an operation.
NetWare 6 monitors available server memory using the Least Recently Used (LRU) algorithm. Data that hasn’t been used for some time is moved from memory to disk, thus freeing memory for other uses. When the data on disk is needed again, it’s moved back into available memory. Because data is swapped on and off the disk, the available memory supports more operations than its physical capacity would usually allow.
When data is moved from memory to disk, it is stored in a swap file. By default, NetWare 6 automatically creates a swap file on the SYS: volume. You can create swap files on any NetWare 6 volume, although only one swap file can exist per volume.
Java applications and server modules that are loaded into protected address spaces automatically use virtual memory. Although swapping data between memory and disk requires additional system resources, it increases the memory available for applications—ultimately improving overall server performance, if managed correctly.
Following are some important considerations for using NetWare 6 virtual memory:
![]() You can only create one swap file per volume. The swap file on the SYS: volume is created by default. It is named _SWAP_.MEM and occupies 2MB in the root directory. You can delete this swap file and move it to another volume if desired. Swap file management tasks must be performed using the NetWare SWAP utility. These operations cannot be performed using Windows or DOS file management utilities. (Note: You can also view, but not modify, swap file statistics using MONITOR.NLM.)
You can only create one swap file per volume. The swap file on the SYS: volume is created by default. It is named _SWAP_.MEM and occupies 2MB in the root directory. You can delete this swap file and move it to another volume if desired. Swap file management tasks must be performed using the NetWare SWAP utility. These operations cannot be performed using Windows or DOS file management utilities. (Note: You can also view, but not modify, swap file statistics using MONITOR.NLM.)
![]() Data moved to virtual memory will be stored in any available swap file on any available volume. To avoid running out of space on SYS:, you should consider moving the swap file on SYS: to a different volume. The best choices for swap file placement are fast volumes with large amounts of available disk space.
Data moved to virtual memory will be stored in any available swap file on any available volume. To avoid running out of space on SYS:, you should consider moving the swap file on SYS: to a different volume. The best choices for swap file placement are fast volumes with large amounts of available disk space.
![]() You can add a swap file to a volume even if the volume isn’t mounted. The file will then be created automatically when the volume is mounted.
You can add a swap file to a volume even if the volume isn’t mounted. The file will then be created automatically when the volume is mounted.
![]() When you down a server, all swap files on host volumes are deleted. The exception is the SYS: volume, which automatically re-creates its swap file each time the server is started. In addition, swap files are deactivated when host volumes are dismounted. Swap files are then automatically reactivated when host volumes are mounted.
When you down a server, all swap files on host volumes are deleted. The exception is the SYS: volume, which automatically re-creates its swap file each time the server is started. In addition, swap files are deactivated when host volumes are dismounted. Swap files are then automatically reactivated when host volumes are mounted.
![]() Swap files are dynamic. They change in size as data is swapped in and out of memory.
Swap files are dynamic. They change in size as data is swapped in and out of memory.
![]() You can specify the minimum, maximum, and minimum free settings for swap files on a designated volume. The default minimum swap file size is 2MB, the default maximum size is the free volume space, and the default minimum free space on the volume is 5MB. If you don’t specify the swap file settings, the defaults take effect.
You can specify the minimum, maximum, and minimum free settings for swap files on a designated volume. The default minimum swap file size is 2MB, the default maximum size is the free volume space, and the default minimum free space on the volume is 5MB. If you don’t specify the swap file settings, the defaults take effect.
You can use the SWAP console command to manage NetWare 6 virtual memory at the server. For more information, type HELP SWAP at the server console. With this utility, you can display information about swap files currently in use, create swap files on specific volumes, delete a swap file, and change swap file parameter values. Examine Table 8.1 for some quick tips on virtual memory management using SWAP.

If the overall supply of server memory is low, swapping occurs more frequently. If memory is extremely low, however, the server might spend numerous processor cycles swapping memory to and from the disk and then have no time left to accomplish useful work. This is called disk thrashing.
If disk thrashing occurs, you should immediately add more RAM to the server. Virtual memory cannot compensate for an overall lack of server memory, although it can prevent processes from failing, and it can enable the server to continue to function. The real value of virtual memory is that it enables a server to use a sufficient supply of memory more efficiently, thus improving server performance. Running server applications in virtual memory also protects the application and improves server reliability.
Any NLM that you load from the server console is always loaded into the OS address space unless you explicitly specify that it be loaded in a protected space. NetWare 6 includes a memory protection scheme that enables you to load server programs into the following two different types of memory space:
![]() Protected address space—Also known as protected memory. Protected address space is a portion of memory that is allowed only carefully controlled communication with the NetWare operating system. NetWare creates a boundary around the protected address space so that any programs running in the space are prohibited from referencing areas of memory outside the boundary. Therefore, the protected address space provides a safe place to run programs because modules loaded into a protected address space can’t corrupt the operating system or cause server abends.
Protected address space—Also known as protected memory. Protected address space is a portion of memory that is allowed only carefully controlled communication with the NetWare operating system. NetWare creates a boundary around the protected address space so that any programs running in the space are prohibited from referencing areas of memory outside the boundary. Therefore, the protected address space provides a safe place to run programs because modules loaded into a protected address space can’t corrupt the operating system or cause server abends.
![]() OS address space—Also known as kernel address space. The NetWare operating system itself cannot run in a protected address space. Instead, it’s loaded outside the boundary of protected memory. This unprotected space offers better performance and direct connections to critical server programs.
OS address space—Also known as kernel address space. The NetWare operating system itself cannot run in a protected address space. Instead, it’s loaded outside the boundary of protected memory. This unprotected space offers better performance and direct connections to critical server programs.
NetWare 6 memory protection is accomplished using SYSCALLS.NLM. This server-based utility works in conjunction with the memory protection subsystem to prevent modules in a protected address space from having direct contact with anything outside the boundary.
By default, modules that are loaded into protected address spaces use virtual memory. Both the module and the data it accesses can be swapped to disk. Modules that are loaded outside of protected address space can also use virtual memory, but the modules themselves cannot be swapped to disk.
Follow these guidelines when using NetWare 6 memory protection:
![]() Because modules loaded into a protected address space have controlled communication with the operating system, all modules that must communicate with each other should be loaded into the same protected address space. NetWare automatically loads all dependent modules of an NLM in the same space as the host program.
Because modules loaded into a protected address space have controlled communication with the operating system, all modules that must communicate with each other should be loaded into the same protected address space. NetWare automatically loads all dependent modules of an NLM in the same space as the host program.
![]() If the same module is loaded into more than one address space, the module’s code will be shared among the address spaces. Therefore, loading a module into multiple address spaces does not require additional memory for the module itself because only the data for the required module is unique in each space.
If the same module is loaded into more than one address space, the module’s code will be shared among the address spaces. Therefore, loading a module into multiple address spaces does not require additional memory for the module itself because only the data for the required module is unique in each space.
![]() Even if an NLM is designed to be loaded only once, you can load multiple copies of the NLM if you load them into different protected spaces.
Even if an NLM is designed to be loaded only once, you can load multiple copies of the NLM if you load them into different protected spaces.
![]() When you load modules into a protected address space, NetWare assigns whatever amount of memory the loaded modules need (up to a maximum of 512MB). The maximum size of a protected address space is fixed, but within that maximum limit, the memory size of the space grows and shrinks as needed by the loaded modules.
When you load modules into a protected address space, NetWare assigns whatever amount of memory the loaded modules need (up to a maximum of 512MB). The maximum size of a protected address space is fixed, but within that maximum limit, the memory size of the space grows and shrinks as needed by the loaded modules.
![]() If you want the server to clean up an abended address space, enter the following command at the server console:
If you want the server to clean up an abended address space, enter the following command at the server console:
SET Memory Protection Fault Cleanup=On
If an address space abends, the server removes the space and its modules and returns the resources to the system. If the Memory Protection Fault Cleanup parameter is set to OFF, the situation is left to the abend recovery mechanism.
![]() A program running within a protected address space will tax server performance about three times more than if you run it outside of a protected address space.
A program running within a protected address space will tax server performance about three times more than if you run it outside of a protected address space.
Network administrators can create a protected address space, load modules into a protected address space, unload modules from a protected address space, remove a protected address space, or kill a protected address space by using the commands in Table 8.2.


The following cannot be loaded into protected space:
![]() SERVER.EXE
SERVER.EXE
![]() LAN and disk drivers
LAN and disk drivers
![]() MONITOR
MONITOR
![]() Modules that use interrupt time processing
Modules that use interrupt time processing
![]() Modules that use direct operating system interfaces
Modules that use direct operating system interfaces
![]() Modules that import operating system data items
Modules that import operating system data items
![]() Other modules or applications that aren’t designed to run in protected address spaces
Other modules or applications that aren’t designed to run in protected address spaces
NetWare can access data from RAM much faster than from other memory on the system. A cache is a temporary area in RAM that stores frequently used information from the hard disk. Think of caching as the reverse of virtual memory. Caching holds frequently used information in memory for quick access, whereas virtual memory moves information out of RAM and into a file on the hard disk.
When the server finds data in RAM (rather than having to go to the disk), it is known as a cache hit. When you have sufficient RAM to cache disk data, you see a high percentage of cache hits, which means an increase in server performance. You can view long-term cache hit statistics from MONITOR by selecting Disk Cache Utilization from the Available Options menu. Note: If your system is strictly NSS, Long Term Cache Hits will be 0.
NetWare 6 includes the following types of memory caching:
![]() File cache—Used with both the traditional file system and NSS, file cache is a pool of 4KB memory pages that stores recently used file data. You strive to be able to retrieve a high percentage of data from cache. Monitoring the disk cache utilization statistic can aid in estimating whether your server has sufficient memory to service requests from cache.
File cache—Used with both the traditional file system and NSS, file cache is a pool of 4KB memory pages that stores recently used file data. You strive to be able to retrieve a high percentage of data from cache. Monitoring the disk cache utilization statistic can aid in estimating whether your server has sufficient memory to service requests from cache.
![]() Directory cache—Used only with the traditional file system, directory cache stores disk directory entries. Upon installation of NetWare, 20 directory cache buffers of 4KB each are allocated. NetWare tunes the server by increasing the number of directory cache buffers as needed.
Directory cache—Used only with the traditional file system, directory cache stores disk directory entries. Upon installation of NetWare, 20 directory cache buffers of 4KB each are allocated. NetWare tunes the server by increasing the number of directory cache buffers as needed.
You can tune file cache by making adjustments to certain memory parameters. Because NetWare tunes the allocation of memory resources, you should wait a week or two after initial installation before making a manual tune. The key to tuning file cache settings for NSS is to monitor performance over a period of time and to correctly interpret performance statistics. Cache hit percentaage will be your key statistic.
Over the long haul, cache hit percentage should be more than 90%. Anything lower than 90% usually is indicative of too little RAM. However, one or more of the following parameters could be set too low:
![]() Cache balance—This represents the percentage of cache blocks that NSS uses. In networks that use both the traditional file system and NSS, you should adjust this parameter to reflect the type of volume you use the most. You can set cache balance by entering the following command at the server console:
Cache balance—This represents the percentage of cache blocks that NSS uses. In networks that use both the traditional file system and NSS, you should adjust this parameter to reflect the type of volume you use the most. You can set cache balance by entering the following command at the server console:
NSS /CACHEBALANCE=x
The default is 60, which provides 60% of the available disk cache to NSS. Your best performance can come from a system that uses only NSS. In this case, you can push the cache balance to 90%. The 60% guideline is a baseline for a mixed system.
![]() Closed file cache size—This represents the maximum number of closed files that can be kept in a file cache (the default is 50,000). If you have applications that consistently open and close the same server files, bump this up to 100,000. To do this, at the server console enter the following command:
Closed file cache size—This represents the maximum number of closed files that can be kept in a file cache (the default is 50,000). If you have applications that consistently open and close the same server files, bump this up to 100,000. To do this, at the server console enter the following command:
NSS /CLOSEDFILECACHESIZE=x
NSS adjusts the number of closed files it keeps in cache to balance the needs of the file system with the needs of other processes. This parameter merely indicates a maximum amount, not the number of closed files that NSS keeps in cache.
![]() File flush timer and buffer flush timer—This represents the number of seconds modified files and buffers remain in memory before being written back to disk. The default is 10 seconds. Obviously, increasing this number improves server performance because the server waits longer to write data to disk. However, increasing this number also increases the risk of data loss when a system failure occurs. To modify this parameter, enter the following at the server console:
File flush timer and buffer flush timer—This represents the number of seconds modified files and buffers remain in memory before being written back to disk. The default is 10 seconds. Obviously, increasing this number improves server performance because the server waits longer to write data to disk. However, increasing this number also increases the risk of data loss when a system failure occurs. To modify this parameter, enter the following at the server console:
NSS /BUFFERSFLUSHTIMER=x
NSS /FILEFLUSHTIMER=x
You can also use MONITOR or Remote Manager to make changes. The changes remain persistent until you change them again. After you make a change, you should check the cache statistics. To reset the statistics, enter the following command at the server console:
NSS /RESETSTATS
This provides a fresh point of reference. Allow NSS to keep statistics for two full business days.
That’s it. A great overview of NetWare 6 memory management. Wasn’t that fun? Now it’s time to begin our monitoring and optimization expedition with a detailed look at MONITOR.NLM. This comprehensive server-based tool helps you isolate performance bottlenecks in the server disk or network packets. Then you can learn how to optimize them in the second half of this chapter.
Test Objective Covered:
![]() Manage and optimize the disk and traditional file system
Manage and optimize the disk and traditional file system
Although NetWare servers have been optimized for LAN services, recent advancements in the Internet, high-capacity multimedia files, and complex digital printing have placed a tremendous load on the NetWare 6 file server. As a result, you must spend more time tuning and optimizing it.
In this section, we’ll study three NetWare 6 optimization solutions aimed at solving server performance problems:
![]() Application management—Enables you to prioritize server-based applications by intelligently allocating processor cycles
Application management—Enables you to prioritize server-based applications by intelligently allocating processor cycles
![]() Block suballocation—Enables you to avoid inefficient server disk storage by suballocating multiple pieces of data into a single block
Block suballocation—Enables you to avoid inefficient server disk storage by suballocating multiple pieces of data into a single block
![]() File compression—Enhances server disk performance by automatically compressing infrequently used files
File compression—Enhances server disk performance by automatically compressing infrequently used files
Let’s get busy...starting with server applications.
The first server optimization strategy involves internal CPU utilization by server-based applications. NetWare 6 enables you to allocate shares of CPU time to each application running on your server. This helps you prioritize server application performance.
NetWare 6 application management relies on the following two important components:
![]() Threads—NLM code is composed of routines that can travel various potential paths. When an NLM runs, it chooses a particular path, called a thread. If one thread encounters a delay, other threads are forced to wait in line. In this case, the thread causing the delay is said to have gone to sleep or is guilty of being a CPU hog. To avoid these delays, NetWare can suspend a thread that’s hogging the CPU and reactivate it at a later time at the exact point where the thread went to sleep. NetWare can then give CPU time to process another thread while the first thread is suspended.
Threads—NLM code is composed of routines that can travel various potential paths. When an NLM runs, it chooses a particular path, called a thread. If one thread encounters a delay, other threads are forced to wait in line. In this case, the thread causing the delay is said to have gone to sleep or is guilty of being a CPU hog. To avoid these delays, NetWare can suspend a thread that’s hogging the CPU and reactivate it at a later time at the exact point where the thread went to sleep. NetWare can then give CPU time to process another thread while the first thread is suspended.
![]() Application—Sometimes referred to as a virtual machine. An application consists of a group of threads within a given application space that are treated as a unit when processing resources are assigned. The physical resources in the computer can be used to share the CPU and to make each application appear to have its own processor. This enables you to specify the amount of CPU time that threads in the application are allowed to use when competing with other applications.
Application—Sometimes referred to as a virtual machine. An application consists of a group of threads within a given application space that are treated as a unit when processing resources are assigned. The physical resources in the computer can be used to share the CPU and to make each application appear to have its own processor. This enables you to specify the amount of CPU time that threads in the application are allowed to use when competing with other applications.
When a NetWare 6 server is started, one application is created by default: the NetWare Application. All traditional file, print, and connectivity services are provided by the NetWare Application. The NetWare Application is loaded with a default share value of 100. All the threads run by startup NLMs are assigned to the NetWare Application.
You can customize application prioritization when you load new NLMs by using the following syntax:
LOAD -A=application NLM
In this example, application refers to your new process tag and NLM refers to the full NLM name. For example, if you want to load MONITOR and create an application named LABS-Monitor for it, you would enter the following command at the server console:
LOAD -A=LABS-Monitor MONITOR.NLM.
After an application has been loaded, you can adjust the share value assigned to it. Share value is the proportional amount of CPU time that threads in the application are allowed to use when competing with other applications on the server. For example, if you assign one application 70 shares and another application 10 shares, the first application will receive seven times more CPU time than the second application.
To adjust the share value assigned to an application, perform the following tasks in MONITOR.NLM: First, select Kernel from the Available Options menu, and choose the process you’re interested in. Finally, press F3 and enter the new share value in the New Share Value window.
Now that you’ve mastered NetWare 6 application prioritization, let’s continue our server optimization discussion with block suballocation.
Block suballocation is a disk optimization feature in the traditional file system that increases the efficiency of file storage on internal server disks. In NetWare 6, data files are stored on hard drives in units called blocks. Default volume block size depends on the size of the volume and is set at the time the volume is created. Table 8.3 shows default sizes.

Problems arise when you combine large block sizes with numerous small files. For example, without suballocation, a 64KB block would be fully occupied by a 5KB or 63KB file. In either case, the unused space (59KB or 1KB, respectively) is wasted and unavailable for use by other files. See Figure 8.3.

Block suballocation solves this problem by dividing partially used disk blocks into 512-byte suballocation blocks. These suballocation blocks can then be used by multiple files. In the first example in Figure 8.3, we would be able to allocate the remaining 59KB for use by other files. A second 100KB file, for example, would take up another 64KB block and send the remaining 36KB over to the first block (as shown in Figure 8.4).

It’s important to remember that files always start at the beginning of a new block. You cannot start a new file within an already occupied suballocation block. You can, however, store the remainder of a large file within the suballocation area. Here’s the bottom line:
![]() Without block suballocation—The two files totaling 105KB would occupy three 64KB blocks and waste 87KB of server disk space.
Without block suballocation—The two files totaling 105KB would occupy three 64KB blocks and waste 87KB of server disk space.
![]() With block suballocation—The two files totaling 105KB would occupy two suballocated blocks, leaving 23KB of server disk space to be used by one or more other files.
With block suballocation—The two files totaling 105KB would occupy two suballocated blocks, leaving 23KB of server disk space to be used by one or more other files.
Because block suballocation saves so much disk space, NetWare automatically activates it during volume creation.
File compression enables NetWare 6 volumes to hold more online data by automatically compressing inactive files. Users can save up to 63% of a server’s disk space by activating file compression—that’s 1GB of files in 500MB of space. This is called the compression ratio. It’s important to note that NetWare sacrifices speed to optimize the compression ratio.
File compression is turned on automatically during traditional volume creation. It cannot be turned off without re-creating the volume. After file compression has been turned on, it can be activated in one of the following two ways:
![]() You can activate file compression by flagging directories and files as IC (immediate compress). The files will then be compressed immediately. However, if the SET ENABLE FILE COMPRESSION parameter is set to OFF, NetWare will queue IC files until compression is turned on again. Incidentally, you can use NetWare Administrator, FILER, FLAG, or Windows Explorer to set these file/directory attributes.
You can activate file compression by flagging directories and files as IC (immediate compress). The files will then be compressed immediately. However, if the SET ENABLE FILE COMPRESSION parameter is set to OFF, NetWare will queue IC files until compression is turned on again. Incidentally, you can use NetWare Administrator, FILER, FLAG, or Windows Explorer to set these file/directory attributes.
![]() You can also activate file compression by using either MONITOR.NLM or ConsoleOne to configure volume-based inactivity delay parameters. These settings should be stored in the server’s AUTOEXEC.NCF file to ensure automatic activation when the server starts. To configure file compression parameters using MONITOR.NLM as shown in Figure 8.5, select Server Parameters @@> Common File System.
You can also activate file compression by using either MONITOR.NLM or ConsoleOne to configure volume-based inactivity delay parameters. These settings should be stored in the server’s AUTOEXEC.NCF file to ensure automatic activation when the server starts. To configure file compression parameters using MONITOR.NLM as shown in Figure 8.5, select Server Parameters @@> Common File System.

By default, the file compression inactivity delay is set to 14 days. If a file isn’t accessed within seven days, it will automatically be compressed. Users can avoid having their files compressed by flagging specific files or directories as DC (don’t compress). Files are automatically decompressed when users access them. Decompression occurs in server RAM before the file is delivered to the workstation. This process happens much faster than compression.
The NetWare 6 file compression process occurs in a series of five steps:
1. A timer goes off and file compression begins. After file compression has been activated, NetWare 6 reads and analyzes each file.
2. NetWare 6 builds a temporary file describing the original file. This feature ensures that the original file isn’t at risk if data is corrupted during the compression process.
3. NetWare 6 determines whether any disk sectors can be saved by compressing the file. A gain of at least 20% (by default) is required before a file is compressed. This parameter is configurable using the SET console command.
4. NetWare 6 begins creation of the compressed file.
5. NetWare 6 replaces the original with the compressed file after an error-free compressed version has been created.
Although file compression is set at the volume level, you can control specific file compression parameters with SET commands, Remote Manager, or MONITOR. These settings should be stored in the AUTOEXEC.NCF file to ensure automatic activation when the server starts. Check out Table 8.3 for a list of all the SET commands you can use to manage Common file compression. These settings affect all files and directories on the server.


After you’ve activated file compression, you can monitor disk space savings in NetWare Administrator. Figure 8.6 illustrates the File Compression statistics available in the Statistics page of a Volume object. As you can see, the volume has 1,658.87MB of disk space, of which 1,333.31MB are free. Yet, there are more than 430.13MB of data already stored on it. Fortunately, the compressed size is 177.00MB. Apparently, you can get seven pounds of sand into a two-pound bag, if you have a good compression program.

That completes our brief, but informative, journey through NetWare 6 server optimization. In summary, your server performs best when you activate the following options:
![]() Critical applications are prioritized with a Share value approaching 100.
Critical applications are prioritized with a Share value approaching 100.
![]() Block Suballocation is enabled (traditional).
Block Suballocation is enabled (traditional).
![]() File Compression is enabled with a short inactivity threshold (traditional).
File Compression is enabled with a short inactivity threshold (traditional).
![]() Volumes are defined with large disk allocation blocks (16KB or larger).
Volumes are defined with large disk allocation blocks (16KB or larger).
Now that the server has been optimized, let’s turn our attention toward network optimization. Full speed ahead.
Test Objective Covered:
![]() Manage and optimize LAN communications
Manage and optimize LAN communications
Data is transferred across the network in small chunks known as packets. As you might imagine, the server sends and receives far more of these packets than do normal workstations. As an advanced network administrator, you need to employ as many packet-optimization strategies as you can.
In this section, we’ll study the following three NetWare 6 optimization solutions aimed at solving network performance problems:
![]() Packet Receive Buffers—The Packet Receive Buffer pool (sometimes called the PRB pool) is a holding tank for incoming packets as they wait for available service processes. You must achieve a balance between small pools (poor network performance) and large pools (wasted server RAM).
Packet Receive Buffers—The Packet Receive Buffer pool (sometimes called the PRB pool) is a holding tank for incoming packets as they wait for available service processes. You must achieve a balance between small pools (poor network performance) and large pools (wasted server RAM).
![]() Packet Burst Protocol—This network feature bunches packets into a bursting group and sends them together, effectively decreasing communications overhead and improving network performance.
Packet Burst Protocol—This network feature bunches packets into a bursting group and sends them together, effectively decreasing communications overhead and improving network performance.
![]() Large Internet Packets—NetWare 6 further enhances network throughput by allowing large packet sizes on router-controlled WAN links.
Large Internet Packets—NetWare 6 further enhances network throughput by allowing large packet sizes on router-controlled WAN links.
Let’s take a closer look at network optimization—our way!
TIP
The Packet Burst feature and the Large Internet Packets feature work only with the IPX protocol.
Packets are discrete allocation units of data organized into messages, which travel from one device to another over a network. When a packet arrives at a NetWare server, it has to wait in a “holding tank” called the Packet Receive Buffer pool until a service process becomes available to handle it. Packet Receive Buffers are also known as Event Control Blocks (ECBs).
When no PRBs are available, the server discards requests from clients and issues a No ECB Available Count error. The client that sent the request waits a set amount of time and then resends the request. If a PRB has become available, the session proceeds as normal (but the server might exhibit a slower response time).
If no PRB is freed after 0.1 seconds, NetWare 6 self-tunes by allocating a new PRB to meet the higher demand. When PRBs are increased to the maximum packet receive buffers parameter, server performance is affected. When this happens, no new packet receive buffers can be allocated and new client requests are discarded until existing buffers are freed.
To optimize network communications, you must achieve a balance between the size of the PRB pool and the number of service processes available to handle incoming requests. This is accomplished using the following five SET parameters:
![]() Maximum Packet Receive Buffers—Determines the maximum number of PRBs that the server can allocate. The default setting (5000) is too low for busy servers.
Maximum Packet Receive Buffers—Determines the maximum number of PRBs that the server can allocate. The default setting (5000) is too low for busy servers.
![]() Minimum Packet Receive Buffers—Determines the minimum number of PRBs allocated at server startup. This parameter must be set in STARTUP.NCF.
Minimum Packet Receive Buffers—Determines the minimum number of PRBs allocated at server startup. This parameter must be set in STARTUP.NCF.
![]() Maximum Service Processes—The maximum number of service processes available to handle incoming user requests. If the number of allocated processes is at its maximum (in the General Information window of MONITOR.NLM), you should consider increasing this parameter to decrease the need for more PRBs.
Maximum Service Processes—The maximum number of service processes available to handle incoming user requests. If the number of allocated processes is at its maximum (in the General Information window of MONITOR.NLM), you should consider increasing this parameter to decrease the need for more PRBs.
![]() Minimum Service Processes—The minimum number of service processes allocated at server startup. If a large number of users are accessing the server, you should increase this parameter to improve network performance. Both service process parameters can be configured using the Server Parameters @@> Miscellaneous menu in MONITOR.NLM.
Minimum Service Processes—The minimum number of service processes allocated at server startup. If a large number of users are accessing the server, you should increase this parameter to improve network performance. Both service process parameters can be configured using the Server Parameters @@> Miscellaneous menu in MONITOR.NLM.
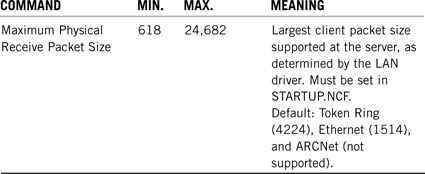
![]() Maximum Physical Receive Packet Size—The largest client packet size supported on the server. You should configure the server LAN driver for the largest packet size it will support so that you don’t artificially limit the size of packets on the network. This parameter must be set in STARTUP.NCF.
Maximum Physical Receive Packet Size—The largest client packet size supported on the server. You should configure the server LAN driver for the largest packet size it will support so that you don’t artificially limit the size of packets on the network. This parameter must be set in STARTUP.NCF.

The Packet Burst Protocol (PBP) is an integrated NetWare Core Protocol (NCP) feature that improves the performance of large reads and writes. It accomplishes this by sending multiple packets in a burst with a single acknowledgment. With packet bursting enabled, NetWare 6 clients can issue a single read or write request for blocks of data of up to 64KB. The data is partitioned into packets and these packets are transmitted back-to-back without requiring individual acknowledgments. This boosts network performance from 10% to 300%, depending on available memory, bandwidth, and message sizes.
NetWare 6 packet bursting relies on the following two key performance components:
![]() Burst gap time—A time delay requested by the client before individual packets are placed back-to-back on the media. This gap time is used to prevent fast servers from overrunning the client’s buffers.
Burst gap time—A time delay requested by the client before individual packets are placed back-to-back on the media. This gap time is used to prevent fast servers from overrunning the client’s buffers.
![]() Burst window size—The number of frames or packets contained in a single burst. With Packet Burst Protocol, the number of packets in the window is variable up to a theoretical maximum value of 128 (64KB divided by 512-byte packets). The window size is also variable by workstation, depending on how many buffers the workstation has available. The client renegotiates these parameters without user intervention. This is one area in which the PBP’s window technology differs from traditional sliding window protocols, such as Synchronous Data-Link Control (SDLC).
Burst window size—The number of frames or packets contained in a single burst. With Packet Burst Protocol, the number of packets in the window is variable up to a theoretical maximum value of 128 (64KB divided by 512-byte packets). The window size is also variable by workstation, depending on how many buffers the workstation has available. The client renegotiates these parameters without user intervention. This is one area in which the PBP’s window technology differs from traditional sliding window protocols, such as Synchronous Data-Link Control (SDLC).
When network traffic is heavy enough that packets are being dropped in transmission, the Novell Client decreases the window size to minimize packet loss. Any packets that are lost are retransmitted individually—the entire burst does not have to be retransmitted.
In previous versions of NetWare, Packet Burst had to be enabled both at the workstation and at the server. In NetWare 6, Packet Burst is automatically enabled. It cannot be disabled at the server, but it can be disabled on individual workstations. Follow these steps to enable packet bursting on Windows 95/98 workstations:
1. Select Start @@> Settings @@> Control Panel and then double-click Network. This provides access to the Windows 95/98 Network Settings dialog box.
2. On the Configuration tab, select Novell NetWare 6 Client 32 and then click Properties.
3. Select the Advanced Settings tab. Scroll down the choices until you find the following three packet bursting parameters: Packet Burst, Packet Burst Read Window Size, and Packet Burst Write Window Size.
Each workstation establishes a Packet Burst connection with a NetWare server at login. After it has been established, the connection remains for the duration of the attachment. Packet Burst is established individually for each connection to different servers. As a result, a workstation running the Novell Client can be attached to a NetWare 6 server using Packet Burst and to a NetWare 3.12 server using a standard NCP connection.
Novell’s Large Internet Packet (LIP) feature enhances throughput on routed networks by allowing workstations and servers to communicate using large packets. Earlier, we learned how the Maximum Physical Receive Packet Size parameter increases packet sizes on NetWare servers. Unfortunately, this number automatically drops to 512 bytes if the server detects a router on the network.
In NetWare 6, LIP is automatically enabled at both the workstation and the server. In this configuration, the server ignores the router check during packet-size negotiation and allows data packets larger than 512 bytes. You can configure NetWare routers for larger packet sizes by placing the appropriate Maximum Physical Receive Packet Size SET parameter in each server’s STARTUP.NCF file and rebooting the servers.
When LIP is used in conjunction with the Packet Burst Protocol, several large packets can be sent consecutively without having to wait for the standard request/response dialog box. This increases data transmission speed and reduces the number of packets exchanged.
One of your most challenging and rewarding responsibilities is optimizing performance on the server and network. You should consider several areas when you assess the efficiency of your network or encounter a performance problem:
![]() Review performance statistics provided through MONITOR to determine the efficiency of your network
Review performance statistics provided through MONITOR to determine the efficiency of your network
![]() Enable server performance features, such as application prioritization, block suballocation, and file compression for the traditional file system
Enable server performance features, such as application prioritization, block suballocation, and file compression for the traditional file system
![]() Consider upgrading key network components, such as Packet Receive Buffers, packet bursting, and LIP for IPX communications
Consider upgrading key network components, such as Packet Receive Buffers, packet bursting, and LIP for IPX communications
Congratulations! You survived NetWare 6 optimization.
As you can see, it’s definitely the new frontier of NetWare 6 networking. Optimization is more important now than ever—mostly because eDirectory taxes the server so much. In this chapter, we learned much about server memory management, monitoring with MONITOR, server optimization, and network communications.
What’s next?!!
Our final stop on this whirlwind tour down NetWare 6 optimization is the server engine—and it all starts there. Novell has made some dramatic improvements to the CORE OS in NetWare 6. Most of these efforts focus on increasing the server’s processing performance and reliability.
Like previous versions, NetWare 6 supports multiple parallel processors in the server. Unlike previous versions, however, NetWare 6’s high-performance capability is storage-to-wire. This means that all NetWare 6 services are multiprocessor enabled—from disk to protocol. This contrasts with NetWare 5 in which only the CORE OS was tuned for high performance—leaving out the TCP/IP stack, NSS, NCP, Web Server, and the eDirectory.
To tune your NetWare 6 high-performance engine, you must become a pro in these three server disciplines:
![]() Multitasking—Each processor in the NetWare 6 server can run two or more programs at the same time.
Multitasking—Each processor in the NetWare 6 server can run two or more programs at the same time.
![]() Multithreading—Enables the multiple execution of software threads to take place concurrently within the same program.
Multithreading—Enables the multiple execution of software threads to take place concurrently within the same program.
![]() Multiprocessing—Enables you to distribute processor load across multiple server processors simultaneously.
Multiprocessing—Enables you to distribute processor load across multiple server processors simultaneously.
NetWare 6 is a multitasking operating system. This means that each single-processor NetWare 6 server is capable of running two or more programs at the same time. As a result, NetWare 6 can constantly service client needs and operate at peak utilization.
For example, while one program is waiting for input, instructions in another program running on the same server can be executed.
The key thing to remember about NetWare 6 multitasking is that it’s based on a single-processor model. This means that you can multitask the server’s multitasking by adding multiple processors. We’ll explore this feature a little bit later.
Multithreading is basically multitasking within a single program. Because NetWare 6 supports multithreading, it can execute multiple software threads concurrently within the same program. Like multitasking, NetWare 6 multithreading is also based upon a single processor model and will benefit dramatically from two or more processors.
To fully grasp the benefit of NetWare 6 multithreading, you must understand the subtle differences between these three operating-system terms:
![]() Software thread—Each software thread is composed of two parts: the first piece defines what the computer must do, and the second part performs the action according to the definition. Each NetWare server application allocates threads just like it allocates memory. When the application is done processing the thread, the thread is returned to the system kernel to be called the next time it’s needed. Because the software thread is allocated CPU time, a processor can execute only one thread at a time.
Software thread—Each software thread is composed of two parts: the first piece defines what the computer must do, and the second part performs the action according to the definition. Each NetWare server application allocates threads just like it allocates memory. When the application is done processing the thread, the thread is returned to the system kernel to be called the next time it’s needed. Because the software thread is allocated CPU time, a processor can execute only one thread at a time.
![]() Simultaneous—With respect to software threads, simultaneous means that one processor can run multiple threads at the same time. However, this isn’t possible with a single-processor server. The only way to achieve true simultaneous threading is to use a multiprocessor server.
Simultaneous—With respect to software threads, simultaneous means that one processor can run multiple threads at the same time. However, this isn’t possible with a single-processor server. The only way to achieve true simultaneous threading is to use a multiprocessor server.
![]() Concurrency—With respect to software threads, concurrency is the perception that a single processor is executing threads simultaneously. In reality, multithreading relies on the fact that fast processors can switch between multiple threads so efficiently that they appear to be running in parallel. In the NetWare 6 multithreading concurrency model, a single processor can switch from one thread to another at any point and can place the resting threads in a state of suspension.
Concurrency—With respect to software threads, concurrency is the perception that a single processor is executing threads simultaneously. In reality, multithreading relies on the fact that fast processors can switch between multiple threads so efficiently that they appear to be running in parallel. In the NetWare 6 multithreading concurrency model, a single processor can switch from one thread to another at any point and can place the resting threads in a state of suspension.
Although multitasking and multithreading help supercharge your NetWare 6 engine, they’re limited to the single-processor model. Imagine how powerful they can be when you add one or more additional processors.
“Perception is reality.”
In NetWare 6, you can transform the simultaneous perception of multithreading concurrency into a reality by adding two or more processors to the server. This means that NetWare 6 can extend beyond the illusion of simultaneous processing by executing multiple threads at the same time. All this magic is made possible using a sophisticated NetWare service called Scheduler.
Scheduler is the brains behind NetWare 6 multiprocessing. It determines how to distribute software threads based on a number of different criteria:
![]() Single-processor thread—If the programmer thread is not multiprocessor safe, Scheduler funnels the program and its threads to a single processor.
Single-processor thread—If the programmer thread is not multiprocessor safe, Scheduler funnels the program and its threads to a single processor.
![]() New multiprocessor thread—If the program is multiprocessor safe but it has never been run on this server before, Scheduler funnels it to all available processors simultaneously.
New multiprocessor thread—If the program is multiprocessor safe but it has never been run on this server before, Scheduler funnels it to all available processors simultaneously.
![]() Returning multiprocessor thread—If the program of thread is multiprocessor safe and it has run on this server before, Scheduler funnels the program and its threads to the processors where they last ran.
Returning multiprocessor thread—If the program of thread is multiprocessor safe and it has run on this server before, Scheduler funnels the program and its threads to the processors where they last ran.
This allows the processors to use their cache to execute threads faster and avoid bottlenecks.
Because NetWare 6 distributes multiprocessing threads according to a cache model, it can create a situation in which some processors are overused and others are underused. To solve this problem, the NetWare Scheduler periodically calculates use of each processor and determines whether it is overused or underused. In the case of an overused processor, Scheduler moves threads to an underused one to balance processor workloads. However, moving data from one processor cache to another causes another problem: cache contention.
Cache contention slows the processor because it is forced to send data back and forth as it tries to accomplish load balancing. To solve this problem, NetWare 6 forces each thread to run on the same processor each time it’s run. And to make matters even better, NetWare 6 creates a run queue (a list of threads to be run) for each installed processor. This enables each processor to track the threads it will run without competing with all others processors for access to one global list.
Although cache contention is generally a bad thing, there are times when it is preferred:
![]() If a thread isn’t multiprocessor-enabled, Scheduler must move it from one processor to another and suffer the corresponding cache contention.
If a thread isn’t multiprocessor-enabled, Scheduler must move it from one processor to another and suffer the corresponding cache contention.
![]() In some cases, cache contention can facilitate load balancing because the gain in allocation of an underused processor is much more powerful than the loss incurred by cache-contention shuffling.
In some cases, cache contention can facilitate load balancing because the gain in allocation of an underused processor is much more powerful than the loss incurred by cache-contention shuffling.
To take advantage of NetWare 6 multiprocessing, the processors in your NetWare 6 server must meet the following minimum requirements:
![]() All processors must be functionally identical. This means they should be of the same family and model. Server processors can, however, use different steppings (similar to revision numbers). For example, you can’t mix a Pentium IV with a Pentium V, but you can mix a Pentium V stepping 3 with a Pentium V stepping 4.
All processors must be functionally identical. This means they should be of the same family and model. Server processors can, however, use different steppings (similar to revision numbers). For example, you can’t mix a Pentium IV with a Pentium V, but you can mix a Pentium V stepping 3 with a Pentium V stepping 4.
![]() All processors must operate at the same speed.
All processors must operate at the same speed.
![]() All processors must be capable of communicating with each other.
All processors must be capable of communicating with each other.
![]() All processors must share the same I/O subsystem.
All processors must share the same I/O subsystem.
![]() All processors must share the same memory space.
All processors must share the same memory space.
Congratulations, you’ve just helped optimize the world’s central information superhighway with the aid of NetWare 6 memory management, optimization tools, and high-performance multiprocessing. More importantly, you’ve just survived the first eight chapters of this book.
In this chapter, we learned how to supercharge the network with the help of numerous advanced administration components, including how to administrate memory management, optimize the server, optimize the network, and use true server-based multiprocessing. I hope that you now feel prepared for the emergence of oneNet. That’s your life as a NetWare 6 CNE.
Now that you’ve completed the foundation of Novell’s information superhighway, it’s time to secure your network. We’ll begin this odyssey with a look at the advanced security measures included with NetWare 6.
How secure do you feel?