
Chapter 13 Advanced iFolder Tasks and Troubleshooting
This chapter covers the following testing objectives for Novell Course 3005: Advanced Novell Network Management:
![]() Perform iFolder Management Tasks
Perform iFolder Management Tasks
![]() Describe iFolder Configuration Files
Describe iFolder Configuration Files
![]() Maintain and Troubleshoot Novell iFolder Client
Maintain and Troubleshoot Novell iFolder Client
![]() Maintain and Troubleshoot Novell iFolder Server
Maintain and Troubleshoot Novell iFolder Server
In the previous chapter, you learned that file storage is still the most popular user activity on a Novell network—even after all these years. You also learned that user demand for more storage and greater accessibility is growing exponentially. Fortunately, NetWare 6 has an answer for these two challenging demands—it’s called iFolder.
iFolder is Novell’s solution for anytime, anywhere storage via the Internet. With this integrated tool, you can provide your users with the two things they want most: more storage and easy access to their files. In a nutshell, iFolder is a central, Web-based storage server that provides automatic, secure, and transparent synchronization of your files. Specifically, iFolder relies on the following three components: iFolder Server, iFolder Client, and the iFolder Java applet.
In this lesson, we’ll expand your file system into the realm of Internet connectivity:
![]() “Understanding iFolder”—In the first iFolder lesson, you’ll discover how this fabulous Web-based server provides a central and secure storage portal where users can access files, download client software, and configure the Java applet for browser support.
“Understanding iFolder”—In the first iFolder lesson, you’ll discover how this fabulous Web-based server provides a central and secure storage portal where users can access files, download client software, and configure the Java applet for browser support.
![]() “Configuring iFolder”—First, you must make sure that the central server and distributed workstations meet minimum system requirements. Then, you can install iFolder using the NetWare 6 installation GUI, and use the iFolder Server Management Console to create user accounts, display LDAP settings, and configure client policies.
“Configuring iFolder”—First, you must make sure that the central server and distributed workstations meet minimum system requirements. Then, you can install iFolder using the NetWare 6 installation GUI, and use the iFolder Server Management Console to create user accounts, display LDAP settings, and configure client policies.
![]() “Managing iFolder”—The iFolder Server Management Console enables you to manage iFolder accounts, track iFolder synchronization activity, and configure client/server policies.
“Managing iFolder”—The iFolder Server Management Console enables you to manage iFolder accounts, track iFolder synchronization activity, and configure client/server policies.
![]() “Troubleshooting iFolder”—In this final iFolder lesson, we’ll explore several optimization and troubleshooting strategies for the iFolder client and server. Remember that this is your ticket to becoming a NetWare 6 anytime, anywhere access engineer.
“Troubleshooting iFolder”—In this final iFolder lesson, we’ll explore several optimization and troubleshooting strategies for the iFolder client and server. Remember that this is your ticket to becoming a NetWare 6 anytime, anywhere access engineer.
Okay, that’s a quick snapshot of network filing in the ubiquitous anytime, anywhere access (AAA) world. Let’s get started with a comprehensive overview of iFolder fundamentals.
Test Objectives Covered:
![]() Perform iFolder Management Tasks
Perform iFolder Management Tasks
Novell iFolder eliminates the email dance that you must perform to synchronize files between your business laptop and your home computer. How many times have you arrived at the office for an important meeting only to find that the presentation you finished the night before is sitting on your home computer? Of course, the only solution to this problem is to call home and have someone attempt to email the file from your home computer to the office. Inevitably, of course, the person on the other end proceeds to crash your computer and the presentation is lost. Remember that Murphy was an optimist!
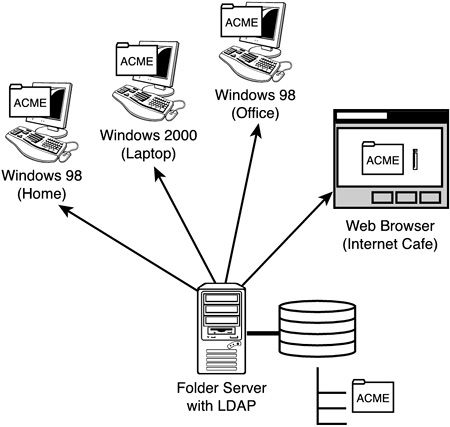
iFolder will save your precious files from such rude treatment. As you can see in Figure 13.1, iFolder enables you to access your files from anywhere and at anytime via the Web. This means you can synchronize files from your business laptop to your home computer and even with Internet café computers while on vacation. iFolder provides these benefits:
![]() A simple and secure way to access, organize, and manage files anytime, anywhere.
A simple and secure way to access, organize, and manage files anytime, anywhere.
![]() Secure access to your files from a Web browser. This includes file encryption to protect files from unauthorized access.
Secure access to your files from a Web browser. This includes file encryption to protect files from unauthorized access.
![]() The ability to work on files offline. This feature is made possible because changes are automatically synchronized to the iFolder server the next time you log in.
The ability to work on files offline. This feature is made possible because changes are automatically synchronized to the iFolder server the next time you log in.
![]() Automatic synchronization of data with the iFolder server during the entire time you are logged in.
Automatic synchronization of data with the iFolder server during the entire time you are logged in.
iFolder is fully integrated with eDirectory and can run on a variety of different server platforms, including: NetWare 5.1, NetWare 6, Windows NT 4.0, and Windows 2000. In fact, iFolder even runs as a plug-in for Internet Information Server (IIS) on Windows NT and/or Windows 2000 servers. This is a perfect example of innovative Novell technology that can run on platforms other than NetWare.
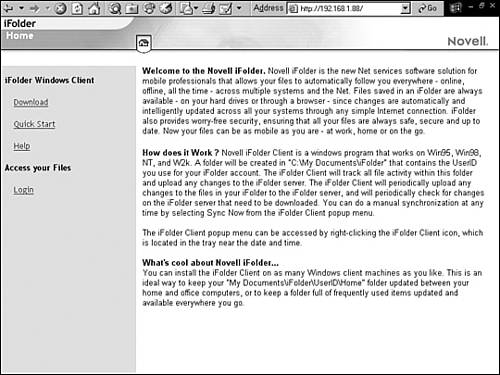
After you’ve installed the iFolder server software (as we’ll do in just a moment), you can access the iFolder Server Management Console, and your users can access the default iFolder Web site. From the Server Management Console, you can perform a variety of administration tasks and, most importantly, create iFolder user accounts. In fact, iFolder uses LDAP (Lightweight Directory Access Protocol) for user authentication and stores your files in encrypted form. The default iFolder Web site provides a central and secure storage portal where users can access files, download client software, and configure the Java applet for browser support. Check it out in Figure 13.2.
So, how does iFolder work? First, you must configure every user workstation to synchronize with the newly created iFolder server. You have three options: iFolder Windows Client (supports Windows 95/98/NT/2000/XP), iFolder Browser Client (supports browser access to iFolder files from a Windows workstation), and the iFolder Java applet (which runs in Internet Explorer and enables your users to access iFolder files from a computer that does not have the iFolder Client installed). You can download the iFolder Client from the default Web site and install it on each Windows workstation. After you’ve done so, an iFolder shortcut is placed on the desktop and an icon appears in the system tray.
As shown in Figure 13.3, the iFolder Home directory behaves just like any other folder on your hard drive. But unlike any other folder on your hard drive, anything that you store in the local iFolder Home directory is automatically synchronized with the iFolder server once you log in. This way you can view your central files from any Windows workstation through either the iFolder Client or a Web browser. The location of the iFolder Home directory is dependent on the version of Windows you’re running:
![]() Windows 95/98/Me—The iFolder Home directory is MYDOCUMENTSIFOLDER{Username}HOME.
Windows 95/98/Me—The iFolder Home directory is MYDOCUMENTSIFOLDER{Username}HOME.
![]() Windows NT/2000/XP—The iFolder Home directory is DOCUMENTS AND SETTINGS{Administrator Username}MYDOCUMENTSIFOLDER{Username}HOME.
Windows NT/2000/XP—The iFolder Home directory is DOCUMENTS AND SETTINGS{Administrator Username}MYDOCUMENTSIFOLDER{Username}HOME.

You can right-click the iFolder icon in the Windows system tray to display a pop-up menu that offers a variety of useful options. For example, the Account Information option displays a dialog box like the one in Figure 13.4. The tabs on this screen enable you to view account information, track transactions that are taking place between the iFolder server and your workstation, and configure the frequency of iFolder server synchronization.

To synchronize with the iFolder server, you must first log in. When you do so, iFolder will ask for a username and password. This is the LDAP authentication service I spoke of earlier. If your network is running eDirectory, this would be your User object name and password. In addition, iFolder will ask for a pass phrase. This pass phrase is used to encrypt files that are uploaded or downloaded to the server.
TIP
iFolder enables you to open and edit documents and files in the Home directory just as you would any other file on your computer. However, you cannot run applications remotely via iFolder. This means you must have a local version of a file’s host application in order to open it. For example, if you have a PowerPoint presentation in your iFolder directory, you must have the Microsoft PowerPoint application installed on your local workstation to access the file.
In summary, the iFolder Client performs these tasks:
![]() The iFolder Client synchronizes your data from the local Home directory with the centralized iFolder server via the Web.
The iFolder Client synchronizes your data from the local Home directory with the centralized iFolder server via the Web.
![]() The iFolder Client supports delta block synchronization. This means that only the blocks of data that have changed are synchronized with the server. Delta block synchronization minimizes bandwidth demands and speeds file updates.
The iFolder Client supports delta block synchronization. This means that only the blocks of data that have changed are synchronized with the server. Delta block synchronization minimizes bandwidth demands and speeds file updates.
![]() The iFolder Client includes a Conflict Bin that contains files that have been deleted from other computers.
The iFolder Client includes a Conflict Bin that contains files that have been deleted from other computers.
![]() The iFolder Client encrypts your files for transmission to and from the iFolder server. File encryption is a configurable option and it requires a pass phrase during authentication.
The iFolder Client encrypts your files for transmission to and from the iFolder server. File encryption is a configurable option and it requires a pass phrase during authentication.
![]() The iFolder Windows Client runs on Windows 95, 98, Me, NT, and 2000/XP workstations.
The iFolder Windows Client runs on Windows 95, 98, Me, NT, and 2000/XP workstations.
![]() The iFolder Browser Client enables you to perform basic file operations from a Web browser running on any Windows workstation that does not have the Windows Client installed.
The iFolder Browser Client enables you to perform basic file operations from a Web browser running on any Windows workstation that does not have the Windows Client installed.
![]() The iFolder Java applet enables you to perform basic file operations from the Internet Explorer Web browser on any workstation that does not have the Windows Client installed.
The iFolder Java applet enables you to perform basic file operations from the Internet Explorer Web browser on any workstation that does not have the Windows Client installed.
That completes our quick overview of iFolder fundamentals. Now let’s dive into this great ubiquitous filing tool with a quick lesson in iFolder installation and configuration.
Test Objectives Covered:
![]() Perform iFolder Management Tasks (continued)
Perform iFolder Management Tasks (continued)
![]() Describe iFolder Configuration Files
Describe iFolder Configuration Files
Enabling iFolder is a snap!
First, you must make sure that the central server and distributed workstations meet minimum system requirements. Then you can install iFolder using the NetWare 6 installation GUI. This involves a variety of IP (Internet Protocol) server Options, LDAP configuration, and some security settings.
When iFolder installation is complete, you can use the Server Management Console to create user accounts, display LDAP settings, and configure client policies. And as if that’s not exciting enough for you, iFolder even supports NetWare Cluster Services (NCS). Starting with the minimum system requirements, let’s now take a closer look at iFolder configuration.
As you learned earlier, iFolder is installed on the NetWare 6 server. However, the real action occurs at distributed Windows workstations. To support iFolder, the host Windows or NetWare server must meet these minimum system requirements:
![]() NetWare 6, NetWare 5, Windows NT 4.0, Windows 2000, and/or Linux/Solaris.
NetWare 6, NetWare 5, Windows NT 4.0, Windows 2000, and/or Linux/Solaris.
![]() eDirectory 8 (or above).
eDirectory 8 (or above).
![]() 10MB of free disk space on volume SYS:
10MB of free disk space on volume SYS:
![]() If you configure a specific DNS name for your iFolder server (such as IFOLDER.ACME.COM), you must make sure that the DNS name and its corresponding IP address are listed in the following iFolder host file: SYS:ETCHOSTS. Alternatively, you can always add an A record for the iFolder IP address to your DNS server.
If you configure a specific DNS name for your iFolder server (such as IFOLDER.ACME.COM), you must make sure that the DNS name and its corresponding IP address are listed in the following iFolder host file: SYS:ETCHOSTS. Alternatively, you can always add an A record for the iFolder IP address to your DNS server.
![]() If you want iFolder to use LDAP over SSL (Secure Socket Layer), you must copy your LDAP server’s root certificate (a file named ROOTCERT.DER) to the SYS:APACHEIFOLDERSERVER directory on your Novell iFolder server.
If you want iFolder to use LDAP over SSL (Secure Socket Layer), you must copy your LDAP server’s root certificate (a file named ROOTCERT.DER) to the SYS:APACHEIFOLDERSERVER directory on your Novell iFolder server.
Earlier we explored the three different clients supported by Novell iFolder. All of them require some sort of download from the default iFolder Web site. The Browser Client and Java applet involve very little configuration, but lack the sophisticated UI of the Windows Client. Before you can install the iFolder Windows Client on your workstation, it must meet the following requirements:
![]() The client workstation must be running the Windows 95, 98, Me, NT, and/or 2000/XP operating system. Fortunately, the client files are very small and occupy only 2MB of free space on your workstation.
The client workstation must be running the Windows 95, 98, Me, NT, and/or 2000/XP operating system. Fortunately, the client files are very small and occupy only 2MB of free space on your workstation.
![]() To install the iFolder Windows Client on a Windows 95 workstation, you must install the Winsock 2 Update (available on the Microsoft Web site):
To install the iFolder Windows Client on a Windows 95 workstation, you must install the Winsock 2 Update (available on the Microsoft Web site):
![]() To download and install the iFolder Windows Client, you must be using one of the supported Web browsers: Netscape 4.7 (or above) and/or Internet Explorer 5 (or above).
To download and install the iFolder Windows Client, you must be using one of the supported Web browsers: Netscape 4.7 (or above) and/or Internet Explorer 5 (or above).
After your iFolder server and workstations have passed muster, it’s time to install the software. Ready, set, go.
iFolder uses the built-in Apache Web Server version 1.3.20. Like most Web servers, Apache uses port 80 for HTTP communications—which is the same port used by the NetWare Enterprise Web Server. Therefore, to run the Apache Web Server, you must first unload the NetWare Enterprise Web Server. Don’t fret, however. If you choose to do so, you can run both the Apache Web Server and the NetWare Enterprise Web Server by binding the Enterprise Web Server to the NetWare server’s secondary IP address. However, remember that you must do so before you begin the iFolder installation process.
To install Novell iFolder to your host NetWare server, follow these simple steps:
1. Mount the NetWare 6 Operating System CD-ROM and then switch to the server’s graphic console and select Install from the Novell menu.
2. The Installed Products screen will appear. Select Add and navigate to the Root volume of the NetWare 6 CD-ROM.
3. Select PRODUCT.INI and choose OK twice to open the product installation utility. When the Components screen appears, select Clear All. Then select iFolder Storage Services and click Next.
4. At the Server Options window, configure the following information:
Secondary IP Address—Configures iFolder to use a unique IP address to avoid port conflicts with other services (such as Enterprise Web Server). You should configure this parameter only if the Apache Web Server is secondary to the Enterprise Web Server.
User Data—Define the path to the directory where you want the iFolder user data to be stored on the iFolder server.
Admin Names—Define the names of all administrators who need rights to modify iFolder user accounts from the Server Management Console. Separate multiple usernames with a semicolon (;).
Network Domain—Define the IP address or the DNS name of the host iFolder server.
Admin’s Email Address—Define the Administrator’s email address for reference.
Select Next to continue.
5. At the Summary window, make sure that iFolder is in the list of products to be installed and select Customize. Next, expand the NetWare 6 Services window and select iFolder Storage Services and click Configure. The Advanced window should appear. Finally, select the Primary LDAP Settings tab and configure the following LDAP information:
LDAP Host—Define the IP address of your LDAP server. Even though this service typically runs on the host NetWare 6 server, it will require its own IP address.
LDAP Port—Define the LDAP port you want to use for iFolder authentication. If you’re using the default port 389, you must configure the LDAP Group object to allow clear-text passwords. This is accomplished by configuring the Properties dialog box of the LDAP Group object that resides in the same container as your host NetWare 6 server. Using ConsoleOne for this activity is a good choice.
LDAP Login DN Context—Define the context of the container where your User objects are located. iFolder enables you to enter multiple contexts but each one must be separated by a semicolon (;). No spaces please.
Subcontainer Search—If you want iFolder to search all subcontainers below the specified LDAP Login DN context, mark the Subcontainer Search check box. If you select this option, you must perform some additional installation tasks. Refer to the following Real World sidebar for detailed steps.
LDAP Root Certificate—If you choose secure port 636 instead of port 389 for LDAP communications, you must define the path for the LDAP Root Certificate in this field. By default, this is the SYS:APACHEIFOLDERSERVER directory of your Novell iFolder server.
6. If you have a secondary LDAP server, you must choose the Secondary LDAP Settings tab from the Advanced window and define the same information. This is necessary only if you have two LDAP directories that require iFolder access.
7. Click OK to close the Advanced window, and click OK again to close the Product Customization window. Choose Finish to complete the iFolder installation and don’t forget to restart your server for all the changes to take effect.
TIP
If you want to use LDAP without SSL encryption, or if your LDAP server doesn’t support SSL, choose port 389. This is fine if iFolder and LDAP are running on the same server because no data is transferred across the wire. However, if you want greater security, you must configure iFolder to use the more secure port 636. Remember that if you choose to use port 636, be sure that you copy the LDAP Root Certificate (the file ROOTCERT.DER) to your iFolder server prior to installation.
If you’ve activated the Subcontainer Search check box during iFolder installation, you must perform some additional installation tasks before this feature will work. Specifically, you must assign the CN property to the [Public] object or create an LDAP Proxy User. Either of these tasks will enable iFolder to search for iFolder users in subcontainers underneath the DN context.
To assign the CN property to [Public], perform these tasks:
1. Launch ConsoleOne. Next right-click the eDirectory tree and select Properties.
2. Within Properties, choose NDS Rights, Public Object, Assigned Rights, Add Property.
3. Then select Show All Properties and choose the CN property from the list. Finally, click OK to continue.
4. Select Inheritable from the list of rights and choose OK. Click OK one more time and click Close to complete the rights assignment.
Remember that rights assigned to [Public] are inherited by all objects in the eDirectory tree. If your iFolder server is outside the firewall, or if you think that these wide-sweeping rights pose a security risk, you can use an LDAP Proxy User to search subcontainers for you. To create an LDAP Proxy User, perform these tasks:
1. Launch ConsoleOne. First create a user, named LDAP Proxy, without a password. Then right-click the eDirectory tree object and select Properties.
2. Choose NDS Rights, Add Trustee. Then browse to your NetWare server, select the LDAP Group object, and click Apply, OK. When you add this user as a trustee of the LDAP Group, accept the default Browse, Compare, and Read rights.
3. Next right-click the LDAP Group object and select Properties, General. Then click the Browse button next to the Proxy Username field and find the LDAP Proxy user that you just created. Double-click the user so that the name appears in the Proxy Username field. Finally, click OK and Close to complete the rights assignment.
Finally, there is actually one more task that you have to perform before the Subcontainer Search feature will work. NetWare 6 accidentally places the asterisk (*) character used for subcontainer searches in the wrong place in the iFolder config file. To solve this problem, perform these steps:
1. Open the iFolder config file in a text editor. It is named
SYS:ApacheiFolderServerhttpd_additions_nw.conf.
2. Navigate to a line that reads LdapLoginDnContext. You’ll notice that there is an asterisk character in the middle of the context listed. Move the asterisk to the beginning of the entry.
3. Then scroll down farther and find the second line that reads LdapLoginDnContext and do the same thing.
4. Finally, save the configuration file and restart your server.
After you’ve completed iFolder LDAP installation, you must create user accounts before clients can access the central storage area. This task is accomplished during iFolder management.
iFolder is specifically configured each time it launches by reading the following two Apache configuration files:
![]() SYS:APACHEIFOLDERSERVERHTTPD.CONF
SYS:APACHEIFOLDERSERVERHTTPD.CONF
![]() SYS:APACHEIFOLDERSERVERHTTPD_ADDITIONS_NW.CONF
SYS:APACHEIFOLDERSERVERHTTPD_ADDITIONS_NW.CONF
These iFolder configuration files are text files, so you can edit them using any text editor. Because these files are accessed when iFolder launches, you’ll need to stop and start iFolder for changes to take effect. As a CNE, it’s imperative that you understand how to configure iFolder using these two Apache files.
HTTPD.CONF is the default Apache configuration file. HTTPD.CONF is organized in three sections:
![]() Global Environment—In this section, focus on Listen {IP Address}:80
Global Environment—In this section, focus on Listen {IP Address}:80
![]() Main Server—In this section, focus on ServerName {IP Address}
Main Server—In this section, focus on ServerName {IP Address}
![]() Virtual Hosts—In this section, focus on SecureListen {IP Address}: 443 “SSL CertificateIP”
Virtual Hosts—In this section, focus on SecureListen {IP Address}: 443 “SSL CertificateIP”
HTTPD_ADDITIONS_NW.CONF is the iFolder-specific server configuration file. This file includes parameters that the Apache Web server uses when loading HTTPD.CONF. HTTPD_ADDITIONS_NW.CONF is the divided into two sections:
![]() NonSecure Virtual Host—Accessed at Port 80
NonSecure Virtual Host—Accessed at Port 80
![]() Secure Virtual Host—Accessed at Port 443
Secure Virtual Host—Accessed at Port 443
Aside from the different numbers, the configurations for each virtual host are identical. For iFolder to function, each virtual host must have the same login context, server name, admin name, and server root location.
In most cases, you’ll edit these iFolder configuration files by using the iFolder Server Management Console (see Figure 13.5). In some cases however, you must make manual changes to these Apache .CONF files. You should edit the Apache iFolder configuration files every time you add new Organization or Organizational Units to your eDirectory tree. These files require that you add login contexts to accommodate new users. Furthermore, you might need to authorize additional iFolder admin users to accommodate the increased size of the organization.
In addition to login context, server IP addressing might force you to edit the Apache configuration files. For example, your iFolder server might need its own IP address so that you can use ports 80 and 443 without causing conflicts with other Web-based services. Finally, you might want to change the default data location for iFolder files from the volume SYS: to a more suitable place.
Let’s take a closer look at how you can customize and manage your new iFolder environment.
Test Objective Covered:
![]() Perform iFolder Management Tasks (continued)
Perform iFolder Management Tasks (continued)
The iFolder Server Management Console, shown in Figure 13.5, is your newest friend. This Web-based tool enables you to manage iFolder accounts, track iFolder synchronization activity, and configure client/server policies.
You can access the Server Management Console by pointing your Web browser to the following URL (refer to Figure 13.5):
HTTPS://{iFolder Server IP Address}/iFolderServer/Admin
To access the iFolder user account information, you must authenticate using your administrative username and password. When you’ve done so, you can click to any or all of the following pages by using this great tool:
![]() General Info—Displays general iFolder server information.
General Info—Displays general iFolder server information.
![]() LDAP—Displays LDAP settings. You cannot configure iFolder LDAP settings by using the Server Management Console. Instead, you must edit the appropriate LDAP configuration files. See the accompanying REAL WORLD sidebar for more information.
LDAP—Displays LDAP settings. You cannot configure iFolder LDAP settings by using the Server Management Console. Instead, you must edit the appropriate LDAP configuration files. See the accompanying REAL WORLD sidebar for more information.
![]() User Accounts—Displays iFolder user account information. As an administrator, you can also remove a user account, change a user’s disk storage quota, and set specific policies for individual users. In addition, you can recover data from a deleted iFolder file by restoring a user’s folder to a secondary iFolder server. This is accomplished within user accounts by identifying the user’s ID, which appears at the bottom of the browser when you roll over the user account. This ID matches the iFolder directory name.
User Accounts—Displays iFolder user account information. As an administrator, you can also remove a user account, change a user’s disk storage quota, and set specific policies for individual users. In addition, you can recover data from a deleted iFolder file by restoring a user’s folder to a secondary iFolder server. This is accomplished within user accounts by identifying the user’s ID, which appears at the bottom of the browser when you roll over the user account. This ID matches the iFolder directory name.
![]() Current Sessions and Current Users—Displays activity for current iFolder sessions and users, respectively.
Current Sessions and Current Users—Displays activity for current iFolder sessions and users, respectively.
![]() Client Policies—Enables you to configure client policies for iFolder users. For example, you can enforce policies for the client to remember passwords and pass phrases so that users cannot change them. You can also hide iFolder client options and force users to enable encryption.
Client Policies—Enables you to configure client policies for iFolder users. For example, you can enforce policies for the client to remember passwords and pass phrases so that users cannot change them. You can also hide iFolder client options and force users to enable encryption.
![]() Server Policies—Enables you to regulate server behavior such as how much disk space is allotted to each iFolder client or how much time passes before a session times out.
Server Policies—Enables you to regulate server behavior such as how much disk space is allotted to each iFolder client or how much time passes before a session times out.
REAL WORLD
If you want to change the LDAP settings of your host iFolder LDAP server, you must modify one of the following platform–specific configuration files:
![]() NetWare—Modify the HTTPD_NW_ADDITIONS.CONF file in the SYS:APACHEIFOLDERSERVER directory.
NetWare—Modify the HTTPD_NW_ADDITIONS.CONF file in the SYS:APACHEIFOLDERSERVER directory.
![]() Windows NT 4.0/Windows 2000—Edit the iFolder Server Registry entry using the Registry Editor at HKey_Local_Machine, System, CurrentControlSet, Services, W3SVC.
Windows NT 4.0/Windows 2000—Edit the iFolder Server Registry entry using the Registry Editor at HKey_Local_Machine, System, CurrentControlSet, Services, W3SVC.
After making changes to HTTPD.CONF or HTTPD_ADDITIONS_NW.CONF, you must stop and restart iFolder before the changes can take affect. Before you stop iFolder, you should stop the iFolder server from synchronizing. This task is performed from the General Info page within the iFolder Server Management Console (see Figure 13.5).
After you’ve stopped synchronizing, you can stop the iFolder server at the console by entering the following command:
STOPIFOLDER
This command runs the STOPIFOLDER.NCF application from the default iFolder directory.
To start the iFolder server, you enter a similarly intuitive command:
STARTIFOLDER
Just to make things easy, the iFolder installation places STARTIFOLDER in AUTOEXEC.NCF so that iFolder is launched each time the server starts. If you have problems starting iFolder, enter NVXADMDN at the server console to down the Apache server. Then, enter NVXADMUP to start the Apache server again. When the Apache server is up, enter STARTIFOLDER to initialize the iFolder server.
The default location for iFolder user data is volume SYS:. This is not a good place to store user data because it might interfere with mission-critical system files. Furthermore, iFolder users can potentially fill up the SYS: volume and bring down the whole server.
To change the location of iFolder user data, you must edit the HTTPD_ADDITIONS_NW.CONF file. For both virtual host sections, edit the iFolderServerRoot entry to indicate the new location for user data. For example, the following entry will place all user data in the iFolder directory off the root of the DATA volume:
IFolderServerRoot: DATA:IFOLDER
After you’ve saved the configuration file, stop iFolder and move the iFolder directory from the root of SYS: to the root of DATA:. Then start iFolder and verify that your changes have taken effect.
Login contexts are required for iFolder users to authenticate to their data. You can add additional organizations to the iFolder login text by editing the HTTPD_ADDITIONS_NW.CONF configuration file. First, access the iFolder Server Management Console and select LDAP. Then make changes to the DN (Distinguished Name) field and choose Update.
When adding login text to the management console, iFolder remarks the old DN configurations and creates a new line with the added context. This enables you to track all context changes made to HTTPD_ADDITIONS_NW.CONF.
You can add additional administrators through the iFolder Server Management Console by using the ADMIN SESSIONS link you saw in Figure 13.5. After you’ve made changes to the authorized ADMIN field, select Update to activate the new iFolder administrators. These changes are also reflected in the HTTPD_ADDITION_NW.CONF configuration file. As with the login context parameter, any changes made in Admin Sessions will be added as new lines where the old ones were marked out.
If you installed the iFolder service to use the host server’s primary IP address, you might decide later that it would be better if iFolder had its own IP address. This management strategy enables you to avoid port conflicts that could occur between the iFolder server and other services that use the primary IP address.
The iFolder server IP address cannot be changed through the iFolder Server Management Console. These changes must be made manually using the following steps:
1. Change the necessary entries in HTTPD.CONF.
2. Change the necessary entries in HTTPD_ADDITIONS_NW.CONF.
3. Modify IFOLDERCLIENT.EXE to use the new IP address by entering the following command at the server console:
FIXUP {IP ADDRESS} IFOLDERCLIENT.EXE
4. Configure the new IP address as a secondary IP address for DNS services. This is accomplished by typing the following command at the server console:
ADD SECONDARY {IP ADDRESS}
Congratulations! You’ve successfully installed and configured a ubiquitous iFolder repository for your users. I’m sure this will make them very happy. In addition, it will increase your organization’s productivity because much less time will be wasted shuffling files between the home and office.
Next, in the final lesson, you’ll learn how to troubleshoot both the iFolder Client and the iFolder Server.
Test Objectives Covered:
![]() Maintain and Troubleshoot Novell iFolder Client
Maintain and Troubleshoot Novell iFolder Client
![]() Maintain and Troubleshoot Novell iFolder Server
Maintain and Troubleshoot Novell iFolder Server
As a NetWare 6 CNE, it’s your responsibility to optimize and troubleshoot the iFolder environment. To get the best possible performance out of your iFolder Server, you can try a number of optimization strategies. Start by adding more RAM to your server. This helps no matter which application you’re running. Second, increase the number of software threads for the Apache Web server applications running on NetWare 6. For optimal performance, you should configure one software thread per client. Finally, consider changing the amount of disk space allocated to each iFolder user.
In this final iFolder lesson, we’ll explore several optimization and troubleshooting strategies for the iFolder Client and the iFolder Server. Remember this is your ticket to becoming a NetWare 6 anytime, anywhere access engineer (AAAE).
The main benefit of using the iFolder Client is automatic data backup. When users log in, the iFolder Client watches for new files and for changes made to existing files in the iFolder Home directory. These changes are synchronized in the background without user intervention. Without the iFolder Client, the user must remember to manually upload new files and modify files on the server.
To understand how the iFolder Client works, you must understand the detailed steps of iFolder synchronization. Follow along:
1. When a user enters a username and password on a workstation, the iFolder Client sends that user to the iFolder server encrypted with RSA encryption.
2. The iFolder Server accepts the username and password and performs an LDAP bind to the LDAP servers. Needless to say, LDAP must be running in the iFolder environment for users to authenticate—via NLDAP.NLM in NetWare 6. When an LDAP bind is successful, LDAP verifies that the user is connected to the correct iFolder Server.
3. After the iFolder connection has been made, the client reconciles the files in the local iFolder directory with the files on the central iFolder server. The iFolder Client compares the sync index, file maps, and dirmaps on the client with the master copies held on the server. The sync index is a 4Kb file that increments each time synchronization takes place. File Maps contain metadata that describe files in your iFolder Home directory. And Dirmaps contain metadata that describes the folders that you create in your iFolder Home directory.
4. If the client discovers through this comparison that there are new files or changes to files on the server or client, the new data is automatically synchronized. Here’s the cool part: The synchronization consists of only the changed portion of an existing file on a 4Kb block level. This minimizes the bandwidth that iFolder requires during synchronization. When uploading or downloading data, iFolder always uses port 80 and these IP packets are never encrypted.
5. When synchronization is complete, the central iFolder sync index is incremented by one. As long as the sync index on the client matches the sync index on the server, there has been no change.
6. When the same user connects to the iFolder server using another computer, iFolder compares indexes. If it sees that the sync index on the server is different from the sync index on the client, it initializes synchronization. In addition, the iFolder Client constantly monitors changes to local files and uploads modifications as necessary.
7. When synchronization is complete, the iFolder server stands idle and waits for the next client login.
Now that you understand the detailed steps of iFolder Client synchronization, let’s take a closer look at some common troubleshooting issues.
While using iFolder, users might discover that files they thought were being synchronized from the client to the server are actually not on the server. Users discover this condition when they try to access a file while using a different computer than the one they created the file on. The cause of this problem is corrupted file maps and dirmaps.
To solve this iFolder Client problem, first delete all file maps from the Home directory on the computer where the non-synchronizing files originated. Have the user log in to iFolder from the originating computer and open the iFolder Client Account Information window. Next, view the Client’s synchronizing activity. You should see that the missing files are now being synchronized.
While using iFolder, users might discover that files that have been synchronized to the server from one computer are not being synchronized when they log in from another computer. The most likely cause is that the second computer does not have sufficient disk space for the local synchronization process to complete. As files are downloaded from the central server, they are placed in the user’s working Home directory before being copied to their iFolder Home directory. The iFolder synchronization process requires that a certain amount of disk space always be available.
To solve this problem, simply increase available disk space on the local client machine.
The purpose of the Conflict Bin is to save files that have been deleted or overwritten by the synchronization process. If a user expects to find a file in the Conflict Bin but it isn’t there, you should look for the following two causes:
![]() The Conflict Bin is too small—The default setting for the Conflict Bin is 25MB. If the Conflict Bin is full or the deleted files are more than 25MB, they won’t be placed in the Conflict Bin. There’s no way to solve this problem after it has occurred, but you can prevent it from happening by allocating more space to the Conflict Bin. Users can increase the size of their bin by right-clicking the iFolder icon and selecting View Conflict Bin. Then, select File-Properties and enter the desired value in the Maximum Space Available field. Finally, select Apply to activate the change.
The Conflict Bin is too small—The default setting for the Conflict Bin is 25MB. If the Conflict Bin is full or the deleted files are more than 25MB, they won’t be placed in the Conflict Bin. There’s no way to solve this problem after it has occurred, but you can prevent it from happening by allocating more space to the Conflict Bin. Users can increase the size of their bin by right-clicking the iFolder icon and selecting View Conflict Bin. Then, select File-Properties and enter the desired value in the Maximum Space Available field. Finally, select Apply to activate the change.
![]() The file has been deleted from the originating computer—When a file is deleted or overwritten, iFolder categorizes it as a conflict only when it takes place on a computer other than the originating machine. For example, if a file originates on Computer A and is deleted from Computer B, it is placed in the Conflict Bin. However, if the file is deleted from Computer A, it is NOT placed in the Conflict Bin.
The file has been deleted from the originating computer—When a file is deleted or overwritten, iFolder categorizes it as a conflict only when it takes place on a computer other than the originating machine. For example, if a file originates on Computer A and is deleted from Computer B, it is placed in the Conflict Bin. However, if the file is deleted from Computer A, it is NOT placed in the Conflict Bin.
This completes our brief lesson in iFolder Client optimization and troubleshooting. Now let’s take a quick jaunt over to the iFolder Server.
The iFolder Server is the center of the iFolder universe. This is where all centrally accessed user data is stored and synchronized. Therefore, it’s imperative that you focus much of your optimization and troubleshooting attention on the central server.
One of the best iFolder Server optimization strategies involves Default Sync Delay Parameters. By default, iFolder will wait 5 seconds after file activity, or 20 seconds after the server polling interval, to synchronize distributed clients. To improve server performance, consider increasing these parameters to 30 seconds after file activity and one minute after each server polling interval.
In addition, there are several common troubleshooting problems you should learn to solve as an iFolder Server engineer. Check them out!
When several users are accessing iFolder through the browser client, you might need to increase the number of threads per iFolder child. This setting is configured in the HTTPD.CONF file using the following parameter:
ThreadsPerChild 150
The default setting for ThreadsPerChild is 150. The maximum setting is 2048. Threads are used to maintain user connections on the iFolder Server from non-Client machines.
If most of your users are accessing the server from an iFolder Client, you don’t need to maintain one thread per user. For example, 50 threads can service 1,200 concurrent iFolder Client connections. On the other hand, if most of your users are connecting through Web browsers, you might need to increase the number of threads per child. Make sure to stop and restart the iFolder server after you’ve made this change.
If your central server authentication certificate becomes corrupted, the iFolder Server Management Console will be inaccessible. In addition, browser-based access will be denied because it requires the secure port 443. iFolder Client users, on the other hand, will still be able to login because the Client uses port 80.
There’s a trick for accessing the Server Management Console even when the secure port 443 is corrupted. And because you’re a CNE, you know the trick! You can modify HTTPD_ADDITIONS_NW.CONF to create a single virtual host—a nonsecure host—for the entire Apache Web server. To do so, simply alter the following parameter in the HTTPD_ADDITIONS_NW.CONF configuration file:
ServerSecurePort 80
Make sure to stop and restart the iFolder server after you’ve made this change.
A port conflict can arise because iFolder and iPrint use port 443 (by default) as their secure port. Fortunately, NetWare includes a port resolver to prevent this problem. If the port resolver detects the conflict when iFolder is installed, it will force iFolder to use port 52443 instead. But if the port resolver does not detect the conflict during installation, you have two choices to solve this problem:
![]() Give iFolder a new IP address—As discussed earlier in the Managing iFolder lesson.
Give iFolder a new IP address—As discussed earlier in the Managing iFolder lesson.
![]() Move iPrint to a new IP address—By default, iPrint uses the HTTP stack that is bound to the primary IP address on the host server. The only way to redirect iPrint is to issue a command that moves the HTTP stack to a new IP address. This is accomplished by adding the following command to the server’s AUTOEXEC.NCF file:
Move iPrint to a new IP address—By default, iPrint uses the HTTP stack that is bound to the primary IP address on the host server. The only way to redirect iPrint is to issue a command that moves the HTTP stack to a new IP address. This is accomplished by adding the following command to the server’s AUTOEXEC.NCF file:
HTTPBIND {NEW IP ADDRESS} /keyfile:"SSL Certificate"
After you’ve redirected the HTTP stack to a new IP address, you must unload and load iPrint for the changes to take effect.
When users forget their pass phrase, they can no longer get into their iFolder account. This problem occurs quite often these days because users are forced to remember hundreds of passwords and pass phrases for all their Web logins.
Believe it or not, the only way to restore a user account when the pass phrase has been forgotten is to re-create the account from scratch. This clumsy solution requires that you identify the user’s Home directory on the server, delete it, and have the user log in to iFolder again. At this point, iFolder will recognize that the user doesn’t have a directory on the server and will ask him to enter a new pass phrase. After the user has done so, the iFolder client will re-synchronize all files from the user’s local directory back onto the server. It’s imperative you ensure that the user has local copies of all files before initiating this risky solution.
If iFolder is configured at installation to use port 389 (rather than port 636), LDAP might be configured to allow clear text passwords. Using port 389 is a legitimate option when the LDAP server and the iFolder server are running on the same physical computer. In this scenario, no communications take place over the wire, so no encryption is required.
If you don’t initially configure LDAP to allow clear text passwords, you must do so afterwards from ConsoleOne. This is accomplished within the properties of the LDAP Group eDirectory object.
If you don’t configure LDAP to allow clear text passwords, you’ll receive an error message that confidentiality is required.
All finished! You’ve successfully built an anytime, anywhere file system by using NetWare 6 iFolder. In this chapter, you learned how to synchronize data files between office laptops and home computers. In addition, you learned how to install iFolder and configure it from the Server Management Console.
Now that we’ve tackled filing—the most popular Novell application—it’s time to explore the other NetWare 6 AAA feature: Anytime, Anywhere, Always Up! In the next chapter, we’ll shift our attention away from building Novell’s information Superhighway to keeping it running.
See you there!
In this lab exercise, you’ll perform these tasks:
![]() Part I: Install iFolder on the server
Part I: Install iFolder on the server
![]() Part II: Install the iFolder Client
Part II: Install the iFolder Client
![]() Part III: Add and synchronize files to your iFolder account
Part III: Add and synchronize files to your iFolder account
![]() Part IV: Test iFolder
Part IV: Test iFolder
![]() Part V: Configure the iFolder Client
Part V: Configure the iFolder Client
![]() Part VI: Access iFolder from a browser
Part VI: Access iFolder from a browser
![]() Part VII: Manage the iFolder server
Part VII: Manage the iFolder server
In this lab exercise, you’ll need these components:
![]() WHITE-SRV1 server created in Chapter 1, “NetWare 6 Installation”
WHITE-SRV1 server created in Chapter 1, “NetWare 6 Installation”
![]() Two workstations running Windows 95/98 or Windows NT/2000/XP
Two workstations running Windows 95/98 or Windows NT/2000/XP
![]() A NetWare 6 Operating System CD
A NetWare 6 Operating System CD
Perform the following tasks on the WHITE-SRV1 server:
1. Mount the CD drive as a volume:
a. Place the NetWare 6 Operating System CD in the server’s CD drive.
b. At the server console prompt, enter CDROM.
2. On the NetWare 6 GUI screen, select Novell, Install.
3. When the Installed Products window appears, select Add.
4. When the Source Path window appears
a. Browse to the root of the CD.
b. Select PRODUCT.INI.
c. Select OK.
5. When the Source Path window reappears, select OK.
6. Wait while files are copied and the Installation Wizard is installed.
7. When the Components window appears
a. Select Clear All.
b. Scroll down and select Novell iFolder Storage Services.
c. Select Next.
8. If prompted, authenticate to eDirectory as Admin.
9. When the Configure IP-Based Services screen appears
a. Select Multiple IP Addresses.
b. In the Novell iFolder Storage Services IP Address field, enter
192.168.1.88.
c. Select Next.
10. When the LDAP Configuration window appears
![]() Verify that the Clear Text Port is 389.
Verify that the Clear Text Port is 389.
![]() Confirm that the SSL port is 636.
Confirm that the SSL port is 636.
![]() Select Allow Clear Text Passwords.
Select Allow Clear Text Passwords.
![]() Select Next.
Select Next.
11. When the iFolder Server Options window appears, enter the following information:
![]() User Data: SYS:iFolder
User Data: SYS:iFolder
![]() Admin name(s): admin
Admin name(s): admin
![]() Network Domain: acme.com
Network Domain: acme.com
![]() Administrator’s Email Address: [email protected]
Administrator’s Email Address: [email protected]
12. When the Summary window appears, review the information on the screen, and then select Finish. Wait while files are copied.
13. When the Installation Complete window appears, select Close.
14. Restart your server.
Perform the following tasks on your primary administrative workstation:
1. Verify that the Clear Text Passwords field is enabled:
a. Launch ConsoleOne.
b. Select the WHITE container.
c. In the right pane, right-click LDAP Group-WHITE-SRV1.
d. When the pop-up menu appears, select Properties.
e. When the Properties of LDAP Group-WHITE-SRV1 dialog box appears
![]() On the General tab, verify that Allow Clear Text Passwords is selected.
On the General tab, verify that Allow Clear Text Passwords is selected.
![]() Close the Properties of LDAP Group-WHITE-SRV1 window.
Close the Properties of LDAP Group-WHITE-SRV1 window.
2. Create a SYS:USERS directory.
a. Launch Windows Explorer.
b. On WHITE-SRV1, at the root of the volume SYS, create a folder named USERS.
c. Close Windows Explorer.
3. Create two new users:
a. Launch ConsoleOne.
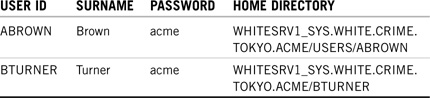
b. Create two users in the WHITE container using the information in Table 13.1.
c. Close ConsoleOne.
4. Save the iFolder Client file to the workstation’s desktop:
a. On your workstation, launch Internet Explorer.
b. In Internet Explorer, access the iFolder server’s IP address: 192.168.1.88
c. If iFolder is running, the iFolder home page will appear.
d. In the iFolder Windows Client section, select Download.
e. When the File Download dialog box appears, select Save. (If you have an older version of Internet Explorer, such as version 5.5, select Save to Disk, and then select OK.)
f. When the Save As dialog box appears, browse to the Desktop and then select Save. Wait while the files are copied.
5. Install the iFolder Client:
a. In the Download complete window, select Open. Wait while the iFolder Client installation program is launched.
b. When the Welcome to the InstallShield Wizard for Novell iFolder dialog box appears, select Next.
c. When the Choose Language for License Agreement window appears, leave English as the language for the License Agreement and select Next.
d. When the Novell iFolder Novell Software License Agreement appears, review the agreement, and then close the Internet Explorer window to continue with the installation.
e. When the License Agreement dialog box reappears, select Yes to accept the terms and conditions of the license agreement.
f. When the Choose Destination Location dialog box appears, leave the destination folder default of C:PROGRAM FILESNOVELL IFOLDER, and then select Next. Wait for the files to copy.
g. When the InstallShield Wizard Complete dialog box appears, deselect the View the ReadMe File option and select Finish. (It might take a while for this screen to appear.) When you are prompted to restart your workstation, select Yes, and then click Finish.
h. When the Novell iFolder Setup Complete dialog box appears, select Continue.
6. Log in to the iFolder Client as ABROWN:
a. When the Novell iFolder Login dialog box appears, perform the following tasks:
![]() In the User ID field, enter ABROWN.
In the User ID field, enter ABROWN.
![]() In the Password field, enter acme.
In the Password field, enter acme.
![]() In the Server field, verify that 192.168.1.88 is listed.
In the Server field, verify that 192.168.1.88 is listed.
![]() Verify that Place a Shortcut to the iFolder on the Desktop is selected.
Verify that Place a Shortcut to the iFolder on the Desktop is selected.
![]() Select Login.
Select Login.
b. When the Novell iFolder New Internet Folder Setup dialog box appears
![]() Select Enable Automatic Login at Startup.
Select Enable Automatic Login at Startup.
![]() Verify that Encrypt Files is selected.
Verify that Encrypt Files is selected.
![]() Select OK.
Select OK.
c. When the Novell iFolder Get Pass Phrase dialog box appears, perform the following tasks:
![]() In the Enter Pass Phrase field, enter acme.
In the Enter Pass Phrase field, enter acme.
![]() In the Confirm Pass Phrase field, enter acme.
In the Confirm Pass Phrase field, enter acme.
![]() Select OK.
Select OK.
d. The following icons will appear:
![]() A yellow ABROWN Home iFolder icon will appear on your desktop.
A yellow ABROWN Home iFolder icon will appear on your desktop.
![]() A yellow iFolder icon will appear in your system tray.
A yellow iFolder icon will appear in your system tray.
Perform the following tasks on your administrative workstation:
1. Double-click the ABROWN Home iFolder icon on your desktop.
2. When the iFolder Home folder appears, select File, New, Text Document.
3. When the New Text Document.Txt icon appears, rename the file TESTFILE1 (using the method of your choice).
4. Add text to the TESTFILE1 file:
a. Launch the Notepad application.
b. Open TEXTFILE1.
c. Enter the following text: This file was created on my primary administrative workstation.
d. Save the file.
e. Exit Notepad.
5. Perform a Sync Now operation:
a. Note the time on your desktop.
b. Right-click the iFolder icon in the system tray.
c. When the menu appears, select Sync Now.
6. Confirm the synchronization:
a. Double-click the iFolder icon in the system tray.
b. When the Novell iFolder Storage Services dialog box appears:
![]() Select the View Activity tab.
Select the View Activity tab.
![]() Make note of the synchronization status. (You should see the date and time that TESTFILE1 synchronized.)
Make note of the synchronization status. (You should see the date and time that TESTFILE1 synchronized.)
![]() Close the iFolder window.
Close the iFolder window.
Perform the following tasks on your secondary administrative workstation:
1. Launch Internet Explorer.
2. Install the iFolder client by using the steps in Part II.
3. Log in to the iFolder client as ABROWN by using the steps in Part II.
4. Double-click the ABROWN Home iFolder icon on your desktop. If the iFolder client is synchronized, the TESTFILE1 file created earlier in the exercise should be listed. (You might need to refresh the iFolder directory because it takes time to synchronize. The time required to synchronize depends on your connection speed.)
5. Alter the contents of TESTFILE1:
a. Launch Notepad.
b. Open TESTFILE1.
c. Change the word primary to secondary.
d. Save the change made to the file.
e. Force synchronization using the iFolder icon in the system tray.
f. Exit Notepad.
6. On your primary administrative workstation
a. Open TESTFILE1 again and note the changes made by the same user on a different workstation.
b. Close TESTFILE1.
7. On your secondary administrative workstation
a. Create a directory in the iFolder Home directory.
b. Add files to that directory using the method of your choice.
c. After iFolder synchronizes the files, view the files on your primary workstation.
Perform the following tasks on your secondary primary administrative workstation:
1. Right-click the iFolder icon in the system tray and review the options on the menu:
![]() Logout/Login—Used to log in to and out of the iFolder Client
Logout/Login—Used to log in to and out of the iFolder Client
![]() Sync Now—Used to force an instant sync with the iFolder Server instead of waiting for the default setting
Sync Now—Used to force an instant sync with the iFolder Server instead of waiting for the default setting
![]() Account Information—Used to view client activity, to configure preferences, and to view account information
Account Information—Used to view client activity, to configure preferences, and to view account information
![]() Open iFolder—Used to open iFolder for the user you’re logged in as
Open iFolder—Used to open iFolder for the user you’re logged in as
![]() View Conflict Bin—Used to restore deleted files that have been saved on the server or to remove them permanently
View Conflict Bin—Used to restore deleted files that have been saved on the server or to remove them permanently
![]() About iFolder—Used to view details on version, uploads, and licensing
About iFolder—Used to view details on version, uploads, and licensing
![]() iFolder Website—Used to launch a browser to access the default iFolder home page
iFolder Website—Used to launch a browser to access the default iFolder home page
![]() Help—Used to view the iFolder product documentation
Help—Used to view the iFolder product documentation
2. View account information:
a. From the system tray iFolder icon, select Account Information.
b. On the Account Information tab, note that the space allocated to your user account is 200MB.
c. Select the View Activity tab, which displays all activity on the iFolder Server. You’ll notice that each time the Client synchronizes, a new entry is added. You can also see the files as they’re being uploaded, downloaded, or deleted.
d. Select the Preferences tab, which enables you to configure the interval for synchronizing to and from the server. It also enables you to remember the user’s password and pass phrase.
e. Close the iFolder client window.
Perform the following tasks on your primary administrative workstation:
1. Access iFolder as user ABROWN.
a. Launch Internet Explorer.
b. In Internet Explorer, access the iFolder server’s IP address:
192.168.1.88
c. If iFolder is running, the iFolder home page will appear.
d. In the Access Your Files section, select Login.
e. When the Novell iFolder Login dialog box appears
![]() In the User ID field, enter ABROWN.
In the User ID field, enter ABROWN.
![]() In the Password field, enter acme.
In the Password field, enter acme.
![]() In the Pass Phrase field, enter acme.
In the Pass Phrase field, enter acme.
![]() In the Server IP field, verify that 192.168.1.88 is listed.
In the Server IP field, verify that 192.168.1.88 is listed.
![]() Select Connect.
Select Connect.
2. Draw a picture:
a. Open the Paint application by selecting Start, Programs, Accessories, Paint.
b. When the Untitled Paint screen appears, draw a picture.
c. Save the picture you drew as PAINT1.BMP on your desktop.
d. Exit the Paint application.
3. In your Internet browser at the iFolder account site
a. Highlight the Home folder.
b. Select Upload.
c. When the Novell iFolder Upload dialog box appears, browse to the .BMP file you created, and then select Open.
d. Expand the Home directory. The .BMP file should appear in the list of files.
4. On your secondary administrative workstation, access the .BMP file.
Perform the following tasks on your secondary administrative workstation:
To access the iFolder administrative Web page, do the following:
1. Access iFolder Storage Services:
a. Launch Internet Explorer.
b. In Internet Explorer, access the Novell Web Manager’s IP address:
https://192.168.1.88:2200
c. The Novell Web Manager window will appear. In the Novell iFolder Storage Services section, select iFolder Service on 192.168.1.88.
d. When the Login frame appears
![]() In the User ID field, enter Admin.
In the User ID field, enter Admin.
![]() In the Password field, enter acme.
In the Password field, enter acme.
![]() Select Login.
Select Login.
e. If the login is successful, a General Information window will appear in the right frame. If you look in the left pane, you’ll notice that there are several Server Management links where you can change iFolder settings for iFolder users.
2. View an iFolder user account and change client policies:
a. In the left frame, under Server Management, select the User Accounts link.
b. When the User Account frame appears, select the ABROWN user account.
c. When the ABROWN/Home frame appears, notice that the size of the allocated space for that user can be changed. You can also change the user’s policy information by selecting Set Policy near the bottom of the page.
d. Browse through the other Server Management links to view the kinds of changes you can make as an iFolder administrator.
e. Select Client Policies and configure them as follows:
![]() Encryption:ON, Not Enforced, Not Hidden
Encryption:ON, Not Enforced, Not Hidden
![]() Save Password:OFF, Enforced, Hidden
Save Password:OFF, Enforced, Hidden
![]() Save Pass Phrase:OFF, Enforced, Not Hidden
Save Pass Phrase:OFF, Enforced, Not Hidden
3. Log in as a new user to view the effects of the client policies:
a. In the system tray, right-click the iFolder icon.
b. When the pop-up menu appears, select Logout.
c. In the system tray, right-click the iFolder icon again.
d. When the pop-up menu appears, select Login.
e. When the Novell iFolder Login dialog box appears, perform the following tasks:
![]() In the User ID field, change the User ID to BTURNER.
In the User ID field, change the User ID to BTURNER.
![]() In the Password field, enter acme.
In the Password field, enter acme.
![]() In the Server field, verify that 192.168.1.88 is listed.
In the Server field, verify that 192.168.1.88 is listed.
![]() Select Login.
Select Login.
f. When the Novell iFolder New Internet Folder Setup window box appears
![]() Note that Automatic Login is selected and can’t be changed.
Note that Automatic Login is selected and can’t be changed.
![]() Note that Encrypt Files is selected and can be deselected.
Note that Encrypt Files is selected and can be deselected.
![]() Select OK.
Select OK.
g. When the Novell iFolder Get Pass Phase dialog box appears
![]() In the Enter Pass Phrase field, enter acme.
In the Enter Pass Phrase field, enter acme.
![]() In the Confirm Pass Phrase field, enter acme.
In the Confirm Pass Phrase field, enter acme.
![]() Select OK. (Note that you are not given the option to save the pass phrase.)
Select OK. (Note that you are not given the option to save the pass phrase.)
h. When the Novell iFolder dialog box appears, right-click the iFolder icon in the system tray, and then select Account Information.
i. Select the Preferences tab. Note that Remember Password is not shown (turned off and hidden) and Remember Pass Phrase is shown but is grayed out (turned off but not hidden).