
Chapter 9 NetWare 6 Advanced Security
This chapter covers the following testing objectives for Novell Course 3004: Novell Network Management:
![]() Describe Public Key Cryptography and How It Works
Describe Public Key Cryptography and How It Works
![]() Identify How Public Key Cryptography Works
Identify How Public Key Cryptography Works
![]() Use Novell Certificate Server to Implement Public Key Cryptography
Use Novell Certificate Server to Implement Public Key Cryptography
![]() Defend the Network Against Hacking and Denial-of-Service (DoS) Attacks
Defend the Network Against Hacking and Denial-of-Service (DoS) Attacks
So, what is security? Simply stated, security is freedom from risk. As a NetWare 6 CNE, you must use every tool in your arsenal to protect your network from risk. On the one extreme, you could live in a titanium vault—secure, but very uncomfortable. On the other extreme, you could live in a 1960s Woodstock fantasy—fun, but way too risky. No, I believe you need to live somewhere in between. Whether you know it or not, your security requirements fall in a spectrum between a titanium vault and the 1960s. The key to security is gauging the range of your boundaries.
Goal: Let the good users in and keep the bad users out!
Of course, it’s very difficult to protect your network from threats that you cannot see or don’t understand. So, the first thing you need to do in developing an advanced security model is to learn about risks.
Risk is a combination of value and threat. The value you determine is the cost of your network resources should you lose them. Value extends well beyond monetary value—it encompasses data integrity, confidentiality, and the value of data to competitors.
A threat is a person, place, or thing that poses some danger to a network asset. Threats can be physical (to file servers and workstations), topological (packet stealing and wire tapping), network-related (viruses and worms), and/or biological (intentional human sabotage or good old-fashioned bumbling). The goal of your threat-based security model is to determine how likely your network is to experience any of these threats and develop countermeasures against them.
The very nature of computer networking puts you continually at risk. In short, sharing data makes data harder to protect. As a NetWare 6 CNE, it’s your responsibility to build impenetrable electronic armor around your network and protect your data from various physical, topological, network-related, and biological threats. Fortunately, you have this chapter to guide you. Here we’ll explore the following four advanced security topics:
![]() Public key cryptography—This communications-oriented security scheme forms the final line of defense. It relies on authentication and encryption processes to secure communication transmissions between senders and receivers over local and global networks.
Public key cryptography—This communications-oriented security scheme forms the final line of defense. It relies on authentication and encryption processes to secure communication transmissions between senders and receivers over local and global networks.
![]() Novell Certificate Server—Public key cryptography is implemented in NetWare 6 by using the Novell Certificate Server. This server process natively integrates public key authentication and encryption mechanisms into eDirectory and enables you to mint, issue, and manage both user and server certificates. You’ll learn how Novell Certificate Server can help you extend communication security within NetWare 6. In addition, you’ll learn how to install Certificate Server and manage security objects using the Java-based ConsoleOne tool.
Novell Certificate Server—Public key cryptography is implemented in NetWare 6 by using the Novell Certificate Server. This server process natively integrates public key authentication and encryption mechanisms into eDirectory and enables you to mint, issue, and manage both user and server certificates. You’ll learn how Novell Certificate Server can help you extend communication security within NetWare 6. In addition, you’ll learn how to install Certificate Server and manage security objects using the Java-based ConsoleOne tool.
![]() Advanced network security—Next, we’ll expand beyond the central server to explore the network as a whole. You’ll learn how to secure your NetWare network from two different perspectives: inside-out and outside-in. Then we’ll proactively attack network viruses before they pounce on us.
Advanced network security—Next, we’ll expand beyond the central server to explore the network as a whole. You’ll learn how to secure your NetWare network from two different perspectives: inside-out and outside-in. Then we’ll proactively attack network viruses before they pounce on us.
![]() Web virus protection plan—In the final advanced security section, we’ll surf the information superhighway and learn how to protect your NetWare Web services from devastating security threats, including viruses, worms, and worse. We’ll build a Web virus protection plan with a variety of internal and external tools.
Web virus protection plan—In the final advanced security section, we’ll surf the information superhighway and learn how to protect your NetWare Web services from devastating security threats, including viruses, worms, and worse. We’ll build a Web virus protection plan with a variety of internal and external tools.
Well, there you go. Risk analysis and countermeasures. These are key factors in protecting your NetWare 6 network. You need to develop appropriate countermeasures for all network threats, not just a few. After all, the ’60s was a great decade but welcome to the twenty-first century. This is the Information Age and your data is a valuable commodity.
Now let’s start our advanced security management studies with a brief lesson in public key cryptography fundamentals.
Test Objectives Covered:
![]() Describe Public Key Cryptography and How It Works
Describe Public Key Cryptography and How It Works
![]() Identify How Public Key Cryptography Works
Identify How Public Key Cryptography Works
Public key cryptography is a standard security system for using digital codes, called keys, to facilitate secure transmissions over the Internet. At the most basic level, it prevents the content of most Internet communications, such as Web page browsing or public chat forums, from being monitored by anyone equipped to do so. In addition, public key cryptography enables the content of other data transmissions, such as credit card purchases, to be kept private.
Public key cryptography is built on the math of related keys. One key in each pair is publicly distributed; the other key is kept strictly private. Each data originator (person, place, or software system) is issued a key pair by a public key cryptography system. The following is a summary of the basic principles and functions of each key in the key pair:
![]() Digital keys in the key pair are generated by a cryptography system and used in combination only with each other.
Digital keys in the key pair are generated by a cryptography system and used in combination only with each other.
![]() The cryptography system openly publishes a public key to any party needing to validate a signature or encrypt a private communication.
The cryptography system openly publishes a public key to any party needing to validate a signature or encrypt a private communication.
![]() The key pair owner, or a cryptography system acting on the owner’s behalf, closely guards the private key. The owner uses the private key to create digital signatures and to decrypt data that’s encrypted with a specific matching public key.
The key pair owner, or a cryptography system acting on the owner’s behalf, closely guards the private key. The owner uses the private key to create digital signatures and to decrypt data that’s encrypted with a specific matching public key.
![]() Parties requiring private communication with a key pair owner use the public key to validate signatures and to encrypt data.
Parties requiring private communication with a key pair owner use the public key to validate signatures and to encrypt data.
In this chapter, we’ll explore the fundamentals of public key cryptography and learn more about its two main functions: authentication and encryption/decryption. Let’s start with public and private key authentication.
Authentication in the public key cryptography sense is a little different from what you might expect—it has nothing to do with logging in (as in eDirectory). Authentication in this case assures data receivers that the sender is exactly who or what he, she, or it claims to be.
In public key cryptography, the sender of a message can be authenticated through a certified public key that the sender makes available in the form of a public key certificate. Furthermore, public key certificates are certified by a certificate authority (CA). Normally, this process involves some due diligence on the part of the CA to verify that the individual or entity is indeed whom they claim to be.
The CA uses public key cryptography to generate keys that provide the following services:
![]() Public key certificate—This can be either a user certificate for an individual or a server certificate for a server.
Public key certificate—This can be either a user certificate for an individual or a server certificate for a server.
![]() Digital signature—This electronic signature is added to an email to verify the origin of the message. Only the message sender can add a digital signature.
Digital signature—This electronic signature is added to an email to verify the origin of the message. Only the message sender can add a digital signature.
![]() Encryption and decryption—As we’ll see later, public key cryptography uses the key pairs to encrypt and decrypt data. The public key encrypts the data and the private key decrypts the data—and vice versa, if necessary.
Encryption and decryption—As we’ll see later, public key cryptography uses the key pairs to encrypt and decrypt data. The public key encrypts the data and the private key decrypts the data—and vice versa, if necessary.
![]() Secure channels—When using a server certificate, a user can access a secure channel when connecting to a server. The browser displays a padlock icon to let the user know that a secure channel has been established.
Secure channels—When using a server certificate, a user can access a secure channel when connecting to a server. The browser displays a padlock icon to let the user know that a secure channel has been established.
For example, if Marie Curie and Albert Einstein want to exchange secure email messages, they need to exchange public keys that enable them to decrypt each other’s messages. The trick is finding a secure way to exchange these keys. Albert needs to be assured that the public key he gets from Marie is indeed her key and vice versa. They could meet somewhere face to face and exchange floppy disks with their public keys, but this type of exchange would be highly inconvenient.
Instead, Albert and Marie can use a certificate authority (CA) to mediate the exchange of public keys. After this verification takes place, the CA issues a public key certificate for each of them. This CA authentication is accomplished using a digital signature.
To create a digital signature, the CA combines the data being signed with the private key of the signer. As a result, no one else can duplicate the signature because no one else has the signer’s private key. In addition, the signer cannot deny having signed the data. This is known as nonrepudiation. When a CA signs a public key certificate with a digital signature, the CA guarantees that it has verified the identity of the public key owner according to the CA’s established and published policies.
After signed data is received, software verifies data authenticity by applying the same computation to the data that the signing software used originally. If the data is unaltered, both computations produce identical results. It can then be safely assumed that neither the data nor the signature were modified in transit.
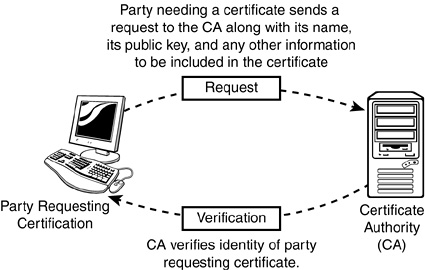
In summary, CA authentication is accomplished using the following four steps (see Figure 9.1):
![]() Step 1—Party A (the one requesting certification) sends a data packet and Party A’s public key to a certificate authority. This is called a certificate signing request.
Step 1—Party A (the one requesting certification) sends a data packet and Party A’s public key to a certificate authority. This is called a certificate signing request.
![]() Step 2—The CA creates a public key certificate containing the required information and then runs a computation on the information in the certificate to produce a small data string (usually 16 to 20 bytes).
Step 2—The CA creates a public key certificate containing the required information and then runs a computation on the information in the certificate to produce a small data string (usually 16 to 20 bytes).
![]() Step 3—The CA encrypts the small data string using the CA’s private key. This generates a unique CA digital signature for the certificate packet.
Step 3—The CA encrypts the small data string using the CA’s private key. This generates a unique CA digital signature for the certificate packet.
![]() Step 4—The CA sends the public key certificate containing the requesting party’s public key and the CA digital signature to Party A.
Step 4—The CA sends the public key certificate containing the requesting party’s public key and the CA digital signature to Party A.
That’s how public key cryptography uses certificate authorities and digital signatures to authenticate network communications. Now let’s learn how encryption extends Internet security into the realm of data authentication.
Earlier, you learned that authentication ensures that two communicating parties are who they say they are. The next level of public key security (encryption and decryption) ensures that the data being exchanged can be read by only the communicating parties.
When data is encrypted using a public key, it can be decrypted only by the private key. Conversely, when data is encrypted using a private key, it can be decrypted only by using the corresponding public key. This system relies on a verified pair of public and private keys.
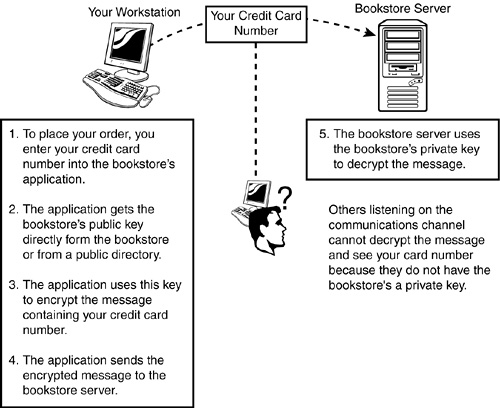
Suppose, for example, you want to order a book (the CNE Study Guide possibly) from an Internet vendor and need to use your credit card to pay for it (see Figure 9.2). Obviously, you don’t want your credit card number read by anyone other than the intended recipient. When you place your order and enter your credit card number into the bookstore’s Web application, the secured Java script in your browser uses the bookstore’s public key to encrypt the message that contains your credit card number. The application then sends the encrypted message over the Internet to the bookstore server, where the bookstore’s private key decrypts the encrypted message. The only way anyone can view your credit card number is if they have both the bookstore’s public and private keys.
Encryption and authentication in the public key cryptography system rely on the following two critical components:
![]() Public key certificates—A public key certificate is a digital message signed with a private key that provides a cryptographic binding between the public key and a given subject. This certificate is generated by a trusted entity called a certificate authority (CA). Public key certificates are also referred to as digital public key certificates, digital IDs, digital passports, and simply certificates. Public key certificates contain, at a minimum, a public key, a subject name, and a CA-generated digital signature. Additionally, you can request an expiration date, the issuing CA, and the certificate serial number all be included in the public key certificate. All certificates generated by commercial CAs and/or the Organizational CA are encoded in the X.509 v3 format.
Public key certificates—A public key certificate is a digital message signed with a private key that provides a cryptographic binding between the public key and a given subject. This certificate is generated by a trusted entity called a certificate authority (CA). Public key certificates are also referred to as digital public key certificates, digital IDs, digital passports, and simply certificates. Public key certificates contain, at a minimum, a public key, a subject name, and a CA-generated digital signature. Additionally, you can request an expiration date, the issuing CA, and the certificate serial number all be included in the public key certificate. All certificates generated by commercial CAs and/or the Organizational CA are encoded in the X.509 v3 format.
![]() Certificate authorities—The certificate authority verifies and certifies the identity of a person or an organization. A CA can be a commercial entity, such as VeriSign, or an internal organization, such as your corporate MIS department. The CA’s chief functions are to verify the identity of senders and receivers and to issue public key certificates. In addition, CAs might offer additional security services, including key pair generation, key pair archival, public key certificate revocation services, public key certificate publishing services, and insurance against public key certificate errors.
Certificate authorities—The certificate authority verifies and certifies the identity of a person or an organization. A CA can be a commercial entity, such as VeriSign, or an internal organization, such as your corporate MIS department. The CA’s chief functions are to verify the identity of senders and receivers and to issue public key certificates. In addition, CAs might offer additional security services, including key pair generation, key pair archival, public key certificate revocation services, public key certificate publishing services, and insurance against public key certificate errors.
When CAs have their own identity authenticated by another CA (that is, verifying that a CA has the authority to issue certificates to users), the authenticating CA (or trusted CA) issues an intermediate certificate. After one CA requests its own public key certificate from another CA, it generates a list that identifies all CAs involved in the authentication process. This list is known as a certificate chain.
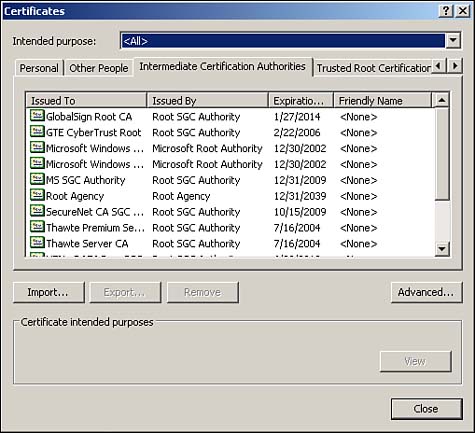
Web browsers contain a default list of trusted CAs. When you download content from the Internet, your Web browser checks to see whether it has a trusted certificate from a CA. If so, the download is allowed to proceed. If not, you would receive a message asking you if you trusted the download site.
You can see the default trusted CAs accepted by your Web browser by using the Internet Options feature found in the Control Panel of a Windows computer. After selecting Internet Options, choose Content, and then Certificates. If you click the Intermediate Certificate Authorities tab as shown in Figure 9.3, you’ll see a list of intermediate CAs. These certificates were issued by CAs and are updated with each release. Note: In the Windows XP world, these Internet options are available from Control Panel, Network and Internet Connections.
This completes our fundamental discussion of public key cryptography. By now, you should have an appreciation for the difficulty of securing Internet communications. Now let’s learn how NetWare 6 implements public key cryptography using Novell Certificate Server.
Test Objective Covered:
![]() Use Novell Certificate Server to Implement Public Key Cryptography
Use Novell Certificate Server to Implement Public Key Cryptography
Novell Certificate Server provides public-key-cryptography services to NetWare 6 clients. The server integrates with eDirectory to enable you to mint, issue, and manage both user and server certificates. Novell Certificate Server provides the following advanced security functions to network administrators:
![]() It provides public key cryptography services on the network. This is accomplished by creating an Organizational CA within your eDirectory tree that issues user and server certificates. You can also use the services of an external CA or a combination of both an Organizational CA and an external CA, if needed.
It provides public key cryptography services on the network. This is accomplished by creating an Organizational CA within your eDirectory tree that issues user and server certificates. You can also use the services of an external CA or a combination of both an Organizational CA and an external CA, if needed.
![]() It controls the costs associated with obtaining key pairs and with managing public key certificates by handling these services internally in the NetWare 6 server.
It controls the costs associated with obtaining key pairs and with managing public key certificates by handling these services internally in the NetWare 6 server.
![]() It allows public keys and certificates to be openly available while also protecting them against tampering. Because key pairs are stored in eDirectory, they can leverage the access control features and fault tolerance of Novell Directory Services.
It allows public keys and certificates to be openly available while also protecting them against tampering. Because key pairs are stored in eDirectory, they can leverage the access control features and fault tolerance of Novell Directory Services.
![]() It uses Novell International Cryptography Infrastructure (NICI) to encrypt private keys and to make private keys available only to requesting entities.
It uses Novell International Cryptography Infrastructure (NICI) to encrypt private keys and to make private keys available only to requesting entities.
![]() It securely backs up private keys via eDirectory backup utilities.
It securely backs up private keys via eDirectory backup utilities.
![]() It enables central administration of certificates by using a ConsoleOne snap-in.
It enables central administration of certificates by using a ConsoleOne snap-in.
![]() It enables users to manage their own user certificates via the Novell Certificate Console utility.
It enables users to manage their own user certificates via the Novell Certificate Console utility.
![]() It supports popular email clients and browsers, such as GroupWise, Microsoft Outlook, and Netscape Messenger.
It supports popular email clients and browsers, such as GroupWise, Microsoft Outlook, and Netscape Messenger.
In this chapter, we’ll study the fundamental architecture of Novell Certificate Server and briefly outline the components that offer these comprehensive security features. Let’s start by learning how Novell Certificate Server integrates with eDirectory.
The Novell Certificate Server consists of two parts: a snap-in module for ConsoleOne (which is the administration point for Novell Certificate Server) and PKI.NLM (which must be loaded on Certificate Server).
TIP
You must use the client version of ConsoleOne, rather than the server version, to manage Novell Certificate Server.
Novell Certificate Server is installed by default when you install NetWare 6. Some NetWare 6 functions (such as login authentication) also use the capabilities of the Certificate Server in the background. By default, the following security objects are created:
![]() Security container—This contains the Key Access Partition (KAP) subcontainer and the Organizational CA object.
Security container—This contains the Key Access Partition (KAP) subcontainer and the Organizational CA object.
![]() KAP container—This contains the W0 leaf object, which represents the security domain key used to encrypt the user’s private key.
KAP container—This contains the W0 leaf object, which represents the security domain key used to encrypt the user’s private key.
![]() Container objects—Objects that are created in the same container as the server include the SSL Certificate DNS-servername object, the SSL CertificateIP-servername object, and the SAS Service-servername object.
Container objects—Objects that are created in the same container as the server include the SSL Certificate DNS-servername object, the SSL CertificateIP-servername object, and the SAS Service-servername object.
Using ConsoleOne, the Novell Certificate Server enables you to request, manage, and store public key certificates and their associated key pairs in the eDirectory tree. In addition, you can establish an Organizational CA that’s specific to your tree and your organization. The following eDirectory objects create the foundation of Novell Certificate Server functionality:
![]() Security Container—The Security Container holds security-related objects for the eDirectory tree, including the Organizational CA object. This container physically resides at the top of the eDirectory tree. The Security Container is created when Novell Secure Authentication Services (SAS) is installed during NetWare 6 installation.
Security Container—The Security Container holds security-related objects for the eDirectory tree, including the Organizational CA object. This container physically resides at the top of the eDirectory tree. The Security Container is created when Novell Secure Authentication Services (SAS) is installed during NetWare 6 installation.
![]() Organizational CA—During NetWare 6 installation, you can elect to create an Organizational CA if one doesn’t exist in the eDirectory tree. Using ConsoleOne, you can also create or re-create the Organizational CA after installation. This object contains the public key, private key, certificate, certificate chain, and other configuration information for Novell Certificate Server. The Organizational CA object resides in the Security container in eDirectory. Note: There can be only one Organizational CA per eDirectory tree.
Organizational CA—During NetWare 6 installation, you can elect to create an Organizational CA if one doesn’t exist in the eDirectory tree. Using ConsoleOne, you can also create or re-create the Organizational CA after installation. This object contains the public key, private key, certificate, certificate chain, and other configuration information for Novell Certificate Server. The Organizational CA object resides in the Security container in eDirectory. Note: There can be only one Organizational CA per eDirectory tree.
![]() Server Certificate—During NetWare 6 installation, you can also elect to create a Server Certificate object. This eDirectory object contains the public key, private key, certificate, and certificate chain that enables Secure Sockets Layer (SSL) security services for server applications. In addition, you can use ConsoleOne to create Server Certificate objects after installation. In either case, Server Certificate objects can be created only in a container where the server resides. If the Server object is moved, all Server Certificate objects belonging to that server must be moved as well. Finally, a server can have many Server Certificate objects associated with it; however, a Server Certificate object cannot be shared between different servers.
Server Certificate—During NetWare 6 installation, you can also elect to create a Server Certificate object. This eDirectory object contains the public key, private key, certificate, and certificate chain that enables Secure Sockets Layer (SSL) security services for server applications. In addition, you can use ConsoleOne to create Server Certificate objects after installation. In either case, Server Certificate objects can be created only in a container where the server resides. If the Server object is moved, all Server Certificate objects belonging to that server must be moved as well. Finally, a server can have many Server Certificate objects associated with it; however, a Server Certificate object cannot be shared between different servers.
![]() User Certificate—A User Certificate allows users to send and receive digitally signed and encrypted email by using the S/MIME standard. Generally, only the CA administrator has sufficient rights to create User Certificates. However, only the user has rights to export or download the private key from eDirectory. The User Certificate is created from the Security tab of the user’s Property page and is signed by an Organizational CA. Finally, multiple certificates can be stored in the user’s eDirectory object.
User Certificate—A User Certificate allows users to send and receive digitally signed and encrypted email by using the S/MIME standard. Generally, only the CA administrator has sufficient rights to create User Certificates. However, only the user has rights to export or download the private key from eDirectory. The User Certificate is created from the Security tab of the user’s Property page and is signed by an Organizational CA. Finally, multiple certificates can be stored in the user’s eDirectory object.
![]() Trusted Root Container—A trusted root provides the basis for trust in public key cryptography. Trusted roots are used to validate certificates signed by CAs. Trusted roots enable security for SSL, secure email, and certificate-based authentication. A Trusted Root container is an eDirectory object that contains one or more Trusted Root objects. You must create the Trusted Root container in the Security container. Check it out on your workstation using the Trusted Root Certification Authorities tab in Internet Options.
Trusted Root Container—A trusted root provides the basis for trust in public key cryptography. Trusted roots are used to validate certificates signed by CAs. Trusted roots enable security for SSL, secure email, and certificate-based authentication. A Trusted Root container is an eDirectory object that contains one or more Trusted Root objects. You must create the Trusted Root container in the Security container. Check it out on your workstation using the Trusted Root Certification Authorities tab in Internet Options.
![]() Trusted Root—A Trusted Root object contains a trusted root certificate from a CA that is trusted (in other words, that is known to be authentic and valid). A trusted root certificate is used to validate certificates signed by the CA and can be exported and used as needed. Check it out on your workstation using the Trusted Root Certification Authorities tab in Internet Options.
Trusted Root—A Trusted Root object contains a trusted root certificate from a CA that is trusted (in other words, that is known to be authentic and valid). A trusted root certificate is used to validate certificates signed by the CA and can be exported and used as needed. Check it out on your workstation using the Trusted Root Certification Authorities tab in Internet Options.
This completes the list of new eDirectory Certificate objects offered by NetWare 6. Now let’s learn a little more about how we can use these eDirectory objects to configure Novell Certificate Server.
The first step in setting up Novell Certificate Server is to configure the Organizational CA object. The CA service runs on a single NetWare server. Therefore, you should select a server within the eDirectory tree that will always be available for digital signing and, therefore, resides in a physically secure location.
During the CA creation process, you’ll be prompted to name the Certificate Authority object and to choose the server on which it will reside. After the Organizational CA has been configured, you can create Server Certificate objects in the container that holds the host server.
During the server certificate creation process, you’re prompted to name the key pair and choose the server that the key pair is to be associated with. By default, the Server Certificate object name is generated by Novell Certificate Server and is based on the key pair name you choose. Finally, you must also specify whether the Server Certificate object will sign certificates using the internal Organizational CA or an external CA. If you use an external CA to sign certificates, the host will generate a Certificate Signing Request (CSR) that you must submit to the external certificate authority.
The following is a summary of how the Novell Certificate Server CA process works:
1. From the client, you send a request to the host server to generate a Server Certificate object using ConsoleOne.
2. The server generates a key pair and stores it in a new Server Certificate object (which resides in the host server’s home container). If the server is signing certificates based on an external CA, it then creates a CSR and sends it back to the client.
3. The CSR is routed to an internal or external CA by email or HTTP for validation.
4. The external or internal CA validates the requests, signs the certificate, and returns the certificate and the CA’s trusted root to the user by email, HTTP, or other mechanism.
5. The trusted root and public key certificate are stored in the Server Certificate object using ConsoleOne.
After the Server Certificate objects have been created, you can configure your applications to use them. Keys are referenced in a given application’s configuration by the key pair name you entered when the Server Certificate object was created. For example, suppose that you create a Server Certificate object for a server running LDAP Services, and the server’s name is Payroll. If the name given to the key pair is LDAPKeys, the Server Certificate object would be named LDAPKeys-Payroll.
To configure LDAP Services to use the LDAPKeys key pair, simply launch ConsoleOne, select the LDAP Application object, and then choose LDAPKeys from a list of key pair names. Finally, keep in mind that you can use both internal and external CAs simultaneously within Novell Certificate Server.
TIP
Remember, a key pair is restricted in its use to only one server. You can have multiple applications running on a given server that reference the same Server Certificate object, but you cannot use a Server Certificate object on multiple servers. Finally, all Server Certificate objects must belong to a server, and their ownership cannot be changed or transferred.
Public key certificates contain a life span specification to control the damage that might be caused by an undiscovered key compromise. The default life span for the Organizational CA’s public key certificate is two years. For externally signed public key certificates, the external CA determines the life span (normally one year). If you suspect that an attacker has your private key, discontinue using it by deleting the Server Certificate object from the eDirectory tree. Then generate a new key pair and obtain a new public key certificate from the Organizational CA or an external CA.
The life cycle of a key pair follows these seven phases:
![]() Phase I: Key pair generation
Phase I: Key pair generation
![]() Phase II: Issuance of public key certificates by a CA
Phase II: Issuance of public key certificates by a CA
![]() Phase III: Key distribution: public key to public repository and private key to owner
Phase III: Key distribution: public key to public repository and private key to owner
![]() Phase IV: Key pair activation
Phase IV: Key pair activation
![]() Phase V: Use of the key pair
Phase V: Use of the key pair
![]() Phase VI: Public key certificate suspension, revocation, or expiration
Phase VI: Public key certificate suspension, revocation, or expiration
![]() Phase VII: Key pair termination
Phase VII: Key pair termination
In certain instances, it might be sufficient to renew the public key certificate for an existing key pair. However, do not renew an existing certificate if you suspect that your private key has been compromised. Instead, obtain a new key pair.
That completes our brief lesson in Novell Certificate Server architecture. As you can see, public key cryptography at the NetWare 6 server relies heavily on unique security-based eDirectory objects and secure communications with external CAs. Now let’s learn a little more about how to set up and manage Novell Certificate Server.
REAL WORLD
Novell Certificate Server relies on the following two advanced security standards for cryptography and secure communications:
![]() Novell International Cryptographic Infrastructure (NICI)—NICI is the underlying cryptographic infrastructure that provides the cryptography for Novell Certificate Server, NMAS, and other applications. NICI must be installed on the host server for Novell Certificate Server to work properly. This process is accomplished during NetWare 6 server installation. The NICI license is tied to the server-based license, so you must make sure that the server has a sufficient license count to support multiple CA requests.
Novell International Cryptographic Infrastructure (NICI)—NICI is the underlying cryptographic infrastructure that provides the cryptography for Novell Certificate Server, NMAS, and other applications. NICI must be installed on the host server for Novell Certificate Server to work properly. This process is accomplished during NetWare 6 server installation. The NICI license is tied to the server-based license, so you must make sure that the server has a sufficient license count to support multiple CA requests.
![]() Secure Sockets Layer (SSL)—SSL is a protocol that establishes and maintains secure communications between SSL-enabled servers and clients. Through a process called SSL handshake, SSL enables a client and any server to establish a communication channel that prevents eavesdropping, tampering, and forgery. To establish a secure connection, the server and client exchanged predefined public keys and agree upon a key to use for this session only (known as a session key). This secure communication channel is the foundation of key exchange in the public key cryptography model.
Secure Sockets Layer (SSL)—SSL is a protocol that establishes and maintains secure communications between SSL-enabled servers and clients. Through a process called SSL handshake, SSL enables a client and any server to establish a communication channel that prevents eavesdropping, tampering, and forgery. To establish a secure connection, the server and client exchanged predefined public keys and agree upon a key to use for this session only (known as a session key). This secure communication channel is the foundation of key exchange in the public key cryptography model.
At the heart of Novell Certificate Server management are two utilities and the certificate authority. NetWare 6 enables you to manage most Certificate Server administration tasks using the client version of ConsoleOne. You can use ConsoleOne to manage public key certificates, Server Certificate objects, and their associated components. In addition, the user-oriented Novell Certificate Console utility enables users to access their own user certificates and keys without having to use the administrative capabilities of ConsoleOne.
During the Novell Certificate Server setup process, you’re asked which type of CA will sign specific Server Certificate objects. As you learned earlier, the Novell Certificate Server gives you two CA options: Organizational CA (internal) and external CA (such as VeriSign).
The benefits of using an Organizational CA as opposed to an external CA are compatibility (an Organizational CA is compatible with applications that share a common trusted root in eDirectory), cost savings (you can create an unlimited number of public key certificates at no cost), eDirectory integration, content control (through critical public key certificate attributes, such as certificate life span, key size, and signature algorithm), and simplified management.
On the other hand, the benefits of using an external CA are liability (an external CA might offer some liability protection in case any private keys are exposed) and availability (an external CA might be more widely available and more compatible with applications outside of eDirectory).
In this chapter, we’ll study the critical management tasks associated with the following three Novell Certificate Server components:
![]() Managing certificate authorities
Managing certificate authorities
![]() Managing Server Certificate objects
Managing Server Certificate objects
![]() Managing User certificates
Managing User certificates
Now let’s begin your transformation from eDirectory guru to Certificate Server expert.
By default, the Novell Certificate Server installation process creates a single Organizational CA for you. At that time, you’re prompted to specify a unique name for the internal CA. When you click Finish, the Organizational CA object is created with default parameters and placed in the Security container.
If you want more control over the creation of the Organizational CA or need to create one manually, you must first log in to the eDirectory tree as an Administrator with Supervisor rights to the Security container. Next, start ConsoleOne, right-click the Security container object, and then select New @@> Object. In the list provided, double-click NDSPKI:CertificateAuthority. This launches the CA creation wizard. Remember, you can have only one Organizational CA in an eDirectory tree.
During the Organizational CA creation process, you’re prompted to name the CA and to choose a host server. It’s important that you select a server that is physically secure, supports all protocols running on your network (including both IP and IPX), and run only software that you trust.
After you’ve created the Organizational CA, you can use ConsoleOne to perform any of the following certificate authority management tasks:
![]() Issuing a public key certificate—ConsoleOne enables you to generate certificates for cryptography-enabled applications that do not recognize Server Certificate objects. The public key certificate signed by the Organizational CA is automatically installed when you create a Server Certificate object that uses the eDirectory tree. Public key certificates are processed and imported directly into cryptography-enabled applications in the same way that clients authenticate via external CAs: via Certificate Signing Requests (CSRs). To issue a public key certificate using ConsoleOne, click the hosting container object and select Tools @@> Issue Certificate. Next, paste a CSR into the dialog box or use the browse button to locate a CSR file, and then click Next. Then select the CA that will sign the certificate, and click Next. Finally, you must specify how the key will be used, and you must configure specific properties, including subject name, validity period, and expiration dates. When you click Finish, a dialog box explains that a certificate has been created and that data about the certificate can be found on the Details page.
Issuing a public key certificate—ConsoleOne enables you to generate certificates for cryptography-enabled applications that do not recognize Server Certificate objects. The public key certificate signed by the Organizational CA is automatically installed when you create a Server Certificate object that uses the eDirectory tree. Public key certificates are processed and imported directly into cryptography-enabled applications in the same way that clients authenticate via external CAs: via Certificate Signing Requests (CSRs). To issue a public key certificate using ConsoleOne, click the hosting container object and select Tools @@> Issue Certificate. Next, paste a CSR into the dialog box or use the browse button to locate a CSR file, and then click Next. Then select the CA that will sign the certificate, and click Next. Finally, you must specify how the key will be used, and you must configure specific properties, including subject name, validity period, and expiration dates. When you click Finish, a dialog box explains that a certificate has been created and that data about the certificate can be found on the Details page.
![]() Viewing certificate authority properties—ConsoleOne enables you to view the Organizational CA’s properties, including information about the public key certificate and the self-signed certificate associated with it. To view the Organizational CA’s properties, simply double-click the Organizational CA object in the ConsoleOne browser. This activates the following property pages: General, Certificates, and other eDirectory-related property pages. In the Organizational CA’s Certificates page, you can view properties relating to two types of CA-owned certificates: public key and self-signed certificates. Both certificate-oriented property pages display the subject name, issuer’s full name, and the validity date of the corresponding certificate.
Viewing certificate authority properties—ConsoleOne enables you to view the Organizational CA’s properties, including information about the public key certificate and the self-signed certificate associated with it. To view the Organizational CA’s properties, simply double-click the Organizational CA object in the ConsoleOne browser. This activates the following property pages: General, Certificates, and other eDirectory-related property pages. In the Organizational CA’s Certificates page, you can view properties relating to two types of CA-owned certificates: public key and self-signed certificates. Both certificate-oriented property pages display the subject name, issuer’s full name, and the validity date of the corresponding certificate.
![]() Exporting the Organizational CA’s self-signed public key certificate—From the Self-Signed Certificate property page described in the preceding paragraph, you can export the integrated public key certificate to a file for use in cryptography-enabled applications. The self-signed certificate that resides in the Organizational CA provides the same verification of the CA’s identity as the trusted root certificate that is exported from a server certificate. Any service that recognizes the Organizational CA as a trusted root will accept the self-signed or trusted root certificate as valid. Click Export from the Self-Signed Certificate Property page to open a wizard that helps you export the Organizational CA certificate to a file.
Exporting the Organizational CA’s self-signed public key certificate—From the Self-Signed Certificate property page described in the preceding paragraph, you can export the integrated public key certificate to a file for use in cryptography-enabled applications. The self-signed certificate that resides in the Organizational CA provides the same verification of the CA’s identity as the trusted root certificate that is exported from a server certificate. Any service that recognizes the Organizational CA as a trusted root will accept the self-signed or trusted root certificate as valid. Click Export from the Self-Signed Certificate Property page to open a wizard that helps you export the Organizational CA certificate to a file.
Now that you’ve installed and configured the Organizational CA, let’s take a closer look at managing Server Certificate objects.
Server Certificate objects are created in the container that holds the host server’s eDirectory object. Depending on your needs, you might want to create a separate Server Certificate object for each cryptography-enabled application on the server or to create one Server Certificate object for all applications used on the server.
The terms Server Certificate object and Key Material object are synonymous. The schema name of the eDirectory object is NDSPKI:KeyMaterial. By default, the Novell Certificate Server installation process creates a Server Certificate object and allows you to give it a unique name. If you want to create a Server Certificate object manually, use the New @@> Object tool in ConsoleOne. From the list in the New Objects dialog box, select NDSPKI:KeyMaterial, and click OK in order to start the server certificate creation wizard.
During the Server Certificate object creation process, you’re prompted to name the key pair and to choose the server that the key pair will be associated with. In addition, you’ll have to determine whether the server certificate will be signed by your internal Organizational CA or an external CA. If you use the internal Organizational CA, the host certificate server must be able to communicate with the server that is running the Organizational CA process (they must be running the same protocol). If you use an external CA to sign the server certificate, the object will automatically generate a CSR that you must submit to the external CA. After the certificate has been signed and returned to you, you’ll need to install the externally authenticated certificate and trusted root into the Server Certificate object using ConsoleOne.
REAL WORLD
Creating a Trusted Root container and a Trusted Root object is really very simple. In both instances, you begin by logging in as an administrator with the appropriate rights and then starting ConsoleOne. For the Trusted Root container, right-click the Security container and select New@@>Object. Double-click NDSPKI:Trusted Root from the list of objects, enter a name, and select OK. For the Trusted Root object, click the Security container, right-click the Trusted Root object, and select New @@>Object. Double-click NDSPKI:Trusted Root Object from the list of objects and follow the instructions from the ensuing Wizard. To create a Trusted Root object, you must export a Trusted Root certificate from the Organizational CA.
To replace a Trusted Root certificate, log in as administrator. You must have the following rights:
![]() Read and Write—NDSPKI:Not After on the Trusted Root object
Read and Write—NDSPKI:Not After on the Trusted Root object
![]() Read and Write—NDSPKI:Not Before on the Trusted Root object
Read and Write—NDSPKI:Not Before on the Trusted Root object
![]() Read and Write—NDSPKI:Subject Name for the Trusted Root object
Read and Write—NDSPKI:Subject Name for the Trusted Root object
![]() Read and Write—NDSPKI:Trusted Root Certificate for the Trusted Root object
Read and Write—NDSPKI:Trusted Root Certificate for the Trusted Root object
Start ConsoleOne and select the Security container. Select the Trusted Root container that contains the Trusted Root object. Double-click the Trusted Root object and select Trusted Root. Then select Replace. Follow the instructions of the ensuing Replace a Trusted Root Wizard.
After you’ve installed the Server Certificate object, you can use ConsoleOne to perform any of the following management tasks:
![]() Importing a public key certificate—If your server certificate chooses to sign with an external CA, you must use ConsoleOne to import the public key and trusted root certificates that are returned. These certificates are then imported and stored in the Server Certificate object within the eDirectory tree. Ultimately, the cryptography-enabled applications that link to this Server Certificate object use this information to perform secure transactions. To import these two certificates into a Server Certificate object, double-click the Server Certificate object in ConsoleOne. Next, from the General or Certificates tab, click Import Certificates. At this point, you can either install the trusted root certificate from a file or paste the certificate information using a text editor. Remember, the trusted root must be installed first, before the public key certificate. Next, the server certificate can be imported either by installing it from a file or pasting the certificate information using a text editor. Finally, when you click Finish, the Certificate Property page displays the distinguished names of the subject and the issuer of the public key and trusted root certificates.
Importing a public key certificate—If your server certificate chooses to sign with an external CA, you must use ConsoleOne to import the public key and trusted root certificates that are returned. These certificates are then imported and stored in the Server Certificate object within the eDirectory tree. Ultimately, the cryptography-enabled applications that link to this Server Certificate object use this information to perform secure transactions. To import these two certificates into a Server Certificate object, double-click the Server Certificate object in ConsoleOne. Next, from the General or Certificates tab, click Import Certificates. At this point, you can either install the trusted root certificate from a file or paste the certificate information using a text editor. Remember, the trusted root must be installed first, before the public key certificate. Next, the server certificate can be imported either by installing it from a file or pasting the certificate information using a text editor. Finally, when you click Finish, the Certificate Property page displays the distinguished names of the subject and the issuer of the public key and trusted root certificates.
![]() Exporting a trusted root certificate—ConsoleOne also enables you to export a trusted root certificate to a file so that your browser can use it to verify the certificate chain sent by a cryptography-enabled application. (Note: A certificate chain is an ordered list of public key certificates indicating all the certificates that chain back to the root authority. In a certificate chain, the topmost public key certificate is known as the trusted root certificate of the certificate chain.) If you export a trusted root certificate to a file, you can specify one of two formats: DER (.DER) and Base64 (.B64). Otherwise, you can export the trusted root certificate to the system clipboard and then paste it directly into a cryptography-enabled application. To export a trusted root certificate that’s enabled in the Server Certificate object of eDirectory, simply double-click the Server Certificate object and choose the Certificates tab. Next, select Trusted Root Certificate and click Export.
Exporting a trusted root certificate—ConsoleOne also enables you to export a trusted root certificate to a file so that your browser can use it to verify the certificate chain sent by a cryptography-enabled application. (Note: A certificate chain is an ordered list of public key certificates indicating all the certificates that chain back to the root authority. In a certificate chain, the topmost public key certificate is known as the trusted root certificate of the certificate chain.) If you export a trusted root certificate to a file, you can specify one of two formats: DER (.DER) and Base64 (.B64). Otherwise, you can export the trusted root certificate to the system clipboard and then paste it directly into a cryptography-enabled application. To export a trusted root certificate that’s enabled in the Server Certificate object of eDirectory, simply double-click the Server Certificate object and choose the Certificates tab. Next, select Trusted Root Certificate and click Export.
![]() Deleting a Server Certificate object—ConsoleOne enables you to delete a Server Certificate object if you suspect that its private key has been compromised. After a Server Certificate object has been deleted, you cannot recover it. Before you delete this object, make sure that no cryptography-enabled applications still need to use it. When it has been deleted, you can re-create a Server Certificate object and assign a new key pair. ConsoleOne provides all of this functionality by using the same steps you would use to delete any other eDirectory object.
Deleting a Server Certificate object—ConsoleOne enables you to delete a Server Certificate object if you suspect that its private key has been compromised. After a Server Certificate object has been deleted, you cannot recover it. Before you delete this object, make sure that no cryptography-enabled applications still need to use it. When it has been deleted, you can re-create a Server Certificate object and assign a new key pair. ConsoleOne provides all of this functionality by using the same steps you would use to delete any other eDirectory object.
![]() Viewing a Server Certificate object’s properties—ConsoleOne enables you to view typical Server Certificate object properties as well as public key and trusted root certificate properties that are unique to the server certificate. When you double-click the Server Certificate object in ConsoleOne, it brings up a General page, a Certificates page, and typical eDirectory-related properties pages. In the Certificates page, you can view details regarding embedded public key and trusted root certificates, including the subject’s name, the issuer’s full name, and the validity dates of the certificates.
Viewing a Server Certificate object’s properties—ConsoleOne enables you to view typical Server Certificate object properties as well as public key and trusted root certificate properties that are unique to the server certificate. When you double-click the Server Certificate object in ConsoleOne, it brings up a General page, a Certificates page, and typical eDirectory-related properties pages. In the Certificates page, you can view details regarding embedded public key and trusted root certificates, including the subject’s name, the issuer’s full name, and the validity dates of the certificates.
That completes our lessons in configuring and managing the Novell Certificate Server’s two most important components: Organizational CA and server certificate. Now let’s complete this chapter with a quick look at user certificates.
User certificates are authenticated, user-owned keys that enable secure email and other communications. User certificates are embedded into user objects in the eDirectory tree. To create a user certificate in ConsoleOne, double-click a host user object and click Create in the Security @@> Certificates window. Then provide a nickname and choose the creation method you want to use. Next, select the type of certificate authority to use and click Next. Then select a key type and size. Make sure that the following radio button is selected: Allow Private Key to Be Used for Secure Email and Authentication.
Finally, view the certificate parameters and make sure that the user’s email address is present. Click Finish to complete the process.
After you’ve created a user certificate and attached it to a user object, you can use ConsoleOne to export this certificate for use in secure email. This process can be accomplished with or without the private key. Keep in mind that the network administrator or any user with sufficient rights can export a user certificate, but only the user who owns the certificate can export it with the private key.
In addition to ConsoleOne, the Novell Certificate Console utility enables users to export a given user certificate for use in secure email. After the Novell Certificate Console has been installed, you can access it by double-clicking the corresponding icon on your desktop. If you’re logged in as more than one user, select the appropriate user from the Current Connections pull-down menu. Keep in mind that you must be logged in as the user who owns the user certificate and must have Browse rights to the user object if you’re exporting the certificate and the private key. After you log in, you’ll be presented with a list of user certificates. Select the correct one and click Export.
After you’ve established an Organizational CA, embedded server certificates into your eDirectory Server objects, and activated user certificates, the Novell Certificate Server is ready to go.
So far in this chapter, you’ve learned how public key cryptography and Novell Certificate Server can dramatically improve the security of network communications. In addition to authentication and encryption, these services help you create a complete trusted network using NetWare 6.
In creating a trusted network, it’s your job to identify network threats and implement appropriate security countermeasures to eliminate them. This isn’t easy. You have many factors working against you, including open communications, hackers, and high data sensitivity. Fortunately, NetWare 6 has a dramatically improved security model for extending eDirectory network armor beyond the LAN and WAN and into the realm of a global Internet. Let’s take a closer look.
Test Objective Covered:
![]() Defend the Network Against Hacking and Denial-Of-Service (DoS) Attacks
Defend the Network Against Hacking and Denial-Of-Service (DoS) Attacks
Now that we’ve secured our central titanium vault, it’s time to expand to the network as a whole. As you learned at the beginning of this chapter, network threats are any person, place, or thing that poses some danger to your network. Threats can be natural, accidental, or deliberate. The goal of threat-based NetWare security is to determine how likely your network is to experience any of these threats and take countermeasures against them. The best approach is to assume that your network is extremely susceptible and to take a paranoid approach to protecting your servers both inside and out.
In this section, you’ll learn how to secure your NetWare network from two different perspectives:
![]() Inside-Out—More than 80% of a network’s threats come from the inside. Believe it or not, unintentional bumbling is the main culprit. In this case, you should consider placing the most experienced employees on the most sensitive systems. On the other hand, intentional sabotage is also a very serious problem. In this case, you must rely on a variety of Novell and third-party tools to help you track security breeches.
Inside-Out—More than 80% of a network’s threats come from the inside. Believe it or not, unintentional bumbling is the main culprit. In this case, you should consider placing the most experienced employees on the most sensitive systems. On the other hand, intentional sabotage is also a very serious problem. In this case, you must rely on a variety of Novell and third-party tools to help you track security breeches.
![]() Outside-In—After you’ve protected your network from internal bumbling and sabotage, it’s time to turn your focus outward. A complete advanced security model includes countermeasures for protecting your internal network from other networks (such as the Internet). One of the most common tools used to provide external security is a firewall. In this section, you’ll discover how firewalls can help you protect your network from external threats.
Outside-In—After you’ve protected your network from internal bumbling and sabotage, it’s time to turn your focus outward. A complete advanced security model includes countermeasures for protecting your internal network from other networks (such as the Internet). One of the most common tools used to provide external security is a firewall. In this section, you’ll discover how firewalls can help you protect your network from external threats.
After you’ve secured the central server, removed saboteurs, and built a firewall, your job is only half done. The final advanced network security threat is the most serious: viruses. The term virus comes from the Latin word for poison. A virus is any number of organic (or inorganic) entities consisting of simple genetic (or programming) materials surrounded by a protective coat. By itself, a virus is a lifeless form. But within living cells (or silicon-based computers), it replicates many times and attacks the host. In this section, we’ll explore viruses in more detail and learn how infection happens. Then we’ll discover some cures and daily virus countermeasures. Whatever you do, keep these critters away from your network.
Before we get into details, let’s take a look at some inherent vulnerabilities in your network.
Way back in the old days, a hack sometimes referred to a cab driver. In today’s high-tech world, however, a hacker is one who either loves to examine programming code to see what makes operating systems and applications tick, or one who uses computer expertise to gain access to computer systems without permission to tamper with programs and data. It’s that latter beast we’re most worried about.
To hack a network, this cybercriminal needs all of the following:
![]() Usernames and passwords—Obviously, these are required to gain illegal access to a network.
Usernames and passwords—Obviously, these are required to gain illegal access to a network.
![]() IP addresses—Because the network address is assumed to be trustworthy, a hacker can easily use the trusted IP address to make a transmission appear as though it came from an authorized user.
IP addresses—Because the network address is assumed to be trustworthy, a hacker can easily use the trusted IP address to make a transmission appear as though it came from an authorized user.
![]() DNS information—By performing a DNS zone transfer from your DNS server (refer to Chapter 6, “NetWare 6 IP Services”), hackers can obtain all hostnames on your network.
DNS information—By performing a DNS zone transfer from your DNS server (refer to Chapter 6, “NetWare 6 IP Services”), hackers can obtain all hostnames on your network.
![]() User profiles—Protocols such as FTP send passwords in clear-text format. By stealing user IDs and passwords, hackers have instant access to your network.
User profiles—Protocols such as FTP send passwords in clear-text format. By stealing user IDs and passwords, hackers have instant access to your network.
Unfortunately, hackers can use IP addresses, DNS information, and user profiles to launch havoc on your network. Among the most common ways are the NLM attacks, login process attacks, and rogue print server object attacks. Pretty scary stuff. Let’s take a look.
Provided they have physical access to the server, hackers can load NLMs on the server to create admin-equivalent objects. They can also create these NLMs if they have the rights to use the admin or equivalent account to gain access from the network. After creating the account, the hacker can log in to the server using the newly created admin account and perform such dastardly deeds as creating and deleting user accounts and revoking admin rights for the current Admin object.
To prevent NLM attacks, you must first physically secure the server. Keep the server in a locked room and closely guard access to the machine. You can also use the SECURE CONSOLE command at the server console to restrict the loading of any NLMs except from SYS:SYSTEM, as well as to disable keyboard entry to the built-in debugger. You must reboot the server to deactivate this command. You should also disable all remote console capabilities or assign a unique password to the RCONJ utility. Finally, use the SCRSAVER.NLM to activate a screen saver that requires a user to enter a username and password for the Admin object to access the server console.
Systems employing default or easy-to-use login configurations provide hackers easy access to your network. Hackers can easily attack a system that doesn’t use an admin password. Hackers can also use forged NetWare Core Protocol (NCP) request packets to enter a privileged session to grant themselves supervisor rights and gain access to all network resources.
Although the login process is the weakest link in network security, you can take some simple measures to shore it up. Define a strong password management policy that prevents the use of clear-text passwords, encrypts passwords, requires periodic password changes, restricts the length of passwords, and implements intruder lockout after a specified number of retries.
To prevent the forgery of packet requests, use NCP digital signatures, which require both the client and server to sign each NCP packet. To set a server’s packet signature level, enter the following command at the server console:
SET NCP Packet Signature Option = signaturelevel
For this command, signaturelevel is set to 0 (the server does not sign packets, regardless of the client level), 1 (the server signs packets only if the client requests it, meaning the client level is 2 or higher), 2 (the server signs packets if the client is capable of signing, meaning the client level is 1 or higher), or 3 (the server signs packets and requires all clients to sign packets). The default setting is 1. Increasing the value might increase security, but could also adversely affect network performance.
To prevent rogue print server attacks, you should ensure that print servers use passwords that are not clear-text. Also, limit the number of concurrent connections for print server accounts.
Now that we understand some of our weaknesses, let’s start our advanced network security lesson on the inside. Remember: Murphy was an optimist!
NetWare 6 internally secures your network using a five-layered electronic barrier, as shown in Figure 9.4. These five increasingly secure layers of protection work together to control access to eDirectory and the file system.
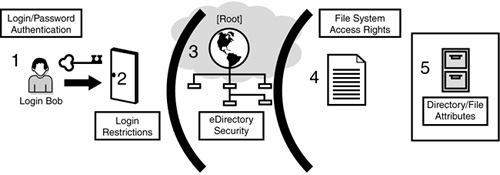
Using this approach, you can adopt the following measures to implement internal security on your network:
![]() Develop an internal security policy
Develop an internal security policy
![]() Limit access to servers
Limit access to servers
![]() Restrict administrative access to the network
Restrict administrative access to the network
![]() Restrict user access to the network (including the disabling of user accounts, assign an expiration date for temporary employees, restricting logins based on work schedules, limiting the number of user connections, limiting eDirectory rights for administering login restrictions, assigning rights to users, setting password properties, and configuring intruder lockout options)
Restrict user access to the network (including the disabling of user accounts, assign an expiration date for temporary employees, restricting logins based on work schedules, limiting the number of user connections, limiting eDirectory rights for administering login restrictions, assigning rights to users, setting password properties, and configuring intruder lockout options)
![]() Test file system security
Test file system security
Although this multi-layered security system provides a secure foundation, it doesn’t completely protect you from unintentional bumbling and internal sabotage. In these cases, it’s best to be paranoid. Let’s take a moment to explore a few examples.
In our first case, imagine what would happen if someone inadvertently (or purposely) created a user object with Supervisor rights to the root of eDirectory. As a CNE, it’s very important that you track all user objects that have more eDirectory and file system access than is required. You must also determine where the rights are coming from: security equivalence, inheritance, or trustee assignments.
In the second case, we’re introduced to a new kind of eDirectory saboteur: rogue admin. This is the name given to a user object created by intruder NLMs. Utilities such as BURGLAR.NLM are designed to create rogue admins with Supervisor rights to the eDirectory tree. To track down these objects, you must determine how they got Supervisor rights in the first place. You can check the SYS$LOG.ERR in SYS:SYSTEM, which contains a record of all loaded NLMs and new user objects. Stay patient though, because SYS$LOG.ERR contains a plethora of other entries as well, and it might take a while to find the rogue Admin object(s).
In the third and final internal security case, our network saboteur finds a way to change the Admin password. Utilities such as SETPASS.NLM can be used by an intruder to change the password of the Admin user object, and therefore lock you out of your network. Fortunately, SETPASS.NLM does not work unless the eDirectory partition that holds the Admin user object resides on the server where Admin’s home container lives. Consider using a distributed partitioning strategy to thwart SETPASS.NLM. Also, you can refer to SYS$LOG.ERR to discover whether any of these offending NLMs have been loaded.
These cases represent only three of the possible ways internal saboteurs can gain access to your network. Believe me, there are plenty more where they came from. As a NetWare 6 CNE, it’s your job to protect your network from the inside-out. Fortunately, Novell and its partners provide you with a plethora of internal security countermeasures:
![]() Novell Advanced Audit Service (NAAS)—NAAS is included with NetWare 6 and it helps you track unauthorized or unusual actions by configuring policies in eDirectory that record selected user actions in a database. You can audit actions such as opening, deleting, and modifying files in Novell Storage Services (NSS) and/or the Novell Traditional File System (NWFS). You can also audit actions in eDirectory, including logging in, creating objects, changing a password, or changing an object’s properties. For NAAS installation and configuration details, surf to www.novell.com/documentation/lg/nw6p/index.html?page=/documentation/lg/nw6p/naas_enu/data/a4fe5v6.html.
Novell Advanced Audit Service (NAAS)—NAAS is included with NetWare 6 and it helps you track unauthorized or unusual actions by configuring policies in eDirectory that record selected user actions in a database. You can audit actions such as opening, deleting, and modifying files in Novell Storage Services (NSS) and/or the Novell Traditional File System (NWFS). You can also audit actions in eDirectory, including logging in, creating objects, changing a password, or changing an object’s properties. For NAAS installation and configuration details, surf to www.novell.com/documentation/lg/nw6p/index.html?page=/documentation/lg/nw6p/naas_enu/data/a4fe5v6.html.
![]() BindView Solutions for Novell—Many paranoid network sleuths use BindView tools to help automate the discovery of offending users. bv-Control for Novell NetWare, for example, enables you to report on and administer virtually every aspect of NetWare from a central RMS console. This tool also enables you to perform security checks across the enterprise for possible vulnerabilities. Similarly, bv-Control for NDS eDirectory provides you with the ability to perform security and configuration checks on your tree. For more information about BindView Solutions for Novell, surf to www.bindview.com.
BindView Solutions for Novell—Many paranoid network sleuths use BindView tools to help automate the discovery of offending users. bv-Control for Novell NetWare, for example, enables you to report on and administer virtually every aspect of NetWare from a central RMS console. This tool also enables you to perform security checks across the enterprise for possible vulnerabilities. Similarly, bv-Control for NDS eDirectory provides you with the ability to perform security and configuration checks on your tree. For more information about BindView Solutions for Novell, surf to www.bindview.com.
![]() Hidden Object Locator—Hidden objects are often used by network saboteurs to maliciously access eDirectory with full Supervisor rights. These container or user objects can be created without your permission. Furthermore, hidden objects are very hard to track because they don’t show up in typical Novell browsing utilities. For example, a hidden user object with full Supervisor rights to the tree can be created by placing a full IRF on a new user and making yourself a trustee with all rights to the object. Fortunately, Novell provides a free Hidden Object Locator tool at www.novell.com/coolsolutions/tools/1098.html.
Hidden Object Locator—Hidden objects are often used by network saboteurs to maliciously access eDirectory with full Supervisor rights. These container or user objects can be created without your permission. Furthermore, hidden objects are very hard to track because they don’t show up in typical Novell browsing utilities. For example, a hidden user object with full Supervisor rights to the tree can be created by placing a full IRF on a new user and making yourself a trustee with all rights to the object. Fortunately, Novell provides a free Hidden Object Locator tool at www.novell.com/coolsolutions/tools/1098.html.
The good news is you’re not alone in trying to fight internal threats on your network. The bad news is there are bad guys outside your network as well. Now, let’s shift gears to securing your network from the outside-in.
Your network’s level of vulnerability is a combination of two factors:
![]() The probability of any given threat occurring
The probability of any given threat occurring
![]() Your network’s weakness to that threat
Your network’s weakness to that threat
Network health is achieved when you decrease a threat’s probability and eliminate your system’s weakness against that threat. Risk management helps you accomplish both of these tasks. In the previous section, you learned how to evaluate the probability of any given threat attacking your network from the inside. Now you need to determine what threats exist from outside your network. Then you can plug the holes and build an impenetrable network armor against those threats.
One of the most powerful tools used to provide external security is a firewall. A firewall is a combination of hardware and software that controls access between your internal network and an external network (such as the Internet). Furthermore, a firewall provides specific exit and entry points to and from your network. For example, you can set up a firewall to deny access to your network from the Internet but allow users from inside to get to the Web. Today’s sophisticated firewalls even enable you to specify who gets access to what both internally and on the Internet.
Novell BorderManager is one of the most comprehensive firewall solutions available today. It includes a large variety of firewall technologies, including filtering, translation, proxy, and caching.
Following is a brief discussion of the firewall technologies included in Novell BorderManager and a description of how each works. Keep in mind most of today’s firewalls include many of these technologies as well.
![]() Packet filtering—Packet filters are the primary firewall technology used to protect a private network from external threats. Packet filtering provides network-layer security (OSI model) to control the type of information sent between networks and hosts. You can configure incoming or outgoing filters to regulate the flow of data based on criteria, including service type, port number, interface number, source address, and destination address.
Packet filtering—Packet filters are the primary firewall technology used to protect a private network from external threats. Packet filtering provides network-layer security (OSI model) to control the type of information sent between networks and hosts. You can configure incoming or outgoing filters to regulate the flow of data based on criteria, including service type, port number, interface number, source address, and destination address.
![]() Network Address Translation (NAT)—NAT is an IP address translation utility that converts private IP addresses (inside your network) to registered IP addresses (the Internet). NAT enables private clients to access the Internet using a private address, thus hiding their source information from the Internet. Because NAT operates at the network router interface, network hosts running any platform can use the interface’s address translation capability, including Windows, Macintosh, Linux, Unix, and OS/2. Finally, you don’t need a one-to-one relationship between internal and external addresses because NAT allows you to share one external address among multiple internal clients. Cool, huh?
Network Address Translation (NAT)—NAT is an IP address translation utility that converts private IP addresses (inside your network) to registered IP addresses (the Internet). NAT enables private clients to access the Internet using a private address, thus hiding their source information from the Internet. Because NAT operates at the network router interface, network hosts running any platform can use the interface’s address translation capability, including Windows, Macintosh, Linux, Unix, and OS/2. Finally, you don’t need a one-to-one relationship between internal and external addresses because NAT allows you to share one external address among multiple internal clients. Cool, huh?
![]() Circuit-level gateway—A circuit-level gateway performs the same function as an NAT gateway. However, it operates at the session layer of the OSI model instead of the network layer. This allows the gateway to inspect more sophisticated information, including address, DNS name, or username. Special client software must be installed on your workstation to use a circuit-level gateway. One primary benefit of a circuit-level gateway is that it enables you to use one IP address for your entire network, but still hide private clients. Novell’s IP Gateway is an example of a circuit-level gateway product.
Circuit-level gateway—A circuit-level gateway performs the same function as an NAT gateway. However, it operates at the session layer of the OSI model instead of the network layer. This allows the gateway to inspect more sophisticated information, including address, DNS name, or username. Special client software must be installed on your workstation to use a circuit-level gateway. One primary benefit of a circuit-level gateway is that it enables you to use one IP address for your entire network, but still hide private clients. Novell’s IP Gateway is an example of a circuit-level gateway product.
![]() Application proxy—An application proxy is specific to an application and works as a proxy server to intercept information running through a gateway, thus preventing direct communication between clients and hosts. For example, an FTP proxy accepts only packets that are generated by the FTP protocol. A proxy server is a server that acts as an intermediary between a workstation user and the Internet so that you can ensure security, administrative control, and caching service.
Application proxy—An application proxy is specific to an application and works as a proxy server to intercept information running through a gateway, thus preventing direct communication between clients and hosts. For example, an FTP proxy accepts only packets that are generated by the FTP protocol. A proxy server is a server that acts as an intermediary between a workstation user and the Internet so that you can ensure security, administrative control, and caching service.
![]() Caching—Caching accelerates Internet performance by locally storing frequently requested Internet information. The client browser makes a request directly to the central proxy server, which locates the object in its memory and returns it expeditiously. If the object isn’t located in the proxy server’s cache, the central host retrieves it from the Internet and then places it into memory.
Caching—Caching accelerates Internet performance by locally storing frequently requested Internet information. The client browser makes a request directly to the central proxy server, which locates the object in its memory and returns it expeditiously. If the object isn’t located in the proxy server’s cache, the central host retrieves it from the Internet and then places it into memory.
![]() Virtual private network (VPN)—A VPN is a private network that runs over a public network (such as the Internet). VPNs allow two or more hosts to exchange data over the Internet using a secure channel. This secure channel is established by using an encrypted data stream between each host.
Virtual private network (VPN)—A VPN is a private network that runs over a public network (such as the Internet). VPNs allow two or more hosts to exchange data over the Internet using a secure channel. This secure channel is established by using an encrypted data stream between each host.
So, there you go. Now you know how to secure your network from the inside out and the outside in. But wait, there’s one more network threat—and it’s a doozy! For the rest of this chapter, we’ll explore viruses. These unwanted, poisonous critters are the single most detrimental threat your network will face. Fortunately, you have a great defense: NetWare 6 CNE certification. But to earn this badge, you must learn how viruses work and more importantly what to do about them when they attack.
Viruses are real! The question is not whether you’ll get infected, but when.
Few words strike as much fear in the hearts of network administrators as the word virus does. Almost 85% of the world’s businesses with 300 or more PCs have been hit at least once with a virus. In recent years, the industry of virus detection and removal has reached staggering proportions. Movies like Terminator and War Games fill our minds with the possibilities of runaway computer systems that ultimately try to eradicate the human race.
So, what is a virus? Viruses are parasitic programs that add themselves to other systems and have a mechanism for replication. These malicious programs have been around for as long as there have been computers and programmers. These destructive data tools are the result of embezzlers, disgruntled employees, hackers, and teenagers with too much time on their hands. The fact is that any program that has been altered to exceed its original mission falls under the category of malicious programming—aka virus.
If you take the necessary precautions, you should seldom get a virus. But the inevitable will occur: Someday you will get a virus. As a NetWare CNE, you must be able to deal with a virus infection and clean up the system when it happens. This is accomplished in two phases:
1. Evaluate virus threats
2. Implement effective virus countermeasures
Let’s take a closer look. Protective gloves required.
In medical terms, viruses are submicroscopic intracellular parasites that consist of either RNA, DNA, or silicon-based programming instructions. These internal components are surrounded by a protective coat, which provides movement, survival, and cellular attachment. As a parasite, virus replication requires living cells (or executable programs). So, there’s the key: Keep viruses away from living cells (or executable programs), and they can’t do any harm.
To prevent a virus attack, you must understand how viruses enter your network, how they infect it, and how they eventually replicate and cause more damage. In step 1 of virus prevention, you must evaluate the type of virus that has attacked your network and understand how to deal with it. For example, a virus can damage data directly, or degrade system performance by taking over system resources, which are then not available to authorized users. In this way, the virus does not behave in a typical fashion.
Viruses are classified depending on how they infect your network. There are four fundamental categories:
![]() Boot sector viruses—Boot sector viruses are usually transmitted when an infected disk is left in the drive and the computer is rebooted. The virus is read from the infected boot sector of the disk and written to the master boot block of the internal hard drive. As soon as you restart your computer, the virus is triggered from the boot block and can cause serious consequences. For example, the CIH/Chernobyl virus has been known to overwrite the first 2048 sectors of the hard drive with random data. Without this file information, the computer assumes that the hard drive is empty and will not run the operating system.
Boot sector viruses—Boot sector viruses are usually transmitted when an infected disk is left in the drive and the computer is rebooted. The virus is read from the infected boot sector of the disk and written to the master boot block of the internal hard drive. As soon as you restart your computer, the virus is triggered from the boot block and can cause serious consequences. For example, the CIH/Chernobyl virus has been known to overwrite the first 2048 sectors of the hard drive with random data. Without this file information, the computer assumes that the hard drive is empty and will not run the operating system.
![]() Program or file viruses—These malicious critters are pieces of code that attach themselves to executable programs or files. When the infected program is run or the file is opened, the virus is transferred to your system’s memory and might replicate itself further. For example, an EXE virus can disguise itself as a JPEG file in the MIME header of a Web page. The MIME header tells your Web browser what types of files are included in the page. If the virus is hidden in the MIME header, the browser will evaluate it as safe and let it pass through. After the offending file reaches your computer, it is opened and run as an EXE application. As such, it can perform significant damage to other computers on the network, depending on your access privileges.
Program or file viruses—These malicious critters are pieces of code that attach themselves to executable programs or files. When the infected program is run or the file is opened, the virus is transferred to your system’s memory and might replicate itself further. For example, an EXE virus can disguise itself as a JPEG file in the MIME header of a Web page. The MIME header tells your Web browser what types of files are included in the page. If the virus is hidden in the MIME header, the browser will evaluate it as safe and let it pass through. After the offending file reaches your computer, it is opened and run as an EXE application. As such, it can perform significant damage to other computers on the network, depending on your access privileges.
![]() Macro viruses—These are the most common viruses. Macro viruses infect files run by applications that use macro languages, such as Microsoft Word or Excel. These viruses behave as a regular macro. However, they’re written to cause damage when the file is opened and the macro is automatically run.
Macro viruses—These are the most common viruses. Macro viruses infect files run by applications that use macro languages, such as Microsoft Word or Excel. These viruses behave as a regular macro. However, they’re written to cause damage when the file is opened and the macro is automatically run.
![]() Multipartite viruses—These silicon organisms have characteristics of both boot sector and file viruses. They might start out in the boot sector and spread to applications or vice versa.
Multipartite viruses—These silicon organisms have characteristics of both boot sector and file viruses. They might start out in the boot sector and spread to applications or vice versa.
Now that you understand what viruses can do, let’s take a moment to recognize the common symptoms of a computer infected with a virus. The most telling symptom is the computer fails to start. Beyond this, programs don’t launch or they fail when simple commands are performed. Typically, viruses attack file systems. Therefore, filenames can be changed or the contents become inaccessible. In some cases, viruses will cause unusual words or graphics to appear on the screen. In the worst instances, hard disks or floppy disks can be completely reformatted and all data lost.
It’s important for you to be aware of these symptoms and make sure that your network users are educated in observing and reporting them. Why? Because you’re certified, and as such, you’re trained to implement virus countermeasures.
After all the threats have been evaluated, it’s time to develop and implement countermeasures. Countermeasures are actions that create a protective barrier against network threats. In many cases, countermeasures can reduce the probability that threats will cause harmful damage.
The real goal in step 2 is to stop viruses before they get to your network. As you learned, LANs are highly susceptible to virus propagation. As I’m sure you can imagine, viruses often feel right at home in the network environment. After all, networks are designed to allow as many programs as possible to run on them. In addition, they encourage data sharing and connectivity. It’s like adding fuel to the virus fire.
So, how can you protect your network from these horrible little programs? The best way is to implement preventative countermeasures. That is, stop viruses before they attack. After all, an ounce of prevention is worth a ton and a half of cure. The following is a list of my favorite time-proven virus countermeasures:
![]() Develop a virus protection plan—Every great success begins with a plan. First, you must identify all entry points in your network through which a virus attack is possible. These include disk drives, external storage media, infected documents, SMTP email gateways, Internet gateways, and wireless Internet devices. Second, your plan should specify the virus prevention responsibilities and authority of network users and administrators. For example, you might decide that all employees must be responsible for updating the anti-virus software on their computers. Finally, in part three of your virus protection plan, make sure to provide installation and operation instructions for networkwide anti-virus tools.
Develop a virus protection plan—Every great success begins with a plan. First, you must identify all entry points in your network through which a virus attack is possible. These include disk drives, external storage media, infected documents, SMTP email gateways, Internet gateways, and wireless Internet devices. Second, your plan should specify the virus prevention responsibilities and authority of network users and administrators. For example, you might decide that all employees must be responsible for updating the anti-virus software on their computers. Finally, in part three of your virus protection plan, make sure to provide installation and operation instructions for networkwide anti-virus tools.
![]() Install anti-virus and data-integrity software—As the number of viruses has increased, so has the number of programs available to combat them. These programs come from large companies, as well as small offices and individuals. Their effectiveness varies greatly, but at least there is competition and choice. Most anti-virus programs enable users to completely scan all files read from disk drives or downloaded from the Internet. In addition, data-integrity tools help you detect whether files have been modified on the system. These checkers are useful for detecting a possible infection and helping identify intruders.
Install anti-virus and data-integrity software—As the number of viruses has increased, so has the number of programs available to combat them. These programs come from large companies, as well as small offices and individuals. Their effectiveness varies greatly, but at least there is competition and choice. Most anti-virus programs enable users to completely scan all files read from disk drives or downloaded from the Internet. In addition, data-integrity tools help you detect whether files have been modified on the system. These checkers are useful for detecting a possible infection and helping identify intruders.
![]() Automatic anti-virus operation—After you’ve installed the anti-virus software, you must configure it to scan the files on your system. Many anti-virus software programs enable you to select the time when you want your network scanned. The most powerful systems scan every file as it is passed through the network. Scanning is good, but the real challenge for anti-virus programs is keeping up to date with the daily flood of new virus strains. It’s imperative that you configure your anti-virus software for automatic updates from the Internet to keep your definitions current. This is accomplished through definition files. If you don’t have updated definition files, virus programs can infect your anti-virus software and render it useless.
Automatic anti-virus operation—After you’ve installed the anti-virus software, you must configure it to scan the files on your system. Many anti-virus software programs enable you to select the time when you want your network scanned. The most powerful systems scan every file as it is passed through the network. Scanning is good, but the real challenge for anti-virus programs is keeping up to date with the daily flood of new virus strains. It’s imperative that you configure your anti-virus software for automatic updates from the Internet to keep your definitions current. This is accomplished through definition files. If you don’t have updated definition files, virus programs can infect your anti-virus software and render it useless.
![]() Back up your data regularly—Although you might have several preventative measures and plans in place to stop virus attacks, you can never completely secure your network. Therefore, regular data backups lead to job security and happiness. In addition to local backup devices, secure services are available on the Internet for backing up your network data on a daily basis.
Back up your data regularly—Although you might have several preventative measures and plans in place to stop virus attacks, you can never completely secure your network. Therefore, regular data backups lead to job security and happiness. In addition to local backup devices, secure services are available on the Internet for backing up your network data on a daily basis.
![]() Live in paranoia—One of the best preventative virus countermeasures is a social one. You should always consider every disk, program, and email attachment as a threat. Never assume that files that have been sent by friends, family, business associates, or other employees are not infected. Although this sounds very paranoid, it ensures that you’re always on guard should a virus find its way into your network. Furthermore, when handling files received from outside your network, consider these guidelines: write-protect any data-source disk before inserting it into a drive, scan files before copying them to your network, change your computer’s CMOS boot sequence to start with drive C: first, and, last, but not least, never download attachments or files that you receive from strangers.
Live in paranoia—One of the best preventative virus countermeasures is a social one. You should always consider every disk, program, and email attachment as a threat. Never assume that files that have been sent by friends, family, business associates, or other employees are not infected. Although this sounds very paranoid, it ensures that you’re always on guard should a virus find its way into your network. Furthermore, when handling files received from outside your network, consider these guidelines: write-protect any data-source disk before inserting it into a drive, scan files before copying them to your network, change your computer’s CMOS boot sequence to start with drive C: first, and, last, but not least, never download attachments or files that you receive from strangers.
![]() Use caution when downloading files from the Internet—You should always download files to a quarantined scanning area on your hard drive before allowing them to intermingle with the rest of your network data. You might consider dedicating a full computer to this task so that the virus-scanning overhead doesn’t affect the performance of your computer. This way, all files on the control machine can be scanned systematically before they’re accessed.
Use caution when downloading files from the Internet—You should always download files to a quarantined scanning area on your hard drive before allowing them to intermingle with the rest of your network data. You might consider dedicating a full computer to this task so that the virus-scanning overhead doesn’t affect the performance of your computer. This way, all files on the control machine can be scanned systematically before they’re accessed.
![]() Be aware of virus hoaxes—You need to be careful about virus hoaxes on the Internet. If you receive a virus warning, check your anti-virus software provider’s Web site to make sure that the warning is accurate. For example, many ignored the Love Bug virus warnings because of the number of hoaxes circulating on the Internet at the time. By ignoring a valid warning, many companies lost thousands of dollars as a result of the Love Bug invading their networks. Be careful, though, because empires have been built around supplying virus antidotes and sometimes those supplying the antidotes are the ones crying, “Wolf!” the loudest.
Be aware of virus hoaxes—You need to be careful about virus hoaxes on the Internet. If you receive a virus warning, check your anti-virus software provider’s Web site to make sure that the warning is accurate. For example, many ignored the Love Bug virus warnings because of the number of hoaxes circulating on the Internet at the time. By ignoring a valid warning, many companies lost thousands of dollars as a result of the Love Bug invading their networks. Be careful, though, because empires have been built around supplying virus antidotes and sometimes those supplying the antidotes are the ones crying, “Wolf!” the loudest.
![]() Educate your network users—Many users don’t realize that certain activities promote virus spread, including downloading files, bringing games from home, and/or using unapproved software. Making users aware of the potential cost of these high-risk activities will help. As part of your employee-awareness strategy, make sure to emphasize the risks to the network if one computer does not have anti-virus software installed. In addition, employees who work at home should use company-supplied computers. And finally, make sure that floppy disks brought from home are write-protected and scanned before being used on the network.
Educate your network users—Many users don’t realize that certain activities promote virus spread, including downloading files, bringing games from home, and/or using unapproved software. Making users aware of the potential cost of these high-risk activities will help. As part of your employee-awareness strategy, make sure to emphasize the risks to the network if one computer does not have anti-virus software installed. In addition, employees who work at home should use company-supplied computers. And finally, make sure that floppy disks brought from home are write-protected and scanned before being used on the network.
A virus-prevention plan can go a long way toward protecting your network from malicious programs. It doesn’t, however, guarantee that you’ll never get a virus. If this unthinkable occurs, you’ll have to have a good virus response plan (VRP). Table 9.1 provides a good VRP for containing and eliminating network viruses.
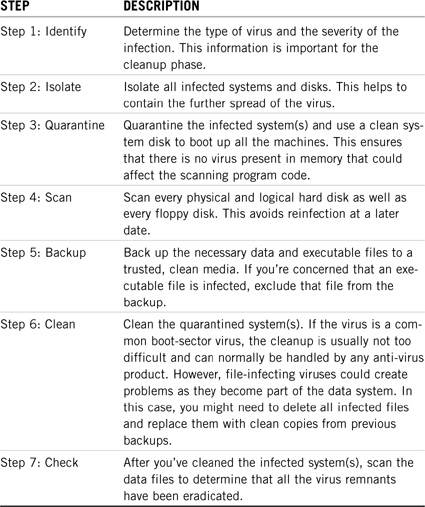
Prevention is a great thing. I can’t think of a better time to deal with network problems than before they occur. It’s interesting: As a NetWare 6 CNE, your life is a paradox. You’re needed only when the network is sick, and yet your primary goal is to encourage network health. I guess success is achieved only when you become obsolete. Don’t worry, though, that isn’t going to happen any time soon. As a matter of fact, there is one important network component that will ensure you’ll be busy troubleshooting security for many years to come: the Web.
In the final advanced security section, we’ll surf the information superhighway and learn how to protect your NetWare Web services from devastating security threats, including viruses, worms, and worse. Remember, our NetWare 6 credo: A healthy network is a happy network.
Test Objective Covered:
![]() Defend the Network Against Hacking and Denial-of-Service (DoS) Attacks (continued)
Defend the Network Against Hacking and Denial-of-Service (DoS) Attacks (continued)
The Web is your friend...and potentially your enemy.
Because the Internet is a public domain network, any Web services you provide are vulnerable to virus attacks by hackers. Confidential information, for example, can be captured and transmitted, critical information can be modified, and server configurations can be changed to allow unauthorized access by malicious saboteurs. Not very friendly, huh?
So, why do they do it? To effectively protect your Web services from virus attacks, and build a Web virus protection plan, you need to understand the factors that encourage individuals to attack your Web services. Believe it or not, it all comes down to three factors: means, motive, and opportunity.
The means of Web virus attacks have evolved dramatically in the last few years. Ten years ago, intruders attacked computer systems by trying to get passwords. Today, intrusion tools are highly sophisticated and often provide an easy-to-use graphical interface. Because these tools are well documented and readily available, people with limited knowledge of Internet architecture and basic computer skills can cause significant damage to unsecured Web services.
Similarly, the motive to attack Web services has also evolved over the last few years. Today, more than 100 million computers and Web services are connected to the Internet with proprietary information, including corporate strategic plans, financial resources and records, and commercial product information. This is the type of information that hackers are motivated to change or steal. They might do it out of curiosity, for power, for money, or for political reasons. Regardless, today’s Web hackers are highly motivated.
And finally, the opportunity for Web services attacks have never been better. This increase in hacking opportunity is the result of various Web factors, including the high number of computers on the Internet, the difficulty of configuring these computers securely, the low cost of Internet access, the increased power of computers, and the general hacker philosophy of finders keepers, losers weepers.
So, there you have it. Today’s Web service hackers are highly motivated, with great opportunity, and very sophisticated means. That sounds like a very formidable enemy. Don’t worry, you’re a NetWare 6 CNE and, as such, the architect of a powerful Web virus protection plan. The most important strategy to defeat Web virus attacks is to know thine enemy. In this section, we’ll explore four categories of Web viruses:
![]() Email virus attacks
Email virus attacks
![]() Buffer overflow viruses
Buffer overflow viruses
![]() Denial-of-service (DoS) attacks
Denial-of-service (DoS) attacks
![]() Blended threats
Blended threats
Without any further ado, let’s discover what kind of enemies are skulking on the Web.
Email virus attacks are a client-to-client attack and rely on a user to perform some action such as opening an email or an email attachment. Although the damage of an email virus can be restricted to a user’s computer, many of today’s sophisticated viruses spread like wildfire through the email program’s contact list.
To further complicate things, email virus attacks can come from viruses, worms, or Trojan Horses. Following are examples of malicious programs that use email to attack your Web services:
![]() Melissa macro virus
Melissa macro virus
![]() W32Goner worm
W32Goner worm
![]() TROJAN.DANSCHL.A Trojan Horse
TROJAN.DANSCHL.A Trojan Horse
Let’s learn a little bit more about these horrible little programs.
The Melissa macro virus spreads as an infected VBA Word document attached to an email message. The subject line often contains the following message:
Subject: Important Message From <Sender>
The body of the Melissa macro virus usually includes the following text:
Here is that document you asked for ... Don’t show anyone else
;-)
The attachment is an infected DOC file initially called LIST.DOC that often contains references to various Web sites. When the user opens the infected DOC file with Microsoft Word 97 or Microsoft Word 2000, the macro virus is immediately executed. Here’s what she does:
1. Melissa lowers the macro security settings to make sure that the user is not notified when the virus is executed in the future.
2. Melissa checks the following Registry key:
HKEY_Current_UserSoftwareMicrosoftOfficeMelissa?
If the Registry key does not exist or does not have a value of “...by Kwyjibo,” the virus spreads itself by sending the same email message to the first 50 entries in every Microsoft Outlook MAPI Address Book readable by the user executing the macro. If any of these email addresses are mailing lists, the macro is delivered to everyone on the mailing list.
3. Melissa sets the value of the Registry key to “... by Kwyjibo.” Setting this Registry key causes the virus only to spread once per session.
4. Melissa infects the NORMAL.DOT template file. This ensures that all newly created Word documents are infected by the default template.
5. Finally, Melissa adds the following silly message to the current Word document (only if the minute of the hour matches the day of the month):
Twenty-two points, plus triple Word score, plus 50 points
for using all my letters. Game’s over. I’m outta here.
The W32/Goner worm is a Windows program disguised as a GON.SCR screen saver. This worm is distributed as an email file attachment or through ICQ (instant messaging program) file transfers. Here’s what it looks like:
Subject: Hi!
How are you?
When I saw this screen saver, I immediately thought about you.
I am in a hurry. I promise you will love it!
Attachment: GONE.SCR
When the unsuspecting user starts GONE.SCR, the worm displays a splash screen and false error message in an attempt to fool the user into thinking the program is legitimate. Goner then copies itself to the Windows System folder and modifies the Windows Registry to execute itself when the user reboots the computer. Goner replicates itself by sending itself to all addresses listed in the user’s Microsoft Outlook Address Book and all online users in the ICQ contact list. In addition, Goner deletes any local anti-virus and/or security programs that are running and removes their host directories. If the worm is unable to delete the files immediately, it creates a file called WININIT.INI, which deletes the files when the user reboots the computer.
TROJAN.DANSCHL.A is a simple Trojan Horse program written in Visual Basic that deletes files from your key C: folders. First, this Trojan Horse deletes all files from C:WindowsTemp and creates new folders in C:Windows. Also, the Trojan Horse deletes all SYS files from the C:WindowsSystem32Drivers folder.
While this Trojan Horse is in the process of deleting files, it might come across a file that is in use in the C:WindowsTemp directory. In that case, the Trojan Horse will exit the program and display the following message:
Run-time error: single ’75’: Path/File access error
After the Trojan Horse’s actions have been completed, it displays a message that can only be closed by pressing Ctrl+Alt+Delete and selecting End Task.
BRAIN SNACK
This mystery doesn’t seem to have any rhyme or reason. Speaking of which, each of the following six rhymes provides clues to a word. When you’ve uncovered the mysterious list, use the first and last letters of each word to discover the reason for our journey. Ready, set, go.
![]() A tiny note, it’s in quick time, All you need to solve this rhyme?
A tiny note, it’s in quick time, All you need to solve this rhyme?
![]() Cry to Mark, it’s so abrupt, Delight or horror will erupt.
Cry to Mark, it’s so abrupt, Delight or horror will erupt.
![]() Set a course to steer the ship, Plot the route when off you trip.
Set a course to steer the ship, Plot the route when off you trip.
![]() Just a drop to come apart, Joy perhaps, or sad at heart?
Just a drop to come apart, Joy perhaps, or sad at heart?
![]() Describe a lad who now is striving, One day his hopes may be arriving.
Describe a lad who now is striving, One day his hopes may be arriving.
![]() Sculpture of freedom and all is well, Here’s independence and the marching bell.
Sculpture of freedom and all is well, Here’s independence and the marching bell.
Good luck. You’re going to need a lot of mental energy to solve this mystery.
Buffer overflows are a common method for Web virus attacks. These overflows occur when programs attempt to store more data in server memory than is available. To improve performance, Web servers and FTP servers typically track data changes and process commands in server memory.
Depending on the nature of the buffer overflow virus, the overflow itself might be the intended result. This forces the server to stop executing or slow down. However, more sophisticated buffer overflow viruses introduce new instructions in the memory overflow area that overwrite existing program code and commands. This gives the saboteur control of the Web server or FTP server.
The following are two examples of buffer overflow viruses:
![]() Web server extension vulnerability—Web servers use extensions to provide a variety of services. Like other software programs, extensions often use buffers to process instructions in memory and are vulnerable to virus attacks. For example, Windows 2000 includes support for the Internet Printing Protocol (IPP) through an ISAPI extension. This extension is installed by default on all Windows 2000 systems, but is accessible only through the IIS Web server. The IPP extension contains a buffer overflow that can be used by a saboteur to run virus code and to gain complete administrative control of the system.
Web server extension vulnerability—Web servers use extensions to provide a variety of services. Like other software programs, extensions often use buffers to process instructions in memory and are vulnerable to virus attacks. For example, Windows 2000 includes support for the Internet Printing Protocol (IPP) through an ISAPI extension. This extension is installed by default on all Windows 2000 systems, but is accessible only through the IIS Web server. The IPP extension contains a buffer overflow that can be used by a saboteur to run virus code and to gain complete administrative control of the system.
![]() FTP server globbing—Filename globbing is the process of expanding short-hand notation into complete filenames. FTP servers based on ftpd are especially vulnerable to globbing through the use of the GLOB() command. Intruders can use the expansion done by the GLOB() command to overflow various buffers and FTP servers, thus allowing saboteurs to store and execute arbitrary code in host server memory. This has the further side effect of expanding other such characters in the pathname string, which ultimately leads to very large virus input strings being passed to the main command-processing routines of server RAM.
FTP server globbing—Filename globbing is the process of expanding short-hand notation into complete filenames. FTP servers based on ftpd are especially vulnerable to globbing through the use of the GLOB() command. Intruders can use the expansion done by the GLOB() command to overflow various buffers and FTP servers, thus allowing saboteurs to store and execute arbitrary code in host server memory. This has the further side effect of expanding other such characters in the pathname string, which ultimately leads to very large virus input strings being passed to the main command-processing routines of server RAM.
Denial-of-service (DoS) attacks can be spread using a variety of methods including Internet data packets and worms. The intent of DoS attacks is to prevent or impair the legitimate use of Web services on the network. The most common DoS attack type is called packet flooding. Packet flooding involves sending a large number of bogus requests, thus consuming all the network’s available bandwidth.
Early DoS attacks involved simple tools that generated and sent packets from a single source aimed at a single destination. In the past few years, these horrible worms have evolved to attack multiple targets from multiple sources. In this Web viruses lesson, we’ll discover following different types of DoS attacks:
![]() TCP/IP implementation attacks—These attacks exploit a weakness in the TCP/IP stack, and include the Ping of Death and Teardrop.
TCP/IP implementation attacks—These attacks exploit a weakness in the TCP/IP stack, and include the Ping of Death and Teardrop.
![]() TCP/IP standards attacks—These attacks exploit the weakness in the TCP/IP standard, and include the SYN attack, FIN attack, and Land attack
TCP/IP standards attacks—These attacks exploit the weakness in the TCP/IP standard, and include the SYN attack, FIN attack, and Land attack
![]() Brute-force attacks—These attacks create excess traffic on the network, and include the Smurf IP attack and the UDP flood attack.
Brute-force attacks—These attacks create excess traffic on the network, and include the Smurf IP attack and the UDP flood attack.
![]() Worm attacks—These attacks focus on multiple targets from multiple sources, and include the Code Red worm and W32/Nimda worm.
Worm attacks—These attacks focus on multiple targets from multiple sources, and include the Code Red worm and W32/Nimda worm.
Have your anti-virus software ready.
This attack uses the functionality of the PING command to send a packet that exceeds the size limit of 65,536 bytes established in the TCP/IP standard. Receiving an oversized packet causes many older Unix and Linux systems to crash, hang, or reboot.
Because this attack has been around for years, most operating systems have been able to build patches to counter this problem. NetWare 6 includes the patches to defend against Ping of Death attacks.
The Teardrop attack sends a series of IP fragments with overlapping values in the offset fields. As it passes through various routers, an IP packet is broken into smaller fragments that contain an offset field with a sequencing number. Using the values in the offset fields, the receiving system reassembles the fragments into the original packet. When the receiving system attempts to reassemble fragments with overlapping values, it crashes or hangs.
Like the Ping of Death attacks, the best defense against Teardrop attacks is to apply operating system-specific patches. NetWare 6 includes the patches to defend against Teardrop attacks.
A SYN attack floods a targeted system with SYN messages containing bad source IP addresses (also known as spoofing). When a client system sends a SYN message to a server, the server should respond by acknowledging the SYN message with a SYN-ACK message sent back to the client. The client then responds to the SYN-ACK message with an ACK message to the server. When the ACK message is received, a connection between server and client is established and data can be exchanged. In a SYN attack, the target system never receives the SYN-ACK message because it is sent to an incorrect IP address. The target system, while patiently waiting for the ACK message, queues up all unanswered SYN-ACK messages in its backlog queue. When the queue is full, the target system ignores all incoming SYN requests and the connection cannot be established.
The best defense against a SYN attack is to configure your firewall to ensure outbound packets contain source IP addresses originating from your internal network. This ensures that source IP addresses cannot be spoofed from the network.
The FIN attack prevents data transfers after a connection is made with a server. The connection is then closed immediately, the server becomes overloaded with close requests, and the server is forced to keep track of a large number of closure states.
The Novell TCP/IP stack includes the Minimum Threshold tuning parameter to defend against the FIN attack. This parameter sets the minimum number of connection states that can be established with the server. To enable this feature, enter the following command at the server console:
SET MAXIMUM WAIT STATES = x
You can set this parameter to a value between 1 and 100000, with the default being 0 (disabled).
A variant of the SYN attack, the Land attack floods the target system with SYN messages. However, rather than including an unreachable IP address, the Land attack spoofs the origin of the messages with the IP address of the target system. This results in SYN-ACK messages being sent to the IP address of the target system.
The best defense against a Land attack is to apply fixes to the operating system that are supplied by the vendor. You can also make sure that your firewall filters all incoming packets with known bad source IP addresses. For example, packets that enter your system with source IP addresses that identify them as generated from your internal system should be considered to be bad. You should also filter the following private source IP addresses:
![]() 10.0.0.0 to 10.255.255.255
10.0.0.0 to 10.255.255.255
![]() 127.0.0.0 to 127.255.255.255
127.0.0.0 to 127.255.255.255
![]() 172.16.0.0 to 172.31.255.255
172.16.0.0 to 172.31.255.255
![]() 192.168.0.0 to 192.168.255.255
192.168.0.0 to 192.168.255.255
A Smurf is a small, blue, elf-like cartoon character. A Smurf attack is a brute-force assault on your network using direct broadcast addressing. Saboteurs can use echo-request packets (such as the ICMP PING command) from remote locations to generate DoS attacks. These attacks have been referred to as Smurf attacks because that was the name of the initial program which founded this DoS attack type.
When intruders create a Smurf packet, they do not use the IP address of their own machine as the source address. Instead they create forged packets that contain the source address of the attacker’s intended victim. The result is that when all the computers at the intermediary’s site respond to the ICMP echo request, they send replies to the victim’s machine. The victim is subjected to network congestion that can make the network unusable. When hackers spoof the IP address of the ICMP echo request packet, and the resulting ICMP traffic clogs the network, this is known as an intermediary network. When the ICMP traffic congests the network of the spoofed source IP address, this is called the victim network.
Smurf saboteurs have developed automated tools that enable them to send these attacks to multiple intermediaries at the same time. Furthermore, these tools find network routers that do not filter broadcast traffic and are therefore susceptible to propagating DoS flooding.
When considering your defenses against Smurf attacks, keep in mind that these attacks affect the intermediary network, the victim of the attack, and the source site from where the attacks originate. Therefore, you need three lines of defense:
![]() Intermediary network—Here you should disable IP-directed broadcasts on all your routers. In doing so, you deny IP broadcast traffic to your network from another network. Also, configure your operating system to prevent the system from responding to ICMP packets sent to IP broadcast addresses. This will prevent your machines from being used as intermediaries in this type of attack.
Intermediary network—Here you should disable IP-directed broadcasts on all your routers. In doing so, you deny IP broadcast traffic to your network from another network. Also, configure your operating system to prevent the system from responding to ICMP packets sent to IP broadcast addresses. This will prevent your machines from being used as intermediaries in this type of attack.
![]() Victim of the attack—Victims, unfortunately, are almost helpless. You could block ICMP echo reply traffic on the victim’s router, but this doesn’t necessarily prevent congestion that occurs between the victim’s router and the victim’s ISP. Victims should, at the very least, contact the intermediaries and inform them of the attack.
Victim of the attack—Victims, unfortunately, are almost helpless. You could block ICMP echo reply traffic on the victim’s router, but this doesn’t necessarily prevent congestion that occurs between the victim’s router and the victim’s ISP. Victims should, at the very least, contact the intermediaries and inform them of the attack.
![]() Source site where attacks originate—You can do a couple of things here. First, you can filter outgoing packets that contain a source address from a different network. Because the attacker deliberately alters the origin address of forged packets, you can use filtering to reduce the probability of your network being used to initiate forged packets. Second, you can install filtering on your routers. This is your best choice. It requires the packets leaving your network to have a source address from your internal network. Thus, you filter all outgoing packets that contain a source address from a different network.
Source site where attacks originate—You can do a couple of things here. First, you can filter outgoing packets that contain a source address from a different network. Because the attacker deliberately alters the origin address of forged packets, you can use filtering to reduce the probability of your network being used to initiate forged packets. Second, you can install filtering on your routers. This is your best choice. It requires the packets leaving your network to have a source address from your internal network. Thus, you filter all outgoing packets that contain a source address from a different network.
The User Datagram Protocol (UDP) Flood attack links two unsuspecting systems running a UDP character generator (chargen) service and the UDP echo service. The chargen service is used to test the system by generating a series of characters for each packet it receives. The echo service echoes any character it receives in an attempt to test network programs. UDP Flood attacks use spoofing to hook up one system’s chargen service with another systems echo service, resulting in a nonstop flood of data passing between the two systems.
To prevent UDP Flood attacks, you can either disable all UDP services on each host in your network, or have your firewall filter all incoming UDP service requests. Because UDP services are designed for internal diagnostics, you can probably deny any UDP service access from the Internet. Denying all UDP traffic, however, might cause problems with applications such as RealAudio that use UDP as their transport mechanism.
The Code Red worm exploits a known vulnerability in Microsoft IIS servers that allows a remote intruder to run arbitrary code on the victim’s machine. The worm attempts to connect to TCP port 80 (default Web server port) on a randomly chosen host server. Once connected, the attacking host sends an HTTP GET request to initiate a buffer overflow of the Indexing Service of IIS. If the connection is successful, the worm begins executing on the host Web server. In an early version of the worm, a host with a default language of English sent all pages requested from the Web server with the following graffiti:
HELLO! Welcome to http://www.worm.com! Hacked by Chinese!
In addition to the initial packet flooding, the Code Red worm causes network havoc according to the following schedule:
![]() Day 1[nd]19:The infected host attempts to connect to TCP port 80 of randomly chosen IP addresses to spread the worm.
Day 1[nd]19:The infected host attempts to connect to TCP port 80 of randomly chosen IP addresses to spread the worm.
![]() Day 20[nd]27:A packet-flooding DoS attack is launched against a particular fixed IP address.
Day 20[nd]27:A packet-flooding DoS attack is launched against a particular fixed IP address.
![]() Day 28:The worm sleeps for one day at the end of the month.
Day 28:The worm sleeps for one day at the end of the month.
The Nimda worm is delivered as a README.EXE attachment to a blank email message with no text or subject. The Nimda MIME type is audiox-wav. This file program is automatically launched when the unsuspecting user opens the email. Nimda is very clever in how it exploits a quirk in Microsoft email that forces attachments to be accessed automatically when email is opened.
TIP
Nimda works only on email programs running on the x86 platform using Microsoft Internet Explorer 5.5 SP1 (or earlier, except Internet Explorer 5.01 SP2).
The following are some of the ways that the Nimda worm spreads across the Internet:
![]() Client to client—Nimda contains code that attempts to resend itself through email to other clients accessing the Internet. Furthermore, Nimda stores the time the last email messages were sent in the Windows Registry and repeats the process every ten days.
Client to client—Nimda contains code that attempts to resend itself through email to other clients accessing the Internet. Furthermore, Nimda stores the time the last email messages were sent in the Windows Registry and repeats the process every ten days.
![]() Web server to client—As part of the infection process, the Nimda worm modifies all Web content files it finds, including HTM, HTML, and ASP files. As a result, any time you browse Web content on the Internet, the server could download a copy of the worm.
Web server to client—As part of the infection process, the Nimda worm modifies all Web content files it finds, including HTM, HTML, and ASP files. As a result, any time you browse Web content on the Internet, the server could download a copy of the worm.
![]() Client to Web server—When infected with Nimda, the client begins scanning for vulnerable IIS servers and attempts to transfer a copy of the Nimda code via TFTP (a version of FTP with no security features).
Client to Web server—When infected with Nimda, the client begins scanning for vulnerable IIS servers and attempts to transfer a copy of the Nimda code via TFTP (a version of FTP with no security features).
The Nimda worm has the potential to affect both clients running Windows 95, 98, Me, NT, 2000, or XP. The Nimda worm also has the potential to affect servers running Windows NT and Windows 2000.
A blended threat (a term invented by Symantec) uses multiple methods and techniques to transmit and spread an attack. To effectively protect your Web services and host servers from blended threats, you need a comprehensive security solution. The following are some characteristics of a blended threat:
![]() Causes harm—Some attacks have been known to launch a DoS attack at a target IP address to deface Web servers and leave Trojan Horses behind for later execution.
Causes harm—Some attacks have been known to launch a DoS attack at a target IP address to deface Web servers and leave Trojan Horses behind for later execution.
![]() Multiple methods of propagation—Blended threats scan for one of many vulnerabilities to compromise a system. Some methods include embedding code to HTML, infecting visitors to Web sites, or sending out emails with attached worms.
Multiple methods of propagation—Blended threats scan for one of many vulnerabilities to compromise a system. Some methods include embedding code to HTML, infecting visitors to Web sites, or sending out emails with attached worms.
![]() Multiple points of attack—Nimda is an example of a blended threat that attacks systems on a variety of fronts, including injecting malicious code into EXE files, increasing the access rights of the guest account, creating global read and writable network shares, making numerous Registry changes, and embedding code into HTML files.
Multiple points of attack—Nimda is an example of a blended threat that attacks systems on a variety of fronts, including injecting malicious code into EXE files, increasing the access rights of the guest account, creating global read and writable network shares, making numerous Registry changes, and embedding code into HTML files.
![]() Automatic replication—Unlike viruses, which rely on people to spread infected files, blended threats scan the Internet automatically for vulnerable servers to attack.
Automatic replication—Unlike viruses, which rely on people to spread infected files, blended threats scan the Internet automatically for vulnerable servers to attack.
![]() Exploits vulnerabilities—Blended threats take advantage of known vulnerabilities such as buffer overflows and default passwords. When saboteurs gain unauthorized administrative access to servers, the information stored at the root level can be opened and reconfigured.
Exploits vulnerabilities—Blended threats take advantage of known vulnerabilities such as buffer overflows and default passwords. When saboteurs gain unauthorized administrative access to servers, the information stored at the root level can be opened and reconfigured.
Congratulations! You survived a plethora of Web viruses and lived to talk about it. In this lesson, we surfed the information superhighway and learned how to protect NetWare Web services from viruses, worms, and FTP globbering. If you take these precautions seriously, you should seldom get a virus. But as you learned in the previous section, some day the inevitable will occur—you will get a virus. The extent of the devastation depends on you.
An independent research firm, Computer Economics, estimates that Nimda infected more than 2.2 million servers and workstations in a 24-hour period in September 2001. The worldwide economic impact of Nimda was more than $590 million. Of course, that was just a drop in the bucket compared with Code Red, and its successor Code Red 2, which together caused more than $2.62 billion worth of DoS damage.
These are two sobering examples of the importance of building an impenetrable secure armor around your network. Remember: The very nature of computer network puts you continually at risk and as a NetWare 6 CNE, it’s your responsibility to protect your data from various physical, topological, network-related, and biological threats.
In this chapter, you’ve learned how to develop powerful countermeasures for all the potential threats that could attack your network. After all, this is the Information Age and your data is a valuable commodity.
We’re almost finished with Part I of this CNE study guide. Only one more chapter to go, and it’s an important one: “NetWare 6 Troubleshooting Fundamentals.”
Ready, aim, troubleshoot!