About Live View
Live View features and functions
Setting Up for Live View
Shooting in Live View
The Live View feature on the Rebel XSi/450D offers a variety of advantages. It offers flexibility in framing images, particularly when crouching down to examine the shot through the viewfinder requires unnatural body contortions; it offers a large LCD view that can be magnified up to 10x to ensure tack-sharp automatic or manual focus; and it can be used with the camera connected to a computer with control of the camera offered on the computer using the EOS Utility program.
The Live View shooting function is useful in specific shooting situations, including macro work, when shooting tethered, or where the camera is connected by a cable to a computer, and for still-life shooting. In short, it is most useful in controlled and close-up shooting scenarios.
The concept of the camera being able to hold the shutter open to provide a real-time view of the scene and yet pause long enough to focus is impressive in terms of technology for digital SLR cameras. And even more impressive is the quality of the live view that the XSi/450D provides, which is smooth and detailed.
To create this live view, Canon engineered an electronic first-curtain shutter that enables shooting while the mechanical shutter is completely open. To give the detailed view, the camera uses high-speed scanning and an electronic reset system that mimics the high-speed mechanical shutter operation. The system then synchronizes with the mechanical second-curtain shutter to create what Canon terms a slit exposure.
Although Live View shooting has an admittedly high "coolness" factor, it comes with cautionary notes. With continual use of Live View shooting, the sensor heats up quickly, and the battery life diminishes markedly.
More specifically, here is what you can expect with Live View shooting:
Temperature affects the number of shots you can get using Live View. With a fully charged LP-E5 battery, you can expect 200 shots without flash use and approximately 190 shots with 50 percent flash use in 73-degree F temperatures. In freezing temperatures, you can expect 190 shots without flash use and 180 shots with 50 percent flash use per charge. With a fully charged battery, you'll get approximately 30 minutes of continuous Live View shooting before the battery is exhausted.
High ambient temperatures, high ISO speeds, or long exposures can cause digital noise or irregular color in images taken using Live View. Stop using Live View when you're not shooting images to help avoid high internal camera temperatures.
Just as real-time shooting is unusual for digital Single Lens Reflex (SLR) photography, so are some of the functions and techniques for Live View shooting. Canon implemented some helpful features, but it's important to understand what changes when you're shooting in Live View.
With Live View shooting, you have three focusing options: Quick mode, which uses the camera's nine-point autofocus system; Live mode, which is a contrast-based autofocus system that reads the sharpness of subjects directly from the image sensor; and manual focusing. Of the three focusing options, manual focusing with the image magnified provides the most precise focusing.
By necessity, the camera's reflex mirror must remain locked up to provide live viewing. When you use Quick mode to focus, Live View is momentarily interrupted. During that time, you cannot make the picture, but you can make the picture after focus is achieved and Live View resumes. In Quick mode, you can choose any of the AF points in the viewfinder for focusing in Live View shooting. However, if you're using a super-telephoto lens, the focus preset feature can't be used.
The second autofocusing mode, Live mode, uses contrast detection based on data from the image sensor. This method takes a bit longer to focus, and it may be more difficult for the camera to achieve focus.
Note
For details on focusing and drive modes, see Chapter 2.
As you move the camera in Live View, the Rebel XSi/450D updates the LCD to show the scene as it simultaneously meters the changing scene light. To show you whether the LCD view is close to what the final picture will be, the XSi/450D displays a nonblinking Exp.SIM icon on the LCD. If the icon is blinking, it means that the image simulation is not displayed at the suitable brightness level because of very low or bright ambient light.
Also, if Custom Function C.Fn-6 is enabled, which it is by default on the XSi/450D, then Auto Lighting Optimizer automatically corrects underexposed and low-contrast images. As a result, images may appear brighter than they would without using Auto Lighting Optimizer.
Note
Auto Lighting Optimizer also corrects image brightness if you have set exposure modifications such as negative Exposure Compensation. To see the effect of exposure modifications, disable C.Fn-6, Auto Lighting Optimizer. Custom Functions are detailed in Chapter 5.
As you move the camera around a scene, or as the light changes, the exposure must be updated accordingly. You can choose the amount of time that the exposure is retained, and the options are from 4 seconds to 30 minutes. A longer time speeds up the Live View shooting operation overall, and this option works well when the scene light is controlled or constant.
You can also use the Depth of field preview button on the front of the camera. And if you are tethered to the computer (the camera is connected to the computer using the supplied USB cable), the EOS Utility Remote Live View window also enables you to preview the depth of field using the program's controls.
Also by setting the Live View function settings on the Setup 2 (yellow) menu, you can choose to display a handy 3 × 3 grid on the LCD to help align vertical and horizontal lines in the image.
You can also use the built-in flash or an accessory EX-series Speedlite with Live View shooting. When the built-in flash or an accessory EX-series Speedlite is used, the shooting sequence after fully pressing the Shutter button is for the reflex mirror to drop to allow the camera to gather the preflash data, and then the mirror to move up out of the optical path for the actual exposure. As a result, you hear two shutter clicks, but only one image is taken. Here are some things you should know about using Live View shooting with a flash unit:
With an EX-series Speedlite, FE (flash exposure) Lock, modeling flash, and test firing cannot be used, and the Speedlite's Custom Functions cannot be set on the flash unit.
Non-Canon flash units will not fire.
Before you begin using Live View shooting, decide on the focusing method that you want to use and whether you want to turn off Auto Lighting Optimizer, which automatically adjusts underexposed and low-contrast images. The next step is to set the options on the camera menu to activate Live View shooting and set your preferences.
It's also a good idea to spend a few minutes setting up Custom Functions, especially if you want to use autofocusing instead of focusing manually.
While Chapter 5 details setting Custom Functions (C.Fn), there are two functions you should set before you begin using Live View shooting. For the sake of convenience, they are included here.
AF during Live View shooting determines whether you use the camera's built-in autofocusing system during Live View shooting. The function is set to Disable by default. To use the camera's autofocus system, you must turn on either Quick mode or Live mode, both of which are explained in the step-by-step procedure next.
Tip
If you choose not to use either of the autofocus methods, you can focus in Live View manually, a technique that is detailed later in this section.
To set this Custom Function so that you can use the XSi/450D's autofocus system during Live View shooting, follow these steps:
Set the Mode dial to P, Tv, Av, M, or A-DEP.
Press the Menu button, and then press the right cross key until the Setup 3 (yellow) menu is displayed.
Press the up or down cross key to highlight Custom Functions (C.Fn), and then press the Set button. The Custom Functions screen appears.
Press the right or left cross key until the Custom Function number "8" is displayed in the box at the top right of the screen, and then press the Set button. The Custom Function option control is activated and the option that is currently in effect is highlighted. Here is an explanation of each option:
0: Disable. With this default option set, autofocus using the XSi/450D's onboard autofocus system is not possible in either Quick or Live mode. If you want to use the XSi/450D's autofocus system, do not choose this option.
1: Quick mode. Using this option, you focus as you normally do in non-Live View shooting using the onboard autofocus system with the focusing switch on the lens set to AF. When you focus, the reflex mirror flips down to establish focus, and that temporarily suspends Live View on the LCD. The camera must be set to One-shot drive mode. With this option, you can manually select any of the AF points in the viewfinder before you begin shooting in Live View and focusing.
2: Live mode. Using this option, focusing is established using the image sensor. You can autofocus while the Live View image is displayed on the LCD, but focusing is slower and may be more difficult than with option 1: Quick mode. Also, you cannot use Remote Switch RS-060E3 for focusing with this option.
Press the up or down cross key to highlight the option you want, and then press the Set button. The option you choose remains in effect until you change it. Lightly press the Shutter button to return to shooting.
Auto Lighting Optimizer is an automatic exposure adjustment that corrects overly dark or underexposed images and boosts the contrast in low-contrast scenes such as in hazy or overcast light. While this may be a good option if you print directly from the SD card, it "corrects" the effects of using Auto Exposure Bracketing and Exposure Compensation so that you don't see the changes. For example, if you've set negative Exposure Compensation for shooting in Live View mode, the image will be automatically brightened by Auto Lighting Optimizer.
If you want to disable Auto Lighting Optimizer, follow these steps:
Follow Steps 1 through 4 in the previous step-by-step task, and then go to Step 2 below.
Press the right or left cross key until the Custom Function number "6" is displayed in the box at the top right of the screen, and then press the Set button. The Custom Function option control is activated and the option that is currently in effect is highlighted.
Press the down cross key to select 1: Disable, and then press the Set button. The option you choose remains in effect for pictures you make in Creative Zone modes such as P, Tv, Av, and so on, until you change it. Lightly press the Shutter button to return to shooting.
The second Live View pre-shooting task is to enable Live View shooting and set your preferences, including whether to display a grid on the LCD and how long the XSi/450D retains the current exposure settings.
To set up the Rebel for Live View shooting and to set your preferences, follow these steps:
Set the Mode dial to P, Tv, Av, M, or A-DEP.
Press the Menu button, and then press the right cross key button until the Setup 2 (yellow) menu is displayed.
Press the down cross key to highlight Live View function settings, and then press the Set button. The Live View function settings screen appears with the Live View shoot option selected.
With the Live View shoot option highlighted, press the Set button. The camera activates the Live View shoot options.
Press the down cross key to highlight Enable, and then press the Set button. The Live View function settings screen is displayed.
Press the down cross key to select Grid display, and then press the Set button. The Grid display options appear. Turning on the grid option displays a 3 × 3 grid on the LCD that helps you square up horizontal and vertical lines during Live View shooting.
Press the down cross key to highlight On, and then press the Set button. The default setting is Off. If you do not want the grid displayed, leave the setting to Off, and then press the Set button without making any changes. The Live View function settings screen is displayed.
Press the down cross key to highlight Metering timer, and then press the Set button. The Metering timer options appear.
Press the down or up cross key to highlight the timer option you want, and then press the Set button.
Lightly press the Shutter button to dismiss the menu.
Press the Set button to begin shooting in Live View. The LCD displays a real-time view of the subject or scene.
Once you have the options and functions set up for Live View, you can begin shooting. Live View is well suited for macro or still-life shooting. With this type of shooting, you most likely want to use either manual focusing or Quick mode autofocusing with manual tweaking. During focusing, you can enlarge the view up to 10x to ensure tack-sharp focus.
Another good option is to use Remote Live View with the camera connected, or tethered, to a computer. With the Remote Live View option, you connect the camera to the computer using the supplied USB cable and then control the camera on the computer. You can view the scene on the computer monitor in real time.
Either way, just a few minutes of watching the real-time view convinces you that a tripod is necessary for Live View shooting. With any focal length approaching telephoto, Live View provides a real-time gauge of just how steady or unsteady your hands are.
When you're shooting in Live View, you have choices on how to focus. You can choose Quick mode, Live mode, or manual focusing. Each option is detailed in the following sections.
Quick mode focusing uses the XSi/450D's nine-AF-point autofocus system and is useful for capturing action or shooting in low light. Because this system uses the camera's autofocus system to measure subject contrast, when you press the AE Lock button, the camera flips the mirror down briefly to focus on the subject. When focus is achieved, you press the Shutter button completely to make the picture, and then Live View resumes.
Before you begin, verify that the lens focusing switch is set to AF (autofocus) and that you've set C.Fn-8 to Option 1: Quick mode. Then to focus in Quick mode, follow these steps:
Set the Mode dial to P, Tv, Av, M, or A-DEP, and then set the ISO, aperture, and/or shutter speed. Your settings depend on the shooting mode you chose. You can also use AEB, choose a Picture Style, and set the white balance for Live View shooting.
Before you press the Set button to begin Live View shooting, press the Display button if the shooting information is not already displayed on the LCD. If the shooting information is displayed, skip this step.
Press the AF-point selection/Magnify button on the top right of the back of the camera. The AF-point selection screen appears.
Note
If you have the camera set to A-DEP mode, skip Step 3. In A-DEP mode, the camera automatically selects the AF points, and you cannot change them.
Press a cross key to select the AF point that you want to use, and then lightly press the Shutter button to dismiss the AF-point selection display.
Press the Set button to begin Live View shooting mode. The LCD displays the scene in real time. The selected AF point and a larger focusing frame are also displayed. You can move the focusing frame by pressing the cross keys. You may want to magnify the image by pressing the AF-point selection/ Magnify button on the top-right back of the camera.
Position the camera so that the AF point is over the part of the subject that you want in sharp focus, and then hold down the AE Lock button. The AE Lock button is on the back right side of the camera, and it has an asterisk above it. The reflex mirror flips down momentarily to establish focus and a beep confirms the focus. As long as you hold down the AE Lock button, you cannot press the Shutter button to make the picture.
Release the AE Lock button to resume the Live View, and without moving the camera, press the Shutter button to make the picture.
Alternately, you can use Live mode focusing. In this mode, the mirror stays up and the shutter stays open so that Live View is not interrupted. In this mode, the camera detects contrast directly from the image sensor. You can move the focusing frame around approximately 80 percent of the screen by pressing and holding the cross keys to move the frame. You can also zoom in to 5x or 10x to verify the focus. If you use this mode, don't point the camera at a bright light source during Live View.
Verify that the lens focusing switch is set to AF, and that you've set C.Fn-8 to Option 2: Live mode. Then to focus in Live View using Live mode, follow these steps:
Set the Mode dial to P, Tv, Av, M, or A-DEP, and then set the ISO, aperture, and/or shutter speed. Your settings depend on the shooting mode you chose. You can also use AEB, choose a Picture Style, and set the white balance for Live View shooting.
Press the Set button to begin Live View shooting. The scene is displayed in real time on the LCD along with the AF point, which is shown as a white rectangle.
Position the camera so that the AF point is over the part of the subject that you want in sharpest focus, and then press the AE Lock button on the top-right back of the camera. The AE Lock button has an asterisk above it. You can also press the AF-point selection/Magnify button on the top far-right corner of the camera to magnify the view. The first press of the button enlarges the view to 5x, and a second press enlarges the view to 10x. The magnifications are shown on the LCD as X5 and X10. When focus is achieved, the AF-point rectangle turns green and the beeper sounds. If focus isn't achieved, the AF-point rectangle turns orange. Note also that in this mode, it may take slightly longer than you're accustomed to for the camera to achieve focus.
Release the AE Lock button, and then press the Shutter button completely to make the picture.
Press the Set button to go back to standard (non-Live View) shooting mode. If you do not do this step, the camera automatically closes the shutter when the camera Auto Power Off (Setup 1 menu) delay elapses.
Manual focusing coupled with a magnified view in Live View shooting provides the most precise focusing, especially if the XSi/450D is mounted on a tripod. Without a tripod, movement from handholding makes sharp focus iffy at best.
To shoot in Live View using manual focus, follow these steps, but first ensure that C.Fn8 is set to 0: Disable:
Set the Mode dial to P, Tv, Av, M, or A-DEP, and then set the ISO, aperture, and/or shutter speed. Your settings will depend on the shooting mode you chose. You can also use AEB, choose a Picture Style, and set the white balance, and use AE Lock in Live View shooting. AE Lock is applied to the full-view exposure.
Set the focusing switch on the lens to MF (Manual Focus).
Press the Set button. The shutter opens and the Live View display begins.
Compose the image as you want by moving the camera. You can press the Depth of field preview button on the front of the camera to gauge the depth of field. In A-DEP mode, the camera does not automatically select the AF points and calculate the optimal depth of field, so it responds in much the same way as if you were shooting in P (Program AE) mode.
Press any of the cross keys to move the focusing frame, or to quickly select the center AF point, press the Erase (trash can) button on the back of the camera.
Press the AF-point selection/Magnify button on the top far-right corner of the camera to magnify the view. The first press of the button enlarges the view to 5x, and a second press enlarges the view to 10x. These magnifications are shown on the LCD as X5 and X10.
Turn the lens focusing ring to focus. Once focus is achieved, you can press the AE Lock/Reduce button to return to full view.
Press the Shutter button completely to make the picture. The shutter fires to make the picture, the image playback is displayed, and the Live View resumes.
One of the most useful ways to use Live View shooting is for shooting still-life subjects such as products, food, stock, and so on with the camera connected to a computer. You can set up with the XSi/450D connected to a computer using the USB cable supplied with the camera.
Before you begin, ensure that you have installed the EOS Digital Solution Disk on the computer to which you are connecting the camera.
To shoot in Live View with the XSi/450D tethered to the computer, follow these steps:
Turn off the camera, and attach the USB cord to the Digital terminal located under the terminal covers on the side of the camera. Be sure that the icon on the cable connector faces the front side of the camera.
Connect the other end of the USB cable to a USB terminal on the computer.
Turn on the power switch on the camera and set the Mode dial to P, Tv, Av, or M. If this is the first time you've connected the camera to the computer, the computer installs the device driver software and identifies the camera. If you're using Windows Vista, the AutoPlay dialog box appears. Click Download images from EOS camera using EOS Utility. The EOS Utility – EOS XSi/450D dialog box appears. If a camera model selection screen appears, select the EOS XSi/450D.
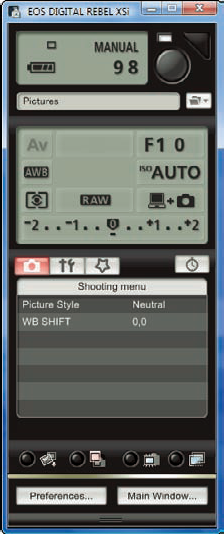
Click Camera settings/Remote shooting in the EOS Utility window. The XSi/450D control panel appears. You can use the panel to control exposure settings, set the white balance, set the Picture Style, and set White-Balance Shift. To set exposure, double-click the aperture, ISO, and so on, and use the controls to adjust the settings.
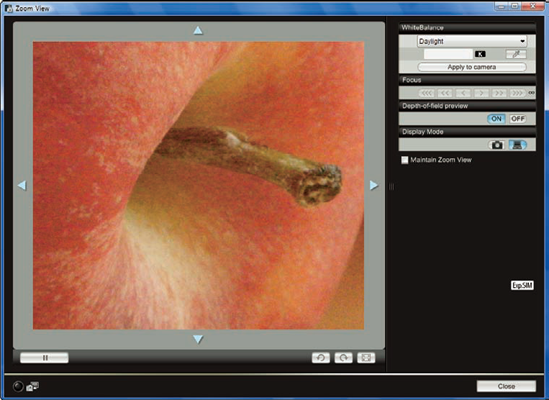
Click the Remote Live View Shooting button (the third from the left button at the bottom right of the Remote Shooting control panel). The Remote Live View window appears. In this window, you can set the white point by clicking a white area or neutral gray area in the scene, use the controls to set the exposure compensation, preview the depth of field by clicking the On button, switch between the Brightness and RGB histograms, and monitor the histogram as the camera moves or as lighting changes.

Figure 4.2. The Remote Live View Shooting button, which is not labeled in the control panel but does have rollover text to identify it
When the exposure and composition are set, you can magnify the view and then focus using either Quick or Live mode focusing techniques detailed earlier in this chapter, or you can focus manually, depending on your setting for C.Fn-8.
Press the Shutter button at the top right of the EOS Utility control panel to make the picture. The Digital Photo Professional main window opens with the image selected.
When you finish, turn off the camera, and then disconnect the USB cable from the camera.