Learning about RAW capture
Canon's RAW conversion program
Sample RAW image conversion
Creating an efficient workflow
You may have heard about RAW capture, but you may not understand what the advantages and disadvantages of RAW shooting are. This appendix provides an overview of RAW capture as well as a brief walk-through on converting RAW image data into a final image.
RAW capture provides significant advantages including the ability to get the best quality from the XSi/450D images. But RAW capture isn't for everyone. If you prefer images that are ready to print straight out of the camera, then JPEG capture is the best option. However, if you enjoy working with images on the computer and having creative control over the quality and appearance of the image, then RAW is the option to explore.
RAW capture allows you to save the data that comes off the image sensor with virtually no internal camera processing. The only camera settings that the camera applies to a RAW image are ISO, shutter speed, and aperture. And because many of the camera settings have been noted but not applied in the camera, you have the opportunity to make changes to settings including image brightness, white balance, contrast, and saturation when you convert the RAW image data into a final image using a conversion program such as Canon's Digital Photo Professional, Adobe Camera Raw, Adobe Lightroom, or Apple Aperture.
Note
In addition to the RAW image data, the RAW file also includes information, called metadata, about how the image was shot, the camera and lens used, and other description fields.
An important characteristic of RAW capture is that it offers more latitude and stability in editing converted RAW files than JPEG files offer. With JPEG images, large amounts of image data are discarded when the images are converted to 8-bit mode in the camera, and then the image data is further reduced when JPEG algorithms compress image files to reduce the size. As a result, the image leaves little, if any, wiggle room to correct tonal range, white balance, contrast, and saturation during image editing. Ultimately, this means that if the highlights in an image are overexposed or, blown, then they're blown for good. If the shadows are blocked up (meaning they lack detail), then they will likely stay blocked up. It may be possible to make improvements in Photoshop, but the edits make the final image susceptible to posterization or banding that occurs when the tonal range is stretched and gaps appear between tonal levels. This stretching makes the tonal range on the histogram look like a comb.
Note
See Chapter 2 for a more detailed explanation of bit depth.
On the other hand, RAW images have rich data depth and provide far more image data to work with during conversion and subsequent image editing. In addition, RAW files are more forgiving if you need to recover overexposed highlight detail during conversion of the RAW file.
Table B.1 illustrates the general differences in file richness between a RAW image and a JPEG image. Note that the table data assumes a 5-stop dynamic range, the difference between the lightest and darkest values in an image, for an exposure.
Note
With digital cameras, dynamic range depends on the sensor. The brightest f-stop is a function of the brightest highlight in the scene that the sensor can capture, or the point at which the sensor element is saturated with photons. The darkest tone is determined by the point at which the noise in the system is greater than the comparatively weak signal generated by the photons hitting the sensor element.
These differences in data richness translate directly to editing leeway. And maximum editing leeway is important because after the image is converted, all the edits you make in an editing program, such as Adobe Photoshop, are destructive.
Proper exposure is important with any image, and it is no less so with RAW images. With RAW images, proper exposure provides a file that captures rich tonal data that withstands conversion and editing well. For example, during conversion, image brightness levels must be mapped so that the levels look more like what we see with our eyes — a process called gamma encoding. In addition, you will also likely adjust the contrast and midtones and move the endpoints on the histogram. For an image to withstand these conversions and changes, a correctly exposed and data rich file is critical.
RAW exposure is also critical considering that digital capture devotes the lion's share of tonal levels to highlights while devoting far fewer levels to shadows, as shown in Table B.1. In fact, half of all the tonal levels in the image are assigned to the first f-stop of brightness. Half of the rest of the tonal levels account for the second f-stop, and half for the next f-stop, and so on.
Table B.1. Comparison of Brightness Levels
F-stop | Brightness Levels Available | ||
|---|---|---|---|
12-bit RAW file | 8-bit JPEG file | ||
First f-stop (brightest tones) | 2048 | 69 | |
Second f-stop (bright tones) | 1024 | 50 | |
Third f-stop (midtones) | 512 | 37 | |
Fourth f-stop (dark tones) | 256 | 27 | |
Fifth f-stop (darkest tones) | 128 | 20 |
Clearly, capturing the first f-stop of image data is critical because fully half of the image data is devoted to that f-stop. If an image is underexposed, not only is important image data sacrificed, but the file is also more likely to have digital noise to both shadow and midtone areas.
Underexposure also means that during image conversion, the fewer captured levels must be stretched across the entire tonal range. Stretching tonal levels creates gaps between levels that reduce the appearance of continuous gradation between levels.
The general guideline when shooting RAW capture is to "expose to the right" so that the highlight pixels just touch the right side of the histogram. Thus, when tonal mapping is applied during conversion, the file has significantly more bits that can be redistributed to the midtones and darker tones where the human eye is most sensitive to changes.
If you've always shot JPEG capture, the exposing-to-the-right approach may just seem wrong. When shooting JPEG images, the guideline is to expose so that the highlights are not blown out because if detail is not captured in the highlights, it's gone for good. This guideline is good for JPEG images where the tonal levels are encoded and the image is essentially pre-edited inside the camera. However, with RAW capture, gamma encoding as well as other contrast adjustments are made during conversion with a good bit of latitude. And if highlights are overexposed, conversion programs such as Adobe Camera Raw can recover varying amounts of highlight detail.
In summary, RAW capture produces files with the most image data that the camera can deliver, and you get a great deal of creative control over how the RAW data is converted into a final image. Most important, you get strong, data- and color-rich files that withstand image editing and create lovely prints.
However, if you decide to shoot RAW images, you also sign on for another step in the process from capturing images to getting finished images, and that step is RAW conversion. With RAW capture, the overall workflow is to capture the images, convert the RAW data in a RAW-conversion program, edit images in an image-editing program, and then print them. You may decide that you want to shoot in RAW+JPEG so that you have JPEGs that require no conversion, but you have the option to convert exceptional or problem images from the RAW files with more creative control and latitude.
If you're new to RAW conversion, it is worth noting differences between JPEG and RAW images. With JPEG images, the camera automatically processes the image data coming off the sensor, converts the images from 14- to 8-bit files, and compresses them in the JPEG file format. JPEG is a familiar file format that allows images to be viewed on any computer and to be opened in any image-editing program.
By contrast, RAW images are stored in proprietary format, and they cannot be viewed on some computers or opened in some image-editing programs without first converting the files to a more universal file format such as TIFF, PSD, or JPEG. Canon includes a free program, Digital Professional Pro, on the EOS Digital Solution Disk. You can use this program to convert XSi/450D RAW files, and then save them as TIFF files.
Tip
Images captured in RAW mode include unique filename extensions such as .CR2 for Canon XSi/450D RAW files.
Digital Photo Professional (DPP) is noticeably different from traditional image-editing programs. It focuses on image conversion tasks, including correcting or tweaking white balance, brightness, shadow areas, contrast, saturation, sharpness, noise reduction, and so on. It doesn't include some familiar image-editing tools such as healing or history brushes, nor does it offer the ability to work with layers.

Figure B.1. This figure shows Canon's Digital Photo Professional's main window with the toolbar for quick access to commonly accessed tasks.
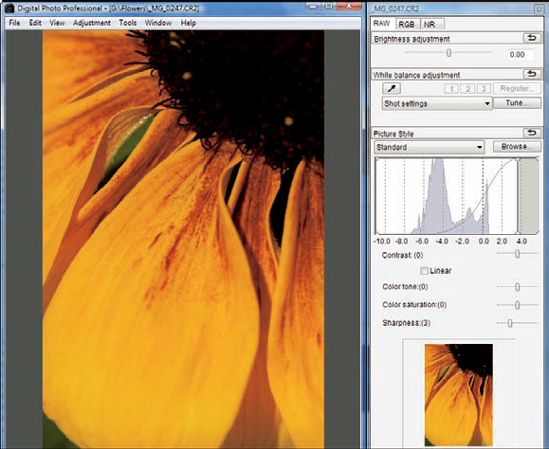
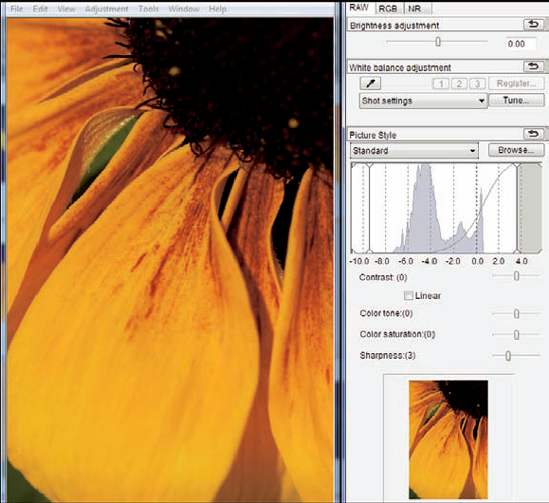
Figure B.2. This figure shows the RAW image adjustment controls in Canon's Digital Photo Professional. Note that you can apply a Picture Style after capture.
Note
Canon also includes a Picture Style Editor on the disk that comes with the camera. This program is a great way to set up a Picture Style that works well for RAW capture. For details on the Picture Style Editor, see Chapter 3.
Although RAW image conversion adds a step to image processing, this important step is well worth the time. To illustrate the overall process, here is a high-level task-flow for converting an XSi/450D RAW image by using Canon's DPP.
Be sure to install Digital Photo Professional, provided on the EOS Digital Solution Disk, before following this task sequence.
Start Digital Photo Professional. The program opens. If no images are displayed, you can select a directory and folder from the Folder panel. RAW images are displayed with a camera icon and the word RAW in the lower left of the thumbnail, and the file extension is .CR2.
Double-click the image you want to process. The RAW image tool palette opens next to an image preview with the RAW tab selected. In this mode, you can:
Drag the Brightness adjustment slider to the left to darken the image or to the right to lighten it. To quickly return to the original brightness setting, click the curved arrow above and to the left of the slider.
Use the white balance adjustment controls to adjust color. You can click the Eyedropper button, and then click an area that is white in the image to quickly set white balance, choose one of the preset white balance settings from the Shot Setting drop-down menu, or click the Tune button to adjust the white balance using a color wheel. Once you have the color corrected, you can click Register to save the setting, and then use it to correct other images.
Change the Picture Style by clicking the down arrow next to the currently listed Picture Style and selecting a different Picture Style from the list. The Picture Styles offered in DPP are the same as those offered on the menu on the XSi/450D. When you change the Picture Style in DPP, the image preview updates to show the change. You can adjust the curve, color tone, saturation, and sharpness. If you don't like the results, you can click the curved arrow to the right of Picture Style to change back to the original Picture Style.
Adjust the black and white points on the image histogram by dragging the bars at the far left and right of the histogram toward the center. By dragging the slider under the histogram, you can adjust the tonal curve.
Adjust the Color tone, Color saturation, and Sharpness by dragging the sliders. Dragging the Color tone slider to the right increases the green tone and dragging it to the left increases the magenta tone. Dragging the Color saturation to the right increases the saturation and vice versa. Dragging the Sharpness slider to the right increases the sharpness and vice versa.
Click the RGB image adjustment tab. Here you can apply an RGB curve and apply separate curves in each of the three color channels: Red, Green, and Blue. You can also do the following:
Click one of the tonal curve options to the right of Tone curve assist to set a classic "S" curve that lightens the midtones in the image without changing the black and white points. If you want to increase the curve, click the Tone curve assist button marked with a plus (+) sign one or more times to increase the curve. Alternately, you can click the linear line on the histogram, and then drag the line to set a custom tonal adjustment curve. If you want to undo the curve changes, click the curved arrow to the right of Tone curve adjustment or the curved arrow to the right of Tone curve assist.
Click the R, G, or B button next to RGB to make changes to a single color channel. Working with an individual color channel is helpful when you need to reduce an overall color cast in an image.
Drag the Brightness slider to the left to darken the image or to the right to brighten the image. The changes you make are shown on the RGB histogram as you make them.
Drag the Contrast slider to the left to decrease contrast or to the right to increase contrast.
Drag the Hue, Saturation, and Sharpness sliders to make the appropriate adjustments.
In the image preview window, choose File

Tip
The Edit menu also enables you to save the current image's conversion settings as a recipe. Then you can apply the recipe to other images in the folder.
Click Save. DPP displays the Digital Photo Professional dialog box until the file is converted. DPP saves the image in the location and format that you choose.

Workflow is the process of converting and editing images in a logical and consistent manner. The overall concept of workflow begins with image capture by setting image quality, the color space, and type of capture. Then it continues with RAW image conversion ensuring that the image quality settings and color space remain consistent in the conversion program, editing the image in image-editing software, and, finally, printing the image.
While workflow varies depending on your needs, here are some general steps to consider as you create your workflow strategy:
Back up files. The first workflow step is backing up original images to a stand alone hard drive or to a DVD. Whether you do this step now or later, it's a critical aspect of any workflow.
Batch rename files. Batch file renaming allows you to identify groups of images by subject, location, date, or all these elements. Programs such as DPP and Adobe Bridge offer tools for batch renaming that save time in the workflow.
Use a standard template. Create a standard template that has your name, address, phone number, and other important information about the image that you appended to the image metadata.
Select images. Regardless of whether you're shooting RAW or JPEG images, programs such as Adobe Bridge and Digital Photo Professional provide tools to rate images and then sort them to display top-rated images to process.
Consider processing RAW files as a group. If you're processing RAW images, you can open the selected images individually or in groups, depending on the RAW-conversion program you're using. Then you can save the images or open them in Photoshop or another image-editing program for additional editing.
Take advantage of actions. If you create JPEG versions of the images for your Web site and if you use Photoshop, you can use an action to make and automatically size images for the Web and save the images in a separate subfolder.
Save JPEGs in your image database. If you maintain a database of your images, this is a good time to add JPEG versions of the images to the database.
Consider copyrighting your images. You may want to register images with the Copyright Office to protect the copyright to your images. The copyright gives you the right to control use of your images for your lifetime plus 70 years. The annual fee for bulk image registration is provided on the Copyright Web site at
www.copyright.gov/register/visual.html. For additional information on registering copyrights visit www.editorialphoto.com/copyright/.Finalize images. With the final selections made, you can do the final image editing in Photoshop.
Archive images for safe keeping. When the final images are ready, you can add the edited images to the stand alone hard drive or burn a DVD. Consider storing the backup files in a fire-safe and flood-safe location.