Exploring flash technology
Using the onboard flash
Modifying flash exposure
Using flash control options
Using one or more accessory Speedlites
Countless scenes open the door for using flash — either the Rebel XSi/450D's onboard flash unit or one or more accessory Canon EX-series Speedlites. And on the creative front, flash offers opportunities for capturing everything from a drip of water to stroboscopic motion.
This chapter explores flash technology, details the use of the XSi/450D's onboard flash, and covers the menu options for the built-in flash and for accessory EX-series Speedlites. This chapter is not an exhaustive look at all the ways in which you can use the onboard or accessory flash units. Rather, the focus is on fundamental flash techniques and ideas for using flash for both practical situations and creative effect.
Both the onboard flash and Canon's EX-series Speedlites employ E-TTL II technology. E-TTL stands for Evaluative Through-the-Lens flash exposure control. E-TTL II is a flash technology that receives information from the camera, including the focal length of the lens, distance from the subject, exposure settings including aperture, and the camera's built-in evaluative metering system to balance subject exposure with the ambient light.
In more technical terms, with E-TTL II, the camera's meter reads through the lens, but not off the focal plane. After the Shutter button is fully pressed but before the reflex mirror goes up, the flash fires a preflash beam. Information from this preflash is combined with data from the evaluative metering system to analyze and compare ambient light exposure values with the amount of light needed to make a good exposure. Then the camera calculates and stores the flash output needed to illuminate the subject while maintaining a natural-looking balance with the ambient light in the background.
In addition, the flash automatically figures in the angle of view for the XSi/450D given its cropped image sensor size. Thus, regardless of the focal length of the lens being used, the built-in flash and EX-series Speedlites automatically adjust the flash zoom mechanism for the best flash angle and to illuminate only key areas of the scene, which conserves power. Altogether, this technology makes the flash very handy for a variety of subjects.
With the built-in flash, you can use flash in all the camera's Creative Zone modes and the Basic Zone modes except Landscape, Sports, and Flash Off modes, knowing that the exposure settings are taken into account during exposure given the maximum sync speed for the flash.
Note
In Basic Zone modes except Landscape, Sports, and Flash Off, the camera automatically fires the flash when it determines the light level is too low to produce a sharp handheld image. And in P mode, the camera automatically sets the shutter speed to 1/60 to 1/200 second to prevent blur from camera shake.
When shooting with accessory Speedlites, Canon's flash technology allows wireless, multiple flash photography where you can simulate studio lighting in both placement of lights and light ratios (the relative intensity of each flash unit).

The onboard flash unit on the XSi/450D offers a handy complement to ambient-light shooting. The unit offers flash coverage for lenses as wide as 17mm (equivalent to 27mm in full 35mm frame shooting). The flash recycles in approximately one to three seconds depending on the number of firings and is indicated with the Flash-ready light in the viewfinder.
The built-in flash offers good versatility and features overrides, including Flash Exposure Compensation (FEC) and Flash Exposure Lock (FE Lock). In addition, many flash options can be set on the camera's Flash Control menu when you shoot in Creative Zone modes.
Flash Control menu options include the ability to turn off firing of the built-in flash and an accessory flash, shutter sync with first or second curtain, and Evaluative or Average metering. The XSi/450D also allows you to set Custom Functions for an accessory EX-series Speedlite through the Set-up 3 (yellow) camera menu — a handy feature that allows you to use the camera's larger size LCD to set up external flash functions. Control of Red-eye reduction is also provided on the Shooting 1 (red) menu.
In the Basic Zone modes of Portrait, Close-up, and Night Portrait, the Rebel XSi/450D automatically fires the flash when it detects lower light or backlit subjects. In Landscape, Sports, and, of course, in Flash Off modes, the flash doesn't fire. In Landscape mode, the range of the flash isn't sufficient to illuminate distant scenes. In Sports mode, the shutter speed often exceeds the flash-sync speed or the subject distance exceeds the range of the flash.
Table 7.1 shows the behavior of the flash in each of the Rebel's Creative Zone shooting modes. Table 7.2 shows the approximate effective range of the flash with the Canon EF 18–55mm lenses.
Tip
When you use the built-in flash, be sure to remove the lens hood to prevent obstruction of the flash coverage. And if you use a fast super-telephoto lens, the built-in flash coverage may also be obstructed.
Table 7.1. Using the Built-in Flash in Creative Zone Modes
Mode | Shutter Speed | Automatic Exposure (AE) Setting |
|---|---|---|
Tv (Shutter-priority AE) | 30 sec. to 1/200 sec. | You can set the shutter speed up to 1/200 second, and the camera automatically sets the appropriate aperture. |
Av (Aperture-priority AE) | 30 sec. to 1/200 sec. | You set the aperture, and the camera automatically sets the shutter speed up to 1/200 second. In this mode, the camera may set long shutter speeds with dark backgrounds, resulting in blur if the subject moves or from camera shake. To avoid this, you can set C.Fn-2 to Option 1:1/200 second (fixed). |
M (Manual) | 30 sec. to 1/200 sec. | You set both the aperture and the shutter speed. Flash exposure is set automatically. |
A-DEP (Automatic depth-of field), and P (Program) | 1/60 sec. to 1/200 sec. | Both the aperture and the shutter speed are set automatically by the camera. |
Table 7.2. XSi/450D Built-in Flash Range with the EF-S 18–55mm Lens
ISO | 18mm | 55mm |
|---|---|---|
100 | 1 to 3.7m (3.3 to 12.1 ft.) | 1 to 2.3m (3.3 to 7.5 ft.) |
200 | 1 to 5.3m (3.3 to 17.4 ft.) | 1 to 3.3m (3.3 to 10.8 ft.) |
400 | 1 to 7.4m (3.3 to 24.3 ft.) | 1 to 4.6m (3.3 to 15.1 ft.) |
800 | 1 to 10.5m (3.3 to 34.4 ft.) | 1 to 6.6m (3.3 to 21.7 ft.) |
1600 | 1 to 14.9m (3.3 to 47.9 ft.) | 1 to 9.3m (3.3 to 30.5 ft.) |
In some low-light scenes, you may want to shoot using ambient light without using the flash. However, the camera may have trouble establishing good focus due to the low light. The autofocus-assist (AF-assist) beam from the flash is invaluable in these situations to help the camera establish focus. In these kinds of scenes, you can disable the flash firing and still use the flash's AF-assist beam to help the camera to establish focus.
To enable or disable flash firing but still allow the camera to use the flash's AF-assist beam for focusing, follow these steps:
Press the Menu button, and then press the right cross key until the Setup 2 (yellow) menu is displayed.
Press the down cross key to highlight Flash control, and then press the Set button. The Flash control screen appears.
Press a cross key to highlight Flash firing, and then press the Set button. Two options appear.
Press a cross key to highlight either Enable or Disable, and then press the Set button. If you choose Disable, neither the built-in flash nor an accessory Speedlite will fire. However, the camera will use the flash's AF-assist beam to establish focus in low-light scenes.
Pop up the built-in flash by pressing the Flash button on the front of the camera, or mount an accessory EX-series Speedlite, press the Shutter button halfway to focus, and then press the Shutter button completely to make the picture. When you press the Shutter button halfway, the flash's AF-assist beam fires to help the camera establish focus.
Also, with Custom Function, C.Fn-7, you can choose whether the AF-assist beam is fired by the camera's built-in flash or by an accessory Speedlite. If this function is set to 1: Disable, the AF-assist beam is not used. If you've set the Custom Function on the Speedlite for AF-assist beam firing to Disable, the AF-assist beam is not used regardless of what option you choose on the camera for C.Fn-7. You can also select option 2: Only external flash emits so that only the Speedlite's AF-assist beam is fired and the built-in flash AF-assist beam does not fire.
Note
For details on Custom Functions, see Chapter 5.
A disadvantage of flash exposure in portraits of people and pets is unattractive red in the subject's eyes. There is no sure fix that prevents red eye, but a few steps help reduce it. First, be sure to turn on Red-Eye Reduction on the XSi/450D. This option is set to Off by default. Then, before making the picture, have the subject look at the Red-Eye Reduction lamp on the front of the camera when it fires at the beginning of a flash exposure. Also have the room well lit. Before you begin, ensure that the Flash Firing is set to Enable on the Set-up 2 (yellow) menu. To turn on Red-Eye Reduction, follow these steps:
Press the Menu button, and then press the left cross key to select the Shooting 1 (red) menu if it isn't already displayed.
Press the down cross key to highlight Red-eye On/Off, and then press the Set button. Two options are displayed.
Press the down cross key to highlight On, and then press the Set button. The setting you choose applies to both Basic and Creative Zone modes.
If you're in a Creative Zone shooting mode such as P, Tv, Av, M, or A-DEP, press the Flash button on the front of the camera to pop up the built-in flash. In Basic Zone modes such as Full Auto, Portrait, close-up, and so on, the XSi/450D pops up and fires the flash automatically depending on the amount of light in the scene.
Focus on the subject by pressing the Shutter button halfway, and then watch the timer display at the bottom center of the viewfinder. When the timer display in the viewfinder disappears, press the Shutter button completely to make the picture.
There are doubtless times when the output of the flash will not be what you envisioned. Most often, the output is stronger than desired, creating an unnaturally bright illumination on the subject. The XSi/450D offers two options for modifying the flash output: Flash Exposure Compensation (FEC) and Flash Exposure Lock (FE Lock) for both the built-in flash and one or more accessory Speedlites.
One way to modify flash output is by using Flash Exposure Lock (FE Lock). Much like Auto Exposure Lock (AE Lock), FE Lock allows you to meter and set the flash output on any part of the scene.
With FE Lock, you lock the flash exposure on a midtone area in the scene. The camera calculates a suitable flash output, and locks or remembers the exposure, and then you can recompose, focus, and make the picture.
FE Lock is also effective when there are reflective surfaces such as a mirror, chrome, or glass in the scene. Without using FE Lock, the camera takes the reflective surface into account and reduces the flash, causing underexposure. Instead, set FE Lock for a midtone area in the scene that does not include the reflective surface, and then make the exposure.
To set FE Lock, follow these steps:
Set the camera to a Creative Zone mode such as P, Tv, Av, or M, and then press the Flash button to raise the built-in flash or mount the accessory Speedlite. The flash icon appears in the viewfinder.
Point the lens at the midtone area of the subject or scene where you want to lock the flash exposure, press the Shutter button halfway, and then press the AE/FE Lock button on the back right side of the camera. This button has an asterisk above it. The flash exposure is set at the currently selected AF point. The camera fires a preflash. FEL is displayed momentarily in the viewfinder, and the flash icon in the viewfinder displays an asterisk beside it to indicate that flash exposure is locked. The camera retains the flash output in memory.
Note
If the flash icon in the viewfinder blinks, you are too far from the subject for the flash range. Move closer to the subject and repeat Step 2.
Move the camera to compose the image, press the Shutter button halfway to focus on the subject, wait for the flash timer display to disappear, and then completely press the Shutter button to make the image.
Note
You can take additional pictures at this flash output as long as the asterisk is displayed in the viewfinder.
FE Lock is a practical technique to use when shooting individual images. But if you're shooting a series of images under unchanging light, then FEC is more efficient and practical.
Flash Exposure Compensation (FEC) is much like Auto Exposure Compensation in that you can increase or decrease flash exposure up to +/-2 stops in 1/3-stop increments. A positive compensation increases the flash output and a negative compensation decreases the flash output. The compensation is applied to all flash exposures until you reset the compensation back to 0. As with non-flash exposure, the camera is calibrated for an "average" scene of 18 percent gray, and flash exposures can be thrown off by very light and very dark subjects or scenes. As a result, very light subjects may need increased flash exposure ranging from +0.5 to +1.5 stops. Dark-toned subjects may need a flash reduction of approximately −1 to −2 stops. Some experimentation is required because subject and scene tonality varies.
If you use flash compensation to create a more natural-looking portrait in daylight, try setting negative compensation it between −1 and −2 stops. Also be aware that in bright light, the camera assumes that you're using fill flash to reduce dark shadows and automatically provides flash reduction. Experiment with the Rebel XSi/450D in a variety of lighting to know what to expect.
It's important to note that if you use FEC, you may not see much if any difference with negative compensation because the XSi/ 450D has Auto Lighting Optimizer turned on by default for all JPEG images. This feature automatically corrects images that are underexposed or have low contrast. So if you set FEC to a negative setting to reduce flash output, the camera may detect the image as being underexposed (too dark) and automatically brighten the picture.

Figure 7.2. This image was taken with the built-in flash with no flash output modifications. The main light is from a window to camera left. A large silver reflector is positioned to camera right. The dark shadow behind the dog is a disadvantage of using unmodified flash. Exposure: ISO 100, f/4, 1/15 second, Av mode, custom white balance.
If you're using FEC, it's best to turn off Auto Lighting Optimizer. Just go to the Set-up 3 (yellow) menu, and then press the down cross key to select Custom Functions (C.Fn). Press the Set button. Press the right or left cross key until the C.Fn II: Image, Auto Lighting Optimizer screen appears and the number 6 is displayed in the box at the top right of the screen. Press the Set button to activate the option controls. Press the down cross key to select option 1: Disable, and then press the Set button. The Auto Lighting Optimizer remains disabled in Creative Zone Modes until you enable it again.
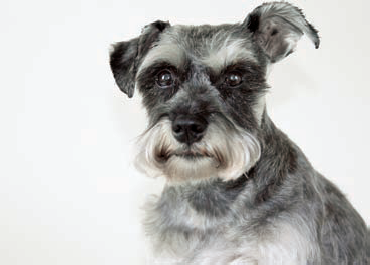
Figure 7.3. For this image, flash exposure compensation was set to −1 Exposure Value (EV). The lowered flash exposure provides a more natural appearance than straight-on flash and lightens the shadow behind the dog. Exposure: ISO 100, f/4, 1/15 second, Av mode.
If you use an accessory Speedlite, you can set FEC either on the camera or on the Speedlite. However, the compensation that you set on the Speedlite overrides any compensation that you set on the XSi/450D's Set-up 2 (yellow) camera menu. If you set compensation on both the Speedlite and the camera, the Speedlite setting overrides what you set on the camera. So set compensation either on the Speedlite or on the camera, but not on both.
FEC can be combined with Exposure Compensation. If you're shooting a scene where one part of the scene is brightly lit and another part of the scene is much darker — for example, an interior room with a view to the outdoors — then you can set Exposure Compensation to −1 and set the FEC to −1 to make the transition between the two differently lit areas more natural.
To set FEC for the built-in flash, follow these steps:
Set the camera to a Creative Zone mode such as P, Tv, Av, M, or A-DEP.
Press the Menu button, and turn the Main dial to select the Shooting 2 (red) menu.
Press the down cross key to select Flash exp comp, and then press the Set button. The Exposure Level indicator meter is activated.
Press the left cross key to set negative compensation (lower flash output) or press the right cross key to set positive flash output (increased flash output). As you make changes, a tick mark under the Exposure Level meter moves to indicate the amount of FEC in 1/3-stop increments. The FEC is displayed in the viewfinder when you press the Shutter button halfway. The FEC you set on the camera remains in effect until you change it.
To remove FEC, repeat these steps, but in Step 2, press the left or right cross key to move the tick mark on the Exposure Level meter back to the center point.

Figure 7.4. For this image, I used the Canon 580 EX Speedlite and bounced it off a white card held above the flash head. The exposure on the schnauzer is good, but the background shadow is still objectionable. Using another Speedlite to light the background would eliminate the shadow. Exposure: ISO 100, f/4, 1/6 second, Av mode.
With the XSi/450D, many of the onboard and accessory flash settings are available on the camera menus. The Set-up 2 (yellow) menu offers onboard flash settings including the first or second curtain shutter sync, Flash Exposure Compensation, and E-TTL II or Average exposure metering.
When an accessory Speedlite is mounted, you can use the Set-up 2 (yellow) menu to set FEC and to set Evaluative or Average flash metering. In addition, you can change or clear the Custom Function (C.Fn) settings for compatible Speedlites such as the 580 EX II. If the Speedlite functions cannot be set with the camera, these options display a message notifying you that the flash is incompatible with this option. In that case, set the options you want on the Speedlite itself.
To change settings for the onboard or compatible accessory EX-series Speedlites, follow these steps:
Set the camera to a Creative Zone mode such as P, Tv, Av, M, or A-DEP. If you're using an accessory Speedlite, mount it on the camera and turn on the power.
The XSi/450D is compatible with the Canon 580EX II, 430EX, 220EX, Macro Ring Lite MR-14X, and Macro Twin Lite MT-24EX, although available options for each Speedlite may vary on the External flash func. setting screen menu that's accessed from the Flash Control screen.
Press the Menu button, and then press the right cross key until the Set-up 2 (yellow) menu is displayed.
Press the down cross key to highlight Flash Control, and then press the Set button. The Flash Control screen appears with options for the built-in and external flash.
Press a cross key to highlight the option you want, and then press the Set button. Choose a control option from the Flash Control menu and press the Set button. Table 7.3 lists the menu settings, options, and suboptions that you can choose from to control the flash.
Table 7.3. Flash Control Menu Options
Setting | Option(s) | Suboptions/Notes |
|---|---|---|
Built-in flash func. setting | Flash mode | Cannot be changed from E-TTL II |
Shutter Sync | 1st curtain: Flash fires immediately after the exposure begins. 2nd curtain: Flash fires just before the exposure ends. Can be used with slow-sync speed to create light trails behind the subject. | |
Flash exp. Comp | Press the Set button to activate the Exposure Level meter, and then press a cross key to set positive or negative compensation. | |
E-TTL II | Evaluative (default) option sets the flash exposure based on an evaluation of the entire scene. Average option flash exposure is metered and averaged for the entire scene. Results in brighter output on the subject and less balancing of ambient light in the scene. | |
Flash mode | E-TTL II | |
Shutter sync | 1st curtain: Flash fires immediately after the exposure begins. 2nd curtain: Flash fires just before the exposure ends. Can be used with slow-sync speed to create light trails behind the subject. | |
FEB (Flash Exposure Bracketing) | Press the Set button to activate the Exposure Level meter, and then press a cross key to set the bracketing amount. | |
Flash exp. comp | Press the Set button to activate the Exposure Level meter, and then press a cross key to set positive or negative compensation. | |
E-TTL II | You can choose either Evaluative or Average metering. | |
External flash C.Fn setting | (The available options depend on the Speedlite's Custom Functions.) | Press the Set button, and then choose the C.Fn settings you want to set for the Speedlite you're using. |
Clear ext. flash C.Fn set | Clears C.Fn settings for the Speedlite you're using. |
With one or more accessory flash units, a new level of lighting options opens up, ranging from simple techniques such as bounce flash and fill flash to controlled lighting ratios with up to three groups of accessory flash units. With E-TTL II metering, you have the option of using one or more flash units as either the main or an auxiliary light source to balance ambient light with flash to provide even and natural illumination and balance among light sources.

Figure 7.5. For this image, I bounced a Canon Speedlite 580EX off the wall to the right of the apples. I also held a silver reflector next to the Speedlite and tilted it down slightly to direct the light a bit. Exposure: ISO 100, f/11, 1/3 second.
One or more Speedlites provide an excellent portable studio for portraits and still-life shooting. And you can add light stands and light modifiers such as umbrellas and/or softboxes, and use a variety of reflectors to produce images that either replicate studio lighting results or enhance existing light.
I encourage you to explore the options that multiple Speedlites offer. For detailed information on using Canon Speedlites, be sure to check out the Canon Speedlite System Digital Field Guide by J. Dennis Thomas (Wiley, 2007).

Figure 7.6. Here I used two EX-series Speedlites, a 580 EX Speedlite mounted on the camera and bounced off a white reflector held above the flash, and a 550 EX Speedlite to the left of the apples to light the background. The 550 was fired wirelessly from the 580. Exposure: ISO 100, f/11, 1/3 second.